1
DTT Receiver
WITH USB PORT
FOR DIGITAL RECORDING TO EXTERNAL HARD DRIVE
AND PLAYBACK OF MULTIMEDIA FILES
CONTENTS
Receiver
Thank you for choosing the SMARTmini receiver by IKUSI, which will permit you to watch Digital Terrestrial
Television (DTT) programmes with maximum quality image and sound. You will be able to receive all of the
FTA channels broadcast in your region, including radio programmes. In addition, through its USB port, the
device will allow you to digitally record TV programmes; view videos and photos; listen to audio files; and
have fun playing the various games that it includes.
Using the SMARTmini receiver is very simple, but reading this manual before starting is essential. Keep it
safe for future reference.
INFORMATION AND WARNING SIGNS
Throughout the manual, you will find these symbols :
Provides information of interest or advice to
facilitate the use of the device
1. PANEL DESCRIPTION ..................................................................................... 4
2. PREPARATION
2.1 Preparing the remote control ................................................................................. 5
2.2 Connections ...................................................................................................... 5
2.2.1
2.2.2
2.2.3
2.2.4
2.2.5
2.2.6
Connecting the antenna .................................................................................................... 5
Connecting to the TV set ................................................................................................... 6
Connecting to a Hi-Fi system ............................................................................................ 6
Connecting to a video projector ......................................................................................... 6
Connecting an external USB device .................................................................................. 7
Connecting the power supply ............................................................................................ 7
2.3 Turning the receiver ON and OFF .......................................................................... 7
2.3.1 Turning ON the receiver .................................................................................................... 7
2.3.2 Turning OFF the receiver .................................................................................................. 7
3. REMOTE CONTROL BUTTONS ...................................................................... 8
!
Warns of potential hazards that could damage the
device
4.1 Initial startup ..................................................................................................... 9
4.2 Receiver settings ................................................................................................... 10
Contents of the package
●
●
●
●
●
●
1x
1x
1x
2x
1x
1x
SMARTmini receiver
DC power supply
Remote control
1.5 V batteries (AAA - LR03)
1.2 m SCART cable [For Australian market : 1x 3.5 mm Jack - (3x) RCA cable]
User Manual
SAFETY INSTRUCTIONS
●
●
●
●
●
The receiver is powered with the +12 VDC power supply provided, which in turn is connected to the
230/240 V 50 Hz mains. Unplug the power supply unit and disconnect the antenna during electrical
storms or when the receiver is not in use for a prolonged period of time.
The receiver, the power supply and the remote control can only be repaired by authorised service
personnel. Never open them.
Do not obstruct the air vents of the receiver or the power supply, or place other devices on top of
them. Leave enough space around them to allow the heat they produce to dissipate.
Place the receiver and the power supply away from heat sources and direct sunlight. Do not use
them in areas with high humidity (swimming pools, etc.) and avoid contact with insecticides or
solvents.
To clean the receiver, the power supply and the remote control, use a dry or slightly damp soft cloth.
Do not dispose of the receiver or the power supply by throwing them out with normal
household waste. Take them to the special collection points made available by your
local authorities. The packaging is recyclable; deposit it in the paper and cardboard
recycling bin.
2
4. RECEIVING DTT
4.2.1
4.2.2
4.2.3
4.2.4
4.2.5
4.2.6
Channel searching .......................................................................................................... 10
Channel list ..................................................................................................................... 11
Configuration ................................................................................................................... 13
Factory settings ............................................................................................................... 17
Receiver version .............................................................................................................. 18
Software update .............................................................................................................. 18
4.3 Daily use ................................................................................................................. 19
4.3.1
4.3.2
4.3.3
4.3.4
4.3.5
4.3.6
4.3.7
4.3.8
4.3.9
4.3.10
4.3.11
Turning ON and turning OFF the receiver ....................................................................... 19
Adjusting the volume ....................................................................................................... 19
Changing between TV channels and Radio channels ..................................................... 19
Changing channel ........................................................................................................... 19
Viewing channel information ............................................................................................ 20
Returning to the last viewed channel ............................................................................... 20
Selecting the audio language .......................................................................................... 20
Image zoom .................................................................................................................... 20
EPG - Electronic Programme Guide ................................................................................ 20
Teletext ............................................................................................................................ 22
Subtitles .......................................................................................................................... 22
5. MULTIMEDIA
5.1 Multimedia playback .............................................................................................. 23
5.1.1 USB Cinema ................................................................................................................... 23
5.1.2 USB Music ...................................................................................................................... 23
5.1.3 USB Photos ..................................................................................................................... 24
6. PVR (Personal Video Recorder)
6.1 Instant recording .................................................................................................... 25
6.2 Scheduled recording ............................................................................................. 25
7. GAMES ...........................................................................................................
26
8. USB UNIT ........................................................................................................
27
9. TECHNICAL CHARACTERISTICS ................................................................
28
10. APPENDIX
Troubleshooting ................................................................................................................................... 29
Guarantee ........................................................................................................................................... 30
Alphabetical index ............................................................................................................................... 31
3
SMARTmini Receiver
Preparation
1. PANEL DESCRIPTION
2. PREPARATION
2.1 Preparing the remote control
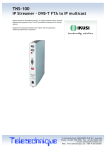
FRONT PANEL
Remove the battery compartment cover and insert the two supplied batteries (1.5V, AAA-LR03), making
sure that they are inserted the right way round. Replace the cover.
IKUSI
1 2
When using the remote control, point it directly at the front of the SMARTmini receiver. If the remote control
does not work correctly, it is likely that the batteries have run out and should be replaced. Use only alkaline
batteries. If the receiver is not going to be used for a prolonged period of time, remove the batteries from the
remote control.
mini
3
2.2 Connections
REAR PANEL
!
Disconnect from the mains supply the devices to be connected to the receiver.
2.2.1 Connecting the antenna
Using a coaxial cable, connect the antenna to the receiver’s RF In input (Fig. 1).
RF In
4
RF Out
5
TV
6
VCR
7
A/V
12V
8 9
If required, this same antenna signal can be sent to a second SMARTmini receiver being used with another
TV set. To do so, use a second antenna cable and connect the RF Out output on the first receiver to the
RF In input on the second (Fig. 2).
NOTE: This connection can only be made if the RF Out output is not going to be used to connect the
antenna signal to the TV set itself (see Fig. 5 on next page).
TV
1 operating LED
2 infrared sensor
3 USB : external device connection port
RF In
RD
RF Out
TV
A/V
12V
Fig. 1
4 RF In : antenna input
5
6
7
8
9
VCR
RF Out : antenna output, for TV set, DVD or additional SMARTmini
TV
RD
TV : audio/video input/output for connecting to TV set
VCR : audio/video input/output for connecting to DVD
A/V : video and stereo audio output
12V : power input (+12 VDC)
RF In
RF Out
TV
VCR
A/V
RF In
12V
SMARTmini 1
RF Out
TV
VCR
A/V
12V
SMARTmini 2
Fig. 2
4
5
SMARTmini Receiver
Preparation
2.2.2 Connecting the TV set
2.2.5 Connecting an external USB device
Using the supplied SCART cable, connect the SCART socket marked TV on the receiver to an available
SCART socket on the TV set (Fig. 3).
You can use your SMARTmini to play video, music and
photo digital files stored on external USB devices (flash
drives, hard disks), as well as record onto these devices
the video and audio from the DTT channel which is
currently tuned in. Using a USB cable, connect the USB
connector of the external device to the USB port on the
front panel of the receiver.
The format of the video signal provided by the receiver can be either RGB or CVBS PAL/NTSC composite
video. The TV set must therefore be compatible with one of these two video formats.
If your TV set does not have a free SCART socket, disconnect one of the other devices from the TV set
–typically a DVD player– and connect this device to the SCART socket marked VCR on the SMARTmini
receiver (Fig. 4). When the device is turned on, the signal will automatically be diverted to the TV set.
If you install your SMARTmini receiver before the analogue switchover comes into effect in your region, you
should connect the antenna to the TV set (and to your video or DVD) in order to continue receiving the
analogue channels. To do so, use a second antenna cable and connect the RF Out output on the
SMARTmini receiver to the antenna input on the TV set (Fig. 5).
IKUSI
mini
Fig. 7
The SMARTmini is mainly designed to work with external hard disks that have their own power suppy, i.e.
which are powered from the mains supply. However, although we cannot guarantee that they will work with
the receiver, the use of self-powered disks may also be possible. In any event, the disk must be formatted
using the FAT32 file system.
IKUSI takes no responsibility for the loss of any data from the external device caused by the incorrect use of
the SMARTmini receiver. We recommend that a backup copy of all data is made prior to use.
RF In
RF Out
VCR
TV
A/V
RF In
12V
RF Out
TV
VCR
A/V
12V
1.
2.2.6 Connecting the power supply
Fig. 4
Fig. 3
TV
DVD
TV
RF In
RF Out
TV
VCR
A/V
Insert the jack connector of the power supply
into the 12V input on the SMARTmini receiver
and then plug the power supply unit into the
mains socket.
12V
A/V
VCR
TV
RF
RF
Out
In
2.
Fig. 8
12V
Connecting the TV set in AUSTRALIA :
Using the supplied Jack-(3x)RCA cable,
connect the mini-jack of the cable to the A/V
output on the SMARTmini, and then make the
video and audio connections to the TV set.
Fig. 5
2.3 Turning the receiver ON and OFF
2.2.3 Connecting to a Hi-Fi system
The SMARTmini receiver can also deliver the analogue audio signal to your Hi-Fi system, allowing you to
enjoy a far better sound quality than that provided by a normal TV set. For this you will need a Jack-(3x)RCA
cable (not supplied). Connect the cable to the A/V output of the SMARTmini and then make the audio
connections indicated in figure 6.
2.3.1 Turning ON the receiver
When the power supply is plugged into the mains socket, the light on the front panel will light green
(receiver in on mode). When in daily use the light is red or out (receiver in standby mode), press the
button on the remote contro; the light will turn green (receiver in on mode).
2.2.4 Connecting to a video projector
2.3.2 Turning OFF the receiver
You will need the previously mentioned Jack-(3x)RCA cable. Connect the mini-jack of the cable to the A/V
output on the SMARTmini, and the video connector to the input on the projector.
With the receiver in on mode (the light on the front panel is green), press the
(receiver in standby mode).
RF In
RF Out
TV
VCR
A/V
12V
Jack-(3x)RCA cable
video
audio L
button to turn it off
The SMARTmini receiver does not feature a switch for completely disconnecting the power supply. When you
wish to completely disconnect it from the mains, unplug the power supply from the mains socket. The light on
the front panel will go out.
Unplug the power supply if you are not going to use the receiver for a prolonged period of time (e.g. whilst on
holiday).
audio R
Fig. 6
Projector
6
Hi-Fi System
7
SMARTmini Receiver
Settings
3. REMOTE CONTROL BUTTONS
4. RECEIVING DTT (Digital Terrestrial Television)
(on/standby)
(mute sound)
NUMBER BUTTONS 0 - 9
(select channels)
(enter numeric values)
EPG
(open electronic programme guide)
RECALL
(return to the last viewed channel)
FAV
(open favourite channels list)
INFO
(display channel information in TV Viewing mode)
(display buttons operation in Menu mode)
EXIT
(close OSD window)
(return to previous menu)
(exit main menu and enter TV viewing)
OK
(open channel list)
(confirm selection in list or menu)
/
▲
▲
▲ / ▼
(move up/down in list or menu)
(flip photo in multimedia playback)
(move left/right in menu)
(choose option in circular menu)
(rename channel in Channel Managing)
(open Calendar in date selection)
(see weekly programme information in the EPG guide)
(rotate photo in multimedia playback)
CH+ / CH–
(next/previous channel in channel list)
VOL+ / VOL–
(raise/lower volume)
F1 – red button
(mark a channel as favourite in Channel Managing)
(go to next month in Calendar)
(go to Today from Week in the EPG guide)
F2 – green button
(remove channel in Channel Managing)
(go to next year in Calendar)
(go to Week from Today in the EPG guide)
(select action when managing recorded files)
PLAY/PAUSE
(pause/continue multimedia playback)
STOP
(stop multimedia playback)
(stop instant recording)
SLOW
(change video playback to slow motion)
REC
(start instant recording)
(schedule recording from EPG guide)
FRW & FFW
(change day of week in EPG guide)
(fast-forward & rewind video or audio playback)
PREV & NEXT
(play previous & next multimedia file)
8
F3 – yellow button
(move channel in Channel Managing)
(go to previous month in Calendar)
(show additional programme information in EPG guide)
(repeat the playback of video and audio files)
(state duration of instant recording)
F4 – blue button
(lock channel in Channel Managing)
(go to previous year in Calendar)
SUBT
(select language or deactivate subtitles, if available)
AUDIO
(select audio language, if available)
(change between stereo, left channel and right channel)
TXT
(open teletext, if available)
ZOOM
(activate image zoom in TV viewing)
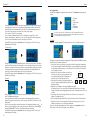
When you turn on the SMARTmini receiver for the first time, the TV
set displays the Start installation screen. From here you can
automatically install all of the digital channels received via the
antenna. But first you must make the correct choices regarding the
following parameters:
1. OSD language : this is the language used for the menus and the
messages that the receiver displays on screen. By default, this is
set to English. To change this option, press the
button on the
remote control to open the list of languages on the right-hand
side; now use the ▲ / ▼ buttons to highlight the desired
language and press OK. From this moment onwards, all of the
text displayed on the screen will be in that language.
2. Country : this is where the receiver is installed. By default, this
is set to England. If you are in another country, change this
option in the same way as indicated above.
3. LCN (Logical Channel Numbering) : this refers to the automatic
classification of the channels. Select ON or OFF in the
same way as indicated above.
▲
MENU
(exit TV viewing and enter main menu)
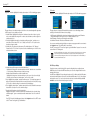
4.1 Initial startup
Press the OK button. A confirmation message appears.
Press
to select "Yes" and then press OK again. The
channel search begins. The receiver will detect all the
channels received via the RF In input and will automatically
create a list of channels. Once the process has finished,
the television screen will begin to display images from the
first channel on the list.
You are now watching DTT on your TV !
▲
TV/RADIO
(change between TV channels and Radio channels)
Accessing the menus
Your SMARTmini receiver has stored information about all of the channels that it receives through the
antenna and has created the Channel List. You can already view any of the channels in this list (take a look
at section 4.3.4 on page 19) but please carry on reading this manual in order to first discover all of the
features of the receiver and to familiarise yourself with its use.
On the screen you are seeing images from the first channel in
the list. Press the MENU button on the remote control. The
Main Menu page appears, with these options :
1) DTT, to watch the television or listen to the radio.
2) Multimedia, to play back video or audio files or to view photos.
3) Schedule recording, to external hard disk.
4) Games, just for fun.
5) USB unit, for managing the external USB device.
The DTT option is the main function of the SMARTmini receiver
and is the subject of this chapter 4.
When the receiver is turned on during its daily use, the screen displays the
channel that was tuned in the last time the device was turned off.
If you are watching the television («TV viewing») and you wish to access the
Main Menu, press the MENU button on the remote control.
If you are on the menu screen and wish to return to the TV viewing, press the
EXIT button several times.
9
Receiving DTT
Settings
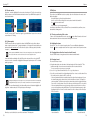
4.2 Receiver settings
With the Main Menu on the screen, use the ▲ / ▼ buttons to highlight the DTT option. Press OK. The DTT
menu will appear :
4.2.2 Channel list
4.2.1 Channel searching
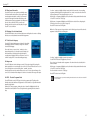
The page offers five options: Favourite channel (Fav), Delete channel (Del), Move channel (Mov), Lock
channel (Lock) and Rename channel. Using the ▲ / ▼ buttons, select the channel in question and then
press the corresponding remote control button :
ONLY FOR AUSTRALIA
177500
Start Frequency :
226500
End Frequency :
7M
Bandwidth :
529500
816500
7M
Press the OK button for the marks or actions carried out to
take effect.
Press the EXIT button to leave the ‘Channel managing’ screen and return to the Channel list menu. If any
channel was marked as "deleted", a confirmation message will appear. Use the
/ buttons to select
"Yes" or "No" and press OK to finish. Press EXIT to return to the DTT menu. To go to the Main Menu, press
EXIT again.
▲
10
Start Frequency :
End Frequency :
Bandwidth :
- press the red button to mark the channel as a favourite;
- press the green button to mark the channel as deleted;
- press the yellow button to move the channel to another position on the list. Use the ▲ / ▼ buttons to
move it to the desired position and then press OK;
- press the blue button to mark the channel as locked (parental lock). You will be asked for the PIN
number ("0000" by default);
- press the button to rename the channel. A virtual
keyboard will open on the screen. Use the number and
coloured buttons to enter the new channel name. The
editing functions that the coloured buttons carry out are
indicated at the bottom of said keyboard.
▲
Manual search (I)
This option as well the next one –Manual search (II)– are intended for
expert users of DTT. Use the ▲ / ▼ buttons to highlight the Manual
search (I) option and press OK. The 'Manual search (I)' page will
appear; it allows to search the channels by frequency bands. Most
countries broadcast DTT only in UHF band. Before starting the
search, you should enter, if they have not already been entered, the
following values :
Press OK to start the search. The receiver will detect all the multiplex
Start Frequency : 474000
(digital channels) existing in the selected band and will automatically
End Frequency : 858000
create the channel list. When the search ends, the screen returns to
Bandwidth :
8M
the Channel searching menu.
If another band must be scanned, carry out a new
search by entering the corresponding frequency
values. Then press EXIT to return to the DTT menu.
To go to the Main Menu, press EXIT again.
▲
Automatic search
The SMARTmini receiver makes an intelligent search for all the DTT
channels broadcasted over the country where you are installing it (the
country you selected in the "Start installation" screen). Use the ▲ / ▼
buttons to highlight the Automatic search option and press OK. The
'Channel searching' page will appear, and at once the search starts –if
you want to stop it at any moment press EXIT–. The receiver will detect
all the multiplex (digital channels) received via the antenna and will
automatically create the channel list. When the search ends, the screen
returns to the Channel searching menu. Press EXIT to return to the
DTT menu. To go to the Main Menu, press EXIT again.
a) Channel managing
Using the ▲ / ▼ buttons, highlight the Channel managing option and press OK. The ‘Channel managing’
screen will appear, showing the list of channels found in the search :
▲
This option can be used when, for whatever reason, all of the channels have been deleted from the channel list
or when you wish to add an additional channel to the current list.
In the DTT menu, highlight Channel searching and press OK. You will
be asked to enter the PIN number; enter it using the number buttons
on the remote control (by default, the PIN number is "0000", and you
can change it via the PIN number option in the Configuration menu,
see page 17). The Channel searching menu appears, which will help
you to create the list of channels. There are 3 ways to proceed:
1) Automatic search
2) Manual search (I)
3) Manual search (II)
In the DTT menu, highlight the Channel list option and press the OK button. The screen will change to the
Channel list menu. This menu allows you to a) manage, b) order, c) sort and d) delete the channels found
in the search. You can change from television channels to radio channels by pressing the TV/Radio button
on the remote control.
▲
▲
- Channel searching
- Channel list
- Configuration
- Factory settings
- Receiver version
- Software update
Manual search (II)
This type of search is indicated to add a new multiplex to the current
channel list. Open the ‘Manual search (II)’ page as explained for the
Manual search (I). Here you must enter the frequency and the
bandwidth of the multiplex you wish to search for, and then press the
OK button. Afterwards, the screen returns to the Channel searching
menu each time, ready to search for another multiplex.
The abbreviations Fav, Del, Mov and Lock at the top of the ‘Channel managing’ page are the same colours
as the buttons that are used to carry out the actions represented by these abbreviations. This information is
also available in the window that opens when the INFO button is pressed. Press EXIT to close this window.
11
Receiving DTT
Settings
b) Channel ordering
4.2.3 Configuration
In the DTT menu, highlight the Configuration option and press OK. The Configuration menu appears, with
6 options :
▲
▲
a) TV Image
b) OSD
c) System Setup
d) Clock
e) Scheduling
f) PIN number
As you will see, the options a), b), c) and d) have numerous selection and adjustment parameters.
However, most default values of these parameters may be perfectly suitable for your purposes, and
so you will probably need to change not many of them.
▲
In the channel list that was created when the receiver was turned on for the first time, the channels appear
in ascending order of frequency of the corresponding radio-electric multiplex, and in accordance with the
LCN function (if this was activated and works in your country). The ‘Channel ordering’ page allows you, if
you so wish, to change the order of the channels. There are two selection options :
- Type of channel : all, only FTA, or only encrypted.
- Type of ordering : in alphabetical order (A-Z or Z-A) or, if applicable, according to LCN+ or LCN–.
to go to the right and select the desired parameter.
Select the option using the ▲ / ▼ buttons. Press
Press OK : the lower box will display the new list, ordered as per your selection.
Press the EXIT button to return to the Channel list menu. Press it again to go to the DTT menu. To go to
the Main Menu, press EXIT again.
a) TV Image
Using the ▲ / ▼ buttons, highlight the TV Image option and press OK. The ‘TV Image’ page appears :
c) Channel sorting
▲
▲
d) Delete all
▲
▲
▲
▲
▲
When you highlight the Delete all option and press OK you will be asked for the PIN number ("0000" by
default). The Delete all menu will appear.
How to delete channels from the list one by one using the Channel managing option has already been
explained. This page, ‘Delete all’, allows you to remove, in one go, either all of the TV channels or all of the
Radio channels.
Select the correct option using the ▲ / ▼ buttons and press OK. A dialogue box will appear; use the
/
buttons to select "Yes" and then press OK. Once the action has been completed, the screen will display the
message "DATABASE EMPTY" if all of the TV and Radio channels have been deleted.
Press the EXIT button to return to the Channel list menu. Press it again to go to the DTT menu. To go to
the Main Menu, press EXIT again.
12
1. Colour System : here you can choose the colour system of the CVBS (composite video) signal that the
receiver provides through the TV SCART and A/V mini-jack connectors. Highlight the correct line using
the ▲ / ▼ buttons and then press
to select that system. There are 3 options: PAL, NTSC and
/
Auto. The default option is Auto.
16:9
2. Aspect Ratio : this selection is made in the same way. If your
television screen is 4:3, that is to say, not panoramic, you can
choose between 4:3 PS and 4:3 LB. If it is panoramic, you
should select 16:9 PS. The default option is 4:3 PS.
3. Video Output : this is the type of video signal provided by the
receiver. The options are RGB and CVBS (composite video). The
4:3 PS
4:3 LB
16:9 PS
default option is RGB.
4. Brightness : this is the brightness of the image. Highlight the line using the
▲ / ▼ buttons. Next, press
to go to the list on the right-hand side and select there, once again
using the ▲ / ▼ buttons, the percentage brightness that you prefer. The default value is 80%. Press OK
to confirm.
5. Contrast : this is the contrast of the image. Follow the same selection process as used to set the
brightness. The default value is 80%.
6. Hue : this should only be adjusted if the NTSC colour system has been selected. The default value is 0.
7. Saturation : this is the level of colour saturation. Follow the same selection process as before. The
available levels range from 0 to 12, with 0 being the default value.
▲
This page lets you associate channels with different themes : cinema, sports, music, kids, etc. This makes it
possible, in the TV Viewing mode, to list themed groups of channels, thus making it easier to choose a channel.
Using the ▲ / ▼ buttons, select the channel you want to associate with a theme and then press the remote
control number button that corresponds to that theme, as indicated in the list on the right-hand side. The
symbol of the chosen theme will then appear on the line of the selected channel.
Press the EXIT button to return to the Channel list menu. Press it again to go to the DTT menu. To go to the
Main Menu, press EXIT again.
This page lets you adjust various parameters regarding the TV image provided by the SMARTmini, allowing
you to fine-tune it to your particular television set :
Press OK to confirm the completed adjustments. The screen returns to the Configuration menu. Press
EXIT to return to the DTT menu. Press it again to go to the Main Menu.
13
Receiving DTT
Settings
b) OSD
Using the ▲ / ▼ buttons, highlight the OSD option and press OK. The ‘OSD’ (On Screen Display) page appears:
▲
Press OK to confirm the completed adjustments. The screen returns to the Configuration menu. Press
EXIT to return to the DTT menu. Press it again to go to the Main Menu.
This page allows you to configure 8 parameters of the OSD (On Screen Display) functions :
d) Clock
Using the ▲ / ▼ buttons, highlight the Clock option and press OK. The ‘Clock’ page appears :
▲
▲
▲
The ‘Clock’ page allows you to set the date and time of the system either automatically or manually.
To set them automatically, do the following :
▲
▲
1. Setup : using the /
buttons, select Auto. The Date and Time lines are disabled.
2. GMT Offset : the default value, «Auto», should normally be left unless the receiver is being installed in a
time zone that is different to that of the rest of the country; in the Canary Islands, for example. If this is
the case, highlight the line using the ▲ / ▼ buttons and then press
to move to the box on the righthand side; select +1:00 for summer time or 00:00 otherwise. Press OK to confirm your choice.
3. Summer Time : this line is enabled only if Auto was not selected on the previous line. Select ON if you
are currently in summer time, or OFF otherwise.
▲
▲
▲
The DTT channels transmit the date, and the time and GMT offset. This information can be used by the
receiver to automatically adjust the system date and time.
▲
▲
▲
▲
▲
▲
▲
▲
▲
1. OSD : here you can select the colour scheme of the OSD. Highlight the line using the ▲ / ▼ buttons
and then press the /
buttons to choose the colour you prefer.
2. Time on screen : use this option to select whether or not the time is displayed over the TV image.
Highlight the line using the ▲ / ▼ buttons and then press
/ to select either «On» or «Off».
3. Automatic OSD duration : this is the amount of time that the OSD message will automatically appear for
after certain actions are carried out in the menus or when watching the TV. Make the selection by
repeatedly pressing the
buttons. Values range from 1 to 6 seconds (3 secs. by default).
/
4. OSD transparency : this is the degree of transparency of the OSD messages. It can be set to between
0% and 60%. Make the selection by repeatedly pressing the
/ buttons.
5. OSD Language : the language in which the on-screen text is displayed. Highlight the line using the ▲ /
▼ buttons; next, press the
button to move to the section on the right-hand side; select the language
you prefer using the
buttons. Press OK to confirm your choice.
/
6. 1st audio language : choose the language that you want to appear first in the list of available languages
on the TV channels (AUDIO button). Press OK to confirm.
7. 2nd audio language : choose the language which will appear in second place.
8. MP4 subtitle language : this is the language of the subtitles when playing DivX files. Highlight the line
button to move to the section on the right-hand side;
using the ▲ / ▼ buttons; next, press the
select the language you prefer using the
buttons. Press OK to confirm your choice.
/
Lastly, press OK to confirm all of the OSD settings. The screen returns to the Configuration menu. Press
EXIT to return to the DTT menu. Press it again to go to the Main Menu.
▲
4. LCN : this refers to the automatic classification of channels in the channel list.
5. Country : select your country.
6. Photo Effect : select ON if you want the receiver’s multimedia playback feature to include artistic
transition effects when displaying photo slide shows.
If for whatever reason you wish to manually set the date and time of the system, proceed as follows :
▲
1. Setup : using the /
buttons, select Manual. The Date and Time lines are now enabled (see lefthand image below).
2. Date : highlight the line using the ▲ / ▼ buttons and then press
. The Calendar window appears
(see centre image below) in which you should use the buttons on the remote control to select the day (to
see what buttons to use, press INFO; an information window will pop up, see right-hand image below;
press EXIT to close this window). Press OK to confirm the date setting. You are returned to the Clock
page.
3. Time : highlight the line using the ▲ / ▼ buttons and enter the time using the
/ movement
buttons and the number buttons.
▲
c) System Setup
Highlight the System Setup option and press OK. The ‘System Setup’ page appears :
▲
!
14
Press OK to confirm the settings (automatic or manual). The screen returns to the Configuration menu.
Press EXIT to return to the DTT menu. Press it again to go to the Main Menu.
▲
▲
▲
▲
1. Sound Class : this setting allows you to choose a particular type of sound. Highlight the line using the ▲
/ ▼ buttons and then repeatedly press the
buttons to choose between Standard, Classical, Rock,
/
Jazz and Pop. The selection by default is Standard. Press OK to confirm.
2. Sound Effect : select a «stage» effect. This can only be changed if the sound class was set to Standard.
Highlight the line using the ▲ / ▼ buttons and then repeatedly press the
buttons to choose
/
between Off, Concert, Church, Passive or Live.
3. Active Antenna: the possible options are ON and OFF. If you select ON, the receiver sends a voltage of
+5 V through the antenna connector. If there is no active antenna connected, you should select OFF.
▲
▲
▲
Here you can set different parameters regarding the general system of your SMARTmini receiver :
If you select "ON" and there is no active antenna connected (indoor antenna equipped with preamplifier),
the receiver may become damaged and cease to work.
15
Receiving DTT
Settings
e) Scheduling
Using the ▲ / ▼ buttons, highlight the Scheduling option and press OK. The ‘Scheduling’ page appears :
f) PIN number
Using the ▲ / ▼ buttons, highlight the PIN number option and press OK. The ‘PIN number’ page appears :
▲
▲
This page allows you to schedule the turning on and off of the receiver, channel tuning and the appearance
of OSD messages. Up to 8 schedules are possible.
▲
▲
▲
button to go to the
1. Schedule Number : highlight the line using the ▲ / ▼ buttons and press the
section on the right-hand side; using the ▲ / ▼ buttons, select the number you wish to assign to the
schedule and press OK.
2. Periodicity : highlight the line using the ▲ / ▼ buttons and then press the
buttons once or
/
several times to choose between "Off", "Once", "Weekly", and "Yearly". The "Off»" option is used to
deactivate or change a schedule.
3. Schedule Class : this option works in the same way. The available options are "Off", "Message",
"Channel" and "On". The "Off" and "On" options refer to the scheduled turning on or off of the receiver
on the date and time set below.
This page allows you to change the PIN number that is required to access certain settings (channel
searching, lock channel, delete all channels, factory settings) :
1. Old PIN number : Highlight the line using the ▲ / ▼ buttons and then enter the current PIN number
using the number buttons on the remote control. The default PIN number is "0000".
2. New PIN number : Enter the new PIN number (4 numerical digits).
3. Confirm New PIN number : Enter the new PIN number once more.
If no errors were made when entering the digits, an acceptance message appears and the screen returns to
the Configuration menu. The new PIN number is now activated.
Press EXIT to return to the DTT menu. Press it again to go to the Main Menu. If you press it once more, the
screen will return to TV Viewing mode.
Record the new PIN number in a safe place, since if it is forgotten you will not be able to access the menus
or options that require it. If the PIN number has been forgotten, use the Software update option (see
section 4.2.6) either by loading a new software version or by reloading the current one. This will allow you
to use the default PIN number, "0000".
4.2.4 Factory settings
▲
▲
▲
▲
In the DTT menu, highlight the Factory settings option and press OK. You will be asked for the PIN number;
enter it using the number buttons on the remote control (the default PIN number is "0000"). In the dialogue
box that appears, select "Yes". Once the action has been carried out, the television will display the Start
installation screen. Now follow the instructions given in section 4.1.
▲
▲
▲
If for whatever reason you wish to delete all of the personal settings that you have configured on your
SMARTmini receiver, this option in the DTT menu allows you to restore the configuration that the receiver
had when it left the factory.
▲
4. Schedule Message (if Message was selected in Schedule Class) :
Highlight the line using the ▲ / ▼ buttons and then press the
buttons once or several times
/
to choose between a birthday, anniversary or thank-you message.
Schedule Channel (if Channel was selected in Schedule Class) :
Highlight the line using the ▲ / ▼ buttons and then press
to move to the section on the righthand side; select the channel to schedule using ▲ / ▼ . Press OK to confirm.
5. Date : highlight the line using the ▲ / ▼ buttons and then press
. The ‘Calendar’ page appears, in
which you should select the schedule date in the same way as that used in the Clock option (see page
15). Press OK to confirm the settings. You are returned to the ‘Scheduling’ page.
6. Time : highlight the line with the ▲ / ▼ buttons and enter the time for the schedule in the same way as
that used in the Clock option. Press OK to confirm the settings.
7. Duration (only if Channel was selected in Schedule Class) :
Highlight the line using the ▲ / ▼ buttons and enter the desired duration of the action that is being
scheduled, using the
movement buttons and the number buttons. Press OK to confirm the
/
duration.
Press EXIT to leave the Scheduling page and return to the Configuration menu. Press EXIT to return
to the DTT menu. Press it again to go to the Main Menu.
16
17
Receiving DTT
Daily use
4.2.5 Receiver version
4.3 Daily use
Using the ▲ / ▼ buttons, highlight the Receiver version option and press OK. The ‘Receiver version’ page
will appear, where you can view the hardware and software versions of your SMARTmini, along with some
other related information :
The operation of your SMARTmini receiver is very simple. Only a few of the buttons on the remote control
will be used regularly :
▲
▲
Press EXIT to return to the DTT menu. Press it again to go to the Main Menu. If you press it once more, the
screen will return to TV Viewing.
4.2.6 Software update
This DTT menu option allows you to update the software of the SMARTmini receiver, either to add new
features or improve the current ones. To complete said update, a ".bin" software file is needed, which can be
downloaded from http://www.ikusi.com. This file can then be copied to a USB storage device (a flash drive,
for example).
When you update the SMARTmini software, all of the personal settings that you have configured will be lost.
As a result, you will need to search for the channels once more and configure the receiver.
Connect the flash drive containing the file to the USB port on the front panel of the receiver. On the DTT
menu screen, use the ▲ / ▼ buttons to highlight the Software update option and press OK. The ‘Software
update’ page appears :
• the number buttons to go directly to a particular channel
• the CH+ and CH– buttons to change to the next or previous channel in the channel list
• the
button to mute the sound
• the EPG button to go to the programme guide
You will also use other buttons, but only occasionally. The most common tasks that you will carry out are
described in the following sections.
4.3.1 Turning on and turning off the receiver
To turn on or turn off (standby mode) the receiver, press the
button. When it is turned on, the channel
that was tuned in when the receiver was last turned off will appear on the screen.
4.3.2 Adjusting the volume
Press the VOL+ or the VOL– button to change the volume. The screen will display adjustment bars.
Press the
button to completely mute all sound. Press it again to return the sound to its previous volume.
4.3.3 Changing between television channels and radio channels
Press the TV/RADIO button to change between television channels and radio channels.
4.3.4 Changing channel
This can be done in any of 3 ways :
a) Using the number buttons, enter the number of the channel assigned to it in the channel list (*). If the
number has two digits, the second one must be entered in less than 2 seconds after the first.
( )
* The list is opened by pressing OK and closed by pressing EXIT.
▲
!
Although the updating process is fast (approx. 20 secs.), it is important to ensure that it is not interrupted by
anything whilst running. An electricity cut, for example, could render the receiver permanently inoperable.
Press OK. The screen will now display all of the folders and files stored on the flash drive. Highlight the file
using the ▲ / ▼ buttons and press OK. The update process will now begin.
▲
c) Press OK to open the channel list (see left-hand image below). Press ▲ / ▼ to select the channel. Press
OK to confirm your choice. Next press EXIT to close the list.
- If there are channels which have been sorted by theme (in the option Channel sorting, page 12), open
the channel list and, using the /
buttons, select the desired theme («Sports», for example; see
centre image below). The list will now show only those channels that you have associated with this theme.
Press ▲ / ▼ to select the channel. Press OK to confirm your choice. Next press EXIT to close the list.
- If there are channels which have been set as favourites, and the one you wish to view is one of them,
you can select it quicker by pressing the FAV button. The list of favourite channels appears (see righthand image below). Press ▲ / ▼ to select the channel. Press OK to confirm your choice. Next press
EXIT to close the list.
▲
▲
b) Press CH+ to go to the next channel in the list, or CH– to go to the previous one.
▲
When the process has finished, the screen will close and return to TV Viewing mode.
18
General channel list
Themed channel list
Favourite channel list
19
Receiving DTT
Daily use
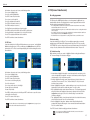
- Use the ▲ / ▼ buttons to highlight a different channel in the list. At the same time, the corresponding
programme grid will be displayed on the right-hand side. Press
to move between the channel list
/
and the programme grid. To move through the grid, press ▲ / ▼ .
▲
Press the INFO button to open up a window containing the name
of the channel and the names and times of the programme that is
currently being broadcast and the one that is to be shown next. If
you press the button again, the window will also display certain
technical parameters (frequency and number of the multiplex, and
the service, video, audio and PCR PIDs), as well as some
information about the reception level and the quality of the signal.
Press EXIT to close the window
▲
4.3.5 View channel information
- With the name of a programme highlighted, press the yellow button to display extended information about
it. Press EXIT to return to the "Today" page.
- With the name of a programme highlighted, press the REC button to schedule it for recording using the
PVR function of the receiver (see section 6.2 on page 25).
Press the EXIT button to leave the EPG guide.
Whilst on the «Today» page, press the green button to enter the "Week" page, where you will be shown the
programmes for today and for the six following days :
4.3.6 Returning to the last viewed channel
Press the RECALL button to return to the channel that you were watching before the current one. By using
this button you can easily alternate between two different programmes.
4.3.7 Select the audio language
Press the AUDIO button. A window appears, showing all of the available
audio languages (and their PID numbers). Using the ▲ / ▼ buttons,
select the desired language.
▲
▲
If the sound is stereo, you can use the
buttons to choose
/
between listening in stereo (i.e. both audio channels), listening to just
the left-hand channel, or listening to just the right-hand channel,
according to what is indicated in the above selection box. Press OK to
confirm the settings or EXIT to leave without making any changes
▲
▲
▲
Press the ZOOM button to activate the image zoom mode. The image is enlarged x2. By pressing this
button repeatedly, the zoom can be changed to x3, x4, x1/2, x1/3, x1/4, and off. When the zoom is set to x2,
x3 or x4, the image frame can be moved using the
/ and ▲ / ▼ buttons.
Information about the zoom level remains on display on the screen. To return to the normal image, set the
zoom to "off"; the information will then disappear once the time set for automatic OSD messages has elapsed.
4.3.9 EPG - Electronic Programme Guide
▲
4.3.8 Image zoom
- Use the ▲ / ▼ buttons to highlight a channel in the channel list.
- Use the FRW / FFW buttons to highlight a day of the week.
- Press /
to see information about the programmes of the channel and on the selected day in their
different schedules.
- With the name of a programme highlighted, press the yellow button to display extended information about
it. Press EXIT to return to the "Week" page.
- Press the red button to return to the "Today" page.
Press the EXIT button to leave the EPG guide.
Press the INFO button to open a window containing information about the actions of the buttons. Press EXIT
to close the window.
Press the EPG button to enter the ‘EPG’ page, the electronic programme guide. The guide provides
information about today’s and this week’s programmes for all of the channels, as long as this information is
transmitted by the channels.
By default, the "Today" page appears, showing the receiver’s channel list. Highlighted in the list is the
channel which is currently tuned in. The box to the right shows the programme grid for that channel for
today.
20
21
Receiving DTT
Multimedia
5. MULTIMEDIA
4.3.10 Teletext
Some channels feature a teletext service. Whilst watching a programme, press the TXT button. If the
channel features teletext, a window will appear indicating the PID number of the service. Press OK. A
standard teletext window will open, which you can use as normal.
Multimedia playback
▲
The SMARTmini receiver features a USB port on its front panel for the connection of external devices such
as flash drives, MP3 players, hard disks and digital cameras. The receiver can reproduce MP3 audio files,
MPEG-2/4 and DivX video files, and JPEG images, amongst other file types.
Press the MENU button on the remote control to bring up the Main Menu.
5.1 USB Cinema
To select a teletext page, enter the three-digit page number using the number buttons on the remote control.
●
●
Connect the external device to the USB port. With the main menu on screen, press ▲ / ▼ to highlight the
Multimedia option and then press OK. The screen will change to the Multimedia menu. Select the Cinema
option and press OK. The ‘Cinema’ screen will appear, displaying all of the folders and video files stored on
the external device :
If you make a mistake, finish entering any three digits and then enter the correct page number once more.
If the page counter does not stop, it means that the page you have requested is not available. In this case, enter
another page number.
▲
▲
▲
▲
Press ▲ / ▼ to go to the next/previous page.
Press
to move forward 100 pages.
Press
to return to the starting page, 100.
Press EXIT to leave teletext.
4.3.11 Subtitles
▲
▲
Press the SUBT button whilst watching a channel. The Subtitles window
will appear, indicating the subtitle languages that that channel offers and
their PID number. The top part of the window features a selection box;
use the /
buttons to choose between Subtitles, TTX Subtitles and
OFF :
- If you select Subtitles, the box below will show the available
languages; select the one you want to use using the ▲ / ▼ buttons
and press OK.
- If you select TTX Subtitles, the box will indicate the number of the
teletext page that transmits them.
- Select OFF if you do not wish subtitles to appear for the programmes
on that channel.
Press EXIT to close the window.
Use the buttons on the remote control to carry out the following operations :
- Press ▲ / ▼ to highlight the folder
- Press OK to open the highlighted folder
- Press EXIT to return to the previous folder
- Press ▲ / ▼ to select the video file
- Press OK to start playback of the video
- Press FFW to fast-forward (x2, x4, x8, x20, x1)
- Press FRW to rewind (x2, x4, x8, x20, x1)
- Press SLOW for slow-motion playback (1/2, 1/4, 1)
- Press Play/Pause to pause playback; press it again to continue
- Press PREV to play the previous video in the list; press NEXT to play the next one
- Press the yellow button to repeat playback of one or all of the files in the folder
- Press STOP to stop playback and return to the list of videos
- Press EXIT several times to return to the main menu.
5.2 USB Music
Connect the external device to the USB port. With the main menu on screen, press ▲ / ▼ to highlight the
Multimedia option and then press OK. The screen will change to the Multimedia menu. Select the Music
option and press OK. The ‘Music’ screen will appear, displaying all of the folders and audio files stored on
the external device :
▲
▲
22
23
Multimedia
PVR
Use the buttons on the remote control to carry out the following operations :
- Press ▲ / ▼ to highlight the folder
- Press OK to open the highlighted folder
- Press EXIT to return to the previous folder
- Press ▲ / ▼ to select the audio file
- Press OK to start playback of the audio file
- Press FFW to fast-forward (x2, x4, x8, x20, x1)
- Press FRW to rewind (x2, x4, x8, x20, x1)
- Press Play/Pause to pause playback; press it again to continue
- Press PREV to play the previous file in the list; press NEXT to play the next one
- Press the yellow button to repeat playback of one or all of the files in the folder
- Press STOP to stop playback and return to the list of audio files
6. PVR (Personal Video Recorder)
Recording programmes
The PVR feature of the SMARTmini function allows you to record programmes, in digital format, to an
external hard disk or flash drive. The disk should have its own power supply, and this device as well the
flash drive should be formatted using the FAT32 file system.
– The recording is MPEG-2 compatible, and only includes the video and the main audio from the channel. Subtitles,
teletext and multiple audio streams are not recorded.
– Check that the hard disk has enough free space. 1.5 GB should be available for each hour of recording. When the disk
is full, recording stops.
– The recording is saved in the ".mpg" format, in a folder called PVR which is created automatically. Recorded files can
be played using the Cinema option in the Multimedia menu (page 23).
– The maximum file size for recordings is 3.8 GB. If a recording exceeds this limit, a second file will be created.
- Press EXIT several times to return to the main menu.
6.1 Instant recording
▲
Connect the external device to the USB port. With the main menu on screen, press ▲ / ▼ to highlight the
Multimedia option and then press OK. The screen will change to the Multimedia menu. Select the Photos
option and press OK. The ‘Photos’ screen will appear, displaying all of the folders and image files stored on
the external device :
Connect the external device to the USB port. To start recording the programme that you are currently
watching, just press the REC button. REC is displayed over the image. Press STOP to stop recording.
- STATE DURATION: Once the recording is started, you can state its duration between 15 and 120 min in 15
min steps. Press the yellow button and select the duration with the
buttons. Then press OK.
/
▲
5.3 USB Photos
6.2 Scheduled recording
With the main menu on screen, press ▲ / ▼ to highlight the Schedule recording option and then press
OK. The screen will change to the ‘Schedule recording’ page :
▲
▲
▲
▲
▲
▲
▲
▲
▲
If the Photo Effect option on the ‘System Settings’ page of the Configuration menu (see page 15) is set to
ON, the slide show will include artistic transition effects.
▲
- Press EXIT several times to return to the main menu.
button to go to the
1. Schedule Number : highlight the line using the ▲ / ▼ buttons and press the
section on the right-hand side; using the ▲ / ▼ buttons, select the number you wish to assign to the
schedule and press OK. Up to 8 schedules are possible.
2. Periodicity : highlight the line using the ▲ / ▼ buttons and then press the
buttons once or
/
several times to choose between "Off", "Once", "Daily" and "Weekly". The "Off" option is used to
deactivate or change a schedule.
3. Channel : highlight the line using the ▲ / ▼ buttons and then press
to move to the section on the
right-hand side; select the channel to schedule using ▲ / ▼ . Press OK to confirm.
4. Date : highlight the line using the ▲ / ▼ buttons and then press
. The ‘Calendar’ page appears, in
which you should select the schedule date in the same way as that used in the Clock option in the
Configuration menu (see page 15). Press OK to confirm the settings. You are returned to the
‘Schedule recording’ page.
5. Time : highlight the line with the ▲ / ▼ buttons and enter the time for the schedule in the same way
as that used in the Clock option. Press OK to confirm the settings.
6. Duration : highlight the line using the ▲ / ▼ buttons and enter the predicted duration of the
programme that is being scheduled, using the
movement buttons and the number buttons.
/
Press OK to confirm the duration.
▲
▲
Use the buttons on the remote control to carry out the following operations :
- Press ▲ / ▼ to highlight the folder
- Press OK to open the highlighted folder
- Press EXIT to return to the previous folder
- Press ▲ / ▼ to select the image file (photo)
- Press OK to view the photo
- Press /
to turn the photo 90° to the left/right
- Press ▲ to flip the photo horizontally
- Press ▼ to flip it vertically
- Press PREV to view the previous photo in the list; press NEXT to view the next one; press OK to start an
automatic slide show of the photos
- Press STOP to return to the list of photos
Press EXIT to leave the ‘Schedule recording’ page and return to the main menu.
Do not forget to have the USB device (hard disk or flash drive) connected to the receiver at
the scheduled time on the scheduled date.
24
25
Games
USB unit
7. GAMES
8. USB UNIT
The SMARTmini receiver includes some games for your entertainment. With the main menu on screen,
press the ▲ or ▼ button on the remote control to highlight the Games option, and then press OK. The
screen will change to the Games page, which includes the folder Embedded Games. Press OK again.
7.1 Box Man
This main menu option is dedicated to managing the USB device (hard disk or flash drive) used for the PVR
feature described on page 25.
Connect the device to the USB port. With the main menu on screen, press the ▲ or ▼ button on the remote
control to highlight the USB unit option, and then press OK. The screen will change to the USB unit menu :
Select BoxMan and press OK :
▲
7.2 Tetris
Select Tetris and press OK :
▲
▲
1. On the left-hand side the five available functions are
shown, which are selected using the ▲ / ▼ buttons.
2. Select Settings to adjust the speed and difficulty level.
3. To start a game, select the option Start Game and
press OK.
4. Press the
buttons to move the object left or
/
right.
5. Press the ▲ button to rotate the object.
6. Press the ▼ button to make the object fall faster.
7. Press OK to pause the game.
8. Select Main Menu to end the game and return to the
previous menu. Here, select Exit Game to leave.
7.3 Hit Rat
Select Hit Rat. The gameplay screen will appear :
▲
The menu presents two options : File manager and Format partition.
a) File manager
Using the ▲ / ▼ buttons, highlight the File manager option and press OK. The ‘File manager’ page will
appear, showing all of the «.mpg» files in the PVR folder on the device, along with their duration and size.
From here you can play or delete any of the files.
First you must select in the top part of the screen which of these
actions to carry out. To do so, press the green button on the
remote control once or more.
Select the "Play" action if you wish to monitor a file. Highlight the
file using the ▲ / ▼ buttons and press OK. The file will play on
the right-hand side of the window.
Press OK again to restart the playback or press STOP to stop it.
- Select the "Delete all" action if you wish to delete all of the files
in the list. Press OK. A message will appear, asking you to wait,
followed by another asking you to confirm.
- Select the "Delete one" action if you wish to delete a single file
from the list. Highlight the file to delete using the ▲ / ▼ buttons
and press OK. A message will appear, asking you to wait,
followed by another asking you to confirm.
Press EXIT several times to return to the main menu.
b) Format partition
This option can be used to format the USB device used for the PVR feature with the FAT32 file system, if it
has not already been done.
Connect the device to the USB port. Using the ▲ / ▼ buttons, highlight the Format partition option and
press OK. A dialogue box will open asking you to confirm that you wish to format the device :
▲
1. On the left-hand side the five available functions are
shown, which are selected using the ▲ / ▼ buttons.
2. Set the Speed using the
buttons.
/
3. To start a game, select the option New Game and
press OK.
4. The number buttons 1, 2, 3, 4, 5, 6, 7, 8, 9 are used to
point to top-left, top-centre, top-right, middle-left,
middle-centre, middle-right, bottom-left, bottom-centre,
and bottom-right, respectively.
5. Press OK to pause the game.
6. Select Main Menu to end the game and return to the
previous menu. Here, select Exit Game to leave.
▲
26
▲
▲
1. On the left-hand side the six available functions are
shown, which are selected using the ▲ / ▼ buttons.
2. To start a game, select the option New Game and press
OK. The functions that are greyed out cannot be used.
3. Press the ▲ , ▼ ,
, arrow buttons to move the
character.
4. Press OK to pause the game.
5. Select Exit Game to end the game and return to the
'Embedded Games' page.
!
Upon formatting the USB device, all of the data stored on it will be permanently deleted.
27
9. TECHNICAL CHARACTERISTICS
10. APPENDIX
RF input
Software
• DVB-T FTA, MPEG-2, COFDM
• Frequency band : 170-858 MHz
• Signal level : 29-99 dBμV
• COFDM modes : 2K and 8K
• Channel bandwidth : 6 / 7 / 8 MHz
• Loop-through bandwidth : 47-862 MHz
• Indoor antenna remote powering : +5 VDC
• Multi-language OSD
• List of favourite channels
• Electronic Programme Guide (EPG)
• Parental control (channel and configuration lock)
• Functions for ordering, renaming, sorting and deleting channels
• Subtitles and teletext (if available)
• Last channel memorised and previous channel button
• PAL/NTSC support
• Image zoom
• Scheduling of messages and channel tuning
• Quick software updating
• MPEG-2 recording to external hard disk or flash-drive
- instant
- scheduled
• Multimedia reader
(MP3, JPEG, MPEG-2, MPEG-4, DivX 3.11)
• Games
MPEG-2 decoding
• Standard MPEG-2 MP@HL
A/V inputs/outputs
• TV SCART : RGB out, PAL/NTSC out, stereo audio out
• VCR SCART : PAL/NTSC in/out, stereo audio in/out
• A/V jack : PAL/NTSC out, stereo audio out
Front panel
• Type-A female USB2 port
• Red/green LED indicator
• Infrared sensor
Rear panel
• 1x female IEC 169-2 (RF input)
• 1x male IEC 169-2 (RF loop-through output)
• 2x SCART (TV , VCR)
• 1x 3.5 mm mini-jack
• 1x DC jack (12V input)
Troubleshooting
Problem
Possible cause
What to do
There is no image or sound
The TV set is not receiving a signal from
the SMARTmini receiver or is not set up
correctly
Check that all of the devices are turned on
and connected correctly. Check that the
television set is using the appropriate A/V
input
There is an image but no
sound
"Mute" is activated on the receiver or the
TV set
Check the volume setting on the receiver
and on the TV set
The image and the sound
cut out temporarily or
"freeze"
The signal received through the antenna
is weak
Check the signal level indicated on the
information screen for that channel (INFO
button, pressed twice). Consult an antenna
technician to ensure that the antenna
orientation is correct.
A particular channel cannot
be found
The corresponding signal through the
antenna is very weak
Consult an antenna technician to ensure
that the antenna is correctly installed
The remote control does not
work
The batteries have run out
Change the batteries
The remote control does not point
correctly
Point the remote control at the front panel of
the receiver
There is an obstacle between the
receiver and the remote control
Remove any obstacles preventing direct
visual contact
The receiver has locked up
Wait a few minutes. If the receiver does not
recover, unplug and plug the power supply
This is normal. The update process
deletes all of the channels and any
personal settings.
Search for the channels and configure the
receiver again
Power supply
• AC in (power supply unit) : 100-240 V, ~50/60 Hz
• DC out (power supply unit) / DC in (receiver) : +12 VDC
• Consumption (receiver) : 5.5 W (max)
Accessories
• 44-button remote control
• Batteries : 2x 1.5 V (AAA - LR03)
• 1.2 m SCART cable [For Australian market : 1x 3.5 mm Jack - (3x) RCA cable]
• DC power supply with bipolar plug
• User manual
The receiver does not
work after having updated
the software
The PIN number used to
lock channels has been
lost
Use the "Software update" option. You will
have to search for the channels and
configure the receiver again, using the
default PIN number, "0000".
General
• Operating temperature : 0°C to +45°C
• Relative humidity : 25 to 75%
• Dimensions (width x height x depth) : 210 x 30 x 90 mm
• Weight : 270 g
Technical Assistance
If you experience any doubts or difficulties using your SMARTmini receiver, contact the establishment where
you purchased the device. Do not forget to present the sales receipt.
28
29
CE Marking
Alphabetical index
In reproducing the CE marking, IKUSI guarantees compliance, of both the
SMARTmini receiver and the supplied power supply, with all corresponding
regulations in accordance with directives EMC 2004/108/EC and LVD 2006/95/EC.
A
M
T
Active antenna ........................... 15
Aspect ratio ................................ 13
Moving a channel in the list ........ 11
Technical characteristics ............ 28
Teletext ....................................... 22
Time of the system ..................... 15
Time on screen ........................... 14
Transparency of OSD ................. 14
Troubleshooting .......................... 29
Turning off the receiver ................. 7
disconnecting from the mains .... 7
standby mode ............................ 7
Turning on the receiver ................. 7
TV image .................................... 13
O
B
Guarantee
Notwithstanding any claims presented to the direct reseller of the product, IKUSI offers the user of the
SMARTmini receiver a guarantee of two years starting on the date of the sales invoice, validated through
the presentation of the sales document.
During the period of the guarantee, IKUSI will take care of any faults caused by defects of materials or
manufacture, repairing the receiver or replacing it for another which corresponds to the current equivalent
technology. The guarantee does not cover breakdowns or defects caused by the incorrect use of the device
or the failure to follow the instructions detailed in this user manual.
The guarantee does not cover any claims other than the aforementioned; in particular, the guarantee does
not cover the services provided by the authorised reseller (e.g. installation, configuration, software updates)
nor repairs for any damage or any harm that the client or any third party may suffer as a result of the
installation or operation of the receiver, lightning strikes or other natural phenomena.
Brightness of image .................... 13
Ordering the channels ................ 12
OSD ........................................... 14
C
P
Changing channel ...................... 19
Channel information ................... 20
Colour system ............................ 13
Configuration .............................. 13
Connections ................................. 5
antenna ...................................... 5
multimedia USB devices ............ 7
music centre .............................. 6
power supply .............................. 7
television set .............................. 6
video projector ........................... 6
Contrast of image ....................... 13
Panel description .......................... 4
Parental lock .............................. 11
Photo Effect ................................ 15
PIN number ................................ 17
Playing audio .............................. 23
Playing video .............................. 23
D
Deleting a channel ...................... 11
Deleting all chanels .................... 12
E
EPG (programme guide) ............ 20
F
Factory setings ........................... 17
Favourite channel, create ........... 11
G
Games ....................................... 26
L
Language
audio ........................................ 20
OSD ......................................... 14
subtitles ................................... 22
List of channels .......................... 19
List of favourite channels ............ 19
30
R
Radio, listening ........................... 19
Recording programmes .............. 25
Remote control
function of the buttons ............... 8
preparing ................................... 5
Renaming a channel .................. 11
Return to previous channel ........ 20
U
Updating software ...................... 18
USB unit ..................................... 27
file manager ............................. 27
formatting a partition ................ 27
V
Versions of SW and HW ............. 18
Video output signal ..................... 13
Viewing photos ........................... 24
S
Z
Safety instructions ........................ 2
Saturation of image colour ......... 13
Scheduling ................................. 16
channels .................................. 16
messages ................................ 16
recordings ................................ 25
turning off the receiver ............. 16
turning on the receiver ............. 16
Searching for channels ............... 10
Sorting channels ........................ 12
Sound
muting ...................................... 19
raise/lower volume ................... 19
Subtitles ..................................... 22
System clock .............................. 15
System setup ............................. 14
Zoom, changing level ................. 20
31
IKUSI - Ángel Iglesias, S.A.
Paseo Miramón, 170
20009 San Sebastián
SPAIN
Tel.: +34 943 44 88 00
Fax: +34 943 44 88 11
www.ikusi.com
ER-0149/1996
120104A