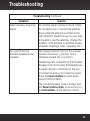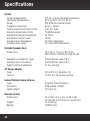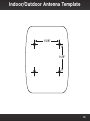
1
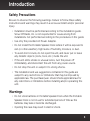
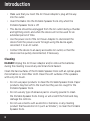
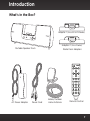
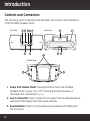
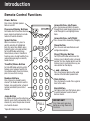
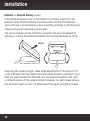
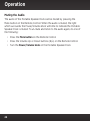
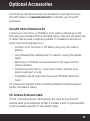
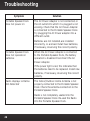
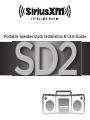
SD2
Portable Speaker Dock Installation & User Guide
Table of Contents
Introduction . . . . . . . . . . . . . . . . . . . . . . . . . . . . . . . . . . . . . . . . . . . . . . . . . 4
Compatibility. . . . . . . . . . . . . . . . . . . . . . . . . . . . . . . . . . . . . . . . . . . . . . . . . . . . . . . . . . . . . 4
Safety Precautions . . . . . . . . . . . . . . . . . . . . . . . . . . . . . . . . . . . . . . . . . . . . . . . . . . . . . . . . 5
Warnings. . . . . . . . . . . . . . . . . . . . . . . . . . . . . . . . . . . . . . . . . . . . . . . . . . . . . . . . . . . . . . . . . 5
What’s in the Box? . . . . . . . . . . . . . . . . . . . . . . . . . . . . . . . . . . . . . . . . . . . . . . . . . . . . . . . . 7
Controls and Connectors. . . . . . . . . . . . . . . . . . . . . . . . . . . . . . . . . . . . . . . . . . . . . . . . . . . 8
Remote Control Functions . . . . . . . . . . . . . . . . . . . . . . . . . . . . . . . . . . . . . . . . . . . . . . . . 10
Remote Control Battery Replacement. . . . . . . . . . . . . . . . . . . . . . . . . . . . . . . . . . . . . . . 11
Installation . . . . . . . . . . . . . . . . . . . . . . . . . . . . . . . . . . . . . . . . . . . . . . . . . .12
Installing the Radio Dock Adapter for Your Radio. . . . . . . . . . . . . . . . . . . . . . . . . . . .
Docking the Radio . . . . . . . . . . . . . . . . . . . . . . . . . . . . . . . . . . . . . . . . . . . . . . . . . . . . . . .
Connecting the Power Adapter. . . . . . . . . . . . . . . . . . . . . . . . . . . . . . . . . . . . . . . . . . . .
Removing the Radio Dock Adapter. . . . . . . . . . . . . . . . . . . . . . . . . . . . . . . . . . . . . . . . .
Installing the Indoor/Outdoor Home Antenna . . . . . . . . . . . . . . . . . . . . . . . . . . . . . . .
Using Your Portable Speaker Dock Outdoors or On-The-Go. . . . . . . . . . . . . . . . . . .
Using Your Portable Speaker Dock Indoors. . . . . . . . . . . . . . . . . . . . . . . . . . . . . . . . . .
Other Indoor/Outdoor Antenna Installation Suggestions. . . . . . . . . . . . . . . . . . . . . .
12
13
13
14
15
16
16
17
Subscribing to the Sirius or XM Service . . . . . . . . . . . . . . . . . . . . . . . . . .21
Operation . . . . . . . . . . . . . . . . . . . . . . . . . . . . . . . . . . . . . . . . . . . . . . . . . . 22
Optional Accessories . . . . . . . . . . . . . . . . . . . . . . . . . . . . . . . . . . . . . . . . . 25
Troubleshooting . . . . . . . . . . . . . . . . . . . . . . . . . . . . . . . . . . . . . . . . . . . . . 26
Specifications . . . . . . . . . . . . . . . . . . . . . . . . . . . . . . . . . . . . . . . . . . . . . . . 28
FCC Statement . . . . . . . . . . . . . . . . . . . . . . . . . . . . . . . . . . . . . . . . . . . . . . 29
Copyrights & Trademarks . . . . . . . . . . . . . . . . . . . . . . . . . . . . . . . . . . . . . 30
Indoor/Outdoor Antenna Template . . . . . . . . . . . . . . . . . . . . . . . . . . . . . 31
3
Introduction
Thank you for purchasing the SiriusXM SXSD2 Portable Speaker
Dock for Dock and Play Radios!
Your new SiriusXM SXSD2 Portable Speaker Dock lets you enjoy satellite
radio entertainment in your home, office, or other location. Use this guide
for the proper installation and use.
For the latest information about this and other SiriusXM product and
accessories, visit www.siriusxm.com.
Compatibility
The SXSD2 Portable Speaker Dock is compatible with these Dock and Play
Radios:
SiriusXM Dock & Play Radios:
• Onyx Plus and Edge
XM Dock & Play Radios:
• Onyx, Onyx EZ, XpressRCi, XpressRC, XpressR, XpressEZ, and Xpress
Sirius Dock & Play Radios:
• Sportster 5, Starmate 8, 5, 4, 3, Stratus 7, 6, 5, 4, and Stratus
4
Introduction
Safety Precautions
Be sure to observe the following warnings. Failure to follow these safety
instructions and warnings may result in a serious accident and/or personal
injury.
• Installation must be performed according to this installation guide.
Sirius XM Radio, Inc. is not responsible for issues arising from
installations not performed according to the procedures in this guide.
• Use only the provided AC Power Adapter.
• Do not install the Portable Speaker Dock where it will be exposed to
rain (or other weather), high levels of humidity, moisture, or dust.
• To avoid short circuits, do not open the unit, and never put or leave
any metallic objects (coins, tools, etc.) inside the unit.
• If the unit emits smoke or unusual odors, turn the power off
immediately, and disconnect the unit from any power source.
• Do not drop the unit or subject it to strong shocks.
• The installation and use suggestions contained in this guide are
subject to any restrictions or limitations that may be imposed by
applicable law. The purchaser/user should check applicable law for
any restrictions or limitations before installing and/or operating this
unit.
Warnings
• Do not store batteries in Portable Speaker Dock when the Portable
Speaker Dock is not in use for extended periods of time as the
batteries may leak or become discharged.
• Opening the case may result in electric shock.
5
Introduction
• Make sure that you insert the AC Power Adapter’s plug all the way
into the outlet.
• Insert the Radio into the Portable Speaker Dock only when the
Portable Speaker Dock is off.
• This device should be unplugged from the AC outlet during a thunder
and lightning storm, and when the device will not be used for an
extended period of time.
• Use the power cord of the AC Power Adapter to disconnect the
device from the power source To begin using the device again,
reconnect it to an AC outlet.
• Connect the device to an easily accessible AC outlet, so that the
device can be quickly disconnected, if necessary.
Cleaning
DANGER! Unplug the AC Power Adapter and/or remove the batteries
during the cleaning to avoid any electrical shock hazard.
Clean the hard surfaces of the Portable Speaker Dock with an optical-grade
microchamois or microfiber cloth. Clean the soft surfaces of the speakers
with a dry lint brush.
• Do not use paper products to clean the Portable Speaker Dock. Paper
products may feel soft to the touch but they are too rough for the
Portable Speaker Dock.
• Do not use any type of abrasive pad or scouring powder to clean
the Portable Speaker Dock. Doing so will scratch the finish and may
damage the controls.
• Do not use solvents such as alcohol or benzene, or any cleaning
product that has alcohol in it (such as Windex®), to clean the Portable
Speaker Dock.
6
Introduction
What’s in the Box?
Adapter 1 (SiriusXM & XM Radios)
Portable Speaker Dock
Adapter 2 (Sirius Radios)
Radio Dock Adapters
memo
display
t-mix
menu
direct
–
mute
+
1
2
3
4
5
6
7
8
9
jump
0
bank
PULL
AC Power Adapter
Power Cord
Indoor/Outdoor
Home Antenna
Remote Control
7
Introduction
Controls and Connectors
The following section identifies and describes the controls and connectors
of the Portable Speaker Dock.
Front View
3 4
source
5 6 7
Rear View
11
10
aux in
2
1
12
8
9
Bottom View
13
13
1. Power and Volume Knob: Pressing the knob turns the Portable
Speaker Dock’s power On or Off. Turning the knob increases or
decreases the volume level (+/—).
2. Aux In Connector: Input connection for audio from an external device,
such as an MP3 player and other audio devices.
3. Source Button: Press to switch audio output between the Radio and
the Aux input.
8
Introduction
4. Radio Dock Adapter Slot: Holds adapter for the Radio.
5. Headphone Connector: Stereo headphone jack to privately listen to
the Portable Speaker Dock.
6. Power On/Low Battery/Mute Light: The light is blue when the
Portable Speaker Dock is powered on. The light will turn red when
the batteries in the Portable Speaker Dock are nearly discharged and
need replacement. The light will flash when the Portable Speaker
Dock is muted.
7. IR Eye: Sensor for the Remote Control.
8. AC Power Adapter Connector: Connection for the AC Power Adapter.
(DC Power)
9. Antenna Connector: Connection for the Indoor/Outdoor Home
Antenna (Antenna).
10.Antenna Storage: Storage area for the Indoor/Outdoor Home
Antenna.
11. Antenna Cable Storage: Storage area for the antenna cable.
12.Battery Compartments: Two battery compartments of 4 batteries
each, for a total of eight “D” size cells. For best performance use
alkaline batteries.
13.Battery Compartment Latches: Latches for the battery
compartments. Press toward center of the Portable Speaker Dock to
open the compartment cover.
9
Introduction
Remote Control Functions
Power Button
Press to turn Portable Speaker
Dock on and off.
Arrow Buttons Up/Down
Press to preview and tune to channels
through the channel lineup; also press to
scroll through lists and highlight menu
items.
Pause and Replay Buttons
For Radios which have these features,
pause, rewind, and replay live radio
and smart favorite channels.
Select Button
When in a menu or list, press to
confirm selection of highlighted
item; for some Sirius Radios, press
to directly enter a channel number;
for SiriusXM Radios which have
these features, when in TuneMix or
TuneScan, press to end TuneMix/Scan
and continue playing the currently
tuned channel.
TuneMix/Memo Button
For SiriusXM Radios which have this
feature, press to begin TuneMix; for
Sirius Radios which have this feature,
press to save artists or songs.
Number Buttons
Press to tune to a stored favorite
channel*; for Radios which have this
feature, also used to enter a channel
number and directly tune to that
channel.
Jump Button
For Radios which have these features,
directly access traffic and weather of the
chosen city; access the previous channel
or a favorite channel.
*XpressRCi Radios must be in FAV mode.
10
Arrow Buttons Left/Right
Press to search for channels by category.
Menu Button
Press to access advanced features and
configuration options.
memo
display
t-mix
menu
direct
–
mute
+
1
2
3
4
5
6
7
8
9
jump
0
bank
PULL
Direct/Display Button
For XM/SiriusXM radios which have this
feature, press to directly enter a channel
number; for Sirius Radios which have this
feature, press to customize the way you
view content on the display.
+ and – Buttons
Press to increase or decrease the audio
volume of the Portable Speaker Dock.
Mute Button
Press to silence the audio. Press again to
hear to the audio.
Bank Button
For Radios which have this feature, press
to switch between favorite channel
banks or bands.
IMPORTANT!
Pull tab and remove
before using Remote
Control.
Introduction
Remote Control Battery Replacement
The Remote Control has a child resistant battery compartment which
requires a pointed object to open the battery compartment. A paper clip is
recommended, as shown.
To Replace the Battery:
1. Press the paper clip or
other object into the
lock release opening
on the Remote
Control, and slide the
battery compartment
cover off of the
Remote Control.
Paper Clip
Lock Release
Battery
Compartment
Cover
2. Slide the battery
out of the battery
compartment.
3. Replace with a new
battery. Observe the
correct orientation of the
battery; the + positive side
of the battery should be
facing up.
Battery
4. Replace the battery
compartment cover.
11
Installation
Installing the Radio Dock Adapter for Your Radio
1. Select the Dock Adapter for your Radio by referring to “What’s in the
Box?” on page 7 to identify the adapter, or turn the adapters over
and locate the name imprinted on the underside of the adapter:
SiriusXM & XM
SiriusXM & XM: Adapter 1 for all SiriusXM & XM Radios.
Sirius: Adapter 2 for all Sirius Radios.
2. Install the Radio Dock Adapter for your Radio into the Portable
Speaker Dock as shown. Align the Radio Dock Adapter in the Portable
Speaker Dock and gently press it until it snaps into place.
12
Installation
Docking the Radio
Place your Plug and Play Radio into the Portable Speaker Dock as follows:
1. Be sure the Portable Speaker Dock is powered off.
2. Align the Radio with the Radio Dock Adapter and connector.
3. Once aligned, gently press the Radio down so that it slides down the
Radio Dock Adapter and onto the connector until it is fully seated in
the Portable Speaker Dock.
Connecting the Power Adapter
The Portable Speaker Dock can operate on either batteries (8 “D” cells)
or by using the AC Power Adapter. Connect the AC Power Adapter to the
DC Power connector at the rear of the Portable Speaker Dock. (Refer to
“Controls and Connectors” on page 8.) Connect the Power Cord to the
AC Power Adapter and plug it into an AC outlet.
13
Installation
Removing the Radio Dock Adapter
If it becomes necessary to remove the Radio Dock Adapter, remember that
the Radio Dock Adapters are constructed from precision molded plastic.
During removal, extra care must be taken to not bend, force, or otherwise
stress the adapter, or break off the tabs that hold the adapter in the
Portable Speaker Dock.
Remove the Radio Dock Adapter from the Portable Speaker Dock by
placing a coin, or your fingernail, into the slot at the back of the adapter,
and pulling it up straight up, as shown.
14
Installation
Installing the Indoor/Outdoor Home Antenna
Before installing the Indoor/Outdoor Home Antenna, please read this entire
section.
The Indoor/Outdoor Home Antenna should be placed into the storage
area on the top of the Portable Speaker Dock as shown below. The antenna
clamshell should face the sky. Wrap the excess antenna cable around the
storage area at the rear, and plug the antenna cable into the Antenna
connector at the rear of the Portable Speaker Dock.
15
Installation
Using Your Portable Speaker Dock Outdoors or On-The-Go
If you are using the Portable Speaker Dock outdoors, try using it with the
antenna in the storage area. Place the Portable Speaker Dock where there
are no obstructions to block the antenna’s view of the sky, such as trees,
bridges, buildings, etc.
If the reception is not good,
then remove the antenna and
position it facing south. Not
sure which way is south? Try
pointing the antenna in different
directions until the reception
improves. Wait a few seconds
each time you reposition it for
the Portable Speaker Dock to
receive the signal.
S
Using Your Portable Speaker Dock Indoors
If you are using the Portable Speaker Dock
indoors try experimenting with the antenna
to get a feel for the reception in your location.
Move the antenna around the room or from
room to room. Aim it from different windows.
In major metropolitan areas, you might
find that you get great reception in several
locations without worrying too much about aim
and placement.
Signal Indicator
SATELLITE
TERRESTRIAL
Refer to your Radio’s User Guide for instructions, *The screen shown above is representative and may differ from the
and access the Signal Indicator or Antenna
screen displayed on your Radio.
16
Installation
Aiming screen of your Radio to see a visual indication of signal strength. If
you’re receiving a good Satellite and Terrestrial signal strength, you’re done.
If not, try some of the suggestions which follow.
Other Indoor/Outdoor Antenna Installation Suggestions
If you find you are getting a signal, but it’s inconsistent, try moving the
Indoor/Outdoor Home Antenna closer
to a window, ideally one that is facing
due south.
Not sure which way is south? Think
about where the sun rises (in the east)
and sets (in the west). Then stand
so that east is to your left and you’ll
be facing south. Is there a window in
the direction you’re facing? Move the
antenna closer to the window.
TIP! Still not sure which way is south
or where to place your antenna? Look
up your location on an online mapping
Web site that offers satellite views of
street addresses where you can easily
see which way is south, and what
window may offer an unobstructed
view of the sky.
S
SOUTH
Another easy method is to start at any
window, then work from window to
window in a simple pattern to find the
window gives the best signal strength.
Note that the antenna must also have
17
Installation
an unobstructed view. No trees or buildings blocking its aim. If the antenna
is aimed through a window, be aware
that blinds, screens, or any other
SOFFIT
non-glass elements such as thermal
insulation can sometimes cause
reception issues. If this is the case,
you may want to use another window
or place the antenna outside of the
window.
SOUTH
If you find a window that gives you
good signal strength, you can place the
antenna on the windowsill. The antenna
may need to be placed on something
to raise it above the level of the window
frame.
If you don’t have a window where
you receive a consistent signal, or
placing the antenna in a window
is not a practical solution for you,
BETTER reception can be achieved
by placing the antenna outside on a
window ledge, porch, table, or patio.
The location you choose should
provide the antenna with a clear
view of the southern sky.
OUTDOORS
SOUTH
If none of the previous solutions
work for you, then the BEST reception can be achieved by mounting the
antenna outdoors on a wall or soffit, with a clear view of the southern sky.
If you decide to do this more permanent antenna installation, you’ll
18
Installation
probably want to purchase a second indoor/
outdoor antenna, so that you’ll have one to
use with the Portable Speaker Dock when
on-the-go. An additional antenna can be
purchased at www.siriusxm.com.
Note that you will want to consider any
potential hazards when you choose the
mounting location, and possibly consider
professional installation. Sirius XM Canada,
Inc. is not liable for any damages.
1-3/8 in
1-1/8 in
To mount the antenna, you will need four
screws (sold separately) with a 1/4” head
(e.g., an M3 screw), and that are suitable for the material onto which you are
affixing the antenna, (e.g., wood, metal, etc.). The screws should be spaced
1-3/8” apart horizontally and 1-1/8” vertically. Refer to the “Indoor/Outdoor
Antenna Template” on page 31.
Once you have found a suitable location for the antenna, route the antenna
cable to the Portable Speaker Dock. Be sure you avoid any obstructions
that could crimp, kink, or twist the cable. Use protective grommets
wherever rough openings are encountered. If the antenna is installed
outdoors, route the cable from the antenna location to the interior of the
home, working the cable through the basement, under a window sill, etc.,
and make adjustments to take up cable slack as necessary.
TIP! If your indoor/outdoor antenna’s cable isn’t long enough, visit
www.siriusxm.com and consider a 50 ft. Indoor/Outdoor Home Antenna
Extension Cable or a Home Distribution Kit.
If the signal is good for either Satellite or Terrestrial (or both), and you are
hearing the audio from the Radio, the antenna installation is complete.
(Refer to your Radio’s User Guide for instructions on how to access the Signal
19
Installation
Indicator or Antenna Aiming screen.)
If the signal reception is low, or intermittent, try another location for the
antenna. Verify that the antenna is pointed south, and that the antenna’s
view of the sky is not blocked by a tree, a building, a bridge, or anything else.
Adjust until you are receiving a good signal.
The Indoor/Outdoor Home Antenna’s reception can also be tweaked by
opening or closing the antenna clamshell, and turning the antenna. While
SOUTH
observing the signal strength, make small adjustments to the angle of tilt
of the clamshell until the highest possible signal strength is achieved. If you
have not wall-mounted the antenna, turn the antenna slightly to the right
or left and observe if the signal strength increases. For each tweak, allow a
few seconds in each position to determine if the signal strength increases.
20
Subscribing to the Sirius or XM Service
If you have not yet subscribed to the Sirius or XM satellite radio service,
you’ll need to before you can listen to SiriusXM programming on your
Radio. To subscribe, refer to the Quick Start Guide which accompanied your
Radio for instructions, or go to www.siriusxm.com/guides to access the
Quick Start and User Guides for your Radio.
21
Operation
Power on the Portable Speaker Dock by pressing the Power/Volume knob
on the front panel. The light on the front panel surrounding the knob should
light up blue to indicate power is on. If the Radio does not power on at
the same time, press the Power button on the Radio. You should now hear
the Sirius or XM audio. If you do not, increase the volume of the Portable
Speaker Dock by turning the Power/Volume knob clockwise (+).
Your Radio remembers whether it was on or off when power to the Radio is
turned off at the time the Portable Speaker Dock is turned off. Therefore, if
your Radio was on at the time you turned the Portable Speaker Dock off, when
you turn the Portable Speaker Dock back on, the Radio will turn on also. If
the Radio was off at the time you turned off the Portable Speaker Dock, you’ll
need to turn the Radio on also when you turn on the Portable Speaker Dock.
Batteries
When the Portable Speaker Dock is powered on the light on the front panel
surrounding the Power/Volume knob is normally blue. When the light turns
red, that indicates the battery power is low. Replace the batteries.
Battery Life
Battery life is dependent upon several factors, including:
• The model of your Radio.
• The strength of the satellite signal.
• The volume level at which the Portable Speaker Dock is set.
• The type of audio playing, i.e., talk or music, and music with heavy
bass which requires greater power to drive the woofer.
• Type and freshness of the batteries.
With fresh alkaline batteries and a good satellite signal, battery life is
22
Operation
estimated at approximately 8 hours at half volume. Expect the actual
battery life to vary.
Storing the Portable Speaker Dock
When the Portable Speaker dock is powered off, it is placed into sleep
mode, and continues to use a small amount of power. For this reason, if you
do not intend to use the Portable Speaker Dock for a period of time, do
one of the following:
• Keep the Portable Speaker Dock connected to an outlet using the AC
Power Adapter.
• Temporarily remove the batteries from the Portable Speaker Dock.
Using the Aux Input
If you want to listen to an external audio device such as an MP3 player or
other audio device through the Portable Speaker Dock, do the following:
1. Initially set the volume level on the audio device to mid-range.
2. Connect the output of the audio device to the Aux In connector
on the front panel of the Portable Speaker Dock. Press the Source
button to select the Aux input.
3. Adjust the volume on the audio device to obtain satisfactory audio
output from the Portable Speaker Dock. If the sound is distorted,
lower the volume level on the audio device and increase the volume
level on the Portable Speaker Dock.
Headphones
To listen using headphone, connect your headphones to the Headphone
connector on the front panel of the Portable Speaker Dock.
23
Operation
Muting the Audio
The audio of the Portable Speaker Dock can be muted by pressing the
Mute button on the Remote Control. When the audio is muted, the light
which surrounds the Power/Volume knob will blink to indicate the Portable
Speaker Dock is muted. To un-mute and listen to the audio again, do one of
the following:
• Press the Mute button on the Remote Control
• Press the Volume Up or Down buttons (+/–) on the Remote Control
• Turn the Power/Volume knob on the Portable Speaker Dock
24
Optional Accessories
The following optional accessories are available for purchase from your
SiriusXM retailer or at www.siriusxm.com to maximize your SiriusXM
experience.
SiriusXM Home Distribution Kit
Connect up to two Sirius or XM Radios to an outdoor antenna up to 150
feet away using standard off-the-shelf RG6 cables. These are the same type
of cables that are used in cable and satellite TV installations and can be
found in any local hardware store.
• Connects up to two Sirius or XM Radios using only one outdoor
antenna.
• Uses standard RG6 satellite/cable TV cable for routing the satellite
signal.
• Each Sirius or XM Radio can be placed up to 150’ away from the
outdoor antenna.
• Flexible mounting options - mount your outdoor antenna on an
exterior wall, mast, or pole.
• Compatible with all single-input Sirius and XM Radios and home
tuners.
Kit includes the SiriusXM outdoor antenna, antenna mounting hardware,
splitter, and adapter cables.
50’ Antenna Extension Cable
The 50’ Antenna Extension Cable extends the reach of your SiriusXM
antenna cable by an additional 50 feet. It includes a built-in signal amplifier
to ensure reliable reception of the satellite signal.
25
Troubleshooting
Symptom
Portable Speaker Dock
does not power on
Solution
The AC Power Adapter is not connected, or
the AC outlet into which it is plugged is not
working. Check that the AC Power Adapter
is connected to the Portable Speaker Dock.
Try plugging the AC Power adapter into a
different outlet.
Batteries are not installed, are installed
incorrectly, or are bad. Install new batteries,
if necessary, observing the correct polarity.
Portable Speaker Dock
does not operate on
batteries
When the AC Power Adapter is connected
to the Portable Speaker Dock, the battery
operation is disabled. Disconnect the AC
Power Adapter.
If the power light is red, this indicates that
the batteries need to be replaced. Install new
batteries, if necessary, observing the correct
polarity.
Radio displays: Antenna
Not Detected
The Indoor/Outdoor Home Antenna is not
properly connected to the Portable Speaker
Dock. Check the antenna connection to the
Portable Speaker Dock.
Radio is not completely seated into the
Portable Speaker Dock. Re-seat the Radio
into the Portable Speaker Dock.
26
Troubleshooting
Troubleshooting Continued
Symptom
Radio displays: Acquiring
Signal
Solution
No satellite signal is being received. Check
for obstacles over or around the antenna.
Ensure that the antenna is pointed in the
right direction toward the sky for your area
to be able to see the satellites. Change the
location of the antenna to eliminate nearby
obstacles (buildings, trees, overhangs etc.).
No sound from the
Portable Speaker Dock
speakers
The Power/Volume knob is in the extreme
counter clockwise (-) position. Turn it
clockwise toward the (+) position.
Headphones are connected to the Portable
Speaker Dock. Disconnect the headphones.
An audio device is connected to the Aux
In connection and is not producing sound.
Press the Source button to select audio
output from the Radio.
The Portable Speaker Dock is muted. Turn
the Power/Volume knob, or press the + or –
or mute buttons on the Remote Control.
27
Specifications
System
Power Requirements:
Operating Temperature:
Power:
Frequency Response: Total Harmonic Distortion (THD):
Signal-to-Noise Ratio (S/N):
Headphone Output Impedance:
Headphone Output Level:
Auxiliary Input Impedance:
Auxiliary Input Level:
12V DC, or 8 D-size alkaline batteries
32°F to 122°F (0°C to 50°C)
5W RMS per channel (max)
60 Hz – 20KHz
0.2% at 1 Watt
70dB Maximum
32 Ohms
12mW
3K Ohms (Nominal)
2.0 Volts RMS (Maximum)
Portable Speaker Dock
Dimensions: 19 in (W) x 7 in (H) x 8.5 in (D)
487 mm (W) x 179 mm (H) x 216 mm (D)
Headphone Connector Type:
Auxiliary Input Connector:
Weight (without batteries):
3.5mm Stereo Jack (1/8”)
3.5mm Stereo Jack (1/8”)
7.7 lbs. (3.5 Kg)
AC Power Adapter
Input:
Output:
100-240V AC, 50-60Hz, 1 A
12 Volt DC, 3A, center positive
Indoor/Outdoor Home Antenna
Type:
Connector:
Cable Length:
SiriusXM Indoor/Outdoor
SMB female, straight
21 ft (6.4 m)
Remote Control
Dimensions: Weight:
Battery:
1.6 in (W) x 4.7 in (H) x 0.63 in (D)
41 mm (W) x 120 mm (H) x 16 mm (D)
2.1 oz (60 g)
CR2032 (3V)
28
FCC Statement
The user is cautioned that changes or modifications not expressly approved by Sirius
XM Radio Inc. can void the user’s authority to operate this device.
This device complies with Part 15 of the FCC Rules. Operation is subject to the
following two conditions:
1. This device may not cause harmful interference.
2. This device must accept any interference received, including interference
that may cause undesired operation.
This equipment has been tested and found to comply with the limits for a Class B
digital device, pursuant to Part 15 of the FCC Rules. These limits are designed to
provide reasonable protection against harmful interference in a residential installation.
This equipment generates, uses, and can radiate radio frequency energy and, if not
installed and used in accordance with the installation instructions, may cause harmful
interference to radio communications. However, there is no guarantee that interference
will not occur in a particular installation. If this equipment does cause harmful
interference to radio or television reception, which can be determined by turning the
equipment off and on, the user is encouraged to try to correct the interference by one
or more of the following measures:
• Reorient or relocate the receiving antenna of the affected receiver.
• Increase the separation between the SiriusXM equipment and the affected
receiver.
• Connect the SiriusXM equipment into an outlet on a circuit different from that to
which the affected receiver is connected.
• Consult the dealer or an experienced radio/TV technician for help.
WARNING! The FCC and FAA have not certified Satellite Radio Receiver use in any
aircraft (neither portable nor permanent installation). Therefore, Sirius XM Radio Inc.
cannot support this type of application or installation.
29
Copyrights & Trademarks
©2014 Sirius XM Radio Inc. “Sirius”, “XM” and all related marks and logos are
trademarks of Sirius XM Radio Inc. “BBC” and “Radio One” are trademarks of the
British Broadcasting Corporation and are used under license. BBC logo © BBC
1996. Radio 1 logo © BBC 2001. Cosmopolitan™ is a registered trademark of Hearst
Communications, Inc. Elvis Radio logo © EPE Reg. U.S. Pat & TM off. IndyCar
(and Design) are registered trademarks of Brickyard Trademarks, Inc., used with
permission. IZOD is a registered trademark of Phillips-Van Heusen Corporation, used
with permission. Major League Baseball trademarks and copyrights are used with
permission of Major League Baseball Properties, Inc. Visit the official website at MLB.
com. Games subject to availability and change and may not include all spring training
games. All rights reserved. NASCAR™ is a registered trademark of the National
Association for Stock Car Auto Racing, Inc. The NBA identifications are the intellectual
property of NBA Properties, Inc. and the respective NBA member teams. © 2014 NBA
Properties, Inc. © 2014 NFL Properties LLC. All NFL-related trademarks are trademarks
of the National Football League. NHL and the NHL Shield are registered trademarks
of the National Hockey League. © NHL 2014. All NHL logos and marks and NHL team
logos and marks depicted herein are the property of the NHL and the respective
teams and may not be reproduced without the prior written consent of NHL
Enterprises, L.P. PGA TOUR and the Swinging Golfer Design are trademarks owned by
PGA TOUR, Inc. Visit www.siriusxm.com/channellineup for updates. All programming/
channel lineup/Sirius service/XM service subject to change or preemption. All other
marks and logos are the property of their respective owners. All rights reserved.
IMPORTANT NOTICE: REQUIRED SUBSCRIPTION
Hardware and subscription sold separately, and activation fee required. Other fees
and taxes apply. Service will automatically renew into the subscription package you
choose (which may differ from the package which arrived with the Radio), and will
automatically bill at the rates in effect at the time of renewal, until you call us at
1-866-635-2349 to cancel. See our Customer Agreement for complete terms at
www.siriusxm.com. All fees and programming are subject to change. Our satellite
service is available only to those at least 18 and older in the 48 contiguous USA and
DC. Our Sirius satellite service is also available in PR (with coverage limitations). Our
Internet radio service is available throughout our satellite service area and in AK and
HI. Certain channels are not available on our Internet radio service, including MLB®
play-by-play.
30
Indoor/Outdoor Antenna Template
1-3/8”
1-1/8”
31
Sirius XM Radio Inc.
1221 Avenue of the Americas
New York, NY 10020
1.866.635.2349
© 2014 Sirius XM Radio Inc.
SXSD2 140708a
siriusxm.com