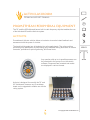
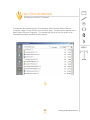
1
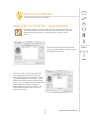
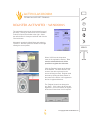
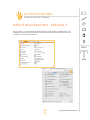
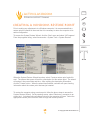
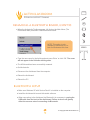
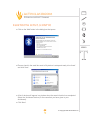
Activclassroom
TECHNICAL SUPPORT SERIES
©
Copyright 2007 Promethean, Inc.® All rights reserved.
The purchase of this book entitles the individual teacher, or technical personnel to reproduce
copies of the information for use in a single classroom only.
The reproduction by any means of any part of this book for an entire school or school
system or for commercial use is strictly prohibited.
No form of this publication may be reproduced, transmitted, transcribed, stored in a
retrieval system, or translated into any language, in any form, by any means without
the written permission of Promethean, Inc.
Activstudio2 ® and the Promethean design mark are registered trademarks.
Other brands and trademarks are the property of their respective owners.
Activclassroom
TECHNICAL SUPPORT TRAINING
The Technical Support Training Course is designed to provide participants with
knowledge of the hardware components of the Activclassroom. Upon completion
of this course, participants will have the knowledge necessary to provide enduser support for the Promethean Activclassroom. The components covered in
this course include the Activboard, Activslate, Activotes, and Activtablet. The
course will also cover installation of the Activstsudio software package and
present basic features of this software.
SERIES
© Copyright 2007 Promethean Inc.
Activclassroom
TECHNICAL SUPPORT SERIES
TRAINING
Table of Contents
Recognizing Promethean Products
1
78” Activboard
2
64” Activboard 3
95” Activboard
4
Legacy Activboards
Promethean Peripheral Equipment
5
Activotes
8
Activslate
13 Device Registration, Version 3
14 Activtablet 15 Computer Specifications
17 Troubleshooting
20 Creating A Windows Restore Point
21 Removing Application Data
22 Working With Windows Registry
23 Backing Up Registry Keys
24 Removing Registry Keys 26 Support Utilities for Windows
29 Support Utilities for Macintosh 30 Where Files Install 31 Firmware
32 Version 3 Dashboard
33 Windows Firmware Upgrade
38 Macintosh Firmware Upgrade
31 Verifying Software and Driver Version
46 Driver Update
47 Activboard Electronics
SERIES
© Copyright 2006
2007 Promethean Inc.
Activclassroom
TECHNICAL SUPPORT TRAINING
Table of contents (cont’d)
47
50
55
59
75
81
82
83
Activboard Electronics
Replacing Electronics
Box Contents
Bluetooth
59 Renaming a Bluetooth Activboard
60 Bluetooth Setup - Windows
66 Disconnecting From The Activboard - Windows
67 Bluetooth Troubleshooting - Windows
70 Bluetooth Setup - Macintosh
74 Bluetooth Troubleshooting - Macintosh
Installing Activstudio - Windows
Who To Call For support
Setting Up Activboad Driver on XP
Glossary
© Copyright 2007 Promethean Inc.
SERIES
Activclassroom
TECHNICAL SUPPORT TRAINING
recognizing promethean products
The 78” Activboard
The 78” board was released in July 2004; branding has changed several times since
then. The original 78” boards had an orange globe emblem in the upper left corner and
were not equipped with Bluetooth.
The following are features of the 78” Activboard.
■
■
■
■
The board is labeled “proACTIV” in the upper right corner.
A nickel-sized emblem displaying the Promethean flame will be in the upper left
corner. This emblem is illuminated when the board is powered on.
Newer models of the Activboard include the Bluetooth logo in the upper right corner.
Newer boards are labeled “Promethean” and “Activboard” on the top frame. The Bluetooth logo is also on the upper frame.
78” Activboard Specifications
Overall dimensions:
Active Area Dimensions:
Active Area Diagonal:
Digitizing Technology:
Connection to Computer:
Connection to Peripherals:
67” x 49”
64” x 46”
78”
Passive Electromagnetic
Serial RS232 at 38.4kbs, USB 1.1/2, or Bluetooth
Built-in RF at 915mHz, range is up to 50 feet
© Copyright 2007 Promethean Inc.
SERIES
Activclassroom
TECHNICAL SUPPORT TRAINING
64” Activboard
The 64” Activboard was released in September 2005
The following are features of the 64” Activboard.
■
■
The board is labeled “proACTIV” in the upper right corner.
A nickel-sized emblem displaying the Promethean flame will be in the upper left corner. This emblem is illuminated when the board is powered on.
SERIES
64” activboard specifications
Overall dimensions:
Active Area Dimensions:
Active Area Diagonal:
Power Requirements:
Digitizing Technology:
Connection to Computer:
Connection to Peripherals:
53” x 42”
50” x 40”
64”
6 volt, 0.5 amp
Passive Electromagnetic
Serial RS232 at 38.4kbs, USB 1.1/2, or Bluetooth
Built-in RF at 915mHz, range is up to 50 feet
© Copyright 2007 Promethean Inc.
Activclassroom
TECHNICAL SUPPORT TRAINING
95” Activboard
The following are features of the 95” Activboard.
■
■
A nickel-sized emblem displaying the Promethean flame will be in the upper left corner. This emblem is illuminated when the board is powered on.
The board is labeled ‘Promethean’ and ‘Activboard’ on the upper frame.
SERIES
95” activboard specifications
Overall dimensions:
Active Area Dimensions:
Active Area Diagonal:
Power Requirements:
Digitizing Technology:
Connection to Computer:
Connection to Peripherals:
88” x 49”
65” x 46”
95”
6 volt, 0.5 amp
Passive Electromagnetic
Serial RS232 at 38.4kbs, USB 1.1/2, or Bluetooth
Requires Activhub to connect to Activote/Activslate
© Copyright 2007 Promethean Inc.
Activclassroom
TECHNICAL SUPPORT TRAINING
Legacy Activboards
75” Activboard
The 75” board was built and sold in the United States between November, 1999 and
September, 2005. It uses IR technology and requires a transceiver to communicate with
Activotes and the Activslate.
The following are features of the 75” Activboard.
■
■
■
The board has a large black oval in upper left corner. When the board is powered on, this oval is lighted.
There are ‘L’ brackets in all four corners which frame the active area of the board.
The board is labeled ‘ACTIVboard’ in the upper left corner below the black oval.
48” Activboard
Manufactured between March, 2003 and March, 2006, approximately 2,000 of the
boards were sold world-wide.
The following are features of the 48” Activboard.
■
The board is labeled ‘ACTIVboard’ in the upper left corner.
■
Four ‘L’ brackets in each corner mark the active area of the board.
© Copyright 2007 Promethean Inc.
SERIES
Activclassroom
TECHNICAL SUPPORT TRAINING
Promethean Peripheral Equipment
The 78” and the 95”Activboard have a built in radio frequency chip that enables the use
of the ActivslateXR and the Activote system.
Activote
Promethean’s Activote solution allows an instructor to receive instant feedback and
assessment with the press of a button.
The hand-held keypads turn all students into active participants. The voting solution
promotes group participation by stimulating group feedback during discussion or debate
scenarios, spontaneous opinion gathering, and formal tests.
Any question with up to six possible answers can
be presented to the group via our Activstudio
software. Responses are recorded and results
are displayed in various formats.
Activote is designed for use with the 78” and
95” Activboards, however any Promethean
board can be upgraded to enable use with the
voting system.
© Copyright 2007 Promethean Inc.
SERIES
Activclassroom
TECHNICAL SUPPORT TRAINING
Register Activotes - macintosh
To register Activotes, do one of the following: ckick the Activote icon
in the Main toolbox and select ‘Devices’, or click ‘Activote’>‘Devices’
either from the Main Menu or in the Menu Bar at the top of the
screen.
When the Activote registration window
opens, click the ‘Register’ button to begin
the registration process.
The center button of the Activote device
in the registration window will begin to
flash indicating that the computer is ready
to receive registration information. Press
and hold the center button on the Activote
device until it is added to the list of devices
in the registration window. When all
devices are registered, click ‘Done’. It is
not necessary to register all 32 votes if
fewer are needed.
© Copyright 2007 Promethean Inc.
SERIES
Activclassroom
TECHNICAL SUPPORT TRAINING
register activotes - windows
The registration process can be accessed in one of
two ways. Clicking on the Activote icon in the Main
Toolbox will open the window to the right. Select
the radio button for ‘Anonymous Mode’ and click the
‘Devices’ button.
Alternately, opening the Main Menu and selecting
‘Activote’ > ‘Devices’ opens the window to the right
offering the same options.
SERIES
Select ‘USA’ from the drop-down
menu in the registration window. This
must be selected before it will be
possible to register the Activotes.
Click the ‘Register’ button at the bottom
of the window. The flame button in the
center of the device pictured on the
screen will begin to flash. Register each
Activote by holding the flame button in
the center of the device until it appears in
the list of registered devices.
The ‘Register’ button has changed to
say ‘Done’. Click it when all devices are
registered. It is not necessary to register
all devices if fewer than 32 are required.
© Copyright 2007 Promethean Inc.
Activclassroom
TECHNICAL SUPPORT TRAINING
activslate XR
The Activslate enables wireless control of the Activboard from anywhere in the
classroom. It allows the teacher to move freely around the room and continue to interact
with the Activboard. Alternately, students can interact with the board from their seats
using the Activslate.
SERIES
PLEASE NOTE: The Activslate will not work when
connected to the computer via the serial cable which
ships with it. This cable is supplied only for charging the
slate or for upgrading the slate firmware.
© Copyright 2007 Promethean Inc.
Activclassroom
TECHNICAL SUPPORT TRAINING
register activslate - macintosh
To register the Activslate, do one of the following: ckick the Activslate icon in the Main
toolbox and select ‘Register Activslate’, or click ‘Activslate’>‘Register Activslate’ either
from the Main Menu or in the Menu Bar at the top of the screen.
SERIES
When this window opens, click the
‘Register’ button. With the Activslate
turned on, use the Activpen to press
and hold the flame button on the
Activslate until a three-letter code
appears.
Using the Activpen, press the
corresponding letter buttons on the
Activslate. The red background will turn
green when the registration process is
successful. Registration information for
the Activslate will appear in the Activslate
window.
© Copyright 2007 Promethean Inc.
Activclassroom
TECHNICAL SUPPORT TRAINING
register activslate - macintosh (cont’d)
Before the Activslate can be used to control the Activboard, it must be activated. To activate the
Activslate, select ‘Activslate’ from the Main Menu. Then select ‘Activslate’ from the menu that opens.
In the window that opens, click on the Activslate icon. When the center of the slate is green, the
Activslate is activated. NOTE: It is possible
to register more than one Activslate
the same computer. However, only one slate
can be active at a time.
to
SERIES
© Copyright 2007 Promethean Inc.
Activclassroom
TECHNICAL SUPPORT TRAINING
register activslate - windows
To begin the registration process on a Windows computer click the Activslate icon in the
MainToolbox. From the Activslate window that opens, click ‘Register’.
NOTE: It may be necessary to add the Activslate icon to
the Main Toolbox. To do this, go to Main Menu>Customize
Toolbox>Toolstore. Drag the Activslate icon to the Main
Toolbox.
Click ‘Register’ to begin the
registraation process.
From the drop-down menu,
select ‘USA’. It will then
be possible to select the
‘Register’ button at the
bottom of the window. USA
must be selected before it
is possible to register the
Activslate.
With the Activslate turned on, use the Activpen to press and hold the flame button on the
Activslate until a three-letter code appears. Using the Activpen, enter this three-letter code
with the letter buttons across the top of the Activslate.
© Copyright 2007 Promethean Inc.
SERIES
Activclassroom
TECHNICAL SUPPORT TRAINING
register activslate - windows (cont’d)
The Activslate is successfully
registered when the three-letter
code appears in the right side of
the registration window. Click
‘Exit’ and save the registration
when prompted.
SERIES
The Activslate window will re-open showing the
registered Activslate. Click on the slate icon in
this window to activate the slate. NOTE: It is
possible to have more than one slate registered
to the computer at a time. However, only one
slate can be active at a time.
© Copyright 2007 Promethean Inc.
Activclassroom
TECHNICAL SUPPORT TRAINING
device registration - version 3
Using Version 3 of Activstudio and Activprimary for Windows and Macintosh, the
registratiion process for both Adctivotes and Activslate can be accessed from the
‘Configure’ tab of the Dashboard.
SERIES
© Copyright 2007 Promethean Inc.
Activclassroom
TECHNICAL SUPPORT TRAINING
Activtablet
Using the Activtablet, teachers can prepare lessons in Activstudio away from the
Activboard, freeing the interactive whiteboard for delivery of lessons.
The Activtablet connects to the computer via a USB cable. It is also provided with a pen,
which works the same as the Activpen which is supplied with the Activboard.
Although they work in a similar manner, the Activpen will NOT work on the Activtablet.
SERIES
© Copyright 2007 Promethean Inc.
Activclassroom
TECHNICAL SUPPORT TRAINING
computer specifications
macintosh
activstudio 2.5
Minimum
OS 10.3.9
QuickTime version 7.1
Flash Player Plugin version 8
128 MB RAM
8 MB VRAM or higher
Processor PPC G3 350MHz +
800x600 or higher resolution
Installation: 900 MB disc space
Operation: 300 MB disc space
Recommended
OS 10.4.7 or higher
QuickTime version 7.1
Flash Player Plugin version 8
512 MB RAM
32 MB VRAM or higher
Processor PPC G4 700 MHz +
1024x768 or higher resolution
Installation: 900 MB disc space
Operation: 300 MB disc space
Built-in Bluetooth
Built-in Wi-Fi
Activprimary 2.1
Minimum
OC 10.2.8
128 MB RAM
8 MB VRAM
G3 350 MHz Processor
800x600 resolution
Installation: 700 MB disc space
Recommended
OS 10.4
256 MB RAM
32 MB VRAM
G4 466 MHz Processor
1024x760 resolution
Installation: 700 MB disc space
Spotlight search requires 10.4 or higher
© Copyright 2007 Promethean Inc.
SERIES
Activclassroom
TECHNICAL SUPPORT TRAINING
windows
activstudio, Activprimary 2.5
Minimum
Intel P3 or higher with 1 GHz or higher
256 MB RAM
32 MB graphics card
Direct X 9 (on installation CD)
CD Rom drive
Microphone
Sound card
Windows 98, 2000/XP, NT or ME
SERIES
activstudio windows 3.0
Minimum
Windows 2000, XP Pro or H. E.
Intel P2 233MHz (or equivalent)
64MB RAM
SVGA High Color Graphics
CD Rom drive
Available USB port
Sound card
Recommended
Windows 2000, XP Pro or H. E
Intel P3 1GHz or higher
256 MB RAM
32MB Graphics Card (800x600 at 16 bit)
CD Rom drive
Available USB port
activprimary windows 3.0
Minimum
Windows 98, 2000/XP, NT or ME
Intel P3 or higher with 1 GHZ or higher
256 MB RAM
32 graphics card
Direct X 9 (on installation CD)
Additional Recommendations
CD Rom drive
Microphone
Sound Card
© Copyright 2007 Promethean Inc.
Activclassroom
TECHNICAL SUPPORT TRAINING
Troubleshooting
board power light
White – board is powered and ready to use
Red – Board electronics are bad
Blue – board power supply (brick portion) is bad (The power light will be solid blue if you are connecting to the board via Bluetooth.)
SERIES
board isn’t working with computer
This section assumes that the Activboard has been checked to ensure that it is powered
on.
A watermark shows at the top of the Flipchart page.
■
■
■
Check the board connection to computer. The projector can be showing an image
on the board without the computer recognizing the board.
Restart Promethean software if the board was connedted while Activstudio or
Activprimary was running.
Restart computer.
Is the red “X” over the icon in the system tray?
■
■
Install Human Interface Device driver so computer recognizes the board (see
Appendix xxx).
Update the driver to 4.1.8 (or higher) which is the signed driver.
© Copyright 2007 Promethean Inc.
Activclassroom
TECHNICAL SUPPORT TRAINING
pen is not working with the board
■
Recycle the power to the board. Keep the board powered off for at least five seconds before powering it on again. This will clear the board’s memory of any pens previously used.
■
Restart Activstudio.
■
Restart the computer.
■
Use another pen with the board.
■
If possible, test the non-working pen with a board that hasn’t experienced problems working with the pen.
the software is not keeping up with the pen
If the computer does not meet the minimum specs for the software, you may see
jittering.
Jitter is sometimes an issue with Windows NT with Pentium 4 processor. The operating
system cannot keep up with the pc. If possible, use another computer with the
Activboard, preferably a computer that is functioning properly with another Activboard.
“spiking” and dead Spots
“Spiking” is a term used to describe a number of erratic pen behaviors. Usually, the pen
will not allow the user to write on the board. Instead, lines randomly appear when trying
to write.
Dead spots occur when a line drawn across the has breaks or gaps in it.
■
Update the software and the driver to the latest version available for the platform.
Update downloads can be found at:
http://www.prometheanworld.com/us/server/show/nav.1016
© Copyright 2007 Promethean Inc.
SERIES
Activclassroom
TECHNICAL SUPPORT TRAINING
“spiking” and Dead Spots (cont’d)
■
■
■
Recycle the power to the board. Keep the board powered off for at least five
seconds before powering it on again. This will clear the board’s memory of any
pens previously used.
Check the specifications of the computer against the minimum requirements for
Promethean software. (See the Minimum Computr Requirements section of this
manual.)
Check the configuration of the computer. Windows systems should run
Promethean software in 16-bit color. Macintosh systems can run in either 16 or
32-bit color.
It is possible that the software has become corrupt. Go to:
■
■
Windows: Main Menu>Studio Settings. Select the ‘General’ tab and click the
‘Reset All Settings’ button. Select the ‘Toolboxes’ tab and click the ‘Reset All
Toolboxes’ tab.
Macintosh: Main Menu>Preferences. Select the ‘General’ tab and click the ‘Reset
All Settings’ button. Select the “Toolboxes” tab and click the ‘Reset All Toolboxes’
tab.
All settings will be re-set to their default.
On Windows, these settings can be reset manually by deleting these files:
My Documents\ACTIVstudio 2\settings.ini
My Documents\ACTIVstudio 2\xxxxAS2PE.a21
or
My Documents\ACTIVprimary 2\settings.ini
My Documents\ACTIVprimary 2\xxxxAP2.ap21
xxxx = the country code. In the US, the code is “1033”
■
■
Check the version of firmware on the Activboard and upgrade if necessary. (See
the Firmware section of this manual).
Replace the electronics on the board. (see the Replacing Electronics section of
this manual.)
© Copyright 2007 Promethean Inc.
SERIES
Activclassroom
TECHNICAL SUPPORT TRAINING
creating a windows restore point
Prior to making any adjustments to a Windows computer, it is recommended that a
restore point be created in the event that it is necessary to return the computer to its
earlier configuration.
To access the System Restore Wizard, click the ‘Start’ menu and select ‘All Programs’.
From the programs listing, select Accessories > System Tools > System Restore.
SERIES
When the System Restore Wizard launches, select ‘Create a restore point’ and click
next. The screen that opens will ask for a description for this restore point. The wizard
will assign it the current date and time. After entering the description information,
click the ‘Create’ button. When the wizard has finished, a window will open showing
information about the restore point that was just created.
To restore the computer using a restore point, follow the above steps to access the
System Restore Wizard. On the opening screen, select ‘Restore my computer to an
earlier time’. A window listing all restore points for the computer will open. Select the
appropriate restore point and click ‘Next’ to begin the restore process.
© Copyright 2007 Promethean Inc.
Activclassroom
TECHNICAL SUPPORT TRAINING
Removing Activsoftware
Application Data
The ACTIV Software folder within the Application Data folder contains a sub-folder for
each Promethean program installed on the computer.
If Activotes and/or an Activslate are registered to the computer, there will also be a
Device Registration folder within the ACTIV Software folder. This folder contains
identification information for registered devices.
SERIES
Locate the folder containing the
data to be deleted and right-click
on it. From the menu that opens,
select “Delete”. A sub-window will
open asking for confirmation before
performing the deletion.
If the ACTIV Software folder is
selected, all sub-folders will be
deleted. To delete only Activprimary
data, for example, select the
ACTIVprimary2 folder; to delete vote
or slate registration data, select the
Device Registration folder.
© Copyright 2007 Promethean Inc.
Activclassroom
TECHNICAL SUPPORT TRAINING
Working With Windows Registry
If Promethean software will not uninstall or if it returns an error message when
attempting to reinstall after an uninstall, the issue may be that Registry Keys remain on
the computer from a previous install.
Warning: Not carefully following these steps could cause programs
on the computer not to function properly or could damage the operating system. This process involves editing Registry Keys, which
are essential to proper functioning of the computer. This should not
be done by anyone who is not completely comfortable with editing
Registry Keys without first seeking assistance or guidance.
before beginning:
Accessing the Registry Keys requires Administrative rights for the following:
MyComputer\HKEY_LOCAL_MACHINE\SOFTWARE\ACTIV Software
create a restore point for the computer
Go to: Start•All ProgramsAccessories>System Tools>System Restore
Follow the wizard to create the restore point. Once a Restore Point and a backup of the
ACTIV Software Key have been created, you are ready to begin. Again, do not use this
process unless you are completely comfortable with editing the Registry.
© Copyright 2007 Promethean Inc.
SERIES
Activclassroom
TECHNICAL SUPPORT TRAINING
accessing and backing up registry keys
Go to: Start > Run
The following window will open. Enter ‘regedit’ as shown and click ‘OK’.
Note: Use this process to
access all Registry Keys, not just
the Keys installed with Promethean
software.
SERIES
This will cause the following window to open.
Expand the HKEY_LOCAL_MACHINE folder and locate the ‘Software’ folder. Expand
this folder. Locate the ‘ACTIV Software’ folder and expand it to show folders containing
Registry Keys for individual Promethean software programs.
Right-click on the ACTIV Software folder and choose ‘Export’ from the menu that opens.
This will create a backup of the Registry Keys in all of the sub-folders. Give the back up
file a name that will make it easy to locate if the Registry Keys need to be restored.
© Copyright 2007 Promethean Inc.
Activclassroom
TECHNICAL SUPPORT TRAINING
deleting registry keys
With a back up file created, it is safe to delete the Registry Keys.
Return to the Registry Editor window. Click on the folder containing the Keys to be
deleted. Remember: Deleting the Keys from the ACTIV Software folder, will delete
Keys from all subfolders as well.
Example: To delete only Activstudio Registry Keys and leave
the Activprimary and Activdriver Keys untouched, right-click on
the Activstudio folder and select Delete from the menu.
To delete all ACTIV Software Keys and
all Keys from all subfolders, right click on
ACTIV Software and select ‘Delete’ from
the menu.
The following window will open asking for confirmation of the delete command.
© Copyright 2007 Promethean Inc.
SERIES
Activclassroom
TECHNICAL SUPPORT TRAINING
The deleted Registry Keys can be restored, if necessary, from the back up file created
earlier in the process. Deleting the Key above will delete all Keys for all Promethean
software. This means that Keys for Activprimary, Activstudio, and Activdriver will all
be deleted. To avoid deleting all Keys, expand the ACTIV Software Key for access
to specific Keys. In any case, it is a good idea to make a backup of the entire
ACTIVsoftware Key before deleting any of the subKeys.
SERIES
© Copyright 2007 Promethean Inc.
Activclassroom
TECHNICAL SUPPORT TRAINING
support utilities for windows
The Windows Activstudio and Activprimary installation disks contain a folder called
“Support”. This folder contains utilities for diagnosing and repairing errors within the
operating system of the computer that are affecting the functioning of Promethean
software. AV Doctor is a Promethean application that reports the status of the computer
system. Registry Cleaner Utility and MSI Cleaner Utility are Microsoft utilities which work
with the Registry.
av doctor
SERIES
AV Doctor produces a report that outlines the state of the software and
hardware at the time the utility was run. Components that are in an error
state will be indicated on this report. Occassionally, when working with
Promethean Tech Support, a technicial will ask that a copy of this report
be emailed to help in diagnosing a software or hardware problem.
registry cleaner utility
RegClean analyzes windows Registry Keys stored in a common
location in the windows Registry. Keys that contain erroneous values
are removed after RegClean records them in a file called Undo.Reg.
Registry Cleaner is a Microsoft utility and checks all Keys in the Registry.
RegClean begins when the icon is clicked. Depending on the size of the Registry, the
process could take a few minutes or as long as 30 minutes. When RegClean finishes
checking the Registry, it will pause until the “Fix Errors” button is clicked. Clicking
the “Fix Errors” button also creates an Undo.Reg file. This file is titled “UNDO [your
machine name] yyyymmdd hhmmss.REG”. Use this file to restore what RegClean
removed from the registry if necessary.
RegClean does not fix every known problem with the Registry. It does not fix a
“corrupt” registry; it only fixes problems with some of the entries in a normal registry.
It is possible that RegClean will not correct a problem. It will leave any entries that it
does not understand or could possibly be correct.
The Undo.Reg file should be kept for several days.
© Copyright 2007 Promethean Inc.
Activclassroom
TECHNICAL SUPPORT TRAINING
installation clean up utility
The Installation Clean Up Utility is designed to allow the safe removal of
Windows Installer settings from the Registry. It is possible that problems
encountered while trying to install or update Promethean software are a
result of these Registry Keys being damaged.
The Installer can be damaged if the computer’s Registry becomes corrupt, if a
Registry setting used by Windows Installer is accidentally changed, if the installation
of a program has been interrupted, or if there are multiple setup operations happening
at the same time.
SERIES
There are two versions of
Installer Clean Up Utility in
the Support folder on the
Promethean installation
disk.
msi cleaner 9x: Use with Windows 95 and Windows 98
msi cleaner NT: Use with Windows NT, Windows XP, or Windows 2000
Attempting to install the incorrect version for the operating system of the computer will
result in an error message.
This process has installed the Windows Installer clean Up Utility on the hard drive of
the computer. To run it, go to C:\Program Files\Windows Installer Clean Up.
The Windows Installer Clean Up Utility can be run from the shortcut in the “Start”
menu. Running Windows Installer Clean Up Utility will generate a message
warning that permanent changes will be made and it may be necessary to reinstall
applications. There will also be an opportunity to exit the utility leaveing the registry
untouched.
© Copyright 2007 Promethean Inc.
Activclassroom
TECHNICAL SUPPORT TRAINING
A dialog box will list all programs installed on the computer that were installed using
Windows Installer. It is possible to select all programs in the list or to select individual
programs. To remove the Keys for Promethean software, select Activstudio and/or
Activprimary from the list. After making the selection, click the “Remove” button.
Windows Installer Clean Up Utility issues a second warning message warning that
the programs whose keys are about to be removed must be re-installed before
using them. Clicking “OK” from this window will cause the keys associated with the
selected programs to be removed from the Registry. Any entries for the Add/Remove
Programs control panel will also be removed. Programs installed on the computer will
not be able to add or remove components or repair themselves once these settings
have been removed.
Microsoft’s document for its Installer Clean Up Utility strongly recommends that any
program whose settings have been removed be reinstalled before attempting to use
the program.
© Copyright 2007 Promethean Inc.
SERIES
Activclassroom
TECHNICAL SUPPORT TRAINING
support utilities for macintosh
The installation disk for Activstudio contains the AV Doctor utility.
AV doctor evaluates the computer hardware and installed software
and returns an extensive status report. This report can be used to
determine if any components are in an error state. When AV Doctor
is launched, a dialogue box will open warning that the process of
checking the hardware and software components of the system may
take a long time. A Promethean Tech Support technicial may request a copy of this
report to aid in diagnosing an issue.
SERIES
© Copyright 2007 Promethean Inc.
Activclassroom
TECHNICAL SUPPORT TRAINING
where files install
macintosh
Help files: Macintosh HD>Library>Application Support>Promethean
Preference Pane: Macintosh HD>System>Library>Preference Panes
User Preferences: Macintosh HD>Users>[user name]>Library>Preferences
Device Registration Information: Macintosh HD>UsersàShared>Promethean>Device Registration
Calibration: Macintosh HD>Users>Shared>Library>Preferences
SERIES
windows
Registry Keys: My Computer\HKEY_LOCAL_MACHINE\Software\ACTIV Software\[application]
Device Registration Information: My Computer\’C’ drive\Documents and Settings\All Users\Application Data\ACTIV Software\
Calibration:
Driver: My Computer\’C’ drive\Program Files\ACTIV Software\ACTIV Driver
Application: My Computer\’C’ drive\Program Files
Shared Recource Library: My Computer\’C’ drive\Documents and Settings\All Users\Shared Documents\ACTIV Software\[Application]
Personal Resource Library: My Computer\’C’ drive\Documents and Settings\[user name]\My Documents\ACTIV Software\[Application]
© Copyright 2007 Promethean Inc.
Activclassroom
TECHNICAL SUPPORT TRAINING
Firmware
The software encoded on the electronics is referred to as Firmware. On occasion
the firmware may need to be updated to keep up with changes in current Operating
Systems. Firmware upgrades are usually done only after other troubleshooting steps
have not succeeded and normally with the guidance of a Promethean Certified
Technician. The version of firmware that originally shipped on the electronics can usually
be determined by a label adhered to the electronics.
Once the firmware is updated the current firmware version can be determined through
the computer connected to the Activboard:
SERIES
To the left is a screenshot of the
ACTIVcontrol application which is easily
accessed through right clicking the AV icon
located in the Microsft Windows system tray
and selecting ‘Configure’. For board driver
versions 4.1 and above, this ifnormation can
be found by clicking ‘Settings’.
To the right is a screenshot of the
Activboard Preference Pane in
Macintosh OS 10. The firmware is
listed under the “Version” column.
Note also that the Activboard
Preference Pane version at the
bottom left is actually the driver
version installed on your Mac.
© Copyright 2007 Promethean Inc.
Activclassroom
TECHNICAL SUPPORT TRAINING
version 3 dashboard
From the Configure tab on the
Dashboard it is possible to
calibrate the Activboard, register
Activotes, register the Activslate,
and access the Toolstore and
program settings.
SERIES
To access all of the information that
is available on the Support tab, the
computer must be connected to
an Activboard and/or the internet.
This screen will list the version
of the firmware on the board, the
version of the board driver, and the
version of Activstudio software that
is installed. It is possible to check
for driver and slftware updates by
clicking the ‘Check for Updates’
button.
The AV Doctor utility can be run
from this window as well.
© Copyright 2007 Promethean Inc.
Activclassroom
TECHNICAL SUPPORT TRAINING
Upgrading Firmware
The software encoded on the electronics is referred to as Firmware. On occasion the
firmware may need to be updated in order to keep up with changes in current Operating
Systems. Such procedures are usually done only after other troubleshooting steps have
not succeeded and normally with the guidance of a Promethean Certified Technician.
windows
■
■
■
■
Ensure that the PC is connected to the Activboard and that the PC recognizes the
Activboard.
Insert the firmware CD into the optical drive. The firmware CD is only available
through direct contact with Promethean. It is not available for download.
The following window will open listing available options.
Select the type of board to be upgraded. If you are not certain please contact
Promethean Technical Support for assistance.
© Copyright 2007 Promethean Inc.
SERIES
Activclassroom
TECHNICAL SUPPORT TRAINING
■
A second window will open to specify the method used to connect the Activboard
to the computer.
SERIES
usb Connection
Selecting the ‘Launch USB Firmware Upgrade’ option opens a dialogue box showing the
version of firmware currently installed on the Activboard as well as the version available
on the upgrade CD.
© Copyright 2007 Promethean Inc.
Activclassroom
TECHNICAL SUPPORT TRAINING
Click the ‘Upgrade’ option. A progress bar will begin in the bottom left corner of this
dialogue box.
Warning: It is very important that this process is not interrupted once it
has begun. Failure to complete the upgrade once started could result
in irrevocable damage to the Activboard electronics. Do not move
the laptop to ensure that the connection to the Activboard is not lost.
Do not touch and keys on the keyboard until the upgrade process is
finished.
SERIES
When completed, a dialogue box will open stating that the process has been successful.
The Activboard should be restarted before continuing use.
© Copyright 2007 Promethean Inc.
Activclassroom
TECHNICAL SUPPORT TRAINING
serial connection
If the ‘Launch Serial Firmware Upgrade’ option is selected, the following dialogue box
will open. Select ‘Yes’.
SERIES
■
After Selecting “Yes” the firmware upgrade will begin.
Warning: It is very important that this process is not interrupted once it
has begun. Failure to complete the upgrade once started could result
in irrevocable damage to the Activboard electronics. Do not move
the laptop to ensure that the connection to the Activboard is not lost.
Do not touch and keys on the keyboard until the upgrade process is
finished.
© Copyright 2007 Promethean Inc.
Activclassroom
TECHNICAL SUPPORT TRAINING
serial connection (cont’d)
■
Several windows containing progress bars will open. When the progress bars
end, a window will open stating that the upgrade is complete. Click ‘Yes’ in this
window to exit.
SERIES
■
Reboot your Activboard before continuing use.
© Copyright 2007 Promethean Inc.
Activclassroom
TECHNICAL SUPPORT TRAINING
upgrading firmware, macintosh
Please note that the firmware upgrade utility for the Macintosh
will only allow for USB connection. The upgrade will not work
with a Serial connection. This includes Serial to USB adapter
connections, which are still recognized by the computer as a Serial
connection.
■
■
■
Ensure that the Macintosh computer is connected to the Activboard and that it
recognizes the Activboard.
Insert the firmware CD into the computer’s optical drive. (The firmware CD
is only available through direct contact with Promethean. Currently, it is not
available for download.)
Locate the ‘Flash Upgrader’ Utility on the CD. Double-click the application to
launch.
When the application launches it will scan for the properties of the Activboard being
upgraded and will select the proper upgrade file for the board.
© Copyright 2007 Promethean Inc.
SERIES
Activclassroom
TECHNICAL SUPPORT TRAINING
firmware upgrade, macintosh (cont’d)
The dialogue box that opens will show both the version of firmware installed on the
board and the version available on the CD
.
SERIES
If the disk version is higher than the installed version, click ‘Upgrade’.
A second dialogue box will open containing a message that a long process has
been requested. The entire message should be read before proceeding.
© Copyright 2007 Promethean Inc.
Activclassroom
TECHNICAL SUPPORT TRAINING
firmware upgrade, macintosh (cont’d)
Warning: It is very important that this process is not interrupted once it
has begun. Failure to complete the upgrade once started could result
in irrevocable damage to the Activboard electronics. Do not move
the laptop to ensure that the connection to the Activboard is not lost.
Do not touch and keys on the keyboard until the upgrade process is
finished.
SERIES
When the upgrade process is complete, a dialogue box will open. Click ‘Quit’.
The Activboard should be restarted before continuing.
© Copyright 2007 Promethean Inc.
Activclassroom
TECHNICAL SUPPORT TRAINING
verifying software and driver
versions
Windows 2.5
The installed version of Promethean software can be determined through the ‘Help’
section of the Activstudio or Activprimary Main Menu or by usiong the ‘Add or Remove
Programs’ control panel.
SERIES
© Copyright 2007 Promethean Inc.
Activclassroom
TECHNICAL SUPPORT TRAINING
To determing the installed version of Promethean software using ‘Add or Remove
Programs’, select ‘Control Panels’ from the ‘Start’ menu. From the control panels menu,
select ‘Add or Remove Programs’. The window that opens will list the version of all
Promethean software installed on the computer.
SERIES
© Copyright 2007 Promethean Inc.
Activclassroom
TECHNICAL SUPPORT TRAINING
macintosh version activstudio 2.5,
activprimary 2.1
To determine the installed version of Activstudio using the Activstudio Main Menu, click
‘Help’ and select ‘About Activstudio’. The following window will open containing the
software version number.
SERIES
© Copyright 2007 Promethean Inc.
Activclassroom
TECHNICAL SUPPORT TRAINING
To determine the installer version of Activprimary from the Main Menu, selet ‘About
Activprimary’. The following windiw will open containing that information.
SERIES
© Copyright 2007 Promethean Inc.
Activclassroom
TECHNICAL SUPPORT TRAINING
version 3
Version 3 of Activstudio and Activprimary for both Macintosh and Windows includes the
Dashboard feature. The ‘Configure’ tab lists the currently installed versions of software,
driver, and firmware. (Firmware information is available only when the computer is
connected to the Activboard.).
SERIES
© Copyright 2007 Promethean Inc.
Activclassroom
TECHNICAL SUPPORT TRAINING
Driver Updates
In order to keep up with changes in the current Operating systems, the Activdriver that
allows the communication between the OS and the Activboard is frequently updated in
order to meet the ever changing needs of our customers. The most current version of the
Activdriver for both Mac and PC can be found at the following link:
http://www.prometheanworld.com/us/server/show/nav.2290
SERIES
NOTE: If the user is not experiencing any problems, it is not
necessary to upgrade the driver.
© Copyright 2007 Promethean Inc.
Activclassroom
TECHNICAL SUPPORT TRAINING
78” Activboard Electronics
The actual ‘Brains’ of the Activboard are the ‘Electronics’ – A 4.5”x 4.5” circuit board
that is held in place by 4 screws and attached to the main body of the board via a 50 pin,
1 inch ribbon cable.
Figure -4 [78” Electronics]
Firmware
Version
Screw holes
Ribbon
Cable
USB port
Serial port
The electronics are also where all physical connections are made to the Activboard. Both
the USB and the serial cables connect to the base of the electronics. The following
pages illustrate these connections.
© Copyright 2007 Promethean Inc.
SERIES
Activclassroom
TECHNICAL SUPPORT TRAINING
78” Activboard USB Setup
SERIES
© Copyright 2007 Promethean Inc.
Activclassroom
TECHNICAL SUPPORT TRAINING
78” Activboard Serial Setup
SERIES
© Copyright 2007 Promethean Inc.
Activclassroom
TECHNICAL SUPPORT TRAINING
Replacing Electronics
In instances where updating the firmware version or other troubleshooting techniques
do not resolve a support issue, the Activboard electronics may need to be replaced.
For this process, you will need someone to help you lift the Activboard from its wallmounted position, a Phillips head screwdriver, and, in some cases, a small pliers or
hexdriver.
NOTE: The Promethean Activboard (78”) weighs approximately
40lbs, with the older, 75” board weighing more. We realize that
for some customers this may be a manageable weight. However,
due to the size and awkward nature of the Activboard, Promethean
recommends that it be lifted and/or carried by at least two people to
reduce the risk of personal injury or damage to the Activboard.
© Copyright 2007 Promethean Inc.
SERIES
Activclassroom
TECHNICAL SUPPORT TRAINING
replacing electronics, (cont’d)
■
Disconnect the Activboard from the computer.
■
Power off the Activboard.
■
■
If the Activboard is mounted on the wall, it should be lifted straight up to release it
from the mounting brackets. Move the board away from the wall and set it on the
floor.
With the board well supported, remove the USB and/or Serial cables that are
connected to the electronics.
NOTE: The serial connections for the 75” board and the 78” board
have a release button either on the face of the connector or on
either side of the connector. Press and hold down this release
button before attempting to remove the cable from the electronics.
Failure to do so could damage the serial cable or the serial port on
© Copyright 2007 Promethean Inc.
SERIES
Activclassroom
TECHNICAL SUPPORT TRAINING
replacing electronics, (cont’d)
the electronics.
■ After removing the cables, use the Phillips screwdriver to remove the four screws
holding the electronics cover in place.
SERIES
■
■
To the right side of the electronics is the 1 inch ribbon cable (78” Activboard only)
that connects the electronics to the board.
Hold onto the right end of the ribbon cable by the black plastic connector and lift
the right portion of the ribbon cable from the board. The left portion DOES NOT
© Copyright 2007 Promethean Inc.
Activclassroom
TECHNICAL SUPPORT TRAINING
replacing electronics, (cont’d)
come off.
■
Remove the four screws holding the electronics in place.
SERIES
■
■
■
Place the old electronics in the anti-static bag in which the new electronics came
and return them to Promethean.
Line up the holes on the new electronics with the screws holes on the back of the
Activboard and replace the four screws that hold the electronics in place.
Line up the holes on the ribbon cable connector with the pins protruding from the
right side of the board. Insert the connector with a perpendicular push to avoid
© Copyright 2007 Promethean Inc.
Activclassroom
TECHNICAL SUPPORT TRAINING
replacing electronics, (cont’d)
bending or damaging the pins.
■
Replace the electronics cover by replacing the four screws that hold it in place.
SERIES
You have now successfully replaced the electronics of your Activboard.
© Copyright 2007 Promethean Inc.
Activclassroom
TECHNICAL SUPPORT TRAINING
Box Contents
Each board ships with everything needed to connect to either Mac or PC directly out
of the box. The following contents ship with each board, and is the property of the
Activboard recipient. Note: (The installer should leave all unused parts with the customer
to ensure the ability to connect in the future should the user environment change.)
serial cable
A 25 foot serial cable ships with the Activboard. Primarily used to connect the Activboard
to PC, this cable can also be used to provide power to the board when connecting to the
board via USB.
USB cable
Also provided in each box is a 15 foot USB cable. This cable can be used to connect to
Mac or PC. The USB cable does not, however, provide power to the Activboard. When
using USB to connect to the board, you will also need the previously mentioned serial
cable to provide power or the following DC Power cable.
© Copyright 2007 Promethean Inc.
SERIES
Activclassroom
TECHNICAL SUPPORT TRAINING
DC power cable (for use with USB)
The 15 foot DC power cable that ships with the board is used when one is connecting to
the board via USB. This cable provides power to the Activboard and plugs into the same
port that the serial cable would plug into. One can use this cable or the serial cable to
supply power to the board. If the serial cable is used to provide power to the board,
DO NOT plug the serial cable into the computer.
SERIES
2 activpens
Two Activpens ship with every Activboard. The Activboard recipient is encouraged to
use one pen at a time. In the event that anything should happen to the first pen, the user
would then use the second pen until Promethean or the reseller can replace the pen.
(provided the Activpen is covered by the one-year warranty. ) Note: If the pen is lost it is
not replaceable under the terms of the warranty.
© Copyright 2007 Promethean Inc.
Activclassroom
TECHNICAL SUPPORT TRAINING
power supply
Each board ships with a two piece power supply. When the two cords are joined they
are approximately 13 feet in length. This cord converts standard AC power to DC power
and supplies the board with approximately 6 Volts of current by plugging into the rear
of the Serial cable or the end of the DC Power Cable (both mentioned previously in this
section).
SERIES
mounting brackets
Included inside the Activboard box is a set of wall mounting brackets for the Activboard.
Note: the mounting brackets do not ship with any mounting screws. This is due to the
fact that mounting surfaces will vary (i.e. cinder block, Drywall/ Sheetrock, wood, etc.)
© Copyright 2007 Promethean Inc.
Activclassroom
TECHNICAL SUPPORT TRAINING
mounting template
An illustrated template that outlines the correct placement of the Activboard on the wall is
also supplied with your Activboard. This template notes the optimal installation height of
the board from the floor, where the center point of the projected image should fall, and the
exact placement of the mounting brackets to further ease the installation process.
quick start guide
A “Welcome Pack” booklet is provided as a guide to the basics of installation.
© Copyright 2007 Promethean Inc.
SERIES
Activclassroom
TECHNICAL SUPPORT TRAINING
BLUETOOTH
Newer models of the 78” Activboard come equipped with Bluetooth capabilities and can
be identified by the Bluetooth logo in the upper right-hand corner of the board.
The following sections are a guide for the preparartion and setup of the Bluetooth
features of your Activboard.
renaming a bluetooth activboard
By default the Bluetooth-enabled Activboard will appear as ‘Activboard’ when searching
for Bluetooth devices. It is possible to change the name by following the naming
procedures outlined below
Requirements for renaming your Activboard:
■
■
■
Activstudio 2.5x Professional Edition or above for Windows installed on your PC
computer.
A Bluetooth-enabled Activboard. (Bluetooth boards have the Bluetooth emblem in
the upper right hand corner of the board.)
A computer connected via USB or serial connection to the Activboard.
Naming Setup:
■
Connect your Activboard to your PC via USB or serial.
■
Recycle the Power to the Activboard (Reboot, power off then, power on again.)
■
■
Ensure that your PC recognizes the connection to your board. (There should not
be a Red X on the AV icon in the system tray.)
Launch Activstudio PE 2.5x or above.
© Copyright 2007 Promethean Inc.
SERIES
Activclassroom
TECHNICAL SUPPORT TRAINING
renaming a bluetooth board, (cont’d)
■
When the Activstudio Toolbox appears, left click on the Main Menu (The
Promethean Man) and select “Name Bluetooth Board”.
NOTE: This option is only
available in Activstudio 2.5 or
later for Windows at this time.
■
Type the new name for the Activboard and press ‘Enter’ or click ‘OK’. The name
will not appear in the field after clicking enter.
■
The ACtivboard has been successfully renamed.
■
Quit Activstudio.
■
Disconnect the Activboard from the computer.
■
Reboot the Activboard.
■
Reboot the PC.
bluetooth setup
■
Make sure Windows XP with Service Pack 2 is installed on the computer.
■
Install the Activboard driver and Activstudio software.
■
When connecting to the Activboard via Bluetooth it is necessary to unplug the
USB cable from the back of the Activboard. Failure to do so will greatly
affect the success rate of connecting via Bluetooth.
© Copyright 2007 Promethean Inc.
SERIES
Activclassroom
TECHNICAL SUPPORT TRAINING
bluetooth setup, (cont’d)
■
Restart the computer.
■
Plug in the Windows XP compatible Bluetooth Adapter. Do not attempt to
install manufacturer supplied software that ships with the adapter.
Windows will search internally for drivers suitable for the device.
NOTE: Promethean Customer Support has had the best results
with the “Belkin F8TOO1 ver.2 Bluetooth USB Adapter 100meter”and “Belkin F8TOO3 ver.2 Bluetooth USB Adapter 10meter” and “Comp USA MBD-C2.1-2 50-meter Bluetooth
Adapter” (This is in no way an endorsement of any of these
products. We are merely stating which adapters were used in
the testing process and the creation of this documentation.)
Do not attempt to use a Bluetooth adapter that requires a
driver be installed.
■
Click the ‘Start’ menu and select ‘Control Panels’.
■
Select the ‘Bluetooth Devices’ option.
© Copyright 2007 Promethean Inc.
SERIES
Activclassroom
TECHNICAL SUPPORT TRAINING
bluetooth setup, (cont’d)
■
Click on the ‘Add’ button in the dialog box that opens.
SERIES
■
■
■
Place a check in the small box next to ‘My device is setup and ready to be found’
and click ‘Next’.
A list of devices will appear in a window when the search function has completed.
Select the ‘Activboard’ device (Or the name that you have given to your
Activboard).
Click ‘Next’.
© Copyright 2007 Promethean Inc.
Activclassroom
TECHNICAL SUPPORT TRAINING
bluetooth Setup, (cont’d)
■
In the following box, select ‘Use the passkey found in documentation’ and
enter ‘0000’ as the passkey then click ‘Next’.
SERIES
■
■
COM ports will be assigned to the Bluetooth Activboard. Please take note of the
outgoing and incoming COM ports. This inforation will be needed in the steps to
follow.
If the assigned COM port is 8 or higher, it will need to be changed. Please
consult the ‘Bluetooth Troubleshooting’ section of this manual for instructions
for changing the COM port.
© Copyright 2007 Promethean Inc.
Activclassroom
TECHNICAL SUPPORT TRAINING
bluetooth setup, (cont’d)
■
If the outgoing port is between 4 and 8 click ‘Finish’.
SERIES
■
‘Right click’ with the mouse on the ‘AV icon’ in the system tray. Click ‘Configure’
and the following window will open.
© Copyright 2007 Promethean Inc.
Activclassroom
TECHNICAL SUPPORT TRAINING
bluetooth setup, (cont’d)
■
■
■
Use the drop down list shown in this window to select the outgoing COM port
number noted earlier. If you cannot remember the outgoing COM port, please
consult the ‘Bluetooth Troubleshooting’ section for help determining what it is.
Using the Activpen, hover over the lit flame in the upper left-hand corner of the
board and click the right-click button on the pen. The flame will begin to flash
blue.
Return to the computer and click ‘Start’. A status bar will appear in the window
while the computer attempts to connect to the board. The flame light on the
board will stop flashing and remain solid blue.
Your Bluetooth Activboard should now be interactive.
If the attempt fails, refer to the “Failed”
section of the troubleshooting section.
© Copyright 2007 Promethean Inc.
SERIES
Activclassroom
TECHNICAL SUPPORT TRAINING
disconnecting from the activboard
■
Right click on the AV icon in the lower right system tray. Click on ‘Configure’.
■
Click the ‘Stop’ button to stop receiving the signal from the Activboard.
■
From the Control Panel, select the Bluetooth Devices. A dialogue box will appear
showing all of your connected Bluetooth devices. Select your Activboard and click
‘Remove’.
SERIES
Note: Several moments may pass before the Activboard is
removed from the list. When the proccess is complete, click
“OK” to exit.
© Copyright 2007 Promethean Inc.
Activclassroom
TECHNICAL SUPPORT TRAINING
Bluetooth Troubleshooting
(Windows)
the Connection Attempt Failed
■
■
■
Remove all ‘Activboard’ devices from the Bluetooth Devices dialogue box from
the ‘Devices’ tab.
Remove the Outgoing and Incoming COM ports that were assigned to the
board from the ‘COM Ports’ tab.
Restart the computer and restart the Activboard and begin the process again
beginning with selecting ‘Bluetooth Devices’ in Control Pane
the assigned com port is higher than com8
The assigned COM port must be lower than COM8.
■
Click on the ‘Start’ menu and select ‘Control Panel’.
■
Select ‘System’.
■
Click the ‘Hardware’ tab.
■
Click the ‘Device Manager’ button.
■
Click on the ‘plus sign’ to the left of ‘Ports (COM & LPT)’
■
■
All COM ports are listed. From the ports you noted down previously, double click
the COM port number labelled ‘outgoing’. Select the ‘Port Settings’ tab from the
window that opens.
Click on the ‘Advanced’ button in the window that opens.
© Copyright 2007 Promethean Inc.
SERIES
Activclassroom
TECHNICAL SUPPORT TRAINING
changing assigned com port (cont’d)
■
From the window that opens, select a COM port between 4 and 8. This will ensure
you do not conflict with any internal modems that may exist.
SERIES
If the dialog box indicates that the ports between 4
and 8 are in use select one of the ports anyway. The
‘Communication Port Properties’ window will open.
Click
“yes”.
■
Click ‘OK’ and exit the advance setting for COM ‘X’. Restart the computer and
begin the process again with the step where you right clickedon the AV icon in the
system tray..
© Copyright 2007 Promethean Inc.
Activclassroom
TECHNICAL SUPPORT TRAINING
“I have forgotten my ‘Outgoing COM Port’.
How do I find out what it is?”
■
Click on ‘Start Menu’ and select ‘Control Panel’.
■
Select ‘‘Bluetooth Devices’..
■
From the dialog box that opens, click on the ‘COM ports’ tab.
■
The dialogue box that opens will the outgoing COM port number.’.
SERIES
© Copyright 2007 Promethean Inc.
Activclassroom
TECHNICAL SUPPORT TRAINING
Macintosh Bluetooth Setup
Please read these instructions in their entirety prior to attempting to setup wireless
connectivity (Bluetooth) to your Activboard.
■
Ensure that your Mac has Bluetooth installed and that it is working properly before
attempting to connect to your Activboard.
NOTE: These instructions were created in reference
to Macintosh OS 10.4.x. Some options may appear
different for earlier Macintosh operating systems.
■
■
After confirming that your OS is 10.4.x proceed to the following steps:
Press and hold down barrel button on Activpen while hovering above the illuminated
Promethean Logo until the logo flashes blue. The logo will continue flashing for
approximately 2 minutes. The remaining steps MUST be completed within this
time in order to ensure successful connection.
© Copyright 2007 Promethean Inc.
SERIES
Activclassroom
TECHNICAL SUPPORT TRAINING
macintosh bluetooth setup, (cont’d)
■
On the Macintosh desktop, locate the ‘Apple Menu’ and Sselect ‘System
Preferences’.
SERIES
■
In the System Preferences, select the ‘Bluetooth’ Preference Pane in the
‘Hardware’ section.
© Copyright 2007 Promethean Inc.
Activclassroom
TECHNICAL SUPPORT TRAINING
macintosh bluetooth setup, (cont’d)
■
In the ‘Bluetooth’ dialogue box select the ‘Devices’ tab and select the ‘Set up
New Devices’ Button.
■
The ‘Bluetooth Setup Assistant’ will begin. Click ‘Continue’.
■
On the ‘Select Device Type’ window select ‘Any Device’ and click ‘Continue’.
SERIES
■
■
The Macintosh will then scan for local Bluetooth devices. The Bluetooth enabled
Activboard will appear as ‘Activboard’ (Or as the name given when the Board
was renamed through Activstudio 2.5 for PC) . Highlight the ‘Activboard’ board.
Click on ‘Passkey Options’ button.
In the Passkey Options dialogue
box that pops up select the ‘Use
a specific passkey’ option and
click ‘OK’.
© Copyright 2007 Promethean Inc.
Activclassroom
TECHNICAL SUPPORT TRAINING
macintosh bluetooth setup, (cont’d)
■
The wizard will return to the ‘Bluetooth Device Set Up’ window. Ensure that
‘Activboard’ is selected and click ‘Continue’.
SERIES
■
■
■
The next window simply states that information is being gathered about the
device. Click ‘Continue’.
Enter the passkey to “pair” with the
Activboard device. The Passkey is
“0000” (4 zeros). Enter the passkey
and click ‘Continue’.
The following windows will simply state that your Mac is “Pairing” with your
‘Activboard’. Once the two have successfully paired the wizard will proceed to the
conclusion window.
At this point you have successfully connected to your Bluetooth Activboard and the
flashing blue logo will remain a solid blue. Your board is now ready to use wirelessly. !
© Copyright 2007 Promethean Inc.
Activclassroom
TECHNICAL SUPPORT TRAINING
Bluetooth Troubleshooting
(Macintosh)
If you have problems connecting to your Bluetooth Activboard via Macintosh proceed to
the following steps:
■
■
■
■
Disconnect the Activboard’s USB connection from the rear of the Activboard
and start the steps again. If this does not help then proceed to step 2 of
troubleshooting.
In the Bluetooth Preference Pane under the ‘Devices’ tab highlight the ‘Activboard’
device and click the ‘Edit Serial Ports’ button.
In the resulting window, ensure that the settings appear the same as the above
dialogue box. Then click ‘Apply’.
After making sure that the serial port settings are correct return to the beginning of
the setup instructions and repeat the setup procedure.
© Copyright 2007 Promethean Inc.
SERIES
Activclassroom
TECHNICAL SUPPORT TRAINING
Activstudio Software (PC and MAC)
What makes the Activclassroom even more powerful is the inclusion of Promethean’s
premier software suite, Activstudio, loaded with tons of software tools, utilities, and a
resource library containing 15,000 items.
Another powerful software suite available by Promethean is Activprimary. Activprimary
possesses most of the features of Activstudio but is targeted for younger audiences
with a bolder, simpler, and more colorful interface to meet the needs of the K-5 levels of
education.
Users and technical support staff are encouraged to check the Promethean website
regularily for software updates and information regarding new releases for both
Macintosh and Windows operating systems. http://www.prometheanworld.com/us
© Copyright 2007 Promethean Inc.
SERIES
Activclassroom
TECHNICAL SUPPORT TRAINING
Installing Activstudio
The following steps outline the installation of Activstudio in the Microsoft Windows
environment: This information is also available on the Promethean Planet website under
the “FAQ” section.
before performing a full activstudio
install
SERIES
If ActivStudio has been previously installed on your system:
■
■
■
Remove all ActivStudio components (Start Menu\ Control Panel\ Add or Remove
Programs: ActivDriver, ActivStudio, ActivStudio Help, ActivStudio Resources).
Restart computer.
Insert CD1 (application). If Auto Play is enabled, a language menu screen will
automatically appear. Select appropriate language and click the right-pointing
arrow to move to the next screen.
© Copyright 2007 Promethean Inc.
Activclassroom
TECHNICAL SUPPORT TRAINING
installing activstudio (cont’d)
■
Select “Full Install” (Recommended) to automatically install all software
components. Then, click the “Next” arrow.
SERIES
■
Enter “Name”, “Organization” and verify “Installation paths” (It is recommended
that you do not modify the paths. Leave as default.) Then, click the “Next”arrow.
© Copyright 2007 Promethean Inc.
Activclassroom
TECHNICAL SUPPORT TRAINING
installing activstudio (cont’d)
SERIES
■
Start Installation by clicking “Start Installing Now...”
CD1 (Applications) automated software installation will now start. As the installation
progresses, the compnents being installed will be listed in this window. When
installation is complete, a message will appear indicating that the installation was
succcessful.
After CD1 (Applications) automated
software installation is complete, you will
be prompted to insert “CD2 (Resources).
Eject CD1, insert CD2 and click “OK”
© Copyright 2007 Promethean Inc.
Activclassroom
TECHNICAL SUPPORT TRAINING
installing activstudio (cont’d)
■
A message will appear in the window indicating that the Resource Library is
inslatting. Due to the size of the library, this may take several minutes.
SERIES
When the Resource Library isntallation has completed, a message will appear in the
window indicating that all installations completed successfully. When this message
appears, click the “OK” button.
© Copyright 2007 Promethean Inc.
Activclassroom
TECHNICAL SUPPORT TRAINING
installing activstudio (cont’d)
You will be prompted to restart your computer. Please ensure that all work is saved prior
to restarting. Click the “Yes” button to restart your computer; click “No” to preform the
restart at a later time.
Clicking “No” on the previous window opens a window giving the option to close the
installation menu. Click “Yes” to close this window and restart the computer. Click “No”
to return to the main menu to perform additional software installations. This will be
followed by a prompt to re-insert CD 1 to continue installations.
SERIES
Verify the Installatiion
A successful installation can be verified by opeinig the “Add or
Remove Programs” control panel. The Activsoftware that is installed
will be listed in the window that opens. In the unlikely event that the
automatic installer has not properly performed the installation, reinsert CD 1 and perform a manual installation.
© Copyright 2007 Promethean Inc.
Activclassroom
TECHNICAL SUPPORT TRAINING
Who Should I call For Support?
If you are the technical support person at your school, your first call might be to the
reseller from whom you purchased your Promethean product. If you are a reseller
helping one of your customers, you should call the Promethean Support line. Be
prepared to give not only your information, but the information of the customer that you
are helping.
The Support number for the United States is: 1 (888) 652-2848
Our Support Staff is available from Monday - Friday 7AM to 7PM EST.
SERIES
© Copyright 2007 Promethean Inc.
Activclassroom
TECHNICAL SUPPORT TRAINING
Setting up Activboard Driver on XP.
USB Setup
After installing the Activdriver on a Microsoft Windows PC you may still get a Red ‘X’
over the AV icon in your System Tray. This ‘X’ means that the PC is not recognizing your
Activboard. Follow the steps below to ensure that the driver is setup properly.
■
Find the ‘My Computer’ icon.
■
Right click on it and select the ‘Properties’ option.
■
Choose the ‘Hardware’ tab.
■
■
SERIES
Choose the ‘Device Manager’
.
Look for a yellow exclamation point under ‘Human Interface Devices’. This will be
the USB interface device. Right click on it.
■
Select the ‘Update Driver’ option.
■
This will open the ‘Welcome to New Hardware Wizard’.
■
Choose the ‘No, not at this time” option and then click the ‘Next’ button.
■
Choose the ‘Install from a list or specific location’ option and click the ‘Next’ button.
■
■
■
■
■
Choose the ‘Don’t search I will choose the driver to install’ option and click
the’Next’ button.
Click on ‘USB Activboard’ to highlight it and click the ‘Next’ button.
A window containing an error message will open. You receive this message
because the driver is not certified by Microsoft as of this date. Click ‘Continue” to
finish installation.
When the driver is installed click the ‘-Finish’ button to close the windows.
The driver should then be recognized and the red X should be removed from the
AV icon for Activstudio. If the ‘X’ still appears over the AV icon, power off and
then power back on the Activboard and all will be well.
© Copyright 2007 Promethean Inc.
Activclassroom
TECHNICAL SUPPORT TRAINING
ACTIVnotes
___________________________________________
___________________________________________
__________________________________________________________
__________________________________________________________
_________________________________________________________
____________________________________________________
____________________________________________________
____________________________________________________
___________________________________________________
____________________________________________________
____________________________________________________
____________________________________________________
____________________________________________________
____________________________________________________
___________________________________________________
____________________________________________________
____________________________________________________
____________________________________________________
___________________________________________________
____________________________________________________
____________________________________________________
© Copyright 2007 Promethean Inc.
SERIES