1
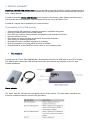
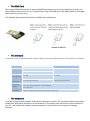
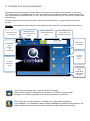
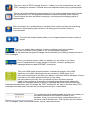
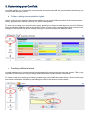
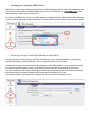
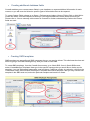
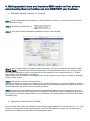
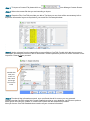
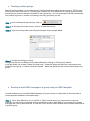
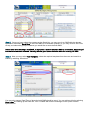
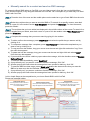
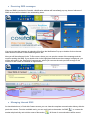
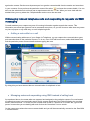
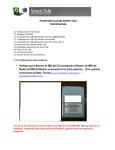
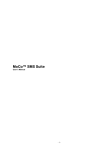
Coretalk - Basic User Guide
Objective:
SMS enable your business
“Which means customers send your business SMS messages and your business receives, manages and
responds to the messages in a professional manner”
As a start we are going to teach you how to professionally send, receive and manage SMS communication
from your PC.
(Once you have mastered this process please go to our support website and view the user guides for the
advanced modules http://support.coretalkgroup.com)
Getting Started
Index
1. What is Coretalk.
• The modem.
• The SIM Card.
• The Software.
• The database.
2. Coretalk front screen explained.
3. Customizing your Coretalk.
• Colour coding communication types.
• Creating additional users.
• Creating your company SMS prefix.
• Ensuring your database is backed up.
• Creating additional database fields.
• Creating SMS templates.
4. Getting people to save your business SMS number on their phones and educating them so
that they can now SMS/TEXT your business.
• Manually adding contacts into Coretalk.
• Importing contacts into Coretalk. (we don’t need to explain bulk create etc…keep it
simple)
• Creating groups.
• Sending a bulk SMS message to a group using an SMS template.
• Manually search for a contact and send an SMS message.
• Receiving SMS messages.
• Managing inbound SMS messages.
5. Managing inbound telephone calls and responding to requests via SMS messaging.
• Adding a note whilst on a call.
• Managing notes and responding using SMS instead of calling back.
• Educating your caller that they can SMS you in future.
1. What is Coretalk?
Coretalk is a Mobile CRM solution that gives you the ability to provide anywhere, anytime customer service.
Make it easy for your customers to communicate with you by letting them use the one device that everyone
uses – cellular phones.
Coretalk’s innovative Mobile CRM Solution gives anyone in any industry a fast, effective and easy way to
communicate with their prospects, clients and staff, all for the cost of an SMS or Text.
Coretalk is a unique tool to streamline your communication.
The benefits of CoreTalk include
•
•
•
•
•
•
•
•
•
Communicating with customers, suppliers and staff on a platform they prefer
Reducing communication costs for both parties
Have all of your inbound communication information at your fingertips in minutes
Improve customer service
Promotions are easy to run with no expensive short codes necessary
Save money on missed appointments
No expensive custom software integration is necessary
Real-time analysis of your daily infield activities is possible
Coretalk fulfils all of your SMS/Text needs, even as your company grows
• The modem
Coretalk uses an iTegno 3800 GSM Modem, which directly connects via USB cable to your PC or Laptop.
The GSM modem comes with USB cable and its drivers are automatically installed on your PC with
Coretalk installation.
Status Indicator
The status indicator indicates the operational status of the modem. The table below describes the
modem’s operational status in various LED light status:
• The SIM Card
Get a simple GSM SIM card and an attractive SMS/Text package from your local cell phone provider, just
like the SIM card that you have in your mobile phone. Plug in the SIM card in the GSM modem as illustrated
below and you are ready to go…
The following steps describe the insertion of SIM Card to the Modem
• The software
Coretalk is based on the latest JAVA platform. Minimum system requirements to run Coretalk are as follows
•
Item
Processor
Minimum
1.5 GHz
Recommended
1.8 GHz
Memory
1.0 GB
2.0 GB
Free Hard
Drive Space
1.0 GB
2.0 GB
Internet
Connection*
Low Speed Internet
High Speed Internet
Operating
System
Windows XP (SP3, Home or Professional), Windows Vista (all editions,
32 or 64 bit), Windows 7 (all editions,
32 or 64 bit)
Screen
Resolution
1024 x 768 pixel minimum resolution required
The database
CoreTalk is using an SQL database where all the information is stored. The CoreTalk installer automatically
installs SQL 2005 Server Express to run its database. If you already have SQL 2005 or higher installed on
your PC , the installer will configure itself automatically so you don’t have to configure any settings
manually.
2. Coretalk front screen explained
Now before we go through this overview, keep in mind that your company may use some, or all of the
TEXT features in the Coretalk product so don ’t be intimidated by all the functionality. Coretalk is like some
of the spreadsheet programmes that you use - they have many features but you end up only using the part
that helps you.
So go through the first overview and learn a little about the functionality - just get a general feel of the
product.
Objective: Understand the general layout of the product and get a feel for the functionality of the product.
Navigation Panel
and Task Bar
GSM Modem and
Internet Connectivity
Status
Modem Signal Meter
and SMS Queue/Sent
Status
Outstanding Items see
what needs to be
dealt with at a glance.
Search for a
Contact Bar
CoreTalk Main
Menu
Settings
&
Preferences
Functions
Shortcut
Menu
CoreTalk
Marketing
Pages
Forward SMS
from
CoreTalk to
your mobile
phone.
This is your home page icon - you back to the home page
when you are you are in other parts of the system. It is there to help you with
navigation. It’s simple to get back to the home page when you want to.
This is the ‘add a contact’ shortcut - it allows you to add contact details into
Your database. You can easily create a relevant database of contacts, when required. It is
always visible so that you can add a new contact no matter what you are doing!
This is the ‘send a TEXT message’ shortcut - it takes you to the screen where you send
TEXT messages to contacts. It’s faster and more responsive than trying to phone people.
This icon is used to schedule an appointment. You can create appointments and Coretalk
will automatically TEXT the appointment details and send a reminder to the recipient.
This will reduce the time and effort in setting up, confirming and reminding people of
appointments.
This is the search for a contact shortcut. Instantly find a contact and then see everything
about them. When dealing with someone, it is really good to see their history of
communication
The back and forward buttons allow you to navigate between screens, making it
simple.
This is your modem status indicator. It tells you whether you have a problem
With your connection to the modem or not. It should always be green.
If the modem is disconnected, the light will change and this will affect your ability to send and receive
TEXT messages.
This is your internet status. It tells you whether you are online or not. Some
of the Coretalk features use the internet to function, however, sending and
receiving TEXT messages does not need INTERNET connectivity.
This is the GSM signal strength indicator. It shows the strength of the GSM
signal at your location. Most areas are now covered by GSM signal. If you
have a poor signal then it will affect your ability to send and receive messages. Keep in
mind that if your mobile phone works and you are using
the same telecom provider, then you should not have a problem with the
signal. It also includes a Queue sent Cancelled status that provides details with
respect to messages waiting to be sent, messages that have been cancelled and
messages that have been sent. It manages the TEXT sending tool. It’s easy to see how many TEXT
messages have been sent, how fast they are being sent and your overall status.
The outstanding items display is really important! It provides you
an instant overview of the CURRENT issues in your
business. It lets you know how many outstanding issues you
have that need to be dealt with. This is broken up into received
TEXT messages, notes, promotional entries, reports, appointments etc…
3. Customising your CoreTalk
CoreTalk enables you to customise many features and options that will suit your business and the way you
communicate with your clients.
• Colour coding communication types
Colour coding is very important feature that enables you to specify different colours of the communication
tables, appointments, reports, notes etc. for easier management.
To start colour coding your communication types, please go to Setup (coretalk logo) on your CoreTalk and
select Application Defaults. Now set the desired colour for each of the communication types, and save the
changes. CoreTalk will now show, identify each type of communication with different colour.
•
Creating additional users
Coretalk enables you to create username and password for each person that uses the system. This is very
important for security and to easy manage tasks associated to that particular user/person.
To create a new user, please go to Setup (coretalk logo) on Coretalk and select Users. Click on New Login
and add its credentials, followed by associating the user to the persons contact details.
•
Creating your company SMS prefix
SMS prefix is a fixed short message inserted in front of SMS messages sent to clients. Each SMS sent from
your CoreTalk will include the specified SMS prefix in front of the message. e.g.: Coretalk Support - Dear
client please log a ticket so we can assist you!
To configure an SMS prefix, on your CoreTalk, please go to Setup and select SMS & Messaging. Select the
+ button to add a new prefix as illustrated below. Once the prefix is created, select it and Save the changes
•
Ensuring that your CoreTalk database is backed up.
It is very important to ensure that you have the latest Backup of your Coretalk database, to avoid losing
important information, contact details etc., due to a hardware failure or file corruption.
Coretalk automatically creates a backup of the database at preconfigured time. You can configure the way
you would like the backups to be done, i.e. specify file path and the amount of backup occurrences.
To access the backup settings, please select Setup (coretalk logo) and select Backup from the menu.
You will immediately note on which date was the last backup processed, the directory of where the backup
was placed and also indication of whether the backup was successfully done or not.
In the backup screen, select Setup and configure the way you want your backups to occur.
•
Creating additional database fields
Coretalk enables you to create custom fields in your database, to capture additional information for each
contact, so you will never be limited to specific types of information that can be captured.
To create Custom Fields, please go to Setup , Preferences and select Custom Fields. Click on Add field to
create new fields. Once the fields are created you can capture additional contact details for each type.
Please refer to “How to manually add contacts in Coretalk” for further understanding of where the custom
fields are used.
•
Creating SMS templates
SMS templates are preconfigured SMS messages that you can send to clients. This eliminates the time and
effort of typing a new SMS message every time you need to send SMS.
To create SMS templates, from the Coretalk front screen, go to Send SMS. Once in Send SMS screen,
select Create/Manage Templates. Now type in the specific message that you would like to further use as
template. (you may add special parameters, such as Name, Cellphone number, by selecting +Add from the
Parameters menu). When finished creating the Template select Save template. Later you may use the Add
template in the SMS send tool, select the particular template and send it to clients.
4. Getting people to save your business SMS number on their phones
and educating them so that they can now SMS/TEXT your business.
• Manually adding contacts in Coretalk
Step 1: Click on Manage Contacts shortcut on the CoreTalk front screen, or you may access it from the
Menu (CoreTalk Logo)
Step 2: On the Next screen click on
Step 3: Type in all Contact information available as shown on the example:
Step 4: Once you have filled in the basic Contact information, you may proceed with the Custom Fields.
Custom Fields: Please add all the additional information for that particular Contact. Let`s say you are an
Car Service/Dealership and you are required to fill in the details for your Contacts Vehicle e.g. Vehicle
Make, Model, First Registration, Last Service.
*please note that if you haven’t pre-configured your Custom Fields you may do so by clicking on “Manage
Custom Fields” option*
Step 5: Allocate the contact to a Contact Group.
*please note that if you haven’t pre-configured your Contact Groups you may do so by clicking on “Create
New Group” option* To allocate your contacts to groups is very important process that ensures that all your
contact information are sorted and can be easily accessed.*
Step 6: You may now Save&Close to close the Contact Management Screen or Save&Next to save the
contact details and let you create another one. Please also note that the Contact Management Screen can
also allow you to view the Contact History of Communication, and Send a Business Card from the contact
to another party.
• Importing contacts into Coretalk
Import Contact Files option in CoreTalk Is used to import contact details from a file such as .xls, .csv … This
process is normally done in the beginning when your CoreTalk database is empty and you would like to
import all your contacts that you have on an excel spread sheet.
Step 1: To Import a Contact File please click on
from Manage Contact Screen.
Step 2: Select the contact file that you are intending to import.
Step 3: Clean the File, CoreTalk provides you with a Tool that you can clean all the unnecessary info or
adjust the information layout as required on your excel file. See sample below:
Step 4: Assign columns from the contact file to correct field on CoreTalk. Double click with the mouse on
“Not Used” and assign the correct Field of Information. Please repeat this process for all the columns on the
import file. Press “next” to proceed.
Double Click
with your
mouse on
“Not Used”
and assign
the Correct
Field.
Step 5: Preview all the information entered, once confirmed that all is correct you may proceed.
Please note that CoreTalk might find Contact Details that exist on your database, you have an option to
either ignore the new info, update, or create new Contact with the information provided.
Now you have a CoreTalk database that contains all your contacts information.
• Creating contact groups
Manage groups enables you to create groups, allocate members or setup remote access to TEXT groups
when you are away from your PC. Profiling your contacts and TEXTING them as a group saves time and
ensure that you provide relevant information to the right person. You can associate CoreTalk contacts with
one another in groups. A contact can belong to as many groups as you like.
Step 1: Once in Manage Groups Screen, click on
.
Step 2: On the right side of the screen, click on “Create New Group”
Step 3: Type in the Group Name and Group Description as per sample below:
Step 4: Proceed by clicking on “Save”
Please note that you can Edit the Group Name/Details by clicking on “Edit a group details”.
CoreTalk allows you to either “Delete by Group only” – delete the group but leave the contacts that were
assigned to the group, or “Delete Group & Contacts” – delete the group and the contacts associated to the
group.
• Sending a bulk SMS message to a group using an SMS template.
Coretalk enables you to send Bulk SMS messages to all your clients, to notify them of various events or
current specials available in few simple steps…
Step 1: Go to Send SMS from your CoreTalk. In Find Contacts screen you may select the contacts
manually or Add a Group of contacts that you would like to send a bulk SMS to. If you select the contacts
manually then click on Add Selected, or click Add From Group to add complete list of contacts associated to
a specific group.
Step 2: Once you have added the contacts on the Send List, you may type in an SMS with the relevant
information and select Send Now to send the SMS to all selected contacts. Or you may click on Add From
Group, and select the group of contacts you would like to send the Bulk SMS.
Please note when sending a bulk SMS , it might take a while to send the SMS to all contacts, depending of
the number of contacts selected. You may monitor your Queue indicator while it`s sending the SMS.
Step 3: Now you may select Add Template , select the required template from the menu and send it to
clients by selecting Send Now.
You may also setup a Date/Time of when the bulk SMS should be send. You can achieve this by selecting
Send Later and setting up the Date and Time. Coretalk will hold the messages in the queue until the
specified time.
• Manually search for a contact and send an SMS message.
To access the Send SMS option on CoreTalk, you can either access it from the Icon on the Main Menu,
Front Screen Shortcuts, or by using the Static bar on CoreTalk. Let`s us explain to you how easy is to send
SMS`s with CoreTalk.
Step 1: Press the icon of the man and the mobile phone on the static bar or go to Send SMS from the main
menu.
Step 2: Select the recipient that you want to send the SMS to! To search for a specific contact, enter their
name or a part of it in the textbox under "Add Recipients" and press the Binoculars. To clear the search,
press the refresh!
Step 3: The recipient that you have added are displayed in the middle column of the screen.To search for a
specific recipient that you added, enter their name or a part of it in the textbox under "View Recipients" and
press the Binoculars.
Step 4: Compose the message that you want to send by typing it in the textbox.
a) To add a prefix to the message, press "Add Prefix" and select the prefix that you want to add by
clicking on it.
b) To compose a message from a template, press "Add Template" and select the template that you
want to use by clicking on it.
c) To copy text from the textbox, drag your mouse over the text and right-click and select "copy" from
the menu that appears.
d) To paste text into the message, drag your mouse over the text and right-click and select "paste"
from the menu that appears
e) If you would like to receive a delivery report about the message, click the checkbox next to "Request
Delivery Report"
f) To send the SMS immediately, press "Send Now" .
g) A pop will ask you if you want to continue to send the message. Click 'OK'.
h) Another pop up will confirm that the message has been queued for delivery, click 'OK'.
i) To send the SMS at a later stage, press "Send Later" select the date and time that you want the
SMS to be sent at on the mini-calendar, and press "Select".
j) A pop will ask you if you want to continue to send the message. Click 'OK'.
k) Another pop up will confirm that the message has been queued for delivery, click 'OK'.
In four simple Steps we have explained to you how to Send SMS`s with CoreTalk.
Please see example bellow:
Find Contact Screen
You may search for the contact or
select the contact that you`d like
to send the SMS to.
Send to Contacts Screen
Once you have added the recipients
they will appear on the Send Screen.
Compose SMS
Type the Message that you intend to
send. Choose from the options as to how
you`d like to send the SMS
• Receiving SMS messages
When an SMS is received in Coretalk, a Notification window will immediately pop up, also an indicator of
SMS received will be shown in the outstanding items.
You may access the message by selecting View from the Notification Pop-up or double click on the new
SMS received indicator in the outstanding Items bar.
Now you will be redirected in the To Do screen, where you can see the content of the message and the
number sending the SMS. If you double click on the highlighted field where the message is displayed, you
will be redirected in the Deal with Contact screen, where you can use the tools provided to reply to the
contact, to add a note or schedule an appointment.
• Managing Inbound SMS
As described above, in Deal with Contact screen you can view the complete communication history with the
particular contact. From the available tools, you can reply back to the sender via SMS
sender telephonically and add the notes of discussion
, or contact the
. All forms of communications will be saved
against the contact. But the most important part is to get the contact details from the sender and save them
in your contacts. Once you have the particular contact LQIRselect and enter the contact details. You can
also use the scheduler tool to directly set an appointment with the sender. When you have dealt with the
sender/client you may select the Complete button and move to the next task.
5.Managing inbound telephone calls and responding to requests via SMS
messaging
Coretalk enables you to capture any sort of incoming information against a particular contact. This
information are sorted per type and can be accessed at any time, so you don’t have to write down any notes
on piece of paper or any other way, to avoid misplacing them.
• Adding a note whilst on a call
Whilst communicating with some of your clients via Telephone, you can capture the communication notes
and associate them to the particular contact. To do so, from CoreTalk front screen, select Add Notes/Task,
find the particular person contact details and start typing the note.
By doing this you have ensured that no communication is misplaced or lost.
• Managing notes and responding using SMS instead of calling back
As mentioned above, the notes taken are captured and assigned to the particular contact. So now instead
of calling that person you can simply search for his contact details and CoreTalk will display the complete
historic communication. To do this, on the Coretalk front screen in “Search for A Contact” bar, type in the
person`s name that you are dealing with and click on the “binoculars” icon to search.
On the next screen select the correct contact details and you will be automatically rerouted to the Deal With
a Contact Screen.
Now we can view the notes taken for this person, so let`s send him an SMS with the necessary information
and encourage him to use SMS instead of calling us.
Select the Send SMS button, and type in the SMS that you intend to send.
• Educating your caller that they can SMS you in future
So in few easy steps we have replied back via SMS to the client with the necessary information and in the
same time we have notified them to save the service number and to SMS any query in future to get
feedback ASAP.
Congratulations you have learnt the basics and you can now expect your customers to start sending you
TEXT messages. If you have any questions or are confused with respect to using the Coretalk please go to
our support website http://support.coretalkgroup.com and log a support ticket. We will respond shortly and
look forward to assisting you further.
CoreTalk Functionality Diagram
Feel free to browse the Coretalk Knowledgebase to see how the rest of the software functionality works
http://support.coretalkgroup.com/index.php?/Knowledgebase/List
Coretalk by Industry:
Complete user guide for Salons please click on:
http://esmssoftware.com/uploads/Documentation/UserManuals/Salons%20User%20Manual%20.pdf
Complete user guide on Coretalk for webmasters please click on:
http://support.coretalkgroup.com/manuals/How%20to%20SMS%20enable%20your%20website.pdf
For a general overview of the features and benefits of the solution navigate to www.coretalk.co and then
view the information in the about Coretalk section of the website.
Want to see how the Coretalk value comes together for other companies? Simply navigate to
www.coretalk.co and then view the detailed video material in the Coretalk by industry section of the website.
Thank you for purchasing Coretalk, we appreciate your business.
Copyright MMG Holdings 2012