1
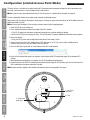
Wi-Fi Installation Manual
Installation and Operation Manual
Wi-Fi Clocks
®
Part # H004768
Rev. 2
February 2015
Safety Precautions
Wi-Fi Installation Manual
The Wi-Fi clock(s) should be installed in a secure location protected from:
—Physical damage
—Water, including condensation
Operation of this product in a manner inconsistent with the instructions in the manual may result in damage to the product and
will void the warranty.
2
© American Time
Table of Contents
Wi-Fi Installation Manual
Introduction...............................................................................................................................................................................4
Specifications............................................................................................................................................................................5
Installation.................................................................................................................................................................................6
Button operation........................................................................................................................................................................7
Configuration.............................................................................................................................................................................8
Limited Access Point Mode.................................................................................................................................................8
Clock..................................................................................................................................................................................9
Wi-Fi.................................................................................................................................................................................10
Administrator Settings.......................................................................................................................................................14
Homing clock (check hand position).........................................................................................................................................15
Firmware update......................................................................................................................................................................16
Factory Defaults restore...........................................................................................................................................................17
Troubleshooting.......................................................................................................................................................................18
Appendix A - SNTP Time Servers.............................................................................................................................................19
Appendix B- Supported Time Zones.........................................................................................................................................20
American Time
140 3rd Street South
PO Box 707
Dassel, MN 55325-0707
Phone: 866-748-3796
Fax: 800-789-1882
american-time.com
© American Time
3
Wi-Fi Installation Manual
Wi-Fi is a popular technology that allows an electronic device to exchange data or connect to the internet wirelessly using radio
waves. Wi-Fi and Simple Network Time Protocol (SNTP) are used to make installation and setup as simple as possible. All you
need to do is power your preconfigured clock in an area where the intended wireless local area network (WLAN) signal strength
is sufficient.
Each Wi-Fi clock is factory-configured to receive the precise time signal from your network time server. They also automatically
correct for the Daylight Saving Time changes and require no maintenance for up to 5+ years. These Wi-Fi clocks only require
synchronization twice per day using SNTP and create very little network traffic.
Network
These preconfigured Wi-Fi Clocks are plug and play on networks with Dynamic Hosting Configuration Protocol (DHCP). A limited
access point mode is also available for clocks that are not preconfigured at American Time as recommended.
Appendix
Troubleshooting Factory Defaults
Restore
Firmware
Update
Homing Clock
Configuration
Button
Operation
Installation
Specifications
Introduction
Introduction
4
© American Time
Wi-Fi Installation Manual
Specifications
Installation
Button
Operation
Specifications
Dimensions: Varies by model
Specifications
Features
•Up to 5 years battery life using AA Lithium batteries
•Supports 2 SNTP servers for redundancy
•802.11b (802.11b/g/n compatible); Rates Supported: 11, 5.5, 2 and 1 Mbps (CCK/QPSK/BPSK Modulation); Wireless security
using WEP and WPA/WPA2 (AES and TKIP)
•DHCP or Static IP addressing
•Limited Access point operation for configuration
•Clocks may be preconfigured (SSID, Passphrase, time zone, time servers) for plug-n-play installation
•Status LED
•Staggered wake times for reduced network load
•Wi-Fi Alliance Radio/FCC/ICC certified
•RoHS Compliant
Introduction
Optional Product:
Security Bracket (part number varies by size)
Weight: Varies by model
Operating Temperature: 41˚F to 131˚F
Storage Temperature: 41˚F to 131˚F
Configuration
Operating Humidity: 0% to 95%, non-condensing
Accuracy: ±1 second
Homing Clock
Firmware
Update
Factory Defaults Troubleshooting
Restore
Appendix
© American Time
5
Wi-Fi Installation Manual
Before installing verify:
• Dynamic Host Configuration Protocol (DHCP) settings
• Firewall port 123 is open for UDP data
• Good Wi-Fi coverage at intended installation location.
• Green gear locking pin (A) is removed from the movement
1. Adjustments/Configuration via limited access Point mode
If clock was preconfigured at American Time as recommended, skip to step 2.
Otherwise, refer to Button Operation and Configuration (Limited Access Point mode) sections to configure clock manually.
2. Apply power to the clock by inserting the barrel plug (C) of the battery pack into the left side of the Wi-Fi module where the power connection is located.
nNote: If green gear locking pin (A) has not been removed, remove it prior to applying power.
i. Verify the LED (B):
1.Flashes red when power is applied to the clock.
2.Flashes green within 60 seconds.
3.Green flash stops within 120 seconds.
ii. Verify the clocks hands begin to spin rapidly within 6 minutes after applying power.
iii. Verify the correct time on the clock within 20 minutes of applying power.
3. Place the clock on the wall using the hanger on the back of the clock or the optional security bracket (sold separately).
A - Green gear
locking pin
B - LED
C - Battery pack
power input
Appendix
Troubleshooting Factory Defaults
Restore
Firmware
Update
Homing Clock
Configuration
Button
Operation
Installation
Specifications
Introduction
Clock Installation
6
© American Time
Button Operation
Wi-Fi Installation Manual
1.
2.
3.
4.
onfiguration (via Limited Access Point) .
C
Clock homing (sending clock hands to 12 O’clock).
Firmware updates (internet access is required).
Factory defaults restore (restores to the configuration that the clock was shipped).
Introduction
A recessed push button is located in the lower central part of the Wi-Fi module. It can be used to initiate 4 different operations:
Specifications
Installation
LED
Button
Operation
Configuration
Orange
LED Flash
Count
Button
Press
Duration
0
< 1 second Wi-Fi Module Sleep
OFF
Wi-Fi module will immediately go back to sleep
1
1-5
seconds
Configuration
Solid RED
Wi-Fi Limited Access Point is available for clock and WiFi configuration
2
5-10
seconds
Clock Homing
Flash GREEN/
ORANGE
Send clock hands to 12 O'clock position then stop until
power is reset
3
10-15
seconds
Firmware Update
Flash GREEN/
RED
Update the firmware from the internet (port 80)
4
15+
seconds
Factory Defaults
Restore
Flash ORANGE/
RED
Reset configuration to factory settings
Operation
Homing Clock
Each operation is proceeded by a number of orange flashes. If the button is released after the operational flash count (see list
below) it will attempt the specific operation listed.
LED Indication Description
Firmware
Update
Factory Defaults Troubleshooting
Restore
Appendix
© American Time
7
Wi-Fi Installation Manual
The clock will act as a limited access point for direct Wi-Fi communication to complete configuration. After connecting to the
clock with a wireless device it can be configured with a web browser.
nNote: If your clock was preconfigured by American Time this process is unneeded unless changes are required.
To enter configuration (limited access point mode) complete the following process:
Apply power to Wi-Fi module by inserting the barrel plug (C) of the battery pack into the left side of the Wi-Fi module where the
power connection is located.
nNote: If green gear locking pin (A) has not been removed, remove it prior to applying power.
1.Verify the LED (B) starts flashing red.
2.Press and hold the button located on the middle of the Wi-Fi module.
a.The LED (B) should turn solid green to indicated the button press (continue holding the button).
b.Wait for the LED (B) to flash orange one time. This will take about 2 seconds (additional flashes indicate other modes).
3.Release the button.
a.Verify the LED (B) turns solid red indicating Limited Access Point mode is active.
4.Connect to the clock with a Wi-Fi enabled device (SSID will show up as AT_Prov_xxxxxx under available wireless networks, where xxxxxx is the last 6 digits of the mac address.
5.Enter 192.168.240.1 into the URL of a web browser of the Wi-Fi enabled device.
6.Refer to Clock Configuration (page 9) to configure clock settings and Wi-Fi Configuration (page 10) to configure Wi-Fi
settings.
7.When adjustments/configuration are complete, the LED (B) should begin flashing again.
8.Disconnect power from the Wi-Fi module by disconnecting the barrel plug (C) of the battery pack from the left side of the Wi-Fi module where the power connection is located.
nNote: Power should be applied at the intended installation location to verify good Wi-Fi coverage.
A - Green gear
locking pin
B - LED
C - Battery pack
power input
Appendix
Troubleshooting Factory Defaults
Restore
Firmware
Update
Homing Clock
Configuration
Button
Operation
Installation
Specifications
Introduction
Configuration (Limited Access Point Mode)
8
© American Time
Wi-Fi Installation Manual
Clock Configuration
Introduction
Specifications
Installation
Button
Operation
Configuration
Homing Clock
Firmware
Update
1. Time Zones – the Time Zone entry sets the time zone. Reference Appendix B for a list of all available time zone configurations.
2. Daylight Saving Time – When Daylight Saving Time is enabled United States Daylight Saving Time dates and bias are used.
3. Primary SNTP IP – This is the first SNTP time server from which the Wi-Fi clock will receive time. This server will be attempted first. If
it fails to provide a valid time the secondary server is tried next.
4. Secondary SNTP IP – This is the second SNTP time server from which the Wi-Fi clock will receive time. This server is attempted only
after the Primary SNTP server IP fails.
5. Save button – This button is used to save on screen settings.
6. Wi-Fi Configuration – This button moves to client settings menu page. Through the client settings menu page wireless network
configuration pages can also be reached.
7. Exit Setup – This button exits limited Access Point mode and returns to normal operation.
8. Current SSID – The current Service Set Identifier (SSID) is the name of the wireless network the Wi-Fi clock will attempt to use if
left unchanged.
9. FW Version – The current firmware version used on the Wi-Fi clock.
10.MAC Address – The Media Access Control (MAC) address is a unique identifier assigned to the Wi-Fi clock network hardware for
communications.
Factory Defaults Troubleshooting
Restore
Appendix
© American Time
9
Wi-Fi Installation Manual
1. Click on “WiFi Configuration” button from clock configuration pages.
Installation
Specifications
Introduction
Wi-Fi Configuration
3. Select Wi-Fi configuration entry method.
a. Click on “Select an Existing Network if beckon is active and available (this is normally the case) from desired network. Go to page 11 if you select this option.
b. Click on “Manual Configuration to Join a Network” if beckon is not active or is unavailable. Go to page 13 if you select this option.
Appendix
Troubleshooting Factory Defaults
Restore
Firmware
Update
Homing Clock
Configuration
Button
Operation
2. Click on “Wireless and Network configuration”.
10
© American Time
Wi-Fi Installation Manual
Wi-Fi Configuration
Introduction
Specifications
a. Select an Existing Network
4. If you selected the existing network option the screen above will appear while the clock scans for available networks.
nNote: If you selected “Manual Configuration to Join a Network”, go to “b. Manual Configuration to Join a Network” (page 13).
Installation
Button
Operation
Configuration
Homing Clock
Firmware
Update
5. The above screen will appear when the clock has completed the SSID scan process.
6. Click on the select button next to the SSID you wish to configure your clock to.
Factory Defaults Troubleshooting
Restore
Appendix
© American Time
11
Wi-Fi Installation Manual
7. Enter security information (if required for your network) and click next.
nNote: If a static IP address is required, check the Advanced Options and select “Static IP Address Configuration” radial button.
8. Select Save and Apply button to save and exit to normal operation.
Appendix
Troubleshooting Factory Defaults
Restore
Firmware
Update
Homing Clock
Configuration
Button
Operation
Installation
Specifications
Introduction
Wi-Fi Configuration
12
© American Time
Wi-Fi Installation Manual
Wi-Fi Configuration
Introduction
Specifications
Installation
Configuration
4. If you selected “Manual Configuration to Join a Network” in step 3 the screen above will appear.
5. Enter the SSID, security type and security settings.
nNote: If a static IP address is required, check the Advanced Options and select “Static IP Address Configuration” radial button.
6. Click the next button to continue.
Button
Operation
b. Manual Configuration to Join a Network
Homing Clock
Firmware
Update
Factory Defaults Troubleshooting
Restore
7. Click on the Save and Apply button to save and exit to normal operation.
Appendix
© American Time
13
Wi-Fi Installation Manual
The Administrator Settings are used to enable/disable security for the clock and Wi-Fi browser pages. Enter your security
settings (Username and Password) to enable security. Blank out the username and password to disable security.
1. Click on “WiFi Configuration” button from clock configuration pages.
2. Click on “Administrator Settings” in the Client Settings menu.
3. Enter Username into text field (leave blank to disable security for limited access point mode).
4. Enter Password and confirm in to the the password text fields (leave both blank to disable security for limited access point mode).
5. Click on click on “Save and Apply”.
Appendix
Troubleshooting Factory Defaults
Restore
Firmware
Update
Homing Clock
Configuration
Button
Operation
Installation
Specifications
Introduction
Administrator Settings
14
© American Time
Homing Clock
Wi-Fi Installation Manual
To check hand placement complete the following process:
Installation
1. Apply power to Wi-Fi module by inserting the barrel plug of the battery pack into the left side of the Wi-Fi module where the power connection is located.
Specifications
C - Battery pack
power input
A - Green gear
locking pin
B - LED
Introduction
If the clock is dropped it is possible for the clock hands to move from the correct placement. The Wi-Fi module can tell the
clock movement to go to 12 O’clock to verify hand placement is still correct.
Button
Operation
Configuration
2. Verify the LED starts flashing red.
3. Press and hold the button located on the middle of the Wi-Fi module.
Homing Clock
Firmware
Update
Appendix
© American Time
Factory Defaults Troubleshooting
Restore
a. The LED should turn solid green to indicated the button press (continue holding the button).
b. Wait for the LED to flash orange one time (do not release the button).
c. Wait for the LED to flash orange twice.
4. Release the button.
a. Verify the LED alternates green/orange.
5. Hands should begin moving rapidly within 30 seconds.
a. If not, remove power and start with step 1 again.
6. Wait for hands to stop moving (this may take up to 20 minutes).
7. Verify all three hands (second hand, minute hand and hour hand) stop at the 12 position.
a. If not, contact American Time technical support at 866-748-3796.
8. Power cycle Wi-Fi module by disconnecting barrel plug of the battery pack for 5 seconds and reconnecting.
15
Wi-Fi Installation Manual
Occasionally American Time will have new firmware updates available. Contact American Time for the most recent firmware
version available. Firmware updates require access to the internet through port 80.
nNote: If traffic is redirected on port 80, firmware updates will fail. Prior to completing the firmware update process verify
internet access is available on port 80.
To complete a firmware update, complete the following process:
1.Apply power to Wi-Fi module by inserting the barrel plug of the battery pack into the left side of the Wi-Fi module where the power connection is located.
2.Verify the LED starts flashing red.
3.Press and hold the button located on the middle of the Wi-Fi module.
a.The LED should turn solid green to indicate the button press (continue holding the button).
b.Wait for the LED to flash orange one time (do not release the button).
c. Wait for the LED to flash orange twice (do not release the button).
d.Wait for the LED to flash orange three times.
4.Release the button.
a.Verify the LED alternates green/red.
b.Verify LED flashes orange.
c. Verify LED turns off for several seconds.
d.Verify LED flashes red.
nNote: If the LED turns solid red for approximately 3 seconds, the firmware update process failed. To verify firmware update
process is successful connect to clock in configuration mode and verify firmware version at the bottom of the browser page.
Contact American Time technical support at 866-748-3796.
5.Power cycle Wi-Fi module by disconnecting barrel plug of the battery pack for 5 seconds and reconnecting.
Appendix
Troubleshooting Factory Defaults
Restore
Firmware
Update
Homing Clock
Configuration
Button
Operation
Installation
Specifications
Introduction
Firmware Update
16
© American Time
Wi-Fi Installation Manual
Factory Defaults Restore
Introduction
Specifications
American Time preconfigures your clock settings prior to shipment to you. These preconfigured settings are stored in memory
even after settings have been changed.
nNote: If your clock was not preconfigured at American Time, completing the factory defaults restore process will not help.
Refer to configuration section of this manual to reconfigure your clock.
To restore preconfigured settings complete the following process:
1. Apply power to Wi-Fi module by inserting the barrel plug of the battery pack into the left side of the Wi-Fi module where the power connection is located.
Installation
Button
Operation
2. Verify the LED starts flashing red.
3. Press and hold the button located on the middle of the Wi-Fi module.
Configuration
Homing Clock
Firmware
Update
Factory Defaults Troubleshooting
Restore
a. The LED should turn solid green to indicated the button press (continue holding the button).
b. Wait for the LED to flash orange one time (do not release the button).
c. Wait for the LED to flash orange twice (do not release the button).
d. Wait for the LED to flash orange three times (do not release the button).
e. Wait for the LED to flash orange four times.
4. Release the button.
a. Verify the LED alternates orange/red.
5. Wait 20 seconds.
6. Power cycle Wi-Fi module by disconnecting barrel plug of the battery pack for 5 seconds and reconnecting.
Appendix
© American Time
17
Installation
Specifications
Introduction
Troubleshooting
Wi-Fi Installation Manual
Clock is not on time within 30 minutes of applying power.
• Verify LED flashes green within 60 seconds after applying power.
• Verify hand positions (see Homing Clock page 15).
SNTP failing (flashing orange prior to solid red).
• Verify Port 123 if open for UDP traffic.
• Verify SNTP primary and secondary time servers (See Clock Configuration page 9).
Network connection failing (continues flashing red prior to solid red).
• Verify proper signal reception in the intended installation location.
—Contact IT staff to verify signal at installation location
• Verify correct SSID (See Clock Configuration “Current SSID” page 9).
Button
Operation
Clocks correcting when first powered but time drifts in good signal area using NIST time server.
nNote: NIST time servers will reject multiple time requests from the same IP address.
• Change to internal time server.
Appendix
Troubleshooting Factory Defaults
Restore
Firmware
Update
Homing Clock
Configuration
If the above steps do not resolve the issue, please contact American Time at 866-748-3796 or [email protected].
18
© American Time
Wi-Fi Installation Manual
Appendix A: SNTP Time Servers
IP addressLocation
nist1-ny.ustiming.org
064.090.182.055
nist1-nj.ustiming.org
096.047.067.105Bridgewater, New Jersey
New York City, New York
Installation
Button
Operation
Configuration
nNote: Please reference http://tf.nist.gov/tf-cgi/servrs.cgi for the latest NIST Internet Time servers list, which includes the
status of each server.
Specifications
nist1-pa.ustiming.org206.246.122.250
Hatfield, Pennsylvania
nist1.aol-va.symmetricom.com064.236.096.053Reston, Virginia
nist1-chi.ustiming.org
208.066.175.036Chicago, Illinois
nist1.expertsmi.com
173.014.055.009Monroe, Michigan
nist.netservicesgroup.com 064.113.032.005Southfield, Michigan
nisttime.carsoncity.k12.mi.us
066.219.116.140
Carson City, Michigan
www.nist.gov
024.056.178.140
WWV, Fort Collins, Colorado
utcnist.colorado.edu
128.138.140.044
University of Colorado, Boulder
utcnist2.colorado.edu
128.138.188.172
University of Colorado, Boulder
ntp-nist.ldsbc.edu
198.060.073.008
LDSBC, Salt Lake City, Utah
nist1-lv.ustiming.org
064.250.229.100
Las Vegas, Nevada
nist1.aol-ca.symmetricom.com
207.200.081.113
Mountain View, California
nist1.symmetricom.com
069.025.096.013
San Jose, California
nist1-sj.ustiming.org
216.171.124.036
San Jose, California
nist1-la.ustiming.org
064.147.116.229
Los Angeles, California
Introduction
URL
Homing Clock
Firmware
Update
Factory Defaults Troubleshooting
Restore
Appendix
© American Time
19
Description
USA Alaska
USA Aleutian Time
USA Arizona
USA Atlantic / Puerto Rico
USA Central Time
USA Chammoro
USA Eastern Time
USA Hawaii
USA Indiana East
USA Mountain Time
USA Pacific Time
USA Midway Island / Samoa
USA Wake Islands
UTC+00:00
UTC+01:00
UTC+01:00
UTC+03:00
UTC+03:30
UTC+04:00
UTC+05:00
UTC+05:30
UTC+05:45
UTC+06:00
UTC+06:30
UTC+07:00
UTC+08:00
UTC+08:45
UTC+09:00
UTC+09:30
UTC+10:00
UTC+10:30
UTC+11:00
UTC+12:00
UTC+12:45
UTC+13:00
Hours Difference
from UTC (Winter)
-9
-10
-7
-4
-6
+10
-5
-10
-5
-7
-8
-11
+12
+0
+1
+2
+3
+3.5
+4
+5
+5.5
+5.75
+6
+6.5
+7
+8
+8.75
+9
+9.5
+10
+10.5
+11
+12
+12.75
+13
Hours Difference
from UTC (Summer)
-8
-9
-7
-4
-5
+10
-4
-10
-5
-6
-7
-11
+12
+0
+1
+2
+3
+3.5
+4
+5
+5.5
+5.75
+6
+6.5
+7
+8
+8.75
+9
+9.5
+10
+10.5
+11
+12
+12.75
+13
Wi-Fi Installation Manual
Observes Daylight
Saving Time
YES
YES
NO
NO
YES
NO
YES
NO
NO
YES
YES
NO
NO
NO
NO
NO
NO
NO
NO
NO
NO
NO
NO
NO
NO
NO
NO
NO
NO
NO
NO
NO
NO
NO
NO
Appendix
Troubleshooting Factory Defaults
Restore
Firmware
Update
Homing Clock
Configuration
Button
Operation
Installation
Specifications
Introduction
Appendix B: Supported Time Zones
20
© American Time
Wi-Fi Installation Manual
Button
Operation
Observes Daylight
Saving Time
NO
NO
NO
NO
NO
NO
NO
NO
NO
NO
NO
NO
NO
NO
Installation
Hours Difference
from UTC (Summer)
-1
-2
-3
-3.5
-4
-4.5
-5
-6
-7
-8
-9
-10
-11
-12
Specifications
Hours Difference
from UTC (Winter)
-1
-2
-3
-3.5
-4
-4.5
-5
-6
-7
-8
-9
-10
-11
-12
Introduction
Description
UTC-01:00
UTC-02:00
UTC-03:00
UTC-03:30
UTC-04:00
UTC-04:30
UTC-05:00
UTC-06:00
UTC-07:00
UTC-08:00
UTC-09:00
UTC-10:00
UTC-11:00
UTC-12:00
Appendix B: Supported Time Zones (cont)
Configuration
Homing Clock
Firmware
Update
Factory Defaults Troubleshooting
Restore
Appendix
© American Time
21