1
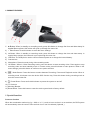
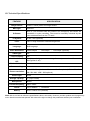
DR-115
Portable DVR System
User Manual
The DR-115 is a compact high definition DVR system and is part of our RecordCam™ series of Mobile DVR
systems. It is designed to be mounted to the windshield of the vehicle and has a built-in 120° CMOS camera that
points out through the front windshield recording anything that happens in front of the vehicle. The system
records in HD 1080P and the recordings are stored on a Micro SD card (32GM max) which can be retrieved from
the system or the unit itself to view the video files. The unit can have the time and date programmed into it and
will display the time and date of each recording.
*PLEASE READ THROUGH THE MANUAL CAREFULLY*
I. PRODUCT FEATURES:
1)▲ Button: When in standby or recording mode, press this button to change the time and date stamp. In
regular Menu options, this button will cycle up through the menu list.
2) ▤ Menu Button: Press this button to enter the menu settings.
3) ▼ Button: When in standby or recording mode, press this button to change the time and date stamp. In
regular Menu options, the button will cycle up through the menu list.
4) USB Port: The USB port is used to connect external power or to charge the internal battery.
5) Camera lens
6) Microphone: Records sound during video recording mode.
7) OK Button: When in Video Recording mode, press this button to start recording video. Press again to stop
recording video and enter standby mode. In Picture mode, press this button to take pictures. When in the
menu settings, press this button to confirm menu option selection.
8)
Mode Button: Press this button to select between Recording, Picture and Playback modes. When in
recording mode, this button can also be the SOS function key. Press this button during recording mode to
save the current video file.
9)
Power Button: Press and hold this button to power the system on and off.
10) TF Card slot
11) Mounting Bracket
12) Reset Button: Press this button to reset the entire system back to factory default.
II. Special function:
G-sensor function
When the acceleration reaches 6g (1g = 9.80 m / s ^ 2 ) such as in an such as in a car accident, the DVR system
will automatically save the current video and lock it so it can’t be deleted ( Optional )
Auto On / Off
When the DVR system is connected to the car power supply (Ignition), it will automatically start recording. When
the ignition is turned off, the system will save the video and turn off automatically.
SOS
Press the
button while in video recording mode. The current video will then be saved automatically.
III. Operating Instructions:
Turn On/Off
1) Press and hold the
button to turn on the power. (The blue LED will light up)
2) Press and hold the
button again to turn off the power. (The blue LED will shut off)
Note: The DVR are system will be prompted and shut down automatically if power level gets too low.
Recording mode
1) Press the "M" key to switch to video mode, the recording icon will appear in the upper left corner of the
screen.
2) Press the "OK" button to start recording. The recording icon will appear as a flashing red dot indicating
the video is now recording.
Photograph mode
1) Press the "M" key to switch to the Photograph mode. The photograph icon will appear in the upper left
corner of the screen.
2) Press the "OK" button to take pictures. The screen will flash once to indicate that the image was taken.
Video / Photo Playback
1) Press the "M" key to switch to playback mode. The screen icon will appear in the upper left hand corner to
indicate display mode or “playback mode”.
2) Press the ▲ button to scroll upwards, or press the ▼ button to scroll downwards through the file list.
3) Press the "OK" button to select the video file and begin playback.
Menu settings
1) Press the "Menu" button to enter into the Settings menu. A yellow background will appear on the video
icons.
2) Press the "Menu" button again to switch to the setting functions. The settings icons will appear with a
yellow background. You are now in the settings menu.
3) Press the ▲ ▼ buttons to scroll through the drop-down menu options. Press the "OK" button to enter the
selected option.
4) Press the "Menu" button or the "M" button to exit the settings mode.
Time Settings
1) Press the “Menu” button to enter the time and date settings.
2) Press the “Menu” button again to access the setup menu.
3) Use the ▲▼ buttons to select the date and time options.
4) Press the "OK" button to enter the option and then you can adjust the value YYYY / MM / DD / hours /
minutes / seconds by using the ▲▼ buttons
5) Press the "OK" button to confirm the changes.
SOS
Press the
button while in video recording mode to save the current video
IV. USB mode
When the system is connected to a computer, press the power button. The DVR will automatically pop up the
USB menu. There are two (2) different modes to choose from:
1) USB-Disk: In this mode, photo or video files can be accessed as files.
2) PC-Camera: This mode will allow you to use the DVR system as a webcam for video chatting or Skype.
V. Charging the Battery
There are three ways to charge the battery. The red indicator light lights up in the charging process. The charging
time is about 180 minutes. The red charging indicator light will automatically turn off after the system is fully
charged. You can use the following three methods of charging:
1) Use the power adapter to charge
2) Use the USB 2.0 adapter to charge from your computer
3) Use the 12 volt vehicle power charger
Battery Indicator Icons:
Full Charged
Half Charged
Low Battery
Note: When there is a problem with the machine caused by improper operation, these problems can be solved by
removing the battery or pressing the “Reset” button.
VI. Troubleshooting:
If the DVR system is operating under normal conditions and it encounters a problem, please refer to the
followings solutions to help troubleshoot the problem. If none of these solutions help, please contact the
manufacturer for support
System will not record video or take pictures:
Check SD card and make sure there is enough space on disk for files.
Systems stops recoding while still activated:
High definition recording uses a lot data to record and store the files. Make sure to use an SDHC compatible
high-speed TF card or a high-speed TF card with a C4 or C6 logo.
In Playback mode, A “File Error” message appears:
An error occurred with the TF card will the system was recording and caused the unit to generate incomplete or
corrupted files. Use the “Format” option in the Settings menu to reformat the TF card.
Picture is Hazy when recording:
Check to make sure the unit does not have any dirt, dust, fingerprints or any kind of grime on the camera lens.
Wipe down the camera lens with a cotton cloth to clean it.
Images are very dark when shooting water, sky or other outdoor scenes:
In higher-contrast scenes (like most outdoor scenes) the brighter light will affect the camera's automatic exposure
function. You can adjust the device for this under the Settings Menu and adjusting the "EV" value for correction.
On cloudy days or with indoor lighting, the color is not perfect:
Go into the Settings Menu of the device and make sure the “White Balance” option is set for “Automatic”.
Images has horizontal scan lines running up and down the screen:
This can be due to a wrong setting in the Settings Menu of the device. Go into the Settings Menu and select the
“Light Frequency” setting. Set the option to "50Hz" or "60Hz" depending on power supply.
Device has Crash
1) Press the reset button to restore and restart the device.
2) Press and hold the power button for five (5) seconds to turn off the device. Then press the Power button
to turn it back on.
Note: To restore the system to factory default settings, go into the settings menu and select the “Default”
setting. Press the “OK” button to restore the factory settings back to default.
VII. Technical Specifications:
FEATURE:
Image Sensor:
SPECIFICATION:
TR036 1 million pixels HD Image Sensor
MPU type:
NOVTEK
G-Sensor:
Built in (The recorded files are locked in an emergency and cannot be
overridden in cycle recording. Files must be manually unlocked by the
user to delete them from the TF card.)
TV System:
Lens:
Language:
Video Resolution:
NTSC / PAL(Optional)
140° A+ High resolution ultra wide-angle lens
Multi-language
1080P/25fps0 -
720P/30fps -
VGA/30fps (Optional)
Video type:
AVI
Loop recording:
Yes
Automatic Power
Yes (Automatically powers on with Ignition and powers down 10 seconds
after ignition is off)
Off:
Motion detection:
Yes
Date recording:
Yes
Picture resolution:
Picture type:
Storage capacity:
Microphone:
Current frequency:
Default 5 million pixels
-
Maximum 12 million pixels (VGA / 1.3M / 2M /
3M / 5M / 8M / 10M / 12M optional)
JPEG
TF (Up to 32GB)
Built-in
50HZ / 60HZ
Power:
DC 5V 800mA /
12v200mA
Battery:
Built in Lithium Ion (180mAh)
Note: We do our best to reflect the specifications above accurately. However, periodic updates and changes may
occur after this manual was printed. We reserve the right to change the parameters without prior notification.