1
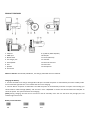
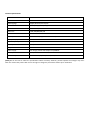
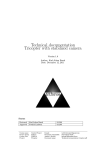
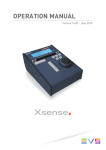
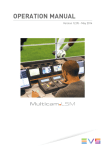
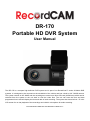
DR-170
Portable HD DVR System
User Manual
The DR-170 is a compact high definition DVR system and is part of our RecordCam™ series of Mobile DVR
systems. It is designed to be mounted on the windshield of the vehicle and has a built-in 120° CMOS camera.
The system records in HD 1080P and the recordings are stored on a Micro SD card (32GM max) which can be
retrieved from the system or the unit itself to view the video files. The unit can have the time and date
programmed into it and will display the time and date of each recording. The system also has a built-in 1.5" color
LCD screen for on-site playback of the recordings and a built-in microphone for audio recording
*PLEASE READ THROUGH THE MANUAL CAREFULLY*
PRODUCT FEATURES:
9. Up/Menu (Mute ON/OFF)
10. REC/OK
11. Down (SOS lock)
12. Indicator
13. Micro-SD card slot
14. Reset hole
15. Microphone
1. USB port
2. HDMI port
3. Bracket base
4. Car charger port
5. Power/Mode
6. Lens
7. Speaker
8. LCD Screen
What’s In the box: DR-170 DVR, 3M Mount, Car Charger, USB Cable and User Manual.
Charging the Battery:
1. Connect the DVR to car charger through Mini-USB port. The DVR will power on automatically and enter standby mode.
The red indicator light will turn on to indicate that the unit is charging.
2. Connect DVR to computer via USB cable. The DVR will power on automatically and enter an option menu letting you
select between “Mass Storage (MSDC)” and “PC-Cam”. Press “UP/DOWN” to choose the desired mode and “REC/OK” to
select the option. The system will then start charging.
[Note] During charging, the DVR can be turned on and off manually. Once the unit has been fully charged, the red
indicator light will turn off.
Battery Level Indicators:
Full
Middle
Low
Installation and Removal of Micro SD card
1. In the direction as indicated, insert the Micro SD card into the slot until it is held firmly.
2. To take the Micro SD card out, lightly press the Micro SD card to eject it out.
[Note]
- Before inserting or removing the SD card, please make sure to turn OFF DVR system.
- Please make sure to insert the SD card correctly into the DVR system. Failure to do so may result in damage to the SD
card or the DVR system.
- When the SD card is inserted into the DVR, the unit will automatically format the SD card as the default storage unit and
any data on the SD card will be unreadable.
- If the Micro SD card is incompatible with the DVR system, please re-insert the or replace the SD card.
- 4GB-32GB/C4-C10 Micro SD card supported.
Operation Instructions:
Turn the DVR On/Off DVR
1. To turn on the system manually, press and hold the power button for 1 second. To turn power off, press and hold the
power button for 3 seconds.
2. Connect the DVR unit to the car charger in the vehicle. When the vehicle ignition turns on, the DVR will switch ON
automatically. When the ignition turns off or when the car charger is disconnected, the DVR will turn OFF automatically
within 10 seconds (as per setting).
System Setup
In Video or Photo mode, press and hold ‘UP’ button to enter menu interface->DOWN->REC/OK button to enter the System
Setup:
- G-Sensor: On/Off. When G-sensor is ON, DVR will protect and lock the current video once G-sensor been triggered by
instant impacts or shocks from traffic accident or crash.
- File Type: Emergent Video (Event)/Common Video/Photo. Select the specified type of files to browse at playback mode.
-Sounds: Voice Recording On/Off, Key Sound On/Off and Volume. Press Power/Mode button to adjust and REC/OK to
confirm.
- Power Save: Off/10 sec./30 sec. Select to screen off automatically after DVR continue recording for 10 sec. or 30 sec. As
default, power save is ‘Off’ and DVR screen stays on indefinitely.
- Date & Time: Date and time adjustment.
- OSD Language: English/Russian/Korean/French/Portuguese/Chinese, etc.
- Light Freq: 50Hz/60Hz
- TV out: PAL/NTSC
- Format: Format the memory card. Select to format the memory card at the first use.
- System: Factory Reset / System Info (Version) / Card Info
- Delay shutdown: On/Off. As default, 10 sec. off delay is ON, to avoid any shutdown command caused by power
interruption during recording.
Recording Video and Setting Video Recording Menu
1. Recording video
After power is turned ON, the DVR enters Video Mode as default, with icon
icon will be displayed in the upper-left
corner of screen. Press the ‘REC/OK’ key to start video recording as long as the correct Micro SD card been inserted into
the system. During recording, the red icon
flashes.
[Note]
- When the DVR is mounted on the windshield with car charger connected, it will power ON and start recording
automatically once car ignition is turned on.
2. Video Setup Options
Press and hold the ‘UP’ button to enter the Video Setup Menu. Press the REC/OK button to enter the different video
settings.
- Resolution: 1080P (30fps) / 720P (60fps)
- Seamless (Loop Recording): Off / 1min / 3min / 5min. Select this option to store and cycle the video files by 1 minute, 3
minute or 5 minute recordings per section.
- Date Stamp: On/Off. Select to stamp the date and time on video screen as watermark.
- Motion Detection: On/Off. The DVR can be set to record ONLY when motion is detected. This can be useful while your
car is parked. In this mode, the DVR will record automatically after sensing motion and continue recording for 10 seconds
afterward. The DVR will return to standby mode if no other motion is detected.
Taking Photos and Photo Setup Menu
1. Take Photos
Press the power key to enter video recording mode as default. Press the “Mode” button to enter Photo mode. The
icon will be displayed on the upper-left corner of the LCD screen.
Then, hold the DVR firmly, press REC/OK key to take photos. Photos will be stored into memory card automatically.
2. Set Photo Menu
Hold the DVR firmly and press “OK” on the LCD screen or press “REC/OK” button to take photos. Photos will be stored into
SD card automatically.
- Resolution: 12M / 10M / 8M / 5M / 2M
- Exposure: EV -2.1 / -1.0 / 0.0 / +1.0 / +2.1
Playback Mode
1. Browse Files
After the DVR powers ON and enters Video Recording mode, press the “MODE” button twice to enter the PLAYBACK
mode. Press the “UP/DOWN” button to browse through the video files or Photo files.
[Note] If the File Type (in System Setting) is selected for “VIDEO”, then only VIDEO files (loop recording files) are available
in PLAYBACK mode. If file type is selected for “EVENT”, then only emergency video files (from G-sensor or SOS) are
available in PLAYBACK mode. If the file type is selected for “PHOTO” then only photo files are available to browse in
PLAYBACK mode.
2. Delete and Protect
In playback mode, Press the “MENU” key to view the “Delete” and “Protection Lock” options. Press the “UP/DOWN” and
“REC/OK” to navigate and select the options “Delete the current” and “Delete All”. Press the “REC/OK” button to select
your option. You may add a lock to the file. Locked files are protected files that cannot be deleted until unlocking it.
Connection to computer via USB Cable
USB Backup Mode (MSDC)
You can upload your videos and pictures to your computer by using the provided mini-USB cable. Make the connection
while DVR is powered off and the display will show 2 options: MSDC / PC-CAM. MSDC = upload to computer, Highlight the
MSDC by using the UP/DOWN keys and press REC/OK key to enter your choice. Your computer should now unload all
photos and videos.
[NOTE] To watch recorded videos, please transfer videos from memory card to the computer. This DVR is compatible with
Windows XP, Windows 7/8 and Macintosh computers.
USB Backup Mode (MSDC)
You can upload your videos and pictures to your computer by using the provided mini-USB cable. Connect to your
computer while DVR system is powered off and the display will show 2 options: MSDC / PC-CAM. MSDC allows you to
upload to computer. Select the MSDC option and your computer should now unload all photos and videos.
[NOTE] To watch recorded videos, please transfer videos from the SD card to the computer. This DVR is compatible with
Windows XP, Windows 7 and Windows 8 Operating system as well as Apple OSX operating systems.
PC-CAM
Connect the DVR to your computer while the DVR system is powered off and the display will show 2 options: MSDC /
PC-CAM. PC-CAM allows you to use the DVR as a web cam. Select the “PC-CAM” option and you will now be able to video
chat with friends on Skype or Messenger.
Connection to TV via HDMI Cable
Connect the DVR system to your home TV via HDMI cable (if available). When connected, the DVR screen will turn black
and the TV screen will show the playback menu files (Video or Photo). Press the “SOS” button to select the desired file and
press the “REC/OK” button to select your choice.
RESET
During daily operations, improper operation or incorrect memory card probably causes DVR to freeze. Please press the
RESET small key on the bottom side of DVR to power OFF the DVR. Power ON DVR manually and DVR will automatically
restore the factory defaulted settings.
Technical Specifications
Screen size
1.5″ 960x240 TFT-LCD
Lens
120° A+ class Glass lens
OSD language
English/Russian/Chinese/etc
Video resolution
1080P (30fps)/ 720P (60fps)
Video format
H.264 codec, AVI
Photo size
12M/10M/8M/5M/2M
Photo format
JPEG
Memory card
Micro SD card, support from 4GB-32GB/C4-C10
Microphone/Speaker
Built-in
Power frequency
50Hz/60Hz
TV output
NTSC/PAL
USB port
Mini-USB 2.0
Power supply
Car charger, DC12V-24V adapt to 5V/1000mA
Battery
3.7V / 350mAh
Operation system
Windows 2000/XP/Vista/Win 7/Win 8,MAC OSX 10.3.6 or above
[Note] We do our best to reflect the specifications above accurately. However, periodic updates and changes may occur
after this manual was printed. We reserve the right to change the parameters without prior notification.