1
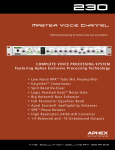
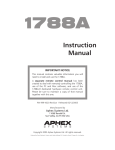
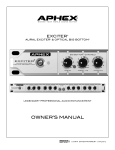
Solution Delivery Series
240
dual logic-gated
EasyRider compressor
Instruction Manual
P/N 999-4400
Revision 2
Released 03/04/2006
Manufactured by
Aphex Systems Ltd.
11068 Randall St.
Sun Valley, CA 91352
USA
S
Y
S
T
E
M
S
Copyright 2006 Aphex Systems Ltd. All rights reserved.
Produced by: Donn Werrbach. Creation tool: Adobe InDesign 2.0. Printed by: Stuart F. Cooper Co., Los Angeles.
240
instruction Manual
A MESSAGE FROM THE PRESIDENT
Dear Aphex Customer,
Congratulations on your purchase of the Model 240 Dual Logic-Gated Compressor.
We have combined two of our patented technologies- the Logic Assisted Gate™ and the Easyrider® Compressor- in an innovative,
interactive way. In an era of endless choices of low cost outboard processors, processors built into mixing desks and software plug-ins that
all leave something to be desired, we decided to introduce a product that cannot be duplicated in function or performance at any price. In
addition to the exclusive processing technologies, we decided to bring these technologies together in an attractive, easy to use package.
And we decided to bring it to market at a very attractive price.
As with all our products, we are extremely proud of the ingenuity of design and the manufacturing quality of the Model 240. We love to
hear from you, our customers, about your experiences with any of our products. Our customer support is unmatched in the industry, so
please do not hesitate to contact us.
Very Truly Yours,
Marvin Caesar
Safety Declarations
CAUTION: For protection against electric shock, do not remove the cover. No user serviceable parts inside.
WARNING: This equipment has been tested and found to comply with the limits for a Class A digital device pursuant to
Part 15 of the FCC Rules. These limits are designed to provide reasonable protection against harmful interference when
the equipment is operated in a commercial environment. This equipment generates, uses, and can radiate radio frequency
energy and, if not installed and used in accordance with the operating guide, may cause interference to radio communications. Operation of this equipment in a residential area is likely to cause interference in which case the user will be required
to correct the interference at his own expense.
The user is cautioned that changes and modifications made to the equipment without approval of the manufacturer could
void the user’s authority to operate this equipment.
It is suggested that the user use only shielded and grounded cables to ensure compliance with FCC Rules.
|
Page 2
Aphex Systems Ltd. Model 240
Copyright 2006 by Aphex Systems, LTD. All rights reserved. All Aphex products are trademarks or registered trademarks of Aphex Systems, LTD. Other brand and product names are trademarks or registered trademarks of their respective holders.
dual logic-gated easyrider™ compressor
Table of Contents
1.0 Controls and Indicators with Quick Setup ——
4
2.0 Installation & Interfacing —— 6
2.1 RACK INSTALLATION —— 6
2.2 AC LINE CONNECTION —— 6
2.3 LINE INPUT CONNECTIONS —— 6
2.4 LINE OUTPUT CONNECTORS —— 6
2.5 LEVEL SWITCH —— 6
2.6 KEY INSERT JACK —— 6
2.7 POWER SUPPLY —— 7
3.0 Using the 240 —— 8
3.1 LEARNING THE LOGIC ASSISTED GATE —— 8
3.1.1 The Easiest Gate —— 8
3.1.2 Logic Assistance —— 8
3.1.3 Brief Gate Tutorial —— 8
3.2 USING THE GATED EASYRIDER COMPRESSOR —— 8
3.2.1 Automatic Adjustment —— 8
3.2.2 Limits of Conventional Compression —— 9
3.2.3 Overcoming the Limitations —— 9
3.2.4 About Our Gated Compression —— 9
3.2.5 Brief Compressor Tutorial —— 9
3.3 COMBINING GATING AND COMPRESSION —— 9
3.4 STEREO LINKING —— 10
4.0 Warranty & Service —— 11
4.1 Limited Warranty —— 11
4.2 SERVICE INFORMATION ——
11
5.0 Specifications —— 12
5.1 GENERAL SPECIFICATIONS —— 12
5.2 ARCHITECTURAL SPECIFICATIONS ——
13
6.0 Appendices —— 14
Appendix A: Balanced and Unbalanced Lines and Operating Levels
Appendix B: Dealing With Grounds and Hum —— 15
Appendix C: Proper Wiring Techniques —— 17
Appendix D: Standard Cable Wiring —— 18
Appendix F: Helpful Wiring Table —— 22
Patent Notice ——
Aphex Systems Ltd. Model 240
——
14
24
Page 3
240
instruction Manual
1.0 Controls and Indicators with Quick Setup
LOGIC ASSISTED GATE™ (Patent #5,334,947)
The Model 240 features the award-winning Aphex Logic-Assisted
Gate technology that has been so widely acclaimed since its first
introduction with the Aphex Model 612 Expander/Gate. It never
hesitates or chatters. Once triggered, even by a microscopic transient, it progresses fully through the attack, hold, and release
sequence. All parameters are fully adjustable to let you optimize
the gating effect.
Threshold
Range: -60 to +20dB. Adjust to reliably open the gate (let sound
through) but reject unwanted background noise. The Gate can
be effectively turned off by turning the threshold all the way to
-60dB.
Attack
Range: 4uS to 100mS. Set to the fastest setting that does not cause
a noticeable click when the gate opens. Slower settings may be
useful for effects.
Hold
Range: 5mS to 500mS. Balance HOLD with RELEASE to obtain the
best gating effect. Usually a longer hold time allows you to use a
shorter release time. This can help when gating repetitive sounds
like drums. The gate can be held long enough to transition the
beats, and then a faster release can gate out the rumble and noise
more effectively. The HOLD setting should always be at least equal
to the ATTACK setting to insure the logic properly assists the attack
function.
Release
Range: 100mS to 1S. Causes the gate to close (stop audio) very
abruptly to very softly. This should be set to bring the best gating
effect to the kind of sound you have.
POWER INDICATOR
Logo glows green indicating power
is on.
POWER
SWITCH
Turns power
on and off.
Page 4
YELLOW LED
Glows when
signal is below
threshold (gatiing).
THRESHOLD
Determines
the signal
level that will
cause the
gate to open
or close.
ATTACK
Determines
the rate at
which the
gate opens
(lets signals
through) after
attenuation.
Depth
Range: 2 to 80dB. Sets the maximum amount of gain reduction the
gate will generate. At 80dB, the gate is virtually a switch. The audio
will gate completely off. Less depth will allow the gate to reduce
the signal but not necessarily cut it off. The best setting is one that
reduces the unwanted noises just enough to be useful. Deep gating
can sometimes be apparently extreme, making the sound seem
chopped, especially with high background noise levels when the
track is naked. Gated tracks added to a mix will have their gating
effects masked by other tracks, allowing deeper gating to be used
in many cases.
EASYRIDER COMPRESSOR™ (Patent #5,483, 600)
Further distinguishing the Model 240 is the award-winning
Easyrider Compressor that adapts to the complex waveforms of
audio signals to optimize loudness, consistency, and density of
sound streams without creating unwanted side effects such as
pumping or hole punching. With the simplicity of just two controls,
Drive and Release, you can get fat and punchy compression or
smooth and natural gain riding and anything in-between.
Drive
The Easyrider Compressor has a fixed internal threshold, so getting
more or less compression means driving it with more or less level.
The Drive control adjusts the signal gain ahead of the compressor to
accomplish that. It does not affect the Gate Threshold.
Speed
The Easyrider Compressor has a complex set of time constants that
adapt to the sound wave characteristics. The basal time constant
can be set by the user with the Speed control. This can be looked
at like the release time control on other compressor/limiters. With
faster speed (shorter release time) the audio will be more aggres-
HOLD
Determines how long the
gate stays open before it is
allowed to close (release).
RELEASE
Determines
the rate at
which the
gate closes
(attenuates or
cuts off the
sound).
DEPTH
Sets the limit
of how deep
the gate will
attenuate the
signal when
closed.
OFF/ON
Serves to bypass channel 1 or 2 independently
unless the Compression Link switch is in.
When linked, either IN/OUT switch operates
both channels.
DRIVE
Sets the
signal level
that drives
the compressor. More
Drive gives
more compression.
SPEED
Sets the baseline release
rate of the
compressor.
LINK
Causes the dual channels
to become a stereo pair,
forcing both channels to
track compression and
gating.
OUTPUT
Controls the
final processed output
level.
Aphex Systems Ltd. Model 240
dual logic-gated easyrider™ compressor
sively compressed and you will hear the sound becoming busier
and fatter. Regardless of the Speed setting, the automatic time
constants are working, just faster or slower.
FEATURE: COMPRESSION GATE
Many other products combine a compressor and gate, but there
are problems making them work together. Usually, you have to just
use one function. That’s because the compressor’s release occurs
during the gate’s closure. The gate is trying to reduce the signal
level while the compressor is trying to raise it. The compressor’s
gain release counter-effects (fights against) the gate.
The Model 240 features a new design first introduced in the Aphex
Model 230 Master Voice Channel. The Easyrider Compressor is gain
locked whenever the Logic-Assisted Gate activates. This holds the
compression gain constant until the gate again opens, when compression is instantly returned to active duty and continues seamlessly. Gating and Compression happily work together for the first
time in history! Even if the GATE DEPTH is set for zero, the compression gate will operate as indicated by the threshold LED.
REAR KEY INSERT JACK
Allows you to insert any kind of line level audio equipment into the
signal path of the gate’s threshold detector. Common uses are the
insertion of an equalizer to tune the detector to specific sounds or
to inject an external Keying signal to open the gate in sync with
another track. The operating level at this jack is in the vicinity of
0dBu. You should set up your inserted outboard gear accordingly.
METER
Dual two-color bargraphs indicate both compression and gating
for both channels. Compression is shown as a green down-going
bar while gating drives a red dot downwards. When the red dot is
engulfed in the green bar, it turns yellow for better contrast.
OUTPUT CONTROL
Once all processing is set where you want it, the output can be
adjusted to the perfect level as indicated by the input meters of the
following equipment.
Channel 2 controls are the same as Channel 1.
Aphex Systems Ltd. Model 240
METERS
Channels 1 and 2 each have a tri-color bargraph to display gain
reduction caused both by compression and gating. Comnpression
is indicated by a downward-moving red bar. Gating is indicated by
a downward moving dot that appears yellow while nested within
the red bar, and green when outside of the red bar. Gating and
compression have separate scales.
Page 5
240
instruction Manual
2.0 Installation & Interfacing
2.1 RACK INSTALLATION
The Model 240 occupies a single rack space (45mm or 1-3/4 inches) of a standard EIA equipment rack. When
rack mounting, use appropriate cushioned rack screws. Never restrict air flow through the device’s vents. When
installing the units into a rack, distribute the units evenly. Otherwise, hazardous conditions may be created
by an uneven weight distribution. Connect the unit only to a properly rated supply circuit. Reliable earthing
(grounding) of rack mounted equipment should be maintained. Try not to position the 240 directly above
devices that generate excessive heat such as power amplifiers (unless adequately ventilated) or near equipment
with heavy transformer hum fields.
Figure 2-1. Rrar Panel View
2.2 AC LINE CONNECTION
Use only a power cord that carries approvals for use
in your location. The 240’s internal power supply is
designed to operate from all nominal power sources
from 100 to 240 volts a.c. at 50/60Hz without requiring the user to change any settings. In case of failure,
do not attempt to change the internal fuse because
it will never blow unless the power supply fails catastrophically. The power supply will need to be serviced
by a competent service technician in such a case.
to feed separate equipment.
The outputs can be used unbalanced. If you
intend to make an unbalanced output from
the XLR jack, simply take “hot” from pin 2 and
use pin 1 for ground. Leave pin 3 unconnected.
Unbalancing the TRS jack simply requires taking
the “tip” as hot, and sleeve as ground. If you
ground the sleeve, you will also be grounding
pin 2 of the XLR which will make it operate as
an unbalanced output.
2.3 LINE INPUT CONNECTIONS
The audio line input connectors are located on the
rear panel. Both standard XLR-3F and 1/4” TRS types
are provided. The TRS jack is paralleled with the XLR,
so they load each other and shorting one brings down
the other. Do not plug two different sources into the
two jacks at the same time.
Refer to Appendix C & D for more information on the
proper wiring of balanced and unbalanced lines.
2.4 LINE OUTPUT CONNECTORS
There are two impedance balanced output connectors located on the rear panel: one 1/4” TRS phone
type and one XLR-3M type. They are driven from the
same output circuit but can be used at the same time
2.5 LEVEL SWITCH
The Model 240 is designed to operate at either professional (+4dBu) or semi-pro (-10dBV) levels. Each
channel has its own level selector switch on the
rear panel. If not enough compression drive can be
attained using the +4dBu setting, then switch it to
-10dBV.
2.6 KEY INSERT JACK
The signal that is sent to the gate’s threshold detec-
Figure 2-2. Key Insert Adapter Cable For The Model 240
Mono (TS) Phone Plug
From Equipment Output
Ground Shield This End Only
Tip
To TRS
Key Insert Jack
Ring
To Equipment Input
Mono (TS) Phone Plug
Page 6
Sleeve
Ground Shield This End Only
Aphex Systems Ltd. Model 240
dual logic-gated easyrider™ compressor
tor passes through the Key Insert Jack so you may
insert an equalizer or external key source. With no
plug inserted, the jack’s switches normal the signal
through. With a plug inserted, the path is broken and
must be completed through an external unbalanced
path. See Figure 2-2 for an example of a proper breakout adapter cable.
2.7 POWER SUPPLY
The 240 is internally powered from a standard IEC
power receptacle on the rear panel. Be sure you use a
power cord that is approved for use in your jurisdiction.
ACCEPTABLE POWER RANGE
85 to 265V~, 50 to 60Hz
Soft-start, overload foldback limiting, and accross-theline voltage spike protection is incorporated to protect
the power supply from damage that might be caused
by component failure or power line disturbances. If
the internal fuse blows out, a catastrophic failure has
occurred and simply replacing the fuse will not fix the
problem. Due to the extensive protective measures
used, it is highly unlikely a catastrophic power supply
failure will ever occur. However, if it does, you should
contact the factory or a competent service technician
to affect repairs. There are no user serviceable parts
inside.
Aphex Systems Ltd. Model 240
Page 7
240
instruction Manual
3.0 Using the 240
Figure 3-1. Front Panel View
3.1 LEARNING THE LOGIC ASSISTED GATE
3.1.1 The Easiest Gate
Books aren’t much help in learning how to use a
Noise Gate effectively. Only direct experimentation
with audio sources can bring you to any point of proficiency. Luckily, the Logic Assisted Gate of the Model
240 is by far the easiest full featured gate to master
and use well.
3.1.2 Logic Assistance
What makes the Logic Assisted gate different is the
digital logic that is used to absolutely guarantee the
gate opens, holds, and releases exactly the same way,
as set by the controls, every time. Standard Noise
Gates operate on the principle that the audio wave
itself not only triggers the gate, but the power in the
wave is used to force open the gate and hold it open.
When the wave is low in power, such as a transient
drumbeat, or a spoken voice, the gate may open too
late, not fully open, chatter, or perhaps not even open
at all.
With Aphex’s Logic Assisted Gate, these things can’t
happen. If the threshold is reached, even by the
shortest transient, the logic system takes over and
operates the gate without depending on the power
of the sound wave. Logic will cause the full attack,
hold, and release to occur as determined by the front
panel adjustments. Even with a very slow attack setting, a short transient like the leading edge of a snare
tap will bring the gate open fully. This translates to
extremely consistent gating with a threshold setting
that is far less critical. The full range of expression can
be gated successfully whereas with a standard Noise
Gate, it’s almost impossible to find a reliable threshold
setting that won’t miss some of the beats or misfire
on crosstalk.
IMPORTANT NOTE
To insure the logic function, the HOLD time
should always be set to a value at least equal to
the ATTACK time.
Page 8
3.1.3 Brief Gate Tutorial
Here is a basic procedure for getting the benefits of
the Logic Assisted Gate. Of course, different sources
like voices, drums and guitars need different settings.
This example uses a recorded or live drum track:
1. Set Threshold, and Depth full CCW
2. Set Attack, Hold and Release full CCW.
3. Start the drum track. You won’t hear it yet because
the gate threshold is too high.
4. Begin turning the Threshold CCW until drum beats
start popping the Gate open. At first only the hardest
beats will pop through. Find the point where you can
get all the desired weaker beats.
5. Increase the Hold time until drums don’t quench
between pattern beats.
6. Increase the Release time to make the drum trails
sound more natural, but still quenched enough to
quiet the in-between noises and crosstalk from other
drums.
7. Slow up the attack time just to see how it affects
the drum attack. Find the setting you like most.
8. Reduce the Depth to the point where you get
enough noise attenuation but not necessarily a deep
dark sonic abyss (unless it’s what you want).
That’s about it. Most users will get the nack within
a few minutes. You will probably discover numerous
gating effects that you like while experimenting. One
thing the Logic Assisted Gate can do that no other
Gate can is to attack very slowly while still triggering positively every time. Try really slowing the attack
down and hear the almost “backwards drum” effect
it produces.
3.2 USING THE GATED EASYRIDER COMPRESSOR
3.2.1 Automatic Adjustment
The Easyrider Compressor takes into account what
other compressors don’t: the audio wave’s complex
energy level. It makes using compression exceptionally
easy by making adjustments automatically.
Aphex Systems Ltd. Model 240
dual logic-gated easyrider™ compressor
3.2.2 Limits of Conventional Compression
Audio sources vary considerably in their peak and
average power levels. For example, when sounds are
already compressed and dense, their peaks are suppressed and the average energy level is relatively high.
Uncompressed, natural sounds have much less average energy compared to their peak level. Each sound
has its own peak to average ratio and wave envelope
shape. That’s why no particular attack and release settings of a conventional compressor can work well on
everything. You always have to fiddle with a regular
compressor’s settings to get a good sound, and still
it may not ever be quite right. That’s because it can’t
follow and adjust itself for the varying audio characteristics.
3.2.3 Overcoming the Limitations
The Easyrider Compressor constantly changes its
attack and release characteristics to adapt to varying
audio waveforms. It can hold up a consistent punch
and density over a whole mix of sounds, but it can
handle the expression and density of a single instrument or vocal track equally well. You can use it to
ride gain smoothly over an audio track, or to bring all
the elements closer together in loudness and density
without ever getting the “sucked out” effect of regular compression.
Figure 3-2. Jumper Locations (one per channel)
again starts, it is already sitting at the right gain reduction and just continues tracking along seamlessly. You
don’t get the front-edge breath exaggeration or
“chiff” of typical compressors.
If, or any reason, you decide you don’t want
compression gating to take place, you can disable the feature by moving internal jumpers
(one per channel).
3.2.5 Brief Compressor Tutorial
One of the advantages of the Easyrider Compressor is
its ultimate simplicity with only two controls to adjust.
Here’s an example of how to set it up successfully.
3.2.4 About Our Gated Compression
It would be a disadvantage if the Logic Assisted Gate
were to start attenuating the noise as it should, while
the compressor gain-releases bringing the noise right
back up at the same time. This is what happens in
other compressor/gate products. It greatly limits their
usability in combination. The Model 240 fixes that
problem by gating the gain reduction of the compressor while the gate is acting. In other words, the
compression is stopped and cannot release while the
gate is closed or closing.
1. Start audio through the Model 240
2. Set the Gate “off” by setting its threshold full
CCW.
3. Adjust the Drive control to get something like 6dB
of compression
4. Adjust the Speed control from slow to fast to locate
a sweet spot for the particular sound track.
5. Readjust the Drive to obtain enough compression
to ride the gain or get the density you need. This may
be as little as 3-4dB of compression or as much as
20dB.
This provides perfect cooperation between the gate
and compressor at all times. It also has the added
advantage of smoothing out the compression during
sound pauses. Instead of having to attack all the way
back into full gain reduction whenever the sound
That’s it! It’s just that simple.
Aphex Systems Ltd. Model 240
3.3 COMBINING GATING AND COMPRESSION
Using the Logic Assisted Gate and the Easyrider
Compressor is easy. As described above, they are very
Page 9
240
instruction Manual
Using the 240
cooperative. Simply adjust the gate first followed by
the compressor - in the order they appear on the
front panel.
3.4 STEREO LINKING
The Model 240 is a dual channel device that can
be stereo linked. Normally, only the compressors
are stereo linked by pressing the Compression Link
button. This links the baseline compression together,
but still allows independent compression activity for
transient control. The advantage of that is maintaining perfect stereo balance but avoiding cross-channel ducking on single-channel transients. The sound
remains much more natural.
Gating is left independent in order to facilitate the
best possible noise reduction.
When Stereo Linked, the two IN/OUT switches
become interconnected so either one will send
both channels out of bypass.
Page 10
Aphex Systems Ltd. Model 240
dual logic-gated easyrider™ compressor
4.0 Warranty & Service
4.1 Limited Warranty
PERIOD
One year from date of purchase
SCOPE
All defects in workmanship and materials. The following are not covered:
a. Voltage conversions
b. Units on which the serial number has been defaced, modified, or removed
c. Damage or deterioration:
1. Resulting from installation and/or removal of the unit.
2. Resulting from accident, misuse, abuse, neglect, unauthorized product modification or failure to
follow instructions contained in the User’s Manual.
3. Resulting from repair or attempted repair by anyone not authorized by Aphex Systems.
4. Occurring from shipping (claims must be presented to shipper).
WHO IS PROTECTED
This warranty will be enforceable by the original purchaser and by any subsequent owner(s) during the warranty
period, so long as a copy of the original Bill of Sale is submitted whenever warranty service is required.
WHAT WE WILL PAY FOR
We will pay for all labor and material expenses for covered items. We will pay return shipping charges if the
repairs are covered by the warranty.
LIMITATION OF WARRANTY
No warranty is made, either expressed or implied, as to the merchantability and fitness for any particular purpose. Any and all warranties are limited to the duration of the warranty stated above.
EXCLUSION OF CERTAIN DAMAGES
Aphex Systems’ liability for any defective unit is limited to the repair or replacement of said unit, at our option,
and shall not include damages of any other kind, whether incidental, consequential, or otherwise.
Some States do not allow limitations on how long an implied warranty lasts and/or do not allow the exclusion
or limitation of incidental or consequential damages, so the above limitations and exclusions may not apply to
you.
This warranty gives you specific legal rights, and you may also have other rights which vary from State to State.
4.2 SERVICE INFORMATION
If it becomes necessary to return this unit for repair, you must first contact Aphex Systems, Ltd. for a Return
Authorization (RMA number), which will need to be included with your shipment for proper identification. If
available, repack this unit in its original carton and packing material. Otherwise, pack the equipment in a strong
carton containing at least 2 inches of padding on all sides. Be sure the unit cannot shift around inside the
carton. Include a letter explaining the symptoms and/or defect(s). Be sure to reference the RMA number in your
letter and mark the RMA number on the outside of the carton. If you believe the problem should be covered
under the terms of the warranty, you must also include proof of purchase. Insure your shipment and send it
to:
Aphex Systems, Ltd.
11068 Randall Street
Sun Valley, CA. 91352
PH: (818) 767-2929 FAX: (818) 767 -2641
Aphex Systems Ltd. Model 240
Page 11
240
instruction Manual
5.1 GENERAL SPECIFICATIONS
5.0 Specifications
LINE INPUTS
Connector:
Type:
Input Z:
Maximum Input Level (MIL):
CMRR:
Nominal Gain:
Operating Level:
XLR-3F & 1/4 in. TRS phone Jack each channel
Balanced, may be used unbalanced
10KΩ nominal
+24dBu
Greater than 70dB @ 60Hz
0dB
Switched between -10dBV and +4dBu; channels independent
OUTPUT
Connector:
Type:
Output Z Balanced:
Output Z Unbalanced:
Nominal Level
Maximum Output Level (MOL):
XLR-3M and TRS 1/4 in. phone jack
XLR is Impedance Balanced (may be used unbalanced); TRS is unbalanced.
XLR & TRS: 66Ω
XLR & TRS: 33Ω
Same as input, determined by operating level switch
+25dBu Unloaded
COMPRESSOR
Attack/Release:
Ratio:
Threshold:
Knee:
Program dependent, user variable release baseline.
3:1
Fixed
Medium Hard
GATE
Attack:
Hold
Release:
Threshold:
Depth:
Variable, 4 uSec to 100 mSec
Variable, 5 mSec to 500 mSec
Variable, 100mSec to 1Sec
Variable, +20 to -60dB
Variable, 0 to 80dB
GATE INSERT
Connector Type Send:
Connector Type Return:
Nominal Operating Level:
Point of Insertion:
1/4” TRS Phone Jack, Balanced
1/4” TRS Phone Jack, Balanced
0dBu
Between input stage and gate detector
ANALOG AUDIO
THD:
IMD:
Freq Resp (FLAT):
OTHER SPECS
Power requirements:
Power Consumption (maximum):
Dimensions:
Depth Behind Front Panel:
Net Weight:
Shipping Weight:
<.01% @ +4dBu Out
<.01% @ +4dBu Out
5Hz to 65KHz +/- 1dB
85 to 260V~, 50-60Hz
12 Watts
19” W x 1.75” H x 8.25” overall depth (482.6mm W x 445mm H x 209.6mm overall depth)
7.5” (190.5mm)
Rack-mounted: 6lbs. (2.73kg)
9lbs. (4.1kg)
All specifications are subject to change without notice.
Page 12
Aphex Systems Ltd. Model 240
dual logic-gated easyrider™ compressor
5.2 ARCHITECTURAL SPECIFICATIONS
Basic Description
A two-channel linkable dynamics processor comprising a noise gate and a compressor for each channel. The
compression of the two channels shall be linkable for stereo operation. The gate and compression elements
shall be cooperative when the gate is cutting down the channel gain, such that any compression gain reduction
that was present when the gate started attacking will be locked steady so as not to counter-effect the gate.
The Noise Gate shall comprise a logic operated process whereby any threshold detect, regardless of transience
or weakness above threshold, causes the full attack and hold sequence to complete. The threshold detecting
circuit shall have a rear panel insert jack to allow insertion of outboard processor devices between the trigger
source and the threshold detector.
The Compressor shall comprise an adaptive dynamic range compressor with multiple time constants that can
adjust to varying audio waveforms to provide optimized compression.
Physical Properties
The device shall be packaged in an all metal chassis measuring 19” (482.23mm) wide, 1.75” (44.42mm) high,
with an overall depth of 8.25” (210mm). Depth behind the front panel shall be approximately 7” (178mm).
The device shall have a net weight of approximately 6lbs. (2.73kg) and is capable of mounting in a standard
electronic equipment rack.
Power
The unit shall have a self contained power supply operating from the ac line. Primary voltage, connectorization
and agency listings shall be appropriate to meet local requirements.
Aphex Systems Ltd. Model 240
Page 13
240
instruction Manual
6.0 Appendices
Appendix A: Balanced and Unbalanced
Lines and Operating Levels
Interfacing all types of equipment with balanced
and unbalanced lines and can sometimes be troublesome. First you have to somehow connect balanced
to unbalanced and then you have to deal with different levels. This tutorial will teach you about the
principles of balanced and unbalanced lines, wiring
standards, and how to effectively interface them.
Standards
Professional audio equipment usually comes equipped
with inputs and outputs that are balanced using
3-pin XLR connectors and sometimes 1/4 inch phone
jacks as well. This equipment most often is designed
to operate at +4dBu, a professional industry standard. That translates to a magnitude of 1.23 volts
RMS (Root-Mean-Squared).
wire is the source and which is the return alternates
accordingly. In this regard, balanced and unbalanced
lines are the same. They both need two conductors.
What makes a system unbalanced is when one of
the wires is formed into a tube that wraps around
the other conductor, without touching it, such that
the outer conductor can be said to “shield” the inner
conductor. This describes all of the coaxial cable used
for video, cable-TV and radio as well as most of the
high fidelity audio cables.
Figure 1 Balanced Line Model
Consumer gear has unbalanced I/O as standard, usually on RCA jacks. The normal operating signal level
follows the IHF (Institute of High Fidelity) standard of
-10dBV, or 0.316 volts (316mV) RMS. Converting to
dBu dimensions, this works out to be the same as
-7.79dBu. There is therefore a difference of 11.79dB
between pro and consumer operating levels.
Grounding
There is the notion that some king of earthly “ground”
exists out there that sinks all the noise and acts as
some kind of a shield. You see wires connected to
ground rods and water pipes that are supposed to
get a good ground. This is not a correct interpretation of grounding from an audio standpoint. Proper
grounding of equipment and wiring is important and
you will gain a better understanding of that as you
read along.
Balanced -vs- Unbalanced
Every audio signal is connected through a circuit. The
circuit must contain two conductors to create a complete return path. In other words, a signal voltage is
conducted to a piece of equipment by injecting a current into a wire. That current has flow though to the
destination through the wire and return back to the
source through another wire. Since audio is an alternating voltage, swinging through negative and positive polarity, the current through the two conductors
changes direction each alternate half cycle. Which
Page 14
Figure 2 Unbalanced Line Model
Balancing
If both conductors are identical insulated wires that
are twisted together, then they form a balanced line.
This describes telephone lines, microphone cables,
and most professional audio cables. Typical balanced
cables include an additional shield wrap around the
twisted pair, but this is not strictly required for balanced lines to work properly.
Many people, because they have more experience
with unbalanced wiring, think that balanced is confusing. Believe it or not, balanced lines are really
easier to understand than unbalanced. There is no
grounding issue with balanced, and the way it works
is perfectly natural and simple. Balancing naturally
rejects hum and noise and eliminates all sorts of complications in interfacing.
Balanced transmission works something like this.
Aphex Systems Ltd. Model 240
dual logic-gated easyrider™ compressor
Your balanced input stage looks at the two wires
and detects only the potential (voltage) difference
between them. Anything that is the same on the two
wires (for all practical purposes as seen measuring
from ground) is called a common mode signal and
is cancelled out by the differential amplifier. Figure
1 illustrates how the hum is induced into both wires
equally and therefore is cancelled out.
Since the balanced line has wires that are twisted
together, each wire tends to pick up the same amount
of induction from external sources. Induction will
create no significant voltage difference between the
wires, hence the noise (or hum) will not be picked up
by the differential input stage.
i.e., there is no “grounding difference” that can
cause current to flow through the shield conductor.
Grounding difference is a serious problem in studios,
because often the equipment grounds are connected
to power outlet grounds, and there can be a significant difference of ac voltage between alternating
wall outlet grounds. For this reason, unbalanced systems can sometimes never be made hum free, and
just changing one piece of equipment in a studio can
cause hum to appear somewhere else. When you are
using unbalanced gear, it is a very good procedure
to power all your equipment from one large power
isolation transformer. At the very least, make sure all
equipment is powered together off the same distribution panel circuit (same circuit breaker).
It can be seen that the signal generator driving the
twisted pair will cause a difference between the wires,
and that signal will be readily picked up by the differential input stage. One of the beauties of the balanced line is that it is completely independent from
ground. Nothing is connected to ground at all, nor
does it care about ground. Nevertheless, most professional cable has an overall shield wrap that is
intended to be connected somehow to ground. You
may well ask why, and the answer is less than glorious. Simply, nothing is perfect, not even balanced
cable. Under some circumstances the shield can overcome extreme interference problems that can’t be
adequately rejected by the twisted pair alone. Things
like 2-way radios, television transmitters, and light
dimmers can induce very heavy interference that may
be reduced by shielding. You are going to find virtually all balanced cables include a shield so you need
to deal with it, even if it is not actually needed. That
subject will be addressed a little later.
Appendix B: Dealing With Grounds and
Hum
Unbalancing
Unbalanced wiring works a little differently. Figure 2
shows the basic plan. In this case, the wires are not
twisted, they are coaxial. The unbalanced input stage
is somewhat like the balanced input stage because
amplifies a difference signal, but this time it is the
difference between two non-symmetrical conductors. To make things even less symmetrical, the outer
conductor is connected to ground at both ends. The
principle is that the outer shield conductor shields
the inner conductor from induced noises. This can
only work well if the cable is relatively short and the
ground at each end of the cable is somewhat equal,
A ground loop is an ac current that has become
routed through your audio ground system. The current comes mainly from ground potential differences
that exist between different wall outlets that return
to opposite phases at the power distribution panel.
Secondarily, however, many pieces of equipment contain line filters and transformers that leak a small
amount of ac power into the chassis and ground
return.
Aphex Systems Ltd. Model 240
Ground Loops
Many people equate this term with hum, and that’s
just about the bottom line of it. If you have a ground
sensitive system, like unbalanced audio equipment
for example, then hum will result from ground
currents that flow from the ac power system. It is
sometimes very difficult to isolate and stop ground
currents between unbalanced equipment, but it is
quite easy to clean up balanced gear. That’s why pro
gear is always balanced! The cost of balancing is that
of more expensive connectors, cable, and electronics
but the cost is worth it when you depend on your
audio quality. That’s why the Model 240 is equipped
with a fully balanced I/O. Now that we’ve sold you
on only using really expensive pro gear, lets show you
how to get away with the really cheap stuff! At least
from the standpoint of killing ground hum.
You may once have had the experience of getting
zapped by touching two pieces of gear at the same
time. That illustrated the ground loop effect going
Page 15
240
instruction Manual
6.0 Appendices
straight through you! No matter what you do, you
may not be able to prevent some of your equipment
from generating ground currents. The most likely culprits are digital products because they use switching
power supplies that require heavy line filters to prevent conducted EMI from going out of the box. These
line filters often take the ground leakage current right
up to the UL safety limits. Although it probably won’t
kill you, that is a lot of ground loop current for audio
cables to handle.
There are basically three ways to attack the problem
of a ground loop. First is to eliminate it from its
source, and the second is to re-route it through
another path. The third is to balance out your unbalanced audio interfaces.
Identify the Sources
A good way to identify grounding problems is to use
a multimeter to check the ac voltage between the
chassis of your various gear when no audio cables are
hooked up and all gear is plugged in and switched
on. Just start touching the two probes to the metal
chassis of different pieces of gear. Ideally, you should
always see zero volts. Warning! You may see as much
as the whole line voltage between two different chassis! It does happen. This voltage between chassis will
be responsible for your ground loop problems. If
you find there is more than about 1 volt between
equipment grounds, you should start looking for a
remedy.
Commonize the Power
Try plugging all of your equipment into the same
outlet strip. Get one that has enough outlets in one
strip or string more than one together. Of course, you
need to make sure you don’t overload the one ac circuit your strip is plugged into. If the load is too great
for one circuit, use a second or third circuit that is
tapped off the same 120 volt phase in your distribution panel. That means all outlets should be on odd
or even numbered circuit breakers. That’s because,
as you go down the column, the circuit breakers
tap into alternating legs of your incoming electric
power. Be sure you’re always on the same leg. You
can tell you’re on the same leg by measuring the ac
voltage between the hot slots of the different outlets
you’ve chosen. It should be very low or zero. That will
remedy 50 percent of the cases.
For products that have 2-wire power cords, try reversing one of the power cords in the socket. That may
reduce the ground current generated by the internal
electronics of the offending gear.
Redirect Ground Loops
Sometimes it just comes down to brute force grounding. That means providing such heavy, low resistance,
ground current paths that little current is left to flow
through your audio grounds. You can try adding
heavy gauge, for example 12 gauge, copper wire
from chassis to chassis. You will need to locate a
metal screw that solidly binds to the metal chassis of
the gear. You may even need to drill a hole through
the chassis and install a screw yourself. Equipment in
rack shelves can have their chassis grounded to the
metal rack frame by a heavy wire and the frame itself
can act as a brute force ground. You just have to try
everything you can think of. Usually a combination of
all these methods will be needed to completely clean
up a badly humming audio system.
Balance Out the Audio
Remember, balanced lines are inherently hum free.
If you can balance out your unbalanced equipment,
you will be able to stop the hum.
Pseudo Balancing
You will find in Appendix D an interconnecting
method called Pseudo Balanced. This works when
connecting an unbalanced output to a balanced
input. This breaks up the ground loop by requiring
the shield to be grounded only at one end. For best
results always ground the shield only at the receiving
end.
Level Interface Units
Aphex manufactures the Model 124A Level Interface
box which is designed to electronically convert two
unbalanced inputs and outputs into two balanced
inputs and outputs, and at the same time translate
the -10dBV IHF unbalanced levels to the pro +4dBu
balanced levels. This cost effectively gives your nonprofessional unbalanced equipment a fully professional I/O equal to the world’s best pro audio gear.
Seriously consider putting one of these on each
unbalanced piece of gear you use.
Check the Cord Polarity
Page 16
Aphex Systems Ltd. Model 240
dual logic-gated easyrider™ compressor
Avoid Transformers
The use of balancing transformers is an option, but
you will invariably lose audio quality due to transformer limitations. Try everything else first.
Appendix C: Proper Wiring Techniques
A true balanced line should be used wherever your
equipment allows. Use “twisted pair” shielded cable.
For unbalanced wiring you should use high grade,
low capacitance shielded wire for best results. If you
have an unbalanced output but have a balanced
input, the “pseudo-balanced” configuration may help
deal with ground loop hum. This method and others
are illustrated in Table 2.
CONNECTOR WIRING STANDARDS
The 3 pin XLR, 1/4” (63.5 mm) TS mono phone and
the 1/4” (63.5 mm) TRS stereo phone are the most
commonly used line level connectors in pro audio.
Less common is the use of the “RCA” phono jack,
which is essentially a consumer type connector. The
XLR and the TRS are three conductor and are used for
balanced connections. The TS and the RCA are two
conductor and are used for unbalanced connections.
In addition to the three main contacts on an XLR
there is also a grounding lug contact. This lug is connected to the connector’s case (shell). In all Aphex
products audio ground and chassis ground are one
and the same. Aphex products that use XLR connectors tie Pin I to the XLR case automatically. Therefore it is not necessary to use the XLR case-ground lug.
This also makes possible the use of XLR ground drop
adapters (see Note 3).
TABLE 1: The wiring convention shown is now standardized in 17 countries including the USA. Please
note that any equipment that still uses Pin 3 as positive on XLR connectors is not adhering to the standard.
THE PIN 1 DILEMMA AND HOW IT AFFECTS
CABLE SHIELD CONNECTIONS
The three main contacts on an XLR (or TRS) and
the accepted wiring assignments shown above are
only part of the picture. The standard for terminat-
Aphex Systems Ltd. Model 240
ing ground is Pin 1 (Sleeve). But which ground? It
could be connected to audio signal ground or chassis
ground depending on the method of grounding used
by the equipment manufacturer. In all Aphex products audio ground and chassis ground are one and
the same at all I/O jacks. This is just good, common
sense engineering practice (which is what you would
expect from us, course). Unfortunately, many products are designed so that the noisy currents from
the shield drain into signal ground instead of chassis ground. This practice creates a real hum and
noise problem for end-users. The appropriate overall
grounding scheme of an audio system would be a lot
easier to predict without this problem1.
The standard balanced line wiring recommendation
from Aphex Engineering is this: In the majority of
cases maximum noise rejection occurs when the
shield is connected to the input ground only (especially in locations with high levels of RFI). That means
the sending end shield should be left disconnected.
However, if you already have cables with the shield
connected at both ends, go ahead and try them
out. If you are connecting a fairly simple audio
system it may be fine as is.
A word on optional shield connections: Connecting the cable shield of a balanced line at both ends
creates unnecessary ground loops which may carry
noise and hum currents that can be amplified. Connecting the shield only at the sending end (instead
of the receiving end) may exaggerate common mode
noises at the receiving input stage. It can actually
increase RFI and noise more than having no shield
at all. Because of the “Pin I Dilemma” (mentioned
above) you may be forced, in some situations, to
experiment with how the cable shield is connected
to ground to eliminate a pesky hum or radio interference problem. It might be good to try XLR ground
drop adapters (see Note 3) as a method of trying
these conflicting methods out and being able to
change easily if necessary.
IMPEDANCE
Regardless of inaccuracies, it has become more or
less standard over the years to refer to balanced
lines as low impedance and unbalanced lines as high
Page 17
240
instruction Manual
Appendices
TABLE 1 - BALANCED & UNBALANCED CONNECTOR WIRING STANDARDS
3-Pin XLR
1/4” TRS Phone
Standard Wiring Convention (Balanced)
Pin-1
Sleeve
Ground/Shield (Earth, Screen)
Pin-2
Tip
Positive (Signal, High, Hot)
Pin-3
Ring
Negative (Signal Reference, Return, Low, Common)
1/4” TS Phone
RCA
Standard Wiring Convention (Unbalanced)
Tip
Center Pin
Positive (Signal)
Sleeve
Shell
Ground/Shield (Signal Reference/Return)
impedance. The fact is, however, that both balanced
and unbalanced lines are operated at low impedance in modern practice owing to the fact that all
output stages have become low impedance. A few
exceptions might be outputs from passive mixers,
instrument pickups, electric guitars and some keyboard synthesizers. It is generally ideal to drive any
audio line from a low impedance and receive into a
high impedance. Generally, a minimum 1: 10 ratio is
possible. This is called “bridging”. This has become
modern practice and all balanced inputs are normally
running 10K ohms or higher impedance. Because of
these developments, it is now no longer as critical to
consider impedance when dealing with interfacing
pro line level equipment (impedance “matching” is
mostly a requirement of the past).
A word on impedance and interfacing adapters:
If you are connecting between two line level devices
and they have different connectors (example: 1/4”
phone to XLR or vice-versa), you do not need to use
an impedance matching transformer. With very few
exceptions you are strictly dealing with a difference
in connector types and should only use hard-wired
adapters (or cables) for this situation.
APPENDIX D: Standard Cable Wiring
In relation to 1/4” phone jacks, you may see the terms
“TS” and “TRS” as abbreviations. Here is a what that
means: TS refers to the Tip-Sleeve or “mono” 2-
Page 18
conductor type and TRS refers to Tip-Ring-Sleeve or
“stereo” 3 conductor type 1/4” phone connectors.
This applies to jacks (female connectors) and plugs
(male connectors).
Note: We recommend using only conventional
1/4” phone plugs with the Model 240 and with
all other audio equipment. Professional patch
bay cords using brass PJ055 telephone type
plugs are designed only for patch bays and will
not make proper contact with standard 1/4”
phone jacks.
The following instructions show all the different ways
you will probably ever need to hook up your 240 as
well as any other equipment you may own. You will
see that connecting balanced outputs to balanced
inputs is ultimately simple and the same cable will
work for all flavors of output stages.
Connecting a balanced output to an unbalanced
input requires a little more knowledge and care.
You should refer to your equipment manuals and
determine the type of balanced output stage that is
provided, then use the correct “transition cable” as
depicted in this section. Improper transition cables
can cause crosstalk, hum, and distortion problems
within your system.
TYPES OF BALANCED OUTPUTS
Believe it or not, there are at least 5 types of balanced
output stages in use today. They may be placed
into two main classes: transformer balanced, and
Aphex Systems Ltd. Model 240
dual logic-gated easyrider™ compressor
transformerless balanced, usually called “active balanced”. Transformer balanced outputs are becoming
outdated because of their high cost and their sonic
limitations. However, they can still be found on a lot
of older equipment.
Within the transformerless class, there are several
types of circuits that are used by different manufacturers. These different types of output circuits all look
just about alike to any balanced line, but they act differently when driving an unbalanced line. You need
to observe the proper cable wiring for each type of
output circuit. We strongly recommend that you refer
to your various equipment manuals to find out what
is used in each case before hooking up to unbalanced
lines.
When connecting a balanced output to a balanced input, however, you don’t need to know
what kind of balanced output you are dealing
with. Simply treat it generically.
XLR to XLR
OK for Microphones
Standard store-bought cable. Shield grounded at both ends.
Positives: Good for microphones.
Negatives: May cause ground loops through the shield grounds if used
to connect equipment together.
Preferred for Line Levels
Shield grounded at receiving end only.
Positives: Stops ground loops and reduces noise.
Negatives: None
PART 1: BALANCED OUT to BALANCED IN
1/4” TRS Phone to 1/4” TRS Phone Balanced Cables
OK
Standard store-bought cable. Shield is grounded at both ends.
Positives: Both ends are interchangeable.
Negatives: May cause ground loops through shield contacts.
No Connect
BETTER
Custom cable. Shield is grounded at receiving end only.
Positives: Stops ground loops and reduces noise.
Negatives: Should be oriented so lifted shield is at sending end.
XLR to 1/4” TRS Phone Balanced Cables
From an Output
To an Input
Female XLR
Male XLR
To an Input
From an Output
Stereo Phone Plug
Stereo Phone Plug
No Connect
Stops Ground Loops
No Connect
Stops Ground Loops
Aphex Systems Ltd. Model 240
Page 19
240
instruction Manual
Appendices
PART 2: BALANCED OUT to UNBALANCED
IN
Voltage Balanced Outputs
It was mentioned that there are several types of balanced output stages in use today. The following diagrams show you how to properly unbalance each
type of output. If you follow these instructions, you
should have no problems.
SIMPLIFIED SCHEMATIC
Unbalancing loses half the output level.
You lose 6dB of gain.
Female XLR
Don’t Ground or Connect Pin 3
Transformer Balanced Outputs
Mono Phone Plug
SIMPLIFIED SCHEMATIC
Unbalancing loses no output level.
You retain full gain.
Female XLR
Ground Pin 3 Directly to Pin 1.
Alternatively, Carry Pin 3 Through Twisted Pair Cable
and Ground at Other End
Impedance Balanced Outputs
Mono Phone Plug
SIMPLIFIED SCHEMATIC
Unbalancing loses no output level.
You retain full gain.
Female XLR
Servo Balanced Outputs
Pin 3 Doesn’t Matter
OK Grounded or Not Grounded
Mono Phone Plug
SIMPLIFIED SCHEMATIC
Unbalancing loses no output level.
You retain full gain.
Female XLR
Ground Pin 3 Directly to Pin 1
Do Not Carry Pin 3 Through Cable and Ground
at Other End
Mono Phone Plug
Page 20
Aphex Systems Ltd. Model 240
dual logic-gated easyrider™ compressor
PART 3: UNBALANCED to UNBALANCED
Standard Cable (Guitar Cord)
Mono (TS) Phone Plug
Mono (TS) Phone Plug
PART 4: UNBALANCED OUT to BALANCED IN
Standard Method
Enhanced Method (Pseudo Balanced)
Advantage: Reduced Hum and Noise Pickup
Mono (TS) Phone Plug
Stereo (TRS) Phone Plug
(Guitar cord of Part 3 above usualy works just as well)
Mono (TS) Phone Plug
Stereo (TRS) Phone Plug
Not Used
Male XLR
Male XLR
Mono (TS) Phone Plug
Mono (TS) Phone Plug
Not Used
PART 5: “Y” INSERT CABLES (Some equipment reverses the role of tip and ring. Check your manuals.)
Male XLR
To Equipment Input
Ground Shield This End Only
Sleeve
Female XLR
Tip
Ring
Stereo Plug
To TRS
Insert Jack
Ground Shield This End Only
From Equipment Output
Don’t Connect Pin 3
Mono (TS) Phone Plug
To Equipment Input
To TRS
Insert Jack
Ground Shield This End Only
From Equipment Output
Mono (TS) Phone Plug
Aphex Systems Ltd. Model 240
Ground Shield This End Only
Page 21
240
instruction Manual
APPENDIX F: HELPFUL WIRING TABLE
Also see next page..
TABLE 2 - - TYPES OF ACTIVE BALANCED INPUT/OUTPUT CIRCUITS & INTERFACE WIRING
OUTPUT
TYPE
WIRING DIAGRAM
(Interface from OUTPUT to INPUT)
INPUT
TYPE
Resulting Interface
METHOD / LEVEL
Wire: single conductor with a shield (coax style)
1
POSITIVE (HIGH)
Unbalanced
SHIELD (GND)
Unbalanced
Wire: two conductor with a shield (twisted pair)
2
Unbalanced
POSITIVE (HIGH)
NEGATIVE (LOW)
SHIELD (GND)
Unbalanced
Pseudo
Balanced
Balanced
No Connection (see Note 4)
(see Note 4 for
Unbalanced
wiring)
Unity
Gain2
Unity
Gain2
Wire: two conductor with a shield (twisted pair)
3
Voltage
Balanced
POSITIVE (HIGH)
NEGATIVE (LOW)
SHIELD (GND)
Unbalanced
Unbalanced
6dB
Loss2
Balanced
Balanced
Unity
Gain2
Unbalanced
Unbalanced
Unity
Gain2
Balanced
Balanced
Unity
Gain2
Unbalanced
Unbalanced
Unity
Gain2
Balanced
Balanced
Unity
Gain2
No Connection (see Note 5)
Wire: two conductor with a shield (twisted pair)
4
Voltage
Balanced
POSITIVE (HIGH)
NEGATIVE (LOW)
SHIELD (GND)
NC Optional (see Note 6)
Wire: two conductor with a shield (twisted pair)
5
Impedance
Balanced
POSITIVE (HIGH)
NEGATIVE (LOW)
SHIELD (GND)
NC Optional (see Note 6)
Wire: two conductor with a shield (twisted pair)
6
Impedance
Balanced
POSITIVE (HIGH)
NEGATIVE (LOW)
SHIELD (GND)
NC Optional (see Note 6)
7
CrossCoupled
Balanced
(Aphex Servo Balanced)
8
CrossCoupled
Balanced
(Aphex Servo Balanced)
Page 22
Wire: two conductor with a shield (twisted pair)
POSITIVE (HIGH)
NEGATIVE (LOW)
SHIELD (GND)
NC Optional (see Note 6)
Wire: two conductor with a shield (twisted pair)
POSITIVE (HIGH)
NEGATIVE (LOW)
SHIELD (GND)
NC Optional (see Note 6)
Aphex Systems Ltd. Model 240
dual logic-gated easyrider™ compressor
NOTES
The following notes are referenced in the text and in Table 2 on the preceding pages.
Note 1: ADDITIONAL READING SUGGESTIONS: Sound System Engineering by Don Davis and Carolynn Davis (Howard W.
Sams and Co.), Handbook for Sound Engineers (The New Audio Cyclopedia) Edited by Glen Ballou (Howard W. Sams and
Co.) and Sound Reinforcement Handbook by Gary Davis and Ralph Jones (Hal Leonard Publishing Corp.).
For more information on the “Pin 1 Dilemma” see the June 1995 issue of the Journal of the AES (Vol.43/No.6, Audio Engineering Society, New York). This issue is dedicated to “Shields & Grounds.”
Note 2: TABLE 2: LEVEL CHARACTERISTICS (unity gain verses 6dB loss)
Diagrams 1, 2 and 4 through 8: The effective interface gain will remain at OdB for all of the interfaces shown.
Diagram 3 Balanced to Unbalanced: This configuration should be used with equipment incorporating a conventional active
balanced output stage. Most non-Aphex equipment uses this kind of output stage because of its simplicity and low cost.
Therefore, you will find yourself using diagram 3 fairly often when interfacing typical equipment together. In this case, the
interface gain will be 50% down, giving a 6dB loss of level. This is because each output driver has fixed gain and supplies
only half the balanced output amplitude. You can usually compensate for the loss by adjusting the output level or input
level settings on the associated equipment.
Note 3: XLR GROUND DROP ADAPTERS A word on using XLR ground drop adapters (and mic cables): A secondary advantage to not using the XLR case lug as a ground is the ability to use barrel style XLR “ground drop” adapters (hard-wired
female to male XLR adapters with Pin 1 disconnected). These can be used on one side of the cable to disconnect the ground
as discussed earlier. If the case lug is tied to the cable’s shield (with or without Pin 1) the cable will still be grounded to the
equipment’s ground though the XLR ground drop’s case. XLR ground drops are useful especially for live sound situations
where the same stock of XLR cable may be used for line level patching and/or for patching microphones. The reason is
that XLR cables used for microphones should never have the shield disconnected at one end. This is a safety issue for the
performing artist - microphones should always be grounded!
Note 4: If you have an unbalanced output but have a balanced input, the “pseudo-balanced” configuration may help deal
with ground loop hum. However, it is possible to wire this as an unbalanced interface. To wire unbalanced - use a coax cable
with a single conductor and a shield, wire as follows: Output (From) - connect the ground contact to the cable shield, connect the positive contact to the positive conductor; Input (To) - connect the ground and the negative contacts to the cable
shield, connect the positive contact to the positive conductor. Please note that this in fact occurs by default when plugging
an unbalanced cable with a 1/4” TS (Tip-Sleeve) phone plug into a TRS (Tip-Ring-Sleeve) phone jack.
Note 5: Some electronically balanced output circuits from other manufacturers exhibit problems when the negative output
amplifier is shorted to ground to in order to drive an unbalanced load. The grounded output amplifier pumps current onto
the ground which may cause distortion or cause the amplifier to fail. When wiring this type of output be careful to leave
the negative contact unterminated.
Note 6: Shield Option: Connect receiving end only. See text preceding Table 2 titled - THE PIN 1 DILEMMA AND HOW IT
AFFECTS CABLE SHIELD CONNECTIONS
Note 7: Single-Ended, Impedance-Balanced
Note 8: It is possible to wire this as an unbalanced interface. To wire unbalanced - use a coax cable with a single conductor and a shield, wire as follows: Output (From) - connect the ground and the negative contacts to the cable shield, connect the positive contact to the positive conductor; Input (To) - connect the ground contact to the cable shield, connect
the positive contact to the positive conductor.
Aphex Systems Ltd. Model 240
Page 23
240
instruction Manual
Patent Notice
This product is protected under one or more of the following Aphex patents.
4,578,648
4,633,501
4,843,626
4,939,471
5,115,471
5,155,769
5,334,947
5,359,665
5,422,602
5,424,488
5,450,034
5,463,695
5,483,600
5,485,077
5,612,612
5,737,432
5,848,167
5,896,458
5,898,395
5,930,374
6,266,423
Page 24
Aphex Systems Ltd. Model 240