1
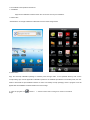
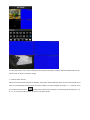
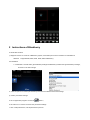
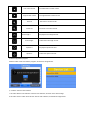
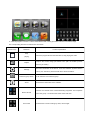
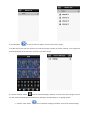
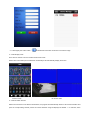
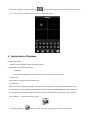
Mobile Viewer Manual 4 Channel CCTV Surveillance Kit C4CHCCTVKIT V1.0 Instruction for mobile monitor 1 Asee This module has mainly instructions on the installation and usage for Android, Blackberry, IPhone mobile phones. 1) The acquisition of client software: The client software can be obtained from the CD material supplied, then choose English and select the options supporting tools. Finally, choose the mobile phone monitoring or obtain it from technical support. Each type of corresponding client software as follows. 1. Asee.apk: The smart phone monitoring client of Android operating system 2. ASee.cod & ASee.alx: The smart phone monitoring client of BlackBerry operating system 3. ASee.sisx: The smart phone monitoring client of Symbian operating system Notes: Th e m obile p h o n e c lie n t of a pp le m o b ile ph o n e s ys te m (iO S )c a n be directly searched for ASee+ in the app store and installed online. Th e m obile p h o n e c lie n t of An droid s ys te m c a n be dire c tly s e a rc h e d fo r AS e e + in th e An d ro id m a rke t a n d installed online. 2) The main functions of the program which is straight even version of current mobile phone monitoring are shown as follows: 1. Browsing real-time video function. In addition to BlackBerry, it can support four pictures at the same time. 2. PTZ control function (the controlling ball interface is in front). 3) The instructions of three platforms is shown as follows. 1. Android 2. Blackberry 3. iPhone 4.Symbian 1.1 Instructions of Android 1.1.1 Essential condition 1) Supports version 1.5 or above of Android system. 1.1.2 Installation and operation instructions 1)Installation Support two installation modes and the user can choose one way for installation. 1. Install online Search ASee+ on Google market and install online. As the below image shows: 2. Install offline Copy the Asee.apk installation package to Android phone through cable. In the specified directory find out the corresponding .apk, click the application installation (If there is not installed apk installer in the mobile phone, the user needs to download an apk installation software so that it can identify the apk package), and the program icons will appear after the installation is finished. Refer to the above image. 3)Click the program icon image. <Asee+>,on the first screen after running as is shown in the below The functions of buttons show as follows: Table 1-1 Function keys Definition Function specification Play When the program connects with device, play video Capture the current screen(the default save path: the default pictures Capture directory of mobile) Set some information of the device, such as IP address, dynamic domain Settings name, port, username, password and device alias information. About Some device information of the software Previous group It can show the previous channels group. Next group It can show the next channels group. Choose one video channel of the device. And cooperate with "next Select channel group" can switch the 8 or 16 channels. PTZ control PTZ direction control including up, down, left and right. Zoom Zoom in/out control of PTZ. Focal length Focal length adjustment of PTZ. Aperture Aperture control of PTZ. 4)If it is first running or need to change the parameters, please click the <settings> button and enter the <Device List> page, as shown in the below image. In <device list>interface, click <Add> button and enter <settings> interface, as shown in the above image Notes: <DVR Title>:It is convenient to identify among multiple devices. <Server>:The public IP address, dynamic domain name or LAN IP of DVR (The port should be mapping before using public IP and mobile phones need to open wifi before using LAN IP). <Port>:The mobile port set in DVR(default parameter is 8888). <Us e r Na m e >:The username permitted to login the DVR(default username is ‘admin’). <Password>:The password of the user (default password is empty). <Max Channel>: The actual channel numbers of DVR. 5)After finishing, click <OK>and enter the Device List page. As shown in the below image Notes: <Back>:Back to the screen of previous image. <Channel List>:It shows the corresponding DVR and the default channel list, the user can arbitrarily choose a channel to preview an image. <Information Edit>:Click this button and enter the “Settings” interface, you can edit or delete the device information, as shown in the above image. 6)Complete settings, choose channel to preview, and the preview function include two modes: common mode and full screen mode. 1. Common mode is shown in the below image 2. Full screen mode occurs when mobile phone is laid down horizontally, whereby it will automatically switch to full screen mode, as shown in the above image. 7)Channel switch function Select some channels in the Device List interface; the program will automatically switch to the Preview Interface and open the corresponding channel preview in Preview Interface. Program displays the default 1 ~ 4 channels, if the user clicks the channel button of Next Group in the Preview Interface, the channels group will switch to 5 ~ 8, 8 ~ 12, 12~16 and circulation switch. As shown in the below image 2 Instructions of Blackberry 2.1 Essential condition 1) Supports version 4.6 or above of Blackberry system, and mobile phone screen resolution is 480*360 and 480*320. Supports 8900, 9000, 9700, 9630, 9900 of Blackberry. 2.2 installation 1)Install ASee. cod and ASee. jdp installation package into Blackberry handset through the desktop manager, as shown in the below image. 2)Click the options on mobile phone desktop and enter the interface of the above image. 3) <Asee> permission settings a. Click <application program> to find out <Asee>; b. Click the icon of <Asee> and enter the permission settings. c. Click <edit permissions>, set all permissions <permit>. Note:Some permissions cannot be set <permit> (the gray options mean cannot change this option), and click “save”. 4)Enter the initial interface Click the program icon <Asee>, after running procedure there will be a welcome page, then enter the initial interface, as shown in the below image. Notes: <Title>:It is convenient to distinguish between multiple devices. <Ad d re s s >:The public IP address, dynamic domain name or LAN IP of DVR (The port should be mapping before using public IP and mobile phones need to open wifi before using LAN IP). <Port>:The mobile port set in DVR(default parameter is 8888). <Channel total>:The actual channel number of DVR. <User ID>:The username Owens view permissions of mobile phone(default username is admin). <Password>:The mobile phone port of DVR (default password is empty). <Network type>:Choose the network type that you need. The corresponding functions of buttons show as follows: Function keys Definition Function specification Enter the playing interface, and the program will connect with device and login begin to play video exit Device list Exit the program Enter the device list interface. 5) Click <login>, play the main interface, as shown in the below image. The corresponding functions of buttons in <Main interface> show as follows: Function keys Definition Play Full screen Function specification When the program connects with device, play video Play full screen. Capture the current image (the default save path: the default pictures Capture directory of mobile) About Next group Some device information of the software. It can select the next channels group (1-4、4-8、8-16) or PTZ control. Choose one video channel of the broadcasting device and select any Select channel one of 8 channels. Up control of PTZ Down control of PTZ The up direction control of PTZ. The down direction control of PTZ. Left control of PTZ The left direction control of PTZ Right control of PTZ The right direction control of PTZ Zoom in The zoom in control of PTZ. Zoom out The zoom out control of PTZ. Focal length + Focal length - Amplify the focal length of PTZ. Lessen the focal length of PTZ. Aperture + Amplify the aperture of PTZ. Aperture - Lessen the aperture of PTZ. 6) Exit the application program Click the button <Exit> and exit the program, as the below image shows. 7) Edit the <Device List> interface 1. Click the <Device List>and enter <Device List> interface, as shown in the above image. 2. Click the <menu> button and enter the <device edit> interface, as the below image shows. The corresponding functions of buttons in < device edit> interface show as follows: Menu definition Set to real-time preview New Device Edit Delete Delete All Records Shutdown Function specification When the program connects with device, play video. Create a new record. Edit record. Delete the selected record. Delete all records. Shut down the program. 3 Instructions for iPhone 3.1 Essential condition 1) Supports version iOS 3.0 or above, and mobile phones includes iPhone, iPod, touch etc. 6.1.3.2 Installation and operation instructions 1)Run the App Store program for iPhone Switch to the search tag page, and input Asee + in the search box to find the application installation package, then click <install> .After finishing installation, there will be Asee + program icon on the mobile phone desktop, as shown in the below image. 2)Click the program icon Asee+ and the initial interface after running procedure is shown in the above image. The corresponding functions of buttons show as follows: Function keys Definition Function specification Stop When the program disconnects with device, stop playing the video. playing Capture the current image (the default save path: the default pictures Capture directory of mobile). Set some information of the device, such as IP address, dynamic domain Settings name, port, username, password and device alias information. Channels group switch About It can switch to next channels group. Some device information of the software. Choose one channel video of the broadcasting equipment. And cooperate Select channel with "next group " can achieve the switch of 8ch and 16ch. PTZ control PTZ direction control including up, down, left and right. Zoom Focal length Aperture Zoom in/out control of PTZ. Focal length adjustment of PTZ. Aperture control of PTZ. 3)Initial usage of need to change the parameter 1. Please click the settings button and enter the device manage interface, as shown in the below image. 2. Then select Add button and enter device add interface, as shown in the above image. Notes: <Device Name>:It is convenient to distinguish between multiple devices. <Address>:The public IP address, dynamic domain name or LAN IP of DVR (The port should be mapped before using public IP and mobile phones need to open wifi before using LAN IP). <Port>:The mobile phone port set in DVR(default parameter is 8888). <User ID>:The username permitted to login the DVR(default username is ‘admin’). <Password>:The password of the user (default password is empty). <Max Channel>:The actual channel number of DVR. 3. After finishing, click <OK>, enter <Device Manage> interface. As shown in the below image. 4. In the <Device Manage> page, click the <back> button, enter the <add channel> interface, then click the <+> button , as shown in the above image. 5. Click the <+> button , and switch automatically to <Device List>, as shown in the below image. 6. Click the button to view all channel numbers, as shown in the above image. 7. Double click any channel, then switch to the <channel preview> interface to preview channels, it can support four channels previewing at the same time, as shown in the below image. 8. Click the <settings> button enter the <Device Manage> interface, as shown in the above image. The user can edit, modify and delete device information by clicking the corresponding icon or slipping the item. (1)Click the <edit> button enter <parameter modifying> interface, as shown in the below image. (2)Slide rightly the <edit> button to delete the information. As shown in the above image. 4)Video display mode There are two modes: common mode and full screen mode Switch: when the mobile phone is laid down horizontally it will automatically display full screen. common mode full screen mode 5)Channel switch function Select some channels in the Device list interface, the program will automatically switch to the Preview Interface and open the corresponding channel preview in Preview Interface. Program displays the default 1 ~ 4 channels, when the channel is selected <Channel switch> button in the <preview interface>, the channels group will switch to 5 ~ 8, 8 ~ 12, 12~16 and circulation switch. As shown in the below image. 4 Instructions of Symbian 4.1 Essential condition 1) Support version OS S60 or above of Symbian system. 4.2 Installation and operation instructions Installation Supports two installation modes and the user can choose which suits them best. 1. Install online Search ASee on Google market and install online. 2. Install offline Copy the Asee.sisx installation package to Symbian phone through cable. In the specified directory find out the corresponding .sisx, click the application installation (If apk installer is not already installed in the mobile phone, the user needs to download an apk installation software so that it can identify the sisx package), and the program icons will appear. As the following figure shows. 2)Click the program icon <Asee>,the first screen after running is shown in the following figure click PTZ show as the following figure The functions of buttons show as follows: Function keys Definition Play/pause Function specification When the program connects with device, play video Capture the current screen(the default save path: the default pictures directory capture of mobile) Set some information of the device, such as IP address, dynamic domain name, settings port, username, password and device alias information. Full screen pervious/next exit For this channel full screen. Pervious to the former channel, next to the latter channel quit current software Choose one video channel of the device. And cooperate with "next group" can Select channel switch the 8 or 16 channels. Ptz PTZ control zoom Focal length Aperture PTZ PTZ direction control including up, down, left and right. Zoom in/out control of PTZ. Focal length adjustment of PTZ. Aperture control of PTZ. 3)If it is first running or need to change the parameters, please click the <settings> button <Device List> page, as shown in the following figure: and enter the Notes: 1)<server address>:The public IP address, dynamic domain name or LAN IP of DVR (The port should be mapped before using public IP and mobile phones need to open wifi before using LAN IP). 2)<port>:The mobile phone port set in DVR(default parameter is 8888). 3)<user ID>:The username permitted to login the DVR(default username is ‘admin’). 4)<password>:The password of the user (default password is empty). 5)<alias>:the record’s name After entering the above information, identify and select play.