1
®
®
Polycom RMX
1500/2000/4000
Release Notes
Version 7.1 | January 2011 | DOC2590A
Trademark Information
Polycom®, the Polycom “Triangles” logo, and the names and marks associated with Polycom’s products
are trademarks and/or service marks of Polycom, Inc., and are registered and/or common-law marks in
the United States and various other countries.
All other trademarks are the property of their respective owners.
Patent Information
The accompanying product is protected by one or more U.S. and foreign patents and/or pending patent
applications held by Polycom, Inc.
© 2011 Polycom, Inc. All rights reserved.
Polycom, Inc.
4750 Willow Road
Pleasanton, CA 94588-2708
USA
No part of this document may be reproduced or transmitted in any form or by any means, electronic or
mechanical, for any purpose, without the express written permission of Polycom, Inc. Under the law,
reproducing includes translating into another language or format.
As between the parties, Polycom, Inc., retains title to and ownership of all proprietary rights with respect to
the software contained within its products. The software is protected by United States copyright laws and
international treaty provision. Therefore, you must treat the software like any other copyrighted material
(e.g., a book or sound recording).
Every effort has been made to ensure that the information in this manual is accurate. Polycom, Inc., is not
responsible for printing or clerical errors. Information in this document is subject to change without notice.
Table of Contents
Version 7.1 - New Features List ......................................................................1
Version 7.1- Changes to Existing Features ...................................................2
Version 7.1- Interoperability Tables................................................................4
Devices ................................................................................................................................ 4
Polycom RMX and Avaya Interoperability ........................................................... 6
RMX Web Client ................................................................................................................ 7
Windows 7™ Security Settings ................................................................................ 7
Internet Explorer 8 Configuration ........................................................................... 9
Polycom Solution Support ............................................................................................. 11
Version 7.1- Upgrade Package Contents .....................................................12
Where to Get the Latest Product Information .............................................. 12
Version 7.1 - Upgrade Procedure..................................................................13
Upgrade Paths to Version 7.1 ........................................................................................ 13
Upgrading from Version 7.0/7.0.1/7.0.2 to Version 7.1 ............................................ 14
Upgrading from Version 6.0.2 to Version 7.1 .............................................................. 17
Intermediate Upgrade from Version 6.0.2 to Version 7.0.2 .............................. 17
Upgrade from Version 7.0.2 to Version 7.1 .......................................................... 19
Upgrading from Versions 6.0/6.0.1 to Version 7.1 ..................................................... 19
Intermediate Upgrade from Version 6.0/6.0.1 to Version 6.0.2 ........................ 19
Intermediate Upgrade from Version 6.0.2 to Version 7.0.2 .............................. 22
Upgrade from Version 7.0.2 to Version 7.1 .......................................................... 22
Upgrading from Version 5.0.2 to Version 7.1 .............................................................. 22
Intermediate Upgrade from Version 5.0.2 to Version 7.0.2 ............................... 22
Upgrade from Version 7.0.2 to Version 7.1 .......................................................... 24
Upgrading from Versions 5.0/5.0.1 to Version 7.1 ..................................................... 24
Intermediate Upgrade from Version 5.0/5.0.1 to Version 5.0.2 ........................ 24
Intermediate Upgrade from Version 5.0.2 to Version 7.0.2 .............................. 25
Upgrade from Version 7.0.2 to Version 7.1 .......................................................... 25
Upgrading from Version 4.x to Version 7.1 ................................................................. 26
Intermediate Upgrade from Version 4.x to Version 5.0.2 .................................. 26
Intermediate Upgrade from Version 5.0.2 to Version 7.0.2 .............................. 27
Upgrade from Version 7.0.2 to Version 7.1 .......................................................... 27
Upgrading from Versions 2.x/3.x to Version 7.1 ........................................................ 28
Intermediate Upgrade 1: From Version 2.x/3.x to Version 4.1.1 ...................... 28
Intermediate Upgrade from Version 4.1.1 to Version 5.0.2 ............................... 29
Intermediate Upgrade from Version 5.0.2 to Version 7.0.2 .............................. 29
Upgrade from Version 7.0.2 to Version 7.1 .......................................................... 29
Additional/Optional System Updates After Upgrading .......................................... 30
IVR Services Update ................................................................................................ 30
Gathering Settings ................................................................................................... 31
Upgrading the RMX Manager Application ................................................................. 32
Version 7.1 Detailed Description ..................................................................34
New RMX 1500 MPMx-Q Card Assembly ................................................................... 34
RMX 1500 System Capacities per Card Assembly .............................................. 34
Conferencing Capacities .................................................................................. 34
Resource Capacities .......................................................................................... 35
i
RMX 1500/2000/4000 Release Notes - Version 7.1
Personal Layout Control via Polycom Touch Control ............................................... 36
Guidelines .......................................................................................................... 36
Automatically Generated Dial Strings in Gateway Calls .......................................... 40
Calling a DMA Virtual Meeting Room ................................................................. 40
Calling an IP Endpoint via Gateway .................................................................... 41
Configuring the Gateway Profile ......................................................................... 41
Changes to the Gateway Profile dialog box .................................................. 41
Recording Status Indication Display ............................................................................ 44
Guidelines .......................................................................................................... 44
Content over ISDN Cascading Link ............................................................................. 45
Network Toplogies Enabling H.239 Content Over ISDN Cascaded Links ..... 45
Guidelines .......................................................................................................... 46
Gateway to Gateway Calls via ISDN Cascading Link ................................ 46
Gateway to MCU Calls via ISDN Cascading Link ....................................... 47
MCU to MCU Calls via ISDN Cascading Link ............................................. 48
RMX Configuration Enabling ISDN Cascading Links ....................................... 48
Conference Profile Definition .......................................................................... 48
MCU Interoperability Table ............................................................................ 49
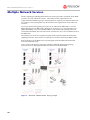
Multiple Network Services ............................................................................................. 52
Guidelines ................................................................................................................. 53
Resource Allocation and Capacity ................................................................. 53
First Time Installation and Configuration ........................................................... 54
Upgrading to Version 7.1 and Multiple Services ................................................ 55
RMX Hardware Configuration .............................................................................. 56
Gather Network Equipment and Address Information - IP Network
Services Required Information ....................................................................... 56
RMX 4000 Multiple Services Configuration ................................................. 57
RMX 2000 Multiple Services Configuration ................................................. 58
RMX 1500 Multiple Services Configuration ................................................. 59
RMX Configuration ................................................................................................. 61
System Flags and License Settings ................................................................. 61
IP Network Service Definition ........................................................................ 61
Setting a Network Service as Default ............................................................. 67
Ethernet Settings ............................................................................................... 68
Signaling Host IP Address and MCU Prefix in GK Indications ................ 68
Video/Voice Port Configuration and Resolution Configuration .............. 68
Conference Profile ............................................................................................ 68
Gateway Profiles ............................................................................................... 70
Hardware Monitor .................................................................................................. 70
Signaling Monitor .................................................................................................... 71
Conferencing ............................................................................................................ 71
Defining Dial Out Participants ....................................................................... 71
Reserving Video Resources for a Conference ............................................... 72
Monitoring Conferences .................................................................................. 72
Resource Report ....................................................................................................... 73
Port Gauge Indications ..................................................................................... 73
SIP People+Content ......................................................................................................... 74
Guidelines ................................................................................................................. 74
Monitoring SIP People+Content ........................................................................... 75
RMX Integration into Microsoft Lync Server 2010 Environment ............................. 77
ii
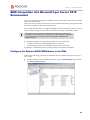
Configure the Polycom RMX FQDN Name in the DNS .................................... 77
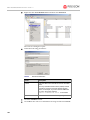
Setting the Routing for the Polycom RMX System ............................................. 79
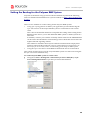
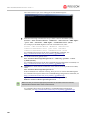
Creating a Trusted Application Pool and Setting the RMX as Trusted
Application ........................................................................................................ 81
Optional. Configuring the Lync Server Registrar for Encryption .................... 82
Creating a Security Certificate for the Polycom RMX System .......................... 82
Methods for Creating the Certificates ............................................................ 83
Method I: Using IIS Manager 7 and Microsoft Management Console ............ 83
Creating the Certificate Request for the Polycom RMX System using IIS
Manager 7 ........................................................................................................... 83
To use the Microsoft Management Console to Export the Created
Certificate .......................................................................................................... 84
Method II: Creating the Certificate Request in Microsoft Lync Server ............ 85
Creating a Temporary Certificate File ........................................................... 85
Creating the Certificate File for the RMX ...................................................... 86
Retrieving the CA Account Information ....................................................... 91
Sending the Certificate File to the RMX ............................................................... 93
Optional. Creating the Certificate Password File (certPassword.txt) ....... 93
Sending the Certificate file to the RMX ......................................................... 93
Supporting Remote and Federated Users in Microsoft Lync Server 2010 ICE
Environment ............................................................................................................. 95
Deployment Considerations ............................................................................ 96
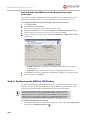
Deployment Process for the RMX Systems ................................................... 96
Task 1: Ensuring SIP Signaling Domains are Allowed ............................... 96
Task 2: Creating an Active Directory Account for the RMX ...................... 97
Task 3: Enabling the RMX User Account for Lync Server .......................... 99
Task 4: Enable the RMX Account for Remote Access and Federation .... 102
Task 5: Configuring the RMX for ICE Dialing ................................................... 102
Version 7.1 Detailed Description - Feature Changes ................................105
Personal Conference Manager (PCM) ........................................................................ 105
Guidelines ............................................................................................................... 105
System Flag ............................................................................................................. 106
PCM Interface ......................................................................................................... 107
Initiating PCM ................................................................................................. 107
Remote Control Device Keys ............................................................................... 108
Menu Navigation - Arrow and Zoom Keys ................................................ 108
PCM Main Menu - Level 1 ................................................................................... 110
Click&View ...................................................................................................... 110
Invite Participant ............................................................................................. 110
Participants Mute/Status ............................................................................... 111
Camera Control ............................................................................................... 113
Video Force ...................................................................................................... 113
Recording ......................................................................................................... 114
PCM Main Menu - Level 2 ................................................................................... 115
Drop Participant .............................................................................................. 115
Terminate Conference .................................................................................... 116
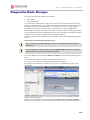
Diagnostics Mode Changes .......................................................................................... 117
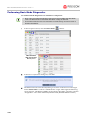
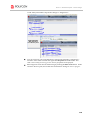
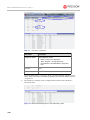
Performing Basic Mode Diagnostics ................................................................... 118
Performing Advanced Mode Diagnostics .......................................................... 121
Version 7.0 Detailed Description - SIP .......................................................126
iii
RMX 1500/2000/4000 Release Notes - Version 7.1
SRTP ................................................................................................................................ 126
SRTP Guidelines .................................................................................................... 126
Enabling Encryption .............................................................................................. 127
In the Profile .................................................................................................... 127
At the Participant Level ................................................................................. 127
Monitoring the Encryption Status ....................................................................... 128
ICE Environment Integration ...................................................................................... 129
ICE Guidelines ....................................................................................................... 129
Connecting to the RMX in ICE Environment .................................................... 129
Dialing Methods .............................................................................................. 130
Supporting Remote and Federated Users in Office Communications Server ICE
Environment ........................................................................................................... 131
Creating an Active Directory Account for the RMX .................................. 131
Enabling the RMX User Account for Office Communication Server ...... 133
Configuring the RMX for ICE Dialing ................................................................ 134
Monitoring the Connection to the STUN and Relay Servers in the ICE
Environment ........................................................................................................... 136
Monitoring the Participant Connection in ICE Environment ......................... 137
ICE Active Alarms ................................................................................................. 139
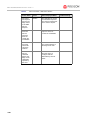
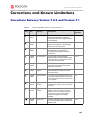
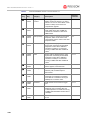
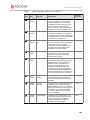
Corrections and Known Limitations .......................................................... 141
Corrections Between Version 7.0.2 and Version 7.1 ................................................. 141
Corrections Between Version 7.0.1 and Version 7.0.2 .............................................. 157
Corrections Between Version 7.0 and Version 7.0.1 ................................................. 161
Corrections Between Version 6.0 and Version 7.0 .................................................... 165
Version 7.1 System Limitations ................................................................................... 174
iv
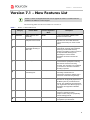
Version 7.1 - New Features List
Version 7.1 - New Features List
Version 7.1 does not support MPM cards. Do not upgrade to version 7.1 if MPM cards are
installed in the RMX and contact Support.
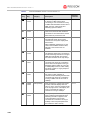
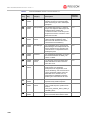
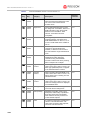
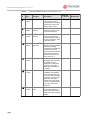
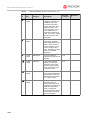
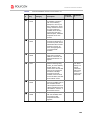
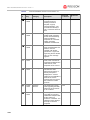
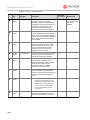
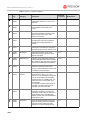
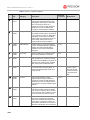
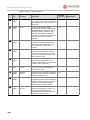
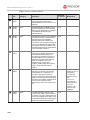
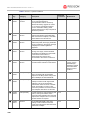
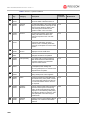
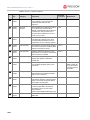
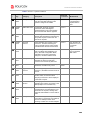
The following table lists the new features in Version 7.1.
Table 1
Version 7.1 New Features List
Category
Feature Name
Card Configuration
Mode
Description
1
Hardware
RMX 1500 new card
assembly
MPMx
A new card assembly, MPMx-Q was
added to the RMX 1500.
2
Video
Layout control via
Polycom Touch Control
MPM+, MPMx
Participants connected via HDX
endpoints can control their Personal
Layouts via the Polycom Touch Control
device.
3
Gateway
Automatically
generated dial string in
GW calls
MPM+, MPMx
Gateway Profiles can be configured to
automatically generate and forward the
dial string from the RMX Gateway
Session to the DMA in order to connect to
the required DMA Meeting Room,
eliminating the need for PSTN
participants to interact with the IVR
Service.
4
General
Recording indication
MPMx
A Recording Indication can be displayed
to all conference participants informing
them that the conference is being
recorded. The recording icon is replaced
by a Pause icon when the conference
recording is paused.
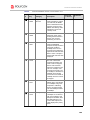
5
General
Content over ISDN
Cascading Link
MPM+, MPMx
Content can be sent over an ISDN
Cascading Link between two
conferences, between a gateway and a
conference or between two gateways.
6
IP
Multiple Services
MPM+, MPMx
Media, signaling and Management
networks can be physically separated on
the RMX system to provide enhanced
security. This addresses the requirement
in an organization that different groups of
participants be supported on different
networks.
7
SIP
P+C
MPM+, MPMx
SIP endpoints can send and receive
Content in conferences using
People+Content, Polycom’s proprietary
content sharing protocol.
8
Partners
Microsoft
MPM+, MPMx
Integration into Microsoft Lync Server
2010 (Wave 14) environment.
1
RMX 1500/2000/4000 Release Notes - Version 7.1
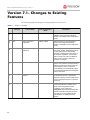
Version 7.1- Changes to Existing
Features
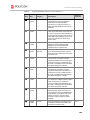
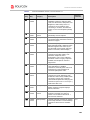
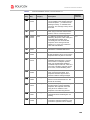
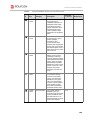
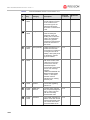
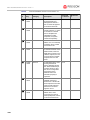
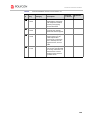
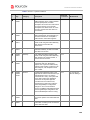
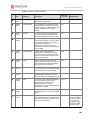
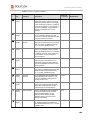
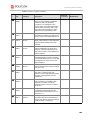
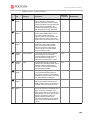
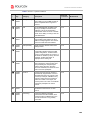
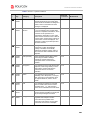
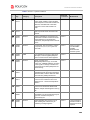
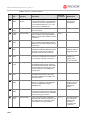
The following table lists changes to existing features in Version 7.1.
Table 2
Version 7.1 changes
Category
Feature Name
Card Configuration
Mode
Description
1
SIP
SRTP
MPM+, MPMx
Encryption of SIP Media is now supported
in MPMx Card Configuration Mode (in
addition to the MPM+ Card Configuration
Mode).
2
SIP
ICE Environment
Integration
MPM+, MPMx
ICE environment is now supported in
MPMx Card configuration Mode (in
addition to the MPM+ Card Configuration
Mode).
3
SIP
Dynamic Port
Allocation
MPM+, MPMx
When the system flag
SIP_FREE_VIDEO_RESOURCES is set
to YES, video ports are dynamically
allocated or released according to the in
the endpoint capabilities. For example,
when an audio Only call is escalated to
Video and vice versa2 or when the
resolution is changed.
4
SIP
SIP Server Registration
MPM+, MPMx
Registration of conferences, Meeting
Rooms, Entry Queues, SIP Factories and
Gateway Sessions was moved from the
Network Service to the Conference
Profile allowing you to individually select
the conferencing entities that will register
with the SIP server.
5
IP
Default Network
Service
MPM+, MPMx
A new field (Server Type) was added to
the IP Network Service - SIP Servers
dialog box, letting you select whether this
server is a Microsoft server or a general
SIP server.
6
General
PCM
MPM+, MPMx
PCM is now supported in MPMx Card
Configuration Mode (in addition to the
MPM+ Card Configuration Mode).
In addition, a new system flag
PCM_FECC allows the user to determine
whether the DTMF Code, ##, the Arrow
Keys (FECC) or both will activate the
PCM interface, or disable the PCM
feature.
2
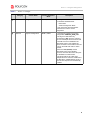
Version 7.1- Changes to Existing Features
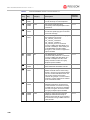
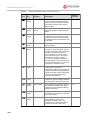
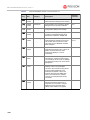
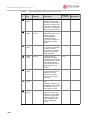
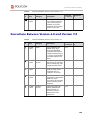
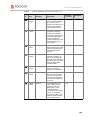
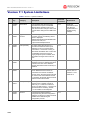
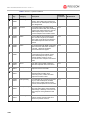
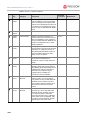
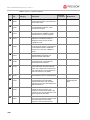
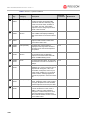
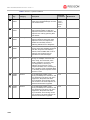
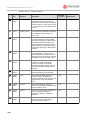
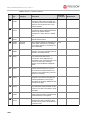
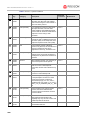
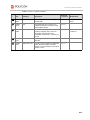
Table 2
Version 7.1 changes
Category
7
General
Feature Name
Diagnostics
Card Configuration
Mode
MPM+, MPMx
Description
Two diagnostic modes are now available
on the RMX 1500/2000/4000:
•
•
Basic Mode
Advanced Diagnostic Mode
A user must login with Administrator
permissions in order to access
Diagnostics.
8
General
System Configuration
MPM+, MPMx
A new flag was added to the system
configuration: RMX2000_RTM_LAN.
This flag is for RMX 2000 only.
Set the flag to YES, when the system is
NOT set to Multiple Services and at least
one RTM LAN card is installed in the
RMX 2000 system. This enables the
direct connection of LAN cable to the LAN
ports on the RTM LAN card for media
transfer.
When set to NO (default) and the
RMX 2000 is NOT set to Multiple
Services, the RTM LAN card’s LAN ports
are disabled for media transfer.
This flag should be set to NO when
Multiple Services License is installed and
the MULTIPLE_SERVICES flag is set to
YES as the LAN ports are automatically
enabled.
3
RMX 1500/2000/4000 Release Notes - Version 7.1
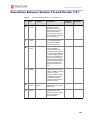
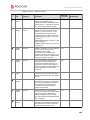
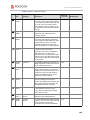
Version 7.1- Interoperability Tables
Devices
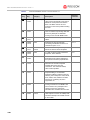
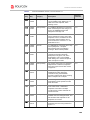
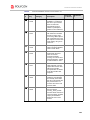
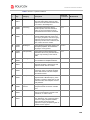
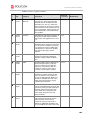
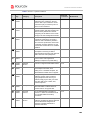
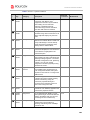
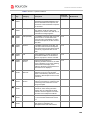
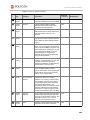
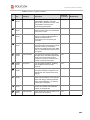
The following table lists the devices with which Version 7.1 was tested.
Table 3
Version 7.1 Device Interoperability Table
Device
Version
Gatekeepers/Proxies
Polycom CMA
5.4.0
Polycom PathNavigator
7.0.14
Polycom SE200
3.00.07.ER001
Cisco gatekeeper
12.3
Radvision ECS gatekeeper
3.5.2.5
Iptel proxy
1.0.2
Microsoft OCS Server
2007 R2 3.5.6907
Microsoft Lync Server
4.0.7457.0
Broadsoft proxy
BroadWorks release 14 sp9
Recorder
Polycom RSS 2000
4.0.0.001 360
Polycom RSS 4000
6.4.0.0-26517
MCUs, Call Managers Network Devices and Add ins
4
Polycom MGC 25/50/100 and MGC+50/100
8.0.2 and 9.0.3
RMX 1000
2.1.2
Polycom DMA 7000
2.3
Avaya CM
5.2
Avaya ACM
2.1.016.4-18111, 943
Avaya IP Softphone
R6.0 SP1
Cisco Call Manager
4.1, 8.0.5
Tandberg MCU
D3.11
Tandberg MPS
J3.3
Polycom VBP 5300LF-S25
9.1.5.3
Polycom VBP - E
9.1.5.3
Polycom Conferencing Add in for Microsoft Outlook
1.0.2
Version 7.1- Interoperability Tables
Table 3
Version 7.1 Device Interoperability Table (Continued)
Device
Version
Endpoints
Polycom HDX Family
3.0.0, 3.0.1
Polycom Telepresence (ITP) Systems
2.6, 2.7
Polycom VSX and V-Series Family
9.0.6.1
Polycom Viewstation Family
7.5.4
Polycom CMA Desktop
5.1.0.0060
Polycom QDX6000
4.0.1
Polycom VVX1500
3.3.1
SoundPointIP 650
3.2.2
Polycom PVX
8.0.16
Polycom VS Family
7.5.4
Polycom VS FX Family (EX, FX, 4000)
6.0.5
Polycom iPower 9000
6.2.1208
Soundstation IP3000
2.8
Aethra X3
12.1.19
Aethra X7
12.1.7
Aethra VegaStar Gold
6.0.49
Avaya IP Softphone
R6 6.01.48
Avaya 1XC Communicator
R1.020-SP2-1696
LifeSize 200
4.7.11.4
LifeSize Room and Express
4.7.11.4
VVX1500
3.3.1
DST B5
2.0
DST K60
2.0.1
DST K80
4.0
Sony PCS -XG80
2.11
Sony PCS -1
3.42
Sony PCS -G family
2.72
Sony PCS -TL50
2.42
Tandberg 150 MXP
L6.0.2
Tandberg MXP F-Series Family
F9.0.1
Tandberg 6000 B
B10.3
Tandberg Classic E Family
E5.3
5
RMX 1500/2000/4000 Release Notes - Version 7.1
Table 3
Version 7.1 Device Interoperability Table (Continued)
Device
Version
Tandberg EX90
3.1.3
Tandberg C Family
3.1.3
Tandberg E20
2.2.1
RadVision E.P SCOPIA XT1000
2.0.18
RadVision SCOPIA E.P
RV-VC240-2
Microsoft OC client R2
R2 3.5.6907.196
Microsoft Lync client
v4.0.7577.0
Vidyo Desktop client
2.0.4
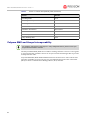
Polycom RMX and Avaya Interoperability
For questions and support on the Polycom - Avaya integrated solution, please contact your
Avaya Authorized Service Provider.
The Polycom RMX 2000/4000 series of MCUs running software version 7.0.1.16 register
to current generally available versions of Avaya Aura Session Manager R6.0 to provide
multipoint video calls.
Polycom RMX 4000, RMX 2000 and RMX 1500 can call and receive calls with current
generally available versions of Avaya one-X Communicator H.323 video soft clients
(R5.2) on Aura Communication Manager R5.2.1, R6.0, and R6.1.
6
Version 7.1- Interoperability Tables
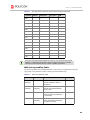
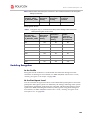
RMX Web Client
The following table lists the environments (Web Browsers and Operating Systems)
with which the RMX Web Client was tested.
Table 4
Version 7.0 Environment Interoperability Table
Web Browser
Operating System
Internet Explorer 6
Windows XP™
Windows XP™
Internet Explorer 7
Windows Vista™
Windows 7
Internet Explorer 8
Windows 7
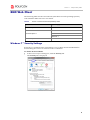
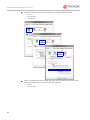
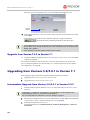
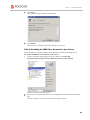
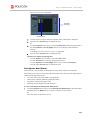
Windows 7™ Security Settings
If Windows7 is installed on the workstation, Protected Mode must be disabled before
downloading the Version 7.0 software to the workstation.
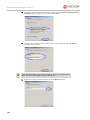
To disable Protected Mode:
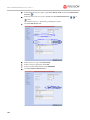
1
In the Internet Options dialog box, click the Security tab.
The Security tab is displayed.
7
RMX 1500/2000/4000 Release Notes - Version 7.1
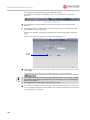
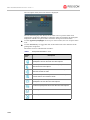
2
Clear the Enable Protected Mode check box for each of the following tabs:
— Internet
— Local intranet
— Trusted sites
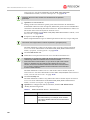
3
After successful connection to RMX, the Enable Protected Mode check boxes can be
selected to enable Protected Mode for the following tabs:
— Internet
— Local intranet
8
Version 7.1- Interoperability Tables
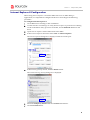
Internet Explorer 8 Configuration
When using Internet Explorer 8 to run the RMX Web Client or RMX Manager
applications, it is important to configure the browser according to the following
procedure.
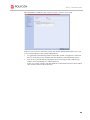
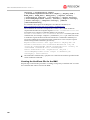
To configure Internet Explorer 8:
1
Close all browsers running on the workstation.
2
Use the Windows Task Manager to verify that no iexplore.exe processes are running
on the workstation. If any processes are found, use the End Task button to end
them.
3
Open Internet Explorer but do not connect to the RMX.
4
In the Internet Explorer menu bar select Tools >> Internet Options.
The Internet Options dialog box is displayed with General tab open.
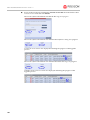
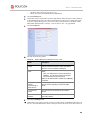
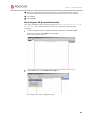
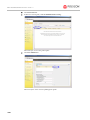
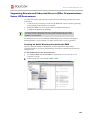
5
In the Browsing history section, click the Delete button.
The Delete Browsing History dialog box is displayed.
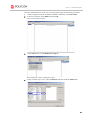
6
Select the Temporary Internet files and Cookies check boxes.
7
Click the Delete button.
9
RMX 1500/2000/4000 Release Notes - Version 7.1
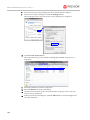
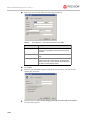
8
The Delete Browsing History dialog box closes and the files are deleted.
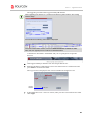
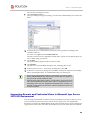
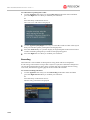
9
In the Internet Options dialog box, click the Settings button.
The Temporary Internet Files and History Settings dialog box is displayed.
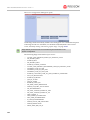
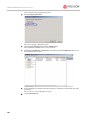
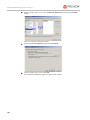
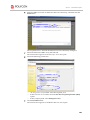
10
Click the View objects button.
The Downloaded Program Files folder containing the installed Program Files is
displayed.
10
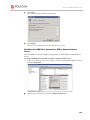
11
Select the CEMAClassLoaderCntl Object file
12
Press the Delete key on the workstation.
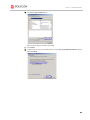
13
Close the Downloaded Program Files folder and the Temporary Internet Files and
History Settings dialog box.
14
In the Internet Options dialog box, click the OK button to save the changes and
close the dialog box.
Version 7.1- Interoperability Tables
Polycom Solution Support
Polycom Implementation and Maintenance services provide support for Polycom
solution components only. Additional services for supported third-party Unified
Communications (UC) environments integrated with Polycom solutions are available
from Polycom Global Services and its certified Partners. These additional services will
help customers successfully design, deploy, optimize and manage Polycom visual
communications within their UC environments.
Professional Services for Microsoft Integration is mandatory for Polycom Conferencing
for Microsoft Outlook and Microsoft Office Communications Server integrations. For
additional information and details please see http://www.polycom.com/services/
professional_services/index.html or contact your local Polycom representative.
11
RMX 1500/2000/4000 Release Notes - Version 7.1
Version 7.1- Upgrade Package
Contents
The Version 7.1 upgrade package must be downloaded from the Polycom Resource
Center and includes the following items:
•
lan.cfg file
•
LanConfigUtility.exe
•
RMX Documentation
•
— RMX 1500/2000/4000 Version 7.1 Release Notes
— RMX 1500/2000/4000 Getting Started Guide
— RMX 1500/2000/4000 Administrator’s Guide
— RMX 1500/2000/4000 Hardware Guide
— RMX 1500/2000/4000 Quick Installation Booklet
— Installation Quick Start Guide for RMX 1500/2000/4000
— RMX Third Party Licenses
External DB Tools
•
— RMX 1500/2000/4000 External Database API Programmer’s Guide
— Sample Scripts
RMX XML API Kit Version 7.0
•
— RMX 1500/2000/4000 XML API Version 7.0.2 Release Notes
— RMX 1500/2000/4000 XML API Overview
— RMX 1500/2000/4000 XML API Schema Reference Guide (version 3.0)
— MGC to RMX XML API Conferencing Comparison
— Polycom XML Tracer User’s Guide
— XML Schemas
— Polycom XML Tracer application
Translations of RMX 1500/2000/4000 Version 7.0 Documentation:
— Getting Started Guide:
French, German, Japanese, Russian, Simplified Chinese, Hebrew and
Portuguese
— Hardware Guide:
French, German, Japanese, Korean, Russian, Simplified Chinese, Spanish
Where to Get the Latest Product Information
To view the latest Polycom product documentation, visit the Support section of the
Polycom website at http://support.polycom.com
12
Version 7.1 - Upgrade Procedure
Version 7.1 - Upgrade Procedure
•
Version 7.1 does not support MPM cards. DO NOT upgrade to version 7.1 if MPM cards
are installed in the RMX and contact Polycom Support.
•
Make sure that media cards are installed in the RMX before upgrading to version 7.1. If
your upgrade process includes upgrading the Media cards, please refer to the
RMX® 2000/4000 MPMx Migration Procedure documentation.
•
If upgrading from version 5.x or earlier, you must first make sure that the Control Unit
memory size is at least 1024MB. If Memory size is 512MB, DO NOT perform the upgrade
procedure and contact Polycom support.
You can check the Card Configuration Mode that reflects the cards installed in the RMX and
the MCU Memory size.
In the RMX Web Client/RMX Manager go to Administration > System Information.
To maximize conferencing performance, especially in high bit rate call environments, a 1 Gb
connection is recommended for each LAN connection.
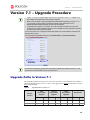
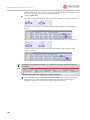
Upgrade Paths to Version 7.1
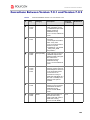
The upgrade options from previous versions to Version 7.1 are summarized in Table 5.
When upgrading from Versions 2.x and 3.x, the upgrades to three intermediate versions
must be performed.
Table 5
Upgrade Paths to Version 7.1
Current
Version
First
Intermediate
Upgrade
Version
Key
Second
Intermediate
Upgrade
Version
Key
Third
Intermediate
Upgrade
Version
Key
New Version
Version
Key
7.0.1 / 7.0.2
N/A
N/A
N/A
7.1
Yes
7.0
N/A
N/A
N/A
7.1
Yes
13
RMX 1500/2000/4000 Release Notes - Version 7.1
Table 5
Upgrade Paths to Version 7.1
Current
Version
First
Intermediate
Upgrade
Second
Intermediate
Upgrade
Version
Key
Version
6.0.2
7.0.2
Yes
N/A
6.0 / 6.0.1
6.0.2
No
7.0.2
5.0.2
7.0.2
Yes
N/A
5.0 / 5.0.1
5.0.2
No
7.0.2
4.x
5.0.2
Yes
2.x / 3.x
4.1.1
Yes
Key
Third
Intermediate
Upgrade
Version
Key
N/A
7.1
Yes
N/A
7.1
Yes
N/A
7.1
Yes
Yes
N/A
7.1
Yes
7.0.2
Yes
N/A
7.1
Yes
5.0.2
Yes
7.0.2
7.1
Yes
Yes
Version
Key
New Version
Yes
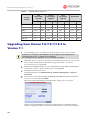
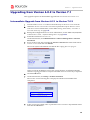
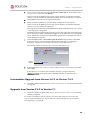
Upgrading from Version 7.0/7.0.1/7.0.2 to
Version 7.1
1
Download the Version 7.1 software from the Polycom Resource Center web site.
If Windows7™ is installed on the workstation, Protected Mode must be disabled before
downloading the Version 7.1 software to the workstation.
For more information see “Windows 7™ Security Settings” on page 7.
2
Obtain the Version 7.1 Product Activation Key from the Polycom Resource Center web
site. For more information, see the RMX Getting Stated Guide, "Procedure 1:
First-time Power-up” on page 2-21.
3
Backup the configuration file. For more information, see the RMX 1500/2000/4000
Administrator’s Guide, "Software Management” on page 19-99.
4
Install MCU Software Version 7.1.
On the RMX menu, click Administration> Software Management > Software
Download.
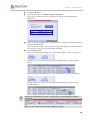
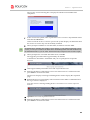
5
Browse to the Install Path, selecting the Version 7.1.x.x.bin file in the folder where
Version 7.1 is saved and click Install.
The Install Software information box that the file Copying files is In progress.
At the end of the installation process the system displays an indication that the
software copying procedure is Completed and that a new Activation Key is required.
14
Version 7.1 - Upgrade Procedure
6
Click the OK button.
7
On the RMX menu, click Setup > Product Activation.
The Product Activation dialog box is displayed with the serial number field
completed.
8
In the Activation Key field, enter or paste the Product Activation Key obtained earlier
and click the OK button.
At the end of the Product Activation process the system displays an indication that
the Product Activation Key was successfully installed.
9
Click the OK button.
The Install Software information box indicates that Software Loading is in progress.
A series of Active Alarms are displayed indicating the progress of the upgrade
process.
The Install Software information box indicates that IPMC Burning is in progress.
A further series of Active Alarms are displayed indicating the progress of the
upgrade process.
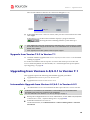
Sometimes, when updating the Version 7.x license key, the system displays the following
active alarm:
Ignore this Active Alarm and complete this installation procedure.
15
RMX 1500/2000/4000 Release Notes - Version 7.1
The upgrade procedure takes approximately 20 minutes.
Connection to the RMX is terminated and you are prompted to reopen the
browser.
10
Approximately 5 minutes after receiving this message, close and reopen the
browser.
11
Enter the IP address of the RMX Control Unit in the browser’s address line and
press Enter to reconnect to RMX.
The browser displays a message indicating that it cannot display the requested
page.
The version number in the Welcome screen has changed to 7.1.
Version
Number
12
In the RMX Web Client – Welcome screen, enter your User Name and Password and
click Login.
In the Main Screen an MCU State indicator displays a progress indicator
showing the time remaining until the system start-up is complete.
•
If the default POLYCOM user is defined in the RMX Web Client, an Active Alarm is created
and the MCU status changes to MAJOR until a new Administrator user is created and the
default user is deleted.
•
If the upgrade process fails, please contact Polycom support.
13
16
To use the new features such as Operator Assistance and Gateway Sessions the IVR
Services must be updated. For more details, see “Additional/Optional System Updates
After Upgrading” on page 30.
Version 7.1 - Upgrade Procedure
Upgrading from Version 6.0.2 to Version 7.1
This upgrade requires an intermediate upgrade from Version 6.0.2 to Version 7.0.2.
Intermediate Upgrade from Version 6.0.2 to Version 7.0.2
1
Download the Version 7.0.2 software from the Polycom Resource Center web site.
2
Obtain the Version 7.0.2 Product Activation Key from the Polycom Resource Center
web site. For more information, see the RMX Getting Stated Guide, "Procedure 1:
First-time Power-up” on page 2-21.
3
Backup the configuration file. For more information, see the RMX 1500/2000/4000
Administrator’s Guide, "Software Management” on page 19-99.
4
Install MCU Software Version 7.0.2.
On the RMX menu, click Administration > Software Management > Software
Download.
5
Browse to the Install Path, selecting the Version 7.0.2.x.bin file in the folder where
Version 7.0.2 is saved and click Install.
The Install Software information box that the file Copying files is In progress.
At the end of the installation process the system displays an indication that the
software copying procedure is Completed and that a new Activation Key is required.
6
Click the OK button.
7
On the RMX menu, click Setup > Product Activation.
The Product Activation dialog box is displayed with the serial number field
completed.
8
In the Activation Key field, enter or paste the Product Activation Key obtained earlier
and click the OK button.
17
RMX 1500/2000/4000 Release Notes - Version 7.1
At the end of the Product Activation process the system displays an indication that
the Product Activation Key was successfully installed.
Click the OK button.
9
The Install Software information box indicates that Software Loading is in progress.
A series of Active Alarms are displayed indicating the progress of the upgrade
process.
The Install Software information box indicates that IPMC Burning is in progress.
A further series of Active Alarms are displayed indicating the progress of the
upgrade process.
Sometimes, when updating the Version 7.0.x license key, the system displays the following
active alarm:
Ignore this Active Alarm and complete this installation procedure.
10
18
After about 30 minutes, close and reopen the browser and connect to the RMX.
If the browser was not closed and reopened, the following error message is
displayed: “Browser environment error. Please reopen the browser”.
Version 7.1 - Upgrade Procedure
The version number in the Welcome screen has changed to 7.0.2.
Version
Number
11
In the RMX Web Client – Welcome screen, enter your User Name and Password and
click Login.
In the Main Screen an MCU State indicator displays a progress indicator
showing the time remaining until the system start-up is
complete.
•
If the default POLYCOM user is defined in the RMX Web Client, an Active Alarm is created
and the MCU status changes to MAJOR until a new Administrator user is created and the
default user is deleted.
•
If the upgrade process fails, please contact Polycom support.
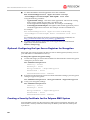
Upgrade from Version 7.0.2 to Version 7.1
>> Continue with the upgrade from Version 7.0/7.0.1/7.0.2 to Version 7.1 as described
starting on page 14.
To use the new features such as Operator Assistance and Gateway Sessions the IVR
Services must be updated. For more details, see “Additional/Optional System Updates
After Upgrading” on page 30.
Upgrading from Versions 6.0/6.0.1 to Version 7.1
This upgrade requires the following intermediate upgrade procedures:
1
Upgrade from Version 6.0./6.0.1 to Version 6.0.2.
2
Upgrade from Version 6.0.2 to Version 7.0.2.
Intermediate Upgrade from Version 6.0/6.0.1 to Version 6.0.2
1
Download the Version 6.0.2 software from the Polycom Resource Center web site.
If Windows7™ is installed on the workstation, Protected Mode must be disabled before
downloading the Version 6.0.2 software to the workstation.
For more information see “Windows 7™ Security Settings” on page 7.
2
Backup the configuration file. For more information, see the RMX 1500/2000/4000
Administrator’s Guide, "Software Management” on page 19-99.
3
Install MCU Software Version 6.0.2.
On the RMX menu, click Administration > Software Management > Software
Download.
19
RMX 1500/2000/4000 Release Notes - Version 7.1
4
Browse to the Install Path, selecting the Version 6.0.2.xx.bin file in the folder where
Version 6.0.2 is saved and click Install.
The Install Software information box that the file copy is In progress.
The Install Software information box indicates that Software Loading is in progress.
A series of Active Alarms are displayed indicating the progress of the upgrade
process.
The Install Software information box indicates that IPMC Burning is in progress.
A further series of Active Alarms are displayed indicating the progress of the
upgrade process.
20
Version 7.1 - Upgrade Procedure
The upgrade procedure takes approximately 20 minutes.
When upgrading from version 6.0.1, if after 20 minutes the system remains in the Loading
Software stage:
and sometimes the following Active Alarm is displayed:
Close the Install Software window, access the Hardware Monitor and Reset the RMX.
After reset, the upgrade process continues as described below.
Connection to the RMX is terminated and you are prompted to reopen the
browser.
5
After approximately 5 minutes close and reopen the browser.
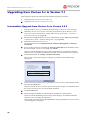
6
Enter the IP address of the RMX Control Unit in the browser’s address line and
press Enter to reconnect to RMX.
The Login screen is displayed. The version number has changed to 6.0.2.
Version
Number
7
In the RMX Web Client – Welcome screen, enter your User Name and Password and
click Login.
21
RMX 1500/2000/4000 Release Notes - Version 7.1
In the Main Screen an MCU State indicator displays a progress indicator
showing the time remaining until the system start-up is
complete.
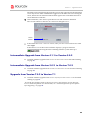
Intermediate Upgrade from Version 6.0.2 to Version 7.0.2
>> Continue with the upgrade from Version 6.0.2 to Version 7.0.2 as described starting
on page 17.
Upgrade from Version 7.0.2 to Version 7.1
>> Continue with the upgrade from Version 7.0/7.0.1/7.0.2 to Version 7.1 as described
starting on page 14.
To use the new features such as Operator Assistance and Gateway Sessions the IVR
Services must be updated. For more details, see “Additional/Optional System Updates
After Upgrading” on page 30.
Upgrading from Version 5.0.2 to Version 7.1
This upgrade requires an intermediate upgrade from Version 5.0.2 to Version 7.0.2.
Intermediate Upgrade from Version 5.0.2 to Version 7.0.2
1
Download the software Version 7.0.2 software from the Polycom Resource Center
web site.
If Windows7™ is installed on the workstation, Protected Mode must be disabled before
downloading the Version 7.0.2 software to the workstation.
For more information see “Windows 7™ Security Settings” on page 7.
2
Obtain the Version 7.0.2 Product Activation Key from the Polycom Resource Center
web site. For more information, see the RMX Getting Stated Guide, "Procedure 1:
First-time Power-up” on page 2-21.
3
Backup the configuration file. For more information, see the RMX 1500/2000/4000
Administrator’s Guide, "Software Management” on page 19-99.
4
Install MCU Software Version 7.0.2.
On the RMX menu, click Administration > Software Management > Software
Download.
5
Browse to the Install Path, selecting the Version 7.0.2xx.bin file in the folder where
Version 7.0.2. is saved and click Install.
At the end of the installation process the Install Software dialog box indicates that
the installed software is being checked. The system then displays an indication
that the software was successfully downloaded and that a new activation key is
required.
6
22
On the RMX 2000/4000 menu, click Setup > Product Activation.
Version 7.1 - Upgrade Procedure
The Product Activation dialog box is displayed with the serial number field
completed.
7
In the Activation Key field, enter or paste the Product Activation Key obtained earlier
and click the OK button.
At the end of the Product Activation process the system displays an indication that
the Product Activation Key was successfully installed.
8
When prompted whether to reset the RMX, click Yes to reset the RMX.
Sometimes when upgrading from version 5.0.2 to version 7.0.x the reset process fails. In such
a case, you can try to connect to the MCU via the Shelf Management and reset the MCU from
the Hardware Monitor or you can “hard” reset the MCU by turning the Power off and on again.
9
When prompted to wait while the RMX resets, click OK.
The upgrade procedure takes approximately 30 minutes.
Connection to the RMX is terminated and you are prompted to reopen the
browser.
10
After approximately 30 minutes close and reopen the browser.
11
Enter the IP address of the RMX Control Unit in the browser’s address line and
press Enter to reconnect to RMX.
The browser displays a message indicating that it cannot display the requested
page.
12
Refresh the browser periodically until connection to the RMX is established and
the Login screen is displayed.
You may receive a message stating Browser environment error. Please reopen the
browser.
13
Optional. Close and reopen the browser.
14
Enter the IP address of the RMX Control Unit in the browser’s address line and
press Enter to reconnect to RMX.
23
RMX 1500/2000/4000 Release Notes - Version 7.1
The Login screen is displayed. The version number has changed to 7.0.2.
Version
Number
15
In the RMX Web Client – Welcome screen, enter your User Name and Password and
click Login.
In the Main Screen an MCU State indicator displays a progress indicator
showing the time remaining until the system start-up is
complete.
•
If the default POLYCOM user is defined in the RMX Web Client, an Active Alarm is created
and the MCU status changes to MAJOR until a new Administrator user is created and the
default user is deleted.
•
If the upgrade process fails, please contact Polycom support.
Upgrade from Version 7.0.2 to Version 7.1
>> Continue with the upgrade from Version 7.0/7.0.1/7.0.2 to Version 7.1 as described
starting on page 14.
To use the new features such as Operator Assistance and Gateway Sessions the IVR
Services must be updated. For more details, see “Additional/Optional System Updates
After Upgrading” on page 30.
Upgrading from Versions 5.0/5.0.1 to Version 7.1
This upgrade requires the following intermediate upgrade procedures:
1
Upgrade from Version 5.0./5.0.1 to Version 5.0.2.
2
Upgrade from Version 5.0.2 to Version 7.0.2.
Intermediate Upgrade from Version 5.0/5.0.1 to Version 5.0.2
1
Download the required software Version 5.0.2 from the Polycom Resource Center
web site.
If Windows7™ is installed on the workstation, Protected Mode must be disabled before
downloading the Version 5.0.2 software to the workstation.
For more information see “Windows 7™ Security Settings” on page 7.
24
2
Backup the configuration file. For more information, see the RMX 1500/2000/4000
Administrator’s Guide, "Software Management” on page 19-99.
3
Install MCU Software Version 5.0.2.
On the RMX menu, click Administration> Software Management > Software
Download.
Version 7.1 - Upgrade Procedure
4
Browse to the Install Path, selecting the Version 5.0.2xx.bin file in the folder where
Version 5.0.2 is saved and click Install.
At the end of the installation process the system displays an indication that the
software was successfully downloaded and that a new activation key is required.
5
Click Close to close the Install Software dialog box.
6
When prompted whether to reset the MCU, click Yes to reset the MCU.
At the end of the installation process the system displays an indication that the
software was successfully downloaded.
The upgrade procedure takes about 30 minutes during which time an Active Alarm
- System Upgrade is displayed.
The RMX resets itself during the upgrade process and connection to the RMX Web
Client may be lost. If the workstation is logged in to the RMX Web Client during the
resets, the MCU State indicator at the bottom right corner of the RMX Web Client
screen indicates STARTUP.
7
After about 30 minutes, close and reopen the browser and connect to the RMX.
If the browser was not closed and reopened, the following error message is
displayed: “Browser environment error. Please reopen the browser”.
The version number in the Welcome screen has changed to 5.0.2.
Version
Number
8
In the RMX Web Client – Welcome screen, enter your User Name and Password and
click Login.
In the Main Screen an MCU State indicator displays a progress indicator
showing the time remaining until the system start-up is
complete.
Intermediate Upgrade from Version 5.0.2 to Version 7.0.2
>> Continue with the upgrade from Version 5.0.2 to Version 7.0.2 as described starting
on page 22.
Upgrade from Version 7.0.2 to Version 7.1
>> Continue with the upgrade from Version 7.0/7.0.1/7.0.2 to Version 7.1 as described
starting on page 14.
To use the new features such as Operator Assistance and Gateway Sessions the IVR
Services must be updated. For more details, see “Additional/Optional System Updates
After Upgrading” on page 30.
25
RMX 1500/2000/4000 Release Notes - Version 7.1
Upgrading from Version 4.x to Version 7.1
This upgrade requires the following intermediate upgrade procedures:
1
Upgrade from Version 4.x to Version 5.0.2.
2
Upgrade from Version 5.0.2 to Version 7.0.2.
Intermediate Upgrade from Version 4.x to Version 5.0.2
1
Download the Version 5.0.2 software from the Polycom Resource Center web site.
2
Obtain the Version 5.0.2 Product Activation Key from the Polycom Resource Center
web site. For more information, see the RMX Getting Stated Guide, "Procedure 1:
First-time Power-up” on page 2-21.
3
Backup the configuration file. For more information, see the RMX 1500/2000/4000
Administrator’s Guide, "Software Management” on page 19-99.
4
Install MCU Software Version 5.0.2
On the RMX menu, click Administration> Software Management > Software
Download.
5
Browse to the Install Path, selecting the Version 5.0.2xx.bin file in the folder where
the downloaded version is saved and click Install.
At the end of the installation process the system displays an indication that the
software was successfully downloaded and that a new activation key is required.
6
On the RMX menu, click Setup > Product Activation.
The Product Activation dialog box is displayed with the serial number field
completed.
7
In the Activation Key field, enter or paste the Product Activation Key obtained earlier
and click the OK button.
At the end of the Product Activation process the system displays an indication that
the Product Activation Key was successfully installed.
8
Click the OK button.
9
When prompted whether to reset the MCU, click Yes to reset the MCU.
At the end of the installation process the system displays an indication that the
software was successfully downloaded.
The upgrade procedure takes about 30 minutes during which time an Active Alarm
- System Upgrade is displayed.
26
Version 7.1 - Upgrade Procedure
The RMX resets itself during the upgrade process and connection to the RMX Web
Client may be lost. If the workstation is logged in to the RMX Web Client during the
resets, the MCU State indicator at the bottom right corner of the RMX Web Client
screen indicates STARTUP.
Sometimes when upgrading from version 4.x to version 5.0.x the reset process fails. In such a
case, you can try to connect to the MCU via the Shelf Management and reset the MCU from
the Hardware Monitor or you can “hard” reset the MCU by turning the Power off and on again.
10
After about 30 minutes, close and reopen the browser and connect to the RMX.
If the browser was not closed and reopened, the following error message is
displayed: “Browser environment error. Please reopen the browser”.
The version number in the Welcome screen has changed to 5.0.2.
Version
Number
11
In the RMX Web Client – Welcome screen, enter your User Name and Password and
click Login.
In the Main Screen an MCU State indicator displays a progress indicator
showing the time remaining until the system start-up is
complete.
If the default POLYCOM user is defined in the RMX Web Client, an Active Alarm is created and
the MCU status changes to MAJOR until the POLYCOM User is renamed or a new
Administrator User is created and the default User is deleted.
Intermediate Upgrade from Version 5.0.2 to Version 7.0.2
>> Continue with the upgrade from Version 5.0.2 to Version 7.0.2 as described starting
on page 22.
Upgrade from Version 7.0.2 to Version 7.1
>> Continue with the upgrade from Version 7.0/7.0.1/7.0.2 to Version 7.1 as described
starting on page 14.
To use the new features such as Operator Assistance and Gateway Sessions the IVR
Services must be updated. For more details, see “Additional/Optional System Updates
After Upgrading” on page 30.
27
RMX 1500/2000/4000 Release Notes - Version 7.1
Upgrading from Versions 2.x/3.x to Version 7.1
From Versions 2.x/3.x, the upgrade to Version 7.1 requires three intermediate upgrades:
1
Intermediate upgrade to Version 4.1.1.
2
Intermediate upgrade from Version 4.1.1 to Version 5.0.2.
3
Intermediate upgrade from Version 5.0.2 to Version 7.0.2.
Intermediate Upgrade 1: From Version 2.x/3.x to Version 4.1.1
1
Download the Version 4.1.1 software from the Polycom Resource Center web site.
2
Obtain the Version 4.1.1 Product Activation Key from the Polycom Resource Center
web site. For more information, see the RMX Getting Stated Guide, "Procedure 1:
First-time Power-up” on page 2-21.
3
Backup the configuration file. For more information, see the RMX 1500/2000/4000
Administrator’s Guide, "Software Management” on page 19-99.
4
Install MCU Software Version 4.1.1
On the RMX menu, click Administration> Software Management > Software
Download.
5
Browse to the Install Path, selecting the Version 4.1.1xx.bin file in the folder where
Version 4.1.1 is saved and click Install.
At the end of the installation process the system displays an indication that the
software was successfully downloaded and that a new activation key is required.
6
On the RMX menu, click Setup > Product Activation.
The Product Activation dialog box is displayed with the serial number field
completed.
7
In the Activation Key field, enter or paste the Product Activation Key obtained earlier
and click the OK button.
At the end of the Product Activation process the system displays an indication that
the Product Activation Key was successfully installed.
8
Click the OK button.
9
When prompted whether to reset the MCU, click Yes to reset the MCU.
The upgrade procedure may take up to 30 minutes during which time an Active
Alarm - System Upgrade is displayed.
28
Version 7.1 - Upgrade Procedure
The RMX resets itself during the upgrade process and connection to the RMX Web
Client may be lost. If the workstation is logged in to the RMX Web Client during the
resets, the MCU State indicator at the bottom right corner of the RMX Web Client
screen indicates STARTUP.
10
After 30 minutes, close and re-open the browser and connect to the RMX.
The version number in the Welcome screen has changed to 4.1.1
Version
Number
11
In the RMX Web Client – Welcome screen, enter your User Name and Password and
click Login.
In the Main Screen an MCU State indicator displays a progress indicator
showing the time remaining until the system start-up is
complete.
Intermediate Upgrade from Version 4.1.1 to Version 5.0.2
>> Continue with the upgrade from Version 4.x to Version 5.0.2 as described starting
on page 26.
Intermediate Upgrade from Version 5.0.2 to Version 7.0.2
>> Continue with the upgrade from Version 5.0.2 to Version 7.0.2 as described starting
on page 22.
Upgrade from Version 7.0.2 to Version 7.1
>> Continue with the upgrade from Version 7.0/7.0.1/7.0.2 to Version 7.1 as described
starting on page 14.
To use the new features such as Operator Assistance and Gateway Sessions the IVR
Services must be updated. For more details, see “Additional/Optional System Updates
After Upgrading” on page 30.
29
RMX 1500/2000/4000 Release Notes - Version 7.1
Additional/Optional System Updates After
Upgrading
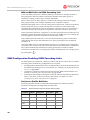
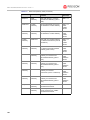
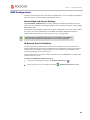
IVR Services Update
When upgrading from version 4.0 and earlier, Operator Assistance and the Gateway calls
options require that the IVR Service includes specific (new) DTMF Codes and voice
messages that are not automatically added to existing IVR Services in order to avoid
conflicts with existing DTMF codes. Therefore, to use these options, new Conference
and Entry Queue IVR Services must be created.
In Version 6.0, recording can be controlled from the HDX remote control using the
designated recording buttons. This is enabled by changing the existing definitions of
the DTMF codes of the Roll Call and Recording actions in the Conference IVR Services
already defined in the RMX.
In Version 7.x, PCM for ISDN participants is enabled by a DTMF code. The code must
be added to the DTMF Codes tab to enable the PCM for ISDN participants. Default
value is 1.
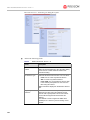
To modify the Conference IVR Service:
1
In the IVR Services list, double-click the service to modify or right click the service
and select Properties.
2
To add the gateway voice messages and dial tones, click the General tab and select
the appropriate *.wav files.
3
To modify the DTMF codes, click the DTMF Codes tab.
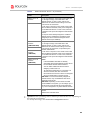
4
Modify the DTMF codes as follows:
Table 6
5
30
DTMF Code Changes
Action
Existing DTMF Code
New DTMF Code
Enable Roll Call
*32
*42
Disable Roll Call
#32
#42
Roll Call Review Names
*33
*43
Roll Call Stop Review
#33
#43
Start/Resume Recording
*73
*3
Stop Recording
*74
*2
Pause Recording
*75
*1
Request Private Assistance
*0
Request Assistance for the
conference
00
PCM (for ISDN participants
only)
##
To add the Operator Assistance Options, click the Operator Assistance tab and
select the appropriate options and messages.
Version 7.1 - Upgrade Procedure
For details on modifying the IVR Services, see RMX 2000 Administrator’s Guide,
"Defining a New Conference IVR Service” on page 15-9.
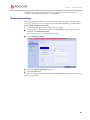
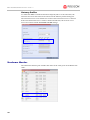
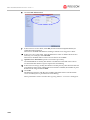
Gathering Settings
When upgrading from earlier versions, the Enable Gathering check box in the Profile
Properties - Gathering Settings dialog box is not selected by default for existing Profiles.
To set Enable Gathering as default:
1
In the RMX Management pane, click Conference Profiles.
2
In the Conference Profiles pane, double-click the Profile or right-click the Profile,
and then click Profile Properties.
3
Click Gathering Settings.
4
Select the Enable Gathering check box.
5
Click the OK Button.
The Profile Properties – General dialog box opens.
For more information, see the RMX 1500/2000/4000 Administrator’s Guide, "Gathering
Phase” on page 2-45.
31
RMX 1500/2000/4000 Release Notes - Version 7.1
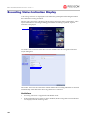
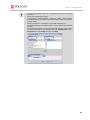
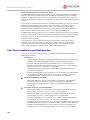
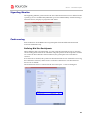
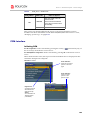
Upgrading the RMX Manager Application
The RMX Manager application can be downloaded from one of the RMX systems
installed in your site or from Polycom web site at http://www.polycom.com/support.
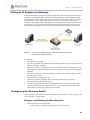
To install RMX Manager (downloading the application from the RMX):
•
When upgrading the RMX Manager application, it is recommended to backup the MCU list
using the Export RMX Manager Configuration option. For more details, see RMX 1500/
2000/4000 Administrator’s Guide, "Software Management” on page 19-99.
•
When upgrading the RMX Manager from a major version (for example, version 7.0) to a
maintenance version of that version (for example, 7.x), the installation must be performed
from the same MCU (IP address) from which the major version (for example, version 7.0)
was installed.
If you are upgrading from another MCU (different IP address), you must first uninstall the
RMX Manager application using Control Panel > Add or Remove Programs.
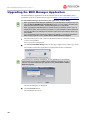
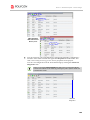
1
Start Internet Explorer and connect to the RMX unit from which the current
version was installed.
The Login screen is displayed.
2
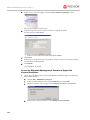
Click the Install RMX Manager link on the upper right corner of the Login screen.
The installer verifies the application’s requirements on the workstation.
If the following error message is displayed, you are upgrading from an MCU that
other than the one used for the installed version (different IP address). In such a
case, first uninstall the RMX Manager application using Control Panel > Add or
Remove Programs.
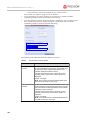
The Install dialog box is displayed.
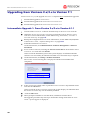
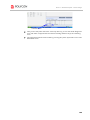
3
Click the Install button.
The installation proceeds.
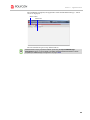
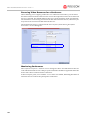
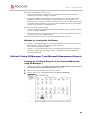
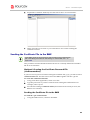
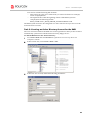
32
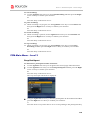
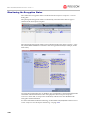
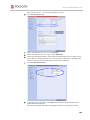
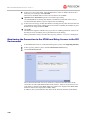
Version 7.1 - Upgrade Procedure
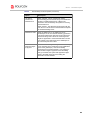
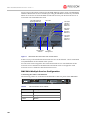
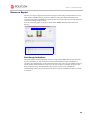
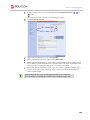
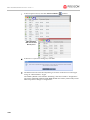
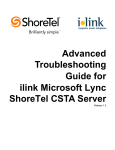
The installation completes, the application loads and the RMX Manager - MCUs
screen is displayed.
MCUs Toolbar
MCUs Pane
The list includes the previously defined MCUs.
If the MCUs list is empty, import the backed up list using the Import RMX Manager
Configuration option. For more details, see RMX 1500/2000/4000 Administrator’s Guide
"Import/Export RMX Manager Configuration” on page 18-29.
33
RMX 1500/2000/4000 Release Notes - Version 7.1
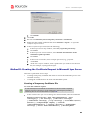
Version 7.1 Detailed Description
New RMX 1500 MPMx-Q Card Assembly
The new RMX 1500 MPMx-Q card assembly is the entry level conferencing system that
provides the full conferencing functionality with lower capacities.
On the RMX1500 MPMx-Q assembly, the use of HD with Continuous Presence requires an
additional license. In the Resource Report and Resolution Configuration HD settings are
displayed but are not enabled and if HD is selected the system will enable SD by default.
RMX 1500 System Capacities per Card Assembly
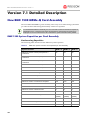
Conferencing Capacities
The following table summarizes the different system capacities.
Table 1-1
34
RMX 1500 System Functions and Capacities per Card Assembly
System Functions
MPMx - Q
MPMx -S
MPMx -D
Maximum number of Video participants in a
conference
25
45
90
Maximum number of PSTN participants in a
conference
90
120
120
Maximum number of VOIP participants in a
conference
90
180
360
Maximum number of Audio calls per second
5
5
5
Maximum number of Video calls per second
2
2
2
Maximum number of conferences
200
400
400
Maximum number of Meeting Rooms
1000
1000
1000
Maximum number of Entry Queues
40
40
40
Maximum number of Profiles
40
40
40
Maximum number of Conference Templates
100
100
100
Maximum number of SIP Factories
40
40
40
Maximum number of IP Services
2
2
2
Maximum number of ISDN Services
2
2
2
Maximum number of IVR Services
40
40
40
Maximum number of Recording Links
20
(default)
20
(default)
20
(default)
Maximum number of IVR Video Slides
150
150
150
Maximum number of Log Files (1Mb max.)
4000
4000
4000
Maximum number of CDR Files
2000
2000
4000
Version 7.1 Detailed Description
Table 1-1
RMX 1500 System Functions and Capacities per Card Assembly
System Functions
MPMx - Q
MPMx -S
MPMx -D
Maximum number of Fault Files
1000
1000
1000
Number of Participant alerts
Unlimited
Unlimited
Unlimited
Maximum number of concurrent RMX Web Client
connections to the MCU
20
20
20
Maximum number Address Book entries
4000
4000
4000
Maximum number of Users
100
100
100
Maximum number of Gateway Profiles
40
40
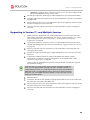
40
Maximum number of Reservations (internal
Scheduler)
2000
2000
2000
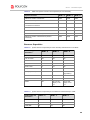
Resource Capacities
Table 1-2
System Resource Capacities per Card Assembly and Resolution in CP Mode
Resource Type/Video
Resolution
MPMx - Q
MPMx -S
MPMx - D
CIF H.263
14
30
60
CIF 30 H.264
25
45
90
CIF 60 H.264
14
30
60
SD 30/ 4CIF H.264
14
30
60
4CIF H.263
7
15
30
720p30/ 4CIF 60/ SD 60
7
15
30
1080p30fps/720p60
3
7
15
(Symmetric)
VOIP
90
180
360
PSTN
90
120
120
ISDN
25
60 (at 128
kbps) - 4 E1/
T1
60 (at 128
kbps) - 4 E1/
T1
Table 1-3
System Resource Capacities per Line Rate and Card Assembly in VSW
Audio/Video and
Resolution
MPMx - Q
MPMx - S
MPMx -D
VSW 2Mb
20
40
80
VSW 4Mb
10
20
40
VSW 6Mb
5
10
20
35
RMX 1500/2000/4000 Release Notes - Version 7.1
Table 1-3
System Resource Capacities per Line Rate and Card Assembly in VSW
Audio/Video and
Resolution
MPMx - Q
MPMx - S
MPMx -D
ISDN
25 (at 128 kbps)
60 (at 128 kbps)
60 (at 128 kbps)
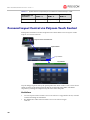
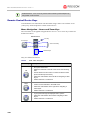
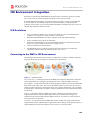
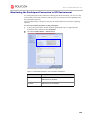
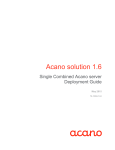
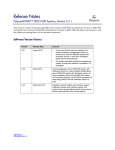
Personal Layout Control via Polycom Touch Control
Participants connected via HDX endpoints can control their Personal Layouts via the
Polycom Touch Control device.
Polycom Touch Control Device
Options Menu
Layout Button
Layout Menu
Layout change requests sent by the participant to the HDX via the Touch Control device
result in DTMF codes being sent from the HDX endpoint to the RMX. The RMX
responds by sending the requested layout to the HDX endpoint.
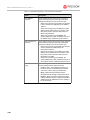
Guidelines
36
•
Personal Layout control via the Touch Control device is supported in H.323, SIP and
ISDN networking environments.
•
By default all DTMF codes from the Touch Control device begin
with *#
Version 7.1 Detailed Description
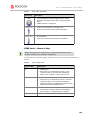
•
The default value of theTouch Control device Permission field is Everyone and can
be modified if required via the DTMF Codes tab of the New Conference IVR Service
or Conference IVR Se vice Properties dialog box.
It is strongly advised that the Touch Control Prefix DTMF code (*#) not be
changed.
Everyone
Default DTMF Code ‘*#”
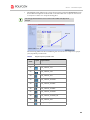
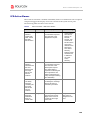
The following tables list the available Regular and Immersive Telepresence Specific
(ITP) layouts by DTMF code:
Table 2
DTMF
Code
00
Regular Layout by DTMF Code
Layout
Layout Name
Return to Conference Layout
01
CP_LAYOUT_1X1
02
CP_LAYOUT_1X2
03
CP_LAYOUT_2X1
04
CP_LAYOUT_2X1HOR
05
CP_LAYOUT_2X1VER
06
CP_LAYOUT_1P2VER
07
CP_LAYOUT_1P2HOR
08
CP_LAYOUT_1P2HOR_UP
09
CP_LAYOUT_2X2
10
CP_LAYOUT_1P3VER
37
RMX 1500/2000/4000 Release Notes - Version 7.1
Table 2
DTMF
Code
Regular Layout by DTMF Code (Continued)
Layout
11
CP_LAYOUT_1P3HOR
12
CP_LAYOUT_1P3HOR_UP
13
CP_LAYOUT_1P5
14
CP_LAYOUT_1P4VER
15
CP_LAYOUT_1P4HOR
16
CP_LAYOUT_1P4HOR_UP
17
CP_LAYOUT_1P7
18
CP_LAYOUT_3X3
19
CP_LAYOUT_1P8CENT
20
CP_LAYOUT_1P8HOR_UP
21
CP_LAYOUT_1P8UP
22
CP_LAYOUT_4X4
23
CP_LAYOUT_1P12
24
CP_LAYOUT_2P8
Table 3
DTMF
Code
38
Layout Name
ITP Specific Layout by DTMF Code
Layout
Layout Name
25
CP_LAYOUT_1X2_FLEX
26
CP_LAYOUT_1P2HOR_RIGHT_FLEX
27
CP_LAYOUT_1P2HOR_LEFT_FLEX
28
CP_LAYOUT_1P2HOR_UP_RIGHT_FLEX
29
CP_LAYOUT_1P2HOR_UP_LEFT_FLEX
30
CP_LAYOUT_2X2_UP_RIGHT_FLEX
31
CP_LAYOUT_2X2_UP_LEFT_FLEX
Version 7.1 Detailed Description
Table 3
DTMF
Code
ITP Specific Layout by DTMF Code (Continued)
Layout
Layout Name
32
CP_LAYOUT_2X2_DOWN_RIGHT_FLEX
33
CP_LAYOUT_2X2_DOWN_LEFT_FLEX
34
CP_LAYOUT_2X2_RIGHT_FLEX
35
CP_LAYOUT_2X2_LEFT_FLEX
39
RMX 1500/2000/4000 Release Notes - Version 7.1
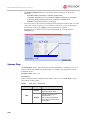
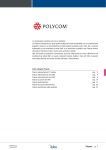
Automatically Generated Dial Strings in Gateway
Calls
A second dialing method to destination endpoints without interaction with the IVR of
the gateway is available to ISDN/PSTN participants. This dialing method is enabled
when the administrator configures the Gateway Profile to automatically generate the
dial string of the destination endpoint or Meeting Room on the DMA by truncating the
dial in string and replacing the truncated digits by other digits that can be used as the
destination number.
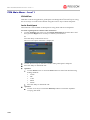
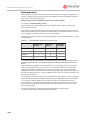
Calling a DMA Virtual Meeting Room
In this configuration, the gateway session initiator enters one of the dial-in numbers
assigned to the gateway profile. This number is truncated by the RMX gateway and the
truncated digits are replaced by a prefix that corresponds either to the DMA prefix in
the Gatekeeper.
Figure 1
Call Flow from ISDN Endpoint to Polycom DMA with Automatically
Generated Forwarded Dial String
Example:
Figure 1 shows the call flow assuming the following parameters:
40
First Dial-in Number
5705550
Last Dial-in Number
5705560
Use Dial-in Numbers as Destination ID
Selected
DMA Meeting Room ID
5555
Destination Prefix (DMA prefix in Gatekeeper)
26
Number of Rightmost Digits to Append
4
PSTN participant dials
(212)5705555
Number that will be used by RMX to forward
the call to the DMA
265555
Version 7.1 Detailed Description
Calling an IP Endpoint via Gateway
If the call destination is an IP endpoint, the endpoints must be registered to the same
gatekeeper to which the RMX is registered. There should be a mapping between the
dial-in numbers in the range defined for the ISDN Network Service and also assigned
to the Gateway Profile and the IP endpoints, in such a way that the alias of each
endpoint is the number that will be appended to the ISDN prefix. When the call arrives
to the gateway, this prefix is truncated and replaced by digits that correspond to the
MCU prefix in the gatekeeper and the call is forwarded to the destination endpoint.
Figure 2
Call Flow from ISDN Endpoint to H.323 Endpoint with Automatically
Generated Forwarded Dial String
For example:
•
The ISDN prefix is 9251.
•
The dial in number range defined in the ISDN Network Service can be 100 to 400
(that is, 9251100 to 9251400).
•
The dial in numbers assigned to the Gateway Profile can the entire range, or part
of the range of other Gateway Profiles are to be used: 100 to 200. (that is 9251100 to
9251200)
•
The aliases assigned to the IP endpoints will range between 100 to 200 or 400 (for
the full range) as well.
•
MCU Prefix in the gatekeeper: 79.
•
Number of digits to append (same as the ISDN prefix is this example): 3
•
The destination endpoint alias is 123.
•
The ISDN endpoint dials 9251123. The RMX truncates the four first digits 9251
replacing them with 79 and appends 123 to 79, to create the destination number
79123 which is sent to the gatekeeper for routing.
Configuring the Gateway Profile
Gateway Profile is described in RMX 1500/2000/4000 Administrator’s Guide, "Defining the
Gateway Profile” on page 16-17.
Changes to the Gateway Profile dialog box
•
Existing fields have been changed:
— Dial-in Number (1) has been changed to First Dial-in Number.
41
RMX 1500/2000/4000 Release Notes - Version 7.1
— Dial-in Number (2) has been changed to Last Dial-in Number.
These fields now define a range of Dial-in numbers.
•
A new check box, Use Dial-in Numbers as Destination ID, enables/disables
automatic generation of the forwarded the dial string.
•
Two new fields, Destination Prefix and Number of Rightmost Digits to Append, have
been added to the Gateway Profile dialog box. These fields are used in the
automatic generation of the forwarded dial string.
The modified and additional fields are defined as follows:
Table 4
42
New Gateway Profile Properties
Option
Description
First Dial-in
Number
Enter the first number in the Dial-in number range to
be used for dialing into the gateway. This number must
be part of the dial-in number range defined in the
selected ISDN/PSTN Network Service.
This field cannot be left empty. If left empty an error
message, Please enter the First Dial in Number is
displayed.
Length: 0-25 digits.
Note: This number must be numerically smaller than
the Last Dial-in Number in the range.
Last Dial-in
Number
Enter the last number in the Dial-in number range to be
used for dialing into the gateway. This number must be
part of the dial-in number range defined in the selected
ISDN/PSTN Network Service.
This field cannot be left empty. If left empty an error
message, Please enter the Last Dial in Number is
displayed.
Length: 0-25 digits.
Note: This number must be numerically larger than the
First Dial-in Number in the range.
Version 7.1 Detailed Description
Table 4
New Gateway Profile Properties (Continued)
Option
Description
Use Dial-in
Numbers as
Destination ID
When selected - Dial-in numbers are used to
automatically generate the dial string of the destination
endpoint or DMA Meeting Room, skipping the
interaction with the Gateway IVR system for entering
the destination ID.
When cleared - The participant must interact with the
IVR Service to enter the ID of the destination endpoint
of the DMA Meeting Room.
Destination Prefix
Enter the DMA prefix or the RMX prefix in the
Gatekeeper for use in automatic dial string generation.
This prefix replaces the digits that are truncated from
the dial-in strings and to which the remaining dial in
digits are appended to create the destination number.
For example, if the DMA Prefix in the Gatekeeper is
26, enter this prefix in this field.
Number of
Rightmost Digits
to Append
Enter the number of rightmost digits of the dialed string
to be appended to the Destination Prefix (DMA/RMX
prefix in the gatekeeper) when automatically
generating the forwarded dial string. For example, if
the number of digits to append is 4 and the dialing
string is 5705555, the system will append the digits
5555 to the DMA prefix (26) and creating the
destination number 265555.
43
RMX 1500/2000/4000 Release Notes - Version 7.1
Recording Status Indication Display
A Recording Indication is displayed to all conference participants informing them that
the conference is being recorded.
The Recording Indication is displayed in the upper left corner of the participant’s video
layout while active recording is taking place. When recording is paused, a pause
indicator is displayed.
An Enable Video Indication check box has been added to the Recording tab of the New
Profile dialog box.
The Enable Video Indication check box which enables the recording indication is selected
automatically when the Enable Recording check box is selected.
Guidelines
44
•
Recording Indication is supported with MPMx cards.
•
If the conference has a Gathering Phase enabled, the Recording and Paused indicators
are displayed in the Gathering Slide.
Version 7.1 Detailed Description
Content over ISDN Cascading Link
Cascaded conferences now support sending H.239 Content over ISDN links.
Network Toplogies Enabling H.239 Content Over ISDN Cascaded
Links
ISDN Cascaded links that support H.239 Content can be created between two
gateways, gateway-to-MCU or between two MCUs in the following network
topologies:
•
Gateway to Gateway
RMX Gateway A
Figure 3
RMX Gateway B
Gateway to Gateway Topology
In this topology, an IP participant calls another IP participant over an ISDN link
between two gateways.
•
Gateway to MCU
RMX Gateway A
Figure 4
RMX MCU B
Gateway to MCU/ MCU to Gateway Topology
In this topology, an IP participant calls a conference running on an MCU via a
gateway and over an ISDN link.
•
MCU to MCU
Figure 5
Cascading Between Two MCUs Using an ISDN Link
45
RMX 1500/2000/4000 Release Notes - Version 7.1
In this topology, an ISDN participant from conference running on MCU A calls a
conference running on MCU B over an ISDN link.
Guidelines
•
Content is restricted. When another endpoint wants to send content, the first
endpoint must stop sending content before the second endpoint can initiate or
send content.
•
Endpoints that do not support H.239 can receive the Content using the Send
Content to Legacy Endpoints option.
•
When a participant joins a conference with active Content, content cannot be
viewed by the new participant. Restart the Content.
•
Cascaded MCUs/Gateways must be registered with the same Gatekeeper or
neighboring Gatekeepers. MCUs and endpoints must also be registered with
Gatekeepers.
•
Gateway/MCU calls require definition of IVR Services. For more information see
the RMX 1500/2000/4000 Administrator’s Guide, "Defining the IVR Service for
Gateway Calls” on page 17-13
In version 7.1, H.239 content protocol is H.263 when sent over ISDN or H.323
Cascading link.
Gateway to Gateway Calls via ISDN Cascading Link
When H.323 participants connects to another IP participants via a Gateway to Gateway
call over an ISDN link, the dialing string includes the following components:
[GW A prefix in GK] - the prefix with which the RMX (gateway) is registered to the
gatekeeper.
[GW Profile ID] - The ID of the Gateway Profile defined on Gateway A to be used
for routing the call to the Gateway B.
[GW Profile ISDN/PSTN number] - the dial-in number assigned to the Gateway
Profile defined on Gateway B, including the required country and area codes.
Information required that is not part of the dialing string:
[Destination number] - the destination number as alias, IPv4 address or ISDN/
PSTN number of participant B.
The dialing string format:
H.323 Participants connecting to another IP participant via a Gateway to Gateway call
over an ISDN link enter a dial string using the format:
<GW A Prefix in GK><Gateway Profile_ID on GW A>*<Destination
ISDN Dial-in number assigned to the Gateway Session Profile GW
B>*<Destination Number, participant>
For example:
GW A prefix in Gatekeeper - (not used with SIP)
Gateway Profile ID in GW A
46
22
9999
Version 7.1 Detailed Description
ISDN Dial-in Number assigned to the
Gateway Session Profile GW B
IP Participant Alias
4444103
3456
H.323 participant dials: 229999*4444103 and when prompted for the Destination
number enters 3456 followed by the pound key (#) using DTMF codes.
SIP Participants connecting to another IP participant via a Gateway to Gateway call over
an ISDN link enter a dial string using the format:
<Gateway Profile_ID on GW A>@<Central Signaling IP GW
A>*<Destination ISDN Dial-in number assigned to the Gateway
Session Profile GW B>*<Destination Number, participant>
For example:
If Central Signaling IP address of Gateway A is 172.22.177.89, SIP participant dials:
9999@ 172.22.177.89* 4444103 and when prompted for the Destination number enters
3456 followed by the pound key (#) using DTMF codes.
Gateway to MCU Calls via ISDN Cascading Link
When H.323 participants connects to a conference/Meeting Room via a Gateway to
MCU call over an ISDN link, the dialing string includes the following components:
The dialing string includes the following components:
[GW A prefix in GK] - the prefix with which Gateway A is registered to the
gatekeeper.
[GW Profile ID on GW A] - The ID of the Gateway Profile on GW A to be used for
routing the call to the Meeting Room/conference running on MCU B.
[Conference/Meeting Room/Entry Queue ISDN/PSTN number] - the dial-in
number assigned to the Entry Queue/Meeting Room/Conference defined on MCU B,
including the required country and area codes.
Information required that is not part of the dialing string:
[Destination Conference ID] - Only if using the Entry Queue on MCU B for
routing calls or creating new ad hoc conferences. The ID of the destination conference
on MCU B.
The dialing string format:
<GW A Prefix in GK><Gateway Profile_ID on GW A>*<ISDN Number
assigned to the Meeting Room/Conference/Entry Queue>
For Example:
GW A prefix in Gatekeeper - (not used with SIP)
Gateway Profile ID in GW A
ISDN Dial-in Number assigned to the
Entry Queue/MR/conference
22
9999
4444100
H.323 participant dials: 229999*4444100.
SIP participant dials (if Central Signaling IP address of Gateway A is 172.22.177.89):
9999@ 172.22.177.89 IP* 4444100.
If dialing an Entry Queue, when prompted for the Destination number enters 3456
followed by the pound key (#) using DTMF codes to create a new conference or join an
ongoing conference with that ID.
47
RMX 1500/2000/4000 Release Notes - Version 7.1
MCU to MCU Calls via ISDN Cascading Link
A dial out ISDN participant is defined (added) to conference A running on MCU A.
The participant’s dial out number is the dial-in number of the Entry Queue or
conference running on MCU B (for example 54145106).
MCU A dials out to an Entry Queue or conference B running on MCU B using the
Entry Queue number (for example 54145106) or the conference number.
When the participant, who is a dial-in participant in conference B, connects to the Entry
Queue, the system plays to all the participants in Conference A the IVR message
requesting the participant to enter the destination conference ID (or if connecting to a
conference directly, the participant is requested to enter the conference password).
At this point the Conference A organizer or any other participant in the conference can
enter the required information for the IVR session using DTMF codes. For example, the
meeting organizer enters the destination conference ID - 12345.
Any DTMF input from conference A is forwarded to the Entry Queue on MCU B to
complete the IVR session and enable the move of the participant to the destination
conference B.
Once the DTMF codes are entered and the IVR session is completed, the participant is
connected to the conference and the connection between the conferences is established.
The system automatically identifies the calling participant as an MCU and the
connection is identified as a cascading link and the cascading link icon is displayed for
the participant. (
).
RMX Configuration Enabling ISDN Cascading Links
To enable Gateway-to-Gateway, Gateway-to-MCU and MCU-to-MCU calls over ISDN
Cascading links, the following configurations are required:
•
Modifying the IP Network Service to include the MCU Prefix in the Gatekeeper (in
the Gatekeepers dialog box). For more details, see "Modifying the Default IP Network
Service” on page 14-13.
•
Configuring a Gateway Profile and assigning dial-in ISDN/PSTN numbers. For
details, see "Defining the Gateway Profile” on page 17-18.
•
Defining the dial-in ISDN participant in MCU B and Dial-out ISDN participant in
MCU A (for MCU-to-MCU cascading conferences). For details, see "Basic
Cascading using ISDN Cascaded Link” on page 3-6.
Conference Profile Definition
The following table lists the recommended Meeting Room/Conference Profile
parameters setting when routing ISDN cascaded calls.
Table 1-1
Recommended Conference Profile Options Setting
Line Rate
Motion
128
Encryption
LPR
128
48
Sharpness
128
128
256
Version 7.1 Detailed Description
Table 1-1
Line Rate
Recommended Conference Profile Options Setting (Continued)
Motion
Sharpness
Encryption
LPR
256
256
256
384
384
384
384
512
512
512
512
768
768
768
768
Since the remote participant settings are unknown, it is recommended that the
gateway or endpoint be configured to support a higher line rate (for example,
768 kbps) to allow flexibility during endpoint capability negotiations.
MCU Interoperability Table
The following table lists the different MCU and Gateway configurations that are
supported or implemented when routing Cascaded ISDN calls.
Table 1-2
MCU Interoperability Table
Scenario
Version(s)
RMX
Gateway
RMX MCU
User calls via a Gateway to a
Remote Conference (user to
conference)
RMX v. 7.1
RMX
Gateway
RMX
Gateway
User calls via a Gateway to a
Remote User behind Gateway
(user to user)
RMX v. 7.1
RMX MCU
RMX MCU
A dial out participants calls to a
remote conference (conference
to conference)
RMX v. 7.1
RMX MCU
RMX
Gateway
A dial out participants calls to a
remote User behind a Gateway
(Conference to User)
RMX v. 7.1
49
RMX 1500/2000/4000 Release Notes - Version 7.1
Table 1-2
50
MCU Interoperability Table (Continued)
Scenario
Version(s)
Endpoint
RMX
Gateway
User calls directly to a remote
user behind a Gateway (User to
User)
RMX v. 7.1
RMX MCU
Codian
Gateway
Dial out participants use a fixed
rule behind the Codian Gateway.
RMX v. 7.1
Latest
Codian
version
RMX
Gateway
Codian
Gateway
Dial out participants use a fixed
rule behind the Codian Gateway.
RMX v. 7.1
Latest
Codian
version
Codian
Gateway
RMX MCU
User calls via a Codian Gateway
to a Remote Conference (user to
conference)
RMX v. 7.1
Latest
Codian
version
Codian
Gateway
RMX
Gateway
User calls via a Codian Gateway
to a Remote User behind RMX
Gateway (user to user)
RMX v. 7.1
Latest
Codian
version
RMX MCU
Radvision
Gateway
User calls via a Radvision
Gateway to a Remote User
behind RMX Gateway (user to
user)
RMX v. 7.1
Latest
Radvision
version
RMX
Gateway
Radvision
Gateway
User calls via a Radvision
Gateway to a Remote User
behind RMX Gateway (user to
user)
RMX v. 7.1
Latest
Radvision
version
Radvision
Gateway
RMX MCU
User calls via a Radvision
Gateway to a Remote
Conference (user to conference)
RMX v. 7.1
Latest
Radvision
version
Radvision
Gateway
RMX
Gateway
User calls via a Radvision
Gateway to a Remote User
behind RMX Gateway (user to
user)
RMX v. 7.1
Latest
Radvision
version
Endpoint
RMX
Gateway
User calls directly to a DMA
controlled environment
RMX v. 7.1
RMX MCU
RMX
Gateway
A dial out participants calls to a
remote conference on a DMA
controlled environment
RMX v. 7.1
Version 7.1 Detailed Description
•
On the Codian gateway Content is not supported with line rates of 128kbps
and below.
•
When using the following topology:
H.323 endpoint ->Codian Gateway -> ISDN Link -> RMX -> H.323 endpoint,
the Codian Gateway is unable to send DTMF and the call is disconnected
(VNGFE- 3587).
•
Sending Content from a participant over Radvision Gateway to a
conference/participant, the GWP20 patch must be installed in the RadVision
gateway:
On the Radvision gateway, open the GWP20 User Interface. Click Settings/
Advanced Commands. In the Command box enter H239OlcPatch. In the
Parameters box enter Enable and then click Send.
51
RMX 1500/2000/4000 Release Notes - Version 7.1
Multiple Network Services
Media, signaling and Management networks can be physically separated on the RMX
system to provide enhanced security. This addresses the requirement in an
organization that different groups of participants be supported on different networks.
For example, some participants may be internal to the organization while others are
external.
Up to four media and signaling networks can be defined for RMX 4000, or two for
RMX 2000 and two for RMX 1500. Multiple IP Network Services can be defined, one
(RMX 2000/4000) or up to two (RMX 1500) for each media and signaling network
connected to the RMX. The networks can be connected to one or several Media cards in
the RMX unit.
The Management Network is logically and physically separated from the media and
signaling networks. There can be one Management Network defined per RMX system.
Each conference on the RMX can host participants from the different IP Network
networks simultaneously.
Figure 6 shows the network topology with three different media and signaling
networks and one Management network connected to the RMX 4000.
Figure 6
52
RMX 4000 - Multiple Network Topology Sample
Version 7.1 Detailed Description
Guidelines
•
Multiple Services system mode is a purchasable option and it is enabled in the
MCU license.
•
Multiple Services system mode is enabled when the system configuration flag
MULTIPLE_SERVICES is added and set to YES.
•
This option is supported with MPM+ and MPMx media cards.
•
Multiple Network Services are supported in MCUs with at least 1024MB memory
only. MCU units with memory of 512MB support only one IP Network Service.
•
Only IPv4 is supported for the definition of Multiple Network Services.
•
In RMX 1500, up to two Network Services, one per LAN port, can be associated
with each Media card.
In RMX 2000/4000 a media card can be associated with only one Network Service.
•
On RMX 2000/4000, RTM ISDN or RTM LAN can be used for Multiple Services
configuration.
•
An IP Network Service can be associated with one or several media cards.
•
If more than one card is associated with the same Network Service, the system
routes the calls to the appropriate card according to resource availability
•
Participants on different networks can connect to the same conference with full
audio, video and content capabilities.
•
Traffic on one network does not influence or affect the traffic on other networks
connected to the same MCU, unless they are connected to the same media card. If
one network fails, it will not affect the traffic in the other connected networks,
unless they are connected to the same media card and the card fails.
•
Maximum Number of services that can be defined per RMX platform:
Table 2
•
Maximum Number of IP Network Service per RMX Platform
RMX Platform
IP Network Services
Management
Services
RMX 1500
2
1
RMX 2000
2 (2 RTM ISDN)
1
RMX 4000
4 (2 RTM ISDN and 2 RTM LAN)
1
Participants are associated with a Network Service and use it resources as follows:
— Dial-in participants - according to the network used to place the call and
connect to the RMX.
— Dial-out participant - according to the Network Service selected during the
participant properties definition by the RMX administrator or during
conference definition, according to the Network Service selected as default by
the RMX administrator.
Resource Allocation and Capacity
The Video/Voice Port Configuration and the Resolution Configuration settings are
configured per MCU and affect the resource capacity of the MCU. They are reflected in
the port gauges displayed on the RMX management application’s main screen. In
Multiple Networks mode, the overall resources as configured in the Video/Voice Port
Configuration are divided between the Network Services. However, the port gauges do
not reflect the resource availability per Network Service.
53
RMX 1500/2000/4000 Release Notes - Version 7.1
Fixed and Flexible Resource Allocation Mode
On RMX 2000/4000 resources are divided between services according to the number of
media cards associated with each service and the card assembly type (for example,
MPM+40 vs. MPM+80). If two identical media cards are installed in the system and
each card is assigned to a different Network Service, the resources are split between the
services.
If two cards are installed but each card is of different assembly type, the resources are
allocated according to the card capacity ratio. For example, in a system with one
MPM+40 and one MPM+80, the capacity ratio is 1 to 2, therefore a third of the
resources will be assigned to the network service associated with MPM+40 and two
thirds will be assigned to the Network Service associated with MPM+80.
On RMX 1500 with two Network Services associated with one media card, the resources
of the two Network Services associated with one media card are not split between the
network services. In such a case, resources are used per their availability by both
Network Services equally.
In Fixed Resource Allocation Mode if the resources cannot be divided into whole
numbers, they will be rounded up to the nearest whole number, assigning that
resource to the Network Service with the higher capacity (i.e. more media cards or
media cards with higher capacity due to a different card assembly).
First Time Installation and Configuration
First Time Installation and Configuration of the RMX 1500/2000/4000 consists of the
following procedures:
1
Preparations:
2
— Gather Network Equipment and Address Information - get the information
needed for integrating the RMX into the local network for each of the
networks that will be connected to the RMX unit. For a list of required
address, see the RMX 1500/2000/4000 Getting Started Guide, "Gather Network
Equipment and Address Information” on page 2-2.
— Unpack the RMX. For more details see the RMX 1500/2000/4000 Getting
Started Guide, Chapter 2.
— Modify the Management Network parameters on the USB Key. For more details
see the RMX 1500/2000/4000 Getting Started Guide, "Modifying the Factory
Default Management Network Settings on the USB Key” on page 2-9.
Hardware Installation and Setup
3
— Mount the RMX in a rack. For more details see the RMX 1500/2000/4000
Getting Started Guide, "Hardware Installation and Setup” on page 2-12.
— Connect the necessary cables. For details, see “RMX Hardware Configuration”
on page 56.
First Entry Power-up and Configuration
— Power up the RMX. For more details see the RMX 1500/2000/4000 Getting
Started Guide, "Procedure 1: First-time Power-up” on page 2-21.
— Register the RMX. For more details see the RMX 1500/2000/4000 Getting
Started Guide, "Procedure 2: Product Registration” on page 2-22.
— Connect to the RMX. For more details see the RMX 1500/2000/4000 Getting
Started Guide, "Procedure 3: Connection to MCU” on page 2-23.
— Configure the Default IP Network Service using the information for one of the
networks connected a media card installed in the system. For more details see
the RMX 1500/2000/4000 Getting Started Guide, "Procedure 4: Modifying the
Default IP Service and ISDN/PSTN Network Service Settings” on page 2-25.
54
Version 7.1 Detailed Description
4
— Optional. Configure the ISDN/PSTN Network Service. For more details see the
RMX 1500/2000/4000 Getting Started Guide.
Modify the required System Flag to enable Multiple Services and reset the MCU.
5
Add the required IP Network Services to accommodate the networks connected to
the RMX unit.
6
Select a Network Service to act as default for dial out and gateway calls for which
the Network Service was not selected.
7
Place several calls and run conferences to ensure that the system is configured
correctly.
Upgrading to Version 7.1 and Multiple Services
1
Gather Network Equipment and Address Information for each of the networks
that will be connected to the RMX unit. For a list of required address, see “Gather
Network Equipment and Address Information - IP Network Services Required
Information” on page 56.
2
Upgrade the software version to Version 7.1 and install the activation key that
contains the Multiple Services license as described in “Upgrade Paths to Version 7.1”
on page 13.
3
Place several calls and run conferences to ensure that the system upgrade was
completed successfully.
4
Modify the required System Flag to enable Multiple Services, DO NOT reset the
MCU yet.
5
Connect the additional network cables to the RMX and change existing
connections to match the required configuration as described in the “RMX
Hardware Configuration” on page 56.
At this point, the Management Network can be modified to match the required
local network settings.
If the RMX 2000 you are upgrading does not include RTM ISDN or RTM LAN
cards, you must install at least one RTM LAN card to enable the definition of
multiple Network Services. If no RTM ISDN or RTM LAN cards are installed, the
RMX 2000 works in a single Network Service mode and an alarm is issued by
the system. For more details about the installation of RTM LAN cards, see the
RMX 2000 Hardware Guide.
6
Reset the MCU.
7
Connect to the MCU and Add the required IP Network Services to accommodate
the networks connected to the RMX unit.
8
Select a Network Service to act as default for dial out and gateway calls for which
the Network Service was not selected.
9
Place several calls and run conferences to ensure that the system is configured
correctly.
55
RMX 1500/2000/4000 Release Notes - Version 7.1
RMX Hardware Configuration
Gather Network Equipment and Address Information - IP
Network Services Required Information
It is important that before connecting multiple networks and implementing Multiple
Services in the RMX, that you obtain the information needed to complete the IP
Network Service configuration for each connected network from your network
administrator.
Table 3
Network Equipment and Address Information per IP Network Service
Parameter
Local Network Settings
Note
Signaling Host IP
address
Media Board IP
address (MPM 1)
Media Board IP
address (MPM 2)
RMX 2000/4000 only
If more than one media
card is associated with
this Network Service
Media Board IP
address (MPM 3)
RMX 4000 only
If more than one media
card is associated with
this Network Service
Media Board IP
address (MPM 4)
RMX 4000 only
If more than one media
card is associated with
this Network Service
Gatekeeper IP
address (optional)
DNS IP address
(optional)
SIP Server IP
address (optional)
When connecting the LAN cables of the various networks to the RMX it is
recommended to use a color system to differentiate between the networks, for
example, using colored cables.
56
Version 7.1 Detailed Description
RMX 4000 Multiple Services Configuration
Connecting the cables to the RTM IP 4000:
The following cables are connected to the RTM IP on the rear panel of the RMX 4000:
Table 4
LAN Connections to the RTM IP
RTM IP Port
Description
LAN 1
Modem
LAN 2
Management
LAN 3
–
LAN 4
–
LAN 5
–
LAN 6
Shelf Management
Connecting the cables to the RTM LAN:
Table 5
LAN Connections to the RTM LAN
RTM LAN Port
Description
LAN 1
–
LAN 2
Signaling and Media - Network Service B
57
RMX 1500/2000/4000 Release Notes - Version 7.1
Figure 7 shows the cables connected to the RMX 4000 rear panel, when one RTM ISDN
and three RTM LAN cards are installed providing IP and ISDN connectivity. The RTM
ISDN card can be used for both ISDN and IP calls and only one IP network Service is
associated with each RTM LAN card.
LAN cable (Media &
Signaling) Network 4
PRI cable
LAN cable
(Media &
Signaling)
Network 3
LAN cable
(Media &
Signaling)
Network 2
LAN cable
(Media &
Signaling)
Network 1
Management
Network
Figure 7
Shelf
Management
RMX 4000 Rear Panel with LAN and PRI cables
In this case, up to four different IP Network Services can be defined - one for each RTM
LAN/RTM ISDN cards installed in the system.
Several cards can be assigned to the same IP Network Service. The definition of the
network services attached to the RMX unit and which cards are assigned to each
network service is defined in the IP Network Service.
RMX 2000 Multiple Services Configuration
Connecting the cables to the RTM IP:
The following cables are connected to the RTM IP on the rear panel of the RMX2000:
Table 6
58
LAN Connections to the RTM IP
RTM IP Port
Description
LAN 1
–
LAN 2
Management
LAN 3
Modem
Version 7.1 Detailed Description
Connecting the cables to the RTM LAN:
If RTM LAN or RTM ISDN cards are not installed on the RMX they must be
installed before connecting the additional network cables for media and
signaling.
Table 7
LAN Connections to the RTM LAN
RTM IP Port
Description
LAN 1
–
LAN 2
Signaling and Media - Network Service B (optional)
If one LAN port per RTM ISDN/ RTM LAN card is used, up to two different IP
Network Services can be defined - one for each installed RTM LAN/RTM ISDN cards.
Figure 8 shows the cables connected to the RMX 2000 rear panel, when two RTM LAN
cards are installed providing IP connectivity.
Figure 8
RMX 2000 Rear Panel with RTM LAN Cables
RMX 1500 Multiple Services Configuration
Connecting the cables to the RTM IP 1500:
The following cables are connected to the RTM IP on the rear panel of the RMX 1500:
Table 8
LAN Connections to the RTM IP
RTM IP Port
Description
LAN 1
Media and signaling - network 1
LAN 2
Media and signaling - network 2
MNG
–
MNG B
Management
59
RMX 1500/2000/4000 Release Notes - Version 7.1
Table 8
60
LAN Connections to the RTM IP
RTM IP Port
Description
Shelf
Shelf Management
LAN 3
–
LAN 4
–
Modem
Modem
Version 7.1 Detailed Description
RMX Configuration
Once the network cables are connected to the RMX unit, you can modify the default IP
Network Service and add additional Network Services.
System Flags and License Settings
The MULTIPLE_SERVICES System Flag determines whether the Multiple Services
option will be activated once the appropriate license is installed. Possible Values: YES /
NO Default: NO
This flag must be manually added to the system configuration and set to YES to enable
this option. For more information see the RMX 1500/2000/4000 Administrator’s
Guide, "Manually Adding and Deleting System Flags” on page 19-19.
If the MULTIPLE_SERVICES System Flag is set to YES and no RTM ISDN or
RTM LAN card is installed in the RMX 2000, an Active Alarm is displayed.
IP Network Service Definition
Use this procedure to define Network Services in addition to the Network Service
already defined during first entry installation and configuration. Each of the defined
Network Service can be associated with one or more media cards installed in the
system (depending on the system type).
Once a media card is associated with a Network Service it cannot be associated with
another network service.
To add new/additional Network Services:
1
In the Device Management pane, click IP Network Services (
2
In the Network Services list toolbar, click the
).
Add Network Service button.
61
RMX 1500/2000/4000 Release Notes - Version 7.1
The New IP Service - Networking IP dialog box opens.
3
Define the following fields:
Table 9
Default IP Network Service – IP
Field
Description
Network Service
Name
Enter the IP Network Service name.
Note: This field is displayed in all IP Signaling dialog
boxes and can contain character sets that use
Unicode encoding.
IP Network Type
Select the IP Network environment. You can select:
•
•
•
H.323: For an H.323-only Network Service.
SIP: For a SIP-only Network Service.
H.323 & SIP: For an integrated IP Service. Both
H.323 and SIP participants can connect to the
MCU using this service.
Note: This field is displayed in all Default IP Service
tabs.
Signaling Host IP
Address
62
Enter the address to be used by IP endpoints when
dialing into the MCU using this Network Service.
Dial out calls of participants to whom this network
service will be assigned are initiated from this
address.
This address is used to register the RMX with a
Gatekeeper or a SIP Proxy server residing on this
network.
Version 7.1 Detailed Description
Table 9
Default IP Network Service – IP (Continued)
Field
Description
Media Card 1 IP
Address
If only one network is connected to this media card,
it is enough to assign one media card to this
Network Service. In such a case, enter one IP
address for the media card according to the LAN
Port used for the connection.
If each of the LAN ports on one media card is used
with two different networks, each port is assigned to
its own Network Service. In such a case, enter the
IP address of the port to be assigned to this Network
Service.
A LAN port that is already assigned to a different
Network Service, displays the IP Address of the
assigned port and it cannot be assigned to this
Network Service (it is disabled).
Media Card 2 IP
Address
(RMX 2000/4000)
If only one network is connected to this media card,
it is enough to assign one media card to this
Network Service. In such a case, enter one IP
address for the media card according to the LAN
Port used for the connection, as provided by the
network administrator.
If each of the LAN ports on one media card is used
with two different networks, each port is assigned to
its own Network Service. In such a case, enter the
IP address of the port to be assigned to this Network
Service.
Notes:
Media Card 3 IP
Address
(RMX 4000)
Media Card 4 IP
Address
(RMX 4000)
•
LAN Ports/Media cards that are already
associated with another Network Service cannot
be associated with this Network Service.
•
You can define a Network Service without
assigning media cards to it.
•
To change the assignment of a card from one
service to another, the card must first be
removed from the service to which it is assigned
prior to its assignment to another service.
RMX 2000: If one card was already assigned to
another service, only one additional card can be
assigned to this service.
RMX 4000: Depending on the number of media
cards installed in the system, you can assign up to 4
media cards to this network service provided that
they are not assigned to any other Network Service.
Subnet Mask
4
Enter the subnet mask of the MCU in that network
service.
Default value: 255.255.255.0.
Optional. Some system flags can be defined per Network Service, depending on
the network environment.
To modify these flags, click the Service Configuration button.
63
RMX 1500/2000/4000 Release Notes - Version 7.1
The Service Configuration dialog box opens.
All the flags must be manually added to this dialog box. For a detailed description
of the flags and how to add them, see the RMX 1500/2000/4000 Administrator’s
Guide, "Manually Adding and Deleting System Flags” on page 19-19.
Flags defined per Network Service override their general definition in the
System Configuration.
The following flags can be defined per service:
—
—
—
—
—
—
—
—
—
—
—
—
—
—
—
—
—
—
—
—
—
—
—
—
—
—
—
64
ALLOW_NON_ENCRYPT_PARTY_IN_ENCRYPT_CONF
SIP_ENABLE_FECC
ENABLE_H239
SIP_ENABLE_FECC
ENABLE_CLOSED_CAPTION
ALLOW_NON_ENCRYPT_RECORDING_LINK_IN_ENCRYPT_CONF
NUMERIC_CONF_ID_LEN
NUMERIC_CONF_ID_MIN_LEN
NUMERIC_CONF_ID_MAX_LEN
ENABLE_CASCADED_LINK_TO_JOIN_WITHOUT_PASSWORD
MAX_CP_RESOLUTION
ENABLE_IP_REDIAL
QOS_IP_AUDIO
QOS_IP_VIDEO
ENABLE_CISCO_GK
SIP_FREE_VIDEO_RESOURCES
FORCE_CIF_PORT_ALLOCATION
MS_ENVIRONMENT
SIP_FAST_UPDATE_INTERVAL_ENV
SIP_FAST_UPDATE_INTERVAL_EP
H263_ANNEX_T
H239_FORCE_CAPABILITIES
MIX_LINK_ENVIRONMENT
IP_LINK_ENVIRONMENT
FORCE_STATIC_MB_ENCODING
FORCE_RESOLUTION
SEND_WIDE_RES_TO_IP
Version 7.1 Detailed Description
— DISABLE_WIDE_RES_TO_SIP_DIAL_OUT
— SEND_SIP_BUSY_UPONRESOURCE_THRESHOLD
5
Click the Routers tab.
6
Define the routers used in this network and that are other than the routers defined
in the Management Network. The field definitions of the Routers tab are the same
as for the Default Management Network. For more information see the RMX 1500/
2000/4000 Administrator’s Guide, "Click the Routers tab.” on page 14-16.
7
Click the DNS tab.
8
Modify the following fields:
Table 10
Default Management Network Service – DNS
Field
Description
Service Host
Name
Enter the host name of this network Service. Each
Network Service must have a unique Host Name
otherwise an error message is displayed.
DNS
Select:
•
•
Off – if no DNS server is used in this network.
Specify – to enter the IP address of the DNS
server used by this network service.
Note: The IP address field is enabled only if Specify
is selected.
Register Host
Names
Automatically to
DNS Servers
Select this option to automatically register this
Network Service Signaling Host with the DNS
server.
Local Domain
Name
Enter the name of the domain for this network
service.
DNS Server
Address
Enter the static IP address of the DNS server that is
part of this network.
9
Click the Gatekeeper tab.
10
Define the Primary and Alternate Gatekeepers and at least one Alias for this network
Service. The field definitions of the Gatekeeper tab are the same as for the Default IP
65
RMX 1500/2000/4000 Release Notes - Version 7.1
Network Service. For more information see the RMX 1500/2000/4000
Administrator’s Guide, "Click the Gatekeeper tab.” on page 14-17.
In Multiple Services mode, an Alias must be defined for the specified
gatekeeper.
11
Optional. Click the Ports tab.
Settings in the Ports tab allow specific ports in the firewall to be allocated to
multimedia conference calls. If required, defined the ports to be used multimedia
conference calls handled by this Network Service. The field definitions of the Ports
tab are the same as for the Default IP Network Service.
For more information see the RMX 1500/2000/4000 Administrator’s Guide, "Click
the Ports tab.” on page 14-20.
12
If required, click the QoS tab.
RMX’s implementation of QoS is defined per Network Service, not per endpoint.
The routers must support QoS in order for IP packets to get higher priority.
The field definitions of the QoS tab are the same as for the Default IP Network
Service. For more information see the RMX 1500/2000/4000 Administrator’s
Guide, "If required, click the QoS tab.” on page 14-22.
13
Click the SIP Servers tab.
14
Define the Primary and Alternate SIP Server for this network Service.
•
Registration of conferencing entities with the SIP Servers was moved to the
conferencing entities and is defined in the Conference Profile.
•
If Microsoft Office Communications or Lync server are part of this network
service, a certificate must be created for this network service. If each
network connected to the RMX includes Microsoft Office Communications
or Lync server, separate certificates must be created and sent to the MCU
for each of these networks.
The field definitions of the SIP Servers tab are the same as for the Default IP
Network Service. For more information see the RMX 1500/2000/4000 Administrator’s
Guide, "Click the SIP Servers tab.” on page 14-25.
15
Click the Security tab.
The field definitions of the Security tab are the same as for the Default IP Network
Service. For more information see the RMX 1500/2000/4000 Administrator’s
Guide, "Click the Security tab.” on page 14-28.
16
Optional. To configure the ICE environment, click the SIP Advanced tab.
17
Modify the following fields:
Table 11
66
Default IP Network Service – SIP Advanced
Field
Description
Server User Name
Enter the User name for this service as defined in
the Active Directory. For example, enter rmxNet2.
This field is disabled if the ICE Environment field is
set to None.
Version 7.1 Detailed Description
Table 11
18
Default IP Network Service – SIP Advanced (Continued)
Field
Description
ICE Environment
Select MS (for Microsoft ICE implementation) to
enable the ICE integration.
This field is disabled if the RMX is not running in
MPM+ Card Configuration Mode.
Click the OK button.
The new Network Service is added to the IP Network Services list pane.
Setting a Network Service as Default
The default Network Service is used when no Network Service is selected for the
following:
•
Dial out participants
•
Reserving resources for participants when starting an ongoing conference
•
Gateway calls
In addition, the Signaling Host IP address and the MCU Prefix in GK displayed on the
RMX Web Client main screen are taken from the default H.323 Network Service.
One IP Network Service can be defined as default for H.323 connections and another
Network Service as default for SIP connections. If the IP Network Service supports
both H.323 and SIP connections, you can set the same Network Service as default for
both H.323 and SIP, or for H.323-only or for SIP-only.
To designate an IP Network Service as the default IP Network Service:
1
In the Device Management pane, click IP Network Services (
).
2
In the Network Services list pane right-click the IP Network Service to be set as the
default, and then click Set As H.323 Default, or Set As SIP Default.
The next time you access this menu, a check mark is added next to the network
service type to indicate its selection as default.
To set this IP Network Service for both H.323 and SIP connections, repeat step 2
and select the option you need.
The following icons are used to indicate the default IP Network Service type:
Table 1-1: Default IP Network Service Icons
Icon
Description
This Network Service supports both SIP and H.323
connections and is designated as default for both SIP
and H.323 connections.
This Network Service supports both SIP and H.323
connections and is designated as default for H.323
connections.
This Network Service supports both SIP and H.323
connections and is designated as default for SIP
connections.
This Network Service supports only H.323
connections and is set as default for H.323
connections.
67
RMX 1500/2000/4000 Release Notes - Version 7.1
Table 1-1: Default IP Network Service Icons
Icon
Description
This Network Service supports only SIP connections
and is set as default for SIP connections.
Ethernet Settings
The RMX 2000 is set to automatically identify the speed and transmit/receive mode of
each LAN ports located on the RTM LAN or RTM ISDN cards that are added to the
system. These port settings can be manually configured if the specific switch requires
it, via the Ethernet Settings as for RMX 1500/4000. For more details, see RMX 2000/
4000 Administrator’s Guide, "Ethernet Settings” on page 14-30.
RMX 1500: The Port numbers displayed in the dialog box do not reflect the
physical Port numbers as labeled on the RMX 1500 MCU.
Signaling Host IP Address and MCU Prefix in GK Indications
The RMX Web Client displays the Signaling Host IP Address and MCU Prefix in GK
parameters as defined in the Default H.323 Network Service.
Video/Voice Port Configuration and Resolution Configuration
These configurations are set for the system and are applied to all the Network Services.
Conference Profile
Registration of conferencing entities such as ongoing conferences, Meeting Rooms,
Entry Queues, SIP Factories and Gateway Sessions with SIP servers is done per
conferencing entity. This allows better control on the number of entities that register
with each SIP server by selecting for each of the conferencing entities whether it will
register with the SIP server.
68
Version 7.1 Detailed Description
The registration is defined in the Conference Profile - Network Services tab.
In the IP Network Services table, the system lists all the defined Network Services (one
or several depending on the system configuration).
•
To register the conferencing entity to which this profile is assigned to a Network
Service, in the Registration column click the check box of that Network Service.
•
You can also prevent dial in participants from connecting to that conferencing
entities when connecting via a Network Service.
In the Accept Calls column, clear the check box of the Network Service from which
calls cannot connect to the conference.
69
RMX 1500/2000/4000 Release Notes - Version 7.1
Gateway Profiles
To enable the RMX to call the destination endpoint/MCU via IP connection, the
Network Service for the call must be selected in the Gateway Profile dialog box.
The Network Service set as default is used if no other Network Service is selected.
If the same Network Service is used for H.323 and SIP calls, the Network Service
Environment must include both H.323 and SIP settings.
Hardware Monitor
The Hardware Monitor pane includes the status of the LAN ports on the RTM LAN
cards.
70
Version 7.1 Detailed Description
Signaling Monitor
The Signaling Monitor pane includes the list of the IP Network Services defined in the
system (up to two in RMX 1500/2000 and up to four in RMX 4000). Double-clicking a
Network Service, displays it properties and status.
Conferencing
Each conference on the RMX can host participants from the different IP Network
networks simultaneously.
Defining Dial Out Participants
When defining dial out participants, you can select the Network Service to place the
call according to the network to which the endpoint pertains. If the endpoint is located
on a network other than the selected network, the participant will not be able to
connect.
If no Network is selected, the system uses the IP Network Service selected for reserving
the conference resources, and if none is set for the conference it uses the Network
Service set as default.
The IP Network Service is selected in the New Participant - Advanced dialog box.
71
RMX 1500/2000/4000 Release Notes - Version 7.1
Reserving Video Resources for a Conference
When defining a new ongoing conference or a conference reservation, you can select
the Network Service that will be used to reserve the required resources. If no Network
Service is selected, the default Network Service is used. Therefore, make sure that not
all conferences are reserving resources from the same Network Service, otherwise you
may run out of resources for that Network Service.
The IP Network Service is selected in the New Conference/New Meeting Room/New
Reservation - General dialog box.
Monitoring Conferences
The Conference Properties - Network Services dialog box shows for each Network Service
with which Network Service’s SIP proxy the conference should be registered and if the
dial in call will be connected to the conference.
In the Participant pane, a new column - Service Name was added, indicating the name of
Network Service used for the participant’s connection.
72
Version 7.1 Detailed Description
Resource Report
The Resource Report displays the resource usage in total and per Network Service in a
table format. The Resources per Service table provides the actual information on
resource usage and availability per network Service and provides an accurate snapshot
of resources usage in the system.
You can select the graph to display: select either Totals (default) or the Network
Service.
Port Gauge Indications
The port Gauges displays the total resource usage for the RMX and not per Network
Service. Therefore, it may not be an accurate representation of the availability of
resources for conferencing, as one Network Service may run out of available resources
while another Network Service may have all of it resources available. In such a case,
the port gauges may show that half of the system resources are available for
conferencing, while calls via the Network Service with no available resources will fail
to connect.
73
RMX 1500/2000/4000 Release Notes - Version 7.1
SIP People+Content
SIP endpoints can send and receive Content in conferences using People+Content,
Polycom’s proprietary content sharing protocol.
Guidelines
•
SIP People+Content is supported with MPM, MPM+ and MPMx cards.
•
SIP People+Content is supported in CP, VSW, and Event Mode.
•
A mix of H.323 and SIP endpoints can share content.
•
SIP endpoints using People +Content behave in the same manner as H.323
endpoints with regard to:
—
—
—
—
•
Content transmission modes.
Content protocol.
Sending content to legacy endpoints.
Interoperability with Polycom CMA and DMA.
For more information see the RMX 1500/2000/4000 Administrator’s Guide
"People+Content” on page 2-27.
The content management control (BFCP) utilizes an unsecured channel even when
SIP TLS is enabled. If security is of higher priority than SIP content sharing, SIP
People+Content can be disabled by setting the
ENABLE_SIP_PEOPLE_PLUS_CONTENT System Flag to NO. The default value
of the flag is YES.
This System Flag must be added to the System Configuration file before it can be
modified. For more information see the RMX 1500/2000/4000 Administrator’s Guide,
"Modifying System Flags” on page 19-5.
74
Version 7.1 Detailed Description
Monitoring SIP People+Content
Two new Content Channels (in and out) have been added to the Participant Properties Channel Status tab.
75
RMX 1500/2000/4000 Release Notes - Version 7.1
SIP People+Content information appears in all three panes of the Participant Properties SDP tab.
In the Channel Status - Advanced tab, three channels can be selected for viewing
additional information:
76
•
Content In
•
Content Out
•
BFCP TCP
Version 7.1 Detailed Description
RMX Integration into Microsoft Lync Server 2010
Environment
Version 7.1 enables the integration of RMX systems into the Microsoft Lync Server 2010
(Wave 14) environment.
In the Lync Server 2010 environment, only the Matched URI dialing (using the SIP URI
address) is available as the call routing method.
This section describes how to configure the RMX system and the Microsoft Lync server
2010 to enable routing of video calls to conferences running on the RMX system.
This section does not describe or provide full administration or maintenance
processes or procedures for Lync Server 2010. For any questions or assistance
on Lync Server 2010, see the Microsoft documentation and/or Microsoft
Support Services.
To enable the integration, the following tasks have to be performed:
•
Configure the Polycom RMX FQDN Name in the DNS
•
Set the Routing for the Polycom RMX System in the Lync Server
In addition, a certificate has to be created/purchased and sent to the RMX.
Configure the Polycom RMX FQDN Name in the DNS
Perform the following procedure to enable the Polycom RMX system to receive Lync
Server calls.
1
On the computer with the DNS installation, open the DNS Manager and expand
the Forward Lookup Zone.
77
RMX 1500/2000/4000 Release Notes - Version 7.1
2
Right-click the <local domain zone> and then click New Host.
The New Host dialog box opens.
3
Define the following parameters:
Table 2
78
New Host Parameters
Field
Description
Name
Enter the RMX name that will be used for its FQDN
name.
The Fully Qualified Domain Name (FQDN) is listed
accordingly using the previously defined domain
name. For example, if you have entered rmx111as
the name, the system displays
rmx111.isrexchlab.local as its FQDN.
IP Address
Enter the IP address of the RMX signaling Host.
4
Click the Add Host button.
5
Click OK on the Add Host confirmation message and then click Done.
Version 7.1 Detailed Description
Setting the Routing for the Polycom RMX System
Polycom recommends using Lync Powershell commands to perform the following
tasks. For detailed documentation for Lync Powershell, see http://blogs.technet.com/
b/csps/.
There are two methods to set the routing for the Polycom RMX System:
•
Using Lync Topology Builder to define your application pool and then using the
Lync Powershell to set the Polycom RMX system as a trusted host with a static
route.
This is the recommended method as it simplifies the setting of the routing for the
RMXand it also allows you to add additional RMX systems or DMA systems at a
later time.
In addition, it allows you to define a friendly domain name for the MatchURI that
can be used as the SIP URI for virtual meeting rooms without the need to know the
FQDN of the SIP signaling domain.
This method is detailed in the Polycom Unified Communications Deployment
Guide for Microsoft Environments, Polycom-enabled Unified Communications for
Microsoft Lync Server 2010, Task 2: Set the Routing for the Polycom RMX System.
•
Using the Lync Powershell to set the RMX as Static Route and as a trusted host.
This section describes how to set the Polycom RMX system as a static route using the
the Lync Powershell commands only.
To set the Polycom RMX system as a static route:
1
Navigate to Start > All Programs > Microsoft Lync Server 2010 (RC) > Lync
Server Management Shell to open the Lync Powershell terminal.
79
RMX 1500/2000/4000 Release Notes - Version 7.1
The Administrator Lync Server Management Shell terminal opens.
2
Enter the following command to set up a static route for the RMX system:
$route = New-CsStaticRoute -TLSRoute -destination "RMX FQDN"
-port 5061 -matchuri "RMX FQDN" -usedefaultcert $true
For example, if the RMX FQDN is rmx111.isrexchlab.local, enter:
$route = New-CsStaticRoute -TLSRoute -destination
"rmx111.isrexchlab.local" -port 5061 -matchuri
"rmx111.isrexchlab.local" -usedefaultcert $true
For a detailed description of the New-CsStaticRoute command, see:
http://technet.microsoft.com/en-us/library/gg398265.aspx
3
To set the route to be global, enter:
Set-CsStaticRoutingConfiguration -identity global -route
@{Add=$route}
For a detailed description of the Set-CsStaticRoutingConfiguration command, see:
http://technet.microsoft.com/en-us/library/gg425811.aspx
4
Optional. To check that the commands were entered correctly in the Powershell,
enter:
Get-CsStaticRoutingConfiguration.
If the command were entered correctly, the Lync server returns the RMX FQDN.
For a detailed description of the Get-CsStaticRoutingConfiguration command, see:
http://technet.microsoft.com/en-us/library/gg398754.aspx
Optional. To remove a static route, use the following command:
Remove-CsStaticRoutingConfiguration
Make sure that you enter the appropriate parameters of the static route to be removed,
otherwise all the defined static routes will be removed.
For a detailed description of the Remove-CsStaticRoutingConfiguration
command, see: http://technet.microsoft.com/en-us/library/gg398668.aspx
80
Version 7.1 Detailed Description
Creating a Trusted Application Pool and Setting the RMX as
Trusted Application
To set the Polycom RMX system as a trusted host with a static route:
In the used to create a new trusted application pool, the Registrar FQDN must be entered. If
you do not know the Registrar FQDN it can be retrieved by entering the command:
Get-CsSite.
The system displays the site parameters with the following required information:
•
•
1
Identity and Computer - RMX FQDN
Registrar - registrar (Lync Server) FQDN
In the Administrator Lync Server Management Shell terminal, enter the command:
New-CsTrustedApplicationPool -Identity <FQDN> -Registrar
Registrar:<registrar FQDN> -site 1 -ComputerFqdn <FQDN>
-ThrottleAsServer $true -TreatAsAuthenticated $true
For example if the <FQDN> is mx111.isrexchlab.local and the <registrar FQDN> is
w2008w14.isrexchlab.local the command entered:
New-CsTrustedApplicationPool -Identity
rmx111.isrexchlab.local -Registrar
Registrar:w2008w14.isrexchlab.local -site 1 -ComputerFqdn
rmx111.isrexchlab.local -ThrottleAsServer $true
-TreatAsAuthenticated $true
For a detailed description of the New-CsTrustedApplicationPool command, see:
http://technet.microsoft.com/en-us/library/gg425804.aspx
A warning message is displayed.
2
Enter Y to continue.
81
RMX 1500/2000/4000 Release Notes - Version 7.1
3
To define the RMX as trusted application enter the command:
New-CsTrustedApplication -ApplicationId <string>
-TrustedApplicationPoolFqdn <RMX FQDN> -Port 5061
Using the following variables:
— ApplicationId <string> - The name of the application. This must be a string
that is unique within the pool that is specified in the
TrustedApplicationPoolFqdn parameter. For example: VideoBridge
— TrustedApplicationPoolFqdn- The FQDN of the trusted application pool on
which the application will reside. For example: rmx111.isrexchlab.local
For example:
New-CsTrustedApplication -ApplicationId VideoBridge
-TrustedApplicationPoolFqdn rmx111.isrexchlab.local -Port
5061
For a detailed description of the New-CsTrustedApplication command, see:
http://technet.microsoft.com/en-us/library/gg398259.aspx
4
To enable all the changes made to the trusted application pool and trusted
application, enter the command:
Enable-CsTopology.
Optional. Configuring the Lync Server Registrar for Encryption
Encrypted calls can be supported by the Lync Server 2010 registrar (formerly a server
pool with Office Communications Server) .
To change the registrar encryption setting:
1
Use the following Lync Powershell command to determine the current encryption
setting for Lync Server 2010.
Get-CsMediaConfiguration
Identity : Global
EnableQoS : False
EncryptionLevel : RequireEncryption
EnableSiren : False
MaxVideoRateAllowed : VGA600K
2
If needed, use the following Lync Powershell command to change your encryption
setting to support encryption.
set-CsMediaConfiguration -EncryptionLevel supportencryption
3
Verify your encryption settings:
Get-CsMediaConfiguration
Identity : Global
EnableQoS : False
EncryptionLevel : SupportEncryption
EnableSiren : False
MaxVideoRateAllowed : VGA600K
Creating a Security Certificate for the Polycom RMX System
Polycom RMX system uses TLS transport in Microsoft environments. Therefore you
must install a security certificate on the Polycom RMX system that is trusted by the
Lync Server.
82
Version 7.1 Detailed Description
This can be accomplished in two ways:
•
Purchase and install a certificate from a commercial Trusted Root Certificate
Authority (CA) such as VeriSign or Thawte.
•
Request and obtain a certificate from your enterprise CA. If your organization
permits the submission of certificate requests directly to the enterprise’s CA
server, use the Lync Server Certificate Wizard. From it, you can then download an
export file of the certificate to your PC for later installation on the Polycom RMX
system. This procedure is described below.
Before you proceed, make sure that:
•
You have all the fully qualified domain names (FQDNs) of the system for which
you are creating a certificate.
•
These host names are in the primary DNS server of the environment and resolve
correctly to the Polycom RMX system.
If the host information in DNS is wrong, the certificates will not work.
Methods for Creating the Certificates
•
Method I - Using IIS Manager 7 to create the certificate request and the Microsoft
Management Console to export the created certificate.
This is the recommended method.
•
Method II - Using Administrator Lync Server Management Shell for creating the
certificate request and exporting it. This is an alternative method if Method I
cannot be performed.
Method I: Using IIS Manager 7 and Microsoft Management Console
Creating the Certificate Request for the Polycom RMX System
using IIS Manager 7
1
On the Lync Server, select Start > All Programs > Administrative Tools Internet
Information Services (IIS) Manager (7.0) to open IIS 7.
2
Under Connections, double-click the server name.
3
In the Features View, under IIS, double-click Server Certificates.
83
RMX 1500/2000/4000 Release Notes - Version 7.1
4
In the Actions pane (far right), select the Create Domain Certificate action.
The Create Certificate wizard opens.
5
6
In the Distinguished Name Properties window, complete all fields.
Do not leave any fields blank.
— In the Common Name field, enter the FQDN of RMX.
Click Next.
7
In the Online Certification Authority window, select a Certificate Authority from the
list and enter a friendly name.
8
Click Finish.
Your certificate is created.
To use the Microsoft Management Console to Export the
Created Certificate
1
84
Open Microsoft Management Console and add the Certificates snap-in, if it has not
been added already.
a
Choose File > Add/Remove Snap-in.
b
In the Available Snap-ins pane, select Certificates and click Add.
c
On the Certificates snap-in page, select Computer Account and click Next.
d
In the Select Computer window, select Manage Local Computer.
Version 7.1 Detailed Description
e
Click Finish.
2
Click OK.
3
Browse to Certificates (Local Computer) > Personal > Certificates.
4
Right-click the created certificate and select All Tasks > Export… to open the
Certificate Export wizard.
5
In the Certificate Export wizard, do the following:
a
In the Export Private Key window, select Yes, export the private key.
b
Click Next.
c
In the Export File Format window, select Include all certificates in the
certification path if possible.
d
Click Next.
e
In the Password window, enter a simple password, e.g., polycom.
f
Click Next.
g
In the File to Export window, enter a path where you want to save the new
file, for example, c:\temp\rmxcert.pfx.
Method II: Creating the Certificate Request in Microsoft Lync Server
This task is performed in two steps:
•
Creating a temporary certificate file which is used to check that the process was
executed correctly.
•
Creating the certificate file to be used with the RMX system.
Creating a Temporary Certificate File
To create the certificate request:
To enter the Request-CsCertificate command the CA Account name is required.
If the CA Account is unknown, it can be retrieved by performing the procedure
"Retrieving the CA Account Information” on page 1-91.
1
In the Administrator Lync Server Management Shell terminal, enter the command:
Request-CsCertificate -New <SwitchParameter> -Type
<CertType[]> [-CA <String>] [-CaAccount <String>]
[-CaPassword <String>] [-City <String>] [-ClientEKU <$true |
$false>] [-ComputerFqdn <Fqdn>] [-Confirm
[<SwitchParameter>]] [-Country <String>] [-DomainName
<String>] [-Force <SwitchParameter>] [-FriendlyName
85
RMX 1500/2000/4000 Release Notes - Version 7.1
<String>] [-GlobalCatalog <Fqdn>]
[-GlobalSettingsDomainController <Fqdn>] [-KeyAlg <RSA |
ECDH_P256 | ECDH_P384 | ECDH_P521>] [-KeySize <Int32>]
[-Organization <String>] [-OU <String>] [-Output <String>]
[-PrivateKeyExportable <$true | $false>] [-Report <String>]
[-State <String>] [-Template <String>] [-WhatIf
[<SwitchParameter>]]
For a detailed description of the Request-CsCertificate command, see
http://technet.microsoft.com/en-us/library/gg425723.aspx
The command shown in the example below creates a new offline certificate
request that includes the computer FQDN is rmx111.isrexchlab.local and
its location is Los Angeles, California and the CA account is
w2008dc.isrexchlab.local\isrexchlab-W2008DC-CA and the path to the
certificate file, for example: -Output C:\Certificates\rmx111.pfx. That will create
a certificate request file that can then be emailed to a certification authority for
processing. When the PrivateKeyExportable parameter is set to True, the request
creates an exportable certificate’s private key.
Request-CsCertificate -New -Type Default -KeyAlg RSA -CA
w2008dc.isrexchlab.local\isrexchlab-W2008DC-CA -City LA
-State CA -ComputerFqdn rmx111.isrexchlab.local -Country US
-DomainName isrexchlab.local -FriendlyName
rmx111.isrexchlab.local -Organization 'Polycom '
-PrivateKeyExportable $true -Output C:\rmx18630.pfx
<CertType[]> enter Default
2
Check that the certificate file (*.pfx) file was created in the location specified in the
create certificate command.
Creating the Certificate File for the RMX
Repeat steps 1 and 2 in the procedure “Creating a Temporary Certificate File” to create
the certificate that will be used for the RMX.
86
Version 7.1 Detailed Description
Once the certificate file is created, it can be exported using the following procedure:
1
On the computer with the installed Certificate Authority, click Start > Run.
2
In the Run window, enter MMC and click OK.
The Console window opens.
3
On the File menu, click Add/Remove Snap-in.
The Add/Remove Snap-in dialog box open.
4
In the Available snap-ins list, select Certificate and then click the Add button.
87
RMX 1500/2000/4000 Release Notes - Version 7.1
The Certificate Snap-in dialog box opens.
5
Select Computer Account.
The Select Computer dialog box open.
88
6
Select Local Computer and click the Finish button.
The Certificate is added to the Console window.
7
Expand the Certificates > Personal tree and then click the Certificates entry to list
the certificate files created.
8
In the certificate list, double-click the temporary certificate created in the previous
procedure.
The Certificate - General dialog box opens.
9
Click the Details tab.
Version 7.1 Detailed Description
10
Click the Copy to File button.
The Certificate Export wizard is activated.
11
Click Next.
12
In the Export Private Key wizard window, select Yes, export the Private key option
and click Next.
89
RMX 1500/2000/4000 Release Notes - Version 7.1
13
In the Export File Format wizard window, make sure that the Personal Information
Exchange option (default) is selected and click Next.
14
In the Password wizard window, enter a password, confirm it and click Next. For
example, enter Polycom.
Write down this password, as it will be used later to create the certPassword file
that is sent to the RMX together with the certificate file.
15
90
In the File To Export wizard window, click the Browse button.
Version 7.1 Detailed Description
16
Enter the certificate file name and select the export destination and click OK.
The selected file name and destination are listed in the File to Export window.
17
Click Next.
18
Click Finish.
Retrieving the CA Account Information
One of the parameters that are required for the Request-CsCertificate is the
CA Account. The CA account can be retrieved by performing the following
procedure:
1
On the computer with the installed Certificate Authority, click Start > Run.
In the Run window, enter MMC and click OK.
The Console window opens.
2
On the File menu, click Add/Remove Snap-in.
The Add/Remove Snap-in dialog box open.
91
RMX 1500/2000/4000 Release Notes - Version 7.1
3
In the Available snap-ins list, select Certificate Authority and then click the Add
button.
The Select Computer dialog box open.
92
4
Select the Local Computer option and click Finish.
5
In the Available snap-ins list, click OK.
The Certificate Authority appears in the Console window.
Version 7.1 Detailed Description
6
Expand the Certificate Authority tree and look for the CA Account name.
7
Write down the CA account so you will be able to use it when creating the
certificate account.
Sending the Certificate File to the RMX
If ICE dialing is part of the environment, this procedure can be performed as
part of the setting of the RMX for ICE Dialing. For more details, see "” on
page 1-102.
This procedure assumes that the IP Network Service is already defined and includes
SIP in its environment.
Optional. Creating the Certificate Password File
(certPassword.txt)
If you have used a password when creating the certificate file (*.pfx), you must create a
certPassword.txt file. This file will be sent to the RMX together with the *.pfx file.
To create the certPassword.txt file:
1
Using a text editor application, create a new file.
2
Type the password as you have entered when creating the certificate file. For
example, enter Polycom.
3
Save the file naming it certPassword.txt (file name must be exactly as show, the
RMX is case sensitive).
Sending the Certificate file to the RMX
To Send the *.pfx Certificate file:
1
Using the Web browser, connect to the RMX.
93
RMX 1500/2000/4000 Release Notes - Version 7.1
2
In the RMX Management pane, expand the Rarely Used list and click IP Network
Services ( ).
3
In the IP Network Services pane, double-click the Default IP Service (
) entry.
The Default IP Service - Networking IP dialog box opens.
94
4
Click the SIP Servers tab.
5
In the SIP Server Type, select Microsoft.
6
In the Transport Type field, select TLS.
7
In the Certificate Method field, select PEM/PFX.
8
Click the Send Certificate button.
,
, or
Version 7.1 Detailed Description
The Install File dialog box opens.
9
Click the Browse button.
The Open dialog box appears, letting you select the certificate file(s) to send to the
MCU.
10
In the file browser, select all files to be sent in one operation according to the
contents of the set:
Two files: one *.pfx file and certPassword.txt.
The file certPassword.txt is manually created if the *.pfx file was created by the Lync
Server 2010 using a password.
11
Click Open.
The selected file(s) appear in the Install Files path.
12
Click Install.
The files are sent to the RMX and the Install File dialog box closes.
13
In the Default IP Service - Networking IP dialog box, click OK.
14
In the Reset Confirmation dialog box, click No to modify the required system flags
before resetting the MCU, or click Yes if the flag was already set.
•
Reset can be performed after setting the system flags (for example, setting
the MS_ENVIRONMENT flag). After system reset the RMX can register to
the Lync server 2010 and make SIP calls.
•
Sometimes the system fails to read the *.pfx file and the conversion process
fails, which is indicated by the active alarm “SIP TLS: Registration server not
responding” and/or “SIP TLS: Registration handshake failure”. Sending *.pfx
file again, as described in this procedure and then resetting the system may
resolve the problem.
Supporting Remote and Federated Users in Microsoft Lync Server
2010 ICE Environment
You can support federated or remote users by including a Lync Server edge server in
your environment. The Lync Server with an access edge server role supports the
Interactive Connectivity Establishment (ICE) protocol which allows devices outside an
organization’s network to call other devices that are also part of the Polycom-enabled
95
RMX 1500/2000/4000 Release Notes - Version 7.1
unified communications solution. This functionality is supported in both the Lync
Server 2010, the Polycom video infrastructure, and Polycom HDX systems. This
functionality is similar to is support with Microsoft Office Communications Server
(Microsoft Wave 13 release).
Deployment Considerations
•
TLS is required for both federated environments and for remote users.
•
Polycom devices use the Access Edge Server IP address to register to a Lync Server
edge server.
•
Numeric dialing is not supported between federated environments.
Deployment Process for the RMX Systems
To enable the remote and Federation connections the following operations must be
performed:
•
Task 1: Ensuring SIP Signaling Domains are Allowed
•
Task 2: Creating an Active Directory account for the RMX that will be used for
registering and operating in the MS ICE environment
•
Task 3: Enabling the RMX User Account for Lync Server 2010
•
Task 4: Enabling the RMX Account for Remote Access and Federation
•
Task 5: Configuring the RMX for ICE dialing
To place federated calls between Domain A and Domain B in ICE environment
sub domains must be federated to the main domain or the RMX system must be
installed on a main domain.
Task 1: Ensuring SIP Signaling Domains are Allowed
When federating with another Lync Server environment that includes a Polycom RMX
system, you need to ensure that both the Lync Server edge server domain and the SIP
signaling domain are allowed on the federated Lync Server edge server.
For example, if companyB wants to connect to calls managed by an RMX system on
companyA, companyB must add the companyA domains to its list of allowed SIP
domains in the Lync Server edge server.
Likewise if companyA wants to connect to calls managed by an RMX system on
companyB, companyB’s SIP domains must be on the allowed SIP domain list of
companyA’s edge server.
To federate a Lync Server edge server with another Lync Server environment:
1
On the Lync Server edge server, navigate to the Computer Management console.
For example, right-click My Computer and choose Manage.
96
2
In the console tree, expand Computer Management > Services and Applications
> Office Communications Server 2007 and right-click Office Communications
Server 2007 and then click Properties.
3
Click the Internal tab.
4
In the Internal SIP Domains support by Office Communications Servers in your
organizations: area, click Add Domain.
5
In the Add SIP Domain dialog box, add each SIP domain to be supported in your
Microsoft Lync deployment. In the box, type the FQDN of the SIP domain, and
then click Add. After adding all SIP domains to be supported, click Next.
Version 7.1 Detailed Description
You need to add the following SIP domains:
— Microsoft Lync edge server with which you want to federate. For example,
LYNC.companyB.com.
— The FQDN of the of the SIP signaling domain of the RMX system in
companyB in the following format:
RMX_NAME.LYNC_EDGE_SERVER_NAME.DOMAIN.COM
The RMX system must also be configured as a static route for the Lync Server on the
network where it resides.
Task 2: Creating an Active Directory Account for the RMX
The User account created for the RMX is used for registration in the Lync Server and to
automatically synchronize with the STUN and relay (Edge) servers.
To add the RMX user to the Active Directory:
1
Go to Start > Run and enter dsa.msc to open the Active Directory Users and
Computers console
2
In the console tree, select Users > New > User.
3
In the New User wizard, define the following parameters:
97
RMX 1500/2000/4000 Release Notes - Version 7.1
Table 3
Active Directory - New User Parameters for the RMX
Field
Description
First Name
Enter the name for the RMX user. This name will be
used in the configuration of the ICE environment in
the RMX.
Full Name
Enter the same name as entered in the First Name
field.
User Login Name
Enter the same name as entered in the First Name
field and select from the drop down list the domain
name for this user. It is the domain name defined for
the Office Communication Server.
A unique user name must be defined for each RMX system installed in the
Microsoft environment.
98
4
Click Next.
5
Enter the password that complies with the Active Directory conventions and
confirm the password.
6
Select the options: User cannot change password and Password never expires.
Clear the other options.
Version 7.1 Detailed Description
7
Click Next.
The system displays summary information.
8
Click Finish.
The new User is added to the Active Directory Users list.
Task 3: Enabling the RMX User Account for Lync Server
The new RMX user must be enabled for registration with the Lync Edge Server.
To enable the RMX User Account for Lync Server:
1
On the computer running the Lync Server 2010, go to Start->All
Programs->Microsoft Lync Server 2010>Lync Server Control Panel.
Windows Security window opens.
2
Enter your User name and Password as configured in the Lync Server and click
OK.
The Microsoft Lync Server 2010 Control Panel window opens.
99
RMX 1500/2000/4000 Release Notes - Version 7.1
3
Click the Users tab.
4
In the User Search pane, click the Enable Users heading.
The New Lync Server User pane opens.
5
Click the Add button.
The Select from Active Directory dialog box opens.
100
Version 7.1 Detailed Description
6
Enter the RMX user name as defined in the Active Directory, and then click the
Find button.
The requested user is listed in the Select From Active Directory dialog box.
7
Select the listed user (RMX user) and click OK.
The selected user appears in the New Lync Server User pane.
8
Select the following parameters:
—
In Assign users to a pool field, select the required pool.
— In the Generate user SIP URI, select the Use the user principal name (UPN)
option.
9
— In the Telephony field, select Enterprise Voice.
Click the Enable button.
The selected user appears as enabled in the User Search pane.
101
RMX 1500/2000/4000 Release Notes - Version 7.1
Task 4: Enable the RMX Account for Remote Access and
Federation
You need to configure the RMX user account for remote access and federation. The
following instructions assume you have configured a Lync Server edge server.
To configure the RMX account for federation and remote user access:
1
Go to Start > Run.
2
Enter dsa.msc and click OK.
The Active Directory Users and Computers console opens.
3
Right-click the RMX user, and select Configure Communications Server Users.
4
In the Configure Communications Server Users wizard, click Next.
5
In the Configure User Settings page, select the Federation and Remote user access
check boxes.
6
— Remote user access is required for all deployments that include remote or
federated users.
— Federation is only required when you are supporting federated users.
Click Next and select any additional configuration settings for your deployment.
7
When complete, click Finish.
Task 5: Configuring the RMX for ICE Dialing
To enable ICE dialing, the Default IP Network Service must be configured to work
with the Lync Server 2010 as the SIP Server and the RMX user defined in the Active
Directory must also be defined in the RMX ICE environment parameters.
The procedure described here assumes that the RMX is configured to work in
Microsoft environment; the MS_ENVIRONMENT flag is set to YES, the IP
Network Service is set to work with Office Communications Server as the SIP
Server and the TLS certificate is installed. For a detailed description of these
settings, see the RMX 1500/2000/4000 Administrator’s Guide, Appendix H.
To configure the RMX for ICE Dialing:
1
In the RMX Web browser, in the RMX Management pane, expand the Rarely Used
list and click IP Network Services ( ).
102
Version 7.1 Detailed Description
2
In the IP Network Services pane, double-click the Default IP Service (
,
, or
) entry.
The Default IP Service - Networking IP dialog box opens.
3
Click the SIP Servers tab.
4
Make sure that the SIP Server is set to Specify.
5
Make sure that the SIP Server Type is set to Microsoft.
6
Make sure that the IP address of the Office Communications Server 2007 or Lync
Server 2010 is specified and the Server Domain Name is the same as defined in the
OCS/Lync Server and in the Management Network for the DNS.
7
Make sure that the IP address of the Lync Server 2010 is specified and the Server
Domain Name is the same as defined in the Lync Server and in the Management
Network for the DNS..
If the certificate file was not sent to the RMX previously, you can send it now.
For more details, see "Sending the Certificate file to the RMX” on page 1-93
103
RMX 1500/2000/4000 Release Notes - Version 7.1
8
Click the SIP Advanced tab.
9
In the ICE Environment field, select MS (for Microsoft ICE implementation) to
enable the ICE integration.
This field is disabled if the RMX is running in MPM Card Configuration Mode.
10
In the Server User Name field, enter the RMX User name as defined in the Active
Directory. For example, enter rmx1234.
This field is disabled if the ICE Environment field is set to None.
11
Optional if the Fixed Ports options was selected previously.
Click the Ports tab to modify the number of UDP Ports allocated to the calls to
accommodate the number of ports required for ICE dialing.
In the UDP Port Range, modify the number of UDP ports by enter the first and last
port numbers in the range. When ICE environment is enabled, the number of ports
defined in the range should be 2024.
13 Click OK.
The RMX will register with the OCS enabling automatic retrieval of the STUN
server and Relay server parameters for ICE dialing.
12
These parameters can be viewed in the Signaling Monitor - ICE Servers dialog box.
104
Version 7.1 Detailed Description - Feature Changes
Version 7.1 Detailed Description Feature Changes
Personal Conference Manager (PCM)
The Personal Conference Manager (PCM) interface enables the conference chairperson to
control various conference features using his/her endpoint’s remote control device.
The following conference operations can be performed:
•
Initiate Polycom’s Click&View™ application to change the local screen layout.
•
Invite a participant to connect to the conference.
•
View and control the audio and video of each connected endpoint.
•
Camera Control - control the camera of a remote endpoint using (FECC).
•
Control the camera of a connected endpoint.
•
Video Force a specific participant to a specific window of the video layout.
•
Initiate and control recording of the conference.
•
Disconnect a participant.
•
Terminate the conference.
•
PCM is supported with MPM+ and MPMx cards.
•
PCM is supported in H.323, SIP, and H.320 network environments.
•
PCM is only available in CP conferences.
•
Although the RMX can host up to a maximum of 800 conferences (depending on
the RMX model) PCM can only be activated from 4 conferences per MPM+ or
MPMx card.
Guidelines
•
— An RMX 2000 with 2 MPM+ or 2 MPMx cards installed can host a total of 8
PCM sessions while an RMX 4000 with 4 MPM+ or 4 MPMx cards installed
can host a total of 16 PCM sessions.
— If 4 PCM sessions are active on an MPM+ /MPMx card and a chairperson of
another conference, hosted on the same MPM+/MPMx card, attempts to start
an additional PCM session, a message is displayed indicating that the
requested PCM session cannot be activated because the maximum number of
concurrent PCM sessions are already activated. FECC is then activated.
— When PCM is active, FECC can only be performed by the chairperson using
PCM’s Camera Control menu.
FECC is available to all IP participants in the conference with the exception of the
chairperson that has an active PCM session.
•
If enabled, Message Overlay is not displayed while PCM is active.
•
Normal conference video is resumed after 4 seconds of inactivity within the PCM
menu.
•
If a chairperson with active PCM session is moved to another conference, the PCM
session is automatically terminated.
105
RMX 1500/2000/4000 Release Notes - Version 7.1
•
The PCM_LANGUAGE System Flag determines the language of the PCM
interface.
Possible Values: ENGLISH, CHINESE_SIMPLIFIED,
CHINESE_TRADITIONAL, JAPANESE, GERMAN, FRENCH, SPANISH,
KOREAN, PORTUGUESE, ITALIAN, RUSSIAN, NORWEGIAN
Default: Current RMX Web Client language.
•
The Start PCM DTMF code for initiating PCM is configured in the DTMF Codes tab
of the New Conference IVR Service or Conference IVR Service Properties dialog box.
The default DTMF Code is ## and can be modified or if required.
The default value of the Permission field is Everyone. It can be modified to
Chairperson.
Everyone /Chairperson
Default DTMF Code ‘##”
System Flag
The PCM_FECC System Flag determines whether the DTMF Code, ##, the Arrow Keys
(FECC) or both will activate the PCM interface. In addition, this flag can be used to
disable the PCM.
Possible Values: YES / NO
Default: YES.
Table 4 summarizes the combined effect of the DTMF Code and PCM_FECC System
Flag settings on the system.
Table 4
PCM_FECC / DTMF Code
PCM_FECC=
DTMF Code
Effect on System
Defined
Both DTMF Codes and Arrow
Keys will activate PCM.
Deleted
Only the Arrow Keys can
activate PCM.
Once PCM is activated the
Arrow Keys lose their FECC
functionality.
YES
106
Version 7.1 Detailed Description - Feature Changes
Table 4
PCM_FECC / DTMF Code
PCM_FECC=
DTMF Code
Effect on System
Defined
Only the DTMF Code can
activate PCM.
Once PCM is activated the
Arrow Keys lose their FECC
functionality.
Deleted
PCM is disabled.
NO
This System Flag must be added to the System Configuration file before it can be
modified. For more information see the RMX 1500/2000/4000 Administrator’s Guide,
"Modifying System Flags” on page 19-5.
PCM Interface
Initiating PCM
For IP endpoints: PCM is activated by pressing the Far key (
the Arrow Keys on the Remote Control Device.
) followed by any of
For ISDN/PSTN endpoints: PCM is activated by pressing ## on the Remote Control
Device.
When PCM becomes active, the top level of the PCM Main Menu is displayed on the
conference chairperson’s endpoint:
Main Menu - Level 1
Arrow Indicator:
There are more menu
options on the next
page
Arrow Indicator:
There are menu
options on the
previous page
Main Menu - Level 2
Right Arrow:
Corresponds to the
Remote Device’s
Right Arrow Key
Action:
Go to Sub-Menu of
Selected Option
(Click&View)
107
RMX 1500/2000/4000 Release Notes - Version 7.1
PCM Main Menu - Level 2 can only viewed and accessed by ISDN endpoints by
using DTMF Codes 7 and 8.
Remote Control Device Keys
PCM facilitates user interaction with the RMX using DTMF Codes and the Arrow
(FECC) keys of the endpoint’s remote control device.
Menu Navigation - Arrow and Zoom Keys
The PCM Menu is navigated using the Remote Device’s Arrow Zoom Keys which are
defined as follows:
Remote Device
Far Key
Arrow Keys
Zoom In/Out Key
Numeric Keys
They are defined as follows:
Table 5
PCM - Menu Navigation
Arrow Key
Left
Right
Up
108
Description
•
•
Go up one menu level.
•
Exit the PCM menu and return to normal conference video
(from PCM the top level menu.)
•
Select the video window to the left when navigating a video
layout.
•
Initiate PCM from a conference.
•
•
•
Go down one menu level.
•
Initiate PCM from a conference.
•
•
Cycle upward through the displayed menu options.
•
Initiate PCM from a conference.
Delete the character to the left of the cursor when entering
data.
Confirm current selection in the PCM menu.
Select the video window to the right when navigating a
video layout.
Select the video window above when navigating a video
layout.
Version 7.1 Detailed Description - Feature Changes
Table 5
PCM - Menu Navigation
Arrow Key
Down
Zoom in (+)
Zoom out (-)
Description
•
•
Cycle downward through the displayed menu options.
•
Initiate PCM from a conference.
•
•
Confirm current selection in the PCM menu.
•
•
Exit PCM Menu.
Select the video window below when navigating a video
layout.
Zoom in on the remote camera when using FECC.
Zoom out on the remote camera when using FECC.
DTMF Codes - Numeric Keys
Before using the shortcut number keys 0-9, enable the DTMF function of the
endpoint according to that endpoint’s configurations.
DTMF codes are entered using the Remote Device Numerics Keys and are defined as
follows:
Table 6
PCM - DTMF Codes
Numeric Key
Description
0
•
•
Number input.
•
Return to the conference - when in FECC mode.
•
•
Number input.
•
Initiate PCM session on ISDN/PSTN endpoint (1 is the
default for the Start PCM DTMF Code).
•
Initiate DTMF mode (with Polycom endpoints) - during
a conference or when the PCM menu is displayed.
•
Enter a period “.” - while entering an IP address.
1-9
*
#
Shortcut key to a numbered menu option - when
conference video or the PCM menu is displayed.
Shortcut key to a numbered menu option - when the
conference video or the PCM menu is displayed.
Confirm selection and send information to the RMX.
109
RMX 1500/2000/4000 Release Notes - Version 7.1
PCM Main Menu - Level 1
Click&View
With the Click&View application, participants can change their Personal Layouts using
the Arrow Keys or DTMF codes entered using the Numeric Keys of their endpoints.
Invite Participant
This function is not available to chairpersons using PCM with ISDN endpoints.
To invite a participant to connect to the conference:
1
Use the Up/Down arrow keys to select Invite Participant in the Main Menu and
then press the Right arrow or # key to confirm your selection.
or
Press the 2 key on the Remote Device.
The Invite Participant sub menu is displayed.
2
Use the Numeric Keys to enter the number of the participant’s endpoint.
3
Press the # key to initiate the call.
4
Optional.
a
b
5
• H.323
• SIP
• VoIP
• ISDN
• PSTN
Press the # key to initiate the call.
Optional.
a
110
Use the Down arrow to select the Auto button to select from the following
dialing methods:
Use the Arrow Keys to select the Directory button to select the Alphabetic
Grouping sub menu.
Version 7.1 Detailed Description - Feature Changes
The Local Directory is displayed.
Alphabetic
Groupings
Participant List
b
Use the Numeric Keys to enter the number of the participant’s endpoint.
c
Press # or the Zoom In key to initiate the call.
or
d
Use the Up/Down arrow keys to select a Participant from the displayed list or
use the Up/Down and Left /Right arrow keys to display other directory
listings.
A message, Press # or Zoom In to select, is displayed.
e
Press # or the Zoom In key to initiate the call.
Optional. To display all participants:
—
—
—
—
Use the Down arrow and the to select the ALL button.
Use the Zoom In key to display the global directory.
Use the Up/Down and Left /Right arrow keys to select a Participant.
Press # or the Zoom In key to initiate the call.
Participants Mute/Status
This function is not available to chairpersons using PCM with ISDN endpoints.
The chairperson can view and control the audio and video status of each participant's
endpoint. The chairperson can:
•
View the audio and video status of participants.
•
Mute, block, unmute, unblock participant audio.
•
Suspend or allow participant video.
•
Mute all (except chairperson and lecturer).
To view and change the Participants Mute/Status:
1
Use the Up/Down arrow keys to select Participants Mute/Status in the Main Menu
and then press the Right arrow or # key to confirm your selection.
or
Press the 3 key on the Remote Device.
111
RMX 1500/2000/4000 Release Notes - Version 7.1
The Participants Mute/Status sub menu is displayed.
The sub menu displays the Muted, Blocked and Video Suspended status of all
participants’ endpoints. ALL can be selected to mute and unmute all participant
endpoints with the exception of the conference chairperson and lecturer.
2
Use the Up/Down/Left/Right arrow keys to select a Mute, Block or Suspend status
icon.
3
Use the Zoom In key to toggle the state of the audio and video channels of the
participants’ endpoints.
The status icons are summarized in Table 7.
Table 7
Status
Icon
Participants Mute/Status - Icons
Description
Audio output from this endpoint is allowed. Other conference
participants can hear the audio from this endpoint.
The endpoint is muted. Other conference participants will not
hear audio from this endpoint.
The audio input to this endpoint is allowed. This endpoint can
hear the conference audio.
The audio output to this endpoint is blocked. This endpoint
cannot receive the conference audio.
Video output from the endpoint is allowed. Other conference
participants can see video from this endpoint.
Video output from the endpoint is suspended. Other
conference participants cannot see video from this endpoint.
The endpoint is neither muted nor blocked.
The endpoint is both muted and blocked.
112
Version 7.1 Detailed Description - Feature Changes
Camera Control
This function is not available to chairpersons using PCM with ISDN endpoints.
The endpoint to be controlled must support Far End Camera Control (FECC).
Using the arrow keys of the remote control device, the chairperson can control the
direction, zoom and focus of a remote endpoint’s camera.
To control a far camera:
1
Use the Up/Down arrow keys to select Camera Control in the Main Menu and
then press the Right arrow or # key to confirm your selection.
or
Press the 4 key on the Remote Device.
The Camera Control sub menu is displayed.
2
Use the Up/Down/Left/Right arrow keys to select the far camera to be controlled.
A colored frame is displayed around the selected cell in the video layout.
3
Use the Zoom In key to activate FECC.
Following a 10 second delay, the FECC active icon (
) is displayed in the video
image of the selected site.
Selected Cell for
Far End
Camera Control
4
Use the Up/Down/Left/Right/Zoom In/Zoom Out arrow keys to control the
remote camera.
5
Press the 0 key on the remote control to exit FECC.
6
Use the Zoom Out key on the remote control to return to the conference video.
Video Force
This function is not available to chairpersons using PCM with ISDN endpoints.
Video Force enables the chairperson to force the video of a specific participant to a
specific window of the video layout.
113
RMX 1500/2000/4000 Release Notes - Version 7.1
To Video Force a participant’s video:
1
Use the Up/Down arrow keys to select Video Force in the Main Menu and then
press the Right arrow or # key to confirm your selection.
or
Press the 5 key on the Remote Device.
The Video Force sub menu is displayed.
2
Use the Up/Down/Left/Right arrow keys to select the window of the video layout
that you want the specific participant to be displayed in.
3
Press the Zoom In key to cycle the display of all participants in the selected video
window until the participant you want to be displayed appears.
4
Press the Right arrow or # key to confirm your selection.
Recording
This function is not available to chairpersons using PCM with ISDN endpoints.
If a Recording Link has been set up in the Conference Profile, the conference chairperson
can use the PCM interface to start, pause, resume and stop recording. If no Recording
Link exists, this function appears grayed out and cannot be selected.
To use the recording functions:
1
Use the Up/Down arrow keys to select Recording in the Main Menu and then
press the Right arrow or # key to confirm your selection.
or
Press the 6 key on the Remote Device.
The Recording sub menu is displayed.
114
Version 7.1 Detailed Description - Feature Changes
To start recording:
>> Use the Up/Down arrow keys to select Start Recording and then press the Right
arrow or # key to confirm your selection.
or
Press the 1 key on the Remote Device.
To pause recording:
>> While recording is in progress, use the Up/Down arrow keys to select Pause and
then press the Right arrow or # key to confirm your selection.
or
Press the 2 key on the Remote Device.
To resume recording:
>> While recording is paused, use the Up/Down arrow keys to select Resume and
then press the Right arrow or # key to confirm your selection.
or
Press the 2 key on the Remote Device.
To stop recording:
>> While recording is in progress, use the Up/Down arrow keys to select Stop
Recording and then press the Right arrow or # key to confirm your selection.
or
Press the 3 key on the Remote Device.
PCM Main Menu - Level 2
Drop Participant
To disconnect a participant from the conference:
1
Use the Up/Down arrow keys to navigate to the second page of the Main Menu
2
Use the Up/Down arrow keys to select Drop Participant and then press the Right
arrow or # key to confirm your selection.
or
Press the 7 key on the Remote Device.
The Drop Participant sub menu is displayed.
3
Using the Up/Down arrow keys, select the participant to be disconnected and then
press the Right arrow or # key to confirm your selection.
or
Press the Numeric Key on the Remote Device corresponding to the participant entry.
115
RMX 1500/2000/4000 Release Notes - Version 7.1
Terminate Conference
Although this function can be accessed and viewed by chairpersons using PCM
with ISDN endpoints, conference termination cannot be executed.
Although this function can be accessed and viewed by chairpersons using PCM with
ISDN endpoints, conference termination cannot be executed.
To terminate a conference:
1
Use the Up/Down arrow keys to navigate to the second page of the Main Menu
2
Use the Up/Down arrow keys to select Terminate Conference and then press the
Right arrow or # key to confirm your selection.
or
Press the 8 key on the Remote Device.
The Terminate Conference sub menu is displayed.
3
Press the Right arrow key to confirm termination of the conference.
or
Press the Left arrow key to cancel termination of the conference.
116
Version 7.1 Detailed Description - Feature Changes
Diagnostics Mode Changes
Two types of Diagnostic Modes are available:
•
Basic Mode
•
Advanced Mode
A user using an Administrator Login, will be able to view and access the Basic Mode.
However, a Administrator “user” with Administrator permissions must be defined on
the RMX system. For more information see "Adding a New User” on page 13-3. A
SUPPORT user can access both the Basic Mode and Advanced Mode Diagnostics.
When Diagnostic Mode is initialized, the MCU is reset and upon restarting, the MCU
will enter Diagnostic Mode. Entering this mode causes the MCU to terminate all active
conferences and prohibits conferences from being established.
Diagnostic Mode is only enabled when connecting directly to the Shelf Management
server.
Connecting to the Shelf Management Server:
When accessing the Shelf Management server, the content displayed will be available in
English only.
To run Diagnostics you are required to Login with Administrator permissions. A user with
Administrator permissions must be defined on the RMX.
Access the RMX browser and click Hardware Monitor. The Hardware Monitor pane
opens.
On the Hardware Monitor toolbar click the Shelf Manager icon.
Type in the URL address of the Shelf Management (IP address).
For example; 172.22.189.51. You must also Login as a “Administrator” user to run
diagnostics
Login to the Shelf Manager.
On the Hardware Monitor toolbar select either the Basic Mode or Advanced Mode
diagnostics. Depending on your selection proceed with one of the following sections:
117
RMX 1500/2000/4000 Release Notes - Version 7.1
Performing Basic Mode Diagnostics
To run Basic Mode Diagnostics on a Hardware Component:
1
•
Most of the user interfaces illustrated in this section show the RMX 2000 with MPMx
cards. The Basic Mode for other RMXs with MPM+ card(s) are identical.
•
On the RMX 1500 less “slots” are used and the module naming conventions used on
elements are different.
In the list pane tool bar, click the Basic Mode (
) button.
RMX 2000/4000 &
RMX 1500 Hardware
Monitor panes
118
2
In the Reset Confirmation dialog box, click Yes.
3
The RMX resets. Re-enter the Shelf Manager IP address in the browser and Login
under POLYCOM or with an “Administrator” Login. After login the following
screen appears. The MPM+/MPMx cards indicate “Resetting” and later switch to
“Diagnostics”. The status of RTM-IP/RTM IP 1500/RTM-IP 4000 and CNTL/
Version 7.1 Detailed Description - Feature Changes
CNTL 1500/CNTL 4000 components change to “Diagnostics”.
RMX 2000/4000 &
RMX 1500 Hardware Monitor panes
4
You can select any one of the Hardware components indicating “Diagnostics/
Normal” in the status column and right-click Properties from the menu. The
card’s General Info/Event Log/Active Alarms properties are displayed.
5
Run Diagnostic Tests & Tests Monitoring by clicking the Run Tests button. In the
Hardware Monitor pane, the toolbar and card statuses change to Tests in progress.
119
RMX 1500/2000/4000 Release Notes - Version 7.1
Table 1-1
Run Tests - Parameters
Parameter
Description
Diagnostic Status
Basic Diagnostic Status:
• Ready - ready to run diagnostics
•
•
Test in Progress - running diagnostics
Passed/Failed - Passed/Failed the diagnostics
tests
Estimated
Duration
Estimated time needed to run Basic Diagnostic
tests.
Time Left
Estimated time to complete Basic Diagnostic tests.
When the RMX enters “Diagnostics Mode”, the status MPM+/MPMx, CNTL/
CNTL 1500/CNTL 4000 and RTM IP/RTM IP 1500/RTM IP 4000 changes to
“Diagnostics”
6.
The Diagnostics Summary pane is displayed at the bottom of the Hardware
Monitoring pane.
Figure 1-1 RMX 2000/4000 Diagnostics Tests & Monitoring Tests
120
Version 7.1 Detailed Description - Feature Changes
Figure 1-2 RMX 1500 Diagnostics Tests & Monitoring Tests
7
Select the Run all Tests box and then click Run Selected Tests.
Table 1-2
Tests Selection - Additional Test Parameters
Parameter
Description
Loop Test
Enter the amount of times the test is to repeat itself
in succession.
Stop On Failure
Stops tests upon a failure.
Run All Test
Runs all tests listed in the TestActive column for the
hardware component.
8
The selected tests are initialized. In the Tests Monitoring pane there is an indication
of the Status of the Tests.
9
This process may take some time. Click Stop Running Test to end all the diagnostic
tests. The MCU completes the current test running and then stops all remaining
tests.
10
When the Test are completed, you have the option to download in Excel format
two types of reports for analysis by your next level of support:
— Export Diagnostic Summary
— Export Full Tests Results
11 The Diagnostics Mode can be exited by pressing the red System Reset icon.
12
The RMX then resets.
Performing Advanced Mode Diagnostics
To run Diagnostics you are required to Login with administrator permissions.
To run Advanced Mode Diagnostics on a Hardware Component:
•
Most of the user interfaces illustrated in this section show the RMX 2000 with MPMx cards.
The Advanced Mode for other RMXs with MPM+ card(s) are identical.
•
On the RMX 1500 less “slots” are used and the module naming conventions used on
elements are different.
•
Before running Advanced Mode Diagnostic testing on the CNTL module, you must insert a
formatted FAT32 USB key in any one of the CNTL panel USB ports of the RMX 2000/4000.
On the RMX1500 insert the USB key in the front panel mouse or keyboard slot.
121
RMX 1500/2000/4000 Release Notes - Version 7.1
1
In the list pane tool bar, click the Advanced Mode (
) button.
RMX 2000/4000 &
RMX 1500 Hardware
Monitor panes
2
In the Reset Confirmation dialog box, click Yes.
3
The RMX resets. Re-enter the Shelf Manager IP address in the browser and Login
using an “Administrator” Login.
The MPM+/MPMx cards indicate “Resetting” and later switch to “Diagnostics”.
The status of RTM-IP/RTM IP 1500/RTM-IP 4000 and CNTL/CNTL 1500/CNTL
4000 components change to “Diagnostics”.
122
Version 7.1 Detailed Description - Feature Changes
RMX 2000/4000 &
RMX 1500 Hardware
Monitor panes
4
You can select any one of the Hardware components indicating “Diagnostics/
Normal” in the status column and right-click Properties from the menu. The
card’s General Info/Event Log/Active Alarms properties are displayed.
You can view Diagnostic Tests & Tests Monitoring by clicking the Advanced
Diagnostics Tab.
When you click the Advanced Mode the RMX enters a “Diagnostics Mode”.
The Advanced Mode can be exited by pressing the yellow System Reset icon.
The RMX then resets.
Advanced
Diagnostics
123
RMX 1500/2000/4000 Release Notes - Version 7.1
The Diagnostics Tests & Monitoring Tests panes are displayed on the right side of
the window pane.
Run all Test Selection
Diagnostics Test Monitoring
Figure 1-3 RMX 2000/4000 Diagnostics Tests & Monitoring Tests
Run all Test Selection
Diagnostics Test Monitoring
Figure 1-4 RMX 1500 Diagnostics Tests & Monitoring Tests
5
When the RMX enters “Diagnostics Mode”, the status MPM+/MPMx, CNTL/
CNTL 1500/CNTL 4000 and RTM IP/RTM IP 1500/RTM IP 4000 changes to
“Diagnostics”
You can run “Diagnostics” test on a card by double clicking any one of the
hardware components indicating “Diagnostics” in the status column.
6
Select the Run all Tests box and then click Run Selected Tests.
Table 1-3
7
124
Tests Selection - Additional Test Parameters
Parameter
Description
Loop Test
Enter the amount of times the test is to repeat itself
in succession.
Stop On Failure
Stops tests upon a failure.
Run All Test
Runs all tests listed in the TestActive column for the
hardware component.
The selected tests are initialized. In the Tests Monitoring pane there is an indication
of the Connection Status of the Tests.
Version 7.1 Detailed Description - Feature Changes
Connection Status
8
This process may take some time. Click Stop Running Test to end all the diagnostic
tests. The MCU completes the current test running and then stops all remaining
tests.
9
The Diagnostics Mode can be exited by pressing the yellow System Reset icon. The
RMX then resets.
125
RMX 1500/2000/4000 Release Notes - Version 7.1
Version 7.0 Detailed Description - SIP
SRTP
Encryption of SIP Media is supported using SRTP (Secured Real-time Transport
Protocol) and the AES key exchange method.
SRTP Guidelines
•
Encryption of SIP Media requires the encryption of SIP signaling - TLS Transport
Layer must be used.
•
Encryption of SIP Media is supported in CP and VSW conferences.
•
All media channels are encrypted: video, audio and FECC.
•
Encryption of SIP Media is available in MPM+ Card Configuration Mode (Version
7.0 and later) and MPMx Card Configuration Mode (Version 7.1 and later).
•
RMX SRTP implementation complies with Microsoft SRTP implementation.
•
LPR is not supported with SRTP.
•
Mixing encrypted and non-encrypted endpoints in one conference is possible,
based on system flag settings:
ALLOW_NON_ENCRYPT_PARTY_IN_ENCRYPT_CONF.
The behavior is the same as for H.323 participants, as shown in Table 2 and
Table 3.
For more information, see RMX 2000/4000 Administrator’s Guide, "Closed Captions”
on page 2-49.
Conference Access:
Table 2 Defined SIP/H.323 Participant Connection to the Conference Based on the Encryption
Settings
ALLOW_NON_
ENCRYPT_PARTY_
IN_ENCRYPT_CONF
126
Conference
Encryption
Setting
Participant
Encryption
Setting
Participant
Connection
Permitted
NO
Yes
Auto
Yes (encrypted)
NO
Yes
No
No
NO
Yes
Yes
Yes (encrypted)
NO
No
Auto
Yes (non-encrypted)
NO
No
No
Yes (non-encrypted)
NO
No
Yes
No
YES
Yes
Auto
Yes (encrypted)
YES
Yes
No
Yes (non-encrypted)
YES
Yes
Yes
Yes (encrypted)
YES
No
Auto
Yes (non-encrypted)
YES
No
No
Yes (non-encrypted)
Version 7.0 Detailed Description - SIP
Table 2 Defined SIP/H.323 Participant Connection to the Conference Based on the Encryption
Settings (Continued)
ALLOW_NON_
ENCRYPT_PARTY_
IN_ENCRYPT_CONF
YES
Conference
Encryption
Setting
No
Participant
Encryption
Setting
Yes
Participant
Connection
Permitted
No
Entry Queue Access:
Table 3
Encryption: Flag vs. Conference and Entry Queue Settings When SIP/H.323
Participant Encryption is set to Auto
ALLOW_NON_
ENCRYPT_PARTY_
IN_ENCRYPT_CONF
Entry Queue
Encryption
Setting
Destination
Conference
Encryption
Setting
Enable
Participant
Move from EQ
to Conference
NO
Yes
No
No
NO
Yes
Yes
Yes
NO
No
No
Yes
NO
No
Yes
No
YES
Yes
No
No
YES
Yes
Yes
Yes
YES
No
No
Yes
YES
No
Yes
Yes
Enabling Encryption
In the Profile
Encryption for the conference is in the Profile and cannot be changed once the
conference is running. For more details, see RMX 2000/4000 Administrator’s Guide,
"Enabling Encryption in the Profile” on page 2-66.
At the Participant Level
You can select the encryption mode for each of the defined participants as for H.323
participants. Encryption options are affected by the settings of the flag in the system
configuration. Undefined participants are connected with the Participant Encryption
option set to Auto, inheriting the conference/Entry Queue encryption setting. For
more details, see RMX 2000/4000 Administrator’s Guide, "Enabling Encryption at the
Participant Level” on page 2-67.
127
RMX 1500/2000/4000 Release Notes - Version 7.1
Monitoring the Encryption Status
The conference encryption status is indicated in the Conference Properties - General
dialog box.
The participant encryption status is indicated by a check mark in the Encryption
column in the Participants list pane.
The participant encryption status is also indicated in the Participant Properties – SDP
tab, where SRTP indication is listed for each encrypted channel (for example, audio
and video).
An encrypted participant who is unable to join a conference is disconnected from the
conference. The disconnection cause is displayed in the Participant Properties –
Connection Status tab, Security Failure indication, and the Cause box identifies the
encryption related situation.
For more information about monitoring, see the RMX 1500/2000/4000 Administrator’s
Guide "Conference and Participant Monitoring” on page 11-1.
128
Version 7.0 Detailed Description - SIP
ICE Environment Integration
Interactive Connectivity Establishment (ICE) provides a structure/protocol to unify
the various NAT Traversal techniques that are used to cross firewalls.
It enables SIP based endpoints to connect while traversing a variety of firewalls that
may exist between the calling endpoint (local) and the MCU or called endpoint
(remote). It is the only way for remote Microsoft Office Communicator/Lync users to
call into the enterprise without a VPN.
ICE Guidelines
•
ICE is available in MPM+ Card Configuration Mode (Version 7.0 and later) and
MPMx Card Configuration Mode (Version 7.1 and later).
•
RMX ICE implementation complies with Microsoft ICE implementation.
•
ICE is available only in IPv4 environment.
•
ICE can be implemented in an environment that includes a STUN server and a
Relay server (for example, Microsoft AV Edge server).
•
The firewall must be UDP enabled.
•
The RMX must have a unique account in the Active Directory and must be
registered with the Office Communications/Lync server.
Connecting to the RMX in ICE Environment
The dialing methods that can be used by an endpoint to connect to another endpoint
depends on the ICE environment: Local, Remote or Federation.
Figure 2
ICE Environment
Local connection - a connection between the RMX and endpoints that reside within the
same organization. For example, an endpoint in Zone A calls the RMX in Zone A.
Branch Office - a connection between an endpoint that is behind a firewall and the RMX
that reside in the same zone. The user in the Branch Office can also place and receive
calls from other enterprises and remote users. For example, Enterprise A also contains
a branch office, which in this example is a Polycom HDX user who is behind more than
one firewall.
Remote - a connection between RMX that resides within the organization and an
endpoint that resides outside of the organization (on a WAN). For example, an
endpoint on the internet that calls the RMX in Zone A. In such a case, the call has to
traverse at least one firewall.
Federation - a connection between RMX that resides within one organization and an
endpoint that resides within another organization. For example, an endpoint in Zone A
calls the RMX in Zone B. The call has to traverse two or more firewalls.
129
RMX 1500/2000/4000 Release Notes - Version 7.1
Dialing Methods
The ICE protocol enables remote and federation connections using the registered user
name for dialing. The endpoint connects to the RMX by entering the RMX registered
user name in the following format:
[RMX registered user name]@[OCS/Lync server domain name]
For example: [email protected]
The call reaches the Transit Entry Queue of the RMX and via IVR is routed to the
destination conference.
This method is added to the local connections and Matched URI and Numerical Dialing
methods available in Microsoft Office Communication environment and the Numerical
Dialing method available in the Lync server environment.
The following table summarizes the dialing methods and its availability in the various
configurations.
Table 1-1
Available dialing methods per Connection Type
Matched URI
Routing
Numerical
Dialing
Registered
User Name
Local
Branch office
X
Remote
X
Federation
X
* To enable the Matched URI dialing in the federated environment to be able to connect to the
RMX SIP signaling domain, you must also configure the Office Communications Server/Lync
Server.
When federating an Office Communications Server/Lync Edge server with another
Office Communications Server/Lync server environment, you need to include the
FQDN of the Office Communications Server/Lync Edge server as well as the SIP
signaling domain for federated environment. The SIP signaling domain is the FQDN of
the Polycom DMA system or a Polycom RMX system (when your deployment does not
include a DMA system).
For example, if company B wants to set up federation with company A and receive and
send SIP calls that will be handled by the Polycom SIP signaling domain in company
A, you need to add the FQDN of the company A Office Communications Server
domain as well as the SIP signaling domain of company A to the list of internal SIP
Server domains supported by the company B Office Communications Server/Lync
Server environment.
For more information, see the Microsoft documentation and the Visual
Communications Deployment Administration Guide.
130
Version 7.0 Detailed Description - SIP
Supporting Remote and Federated Users in Office Communications
Server ICE Environment
To enable the remote and Federation connections the following operations must be
performed:
•
Create an Active Directory account for the RMX that will be used for registering
and operating in the MS ICE environment
•
Enable the RMX User Account for Office Communication Server
•
Configure the RMX for ICE dialing
To place federated calls between Domain A and Domain B in ICE environment
sub domains must be federated to the main domain or the RMX system must be
installed on a main domain.
The RMX can also be set for Matched URI Routing and/or Numerical Dialing to
Meeting Rooms. For more details, see RMX Administrator’s Guide, Appendix H.
Creating an Active Directory Account for the RMX
The User account created for the RMX is used for registration in the Office
Communication Server and to automatically synchronize with the STUN and relay
(Edge) servers.
To add the RMX user to the Active Directory:
1
Go to Start > Run and enter dsa.msc to open the Active Directory Users and
Computers console
2
In the console tree, select Users > New > User.
131
RMX 1500/2000/4000 Release Notes - Version 7.1
3
In the New User wizard, define the following parameters:
Table 2
132
Active Directory - New User Parameters for the RMX
Field
Description
First Name
Enter the name for the RMX user. This name will be
used in the configuration of the ICE environment in
the RMX.
Full Name
Enter the same name as entered in the First Name
field.
User Login Name
Enter the same name as entered in the First Name
field and select from the drop down list the domain
name for this user. It is the domain name defined for
the Office Communication Server.
4
Click Next.
5
Enter the password that complies with the Active Directory conventions and
confirm the password.
6
Select the options: User cannot change password and Password never expires.
Clear the other options.
Version 7.0 Detailed Description - SIP
7
Click Next.
The system displays summary information.
8
Click Finish.
The new User is added to the Active Directory Users list.
Enabling the RMX User Account for Office Communication
Server
The new RMX user must be enabled for registration with the Office Communications
Server.
To enable the RMX User Account for Office Communication Server:
1
In the Active Directory Users and Computers window, right-click the RMX user and
then click Properties.
2
In the Properties dialog box, click the Communications tab.
133
RMX 1500/2000/4000 Release Notes - Version 7.1
3
In the Sign in name field, enter the RMX user name in the format SIP:rmx user
name (for example sip:rmx1234) and select the domain name (for example,
ilsnd.vsg.local) as entered in the New User dialog box.
4
Select the Server or Pool from the list.
5
Click Apply and then OK.
Configuring the RMX for ICE Dialing
To enable ICE dialing, the Default IP Network Service must be configured to work
with the Office Communication Server as the SIP Server and the RMX user defined in
the Active Directory must also be defined in the RMX ICE environment parameters.
The procedure described here assumes that the RMX is configured to work in
Microsoft environment; the MS_ENVIRONMENT flag is set to YES, the IP
Network Service is set to work with Office Communications Server as the SIP
Server and the TLS certificate is installed. For a detailed description of these
settings, see the RMX 1500/2000/4000 Administrator’s Guide, Appendix H.
To configure the RMX for ICE Dialing:
1
In the RMX Web browser, in the RMX Management pane, expand the Rarely Used
list and click IP Network Services ( ).
2
In the IP Network Services pane, double-click the Default IP Service (
) entry.
134
,
, or
Version 7.0 Detailed Description - SIP
The Default IP Service - Networking IP dialog box opens.
3
Click the SIP Servers tab.
4
Make sure that the SIP Server is set to Specify.
5
Make sure that the SIP Server Type is set to Microsoft.
6
Make sure that the IP address of the Office Communications Server 2007 or Lync
Server 2010 is specified and the Server Domain Name is the same as defined in the
OCS/Lync Server and in the Management Network for the DNS.
7
Click the SIP Advanced tab.
8
In the ICE Environment field, select MS (for Microsoft ICE implementation) to
enable the ICE integration.
This field is disabled if the RMX is running in MPM Card Configuration Mode.
135
RMX 1500/2000/4000 Release Notes - Version 7.1
9
In the Server User Name field, enter the RMX User name as defined in the Active
Directory. For example, enter rmx1234.
This field is disabled if the ICE Environment field is set to None.
10
Optional if the Fixed Ports options was selected previously.
Click the Ports tab to modify the number of UDP Ports allocated to the calls to
accommodate the number of ports required for ICE dialing.
11
In the UDP Port Range, modify the number of UDP ports by enter the first and last
port numbers in the range. When ICE environment is enabled, the number of ports
defined in the range should be 2024.
12
Click OK.
The RMX will register with the OCS/Lync Server enabling automatic retrieval of
the STUN server and Relay server parameters for ICE dialing.
These parameters can be viewed in the Signaling Monitor - ICE Servers dialog box.
Monitoring the Connection to the STUN and Relay Servers in the ICE
Environment
1
In the RMX Web browser, in the RMX Management pane, click Signaling Monitor.
2
In the Signaling Monitor pane, click the IP Network Service entry.
3
Click the ICE Servers tab.
The system lists the ICE servers to which it is connected and the status of the
connection of each of the RMX media cards (status 1, status 2, etc) to ICE servers.
(One status is displayed for RMX 1500, two statuses are displayed for RMX 2000
and four statuses are displayed for RMX 4000).
It addition, the system indicates the status of the firewall detection in the RMX.
136
Version 7.0 Detailed Description - SIP
Monitoring the Participant Connection in ICE Environment
For each participant in the conference running in ICE environment, you can view the
local and the external IP addresses and the type of connection between the RMX and
the participant (remote).
The ICE information is displayed only for the media channels and not the signaling
channel.
To view the channel properties of the participant:
1
In the participants pane, double-click the participant entry or right-click the
participant entry and then click Properties.
2
Click the Channel Status - Advanced tab.
The following connection information is displayed:
Table 1-1: Participant Properties - ICE Connection Parameters
Field
Description
RMX IP Address
The local IP address and port (in the format IP
address:Port) of the RMX.
Participant IP
Address
The local IP address and port (in the format IP
address:Port) of the endpoint.
137
RMX 1500/2000/4000 Release Notes - Version 7.1
Table 1-1: Participant Properties - ICE Connection Parameters
Field
Description
ICE RMX IP
Address
The IP address and the Port number of the RMX
used to pass through the media. This information
changes according to the ICE connection type:
ICE Participant IP
Address
ICE Connection
Type
138
•
When ICE connection type is local, it is identical
to the IP address:Port displayed in the RMX IP
Address.
•
When ICE connection type is relay, the system
displays the IP address and port number of the
relay server used to pass the media from the
RMX to the participant.
•
When ICE connection type is firewall, the
system displays the public IP address and port of
the RMX as seen outside the private network.
The IP address and the Port number of the endpoint
used to pass through the media. This information
changes according to the ICE connection type:
•
When ICE connection type is local, it is identical
to the IP address:Port displayed in the
Participant IP Address.
•
When ICE connection type is relay, the system
displays the IP address and port number of the
relay server used to pass the media from the
participant to the RMX.
•
When ICE connection type is firewall, the
system displays the public IP address and port of
the endpoint as seen outside the private network.
Indicates the type of connection between the RMX
and the participant in the ICE environment:
•
Local (or Host) - The endpoint (Remote) is on
the same network as the RMX and the media
connection is direct, using local addresses.
•
Relay - Media between the RMX and the
participant passes through a media relay server.
•
Firewall - Media connection between the RMX
and the participant is done using their external IP
addresses (the IP addresses as seen outside of
the local network).
Version 7.0 Detailed Description - SIP
ICE Active Alarms
When ICE environment is enabled in the RMX, failure to communicate with a required
component triggers the display of an Active Alarm in the System Alerts pane.
The following table lists these active alarms:
Table 2
ICE Environment - RMX Active Alarms
Active Alarm
Phase
Alarm Displayed When
Troubleshooting
ICE failure:
Failed to
register with
OCS. Check
the RMX
Server Name.
Registration
The RMX did not receive
a confirmation response
from the OCS to the
Registration request.
•
Check that the
RMX Server
Name in IP
Network
Service - SIP
Advanced is
identical to the
User name
defined for the
RMX in the
OCS Active
Directory.
•
Make sure that
the RMX user
is defined in
the OCS
Active
Directory.
ICE failure:
Failed to
subscribe with
the OCS,
therefore the
A/V Edge
Server URI
was not
received.
Subscribe
The RMX did not receive
a confirmation response
from the OCS to the
Subscription request.
The Subscription is
required for obtaining the
A/V Edge Server URI
which is followed by the
notify message containing
the credentials).
ICE failure:
The Notify
message
containing the
A/V Edge
Server URI
was not
received
Notify
The Notify message
containing the A/V Edge
Server URI was not
received by the RMX.
ICE failure:
Received
Notification
does not
contain URI.
Notify
The notify message that
was sent from the A/V
Edge Server does not
contain the A/V Edge
server URI.
Verify the A/V
Edge server is
configured in the
OCS.
139
RMX 1500/2000/4000 Release Notes - Version 7.1
Table 2
140
ICE Environment - RMX Active Alarms
Active Alarm
Phase
Alarm Displayed When
ICE failure:
No response
from the A/V
Edge Server
to the RMX
Service
Request
Service
The RMX did not receive
a confirmation response
from the A/V Edge Server
to the Service request.
ICE failure:
Received
Service
message
does not
contain the
Credentials.
Service
The Service message
response does not
contain the Credentials.
ICE failure:
A/V Edge
server URI
cannot be
resolved
Service
The RMX failed to resolve
The remote address of
the Edge server URI.
ICE failure:
Service
credential
denied. A/V
Edge server
credentials
rejected by
the OCS.
Service
This alarm indicates that
the OCS does not
configure with the.
Generated by the ICE
stack.
Troubleshooting
Corrections and Known Limitations
Corrections and Known Limitations
Corrections Between Version 7.0.2 and Version 7.1
Table 3
Corrections Between Version 7.0.2 and Version 7.1
Detected
in Version
Key
Key
Category
Description
1
VNGR19113
RMX Manager
When an HDX endpoint with a 384 kbps
Gateway Profile dials to a Gateway
using ISDN, after accessing the IVR the
call is dropped.
V7.1
2
VNGR18961
General
On an RMX with MPM+ cards and a 768
kbps H.323 conference, the Message
Overlay continuously jumps.
V7.1
3
VNGR18785
RMX Manager
When monitoring conferences on the
RMX Manager, occasionally the
monitoring pane displays the wrong
conference.
V6.0
4
VNGR18773
Documentation
Incorrect flag values are listed in
Release Notes and Administrator Guide:
7200 seconds is not 60 minutes; 3600
seconds is not 30 minutes.
V7.0.2
5
VNGR18660
ISDN
On an RMX 2000 during an ISDN call,
frequently audio clicks can be heard
during the conference.
V5.0.2
6
VNGR18581
Software
Version
Log Analyzer output from RMX 1500/
2000 with MPMx contains numerous
CRT ART errors.
V7.0
7
VNGR18451
Interoperability
In an MS Lync (RTM) environment, the
ICE functionality is deficient as the RMX
sends an incorrect service request to the
Lync registrar.
V7.1
8
VNGR18278
Upgrade
Process
No access to RMX 2000 after software
upgrade from version 7.0.2.61 to version
7.0.2.64.
V7.0.2
9
VNGR18272
Upgrade
Process
When downgrading an RMX 4000 with 4
MPMx cards from version 7.0.2.64 to
version 7.0.1.16, the IMPC is burnt on
only three out of four cards and the
fourth card appears with voltage
problem.
V7.0.2
10
VNGR18257
Diagnostics
Software verification failure is indicated
when running diagnostics on RMX 1500
(MPMx card).
V7.0.2
141
RMX 1500/2000/4000 Release Notes - Version 7.1
Table 3
142
Corrections Between Version 7.0.2 and Version 7.1
Detected
in Version
Key
Key
Category
Description
11
VNGR18242
Upgrade
Process
When upgrading RMX4000 with 4
MPM+ cards from Version 7.0.0.162 to
Version 7.0.2.61 two of the MPM+ cards
remain in startup mode and do not
complete the upgrade.
V7.0.2
12
VNGR18167
General
When using a conference Profile set to
VSW 1080p at line rate of 6MB, the
conference is started at a line rate of
4MB instead.
V7.0.2
13
VNGR18135
Interoperability
When running a conference with mixed
endpoints, video can be seen on the
1XC endpoint, but the video on the HDX
endpoint is blank.
V7.1
14
VNGR18106
Video
Empty cells are displayed in the video
layout when connecting 30 HDX 8006
endpoints at a line rate of 4MB and
resolution of 1080p to a conference
running on RMX 2000 with 2 MPMx-D
cards.
V7.0.2
15
VNGR18106
Video
Empty cells are displayed in the video
layout when connecting 30 HDX 8006
endpoints at a line rate of 4MB and
resolution of 1080p to a conference
running on RMX 2000 with 2 MPMx-D
cards.
V7.0.2
16
VNGR18032
RMX Manager
On the RMX Manager an internal error;
65012 appears, cause unknown.
V6.0
17
VNGR17926
Gateway
When video layout changes in a
Gateway call, the HDX endpoint
disconnects.
V5.0.2
18
VNGR17887
ISDN
Sometimes, HDX9006 2.7.0-5547 and
VSX7000 9.0.6 endpoints connecting
over ISDN to a conference running at
384kbps do not receive video.
V7.0.2
19
VNGR17881
Hardware
RTM IP does not reconnect to logger
port.
V7.0.2
20
VNGR17857
Video
Sometimes the Gathering text is not
displayed when connecting SIP and
H.323 endpoints to a conference running
on RMX 2000 with MPMx at a line rate of
1920kbps.
V7.0.2
21
VNGR17851
Hardware
Sometimes connection with RTM ISDN
is lost.
V7.0.2
Corrections and Known Limitations
Table 3
Corrections Between Version 7.0.2 and Version 7.1
Detected
in Version
Key
Key
Category
Description
22
VNGR17843
General
HDX H323 endpoints are unable to
remain connected to a CP conference
running on RMX1500 at a line rate of
1920kbps with LPR, Video Clarity and
Send Content to Legacy Endpoint
options enabled. The disconnect status
displays MCU internal problem 32212.
V7.0.2
23
VNGR17841
Video
Lip sync occurred when an endpoint
connected at 512kbps to a conference
running at line rate of 2MB on RMX 2000
with 2 MPM+80 cards, and LPR enabled
and active due to packet loss.
V7.0.2
24
VNGR17833
IVR
RadVision Scopia XT1000 and Lifesize
Room 200 remain in the IVR Welcome
stage when connecting to a CP
conference running at 4096kbps with
Encryption and LPR enabled. Other
endpoints connected normally.
V7.0.2
25
VNGR17800
Recording
On an RMX2000 with a conference that
is started from a reservation, when
dialing out manually the RSS2000
recorder does not start.
V5.0.2
26
VNGR17778
RMX 4000
When trying to connect 180 V500/VSX
to each of the two conferences running
simultaneously on RMX 4000 with 4
MPMx-D cards, both conferences
running at a line rate of 384, Video
Quality set to Motion and Max CP
resolution set to CIF, 180 participants
connected to the first conference, while
several participants out of the 180 could
not connect to the second conference.
V7.0.2
27
VNGR17768
Upgrade
Process
When upgrading the RMX 1500 software
version and adding the activation key,
the RMX Web Client disconnects from
the RMX.
V7.0.2
28
VNGR17753
Partners Microsoft
In Microsoft Lync environment with ICE
enabled, when the RMX 4000 with
MPM+80 dials out to two Lync Clients
(MOC1 with Creative Camera connected
and MOC2 with CX5000 RoundTable
connected), MOC1 does not receive
video from MOC2.
V7.0.2
29
VNGR17749
Interoperability
Flickering video is displayed for a few
seconds on Lifesize Room 200 screen
when connecting to a conference
running on RMX 4000 at 4MB with
Encryption and LPR enabled.
V7.0.2
143
RMX 1500/2000/4000 Release Notes - Version 7.1
Table 3
144
Corrections Between Version 7.0.2 and Version 7.1
Detected
in Version
Key
Key
Category
Description
30
VNGR17742
Video
Poor video quality due to low frame rate
is viewed on HDX systems when
connecting to a CP conference running
on RMX 2000 with MPMx at a line rate of
6MB, with LPR, Video Clarity and
Gathering options enabled.
V7.0.2
31
VNGR17732
Interoperability
An RMX registered with the corporate
OCS server, however after restart the
connection to OCS was broken and the
RMX could not provision the ICE.
V6.0.1
32
VNGR17714
General
Occasionally, RMX 4000 with MPM+
automatically resets when running
conferences. The system displays the
Active Alarm:
NEW_VERSION_INSTALLED. A new
version was installed. Reset the MCU,
although a new version was not
installed.
V7.0.2
33
VNGR17708
IVR
HDX8006 and HDX9006 remain in the
IVR Welcome stage when connecting to
a Video Switching conference running at
4MB with Video Quality set to Motion
and video resolution set to 720p 60 fps.
V7.0.2
34
VNGR17671
Content
VSX cannot send Content when
connected over H.323 to a conference
with 9 H323 VSX endpoints running on
RMX4000 with the MPM+ at a line rate
of 768kbpskbps and LPR, Video Clarity
and Send Content To Legacy Endpoint
options enabled.
V7.0.2
35
VNGR17657
Video
The VVX takes over a minute to resume
live video on other endpoints in
conference after releasing the hold when
connected over H.323 to a conference
running on RMX 1500 at a line rate of
128kbps.
V7.0.2
36
VNGR17652
Interoperability
After resuming the call that was placed
on hold, VVX 1500 display does not
return to Auto Layout and remains small
in the top right corner of the display. The
VVX is connected via H.323 to a
conference running at 128kbps.
V7.0.2
37
VNGR17646
Video
H.261 participant video is not seen by
other conference participants and the
Gathering text did not appear on the
H.261 participant's screen when
connected to a conference running at
512kbps. The H.261 participants sees
the conference video correctly.
V7.0.2
Corrections and Known Limitations
Table 3
Corrections Between Version 7.0.2 and Version 7.1
Detected
in Version
Key
Key
Category
Description
38
VNGR17645
ISDN
Video artifacts (video stream is
superimposed on the IVR Welcome
slide) when an ISDN participant
connects to a conference running on
RMX 2000 with MPMx at a line rate of
384kbps.
V7.0.2
39
VNGR17636
Interoperability
VVX is displayed in two conference
video layout cells when connected over
H.323 to a conference that includes two
VVX endpoints when the VVX comes off
hold while in the gathering screen. One
cell is live video and the other cell is
frozen video.
V7.0.2
40
VNGR17633
SIP
Incorrect display name of the RMX is
displayed on SIP endpoints. RMX
Display name includes additional
characters and not just the URI.
V7.0.2
41
VNGR17631
Partners Microsoft
RMX does not identify the OC/4 version
(Lync Server 2010/OCS-W14), hence
the wrong video settings are used (4CIF
instead of CIF).
V7.0.2
42
VNGR17628
SIP
High Profile enabled SIP endpoint
connected at a resolution of SD60
instead of 720p60 when connecting to a
conference running on RMX 4000 at a
line rate of 1024kbps with LPR enabled
and Video Quality set to Motion.
V7.0.2
43
VNGR17627
SIP
High Profile enabled SIP endpoint
connected at a resolution of SD30
instead of SD60 when connecting to a
conference running on RMX 4000 at a
line rate of 512kbps with LPR enabled
and Video Quality set to Motion.
V7.0.2
44
VNGR17626
SIP
SIP endpoint (no High Profile) connected
at a resolution of SD30 instead of SD60
when connecting to a conference
running on RMX 4000 with MPMx at a
line rate of 1024kbps with LPR enabled
and Video Quality set to Motion.
V7.0.2
45
VNGR17615
IVR
iPower 9000 remains in the IVR
Welcome stage when connecting to a
CP conference running at 384kbps with
Video Quality set to Motion and Video
Clarity, Encryption, LPR and Send
Content to Legacy Endpoint options
enabled.
V7.0.2
46
VNGR17587
General
Several participants are deleted from a
conference template when editing the
conference template name.
V7.0.2
145
RMX 1500/2000/4000 Release Notes - Version 7.1
Table 3
146
Corrections Between Version 7.0.2 and Version 7.1
Detected
in Version
Key
Key
Category
Description
47
VNGR17581
Audio
During an audio only conference echo
occurs randomly on PSTN endpoints.
V5.0.0
48
VNGR17580
Video
Site names are blinking when
connecting H.261/263 participants to the
conference.
V7.0.2
49
VNGR17574
ISDN
Internal ISDN\PSTN Audio Only calls get
a loud noise (static/pop) prior to the start
of the IVR message.
V7.0.2
50
VNGR17571
Video
Rainbow bar appears when changing
the conference layout from
CP_LAYOUT_1X2 or from
CP_LAYOUT_1X2HOR to
CP_LAYOUT_1X2VER or
CP_LAYOUT_2X1 in a conference
running on RMX 2000 with MPMx, at a
line rate of 4096kbps, Video Quality set
to SHARPNESS and Video Clarity,
Encryption, LPR and Echo Suppression
options enabled.
V7.0.2
51
VNGR17562
SIP
The QDX6000 SIP endpoint is
connected with problem to a conference
running on RMX 4000 with MPM+ at a
line rate of 768kbps and LPR, Video
Clarity and Send Content To Legacy
Endpoint options enabled.
V7.0.2
52
VNGR17559
Interoperability
Sony PCS-XG80 cannot connect to
RMX 2000/1500 with MPMx over SIP.
V7.0.2
53
VNGR17547
Interoperability
An FX endpoint dialing in to an RMX with
MPMx cards will receive content using
People + Content. An FX endpoint dialed
out from an RMX with MPMx cards will
only receive content via the video
channel using People + Content if Send
Content to Legacy Endpoints is enabled
in the Conference Profile.
V7.0.2
54
VNGR17542
Video
VSX8000 sees frozen video of the
Gathering slide when connected over
H.323 or ISDN to a conference running
on RMX 1500 at a line rate of 1024kbps
and LPR, encryption and Send Content
to Legacy Endpoint options enabled.
V7.0.2
55
VNGR17539
Video
Objects in video sent from VSXs are
displayed stretched horizontally on
HDXs screens when all are connected to
a conference running on RMX 1500 over
H323 and SIP.
V7.0.2
Corrections and Known Limitations
Table 3
Corrections Between Version 7.0.2 and Version 7.1
Detected
in Version
Key
Key
Category
Description
56
VNGR17520
General
In MPMx Card Configuration Mode, the
High Profile Sliders in the Resolution
Configuration dialog box are set to the
minimum and do not show the actual
values for the predefined Resolution
Configurations.
V7.0.2
57
VNGR17436
General
Unit recovery of unit 14, board 1
occurred.
V7.0.1
58
VNGR17433
HD
In 2MB/4MB HD CP 720p conferences
and a combination H.323/SIP dial-out/
dial-in endpoints, an assert “MCU
internal problem” appears.
V7.0.2
59
VNGR17411
Upgrade
Process
Sometimes, the error message “Socket
reconnected” is displayed after
downgrading from V7.0.2.11 to V6.0.2.2.
V7.0.2
60
VNGR17397
RMX Manager
On a RMX 2000 with heavy traffic on the
MCU, the RMX Manager and RMX Web
Client take a long time to load and
appear on the workstation.
V6.0.1
61
VNGR17377
Video
High Profile enabled HDX 8000 remains
in the Gathering layout with frozen video
inside the cells after blast dial out to
several endpoints of type HDX 8000/
HDX 9004 / HDX 4000/ VSX 8000/ VSX
3000 from a CP conference at a line rate
of 512kbps and LPR enabled.
V7.0.2
62
VNGR17363
Video
Endpoint connects at a higher resolution
than expected according to the
Resolution Slider configuration when line
rate of the endpoint is forced to a lower
rate than the conference rate. For
example, if the conference line rate is
1024kbps and the endpoint line rate is
forced to 512kbps, the endpoint
resolution upon connection will be 720p
instead of SD (as if it was connected at
1024kbps).
V7.0.2
63
VNGR17346
Video
Striped video image of all other
participants occurs on HDX8000
endpoint after dialing via DMA to
RMX4000 running V7.0.1.16 with,
4*MPM+80 cards.
V7.0.1
64
VNGR17320
Audio
When dialing in from several endpoints
to a Meeting Room started by the DMA,
audio was lost for several seconds on
the HDX9006 endpoint.
V7.0.1
147
RMX 1500/2000/4000 Release Notes - Version 7.1
Table 3
148
Corrections Between Version 7.0.2 and Version 7.1
Detected
in Version
Key
Key
Category
Description
65
VNGR17296
Interoperability
On an RMX2000 the Microsoft OCS R2
client cannot send DTMF tones when a
dialed out call is placed from RMX to
MOC. The MOC receives an error
message “There was a problem sending
the tone”.
V6.0
66
VNGR17194
Hardware
Board recovery failure occurs after all
units on board 2 stop sending data after
3 recovery attempts on RMX2000
running V7.0.0.162 with MPMx cards.
V7.0
67
VNGR17157
Hardware
DSP did not automatically recover after
failure.
V7.0.1
68
VNGR17148
Video
Participant is seen blurred when
connecting with QVGA resolution to a
conference layout of 1+7.
V7.0.1
69
VNGR17127
Software
Version
On RMX 1500 Message Overlay is
blurred on SIP and H.323 endpoints.
V7.0
70
VNGR17100
Video
In a 2Mb conference with mixed HDX
endpoints, video flickered.
V7.0
71
VNGR17099
General
Extraneous “Total Number of Event
Mode Resources” field is displayed in
the System Information properties box.
V7.0
72
VNGR17079
HD
In an HD VSW conference endpoint,
after about 20 minutes endpoints
suddenly disconnect from the
conference. The CDR lists asserts;
“MCU internal problem.
V6.0
73
VNGR17073
Interoperability
Loss of lip sync occurs on HDX9004
endpoint talking to an HDX9000
endpoint in 2Mbps conference with the
following mix of endpoints: H323, PSTN,
PVX, CMAD, HDX, dialed in via DMA
with LPR on, Gathering Off, Echo
suppression on.
V7.0
74
VNGR17009
General
On both the RMX 2000/4000 when
running conference on an MPMx card
with a minimum of 8 participants and
viewing content, the conference
terminates due an MPMx disconnection.
V7.0
75
VNGR16960
Software
Version
Call on RMX 2000 with MPMx using
HDX endpoint connects at 128kbps with
resolution HD720p even if RMX call rate
is set for 8Mb.
V7.0
Corrections and Known Limitations
Table 3
Corrections Between Version 7.0.2 and Version 7.1
Detected
in Version
Key
Key
Category
Description
76
VNGR16952
Video
During a 1472kbps conference with
LPR, AES, Gathering, Send Content to
Legacy Endpoint, Auto Layout enabled,
VSX7000 and HDX8006 endpoints
Video does not appear in the conference
layout.
V7.0
77
VNGR16950
Interoperability
When RMX dials out from an encrypted
conference running at 768kbps, video
quality set to Sharpness and with LPR
enabled to H.323 HDX-A, the call
connects OK. Then, H.323 HDX-B dials
into HDX-A and the call connects OK.
When HDX-B disconnects from HDX-A,
the video freezes on HDX-A and RMX
shows HDX-A as connected with
problem.
V7.0
78
VNGR16947
Recording
In a conference running at 384kbps and
Gathering is enabled, recording is set to
“Upon request” the recording is started
once the gathering phase ends, resulting
in the display of the Gathering slide and
layout without text details and after 15
seconds the Gathering slide and layout
remain and appear in the recording.
V7.0
79
VNGR16946
ISDN
Video freezes on ISDN endpoints in a
fully loaded RMX 2000 with MPMx when
connecting, disconnecting and
reconnecting all the endpoints at a line
rate of 256kbps.
V7.0
80
VNGR16945
Hardware
On the RMX2000 and RMX4000, when
performing diagnostics using the Power
on Self Tests (POST) you cannot access
the Shelf Manager.
V7.0
81
VNGR16943
Interoperability
The Gathering slide turns green after
changing layout on ViewStations when
ViewStation SP Release 7.5.4.16 SP
and ViewStation 512k Release 7.5.4.17
are connected to a conference running
on RMX2000 with MPM+ at a Line Rate
of 384kbps, LPR, Same Layout and Auto
Layout are enabled.
V7.0
82
VNGR16936
Hardware
On an RMX 4000 when viewing the
Signaling Monitor window, the Active
Alarms pane shows no link between
Fabric Switch Module and MPMx card in
slot 1.
V7.0
83
VNGR16934
Software
Version
When a H.323 call is released without
lobby conn_id parameter, call memory is
possibly not released.
V7.0
149
RMX 1500/2000/4000 Release Notes - Version 7.1
Table 3
150
Corrections Between Version 7.0.2 and Version 7.1
Detected
in Version
Key
Key
Category
Description
84
VNGR16925
Interoperability
Avaya 1XC Softphone intermittently
partially connects to conference RMX
when connecting as 2nd or subsequent
participant.
V7.0
85
VNGR16921
Interoperability
On an RMX with version 7.0, when an
Avaya 1XC Softphone dials Avaya 1XC
Softphone when pressing the
“Conference” button on the Avaya 1XC
Softphone the Ad hoc conference on the
RMX does not start.
V7.0
86
VNGR16903
Software
Version
RMX 2000 with MPMx stops receiving
calls from DMA. Subsequent calls
disconnect with disconnection cause
cited as Resources Deficiency.
V7.0
87
VNGR16896
RMX Manager
On an RMX2000 when monitoring the
RMX Manager with multiple MCUs and
active conferences, the Operator User
commands are not implemented in the
Participants pane.
V6.0
88
VNGR16892
Hardware
On an RMX4000 with MPMx_D cards in
the Hardware Monitor the RTM_LAN
card is not listed.
V7.0
89
VNGR16890
Software
Version
Log Analyzer output from RMX 1500/
2000 with MPMx contains numerous
CRT ART errors.
V7.0
90
VNGR16879
ISDN
In a 384kbps H.320 conference with
Video Clarity, Auto Terminate,
Sharpness, Echo Suppression, Auto
Layout, Gathering, and Send Content to
Legacy Endpoints enabled, when the
RMX dials-out to VS4000, FX, EX,
VSX7000A and HDX9004 endpoints,
flickering and video artifacts are seen.
V7.0
91
VNGR16868
Interoperability
On RMX 1500 audio interruptions are
experienced by CMAD endpoints.
V7.0
92
VNGR16865
Software
Version
MCU INTERNAL fault received on RMX
1500: “UnitId 20 (board 1) didn't return
ACK for
H323_RTP_UPDATE_PORT_OPEN_C
HANNEL_REQ."
V7.0
93
VNGR16863
ISDN
On RMX 1500, ISDN endpoint is listed
with “Connected With Problem” status.
V7.0
Corrections and Known Limitations
Table 3
Corrections Between Version 7.0.2 and Version 7.1
Detected
in Version
Key
Key
Category
Description
94
VNGR16858
Video
On an RMX2000 with MPM+ cards, in a
4096kbps conference with Encryption,
LPR, Auto Termination, Sharpness, Auto
Brightness, Audio Clarity and a 1x1
conference Layout enabled, when
connecting to 10 HDXs, the Welcome
screen on one of the endpoints partially
fuzzy.
V7.0
95
VNGR16857
Software
Version
On RMX 1500 metallic audio is heard
periodically on PVX endpoint.
V7.0
96
VNGR16856
Interoperability
Artifacts displayed on ISDN endpoints
connected to RMX 1500 when content is
started or stopped.
V7.0
97
VNGR16849
PCM
When H.263 participant uses PCM on
RMX 2000 with MPM+, additional Video
Windows appear in the Video Layout
and the PCM menu appears with large
letters on a blurred, colored display.
V7.0
98
VNGR16830
Content
In a mixed H.323 & SIP 1152kbps
conference with Video Clarity, Auto
Terminate, Sharpness, Echo
Suppression, Auto Layout, Gathering
and Send content to Legacy endpoints
enabled, HDX endpoint's content is
fragmented.
V7.0
99
VNGR16820
Interoperability
VSX8000 endpoint connected to RMX
1500 with MPMx in 1920kbps
conference, transmits green video to all
endpoints but correctly displays all
connected participants' video.
V7.0
100
VNGR16812
Video
On an RMX 1500 with a 2Mb HD720p
conference and IVR, Gathering, High
Profiles and Audio Clarity enabled, when
connecting 15 PVX, HDX, VSX 300,
7000 CMAD endpoints and changing the
conference layout from 1x1 to 4x4 (10+)
small video stills occur.
V7.0
101
VNGR16797
Interoperability
In H.323 and SIP calls to RMX with
MPMx, Aethra X7 endpoint displays
blurred, tiled video.
V7.0
102
VNGR16796
Software
Version
On RMX with MPMx, Intra request from
endpoint connected via H.264 CIF
stream can sometimes take almost 1
second to be answered.
V7.0
103
VNGR16735
Interoperability
LifeSize endpoints transmits CIF instead
of HD 720p resolution in a SIP1920kbps
conference call located on an MPMx
card.
V7.0
151
RMX 1500/2000/4000 Release Notes - Version 7.1
Table 3
152
Corrections Between Version 7.0.2 and Version 7.1
Detected
in Version
Key
Key
Category
Description
104
VNGR16726
ISDN
On an RMX2000 with MPMx cards
running an 383 kbps ISDN conference
when connecting 10 endpoints by blast
dial-out the endpoints video showed
black screens.
V7.0
105
VNGR16725
Software
Version
Blinking video occurs during ISDN blast
dial-out at 384kbps on RMX 2000 with
MPMx.
V7.0
106
VNGR16695
Video
Using MPMx, frame rate in motion
conference is less than 60fps on HDX
endpoints that connect at HD resolution
at 1920kbps and are not allocated on the
Turbo DSP.
V7.0
107
VNGR16677
RMX Manager
Progress bar missing in RMX manager
during upgrade.
V7.0
108
VNGR16621
General
Run two conferences that support
Content for Legacy Endpoints, connect
all types of endpoints to each conference
and then send content from a non
Legacy endpoint to each conference.
The conference layout on the Legacy
endpoint is changed to the flag's
CP_LAYOUT_1P4VER configuration,
the default layout. Move one legacy EP
to the second conference - the layout of
it changes to conference layout
V7.0
109
VNGR16618
Video
On an RMX with MPM+ cards, when
configuring the resolution of
Configuration Slider to HD 1080p60/ HD
720p60 - in the participant properties you
should not be able to select HD1080/HD
720p as the Maximum Resolution
(People Video Definition).
V7.0
110
VNGR16599
Interoperability
On an RMX 2000 in a H.261 video
conference, when a Tandberg MXP6000
connects using H.261 there is no video.
V7.0
111
VNGR16519
Interoperability
In an 512kbps CP conference with AES
and Sharpness enabled, when Dial-in
endpoints view the Gathering slide the
CMAD video freezes.
V7.0
112
VNGR16506
Interoperability
Lip sync is noticeable on HDX 7000 rev.
B that dials into a conference running at
a line rate of 1Mbps.
V7.0
113
VNGR16474
Hardware
On RMX 1500 with MPMx-S, MCU
internal problem 32112 occurs
repeatedly in 2Mbps VSW or CP
conference using HDX 8000 endpoint.
Problem did not occur after reset.
V7.0
Corrections and Known Limitations
Table 3
Corrections Between Version 7.0.2 and Version 7.1
Detected
in Version
Key
Key
Category
Description
114
VNGR16408
Interoperability
In a 4096kbps conference with Auto
Layout enabled, when dialing out to 3
HDX and 3 VSX endpoints, video
freezing occurs.
V7.1
115
VNGR16390
Interoperability
In a 768kbps Telepresence conference
when connecting to a TPX using a 1x7
layout, the HDX8000 video looks
elongated in the large cell.
V7.0
116
VNGR16384
Video
On an RMX 2000 with the MPMx card
with a conference running, when HDX
endpoints connect, sometimes in some
of the video cells the Aspect ratio is
incorrect when the source is 4:3 - and
destination is 16:9.
V7.0
117
VNGR16338
General
In a 4MB HD CP conference set to 720p
with 3 participants, 1 endpoint
disconnected due to the following
message: “MCU internal problem.
V7.0
118
VNGR16337
Video
On an RMX 4000 in a 4096kbps
conference with Auto Terminate,
Sharpness, Encryption, LPR, Echo
Suppression, Auto Layout enabled,
when dialing out to 40 HDX endpoints
video corruption occurred.
V7.0.2
119
VNGR16322
Interoperability
On an RMX 1500 running a 1920 kbps
Telepresence conference, endpoints
have the top part of their video screen
cropped off.
V7.0
120
VNGR16272
Audio
RMX 4000 using HDX endpoints in
2048Kpbs HD Video Switching
conference using Siren22Stereo
exceeds conference bit rate by sending
data to endpoints at 2112kpbs.
V7.0
121
VNGR16230
General
In a Meeting Room with five participants
all endpoints receive periods of frozen
audio and video.
V7.0
122
VNGR16194
Interoperability
On an RMX4000 version 7.0, with four
VVX 1500s and an 1 HDX 9000
endpoints connected on multiple
occasions loss of video and audio for
several seconds.
V7.0
123
VNGR16192
Interoperability
In 2MB Conference with Sharpness
enabled when connecting RPX 400, TPX
306 and RPX 200 endpoints not all
endpoints can connect.
V7.0
124
VNGR16170
General
On an RMX 4000 with MPM+ cards,
endpoints are in the wrong locations in
layout 1+7.
V7.0
153
RMX 1500/2000/4000 Release Notes - Version 7.1
Table 3
154
Corrections Between Version 7.0.2 and Version 7.1
Detected
in Version
Key
Key
Category
Description
125
VNGR16166
Hardware
On an RMX 2000 with two MPM+ cards,
after several minutes participants could
not connect due to MCU Internal
Problem 32112.
V7.0
126
VNGR16142
Diagnostics
On the RMX1500/2000 when running
the “Diagnostic - RTM ISDN”, test ID 717
RTM TDM FALC1 Diag, the test fails.
Reason for the test failure: “RTM
Timeout - RTM didn't send Test
Completed”.
V7.0
127
VNGR16058
Hardware
After upgrading RMX4000, an error
message appears: “No RTM-LAN or
RTM-ISDN installed” on slots 13, 14, 15.
In fact no RTM-ISDN card is installed in
slot 13.
V7.0
128
VNGR16050
Video
When using the MPMx card to run a
conference with Auto Brightness
enabled, no difference can be seen in
the video between a light and darkened
room.
V7.0
129
VNGR15938
Audio
RMX 4000 using HDX endpoints in
2048Kpbs HD Video Switching
conference using Siren22Stereo
exceeds conference bit rate by sending
data to endpoints at 2112kpbs.
V7.1
130
VNGR15909
Upgrade
Process
When upgrading RMX4000 MPM+ from
version 6.0.0.105 to version 7.0.0.91, the
RMX Type (RMX4000) does not appear
in the Hardware Monitor window.
V7.0
131
VNGR15907
Upgrade
Process
When upgrading RMX4000 MPM+ from
version 6.0.0.105 to version 7.0.0.91, the
Fabric Switch name is missing from the
Hardware Monitor.
V7.0
132
VNGR15904
Upgrade
Process
When upgrading RMX4000 MPM+ from
version 6.0.0.105 to version 7.0.0.91, the
fault “Card voltage problem” is displayed
for all installed cards.
V7.0
133
VNGR15812
Multilingual
Japanese translation is missing in some
of the IVR Service dialog boxes.
V7.0
134
VNGR15789
Interoperability
RMX4000 using 4Mb, Same Layout,
Sharpness, Video Clarity in profile and
Entry Queue becomes inaccessible
when called via an Entry Queue from
H.323 LifeSize endpoint.
V6.0
135
VNGR15763
Video
A conference started from a Profile set to
“Motion” and Video Resolution “HD
1080" after connecting HDX endpoints,
resources used are incorrect.
V7.0
Corrections and Known Limitations
Table 3
Corrections Between Version 7.0.2 and Version 7.1
Detected
in Version
Key
Key
Category
Description
136
VNGR15750
General
In a conference set to 512kbps with Auto
Layout enabled, when starting PCM from
several endpoints, - you will receive an
Message Overlay: “no available PCM
resources. The message overlay cannot
be closed.
V7.0
137
VNGR15722
Video
On an RMX 4000 with MPM+ cards,
when trying to view the Video Preview
window, video is occasionally absent.
V7.0
138
VNGR15709
Video
In a 2MB CP conference with LPR,
Gathering, Sharpness, Video Clarity and
Auto Brightness enabled, when
connecting SIP & H.323 PVX/HDX
endpoints, when starting PCM and
selecting 1*1 Layout, the conference
video has video artifacts.
V7.0
139
VNGR15554
General
Numerous missing Japanese
translations in the RMX Web Client.
V7.0
140
VNGR15495
Video
Connect to a conference with HDX 8000
& 9000 endpoints, FECC on some of the
endpoints starts only after 10 seconds.
V7.0
141
VNGR15129
Interoperability
In a conference set to a line rate of
4096kbps with Sharpness, 1+5 layout,
with a number of endpoints present,
when a H.323 HD720p30 Tandberg
1700MXP endpoint dial-outs, Video In &
Out freeze. Tandberg endpoints receive
a lot of intra, it is like breathing video.
V7.0
142
VNGR15096
IVR
In a 384kbps conference with no LPR,
when connecting HDX 8000, PVX
endpoints the lower segment of the
welcome's slide is missing/smudged.
V7.0
143
VNGR14800
Multilingual
The translation of the Create Certificate
button in the IP Network Service - SIP
Server tab is missing.
V6.0
144
VNGR14672
Gateway
When a Gateway call is placed through
the RMX 4000 to various HDX8006
endpoints, SIP endpoints connected
using G.722.1C while the H.323
endpoints connected using Siren22.
V7.0.2
145
VNGR14567
Multilingual
Translation of some of the fields in the
Upgrade windows and dialog box are
missing.
V6.0
146
VNGR14338
Multilingual
Translation of the entries Copy
Conference and past Conference in the
Conference right-click menu is missing.
V6.0
155
RMX 1500/2000/4000 Release Notes - Version 7.1
Table 3
156
Corrections Between Version 7.0.2 and Version 7.1
Detected
in Version
Key
Key
Category
Description
147
VNGR14336
Multilingual
Translations of some of the fields in the
New Conference dialog box are missing.
V6.0
148
VNGR14335
Multilingual
Several fields in the Conference Profile
dialog box have not been translated.
V6.0
149
VNGR14333
Multilingual
Translation of the Exchange Integration
Configuration dialog box is missing.
V6.0
150
VNGR14332
Multilingual
The stop monitoring option (in right click
on MCU) in the RMX manager is not
translated to Japanese. VNGBE-851
V6.0
151
VNGR13686
Calendaring
On the RMX 4000 in a 1080p H.323
Video Switching conference with a line
rate of 6Mb, the IVR welcome screen
can freeze on the HDX8006 and HDX
9006 endpoints.
V6.0,
V5.0.0
152
VNGR12240
General
Endpoints are disconnected after
extended time period (8 hrs +) when all
MPM+ resources are used. Error
message is displayed: “Unit not
responding.”
V5.0.0
153
VNGR12181
General
Sometimes an assert may appear when
terminating a conference while running
10 conferences at a line rate of 768kbps
and changing the layout for H.323 & SIP
participants.
V4.6
154
VNGR11491
Content
In a conference with a line rate of
384kbps, when H.323 participant
connect to the conference using FECC,
incorrect data is displayed in the
Participant Properties - FECC and
Content channels of the RMX Web
Client. The information is updated
correctly once the participant is fully
connected.
V4.1
155
VNGR11422
General
When the RMX is set to Flexible
Allocation Mode and more than 14
endpoints are connected to a single
MPM+80 card in line rates above
2Mbps, video artifacts may appear.
V4.1
Corrections and Known Limitations
Corrections Between Version 7.0.1 and Version 7.0.2
Table 4
Corrections Between Version 7.0.1 and Version 7.0.2
Detected
in Version
#
Key
Category
Description
1
VNGR17472/
17379
Video
Striped video image of all
other participants occurs
on HDX8000 endpoint after
dialing via DMA to
RMX4000 running
V7.0.1.16 with, 4*MPM+80
cards.
V7.0.1
2
VNGR17454
General
An MCU internal problem
occurred:
“ConfPartyMcuInternalPro
blem - Party:2467
Conf:744 receives Failure
Status for opcode:
CONFPARTY_CM_OPEN
_UDP_PORT_REQ
Req:799954. “
V7.0.1
3
VNGR17384
Interoperability
Loss of lip sync occurs on
HDX8000 endpoint that
dialed via DMA with higher
line rate than the
conference (512) to
RMX2000 running
V7.0.1.16 with 2*MPM+80
cards.
4
VNGR17426/
17324/
17319
Video
Periodic momentary
freezing of video sent from
ISDN endpoint is observed
on H.323 endpoint when
connected to a CP
conference running on
RMX 2000 with MPMx at a
line rate of 1920kbps and
AES and LPR options
enabled.
V7.0.1
5
VNGR17195
Video
Colored stripes and video
freeze occurs in 512 kbps
calls dialed via DMA to
RMX4000 running
V7.0.0.162 with MPM+
cards.
V7.0
6
VNGR17086
Video
Video is frozen after 2-3
seconds when using
CMA-D with VBP 4350 on
RMX 2000 running
V7.0.0.162 with MPMx.
V7.0
Workaround
157
RMX 1500/2000/4000 Release Notes - Version 7.1
Table 4
158
Corrections Between Version 7.0.1 and Version 7.0.2
Detected
in Version
#
Key
Category
Description
7
VNGR16902
Interoperability
RMX with MPMx
connected via H.320 to
Tandberg 6000 B endpoint
is listed with "Connected
With Problem" status.
V7.0
8
VNGR16866
RMX 1500
General
On RMX 1500 Message
Overlay is blurred on SIP
and H.323 endpoints.
V7.0
9
VNGR16848
RMX 1500
General
On RMX 1500, Media port
is listed in the Ethernet
Settings dialog box but not
in the LAN List pane of the
Hardware Monitor.
V7.0
10
VNGR16833
Partners Microsoft
When using RMX with
MPM+ with ICE enabled in
a Federation dialing
configuration, the Microsoft
Office Communicator
Client is disconnected. Call
Disconnection Cause is
listed as "sip hw internal
MCU problem - 0".
V7.0
11
VNGR16829
Interoperability
Blurred and highly color
saturated video, followed
by a black screen is
displayed on HDX ISDN
endpoint connected to
RMX 2000 with MPMx at
1152kbps.
V7.0
12
VNGR16789
Video
Connecting three
HDX8006, six HDX9004
and nine V500 endpoints
to a 1024 kbps, HD 1080p
conference running on an
RMX1500, with Video
Clarity, Echo Suppression
and Auto Layout enabled,
poor video motion was
observed.
V7.0
13
VNGR16766
RMX 1500
Video
On RMX 1500 with MPMx,
strobe effect appears in
video during H.323 call to
HDX endpoints at 1080p at
4Mbps.
V7.0
Workaround
Corrections and Known Limitations
Table 4
Corrections Between Version 7.0.1 and Version 7.0.2
Detected
in Version
#
Key
Category
Description
14
VNGR16760
Video
On an RMX1500, when
connecting seven
HDX8006 endpoints to a
4096 kbps & HD 1080p
conference with Video
Clarity, Sharpness, Echo
Suppression and Auto
Layout enabled, stripes
appeared in the endpoints
video.
V7.0
15
VNGR16723
Interoperability
On an RMX 1500 running
an mixed (H.323, SIP &
ISDN) 1024kbps
conference, after
connecting the ISDN
endpoint and changing the
layout, after a few minutes
the ISDN endpoint views a
black screen and the video
frame rate is 0.
V7.0
16
VNGR16684
Video
On an RMX 2000 with
MPM+ cards running a
1920 kbps conference
using the following settings
LPR, Sharpness and Video
Clarity, when connecting
ISDN endpoints metallic
background noises can be
heard. Connect an H.323
endpoint, then ISDN
endpoints view their own
video.
V7.0
17
VNGR16661
Content
On an RMX 1500 running
an 1024kbps HD720p
conference with Video
Clarity, Auto Terminate,
Sharpness, Encryption,
LPR, Echo Suppression
and Auto Layout enabled,
when sending content
some dial-out HDX9004
endpoints had bad video.
V7.0
18
VNGR16647
Interoperability
On an RMX 2000 in a
384kbps H.323 CP
conference with Sharpness
and LPR enabled, when
the RMX dials-out to an
Tandberg 6000E, an empty
video frame appears.
V7.0
Workaround
159
RMX 1500/2000/4000 Release Notes - Version 7.1
Table 4
160
Corrections Between Version 7.0.1 and Version 7.0.2
Detected
in Version
#
Key
Category
Description
19
VNGR16603
Gateway
When the endpoint that
initiates a Gateway call
disconnects, the Gateway
session is not terminated
while others are still in the
conference. The Gateway
session should terminate.
V7.0
20
VNGR16565
Upgrade
Process
After upgrading to the
RMX1500 to Ver 7.0.0.123
the following error
message appears:
“CardsComponent
Type:switch, Description:
Temperature problem Major”.
V7.0
21
VNGR16533
Gateway
Intermittent blurred video
or green blocks displayed
on HDX H.320 call
connected via 1024kbps
Gateway call via RMX
2000 with MPMx.
V7.0
22
VNGR16457
General
Critical fan alert is
displayed in the RMX
Hardware Monitor in Event
Log properties box while in
the Hardware Monitor
pane the system status is
displayed correctly as
Normal.
V7.0
23
VNGR16382
Video
During a video conference
on the RMX2000 with an
MPMx card, bitrate
overflow occurs when
there's a lot of motion in
the video.
V7.0
24
VNGR15745
General
When you try to add the
flag:
"REDIAL_INTERVAL_IN_
SECONDS" in the System
Configuration an error
code appears: 30432.
V7.0
25
VNGR15557
Video
On the RMX 4000 with a
VSW conference set to
1080p30, when the RMX
dials out to 3 HDX and 2
LifeSize endpoints, the
HDX endpoints remain
stuck in their splash
screen.
V7.0
Workaround
Corrections and Known Limitations
Corrections Between Version 7.0 and Version 7.0.1
Table 5
Corrections Between Version 7.0 and Version 7.0.1
Detected
in Version
#
Key
Category
Description
1
VNGR17732
SIP
In ICE environment, if QoS
is enabled in the IP
Network Service, the
connection to the OCS is
broken and the RMX
cannot provision ICE and
cannot see the connection
to the edge server.
V7.0/7.0.1
2
VNGR17027
Content
Black screen or frozen
content displayed when
endpoints dial into the
conference via DMA.
V7.0
3
VNGR17007
RMX 4000
No content display and
several endpoints
disconnected from the
conference when content
is sent during a conference
running on RMX 4000 at a
line rate of 1920kbps and
Send Content to Legacy
Endpoints option enabled.
Faults list indicated that the
link between FSM 4000
and the media card was
lost.
V7.0
4
VNGR16959
Interoperability
On RMX running H.323,
384kbps conference with
MPM+ or MPMx with Send
Content to Legacy
Endpoints enabled. When
HDX9004 sends content
iPower9000 endpoint
receives content while FX
endpoint does not.
V7.0
5
VNGR16957
RMX 1500
general
On RMX 1500 with MPMx
High System CPU Usage
fault occurs.
V7.0
6
VNGR16931
General
RMX 2000 with MPM+
displays empty video
window in layout in ISDN +
IP mixed conference
during load test.
V7.0
Workaroun
d
161
RMX 1500/2000/4000 Release Notes - Version 7.1
Table 5
162
Corrections Between Version 7.0 and Version 7.0.1
Detected
in Version
#
Key
Category
Description
7
VNGR16930
Video
When connecting 15
HDX8006 endpoints to a
1024kbps & HD 720p
conference with Video
Clarity, Sharpness, Echo
Suppression and Auto
Layout enabled, running
on an RMX1500, the
endpoints had low frame
rates, frozen video, packet
loss and incorrect video
resolutions.
V7.0
8
VNGR16910
Video
On RMX with MPMx,
High-Profile endpoints
(HDX 8006) display green
flash in video window of
layout. Attempts to send
content result in "MFA
error" followed by shaking
video on HDX 9004
endpoints.
V7.0
9
VNGR16904
Multilingual
Incorrect Japanese
translation of “Restore Last
Version”.
V7.0
10
VNGR16898
Hardware
On an RMX 4000 with
MPMx_D cards in the
Diagnostic mode, when
running card monitoring
tests on the RTM_ISDN
card the tests fail.
V7.0
11
VNGR16893
Diagnostics
On an RMX2000 with MPM
cards, when implementing
the Diagnostic mode the
MPM card status remains
in a "startup" phase.
V7.0
12
VNGR16888
Video
When starting a
conference from the
default profile with 20-30
endpoints connected on an
RMX 4000 with MPMx
cards, changing the
conference layout causes
video freezes and empty
layout cells appear.
V7.0
Workaroun
d
Corrections and Known Limitations
Table 5
Corrections Between Version 7.0 and Version 7.0.1
Detected
in Version
#
Key
Category
Description
13
VNGR16884
Upgrade
Process
On an RMX2000/4000
when upgrading to version
7.0 build 139, the MPMx
card on Hardware Monitor
appears normal, but the
MPMx card blinking LEDs
indicate the card is still
"startup" mode.
V7.0
14
VNGR16882
Hardware
On an RMX 1500 in the
Diagnostic mode, when
viewing the MCU Monitor
section, the card slot
numbering is incorrect.
V7.0
15
VNGR16811
Video
On RMX 1500 MPMx - S,
when the HDX8006
endpoint at 720p resolution
using High-Profile at
512kbps connect to the
conference the participant
experiences welcome slide
flash in video or endpoint
freezes with welcome slide
displayed.
V7.0
16
VNGR16732
Content
When sending content, the
line rate of the sender
endpoint decreases and
when content is stopped,
the line rate increases,
above the conference line
rate. For example, if the
conference line rate is set
to 512kbps, it decreases to
300kbps when sending
content and it increases to
700kbps when the content
is stopped.
V7.0
17
VNGR16711
Video
On an RMX 2000 with
MPMx cards, when dialing
in at 384kbps using VSX
endpoints to a Meeting
Room, the video transfer
rate was 800kbps instead
of 384kbps.
V7.0
18
VNGR16707
Interoperability
An RMX 2000 running an
1920kbps CP conference
with LPR, Gathering and
Sharpness enabled, when
the RMX dials-out to an
H.323 HDX endpoint, the
HDX displays blue patchy
video.
V7.0
Workaroun
d
163
RMX 1500/2000/4000 Release Notes - Version 7.1
Table 5
164
Corrections Between Version 7.0 and Version 7.0.1
Detected
in Version
#
Key
Category
Description
19
VNGR16691
General
In ICE environment, when
a local endpoint connects
to the conference, the
connection type in the
Participant Properties
should be Local instead of
Host.
V7.0
20
VNGR16633
Diagnostics
On an RMX 2000/4000
when accessing the
Diagnostic mode and
clicking the "run all tests"
option, the confirmation
window only appears
minimized in the Windows
Toolbar at the bottom of
the screen.
V7.0
21
VNGR16616
Interoperability
CMAD negotiates G.711u
instead of G.719 when
connecting to a conference
running at a line rate of
64kbps, video quality is set
to sharpness, and auto
layout is enabled.
V7.0
22
VNGR16502
Content
In a 1920kbps conference
with H.264 content, after
HDXs view and receive
content, then when an
VSX3000 endpoint
connects the content halts
and an error message
appears:
"0x80c7a4cCMfaTask::On
BadSpontIndFromMFA
reason: 1, description:
Decoder resource
allocation error! Closing
decoder port! “
V7.0
23
VNGR16430
Upgrade
process
On RMX 2000, MPL failure
occurs after upgrading
Version 7.0.
V7.0
24
VNGR16423
RMX 1500
General
On RMX 1500, changing
the port speed setting from
Auto to 100F is ignored
with Auto remaining
selected after reset.
V7.0
25
VNGR16166
Hardware
On an RMX 2000 with two
MPM+ cards, after several
minutes participants could
not connect due to MCU
Internal Problem 32112.
V7.0
Workaroun
d
Corrections and Known Limitations
Table 5
Corrections Between Version 7.0 and Version 7.0.1
#
Key
Category
Description
26
VNGR15543
Video
On an RMX 4000 with a
CP conference with Auto
Layout and Sharpness
enabled, Sony PCS-1
endpoints do not transmit
video in H.320 calls.
Detected
in Version
Workaroun
d
V7.0
Corrections Between Version 6.0 and Version 7.0
Table 6
Corrections Between Version 6.0 and Version 7.0
Detected
in Version
#
Key
Category
Description
1
VNGR16917
Video
On an RMX2000 with
MPMX cards, when
connecting HDX8000
endpoints with 720p and
1080p resolutions using a
1+7 layout, green artifacts
and stripes appear in the
video.
V7.0
2
VNGR16915
Software
Version
On RMX 1500, Encryption
Key Server can cause the
MCU to display High CPU
Usage alert after restart.
V7.0
3
VNGR16913
PCM
On RMX 4000 with MPM+,
PCM on certain H.323
endpoints does not
respond to arrow keys.
V7.0
4
VNGR16855
ISDN
Video freezes on ISDN
endpoints in a fully loaded
RMX 1500 when
connecting, disconnecting
and reconnecting all the
endpoints.
V7.0
5
VNGR16845
Software
Version
When using RMX with
MPMx, MplApiSocket
disconnects for 10
seconds resulting in
disconnection of all
participants.
V7.0
Workaroun
d
165
RMX 1500/2000/4000 Release Notes - Version 7.1
Table 6
166
Corrections Between Version 6.0 and Version 7.0
Detected
in Version
#
Key
Category
Description
6
VNGR16828
Upgrade
Process
When upgrading RMX4000
7.0.0.136 with MPM+ to
Version 7.0.0.142 or
7.0.0.145, MPL Failure
was indicated and the
RTM-IP still shows "in
upgrade" while the RMX
exits the "startup"
indication.
V7.0
7
VNGR16818
Software
Version
On RMX 2000 with MPM,
after upgrading the RMX
restarted with "no utilizable
unit for audio controller"
requiring hard reset (switch
off and then on).
V7.0
8
VNGR16804
Partners Microsoft
On RMX with MPMx,
Microsoft Office
Communicator Client
connected at 384kbps
doesn't recover and
disconnects after Packet
Loss after dial-in MOC
Client changes LAN
configuration to 100 Half
Duplex during ongoing
conference.
V7.0
9
VNGR16803
Software
Version
On RMX 1500 with MPMx
High System CPU Usage
fault occurs.
V7.0
10
VNGR16743
Video
On an RMX 1500 running
a 2048kbps conference
with LPR, Gathering,
Sharpness, Send Content
to Legacy Endpoints, Auto
Layout, Echo Suppression
and Audio Clarity enabled,
when connecting all the
endpoints together, after
the gathering slide closes
all HDX endpoints display
low quality video.
V7.0
Workaroun
d
Corrections and Known Limitations
Table 6
Corrections Between Version 6.0 and Version 7.0
Detected
in Version
#
Key
Category
Description
11
VNGR16734
Content
On an RMX 1500 running
an 768kbps conference
with LPR, Gathering,
Sharpness, Auto Layout,
Echo Suppression, Audio
Clarity and Send Content
to Legacy Endpoints
enabled, when sending
content from the Sony
XG80 endpoint, HDX7600
endpoints do not view
content.
V7.0
12
VNGR16642
ISDN
On RMX 1500 running a
conference started from a
conference profile, when a
Viewstation MP512 ISDN
endpoint connects, an
error message appears:
"Connected With
Problem".
V7.0
13
VNGR16548
IVR-RMX 4000
On the RMX 4000 & MPMx
card, when running an
4MB CP conference, the
Welcome slide does not
appear.
V7.0
14
VNGR16421
General
When a HDX (A) endpoint
dials the following string:
"Prefix_ID of the Gateway
Profile *ISDN", to the
number of the second HDX
using an IP to ISDN call
and starts a 384kbps
conference with IVR
enabled, if HDX A sends
content to HDX B, the HDX
views a black screen.
V7.0
15
VNGR16400
General
When a conference is
active on the RMX 1500, in
the Hardware Monitor LAN Properties there is an
"Status" indication that the
LAN Media is "Inactive". It
should state "active".
V7.0
16
VNGR16398
Interoperability
In a 1920kbps conference
with LPR enabled, when
connecting 3 HDX
endpoints bad video
appears.
V7.0
Workaroun
d
Connect
both HDXs
directly to a
regular
conference
that is using
the same
profile as the
GW profile.
167
RMX 1500/2000/4000 Release Notes - Version 7.1
Table 6
168
Corrections Between Version 6.0 and Version 7.0
Detected
in Version
#
Key
Category
Description
17
VNGR16397
General
On the RMX 1500, in the
IP Network Service >
Management Network >
the Lan Ports tab appears.
It should be the IP tab.
V7.0
18
VNGR16348
General
On an RMX with the MPM
card and version 7.0, when
a conference is started
from a Template with
ViewStation 512/EX
endpoints, the system
restarts unexpectedly.
V7.0
19
VNGR16293
General
On an RMX 4000 with the
MPM+ card, a "CureDump
ConfParty" file is created
and saved on file.
V7.0
20
VNGR16289
Video
On the RMX2000 running
a conference based on the
default Profile, when the
RMX dials-out in SIP to the
LifeSize endpoint, the call
connects but the LifeSize
endpoint does not view
video.
V7.0
21
VNGR16266
General
In RMX Web Client, when
viewing the Restore
Factory Defaults window
the "Select the Backup &
Continue button to save
the current configuration
and restore factory
defaults" field is not
translated properly in
Japanese.
V7.0
22
VNGR16075
General
On an RMX 2000 with a
384kbps conference
started from a Profile with
three endpoints connected,
when the last endpoints
disconnects an assert
appears: 32112.
V7.0
23
VNGR16038
Audio
On an RMX with two
MPMx cards, when
connecting two dial-out
PSTN participants, there is
no audio between them.
V7.0
Workaroun
d
Corrections and Known Limitations
Table 6
Corrections Between Version 6.0 and Version 7.0
Detected
in Version
#
Key
Category
Description
24
VNGR15954
SIP
After creating a new SIP
Factory and then deleting
it, you cannot create
another new SIP factory. A
message alert appears:
"fail to add SIP factory.”
V7.0
25
VNGR15952
General
When viewing the
properties of the Entry
Queue when selecting
"IVR service provider only"
and clicking [OK], when
re-opening the Entry
Queue properties, the "IVR
service provider only" is
not selected.
V7.0
26
VNGR15951
General
When Dialing in from a
PSTN participant to an EQ
when entering the DTMF
the participant cannot
connect.
V7.0
27
VNGR15950
General
In the Management
Network Properties - IP
tab, when selecting ON
[Secured Communication]
and clicking OK, the popup
message states RMS
instead of RMX.
V7.0
28
VNGR15949
General
After upgrading the RMX to
version 7.0, RMX IP
address is not displayed.
V7.0
29
VNGR15936
Interoperability
When using Japanese
characters in the display
name of VVX1500-175/
VVX1500-176 endpoints,
the endpoints display only
a number.
V7.0
30
VNGR15934
General
In the RMX Web Client,
when creating a new
gateway profile and
clicking OK, a wrong
message appears:
"Conference name already
exists". The message
should be: "Failed to add
Gateway Profile: Display
name already exists".
V7.0
Workaroun
d
169
RMX 1500/2000/4000 Release Notes - Version 7.1
Table 6
170
Corrections Between Version 6.0 and Version 7.0
Detected
in Version
#
Key
Category
Description
31
VNGR15933
General
When accessing the
English version of the RMX
Web Client, when viewing
properties of the
conference profile, some of
the fields are in Japanese.
V7.0
32
VNGR15932
General
In the Web Client set to
Japanese, when selecting
Software download, click
"Browse" you cannot view
the binary download file.
V7.0
33
VNGR15808
General
After modifying settings in
the IP Network Services,
the "Reset MCU" message
did not appear, nor was the
IP Network Service
updated.
V7.0
34
VNGR15801
Hardware
After upgrading RMX4000,
an error message appears:
"No RTM-LAN or
RTM-ISDN installed" on
slots13, 14, 15". In fact no
RTM-ISDN card is installed
in slot 13.
V7.0
35
VNGR15744
General
In the Ping Dialog box,
when clicking Ping an error
message appears instead
of receiving an IP address.
V7.0
36
VNGR15743
General
In the Ping Dialog box,
when clicking Ping an error
message appears instead
of receiving an IP address.
V7.0
37
VNGR15741
General
When modifying the Port
Gauge usage percentage
from the default value
("80%") to a lower value
("40%" or "60%"), an error
message is displayed. The
error message is not
translated into the UI
language.
V7.0
38
VNGR15740
General
After updating the
Exchange Integration
Configuration window and
clicking OK, a Message
alert "31006" does not
provide you with any
information as to the cause
of the error.
V7.0
Workaroun
d
Corrections and Known Limitations
Table 6
Corrections Between Version 6.0 and Version 7.0
Detected
in Version
#
Key
Category
Description
39
VNGR15728
General
When Auto Layout is
enabled in a conference,
the Auto Layout function
does not select the
appropriate layout for
number of participants
present in the conference.
V7.0
40
VNGR15727
Video
A 1024kbps conference
with maximum resolution
forced to H720p, when
connecting HDX endpoint
with a resolution set to CIF,
the endpoint connects with
4CIF thereby using more
resources.
V7.0
41
VNGR15726
General
The "Display repetition"
option should be disabled
when in Static Mode.
V7.0
42
VNGR15723
General
When a conference is
created with the same
name as another
conference already
running, an incorrect error
message appears: "Failed
to add conference: 2501".
V7.0
43
VNGR15717
Video
In a 1MB conference with 2
HDX endpoints one with
High Profile and the other
without High Profile,
corrupted video is viewed
in the High Profile HDX
endpoint.
V7.0
44
VNGR15663
IVR
An IVR slide with1080p
resolution was uploaded
successfully to the RMX
but cannot be viewed with
the preview button nor
could be seen in the IVR
welcome slide.
V7.0
45
VNGR15648
General
In a conference started
from the default
"Factory_Video_Profile"
and with "Send Contents to
Legacy Endpoint" enabled,
Legacy & ViewStation
Endpoints cannot view
content.
V7.0
Workaroun
d
171
RMX 1500/2000/4000 Release Notes - Version 7.1
Table 6
172
Corrections Between Version 6.0 and Version 7.0
Detected
in Version
#
Key
Category
Description
46
VNGR15629
General
When you start a
conference from an
existing conference
template, a popup
message appears: "The
conference ID already in
use". Conference does not
start.
V7.0
47
VNGR15626
Video
During a video conference
audible clicks & popping
sounds are heard during
when the following
endpoints are connected:
CMAD, VSX3000,
HDX6000 and HDX7000.
V7.0
48
VNGR15506
General
In the RMX Web Client,
login as Administrator and
create a new user
"KANSA" with Auditor
permissions. Logout and
login using the new Auditor
user, an error message
appears.
V7.0
49
VNGR15374
General
On an RMX with MPMx
cards, when a number of
endpoints with different line
rates dial-out, some
endpoints do not connect.
V7.0
50
VNGR15023
Cascading
Content cannot be sent via
cascade link. Video
Disconnection Cause of
the link participant is
displayed as: "Content
media was not established
because the remote
endpoint does not support
the conference content
protocol."
V6.0
51
VNGR14844
Upgrade
Process
The Faults List is empty
when upgrading the RMX
2000 from V5.01 build 24
to v6.0 build 86.
V6.0
52
VNGR14837
Video
Gathering slide info is cut
off for dial-out VSX and
CMAD MAC endpoints that
receive video at a
resolution of 480x352. The
gathering screen displays
correctly on the HDX
endpoints
V6.0
Workaroun
d
Corrections and Known Limitations
Table 6
Corrections Between Version 6.0 and Version 7.0
Detected
in Version
#
Key
Category
Description
53
VNGR14673
Video
In a 4MB Immersive
Telepresence conference
with Sharpness enabled,
cracking and popping
sounds are heard.
V6.0
54
VNGR14276
General
When the MCU is in start
up mode, the upgrade
status bar does not appear.
V6.0
55
VNGR12136
SIP
No video or low quality
video is seen by a SIP
HDX endpoint that
connects to a conference
set to 384 kbps at much
higher line rate, such as
4Mb.
V4.6
56
VNGR11703
General
Sometimes participants do
not connect when the RMX
is running under load. The
disconnection cause is
stated as "MCU internal
problem 32121".
V4.5
Workaroun
d
173
RMX 1500/2000/4000 Release Notes - Version 7.1
Version 7.1 System Limitations
Table 7 Version 7.1 System Limitations
Detected
in Version
#
Key
Category
Description
1
VNGFE
-3763
Reservation
The scheduled start time Recurring
reservations that span over different
daylight saving periods move by one
hour when the time changes. This is due
to reservations being saved in GMT time
only.
V7.1
2
VNGR19599
Upgrade
Process
When downgrading from version 7.0.2.68
to version 5.0.2.9, the following Active
Alarm is displayed:
“IPMCInterfaceFAILED READING IPMC
version from CHIP, err =
6:eIpmcRcvHexResponseFail”
V7.0.2
3
VNGR19597
Interoperability
An empty video cell is shown for a
second in the Personal video layout
displayed on the VVX system that is
connected to a conference running on
RMX 2000 with MPMx card at a line rate
of 1920Kbps and Send Content to
Legacy Endpoint option enabled, when
the speaker changes while content is
sent.
V7.1
4
VNGR19595
IP
In Multiple Services mode, after restoring
the RMX to its factory defaults the option
to define more than one IP Network
Service (Add Network Service button) is
disabled.
V7.1
5
VNGR19564
IP
In Multiple Services mode, the name of
one IP Network Service cannot be
contained in the another IP Network
Service name, otherwise all the calls will
be routed to the same Network Service.
For example, IP Network Service named
IPService and IPServiceNew.
V7.1
6
VNGR19541
Interoperability
Tandberg C20 and C90 endpoints
version TC4.0.1.240265 connect as
audio only to a VSW HD conference
running on RMX version 7.1. Issue is not
reproduced when Tandberg release
3.1.2 is installed on the endpoints.
V7.1
7
VNGR19536
General
The Default IP Network Service
configured using the Fast Configuration
Wizard is not saved if no media cards are
installed in the RMX during the
configuration process.
V7.1
174
Workaround
Modify the
Reservations start
time after the
implementation of
daylight saving
changes.
Add digits to the
names, such as
IPService 1 and
IPService 2.
Corrections and Known Limitations
Table 7 Version 7.1 System Limitations
Detected
in Version
#
Key
Category
Description
8
VNGR19477
General
Occasionally, a DSP failure occurs
followed by the following fault:
0x80cd73cCMfaTask::OnBadSpontIndFr
omMFA reason: 1, description: Crashing
Dsp - [Decoder26x] ERROR (H263).
V7.1
9
VNGR19466
Upgrade
Process
When upgrading an RMX 1500 with
Multiple Services option enabled from
version 7.1.0.115 to version 7.1.0.117,
several asserts are displayed in the
Faults list when the system is restarted:
ASSERT:MplApi_FAILED_to_start_durin
g_Startup_!!!
ASSERT:RtmIsdnMngr_FAILED_to_start
_during_Startup_!!!
ASSERT:Installer_FAILED_to_start_duri
ng_Startup_!!!
V7.1
10
VNGR19459
General
When the workstation's screen resolution
is set to 1280 x 720, the Accept
Agreement button in RMX
Documentation and Utilities screen
provided on the Polycom USB key is cut
and the screen becomes corrupted when
enlarging the display using Ctrl, +, +.
V7.1
11
VNGR19455
General
Layout.CPP assert is displayed when
changing the conference layout via
Conference Properties dialog box of a
conference running on RMX 1500 at a
line rate of 512Kbps with 20 ISDN/H.323
and SIP endpoints connected to the
conference.
V7.1
12
VNGR19432
Interoperability
When RMX 4000 with MPM+ dials out to
CX700 over SIP connection, the call is
disconnected after the CX700 accepted
the call.
V7.1
13
VNGR19364
General
Changing the font size display of the
workstation monitor does not change the
size of the fonts displayed in the RMX
Documentation and Utilities screens
provided on the Polycom USB key
shipped with the RMX.
V7.1
14
VNGR19288
General
When two dial-out H.323 endpoints
connect to a conference running on RMX
1500 at a line rate of 384kbps and
Gathering enabled, and press DTMF
code *88, the transparent Gathering pane
does not appear.
V7.1
15
VNGR19265
Content
In VSW and CP conferences started from
a template with two HDX8000 endpoints,
when sending content the content rate
exceeds the conference line rate.
V7.0.2
Workaround
Reset the RMX.
175
RMX 1500/2000/4000 Release Notes - Version 7.1
Table 7 Version 7.1 System Limitations
Detected
in Version
#
Key
Category
Description
16
VNGR19262
ISDN
On an RMX 2000 with MPMx cards, the
maximum capacity of 40 ISDN
participants could not be attained when
participants connected at 256Kpbs to a
conference running at a line rate of
512kbps as downspeeding of the
conference line rate is not supported.
V7.1
17
VNGR19240
RMX 1500Q
When resetting the RMX 1500 MPMx-Q
from the Hardware Monitor (soft Reset),
the IE7 Web Browser window remains
open and an error message is displayed
after a while instead of disconnecting
from the RMX.
V7.1
18
VNGR19237
RMX 1500Q
When installing the Activation Key with a
license of 10 CIF resources on RMX
1500 with MPMx-Q card, only 5 CIF
resources are listed in the System
Information and 6 resources are
displayed in the Port Usage.
V7.1
19
VNGR19128
Interoperability
VVX does not resume video after being
placed on hold when connected to a
conference managed by the DMA.
V7.1
20
VNGR19114
ISDN
In an 1472 kbps CP ISDN conference
with Encryption, Gathering, LPR,
Sharpness and Video Clarity enabled,
when sending content from an
VSX7000A endpoint, VSX8000
endpoints cannot view content.
V7.1
21
VNGR19109
SIP
In an 768 kbps CP conference with Auto
Layout, Gathering, LPR, Sharpness
Graphics and Video Clarity enabled, the
SIP call negotiates H.263 instead of
H.264.
V7.1
22
VNGR19108
Video
>> In an dial-out 384kbps
conference using the Factory
Video Default profile, an DST
H323 Broad 5 endpoint views
corrupt video when another
video participant joins the
conference.
V7.1
23
VNGR19087
Video
On an RMX 1500 in a Real Life
conference, all endpoints have their
audio and video halted for 10 seconds.
V7.1
176
Workaround
Set the
Conference Profile
line rate to
256kbps.
Corrections and Known Limitations
Table 7 Version 7.1 System Limitations
Detected
in Version
#
Key
Category
Description
24
VNGR19085
Content
In an conference with mixed H.323 and
ISDN endpoints, when content switches
between participants, the ISDN
participant can receive the content token
but cannot resend it. As a result all
participants view black screen for a few
seconds, and then the view returns to
normal video.
V7.1
25
VNGR19083
General
After creating a new conference and
adding participants, when attempting to
save the conference to a template a
"failure status" active alarm appears.
V7.1
26
VNGR19077
Content
In a ISDN cascaded conference that
places a call using the Codian Gateway,
after sending Content the call
disconnects.
V7.1
27
VNGR19076
Gateway
When an IP call is forwarded from the
RadVision Gateway to RMX over ISDN,
bad video can be seen.
V7.1
28
VNGR19075
Gateway
In an ISDN cascaded conference that
places a call using the Codian Gateway,
after switching the Content sender, a
black screen can be seen.
V7.1
29
VNGR19068
H.323
In an 512 kbps SIP/H.323 VSW
conference with LPR, Sharpness,
Graphic Auto Layout and Video Clarity
enabled, when sending content from an
HDX endpoint, VSX endpoints cannot
view content.
V7.1
30
VNGR19065/
19156
General
If setting the Gatekeeper prefix to the
digits that are used for Conference ID (for
example prefix is set to 10 and the
conference ID is 1001), the system will
not be able to dial to the destination
conference as the prefix digits are
truncated from the conference ID,
preventing the system from locating it.
When the gatekeeper configuration
changes to “off” in the IP Network
Service, the RMX is still implementing the
previous gatekeeper configuration and
uses the Gatekeeper Prefix for routing.
V7.1
31
VNGR19058
Video
On the RMX1500Q in the IVR Services
you cannot upload a new Video Welcome
Slide.
V7.1
32
VNGR19057
Video
On the RMX1500Q, in H.323 & SIP dialin and dial -out calls you do not view the
Video Welcome Slide.
V7.1
Workaround
Do not use the
alias for dialing in.
177
RMX 1500/2000/4000 Release Notes - Version 7.1
Table 7 Version 7.1 System Limitations
Detected
in Version
#
Key
Category
Description
33
VNGR19050
Recording
In a RSS recorded conference with 2x2
layouts, when starting and pausing the
recorder from an HD endpoint, the pause
icon disappeared.
V7.1
34
VNGR19045
Content
In a mixed H.323, SIP, ISDN, PSTN
conference with 20 HDX, VSX, Tandberg,
LifeSize and CMAD endpoints, when an
ISDN endpoint stops and re-sends
Content endpoints view a black screen.
V7.1
35
VNGR19033
Video
In a 512 kbps H.323 conference with
AES, LPR and single layout enabled,
when HDX one endpoint uses PCM the
other HDX endpoint's video becomes
blurred.
V7.1
36
VNGR18990
Video
On an RMX 2000 with MPM+ cards and a
4Mb conference with Motion enabled, 2
OTX-306, 1 RPX-400 endpoints,
horizontal black lines appear.
V7.1
37
VNGR18985
Content
When Serial endpoint sends content, the
H.323 endpoint views a black screen,
when serial endpoint stops content,
content remains frozen for 10-20
seconds and then endpoints view frozen
video.
V5.1
38
VNGR18975
FECC
In an dial-in H.323 VSW conference,
HDX SIP endpoints cannot use FECC.
V7.1
39
VNGR18973
Interoperability
In an encrypted conference, LYNCH
endpoints cannot use DTMF.
V7.1
40
VNGR18947
CMA
In a 832 kbps H.323 conference
registered with the CMA, when
connecting CUPC, CMA-D and HDX
endpoints the video is bad.
V7.1
41
VNGR18943
Interoperability
In a 4096 kbps CP conference with Auto
Layout, LPR and Graphics enabled,
when an Sony XG80 endpoint sends
content, HDX endpoints do not see video.
V7.1
42
VNGR18942
Interoperability
In a 384 kbps H.323 conference with
AES and LPR enabled, when the RMX
dials through a Gateway connection the
HDX endpoint views garbled text with
video.
V7.1
43
VNGR18918
Recording
With an RMX in the MPM+ mode, when
starting an RSS recording there is no
pause icon present on the UI.
V7.1
178
Workaround
Corrections and Known Limitations
Table 7 Version 7.1 System Limitations
Detected
in Version
#
Key
Category
Description
44
VNGR18917
Video
In a 1920 kbps H.323 conference with
AES and LPR enabled, when an HDX
endpoint views the Welcome Slide there
is no video in the background.
V7.1
45
VNGR18889
Cascading
In Cascaded conferences with an
identical profile, when the conference
starts you are connected to an Entry
Queue instead of the Slave conference.
V7.1
46
VNGR18888
Interoperability
Two identical conferences with Legacy
content enabled with both Legacy and
non-Legacy endpoints, when non-Legacy
endpoints send content and an Legacy
endpoints joins the other conference, the
new content cannot be viewed.
V7.1
47
VNGR18754
Multilingual
When displaying participant names in the
participant properties, the Kazakhstan
language is not supported.
V7.0.2
48
VNGR18679
Interoperability
When GAB processes address book
information sent to it by the CMA server,
you can only call using H.323 and not
ISDN.
V7.1
49
VNGR18668
Multilingual
The words “Enable Gathering Phase” are
not translated into Simplified Chinese.
V7.1
50
VNGR18637
Interoperability
When content is sent from an ISDN
HDX7006 endpoint, Lifesize Room 200
endpoint cannot view the content.
V7.1
51
VNGR18626
Interoperability
On an RMX 4000 with a 128 kbps H.323
conference, when a VVX1500 endpoint
views dials another VVX1500 endpoint
the call disconnects.
V7.1
52
VNGR18606
Interoperability
An RMX 2000 and endpoints are
registered with a Broadsoft proxy, when
the dial-in conference starts from an LPR
enabled Profile, HDX endpoints connect
with problems.
V7.1
53
VNGR18588
Upgrade
Process
During the upgrade from version 4.7 an
unexpected reset occurred on a media
card.
V4.7
54
VNGR18554
CMA
On an RMX registered to the IOS/CMA,
when an VVX endpoint connects to the
conference, no video is seen.
V7.1
55
VNGR18537
Content
In a 512 kbps H.323 conference with
LPR, Gathering, Auto Layout and Send
Content to Legacy Endpoint enabled,
when sending content from VSX
endpoints to Legacy endpoints a green or
pixilated screen appears.
V7.1
Workaround
179
RMX 1500/2000/4000 Release Notes - Version 7.1
Table 7 Version 7.1 System Limitations
Detected
in Version
#
Key
Category
Description
56
VNGR18528
FECC
When using PCM to use FECC when
pressing the exit button “0”, there is no
response.
V7.1
57
VNGR18522
Interoperability
When using PCM to use Click & View, the
menu appears in the middle of the
screen.
V7.1
58
VNGR18510
Video
On the RMX 2000/4000 with MPMx cards
and H.261 endpoints connected, when
there is motion in the video, video
artifacts can be seen.
V7.1
59
VNGR18378
Recording
After creating a new profile with a
recording link, and a new conference
initiates the recording link does not
activate.
V7.1
60
VNGR18374
Interoperability
When using DTMF keys with PCM, after
pressing '8' to terminate the conference,
the pound (#) shortcut key does not work.
V7.1
61
VNGR18357
Multilingual
When the PCM menu is set to the
Japanese language, part of the menu
appears in English.
V7.1
62
VNGR18349
RMX Manager
Following a Comprehensive Restore to
Factory Defaults of RMX 2000, the CDR
file containing 1000 CDR logs cannot be
restored from the Backup Configuration.
V7.0.2
63
VNGR18279
Video
The video display is “jumpy” when
endpoints connect to a conference
running on RMX with MPMx at a line rate
of 512kbps and SD resolution.
V7.0.2
64
VNGR18276
Upgrade
Process
When upgrading an RMX 2000 with one
MPM card from version 7.0.1.16 to
version 7.0.2.64, the MPM card appears
to be in normal state in the Hardware
Monitor but with no available units. The
status LED on the card is green as in
normal status.
The upgrade procedure takes longer to
complete, and until it does the audio
controller units cannot be used.
V7.0.2
65
VNGR18211
RMX Manager
On RMX2000 with MPMx-S, when two
ViewStation endpoints connect to the
conference using H.263, the Video Port
Usage display on the RMX Manager
displays 3 ports used. The Administrator
guide states 4 ports.
V7.0
66
VNGR18186
Cascading
During an ISDN Cascaded conference
when connecting an IP HDX endpoints
with 16:9 screen formats, the video
changes to 4:3 format instead of 16:9.
V7.1
180
Workaround
Corrections and Known Limitations
Table 7 Version 7.1 System Limitations
Detected
in Version
#
Key
Category
Description
67
VNGR18170
RMX Manager
Video Preview cannot be activated in
RMX Manager application.
V7.0.2
68
VNGR18116
Interoperability
In a 384 kbps CP conference with LPR
and AES enabled, when Touch Control
changes the layouts, HDX endpoints hear
a string of DTMF tones after each
change.
V7.1
69
VNGR18111
General
An unclear message “No utilizable unit
for audio controller” is displayed when
removing all Media cards from the RMX.
V7.1
70
VNGR18026
Interoperability
When connecting to a Meeting Room
with a desktop endpoint, when ST clients
connect and terminate the conference,
one participant remains in a
“disconnecting“ status. Neither the
conference nor the client can be deleted
from the RMX.
V7.1
71
VNGR18021
Interoperability
In DMA, when a SIP endpoint is
connected to a certain MCU, and the
user chooses to stop using it, the call is
routed to a different MCU while the call
rate is reduced by 64k.
V7.0
72
VNGR17944
ISDN
When a conference starts using the
default conference profile, after about 15
minutes ISDN HDX endpoints suddenly
disconnect from the conference.
V7.1
73
VNGR17914
Interoperability
When two IBM Sametime clients connect
to a conference, the ST client connecting
from a desktop views video artifacts.
V7.1
74
VNGR17889
RMX Manager
The Logger statues link with the RMX
Manager failed repeatedly. A manual
reset was required to reestablish the link.
V7.1
75
VNGR17888
Video
Full screen layout is displayed instead of
3x3 layout when the 3x3 layout is
selected using Click&View from
HDX9004 version 2.7.0-5547.
Conference is running on RMX 2000 with
either MPM+ or MPMx.
V7.0.2
76
VNGR17869
Hardware
When inserting a Control Unit in Slot 4, in
Hardware Monitor it is shown as inserted
in slot 3
V7.0.2
77
VNGR17861
RMX Manager
RMX Manager failed to install from login
page and the request was aborted due to
the following message: “Could not create
SSL/TLS secure channel”.
V7.5
Workaround
1. Install prior to
moving to initiating
the Secure Mode
2. Install from a
network 3. Install
locally from RMX
Manager folder
181
RMX 1500/2000/4000 Release Notes - Version 7.1
Table 7 Version 7.1 System Limitations
Detected
in Version
#
Key
Category
Description
78
VNGR17823
Interoperability
No cropping, no border and shrunken
video is displayed on the VVX endpoint
when connecting a VVX endpoint, HDX
endpoint and a Telepresence endpoint to
a conference set to Telepresence mode
that is running on RMX 2000 with MPMx
cards.
V7.0.2
79
VNGR17818
General
Video Preview cannot be disabled.
V7.0
80
VNGR17807
Interoperability
Radvison Scopia XT1000 does not
transmit video when connected at a line
rate of at 1920kbps to a CP conference
running on RMX 2000 with MPMx and its
Resource Configuration set for “Video
Quality Optimized”.
V7.0.2
81
VNGR17796
Video
A thin gray line is present at the bottom of
the cells when connecting TPX and RPX
endpoints to a conference running on
RMX 2000/4000 with MPMx cards at a
line rate of 3MB or higher and video
quality is set to sharpness.
V7.0.2
82
VNGR17791
General
DTMF Tones (Click&View) are heard by
all conference participants in a
conference running on RMX 2000 with
MPMx.
V7.0.2
83
VNGR17762
Content
Sometimes Content is sent during the
gathering phase and is shown through
the gathering phase slide background (it
is displayed as a layer underneath it)
when the Sent Content to Legacy
Endpoint option is enabled in a
conference running at 384kbps.
V7.0.2
84
VNGR17757
Partners Microsoft
In Microsoft Lync environment with ICE
enabled, when a Lync client dials an
Entry Queue running on RMX 4000 with
MPM+80, the Lync client is not given
enough time to enter the meeting room
ID and is disconnect from the Entry
Queue.
V7.0.2
85
VNGR17746
Partners Microsoft
In an environment that includes the
Microsoft Lync server and RMX 4000
MPM+80 with ICE enabled, when the
Lync client escalates to video after
connecting as Audio Only to a Meeting
Room that is running at 384kbps, with
Encryption and LPR enabled, artifacts
appears at the start of the video.
V7.0.2
182
Workaround
Corrections and Known Limitations
Table 7 Version 7.1 System Limitations
Detected
in Version
#
Key
Category
Description
86
VNGR17743
Partners Microsoft
In an environment that includes the
Microsoft Lync server and RMX 4000
MPM+80 with ICE enabled, when the
RMX dials out to two Lync clients with
HDX connected, the second Lync client is
disconnected from the conference that is
running at 384kbps, with Encryption and
LPR enabled due to a SIP HW internal
MCU problem.
V7.0.2
87
VNGR17731
Gateway
RMX Gateway calls status messages do
not appear on HDX endpoint after the
RMX version was upgraded from 5.xx to
7.01
V7.0
88
VNGR17729
Content
Video freeze was experienced by many
participants when content was sent from
a PC to 160 CIF participants connected
to a conference running on RMX 2000
with MPM+80 at a line rate of 384kbps
and LPR and Encryption options
enabled.
V7.0.2
89
VNGR17724
General
After Comprehensive Restore to Factory
Defaults, an active alarm displayed,
indicating voltage problem on MPM-f card.
V7.0.2
90
VNGR17689
ISDN
Blurred (Predator) video is displayed on
the HDX endpoint that is in self view
when a movement occurs while the
endpoint is connected via ISDN to a
conference running at a line rate of
1472kbps, with encryption enabled.
V7.0.2
91
VNGR17668
Interoperability
Sony PCS-XG80 receives video at a
resolution of 432x240 instead of 720p
when connected to a CP conference
running on RMX 2000 with MPM+ at a
line rate of 1920kbps with LPR, Video
Clarity and Send Content to Legacy
Endpoint options enabled.
V7.0.2
92
VNGR17640
Video
Video freeze occur when connecting the
74th HD 720p participants (out of 80) to a
conference running on RMX 4000 with 4
MPM+80 cards at a line rate of 1MB,
Video Quality set to Sharpness and
Video Clarity, encryption and LPR
options enabled.
V7.0.2
93
VNGR17616
Audio
HDX H.323 endpoint receives G.722
audio instead of Siren22 (as the SIP
endpoints) when connected to a
conference running at a line rate of
384kbps on RMX4000 with MPM+ and
the CS_ENABLE_EPC flag is set to YES.
V7.0.2
Workaround
183
RMX 1500/2000/4000 Release Notes - Version 7.1
Table 7 Version 7.1 System Limitations
Detected
in Version
#
Key
Category
Description
94
VNGR17611
Video
Video seen on HDX8006/7006 screen
looks superimposed and blotchy after
changing the video layout to full screen
when connected via H.323 to a
conference running on RMX 2000 with
MPMx at a line rate of 384kbps and
Encryption and LPR options enabled.
V7.0.2
95
VNGR17606
Interoperability
LifeSize systems are sometimes locking
up and disconnecting when connected to
a CP conference running on RMX 4000
with MPM+ at a line rate of 1920kbps,
video quality set to Sharpness and LPR,
Video Clarity and Send Content To
Legacy Endpoint options enabled.
V7.0.2
96
VNGR17602
RMX Manager
Double clicking on a card in Hardware
monitor of the RMX Manager application
displays the Card Properties dialog
instead on the Processor Properties
dialog box.
V7.0.2
97
VNGR17596
Recording
When an Audio Only conference starts,
the recording link does not activate.
V7.0
98
VNGR17589
Interoperability
RadVision Scopia XT1000 is connected
with a problem to a conference running
on RMX 2000 with MPMx at a line rate of
4MB and LPR and Encryption enabled
after viewing the IVR Welcome slide.
V7.0.2
99
VNGR17586
RMX Manager
Selecting to save the Alarms and Faults
to a text file when “Group by MCU” is
selected in RMX Manager results in an
empty text file.
V7.0.2
100
VNGR17566
Content
Chroma shift viewed on Legacy
endpoints when sending content in a
conference running on RMX 2000 with
MPMx at a line rate of 512kbps and the
Send Content to Legacy Endpoint option
enabled.
V7.0.2
101
VNGR17558
Content
Legacy endpoint that connect to a
conference in which Content is already
sent, and the conference layout is set to
Auto Layout the does not see the Legacy
Layout and does not receive content.
V7.0.2
102
VNGR17525
Video
A black vertical line is displayed between
cells where usually there is a border
when OTX and RPX 400 endpoints are
connected to a conference running on
RMX system with MPMx at a line rate of
4MB and video Quality set to Sharpness.
V7.0.2
184
Workaround
* Choose “Group
by MCU” again.
This time the text
is saved to the file.
* Save the file as
XML.
Corrections and Known Limitations
Table 7 Version 7.1 System Limitations
Detected
in Version
#
Key
Category
Description
103
VNGR17514
Video
An empty cell is displayed in the video
layout when muting and then unmuting
individual endpoints that are connected
to the conference as follows: 10 ISDN at
a line rate of 128kbps, 7 HDX 8006 at a
line rate of 4096kbps, 15 HDX 9004at a
line rate of 1024kbps and 15 VSX
384kbps.
V7.0.2
104
VNGR17509
Hardware
During a Real Life 512 kbps conference
an error message appears “no LAN
connection”, although the MPM card with
endpoints remains connected.
V7.0.2
105
VNGR17496
Software
Version
DSP recoveries and asserts occur,
endpoints are disconnected or lose both
audio and video on RMX4000 running
V7.0.1.16 with 4*MPM+80 cards.
V7.0.1
106
VNGR17495
Interoperability
QDX6000 connects with a problem over
H323 to a conference running on RMX
2000 with MPMx at a line rate of 192kbps
or 128kbps, and LPR, Video Clarity and
Send Content to Legacy Endpoints
options enabled.
V7.0.2
107
VNGR17484
Video
Periodic video freezes on H.323
endpoints when connected to a CP
conference running on RMX 1500 at a
line rate of 4096kbps and AES and LPR
options enabled.
V7.0.2
108
VNGR17471
Audio
Loss of audio for 2-3 seconds or bursts of
static noise on HDX6000 endpoint in calls
dialed via DMA to RMX4000 running
V7.0.1.16 with, 4*MPM+80 cards.
V7.0.1
109
VNGR17409
Upgrade
Process
On an RMX 2000 with two MPM cards
when upgrading from version 6.0.2 to
7.0.2, the Software Loading process
remains stuck at 22%.
V7.0.2
110
VNGR17395
Interoperability
During a video conference between 3 ST
client s and a video Desktop endpoint,
zebra video artifacts appear on the
conference layout of all endpoints.
V7.1
111
VNGR17362
Interoperability
When a CMAD-MAC endpoint enters a
conference and then PVX and HDX
endpoints subsequently connect,
endpoint names display and then
disappear leaving cut off fonts and
background shading.
V7.0
112
VNGR17302
Video
Black screen with normal audio occurs
on HDX8002 endpoint that dialed via
DMA to RMX2000 running V7.0.1.16 with
2*MPMX cards.
V7.0.1
Workaround
185
RMX 1500/2000/4000 Release Notes - Version 7.1
Table 7 Version 7.1 System Limitations
Detected
in Version
#
Key
Category
Description
113
VNGR17291
Video
In a Dial-in Meeting Room, endpoints
viewed impaired video and occasionally
received bad audio.
V7.0
114
VNGR17282
Video
In a DMA Dial-in Meeting Room with
several HDX8000 endpoints, video
transmission stopped.
V7.0.1
115
VNGR17272
Video
In a DMA Dial-in Meeting Room with
several endpoints, HDX9004 viewed
distorted video from other endpoints.
V7.0.1
116
VNGR17221
Interoperability
Video from CMA-D participant was not
displayed in call dialed via DMA to
RMX4000 running V6.0.0.105 with
4*MPM+80 cards.
V6.0
117
VNGR17220
Video
Horizontal black lines are displayed
across the video window on all endpoints
in calls dialed via DMA to RMX4000
running V6.0.0.105 with, 4*MPM+80
cards.
V6.0
118
VNGR17215
Video
In a Dial-in Meeting Room with mixed
(HDX8000/9004) endpoints, the
endpoints viewed zebra video.
V7.0.1
119
VNGR17156
Video
In a DMA dial-in Meeting Room with
several endpoints, a few endpoints
viewed Zebra video artifacts.
V7.0
120
VNGR17139
Video
In a DMA 2Mb dial-in conference with
LPR enabled and 20 mixed endpoints
(HDX, VSX, CMAD H323, PSTN), three
DSP video failures occurred and frozen
video was viewed on two HDXs.
V7.0.1
121
VNGR17104
FECC
In a 512 kbps H.323 conference with two
HDX endpoints, FECC is extremely slow.
V7.0
122
VNGR17092
Video
In a 384 kbps Meeting Room with LPR,
Auto Brightness and Video Clarity
enabled, when dial-in VSX and HDX
endpoints connect, the default Welcome
Slide is blacked out.
V7.0
123
VNGR17082
Video
On an RMX 2000/4000 with an Ad hoc
conference when the Avaya 1XC
Softphone and HDX 9004 dial-in to the
conference, they view discoloration in the
upper segment of their video.
V7.0
124
VNGR17070
Interoperability
On an RMX 4000 with MPM+ cards,
when running a 512 kbps conference with
mixed HDX 8000 and VSX 3000
endpoints, audio cuts ON and OFF.
V7.0
186
Workaround
Replace the
default Welcome
Slide
Corrections and Known Limitations
Table 7 Version 7.1 System Limitations
Detected
in Version
#
Key
Category
Description
125
VNGR17062
IVR
When two Avaya 1XC Softphone
endpoints join a conference, the IVR
Service “first to join conference” music
continues to play as if there is just one
person in the conference.
V7.0
126
VNGR17001
Hardware
MPMx card remains in Startup mode
instead of Major state after restoring the
RMX to factory defaults and without
configuring the IP address of the media
card(s) in the Fast Configuration Wizard.
V7.0.1
127
VNGR16997
LPR
LPR is enabled by default in the
conference profile when CP mode is
selected. LPR is disabled by default in
the conference profile when VSW mode
is selected. Changing between CP and
VSW modes causes LPR to be enabled/
disabled.
V7.0
128
VNGR16981
Audio
Audio volume of PSTN audio-only
participants connecting via GW is
approximately three times lower than that
audio volume of video participants.
V6.0
129
VNGR16974
ISDN
Dial-in or dial-out ISDN endpoints do not
connect at line rates higher than
768kbps, irrespective of profile setting.
V7.0
130
VNGR16968
Software
Version
PCM is not supported with MPMx Cards.
V7.0
131
VNGR16963
IVR
In a 384 kbps conference with IVR, LPR
and Sharpness enabled, when
dialing-out to a VSX3000 endpoint, the
default Welcome Slide does not appear.
V7.1
132
VNGR16958
Video
During a 128kbps conference with AES,
Gathering, Motion, Send Content to
Legacy Endpoints and Auto Layout
enabled, empty layout cells, poor video
and video stills occur in HDX, VSX,
Lifesize endpoints.
V7.0
133
VNGR16955
Interoperability
iPower 9000 endpoint in H.323 call with
RMX with MPM+ or MPMx does not
transmit audio in encrypted calls.
V7.0
134
VNGR16954
Upgrade
Process
On an RMX4000 after upgrading to
version 7.0, build 148, the RMX “Could
not complete MPM Card startup
procedure”.
V7.0
135
VNGR16944
Software
Version
Conferences at 768 and 1024 kbps with
Gathering enabled may display distorted
font and discolored background at
432x240, 512x288, 848x480 and
720x400 resolutions.
V7.0
Workaround
187
RMX 1500/2000/4000 Release Notes - Version 7.1
Table 7 Version 7.1 System Limitations
Detected
in Version
#
Key
Category
Description
136
VNGR16938
Interoperability
Using Tandberg MXP endpoints, artifacts
and choppy occur in video for 10 seconds
after 1mbps H.323 or SIP connection to
RMX 1500.
V7.0
137
VNGR16935
Audio
On RMX 1500, running 384kbps
conference, an endpoint connected with
##FORCE_MEDIA_ASIREN14_24K or
##FORCE_MEDIA_ASIREN14_32K
connects with ASIREN14_48K audio
algorithm. An endpoint connected without
force connects using G.711 audio
algorithm.
V7.0
138
VNGR16928
ISDN
On RMX 1500, dial out from 256kbps
conference to ISDN endpoint forced to
1920 kbps displays green screen and
disconnects with “Internal MCU
Problem”.
V7.0
139
VNGR16924
Interoperability
In DMA, when a SIP endpoint is
connected to a certain MCU, and the
user chooses to stop using it, the call is
routed to a different MCU while the call
rate is reduced by 64k.
V7.0
140
VNGR16919
Audio
On RMX with MPMx using H.323 with
HDX endpoint, sites receive Siren14
instead of Siren22 Stereo audio algorithm
in 6Mbps VSW conferences.
V7.0
141
VNGR16901
Software
Version
On RMX 1500 Video Preview is preceded
by a green screen momentarily before
Video Preview starts.
V7.0
142
VNGR16894
Software
Version
When the privacy shutter of a VVX1500
endpoint is closed, a mosaic is displayed
instead of a black screen.
V7.0
143
VNGR16889
Interoperability
On RMX 1500 Video Preview - View
Participant Received Video of VSX3000
endpoint is displayed as a green screen.
Problem occurs at 384kbps, feature
works correctly at higher call rates.
V7.0
144
VNGR16886
Upgrade
Process
On an RMX 1500/2000/4000 with MPMx
cards, when upgrading to version 7.0 to
build 139 and implementing the
Diagnostic mode the MPMx card status
remains in a “startup” phase.
V7.0
188
Workaround
Corrections and Known Limitations
Table 7 Version 7.1 System Limitations
Detected
in Version
#
Key
Category
Description
145
VNGR16880
Video
On an RMX 2000 with MPM+ cards,
during an mixed ISDN & IP 4096kbps
conference with Auto Terminate,
Encryption, LPR, Sharpness, Auto
Layout, Same Layout and Video Clarity
enabled, after connecting HDX & VSX
and muting and unmuting them, HDX
endpoints encounter flickering video.
V7.0.2
146
VNGR16877
Interoperability
Avaya 1XC Softphone endpoints
connected to conference on RMX do not
receive content, while HDX endpoints do.
V7.0
147
VNGR16871
Software
Version
In 384kbps conference on RMX with
MPMx, HDX endpoint's “Used Call Rate”
is approximately 100kbps lower than
expected.
V7.0
148
VNGR16867
Software
Version
On RMX 1500 with MPMx, when the
endpoint displayed in the large video
window in 2+8 layout disconnects, the
large video window is not re-allocated to
another endpoint.
V7.0
149
VNGR16861
General
On an RMX 2000 with 2 MPM+80 and 2
RTM ISDN Cards (5 T1/PRI connecting
to each RTM ISDN card), only 70 CIF dial
out endpoints can connect to the 128
kbps conference.
V7.0
150
VNGR16859
Software
Version
On RMX 1500 some endpoints display
green flickering screen on layout change
from 4x4 to 1x1.
V7.0
151
VNGR16841
Interoperability
Connect to the network using VPN and
then start a conference with LPR
enabled, connect endpoints using CMAD,
the video of the endpoints was very
fragmented.
V7.0
152
VNGR16839
SIP
On RMX with MPMx in High-Profile
Motion conference at 512kbps, HDX
endpoints connected via SIP only
transmit H.264 HP / 4SIF at 15 frames
per second.
V7.0
153
VNGR16825
Interoperability
Using RMX 2000 with MPMx, H.320 call
to VSX8000 endpoint fails with Call
Disconnection Cause listed as “No net
connection - 0 “.
V7.0
154
VNGR16817
Upgrade
Process
After upgrading to version 7.0.0.135 the
RMX Web Client shows that RMX is no
longer in the “Startup” phase even though
Faults list states: “Configuring”.
V7.0
Workaround
189
RMX 1500/2000/4000 Release Notes - Version 7.1
Table 7 Version 7.1 System Limitations
Detected
in Version
#
Key
Category
Description
155
VNGR16810
Interoperability
On an RMX 1500 set to the Flexible
mode and running an HD720p 2Mb
conference with IVR, Gathering, High
Profile, and Audio Clarity enabled, 15
PVX, HDX, VSX 300, 7000 CMAD
endpoints cannot change layouts when
DTMF codes are used.
V7.0
156
VNGR16809
Software
Version
DTMF Code *71 (Secure Conference)
sent to RMX 1500 displays Gathering
Slide Text instead of “Secured” indicator
text.
V7.0
157
VNGR16807
Content
Bad audio quality experienced on PVX
endpoint while it sends content when
connected to RMX 1500.
V7.0
158
VNGR16806
Interoperability
On RMX 1500, a macro block is
displayed in the large video window of
the video layout when PVX endpoint is
the speaker.
V7.0
159
VNGR16798
Software
Version
Medium volume horn-like sound heard
for several minutes on HDX4000
endpoint connected to RMX 4000 with
MPM+ via DMA Meeting Room.
V7.0
160
VNGR16794
Audio
On RMX 4000 with MPM+, G.728 codec
isn't declared 1st codec in conference at
96kbps.
V7.0
161
VNGR16793
General
On an RMX 2000 with MPM+, start an
4096kbps 1x1 Layout conference from a
template with Encryption, LPR, Auto
Termination, Sharpness, Same Layout,
Audio Clarity enabled, an “mcu internal
problem: 32212" message appears in
conference properties - connection status
tab.
V7.0
162
VNGR16791
Interoperability
In a 1024kbps conference with Auto
layout, Sharpness, AES, H.239 Content
to Legacy Endpoints and LPR enabled,
Lifesize endpoints encounter poor video.
V7.0
163
VNGR16785
Hardware
Run 8 512kbps conferences and connect
to each conference 2 H.323, 2 SIP, 1
ISDN, 1 PSTN & 1 VOIP endpoints,
change the conference layout on each,
when terminating the conferences an
“MCU Internal Problem 50020" occurred
on the MPMx cards.
V7.0
190
Workaround
Corrections and Known Limitations
Table 7 Version 7.1 System Limitations
Detected
in Version
#
Key
Category
Description
164
VNGR16782
Video
On an RMX 1500 with a 348 kbps CIF CP
conference, with Motion, Echo
Suppression and Auto Layout enabled,
when adding 45 VSX and V500
endpoints, VSX8000 endpoints
connected using incorrect resolutions
and video stills were encountered.
V7.0
165
VNGR16780
HD
During VSW conference at 720p60p
resolution using direct connections or via
DMA, endpoints display only their own
video.
V7.0
166
VNGR16776
Interoperability
Undefined HDX endpoint cannot be
added to the Address Book on RMX with
Avaya Call Manager. Second attempt
yields message that participant name
already exists in Address Book.
V7.0
167
VNGR16757
RMX Manager
When starting a new conference from a
conference template, the new conference
is not selected or highlighted in the
conferences pane.
V6.0
168
VNGR16754
Diagnostics
On an RMX 4000 in the Diagnostic mode
when pressing the menu reset button the
following message appears: “connection
with shelf management is lost, please log
in again”. You can only exit the
Diagnostic mode after physically turning
the RMX Off and On.
V7.0.2
169
VNGR16752
Upgrade
Process
On the RMX 2000/4000 with an ISDN
card installed, after configuring the IP
Fast Configuration Wizard, the system
requests a reset and not to configure the
ISDN Service.
V7.0
170
VNGR16751
General
When creating a second conference with
a display name that is already used by
another conferencing entity, the
conference properties dialog box
re-opens with a redundant check box
next to the routing name field.
V7.0
171
VNGR16745
General
In the RMX manager 7.0, the “new
conference” icon suddenly appears in the
conferences properties window.
V7.0
172
VNGR16742
Diagnostics
On an RMX2000 with MPMx_D cards
when performing an Power ON Self Test
(POST), the MPMx card runs the card
monitoring test in an endless loop.
V7.0
173
VNGR16737
Interoperability
On an RMX 4000 with an MPM+ card,
LifeSize does not transmitting or
receiving video during a SIP 1920kbps
conference call.
V7.0
Workaround
191
RMX 1500/2000/4000 Release Notes - Version 7.1
Table 7 Version 7.1 System Limitations
Detected
in Version
#
Key
Category
Description
174
VNGR16724
Video
On RMX 1500, video display freezes
momentarily during Video Layout
changes before the new Video Layout is
displayed.
V7.0
175
VNGR16722
Video
On RMX 2000 with one MPM-H, small
artifacts are displayed in the Gathering
Slide when the configuration is changed
to Presentation Mode during the
Gathering Phase.
V7.0
176
VNGR16708
Video
The displayed resolution of the gathering
slide differs between H.323 participant
(432x240) and H.320 participant
(480x352) when both endpoints are
connected to a CP conference running at
a line rate of 384kbps with video quality
set to Motion and LPR is enabled. Once
the Gathering phase ends, all participants
connect with 2SIF resolution.
V7.0
177
VNGR16674
SIP
In ICE environment, when connecting
endpoints from all NAT environments
(corporate/branch/federated) to an
encrypted CP conference running at a
line rate of 2Mbps, video quality set to
sharpness, and video clarity and auto
layout are enabled, some of the
endpoints fail to connect due to
TB_MSG_OPEN_PORT MCU internal
problem or SIP HW MCU internal
problem.
V7.0
178
VNGR16663
SIP
In ICE environment, when connecting
endpoints from all NAT environments
(corporate/branch / enterprise) to an
encrypted, 720p VSW conference,
running at a line rate of 2M bps with video
quality set to sharpness and video clarity
and auto layout enabled, endpoints fail to
connect to the conference with a
disconnection cause “SIP request timed
out”.
V7.0
179
VNGR16657
Video
In a 4MB HD1080p conference with
Content, Video Clarity, Auto Termination,
Encryption, LPR, Echo Suppression and
Auto Layout enabled, when dialing out to
six HDX8006 endpoints and changing the
speaker, all endpoints had bad video.
V7.0
192
Workaround
To overcome the
problem do one of
the following:
* Connect the
endpoints one by
one.
* Run a non
encrypted 2M
VSW conference
* Run the
conference at a
lower line rate
(768kbps)
Corrections and Known Limitations
Table 7 Version 7.1 System Limitations
Detected
in Version
#
Key
Category
Description
180
VNGR16650
Interoperability
In a 384kbps SIP conference with Auto
Layout, Sharpness, Video Clarity,
Gathering and Send Content to Legacy
Endpoints enabled, when the RMX blast
dial-out all types of endpoints, the
VSX7000 and VSX8000 sites display
video stills throughout the conference.
V7.0
181
VNGR16646
Interoperability
In a conference started from the default
Profile, when the RMX dials-out to an
H.320 iPower 9000 endpoint, the
endpoint's video layout is shifted to the
bottom right of the monitor with black
borders on the left and top of the screen.
V7.0
182
VNGR16644
Interoperability
In a conference started from the default
conference profile, when the RMX
dials-out to the H.323 iPower 9000
endpoint, it views the IVR welcome
screen for about 40 seconds before
viewing conference video.
V7.0
183
VNGR16643
Interoperability
A conference started from the default
video conference, an H.320 Sony
PCS-G50 endpoint transits the Entry
Queue and when accessing the
conference it connects with no video.
V7.0
184
VNGR16642
ISDN
On RMX 1500 running a conference
started from a conference profile, when a
ViewStation MP512 ISDN endpoint
connects, an error message appears:
“Connected With Problem”.
V7.0
185
VNGR16625
General
Sometimes when upgrading to version
7.0 and resetting the RMX 2000, an
active alarm “CPU slot ID not identified McuMngrCPU board id was not received
from Shelf Manager” is displayed.
V7.0
186
VNGR16624
General
In the RMX Manager, when attempting to
upgrade two RMX simultaneously, the
Install Software window only appears for
one RMX, when you should view both.
V7.0
187
VNGR16617
IP
When CMAD endpoint running on
Lenovo R61connects to a Meeting Room
whose Line rate is 1024 kbps, Video
quality is set to Motion, Content is set is
Hi Res Graphics and LPR, Same Layout
and Echo Suppression option are
enabled, after few minutes in the
conference the CMAD observes packet
loss in the People Rx although QoS is
enabled.
V7.0
Workaround
193
RMX 1500/2000/4000 Release Notes - Version 7.1
Table 7 Version 7.1 System Limitations
Detected
in Version
#
Key
Category
Description
188
VNGR16610
General
The Column width displayed in Web
Client and in the RMX Manager UI need
to be made broader.
V6.0,
V5.0.1,
V5.0.0,
V4.6.1,
V7.0
189
VNGR16607
Gateway
When a Gateway call is started from a
video endpoint (CMAD or HDX) and
endpoints connect to the conference, SIP
endpoints view a blurry gathering slide
with artifacts.
V7.0
190
VNGR16604
Gateway
In a Gateway call started from a video
endpoint (CMAD or HDX) when other
endpoints connect, the endpoint that
initiates the call initially views the
Gathering slide but then it disappears.
V7.0
191
VNGR16600
General
On an RMX2000 & MPMx card running a
mixed H.323 & SIP 1920kbps conference
with AES, Sharpness and Gathering
enabled, when the RMX dials-out to 10
endpoints, the border layouts are
“speckled” and miss their edges.
V7.0
192
VNGR16595
Interoperability
On an RMX 4000 & MPM+ cards,
running an 1920kbps conference with
Video Clarity, Auto Terminate, Video
Quality, Sharpness, Encryption, LPR,
Echo Suppression, Auto Layout,
Gathering and Content for Legacy
Endpoints enabled, when connecting 20
HDX, Tandberg 17000 and edge95 MXP
& 3 Tandberg C series endpoints an MFA
card error occurs.
V7.0
193
VNGR16582
General
On an RMX 2000 & MPM+ cards,
running an 384kbps CIF conference, with
Auto Terminate, Encryption, LPR, Echo
Suppression, Sharpness and Same
Layout enabled, when sending content
from an HDX to 160 other endpoints, an
“Software assert failure” appeared.
V7.0
194
VNGR16581
General
On an RMX 2000 & MPM+ cards,
running an 384kbps CIF conference, with
Auto Terminate, Encryption, LPR, Echo
Suppression, Sharpness and Same
Layout enabled, when sending content
from an HDX to 160 other endpoints, an
“Software assert failure” appeared.
V7.0
194
Workaround
Corrections and Known Limitations
Table 7 Version 7.1 System Limitations
Detected
in Version
#
Key
Category
Description
195
VNGR16562
Gateway
Gateway sessions are always running in
CP mode. If Video Switching is selected
in the Profile, the system will change it to
CP mode, using the closest possible
video settings. However, 60fps may not
be supported in CP mode for the selected
line rate.
V7.0
196
VNGR16560
General
After log-in to the RMX 1500 Web Client,
a Microsoft .NET Framework error
message appears.
V7.0
197
VNGR16556
IVR
In a mixed H.323 & SIP 128kbps
conference with Gathering, Sharpness
and the Welcome Slide defined as “High
Profile optimized”, when connecting
HDX8000 endpoints, the H.323 HDX
video has artifacts on the Gathering slide.
V7.0
198
VNGR16539
IVR
In a mixed H.323 & SIP 128kbps
conference with Video Clarity,
Sharpness, IVR Service and Welcome
Slide settings set to “High profile
optimized”, when connecting HDX 8000
endpoints, the H.323 HDX endpoint does
not view the IVR slide but a black screen
for 15 seconds.
V7.0
199
VNGR16537
Hardware
On the RMX 1500 when the RMX is in a
“Diagnostic Mode” the listed slot numbers
of the modules are incorrect.
V7.0
200
VNGR16535
SIP
SIP HDX sites (Version 2.6.1 and 2.6.0)
receive video in resolution of 432x240
instead of 720p when connecting to a CP
conference running on RMX 4000 at a
line rate of 1920kbps with 10+ layout
selected and LPR is enabled.
V7.0
201
VNGR16529
General
After Restoring Factory Defaults on the
RMX and defining the IP Network
Service, after RMX restart the MCU Host
Name parameter appears empty in the
“Management Network - DNS” tab.
V7.0
202
VNGR16523
FECC
On the RMX 1500 running a mixed H.323
& SIP 384kbps conference, when
connecting an Tandberg SIP endpoint,
FECC does not work.
V7.0
203
VNGR16471
Software
Version
Extraneous MCMS version number is
displayed in the detailed faults list.
V7.0
204
VNGR16466
Software
Version
On RMX 2000 with MPM, “MCU Internal
Problem - 32112" occurs during mini-load
smoke on MPM when 20 video
participants are connected at 384kbps.
V7.0
Workaround
195
RMX 1500/2000/4000 Release Notes - Version 7.1
Table 7 Version 7.1 System Limitations
Detected
in Version
#
Key
Category
Description
205
VNGR16462
Upgrade
Process
When downgrading to software
V6.0.0.105 and performing
“Comprehensive restore” to Factory
default, followed by upgrade to version
V7.0.0.115 the upgrade procedure is
stuck in “Software Loading” phase.
System Reset (hard or soft) is required to
resolve the problem.
V7.0
206
VNGR16460
Software
Version
On RMX 2000 with MPMx, H.261
endpoint that displays the default slide
does not access nor display a new slide
that is added to the IVR Service.
V7.0
207
VNGR16429
Software
Version
On RMX with Operator Conference
selected in profile, when trying to delete a
running conference, the popup message
is displayed in mixed English and
Japanese.
V7.0
208
VNGR16427
Software
Version
On RMX 1500 with two conferences
running and Legacy Content enabled,
line artifacts are displayed in the middle
of the CMAD screen after it is
disconnected from the first and
reconnected to the second conference.
V7.0
209
VNGR16422
Software
Version
RMX 2000 logs off during upgrade
procedure when network is under stress.
V7.0
210
VNGR16387
Interoperability
On an RMX2000 with the MPM+ card,
when connecting with an HDX9000
endpoint to the Entry Queue using a line
rate of 384kbps, the IVR slide blinks.
V7.0
211
VNGR16383
Interoperability
On the RMX2000 with an MPMx card in a
512kbps conference with High Profile,
Gathering, IVR, Echo Suppression
enabled and resources set to a Flexible
Mode, when dialing-out using H.261,
connection problems are encountered in
VSX endpoints after about 10 seconds.
V7.0
212
VNGR16378
Interoperability
In a SD conference (1024 resolution) with
motion, auto layout enabled, when
connecting HDX and dial in from Life Size
endpoint, the endpoints do not connect in
SD with 60 FPS as required.
V7.0
213
VNGR16377
General
On an RMX with MPM+ card, when
starting a VSW conference from the
Profile, the maximum line rate that can be
selected is 6144kbps.
V7.0
196
Workaround
When the network
is busy, use the
RMX Manager
application instead
of the RMX Web
Client to control
the MCU.
Corrections and Known Limitations
Table 7 Version 7.1 System Limitations
Detected
in Version
#
Key
Category
Description
214
VNGR16363
Interoperability
On the RMX2000 with an MPMx card,
when starting a new a 2MB conference,
iPower endpoints take a long time to
connect.
V7.0
215
VNGR16313
IVR
On an RMX2000 with an MPMx card
running a 512kbps conference with
Gathering, IVR, Echo Suppression
enabled and resources set to a Flexible
Mode, when dialing out using H.261 the
IVR slide flashes.
V7.0
216
VNGR16301
ISDN
After starting a VSW conference with
LPR enabled, when dialing out using
ISDN a message appears: “SIP cannot
connect to VSW with LPR enabled”
V7.0
217
VNGR16297
Interoperability
CMAD receives distorted video while
calling to RMX.
V7.0
218
VNGR16296
General
The Host name is not defined in the Fast
Configuration Wizard during the initial
system configuration. Therefore when
trying to configure either the “Control” or
the “Shelf” IP address (or both), the error
message “Invalid Host Name” is
displayed when clicking OK.
V7.0
219
VNGR16283
General
In a conference with a few participants,
when opening the video preview pane
and previewing the next participant
without closing the pane, the pane
becomes minimized, and does not show
video of the next participant.
V7.0
220
VNGR16281
Content
Content sent from HDX (in H.264) is
automatically stopped when a second
participant that does not support H.264
Content (for example, CMAD that only
supports H.263) joins the conference.
When the content is sent again, the
Content protocol is H.263+ to enable all
conference participants to receive
content.
V7.0
221
VNGR16264
ISDN
During a conference the ISDN line is
functional but the line has no clock
source.
V7.0
222
VNGR16239
Cascading
Create two 384kbps cascaded
conferences with LPR enabled, when
creating the dial-out Master link to the
second conference is only partially
connected.
V7.0
Workaround
197
RMX 1500/2000/4000 Release Notes - Version 7.1
Table 7 Version 7.1 System Limitations
Detected
in Version
#
Key
Category
Description
223
VNGR16237
General
Connect to an RMX as Operator using
the RMX Manager. Then connect an
Administrator to same RMX the following
message appears: “cannot login to MCU
x.x.x.x with the user name and password
entered”.
V7.0
224
VNGR16215
Upgrade
Process, Video
Create conference set to High Profile and
connect Durango endpoints, the Durango
and HDX8000 Video preview is in a
green color.
V7.0
225
VNGR16210
RMX Web Client
On an RMX 1500 with a conference and
connected participants, when multiple
web clients are opened on different PC's
and Video Preview is activated, when
opening another browsing session and
viewing Video Preview, all the browsers
close though some view a “failure status”
message.
V7.0
226
VNGR16203
Content
In a 768 kbps Meeting Room with LPR,
Echo Suppression, Auto layout and
Motion enabled when the first to join the
Meeting room sends content, the second
participant to join views a black screen.
V7.0
227
VNGR16120
General
Saving to a Conference Template a
conference in which the Message
Overlay is enabled, automatically
enables the message overlay option in
the conference that is started from this
template.
V7.0
228
VNGR16103
General
After running diagnostics on the RMX,
LED functionality is not documented.
V7.0
229
VNGR16050
Video
When using the MPMx card to run a
conference with Auto Brightness
enabled, no difference can be seen in the
video between a light and darkened
room.
V7.0
230
VNGR16044
General
After downloading and opening an
auditor file of the MPMx, the MPMx name
appears as MPM_PLUS.
V7.0
231
VNGR15953
General
When copying and pasting conferences
based on a Profile, the pasted
conference is added to conference
templates.
V7.0
232
VNGR15939
Interoperability
In a “Fixed resource Capacity” mode,
Legacy endpoints can still receive
content when they should not.
V7.0
198
Workaround
Corrections and Known Limitations
Table 7 Version 7.1 System Limitations
Detected
in Version
#
Key
Category
Description
233
VNGR15937
Interoperability
In a conference with
HDX8006A,HDX8006B,HDX9000,VSX7
000 and ViewStation512 endpoints, the
site names of the ViewStartion endpoints
are switched.
V7.0
234
VNGR15935
Gateway
In the RMX Web Client, when creating a
new gateway profile and setting the
Gateway ID to “#1234” then click OK, no
confirmation message appears.
V7.0
235
VNGR15906
Interoperability
In a 384kbps conference with no IVR and
resources set to a Fixed Mode when
connecting SIP/H.323 HDX & PV dial-in
and dial-out endpoints, the SIP receives
bad video.
V7.0
236
VNGR15837
General
In 768kbps conference set to AES, CP,
Full Layout and two HDXs Chairperson,
when the SIP HDX invokes PCM Camera
Control only segmented video can be
seen.
V7.0
237
VNGR15831
IVR
When uploading a number of high and
low resolution slides to an IVR service,
there is only option to choose one slide.
V7.0
238
VNGR15822
Software
Version
When PCM is activated in a
Gathering-enabled conference, the PCM
menu is displayed on top of the gathering
slide instead of the display of the
Gathering Slide being terminated before
the PCM menu is displayed.
V7.0
239
VNGR15798
Partners Microsoft
In ICE environment, a green overlay is
displayed on top of one of the video
layout in the Gathering slide when a dial
out MOC or HDX endpoint connect to the
conference.
V7.0
240
VNGR15757
Software
Version
Initiating PCM when there is only one
endpoint connected to a conference that
is receiving music results in the music
being interrupted.
V7.0
241
VNGR15755
General
During an active Telepresence
conference, when clicking the Video
Settings tab, the “Telepresence Mode
enabled” check box appears to indicate
the status of the Telepresence Mode.
V7.0
242
VNGR15746
General
When downloading and installing version
7.0, the Download window lists version
6.0.
V7.0
243
VNGR15738
Video
When monitoring a conference and
right-clicking a participant, the
participant's video and audio freezes.
V7.0
Workaround
199
RMX 1500/2000/4000 Release Notes - Version 7.1
Table 7 Version 7.1 System Limitations
Detected
in Version
#
Key
Category
Description
244
VNGR15737
General
In the Resolution Configuration Slider,
the CIF30 slider is absent from the UI.
V7.0
245
VNGR15724
Software
Version
On RMX with MPMx, when a skin without
background is selected, the Polycom skin
background is displayed. When a skin
with a background is selected, the
speaker notation color is incorrect.
V7.0
246
VNGR15718
General
Incorrect disconnection cause after
pulling LAN cable from RMX. The
endpoints reports that the “call close
normal”.
V7.0
247
VNGR15707
ISDN
An RMX 4000 with a 384K H.320
conference with Motion and AES
enabled, when a Tandberg 6000 MXP
connects, the endpoint encounters video
freezes.
V7.0
248
VNGR15700
Software
Version
When PCM is initiated, site names are
displayed over the PCM menu.
V7.0
249
VNGR1569
CDR
When the conference termination time is
changed, the CDR is not updated.
V1.0.0
250
VNGR15649
Interoperability
In a continuously running conference,
after disconnected two HDX7000 and
VSX7000 endpoints, the HDX4000
endpoint's video freezes.
V7.0
251
VNGR15637
General
After creating a conference template with
6 participants, when adding and
removing participants to a conference the
template does not update.
V7.0
252
VNGR15553
General
On an RMX 2000 with MPMx cards,
during startup a list of error appears.
V7.0
253
VNGR15541
Video
Create a conference on the RMX using
the default factory video profile, connect
a Sony PCS-G50 endpoint, and then try
to control the XG80's camera. There is
no response.
V7.0
254
VNGR15523
Partners Microsoft
Primary and Secondary dial in numbers
entered in the Polycom Conferencing
Add-in to Microsoft Outlook are always
displayed on the Gathering slide (during
the gathering phase) for reference, even
if the participant connected using the
invitation link.
V6.0
255
VNGR15386
Software
Version
Artifacts present in the Gathering Slide in
2560kbps, CP conference with Motion
selected.
V7.0
200
Workaround
Corrections and Known Limitations
Table 7 Version 7.1 System Limitations
Detected
in Version
#
Key
Category
Description
256
VNGR15366
General
Sometimes when Restore Factory
Defaults is performed, the active alarm
“CPU slot ID not identified- McuMngrCPU
board id was not received from Shelf
Manager” is displayed.
V7.0
257
VNGR15324
Software
Version
o When monitoring a CP conference with
5 or more endpoints from 5 Web Client
sessions on separate workstations, Video
Previews can be opened from 4
workstations. Attempting to open a fifth
Video Preview causes an error “Failed to
Preview Video: Failure Status” instead of
“The Preview cannot be displayed. The
maximum number of previews per MCU
has been reached.”
V7.0
258
VNGR15320
General
Saving to a Conference Template a
conference in which the Message
Overlay is enabled, automatically
enables the message overlay option in
the conference that is started from this
template.
V7.0
259
VNGR15281
Interoperability
Aethra VegaStar Gold endpoint, when
connecting via ISDN to 384kbps
conference creates CDR Event Participant status “Connected with
problem”.
V7.0
260
VNGR15256
Encryption
In a conference with an IVR Service with
endpoints, when using DTMF (*71/#71/
*88) codes to secure/unsecure the
conference there is no text/icon
indication.
V7.0
261
VNGR15155
Video
In a conference with a line rate of
4096kbps, set to Sharpness, 1+5 layout,
after connecting a few endpoints, when
an endpoint dials out, video In & Out
freeze.
V7.0
262
VNGR15131
IVR
In a conference started from a Profile,
when an ISDN call is forced to Audio
algorithm G722_1_C_24k a buzzing
noise can be heard before the IVR starts.
V7.0
263
VNGR15101
IVR
In a Video Switched 4Mbps conference,
only the last part of DTMFs *6 (mute) and
#6 (unmute) messages are heard.
V7.0
264
VNGR14840
Encryption
No video is seen and the Aethra
VegaStar Gold endpoint remains
connected with a problem when
connecting over H320 to an encrypted
conference at a line rate of 384kbps.
V6.0
Workaround
201
RMX 1500/2000/4000 Release Notes - Version 7.1
Table 7 Version 7.1 System Limitations
Detected
in Version
#
Key
Category
Description
265
VNGR14780
Interoperability
RMX4000 using 4Mb, Same Layout,
Sharpness, Video Clarity in profile and
Entry Queue becomes inaccessible when
called via an Entry Queue from H.323
LifeSize endpoint.
V6.0
266
VNGR14778
RMX Web Client
ISDN/PSTN fields are disabled (grayed
out) although Enable ISDN/PSTN Dial-in
check box is selected in RMX
Management > Entry Queues > Default
EQ.
V6.0
267
VNGR14767
General
H.323 party disconnect due to MCU
Internal Problem 32212.
V6.0
268
VNGR14720
Upgrade
Process
After software Upgrade is completed, an
Active Alarm “Connection to Exchange
Server failed” appears in the Alarms List
on the RMX4000.
V6.0
269
VNGR14688
General
When a conference is deleted in the RMX
Manager, conference participants are not
deleted in the participants list.
V6.0
270
VNGR14687
Audio
When connecting 800 VOIP using 4
Entry Queues and 396 Ad Hoc
conferences, when adding Dial out
participants to the conferences they could
connect. An MCU error message
appears: MCU INTERNAL PROBLEM 65012.
V6.0
271
VNGR14667
General
When defining a New Profile in the Video
Settings tab and selecting a Layout, in
the Conference Profiles list there is no
indication of the selected layout and the
layout icon is missing.
V6.0
272
VNGR14624
General
After changing the conference profile
assigned to a conference template that
includes participants, some of these
participant are randomly deleted from the
conference template.
V7.0
273
VNGR14578
Audio
On an RMX with a license for 800 audio
only participants, a disconnection cause
always occurs after connecting the 767th
participant.
V6.0
274
VNGR14386
RMX 4000
Display information for Slot 5, FSM
(Fabric Switch Module), in the RMX 4000
Hardware Monitor is incomplete.
V5.1
275
VNGR14175
RMX Manager
When using the RMX Manager, a
Message Alert “500” is displayed when
an RMX running Version 4.6 is selected
in the MCU's list.
V6.0
202
Workaround
Corrections and Known Limitations
Table 7 Version 7.1 System Limitations
Detected
in Version
#
Key
Category
Description
276
VNGR14159
General
Operator assistance function is blocked
when the TelePresence mode is enabled.
V6.0
277
VNGR14151
General
A Shelf Voltage problem is always
displayed in the System Alerts pane
regardless of the actual status.
V6.0
278
VNGR14124
Video
On rare occasions in 2Mbps ISDN calls,
ISDN participants connected without their
endpoints sending video for a few
seconds.
V6.0
279
VNGR14062
General
On a fully loaded RMX 4000, endpoint
may disconnects with Call Disconnection
Cause stated as “MCU internal problem 11122".
V6.0
280
VNGR14047
Interoperability
Artifacts appear on LifeSize
_RM1_4.5.1(15) endpoint connected via
SIP or H.323 to a 2Mbps conference with
Video Quality set to “Sharpness” running
on the RMX 2000 in MPM mode. The
LifeSize endpoint is using 4SIF 30
resolution while Polycom endpoints are
using 720*400 resolution.
V6.0
281
VNGR13951
RMX Manager
On the RMX 2000/4000, on the RMX
Manager - IP Network Service, open the
Properties window and then click
Management Network, the Management
Network pane UI remains offset.
V5.0.1
282
VNGR13832
RMX Manager
When the RMX is in an Ultra Secure
Mode, the RMX Manager window
appears “Maximized”. After changing the
layout settings, after re-login the latest
settings are not implemented.
V5.0.1
283
VNGR13729
Unified
Communication
Solution
When connecting from a MOC endpoint
using the link sent in the meeting
invitation to an ongoing conference that
was scheduled via the Polycom add-in
for Microsoft Outlook on the RMX 4000
(standalone) with Gathering and
Recording enabled, the conference is not
started as a Meeting Room/Conference
Reservation or ongoing conference with
the same name already exist in the MCU.
V6.0
284
VNGR13314
Partners Microsoft
When resetting the RMX after loading the
certificate and registering the RMX with
the OCS, two active alarms appear: “SIP
registration transport error” and “No
response from Registration server”.
V6.0
285
VNGR13152
Video
Message overlay is limited to 32 Chinese
characters OR 96 ASCII characters.
V4.6
Workaround
203
RMX 1500/2000/4000 Release Notes - Version 7.1
Table 7 Version 7.1 System Limitations
Detected
in Version
#
Key
Category
Description
286
VNGR13001
Video
Video display freezes momentarily with
every speaker or layout change in a
conference with HDX and SVX
endpoints.
V4.6
287
VNGR12732
Upgrade
Process
After upgrading the system from version
5.0 to version 4.6, the Users list is
deleted and the default POLYCOM User
is created. For security reasons, it is
recommended to delete this User and
create your own User.
V4.6
288
VNGR12415
Interoperability
In a conference running at a line rate of
1728 kbps set to Same Layout, when
PVX/VSX7000 participants connect in
CIF264/263, an error message appears.
V4.6
289
VNGR12373
Interoperability
HDX endpoint connected via H.320 does
not receive Content from Tandberg MXP
endpoint connected via H.323.
V5.0.0
290
VNGR12372
Interoperability
Tandberg 6000 E and B series, H.320
endpoints do not connect to conferences
when encryption is enabled.
V5.0.0
291
VNGR12369
Interoperability
Tandberg C20 endpoint periodically
displays fast updates in HD1080p
conferences.
V5.0.0
292
VNGR12355
Interoperability
DST K60 endpoint receives tiled video
from HDX9004 endpoint during H.323
conference.
V5.0.0
293
VNGR12266
Interoperability
Tandberg MXP endpoint receives
ghosted video from HDX9004 endpoint
during H.323 conference.
V5.0.0
294
VNGR12257
RMX Web Client
When upgrading the RMX Web Client
with software changes, Internet Explorer
needs to be closed and opened before
the upgrade can take place.
V5.0.0
295
VNGR12202
Encryption
Rarely, in an encrypted conference,
H.323 encrypted dial-in and dial-out
participants cannot connect and an
assert appears
(File:EncryptionKeyServerManager.cpp).
V5.0.0
296
VNGR12178
Content
RMX does not support H.264 Content in
ISDN calls.
V5.0.0
204
Workaround
Set the system flag
SEND_WIDE_RE
S_TO_IP to NO to
force the system to
send 4CIF.
Corrections and Known Limitations
Table 7 Version 7.1 System Limitations
Detected
in Version
#
Key
Category
Description
297
VNGR12177
Interoperability
In a conference with AES, LPR and
Video Clarity enabled, H.320 Tandberg
MXP endpoints connect with resolution of
960x720, while identical H.323 MXP
endpoints connect with resolution of
720p.
V5.0.0
298
VNGR12172
RMX Web Client
In the RMX Web Client, the main window
opens up as full screen and cannot be
resized.
V5.0.0
299
VNGR12116
General
When a participant is moved from one
conference to another and becomes the
single participant in the destination
conference, the participant does not hear
music.
V5.0.0
300
VNGR12100
General
Occasionally, after upgrading to version
5.0 (from 4.0.3, 4.1.0, 4.1.1), the soft
reset fails.
V5.0.0
301
VNGR12034
ISDN
In a conference running at a line rate of
384 kbps, H.320 encrypted participant
cannot connect and an assert appears.
V5.0.0
302
VNGR12033
General
Rarely a system error
(BridgePartyVideoOut.cpp, Line:1458,
Code:1701.; DEBUG-ASSERT:) is written
to the log file if a change is made to the
conference layout while participants are
disconnecting.
V5.0.0
303
VNGR12031
IVR
A conference running at a line rate of
1920kbpsand IVR Service that includes a
Welcome Slide, both the Welcome Slide
and Video are partially blacked out.
V5.0.0
304
VNGR12011
ISDN
Occasionally, an ISDN participant fails to
connect to the conference due to the
following error - “MCU internal problem 50020".
V5.0.0
305
VNGR12007
ISDN
Occasionally, when ISDN participants
connect to a conference with line rate
384kbs, multiple asserts appear in the log
file.
V5.0.0
306
VNGR12006
SIP
With SIP defined and undefined dial-in
participants you cannot change the layout
type from “conference layout” to
“personal layout”.
V5.0.0
307
VNGR11987
General
When upgrading from V4.0.3 to V5.0,
after inserting the activation key an
invalid key message appears.
V5.0.0
Workaround
First try to reset
from the SHM if
possible.
Otherwise hard
reset the system.
Logout and login to
the web browser or
reopen the Internet
Explorer.
205
RMX 1500/2000/4000 Release Notes - Version 7.1
Table 7 Version 7.1 System Limitations
Detected
in Version
#
Key
Category
Description
308
VNGR11965
Video
In a conference running at a line rate of
384 kbps, with AES and LPR enabled,
calls connect using the H.263 instead of
the H.264 video protocol.
V5.0.0
309
VNGR11963
Interoperability
In a conference running at a line rate of
384 kbps with AES, LPR and Video
Clarity enabled, HDX ISDN participants
connect with SIF resolution while HDX IP
endpoints connect using a 4SIF
resolution.
V5.0.0
310
VNGR11953
Cascading
When connecting to a cascaded CP
conference with a 768Kpbs line rate and
the video quality set to Sharpness, HDX
endpoints experience bad video quality.
V5.0.0
311
VNGR11949
SIP
The maximum number of Meeting
Rooms, Entry Queues, SIP Factories and
ongoing conferences that can be
registered to the Proxy, is limited to 100.
V5.0.0
312
VNGR11920
Interoperability
In a 4 Mb RPX conference with LPR
enabled, video-out bit rate decreases to
128 kbps due to packet loss and does not
increase.
V5.0.0
313
VNGR11883
General
After software upgrade, it is necessary to
close and reopen Internet explorer.
V5.0.0
314
VNGR11843
Video
In a 2 Mb Video Switched conference
with 10 or more H.323 endpoints
connected, random video refreshes may
occur.
V5.0.0
315
VNGR11830
Interoperability
Sony XG80 endpoint cannot send
Content in H.323 384 kbps call.
V6.0
316
VNGR11810
H.323
The following assert may appear when
H.323 participant connects to a 2 Mb
Continuous Presence conference:
File:AuditorApi.cpp, Line:112, Code:1.;
ASSERT:Audit_free_Data_is_too_long_2
0882,_max_is_20480data_size_is_:_208
82
V5.0.0
317
VNGR11798
Interoperability
When Tandberg C20 endpoint sends
Content, the far end indicates that
Content is being received but received
Content is black.
V5.0.0
318
VNGR11767
Interoperability
In a 6 Mb, Video Switched conference,
HDX endpoints that declare 2 Mb
capability may only connect at a line rate
of 896 kbps after 30 seconds.
V4.1.1
319
VNGR11746
CDR
GMT Time Offset is written to the
unformatted CDR as 0.
V4.1
206
Workaround
Corrections and Known Limitations
Table 7 Version 7.1 System Limitations
Detected
in Version
#
Key
Category
Description
320
VNGR11701
General
Sometimes a system error
“SOFTWARE_ASSERT_FAILURE”
appears when the RMX is running under
load (repetitive connecting and
disconnecting participants).
V4.5
321
VNGR11563
Interoperability
Legacy endpoints occasionally cannot
switch to Content when Content switched
from H,264 to H.263.
V4.1
322
VNGR11543
CMA
When creating a conference using the
CMA, the Conference Management UI
displays the participants as
disconnected, even though they are
connected.
V4.1
323
VNGR11531
IVR
After upgrading the RMX to a software
version that includes the gateway and the
maximum number of IVR services
reached 40 in RMX 2000 and 80 in RMX
4000, the default Gateway IVR Service is
not created.
V4.1
324
VNGR11489
Interoperability
In a conference running at a line rate of
384 kbps, when HDX 8006 endpoint that
sends Content is moved to another
conference, Content is still viewed for a
number of seconds on the HDX.
V4.1
325
VNGR11401
Encryption
In an encrypted conference, Tandberg
MXP endpoints encounter audio
problems.
V4.1
326
VNGR11383
General
When updating the Profile assigned to a
Conference Template, changes are not
applied when the conference becomes
ongoing.
V4.1
327
VNGR11382
Video
Legacy endpoints receive Content in 1+7
layout with black stripes on the sides (for
aspect ratio fitting), selecting a different
layout using Click&View (**) causes the
black stripes to disappear.
V4.1
328
VNGR11351
Video
When the video from an endpoint is
blocked, inconsistent video resolution
settings are implemented.
V4.1
329
VNGR11341
Interoperability
During H.320 calls, Lip Sync issues occur
when content is being sent.
V4.1
Workaround
207
RMX 1500/2000/4000 Release Notes - Version 7.1
Table 7 Version 7.1 System Limitations
Detected
in Version
#
Key
Category
Description
330
VNGR11324
General
When moving many participants
simultaneously from one conference to
the other (both with a line rate of 1920
kbps), a number of HDX8000 endpoints
connect secondary. When trying to
disconnect and reconnect the
participants connected as Secondary, an
MCU Internal error 32122 is displayed.
V4.1
331
VNGR10989
Interoperability
In a ISDN dial-in conference with a line
rate of 384 kbps, Tandberg MXP ISDN
endpoints cannot view content.
V4.1
332
VNGR10922
General
Dial out to participants assigned to a
Meeting Room will only start when the
dial-in participant who has activated it
has completed the connection process
and the Meeting Room has become an
ongoing conference.
V4.1
333
VNGR10849
Interoperability
A black screen may appear in the
following instances: * On HDX8000 HD
Hardware version B endpoints when the
conference line rate is set in the range of
256-768 kbps.
(The Hardware version can be found on
the HDX endpoint's System Information
page.) * On HDX SD endpoints using the
PAL mode when the conference line rate
is set above 128 kbps.
V4.1
334
VNGR10239
Video
In a 4Mb conference set to Sharpness
and the IVR Welcome Message enable
video appears in a 4x3 format. Disable
IVR Welcome message and the video
appears in 6x9 format.
V4.0.1
335
VNGR10104
LPR
When an H.323 HDX endpoint sends
Content, the endpoint disables the LPR.
V4.0.1
336
VNGR10054
IVR
Customized CIF slide is not displayed on
the HDX screen when connecting to a
1080p High Definition Video Switching
conference.
V4.0.1
337
VNGR9909
Interoperability
When dialing out to a Tandberg MXP
ISDN endpoint, the IVR slide is not
displayed, although the IVR message is
played.
V4.0.0
338
VNGR9834
IVR
When DTMF codes have been entered
by the participants, the volume of the IVR
Message may be suppressed or the
message may be cut.
V4.0.0
208
Workaround
(1) Upgrade to
HDX software
version 2.5.0.5
(2) Use
conference line
rates below 256 or
above 768 kbps.
(3) Disable the IVR
Welcome slide and
avoid using a 1x1
Video Layout.”
Corrections and Known Limitations
Table 7 Version 7.1 System Limitations
Detected
in Version
#
Key
Category
Description
Workaround
339
VNGR9830
Interoperability
HDX endpoints may experience packet
loss when the HDX endpoint's LAN
Speed is configured to 100MB.
V4.0.0
340
VNGR9829
RMX Web Client
Occasionally, during an ongoing
conference, when selecting the
Hardware Monitor menu the message
“No connection with Switch” appears.
V4.0.0
341
VNGR9803
General
When using the restore to factory
defaults, after inserting the Activation key,
the system requires a reset when the
reset is not required.
V4.0.0
342
VNGR9740
Upgrade
Process
When upgrading from version 2.0.2 to
version 4.1, and then Restoring the
Factory Defaults, during system restart
sometimes MPL failure is encountered.
V4.0.0
Turn the MCU off
and then turn it on
(“hardware”
reset).”
343
VNGR9729
General
When moving from MPM+ to MPM mode
(with only MPM cards installed in the
MCU), the Card Configuration Mode,
indicated in the System Information
dialog box, remains in MPM+ Mode.
V4.0.0
Logout and then
login to the RMX
Web Client.
344
VNGR9677
Interoperability
When switching Content sending from an
HDX9004 to Aethra X7 and back,
Content is not received by Aethra X7.
V4.0.0
345
VNGR9571
Hardware
In D-type chassis, when hot-swapping an
MPM card, unit failure may occur.
Reset the
MCU.
346
VNGR9565
Upgrade
Process
When downgrading from version 4.0 to
version 3.0, the MPM card does revert to
normal.
V4.0.0
347
VNGR9340
CDR
When a conference was terminated by
an MCU reset, an incorrect status
“Ongoing Conference” will be displayed
in the CDR List pane.
V4.0.0
348
VNGR9228
Software
Version
When trying to restore last version, after
upgrading from version 3 to version 4, the
RMX prompts for an activation key.
V4.0.0
349
VNGR9015
Interoperability
Radvision ECS Gatekeeper set to
Routed Mode is not forwarding the LPR
parameters as required, causing HDX
calls with LPR enabled to connect with no
video.
V3.0.0
350
VNGR8605
Interoperability
The video of Sony G70 endpoint that is
connected to a conference over ISDN at
line rate of 128kbps freezes when
receiving Content from an HDX endpoint.
V3.0.0
Set the endpoint
LAN Speed and
Duplex Mode to
Auto.
V4.0.0
209
RMX 1500/2000/4000 Release Notes - Version 7.1
Table 7 Version 7.1 System Limitations
Detected
in Version
#
Key
Category
Description
351
VNGR8259
Software
Version
If an RMX operating in Secure
Communication Mode, is downgraded to
a version that does not support Secure
Communication Mode (V2.0, V1.1), all
connectivity to the RMX is lost.
V3.0.0
352
VNGR7734
IP
Static Routes table in IP Network Service
does not function.
V3.0.0
353
VNGR7598
Interoperability
H.323 link is connected as secondary
when cascading with Tandberg MPS at
768kbps, in both Video Switching and CP
conferences.
V3.0.0
354
VNGR7597
Interoperability
H.323 link is connected as secondary
when cascading with Tandberg MPS at
768kbps, in both Video Switching and CP
conferences.
V3.0.0
355
VNGR7557
RMX Web Client
When connecting directly to the Shelf
Manager and selecting Diagnostic Mode
the CNTL module does not enter the
diagnostic mode and stays “Normal”.
V3.0.0
Reset the MCU
and then switch to
Diagnostic Mode.
356
VNGR6902
Interoperability
Sony PCS G70 (v2.61) and Sony
PCS-1(v3.41) endpoints cannot connect
to conferences using SIP connections.
V5.1
Force the
endpoints to
connect using
H.323 connection.
357
VNGR5310
Multilingual
Multilingual Settings are not reflected on
the Shelf Management login page and
the multilingual flags appear in the Shelf
Manager window even when they have
not been selected in the Multilingual
Settings pane.
V2.0.0
358
VNGR5151
Multilingual
The Display Name of undefined dial-in
participant using HDX and VSX 7000
endpoints is displayed in English in the
RMX Web Client.
V2.0.0
359
VNGR4652
Interoperability
HDX/VSX endpoints cannot connect
directly to conferences while registered
with Cisco Gatekeeper using the
IP##NID string.
V1.1.0
360
VNGR4405
ISDN
When a busy signal is returned by a
PSTN dial-out participant, the RMX does
not redial but disconnects the participant
with “party hung-up-0” status.
V2.0.0
361
VNGR3977
Interoperability
Faulty connection status is indicated
when the RSS 2000 recording link is the
only participant in a conference and its
video stream is not synchronized.
V1.1.0
210
Workaround
Cancel the Secure
Mode before
downgrading
Connect directly
using the MCU IP
Address via the
Transit Entry
Queue.
The video stream
is synchronized
when the first
participant
connects to the
conference.
Corrections and Known Limitations
Table 7 Version 7.1 System Limitations
Detected
in Version
#
Key
Category
Description
362
VNGR3824
General
The Click & View menu doesn't appear in
64 kbps calls.
V1.1.0
363
VNGR3276
SIP
SIP participants cannot connect to a
conference when the conference name
contains blank spaces.
V1.1.0
364
VNGR3089
HD
In HD Video Switching conferences,
Tandberg endpoints may connect as
Secondary when HD frame rate
capabilities are less than 7.5 frames per
second.
V1.1.0
365
VNGR3011
CDR
The Encryption field is missing from the
CDR file.
V1.1.0
366
VNGR2473
RMX Web Client
Sometimes when installing the RMX Web
Client, Windows Explorer >Internet
Options> Security Settings must be set to
Medium or less.
V1.1.0
Workaround
Use the RMX Web
Client.
Create a CP
conference
211
RMX 1500/2000/4000 Release Notes - Version 7.1
212