1
answers
2
EasyGuide
AMILO A Series
English
Are there ...
... any technical problems or other questions which you would like to be clarified?
Please contact:
• your sales partner
• your sales outlet
Additional information is provided on the Help Desk list and in the "Warranty" manual (the
"Warranty" manual is included on the "Drivers & Utilities" CD provided).
The latest information on our products, tips, updates, etc., can be found on the internet under:
http://www.fujitsu-siemens.com
Dieses Handbuch wurde auf Recycling-Papier gedruckt.
This manual has been printed on recycled paper.
Ce manuel est imprimé sur du papier recyclé.
Este manual ha sido impreso sobre papel reciclado.
Questo manuale è stato stampato su carta da riciclaggio.
Denna handbok är tryckt på recyclingpapper.
Dit handboek werd op recycling-papier gedrukt.
Published by
Fujitsu Siemens Computers GmbH
Order No.: 10600416171
Order No.: 440 N50203
Printed in the Federal Republic of Germany
AG 0404 04/04
Introduction
Index
Notebook views
AMILO A Series
Important notes
Preparing the notebook
for use
Operating manual
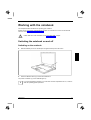
Working with the
notebook
Security functions
Connecting external
devices
Settings in BIOS Setup
Utility
Troubleshooting and tips
Technical data
April 2004 edition
Microsoft, MS, MS-DOS, Windows, and Windows NT are registered trademarks of Microsoft
Corporation.
VESA and DPMS are trademarks of Video Electronics Standards Association.
PS/2 is a registered trademark of International Business Machines, Inc.
Pentium is a registered trademark of Intel Corporation, USA.
Acrobat Reader is a trademark of Adobe Systems Incorporated.
All other trademarks referenced are trademarks or registered trademarks of their respective
owners, whose protected rights are acknowledged.
Copyright Fujitsu Siemens Computers GmbH 2004
All rights, including rights of translation, reproduction by printing, copying or similar methods,
in part or in whole, are reserved.
Offenders will be liable for damages.
All rights, including rights created by patent grant or registration of a utility model or design,
are reserved.
Delivery subject to availability. Right of technical modification reserved.
Contents
Innovative technology ... .................................................................................................................1
Notational conventions ......................................................................................................................2
Notebook views ...............................................................................................................................3
Opened Notebook......................................................................................................................3
Front ..........................................................................................................................................3
Back panel.................................................................................................................................4
Right side panel .........................................................................................................................4
Left side panel ...........................................................................................................................4
Under side .................................................................................................................................5
Important notes ...............................................................................................................................7
Safety notes ......................................................................................................................................7
Notes on installing and removing boards and modules ..............................................................8
Manufacturer’s notes .........................................................................................................................9
Declarations of Conformity.........................................................................................................9
Copyright-protected technology .................................................................................................9
Energy saving ............................................................................................................................9
Recycling and disposal ....................................................................................................................10
CE marking......................................................................................................................................10
Battery storage ................................................................................................................................11
Transporting the notebook ...............................................................................................................12
Before you travel......................................................................................................................12
Transporting the notebook .......................................................................................................12
Cleaning the notebook.....................................................................................................................13
Preparing the notebook for use....................................................................................................15
Unpacking and checking the delivery...............................................................................................15
Selecting a location .........................................................................................................................16
Connecting the power adapter .........................................................................................................16
Working with the notebook...........................................................................................................17
Switching the notebook on and off ...................................................................................................17
Switching on the notebook.......................................................................................................17
Switching the notebook off.......................................................................................................18
Status indicators ..............................................................................................................................18
Keyboard .........................................................................................................................................19
Numeric keypad.......................................................................................................................20
Key combinations ....................................................................................................................21
Easy Launch keys ...........................................................................................................................22
Touchpad and touchpad buttons......................................................................................................23
LCD screen .....................................................................................................................................24
Information on LCD monitor.....................................................................................................24
Monitor settings .......................................................................................................................24
Battery.............................................................................................................................................25
Charging, caring for and maintaining the battery......................................................................25
Removing and installing the battery .........................................................................................26
Using the power-management features ...........................................................................................26
PC cards..........................................................................................................................................27
Installing a PC card..................................................................................................................27
Removing a PC card................................................................................................................27
Memory card reader ........................................................................................................................28
Using memory cards................................................................................................................28
10600416171
Contents
Hard disk......................................................................................................................................... 29
Optical drive .................................................................................................................................... 29
Combo drive (CD-RW/DVD).................................................................................................... 30
DVD+RW drive........................................................................................................................ 30
DVD±RW dual drive ................................................................................................................ 30
Handling CD/DVDs.................................................................................................................. 31
Handling CD/DVDs.................................................................................................................. 31
Inserting or removing a CD/DVD ............................................................................................. 31
Regional codes for DVD films and DVD players ...................................................................... 32
Adjusting AutoPlay function of optical drive ............................................................................. 33
Audio: Setting volume ..................................................................................................................... 33
Integrated 56k modem .................................................................................................................... 33
Connecting notebook modem to telephone connection ........................................................... 34
Ethernet and LAN............................................................................................................................ 34
Wireless LAN .................................................................................................................................. 34
Establishing an infrared connection................................................................................................. 34
Security functions ......................................................................................................................... 35
Overview of all security functions .................................................................................................... 35
Kensington Lock...................................................................................................................... 35
BIOS password protection....................................................................................................... 35
Brief overview of the security functions ........................................................................................... 36
Using Kensington Lock ................................................................................................................... 36
Configuring password protection in BIOS Setup Utility .................................................................... 36
Protecting BIOS Setup Utility (supervisor and user password) ................................................ 37
Password protection of operating system ................................................................................ 38
Connecting external devices........................................................................................................ 39
Connecting an external monitor....................................................................................................... 39
Using the parallel port ..................................................................................................................... 40
Connecting USB devices................................................................................................................. 40
Connecting external audio devices.................................................................................................. 41
Connecting an external device to S-Video Out ................................................................................ 41
Activating television set ........................................................................................................... 41
Connecting an external device to IEEE1394 (FireWire)................................................................... 41
Settings in BIOS Setup Utility ...................................................................................................... 43
Start BIOS Setup Utility................................................................................................................... 43
Operating BIOS Setup Utility........................................................................................................... 44
Exiting BIOS Setup Utility................................................................................................................ 44
Troubleshooting and tips ............................................................................................................. 45
Restoring operating system..................................................................................................... 45
The notebook's date or time is incorrect.................................................................................. 45
The LCD screen of the notebook remains blank...................................................................... 46
The LCD screen is difficult to read .......................................................................................... 46
The external monitor stays blank............................................................................................. 46
The external monitor is blank or the image is unstable............................................................ 47
The notebook cannot be started.............................................................................................. 47
The notebook stops working.................................................................................................... 48
The printer does not print ........................................................................................................ 48
The DVD film does not continue to play .................................................................................. 48
Acoustic warnings ................................................................................................................... 49
System configuration contains invalid data.............................................................................. 49
10600416171
Contents
Technical data................................................................................................................................51
Notebook .................................................................................................................................51
Battery .....................................................................................................................................52
Power adapter 160 W ..............................................................................................................52
Index...............................................................................................................................................53
10600416171
Innovative technology ...
and ergonomic design make your AMILO A the ideal user-friendly and reliable notebook. Your
operating system is preinstalled on the hard disk and optimally configured to facilitate the procedure
when you use your AMILO for the first time.
A PC card slot (CardBus or PCMIA) enables the notebook to operate one type I or type II PC card.
Your notebook is equipped with an internal modem. In addition, your notebook is equipped with a S
Video out socket to connect to a television. External devices such as digital audio/video devices or
other high-speed devices can be connected to the FireWire port.
For mouse control, the notebook has a touchpad.
Your notebook has connectors for external devices such as an external monitor or a printer. You can
connect peripheral devices such as a scanner, loudspeakers, gamepads, keyboard, or mouse via
three USB ports (2.0).
An audio controller and two internal loudspeakers provide your AMILO with an audio capability. You
can also connect an external microphone and an external loudspeaker.
The system settings of the notebook can be configured via the user-friendly BIOS Setup Utility
programme. Certain system settings (e.g. screen display, energy saving functions) can be modified
via various key combinations while you are using the notebook.
Your AMILO has a number of security features to ensure that no unauthorised person can access
your data. For example, you can activate a screen saver with password protection. The security
functions in the BIOS Setup Utility also allow you to protect your data by means of passwords.
This operating manual tells you how to put your AMILO into operation, and how to operate it in daily
use.
Further information about your AMILO can be found:
•
•
•
in the manuals "Safety and Ergonomics", ”Warranty" and “Wireless LAN”
in your operating system documentation
in the information files (e.g. *.TXT, *.DOC, *.WRI, *.HLP, *.PDF)
10600416171
1
Innovative technology ...
Notational conventions
The following symbols are used in this manual:
!
Indicates information which is important for your health or for preventing
physical damage. Failure to follow the instructions may lead to loss of data,
invalidate your warranty, destroy the notebook, or endanger your life.
i
Indicates important information which is required to use the system
properly.
►
Text which follows this symbol describes activities that must be performed
in the order shown.
This font
indicates screen outputs.
This font
indicates programme names, commands, or menu items.
"Quotation marks"
indicate names of chapters, data carriers, and terms that are being
emphasised.
2
10600416171
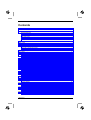
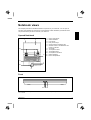
Notebook views
This chapter presents the individual hardware components of your notebook. You can open an
overview of the displays and connections of the notebook. Please familiarise yourself with these
components before you start to work with your notebook.
Opened Notebook
1=
2=
3=
4=
5=
6=
3
1
12
2
45
6
Built-in microphone
Status indicators
LCD screen
Easy Launch keys
On/Off switch for Wireless LAN
ON/OFF switch of the Notebook with
power-on indicator
7 = Touchpad
8 = Touchpad scroll bar
9 = Touchpad buttons
10 = Touchpad scroll buttons
11 = Status indicators
12 = Built-in loudspeakers
11
7
8
10
9
Front
13 14 15
13 = SPDIF Out/Headphones socket
14 = Line In
10600416171
15 = Microphone jack
3
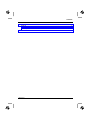
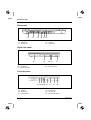
Notebook views
Back panel
16
17
18
19 20 21
16 = Kensington Lock device
17 = Parallel port
18 = Monitor port
19 = Infrared interface
20 = USB port
21 = S-Video out
Right side panel
22
22 = Battery compartment
23 = Optical drive
24 = Insert/Eject button
23
24 25
26
25 = Opening for manual ejection
26 = DC jack (DC IN)
Left side panel
27 28 29 30 31 32
27 =
28 =
29 =
30 =
4
USB port
USB port
Modem port
LAN connector
31 =
32 =
33 =
34 =
33
34
Memory card reader
FireWire port
PC card slot
PC card eject button
10600416171
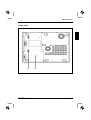
Notebook views
Under side
35
35 = Battery release latch
10600416171
36
36 = Battery compartment
5
Important notes
Here you will find essential safety information regarding your notebook. In addition, the
manufacturer's notes contain helpful information about your notebook.
Safety notes
Pay attention to the information provided in the "Safety and Ergonomics" manual and in
the following safety notes.
!
Observe the sections in the manual marked with the symbol on the left.
•
When connecting and disconnecting cables, observe the relevant notes in this operating
manual.
•
Only use batteries designed for this notebook.
Do not store batteries for longer periods in the notebook.
Take care not to drop the batteries or otherwise damage their casing (fire risk).
If the rechargeable batteries are defective, they must not be used.
Do not touch the contacts of the batteries.
Never interconnect the positive and negative terminals of a battery.
Used batteries must be disposed of in accordance with local regulations (special waste).
•
There is a lithium battery (button cell) installed in the notebook for real-time buffering:
The lithium battery may only be replaced by authorised, specially trained personnel. Incorrect
handling may lead to a risk of explosion.
The lithium battery may be replaced only with an identical battery or with a type recommended
by the manufacturer.
The lithium battery must be disposed of in accordance with local regulations concerning special
waste.
•
All batteries containing pollutants are marked with one of the two symbols below (crossed-out
garbage can).
In addition, the marking is provided with the chemical symbol of the heavy metal decisive for
the classification as a pollutant.
Cd Cadmium
Hg Mercury
Pb
Lead
10600416171
7
Important notes
•
During installation and before operating the device, please observe the instructions on
environmental conditions in the "Technical data" chapter as well as the instructions in the
"Preparing the notebook for use" chapter.
•
When cleaning the device, please observe the relevant notes in the "Cleaning the notebook"
paragraph.
•
Keep this operating manual together with your device.
If you pass on the device to third parties, you should include this manual.
•
If you have a device with wireless LAN, you must also observe the additional safety
precautions for devices with wireless LAN in the "Safety and Ergonomics" manual.
This notebook complies with the relevant safety regulations for data processing equipment. If you
have questions as to whether you can set up the notebook in the intended environment, please
contact your sales point or our hotline/help desk.
Notes on installing and removing boards and modules
!
Only qualified technicians should repair the device. Unauthorised opening or incorrect
repair may greatly endanger the user (electric shock, fire risk).
Boards with electrostatic sensitive devices (ESD) are identifiable by the label shown.
When you handle boards fitted with ESDs, you must, under all circumstances, observe the following
points:
•
•
•
You must statically discharge yourself before working with boards (e.g. by touching a grounded
object).
The equipment and tools you use must be free of static charges.
Remove the power plug from the mains supply before inserting or removing boards containing
ESDs.
Always hold boards with ESDs by their edges.
Never touch pins or conductors on boards fitted with ESDs.
8
10600416171
•
•
Important notes
Manufacturer’s notes
Declarations of Conformity
The "Declarations of Conformity" concerning the AMILO A can be found at our internet address:
http://www.driver-cd.com.
Hereby, Fujitsu Siemens Computers, declares that the AMILO A is in compliance with the essential
requirements and other relevant provisions of Directive 1999/5/EC.
Copyright-protected technology
This product incorporates copyright protection technology that is protected by method claims of
certain U. S. patents and other intellectual property rights owned by Macrovision Corporation and
other rights owners. Use of this copyright protection technology must be authorised by Macrovision
Corporation, and is intended for home and other limited viewing uses only unless otherwise
authorised by Macrovision Corporation. Reverse engineering or disassembly is prohibited.
Energy saving
If you will not be using your notebook, switch it off.
Make use of the device's energy saving functions (see "Working with the notebook"). The notebook
uses less power when the power management features are enabled. You will then be able to work
for longer before having to recharge the battery.
Energy saving under Windows
If a monitor with energy saving features is connected to your notebook, you can use the Screen Saver
tab to activate the energy saving features of the monitor. Select a screen saver in the menu Start Control Panel - Appearance and Themes - Display - Screen Saver.
You may set further energy saving functions in the menu Start - Control Panel - Performance and
Maintenance - Power Options.
i
There is no need for a screen saver for the LCD panel since the LCD screen is turned off
via the energy saving functions.
10600416171
9
Important notes
Recycling and disposal
Do not throw batteries or accumulators into the household waste.
Our devices are mostly produced of materials that can be turned over for proper recycling. The
device may be taken back after use to be recycled, provided that it is returned in a condition that is
the result of normal use. Any components not reclaimed will be disposed of in an environmentally
acceptable manner. To give back a device please take advantage of your country's disposal and
recycling possibilities.
Further information about country-specific disposal and recycling possibilities can be found on the
following website www.fujitsu-siemens.com/recycling.
If you have any questions on disposal, please contact your local office or our Help Desk.
CE marking
CE marking for devices with wireless LAN
This equipment complies with the requirements of Directive 1999/5/EC of the
European Parliament and Commission from 9 March, 1999 governing Radio
and Telecommunications Equipment and mutual recognition of conformity.
This notebook is approved for use in Belgium, Denmark, Germany, Finland,
Greece, Great Britain, Ireland, Italy, Luxembourg, the Netherlands, Austria,
Portugal, Sweden, Switzerland, Spain, Iceland, Liechtenstein and Norway.
Contact the corresponding government office of the respective country for
current information on possible operating restrictions. If your country is not
included in the list, then please contact the corresponding supervisory authority
as to whether the use of this product is permitted in your country.
10
10600416171
Important notes
Restrictions
•
France
−
•
Limited frequency range: only the channels 10 and 11 (2457 MHz or 2462 MHz) may be
used in France. It is prohibited to use the device outdoors.
Italy
−
•
A ministerial permit is also required for use indoors. Please contact the seller concerning
the required procedure. It is prohibited to use the device outdoors.
Netherlands
−
A licence is required for use outdoors. Please contact the seller concerning the required
procedure.
Battery storage
i
If you do not use the batteries for long periods, remove them from the notebook. Never
store the batteries in the unit.
Store the battery when it is half full or two-thirds full. The battery should be stored in a dry area at a
temperature between 0°C and +30°C. The lower the temperature at which the batteries are stored,
the lower is the rate of self-discharge.
10600416171
11
Important notes
Transporting the notebook
Please observe the points listed below when transporting your notebook.
Before you travel
•
•
Back up important data stored on your hard disk.
•
If you are travelling abroad, ensure that the power adapter can be operated with the local mains
voltage. If this is not the case, obtain the appropriate power adapter for your notebook.
Do not use any other voltage converter!
If you wish to use your notebook during a flight, first check with the flight attendants if it is
permissible to do so.
i
If you travel in another country, check whether the local power supply and the
specifications of the power cable are compatible. If this is not the case, buy a power cable
that matches the local conditions. Do not use a connection adapter for electrical devices
to connect the notebook.
If you use a modem, incompatibilities with the local telecommunications system may
result.
Transporting the notebook
•
•
•
•
•
•
Remove all data carriers (e.g. CD, DVD) from the drives.
•
Protect the notebook from severe shocks and extreme temperatures (e.g. direct sunlight in a
car).
12
Switch the notebook off.
Unplug the power adapter and all external devices from the mains outlet.
Disconnect the power adapter cable and the data cables for all external devices.
Close the LCD screen so that it locks into place.
To protect against damaging jolts and bumps, use a notebook carrying case to transport your
notebook.
10600416171
Important notes
Cleaning the notebook
►
Switch the notebook off.
►
Pull the power plug of the network adapter out of the mains outlet.
►
Remove the battery.
!
Do not clean any interior parts yourself; leave this job to a service technician.
Do not use any cleaning agents that contain abrasives or may corrode plastic. The use of
improper cleaning agents can damage the markings on the keyboard and the notebook,
the paintwork of the device or the device itself.
Ensure that no liquid enters the notebook.
Wipe the casing with a dry cloth.
If particularly dirty, use a cloth which has been moistened in mild domestic detergent and then
carefully wrung out.
To clean the keyboard and the touchpad, you can use disinfectant wipes.
10600416171
13
Preparing the notebook for use
!
Please read the "Important notes" chapter.
Before you can work with your notebook, you need to charge the battery and install and configure
the delivered software. The operating system and drivers required are preinstalled.
Upon delivery, the battery can be found in the battery compartment. You need to charge the battery
if you want to operate your notebook with a rechargeable battery.
When not plugged into a mains outlet, the notebook runs on its built-in battery. You can increase the
battery's life by enabling the system's energy saving functions.
If you use the notebook in a normal office situation, run it from the mains using the power adapter.
Please see the "Connecting external devices" chapter for instructions on how to connect devices
such as a mouse and a printer to the notebook.
Unpacking and checking the delivery
►
Unpack all the individual parts.
►
Check the delivery for damage incurred during transportation.
!
i
Should you discover damages incurred during transportation, notify your local sales
outlet immediately!
It is recommended not to throw away the original packaging material. Keep the original
packing material in case you need to ship the equipment again.
10600416171
15
Preparing the notebook for use
Selecting a location
Select a suitable location for the notebook before setting it up. Consider the following points when
looking for a location:
•
Do not place it on a soft surface (e.g., a carpet or soft furnishings). The space between the
notebook's feet must be clear.
Place the notebook on a stable, flat, nonslippery surface. In view of the multitude of different
finishes used on furniture, it is possible that the rubber feet of the notebook will mark the
surface they stand on.
•
•
•
Never place the notebook and the power adapter on a heat-sensitive surface.
•
•
Never cover the fan intake or exhaust openings of the notebook or the power adapter.
•
For wireless data transfer, you must align the notebook's infrared interface with that of the
partner device (e.g. PC). The devices must not be more than one metre apart.
The notebook and the power adapter should be at least 200 mm apart.
Keep other objects 100 mm away from the notebook and its power adapter to ensure adequate
ventilation.
Do not expose the notebook to extreme environmental conditions.
Protect the notebook from dust, humidity, and heat.
Connecting the power adapter
!
Please take note of the information in the section "Safety notes".
The power cable supplied conforms to the requirements of the country in which you
purchased your notebook. Make sure that the power cable is approved for use in the
country in which you intend to use it.
The power adapter's AC cord should only be connected to a mains outlet if the notebook
is connected to the power adapter.
Do not use the power adapter for other notebooks or devices.
Do not use a power adapter that is not specially intended for this notebook.
►
Connect the power adapter cable to the DC jack (DC IN) of the notebook (see chapter
"Notebook views", Number 26).
►
Connect the power cable into the power adapter.
►
Plug the power cable into a mains outlet.
16
10600416171
Working with the notebook
This chapter describes the basics for operating your notebook.
Please see the "Connecting external devices" chapter for instructions on how to connect devices
such as a mouse and a printer to the notebook.
!
Please take note of the information in the "Important notes" chapter.
Switching the notebook on and off
Switching on the notebook
►
Slide the release (on front of notebook) to the right and fold up the LCD screen.
1
►
Press the ON/OFF switch (1) to switch the notebook on.
The power-on indicator (1) of the notebook lights up.
i
If you have assigned a password, you must enter this when requested to do so, in order to
start the operating system password.
10600416171
17
Working with the notebook
Switching the notebook off
►
Shut down the operating system properly in the Start menu via the Quit function.
►
If the notebook is not switched off automatically, press the ON/OFF switch for approx. four
seconds.
►
Close the LCD screen so that it locks into place.
Status indicators
The status indicators (see chapter "Notebook views", Numbers 2, 6 and 11) provide information on
the states of the power supply, the drives and the keyboard functions.
The meanings of the symbols are as follows:
Power-on indicator
The indicator lights up when the notebook is switched on. The power-on
indicator is integrated into the notebook ON/OFF switch.
Indicator drive
The indicator flashes when the CD/DVD in the optical drive is being accessed.
1
A
Num Lock indicator
The indicator lights up when the Num key has been pressed. The numbers on
the upper right on keys in the integrated numeric keypad are enabled.
Caps Lock indicator
The indicator lights up when the caps lock key has been pressed. All the
characters you type appear in uppercase. In the case of overlay keys, the
character printed on the upper left of the key appears when that key is pressed.
Scroll indicator (Scroll Lock)
The indicator lights up when the Scroll Lock has been pressed. The effect
this key has varies from programme to programme.
Energy-saving mode indicator
The indicator flashes when the notebook is in an energy-saving mode. This
indicator is also visible with the notebook closed.
Battery indicator
•
•
•
The indicator lights when the battery is fully charged or in use.
The indicator flashes while the battery being charged.
The indicator is extinguished when the notebook is disconnected from the
mains power.
This indicator is also visible with the notebook closed.
18
10600416171
Working with the notebook
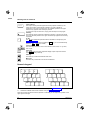
Keyboard
i
The keyboard of your notebook is subject to continuous wear due to normal use. The
keyboard markings are subjected to particularly high loads. The keyboard markings can
wear off in the course of using the notebook.
The keyboard has been designed to provide all the functions of an enhanced keyboard. Some
enhanced keyboard functions are mapped with key combinations.
The following description of keys refers to Windows. Additional functions supported by the keys are
described in the relevant manuals supplied with your application programmes.
The figure below shows how to access the different characters on keys with overlaid functions. The
example applies when the CapsLK indicator is not lit.
Fn
/
7
7
{
/
7
7
{
/
7
7
{
/
7
7
{
Num
Alt Gr
/
7
7
{
Example from a German keyboard
Backspace key
The Backspace key deletes the character to the left of the cursor.
Tab key
The Tab key moves the cursor to the next tab stop.
Enter key (return)
The enter key terminates a command line. The command you have entered
is executed when you press this key.
10600416171
19
Working with the notebook
Caps Lock key
The Caps Lock key activates uppercase mode (CapsLK indicator lit). The
Caps Lock function causes all the characters you type to appear in
uppercase. In the case of overlay keys, the character printed on the upper
left of the key appears when that key is pressed.
To cancel the Caps Lock function, simply press the Caps Lock key again.
Caps Lock
Shift key
The Shift key causes uppercase characters to appear. In the case of overlay
keys, the character printed on the upper left of the key appears when that key
is pressed.
Fn key
The Fn key enables the special functions indicated on overlay keys (see
"Key combinations").
If the external keyboard does not feature a Fn key, you can simultaneously
press the Ctrl + Alt keys instead.
Fn
Cursor keys
The cursor keys move the cursor in the direction of the arrow, i.e. up, down,
left, or right.
Pause key
The Pause key temporarily suspends display output. Output will resume
when you press any other key.
Pause
Break
Start key
The Start key invokes the Windows Start menu.
Menu key
The Menu key invokes the menu for the marked item.
Numeric keypad
&
*
8
7
U
1
)
9
0
I
J
7
O
K
M
1=
2=
(
P
<
,
2
>
.
.
?
/
*
9
4
:
;
L
8
5
1
–
6
2
+
3
0
.
/
Characters enabled when NumLK indicator is not lit (see "Status indicators").
Characters enabled when NumLK indicator is lit (see "Status indicators").
When the numeric keypad is turned on (NumLK is indicated) you can output the symbols on the
upper right on the keys.
20
10600416171
Working with the notebook
Key combinations
The following description of key combinations refers to functions when using Microsoft Windows.
Some of the following key combinations may not function in other operating systems and with some
device drivers.
Other key combinations are described in the relevant manuals supplied with your application
programmes.
Key combinations are performed as follows:
►
Press and hold the first key in the combination.
►
While holding the first key down, press the other key or keys in the combination.
i
If the external keyboard does not feature a Fn key, you can simultaneously press
the Ctrl + Alt keys instead.
Fn
+
F1
Fn
+
F3
Fn
+
F4
Enabling Suspend mode
This key combination switches the notebook into the Suspend mode.
Switching battery warning tone off/on
With this key combination you can set whether the notebook outputs a warning
tone when the battery charge level is low.
Switching between internal and external screen
If an external monitor is connected, the monitor on which the output is to be
displayed can be selected with this key combination.
You can opt to use:
•
•
•
Fn
+
F5
Fn
+
F6
Fn
+
F7
Fn
+
F8
10600416171
just the notebook's LCD screen
just the external monitor
both the LCD screen and the external monitor.
Increasing the volume
This key combination raises the volume of the integrated loudspeakers.
Reducing the volume
This key combination reduces the volume of the integrated loudspeakers.
Increasing screen brightness
This key combination increases screen brightness.
Decreasing screen brightness
This key combination decreases screen brightness.
21
Working with the notebook
Switching between open applications
Alt
+
Ctrl
+
With this key combination you can switch between several open
applications.
Carrying out a warm boot
Alt
+ Del
This key combination triggers a reset and warm-boots the
notebook. First hold down the Ctrl and Alt key, and then press
the Del key. First the Task Manager is displayed. Then you must
press all three keys again to re-boot.
Backtab (Shift+Tab)
+
i
This key combination moves the cursor back to the previous
tabular stop.
Key combinations with the Windows keys are contained in the manual for your operating
system.
Easy Launch keys
Your notebook is equipped with two Easy Launch keys (see chapter "Notebook views", Number 4).
You can start frequently required applications by pressing a single key.
E-mail
Use this button to start the standard e-mail programme for your system.
Internet
With this button you can start the standard internet browser for your system.
22
10600416171
Working with the notebook
Touchpad and touchpad buttons
!
Keep the touchpad clean, protect it from dirt, liquids, and grease.
Do not use the touchpad if your fingers are dirty.
Do not rest heavy objects (e.g. books) on the touchpad or the touchpad buttons.
The touchpad (see chapter "Notebook views", Number 7) enables you to move the mouse pointer
on the screen.
You can use the touchpad to scroll. The scroll bar on the right edge of the touchpad is marked with
arrows (see chapter "Notebook views" Number 8).
The touchpad buttons (see chapter "Notebook views", Number 9) allow the selection and execution
of commands. They correspond to the buttons on a conventional mouse.
With the touchpad scroll buttons (see chapter "Notebook views", Number 10) you can scroll.
Moving the pointer
►
Move your finger on the touchpad.
The pointer will move accordingly.
Selecting an item
►
Move the pointer to the item you wish to select.
►
Tap the touchpad once or press the left button once.
The item will be selected.
Executing a command
►
Move the pointer to the field you wish to select.
►
Tap the touchpad twice or press the left button twice.
The command will be executed.
Dragging an object
►
Activate only the function under Start - Control Panel - Printers and other Hardware / Mouse.
►
Move the pointer to the item you wish to select.
►
Select the desired object, and leave your finger on the touchpad.
►
Drag the object to the desired position.
►
Lift your finger from the touchpad.
The item will be moved.
10600416171
23
Working with the notebook
Scrolling with the touchpad buttons
►
Press the upper or lower side of the touchpad scroll button to scroll up or down.
The information/texts above or below the display area appear.
Scrolling with the touchpad scroll bar
►
Move your finger upwards or downwards on the scroll bar at the right edge of the touchpad.
The display area moves up or down.
LCD screen
Information on LCD monitor
High-quality TFT displays are installed in notebooks from Fujitsu Siemens Computers GmbH. The
specification of the monitor resolution indicates how many pixels can be displayed. For example,
"XGA" stands for 1024 x 768 pixels. Each pixel consists of three so-called subpixels of the colours
red, green and blue. As a result, an XGA monitor consists of 1024 x 768 x 3 = 2,359,296 subpixels.
The standard of production techniques today cannot guarantee an absolutely fault-free monitor. A
few isolated constant lit or unlit pixels may be present. To ensure the highest possible quality,
Fujitsu Siemens Computers uses only monitors that at least comply with the standard
DIN ISO 13406-2 (Class II).
TFT monitors are operated with background lighting. The luminosity of the background lighting can
decrease during the period of use of the notebook. The brightness of your monitor can be set
individually with the brightness control keys of the keyboard.
Monitor settings
Setting the desktop area
The screen resolution of the LCD monitor of your notebook is optimally set at the factory.
Changing the font size
Under Start - Control Panel - Appearance and Themes - Display - Advanced you can choose between a
larger and a smaller font in the Font size field.
Synchronising the display on the LCD screen and an external monitor
Your notebook supports the simultaneous display on the LCD screen and an external monitor.
Pressing the key combination Fn + F4 switches between LCD only, external monitor and LCD
and external monitor only. The last setting is useful if you would like high resolution and refresh rate
on an external monitor.
24
10600416171
Working with the notebook
Battery
The battery is one of the most important components of your notebook. When not plugged into a
mains outlet, the notebook runs on its built-in battery. You can increase the life of the battery by
caring for the battery properly. The average battery life is around 500 charge/discharge cycles.
You can extend the battery life by taking advantage of the available energy saving functions.
!
Only use batteries released for your notebook.
Take care not to drop the batteries or otherwise damage their casing (fire risk).
If the rechargeable batteries are defective, they must not be used.
Do not touch the contacts of the batteries.
Never interconnect the positive and negative terminals of a battery.
Used batteries must be disposed of in accordance with local regulations (special waste).
Observe the information on battery storage in the "Important notes" chapter.
Charging, caring for and maintaining the battery
The notebook battery can only be charged, when the ambient temperature is between 5 °C and
max. 35 °C.
You can charge the battery by connecting the notebook to the power adapter (see "Connecting the
power adapter").
A notebook battery will fully charge in approximately three hours in a notebook that is switched off. A
notebook battery will fully charge in approximately 4.5 hours if the notebook is switched on.
It is a good idea to discharge the battery completely before recharging it, as this will extend battery
lifetime. Work in the battery mode until a warning tone indicates the need for charging. The
notebook battery should not be charged before this point.
If you do not connect the power adapter within five minutes of the signals described above, your
notebook will automatically switch off.
Monitoring the battery charging level
Windows also has a "Battery status meter" in the taskbar for monitoring the battery capacity. When
you place the mouse pointer on the battery symbol, the system displays the battery status.
10600416171
25
Working with the notebook
Removing and installing the battery
!
Only use batteries designed for this notebook.
Never use force when inserting or removing a battery.
Make sure that no foreign bodies get into the battery connections.
Removing battery
►
Switch the notebook off.
►
Close the LCD screen so that it locks into place.
►
Unplug the power adapter from the mains outlet.
►
Disconnect all cables connected to the notebook.
►
Turn the notebook over.
►
Place the notebook on a flat surface.
►
Slide the battery lock (see chapter "Notebook views", Number 35) in the direction of the arrow
and hold it in place.
The arrow is shown on the battery lock.
►
Remove the battery from the battery compartment (see chapter "Notebook views", Number 36).
Inserting battery
►
Push the battery into the battery compartment until it engages.
►
Close the battery compartment.
Using the power-management features
The notebook uses less power when the power management features are enabled. You will then be
able to work longer when using the battery before having to recharge it.
i
If you are connected to a network or use an integrated modem, PC LAN card, or PC
modem card, we advise against enabling an energy saving mode. This could lead to an
interruption of your network connection.
When not using the notebook for long periods of time, first end the energy saving mode,
then switch off the notebook. Never switch off the notebook with the ON/OFF switch while
the notebook is in one of the energy-saving modes.
If your notebook is in an energy-saving mode:
•
•
•
•
•
Do not connect any external devices.
Do not disconnect any external devices.
Do not attempt to switch the notebook on if the built-in battery is flat.
Do not add or remove RAM.
Do not add or remove a PC card.
When you close the lid, the notebook automatically enters an energy-saving mode.
The energy saving functions can be activated under Start - Control Panel - Performance and
Maintenance - Power Options. Under Windows, Hibernate is activated by default.
26
10600416171
Working with the notebook
PC cards
A PC card slot (CardBus or PCMIA) enables the notebook to operate one type I or type II PC card.
!
Consult the documentation supplied by the PC card's manufacturer and follow the
instructions provided.
Never use force when inserting or removing a PC card.
Make sure that foreign objects do not fall into the PC card slot.
Installing a PC card
►
Press the eject button (see chapter "Notebook views", Number 34). The placeholder for the PC
card will project further out of the notebook's case.
►
Pull the placeholder for the PC card out of the slot (see chapter "Notebook views", Number 33).
i
Keep the placeholder for the PC card in a safe place. When you remove the PC card you
should also refit the placeholder for the PC card. Thus you prevent foreign objects from
getting into the PC card slot.
►
Insert the PC card end with the connector contacts into the card slot guide rails
The labelled side of the PC card must face upwards.
►
Gently push the PC card into the slot until you feel it click into place.
i
Consult the documentation supplied with the PC card for information on how to
install the necessary device drivers.
For further information refer to the information files (e.g. *.TXT, *.DOC, *.WRI or
*.HLP) provided on the PC card driver diskette or the information in the operating
system manual.
You can push the PC card slot eject button into the notebook casing. To do this,
press the eject button until it engages.
Removing a PC card
Use the small PC card icon located in your task bar to stop the card:
►
Click on the PC card icon in the task bar with the right mouse button.
►
Select PC card Properties.
►
Select the PC card and click on Stop.
Wait for the dialogue box which tells you that it is now safe to remove the PC card.
10600416171
27
Working with the notebook
►
Press the eject button. The PC card will project further out of the notebook's case.
If the eject button is lowered, you must first cause the eject button to release from the notebook
casing. To do this, press the eject button until it releases.
►
Slide the PC card out of the notebook.
►
Insert the placeholder for the PC card into the slot guide.
►
Gently slide the placeholder for the PC card into the slot until you feel it click into place.
Memory card reader
Your notebook is equipped with a memory card reader. Your memory card reader supports the
following formats:
•
•
•
Secure Digital
MultiMediaCard
Memory Stick
Using memory cards
i
Observe the manufacturer's information when using memory cards.
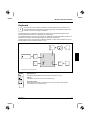
1=
2=
Label area
Insertion direction
2
1
Inserting memory card
►
Depending on the memory card used, insert the memory card in the upper or lower slot guide
with the connection contacts first (see chapter "Notebook views", Number 31).
►
Carefully push the memory card into the slot.
Removing memory card
►
28
Pull the memory card out of the slot.
10600416171
Working with the notebook
Hard disk
The hard disk is the most important storage medium of your notebook. You can work considerably
faster and more efficiently if you copy applications and files from CDs to your hard disk.
Optical drive
Your notebook is delivered with an optical drive. Depending on the variant, your notebook is
equipped with a combo drive (CD-RW/DVD), a DVD+RW drive or a DVD±RW dual drive.
Optical drives can either only read or both read and write different optical data storage media. The
meaning of the respective optical data storage media is described in the following:
CD-ROM
Abbreviation for Compact Disc - Read Only Memory. A CD-ROM is an optical data storage medium
that can contain a maximum of 700 Mbytes. These data cannot be changed.
CD-R
Abbreviation for Compact Disc Recordable. A CD-R is an optical data storage medium that can only
be written with a maximum of 700 Mbytes of data. Then these data cannot be changed, but can be
read as often as desired.
CD-RW
Abbreviation for Compact Disc ReWriteable. A CD-RW is an optical data storage medium that can
be written with a maximum of 700 Mbyte of data a virtually unlimited number of times. This means
the data can be deleted and changed.
DVD (DVD-ROM and DVD video)
Abbreviation for Digital Versatile Disc or Digital Video Disc. A DVD is an optical data storage
medium that can contain a maximum of 17 Gbytes of data. These data cannot be changed.
DVD+R/DVD-R
Abbreviation for Digital Versatile Disc Recordable or Digital Video Disc Recordable. A DVD+R or a
DVD-R is an optical data storage medium that can only be written once with a maximum of
4.7 Gbytes of data. Then these data cannot be changed, but can be read as often as desired.
i
DVD+R and DVD-R are different standards. DVD+Rs and DVD-Rs can only be written by
drives which support the respective standard.
10600416171
29
Working with the notebook
DVD+RW/DVD-RW
Abbreviation for Digital Versatile Disc or Digital Video Disc ReWriteable. A DVD+RW or a DVD-RW
is an optical data storage medium that can be written with a maximum of 4.7 Gbytes of data virtually
an unlimited number of times. This means the data can be deleted and changed.
i
DVD+RW and DVD-RW are different standards. DVD+RWs and DVD-RWs can only be
written by drives which support the respective standard.
Combo drive (CD-RW/DVD)
!
The combo drive in your notebook contains a light-emitting diode (LED), classification as
per IEC 825-1:1993: CLASS 1 LASER, and may therefore not be opened.
With the combo drive you can read all optical data storage media named above. You can also write
CD-Rs and CD-RWs.
DVD+RW drive
!
The DVD+RW drive in your notebook contains a light-emitting diode (LED), classification
as per IEC 825-1:1993: CLASS 1 LASER, and may therefore not be opened.
With the DVD+RW drive you can read all optical data storage media named above. You can also
write CD-R, CD-RW and DVD+RW.
DVD±RW dual drive
!
The DVD±RW dual drive in your notebook contains a light-emitting diode (LED), classified
in accordance with IEC 825-1:1993 as a CLASS 1 LASER, and may therefore not be
opened.
With the DVD±RW dual drive you can read all optical data storage media named above. You can
also write CD-Rs, CD-RWs, DVD+Rs, DVD+RWs, DVD-Rs and DVD-RWs.
30
10600416171
Working with the notebook
Handling CD/DVDs
From this point all different optical data storage media will be referred to as CD/DVDs; the writeable
optical data storage media are called blanks.
!
i
Observe the following when handling CD/DVDs:
•
•
Avoid touching the surface of a CD/DVD. Handle CDs/DVDs only by their edges!
•
•
Protect your CDs/DVDs from dust, mechanical vibration and direct sunlight!
Always store CDs/DVDs in their cases. Thus you avoid dust contamination,
scratches, bending or other damage.
Avoid storing a CD/DVD in areas subject to high temperatures or humidity.
To utilise the optimum writing speed, use CD blanks marked "Multispeed" or "High
Speed".
Use only DVD blanks of the type DVD+RW. Other types of DVD blanks are not supported
by your optical drive.
Inserting or removing a CD/DVD
The notebook must be switched on.
►
Push the insert/eject button (see chapter "Notebook views", Number 24).
The drive tray will open.
10600416171
31
Working with the notebook
►
Pull the drive tray completely out.
►
Place the CD/DVD in the drive tray with the label facing upwards.
or
►
Take out an inserted CD/DVD.
►
Push in the drive tray until you feel it lock into place.
Manual removal (emergency removal)
In the event of a power failure or damage to the drive it may be necessary to manually remove the
CD/DVD.
►
Switch the notebook off.
►
Press a pen or a piece of wire (e.g. a paperclip) firmly into the opening (see chapter "Notebook
views", Number 25).
The drive tray is unlocked. You can now pull the drive tray out of the drive.
Regional codes for DVD films and DVD players
DVD films and DVD players (e.g. the optical drive of your notebook) are always provided with a
regional code. The regional codes of DVD films and DVD players must match so that the DVD film
can be played back.
There are six different regional codes:
•
•
•
Regional code 1: USA and Canada
Regional code 2: Egypt, Europe, Japan, South Africa and the Middle East
Regional code 3: Southeast Asia (including Hong Kong, Indonesia, Philippines, South Korea,
Taiwan)
Regional code 4: Australia, New Zeeland, Southeastern Pacific, Central and South America
and the Caribbean
Regional code 5: Africa (except South Africa), India and the former states of the USSR
Regional code 6: China
•
•
•
The optical drive of your notebook supports the function RPC-II (Phase II System of Regional
Playback Control). This function permits the final user to change the regional code of the drive up to
five times to play back corresponding DVD films. Then the last regional code selected is retained
and cannot be changed again.
i
32
If a DVD film is to be playable in all regions, it has the regional code 0.
Before buying a DVD film you should check that the regional code of the DVD film
matches the regional code set for the optical drive of your notebook.
10600416171
Working with the notebook
Adjusting AutoPlay function of optical drive
With the AutoPlay function you can specify whether or not a program or action is to be run/carried
out depending on the CD/DVD content type of Windows XP. For example, you can specify that
when an Audio CD is inserted, the Media Player is automatically started and automatically plays the
Audio CD.
You can set the AutoPlay function of the optical drive according to your needs. Proceed as follows:
►
Click on the Start menu with the right mouse button or touchpad key.
A context menu appears.
►
Click on Explorer.
►
Click on the corresponding drive with the right mouse button or touchpad key.
A context menu appears.
►
Click on Properties.
►
Click on the AutoPlay tab.
►
Adjust the AutoPlay function to meet your needs.
i
Please note that you must select the desired action and confirm it with Apply for each
individual CD/DVD content type.
Audio: Setting volume
►
To adjust the volume use the Windows volume control from the Start menu - Programs Accessories - Multimedia - Volume Control.
Integrated 56k modem
The integrated 56k modem supports all data communication applications, such as:
•
Modem operation: High-speed downloads at up to 56,000 bit/s (V.90). Downward-compatible to
V.34 modems.
•
•
Fax mode: Transmitting and receiving at up to 14,400 bit/s
Simple country adaptation with programme
The modem complies with the EU Directive 91/263/EEC (Telecommunications terminal equipment
directive) and has been checked in agreement with the guideline TBR-21.
The modem can be operated in the following countries:
Multifrequency (MFC) dialling
Belgium, Denmark, Germany, Finland, France, Greece, Great Britain, Holland, Ireland, Iceland,
Italy, Luxembourg, Norway, Austria, Portugal, Sweden, Switzerland and Spain.
Pulse dialling:
Belgium, France, Holland and Italy.
Also in: Poland, Slovenia, South Africa and Hungary.
10600416171
33
Working with the notebook
Connecting notebook modem to telephone connection
►
Connect the modem cable supplied to the country-specific telephone adapter.
Connect the modem cable to the modem port
the notebook.
►
(see chapter "Notebook views", Number 29) of
Connect the modem cable to your telephone wall socket.
i
If you attach your modem on a TAE-N-connector the phone respectively data cable is
busy. The cable cannot be used for other communication devices at the same time. Pull
the modem plug out of the TAE-N-power socket after the data transfer, because also with
connected cable no other communication devices can be used.
Ethernet and LAN
The internal LAN module of your notebook supports Ethernet-LAN (10/100 Mbps).
Connect the LAN cable to the notebook's LAN connector
Number 30).
►
(see chapter "Notebook views",
Connect the network cable to your LAN network connector.
Wireless LAN
Press the Wireless Lan On/Off switch
the notebook's radio component.
i
(see the "Notebook views" section) to enable or disable
For details, see the online help for your wireless LAN software and the "Wireless LAN"
manual (the "Wireless LAN" manual is provided on the "Drivers & Utilities" CD).
Pay attention to the additional safety precautions for devices with wireless LAN provided
in the "Safety and Ergonomics" manual.
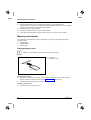
Establishing an infrared connection
The infrared interface (IrDA) (see chapter "Notebook views", Number 19) allows wireless serial data
transfer.
►
Position the infrared transmitter and infrared receiver such that they have "visual contact".
i
34
The devices may be no more than one metre apart. The infrared interface of one
device must be in the range of influence (horizontally approx. 30° and vertically
approx. 15°) of the infrared interface of the other device.
10600416171
Security functions
Your notebook enables you to protect your system and personal data in a number of ways against
unauthorised access. By combining these options, you can achieve maximum protection for your
system.
In this chapter you will learn which security functions your notebook is equipped with, which
advantages these functions offer you and how to configure and use them.
!
Please consider that in the case of improper use, you yourself will also be unable to
access your system and your data. Please note therefore the following hints:
•
•
Back up your data on external data carriers at regular intervals.
Passwords must be assigned for some security functions. Please be sure to note
these passwords, as otherwise you will no longer be able to access your system.
We recommend that you make a note of the passwords and keep them in a safe
place.
If you lose both the user and the admin passwords, you must contact our help desk. The
loss of passwords is not a warranty case and is therefore subject to charge.
Overview of all security functions
The following sections contain a brief description of the security functions that are provided with your
notebook as standard equipment.
Kensington Lock
With the Kensington MicroSaver, a sturdy steel cable, you can protect your notebook from theft. For
this reason your notebook is equipped with a device for the Kensington MicroSaver. The Kensington
MicroSaver is available as an accessory.
BIOS password protection
You can protect you personal data from unauthorised access with various passwords. By combining
these different options, you can achieve maximum protection for your system.
Password protection for the BIOS Setup Utility
With the supervisor password you prevent unauthorised opening of the BIOS Setup Utility, and with it
access to important system settings. In the BIOS Setup Utility you can also activate protection for the
operating system.
Password protection for the operating system
With corresponding settings in the BIOS Setup Utility you can block starting of the operating system.
Only those who know the supervisor or user password can access the system.
10600416171
35
Security functions
Brief overview of the security functions
Security function
Type of protection
Preparation
Kensington Lock
Mechanical
Mount and lock Kensington
MicroSaver (accessory)
BIOS password
protection
Password protection for BIOS Setup
Utility and operating system with
supervisor and user password. The
passwords consist of a maximum of
six alphanumeric characters.
Specify at least one supervisor
password in the BIOS Setup Utility
and activate the password
protection for the operating system
as desired.
Using Kensington Lock
►
Fit the Kensington MicroSaver on the device (see chapter "Notebook views" chapter,
Number 16) on your notebook.
Configuring password protection in BIOS Setup
Utility
!
i
36
Before using the various options of password protection for your data security in the BIOS
Setup Utility, please note the following hints:
•
Please keep in mind your passwords in any case, as you will not be able to access
your BIOS Setup Utility and/or your system any longer, if you forget both the user
password and the supervisor password.
The loss of passwords is not a warranty case and is therefore subject to charge.
•
Back up your data on external data carriers at regular intervals.
Passwords can be up to six characters long. You can use all alphanumeric characters
and need not distinguish between uppercase and lowercase characters.
10600416171
Security functions
Protecting BIOS Setup Utility (supervisor and user password)
i
If you have opened these operating instructions on the screen, we recommend that you
print out the following instructions. Because you cannot call the instructions onto the
screen while you are setting up the password.
You prevent unauthorised opening of the BIOS Setup Utility with both the supervisor and the user
password. With the supervisor password you have access to all functions of the BIOS Setup Utility,
and with the user password only to part of the functions. You can only set a user password if a
supervisor password has already been assigned.
i
Please refer to section "Settings in BIOS Setup Utility" for a description of calling and
operating the BIOS Setup Utility.
Set the supervisor and user password
►
Call BIOS Setup Utility and select the Security menu.
►
Select the Change Supervisor Password field and press the enter key.
With Enter New Password: you are then requested to enter a password.
►
Enter the password and press the Enter key.
With Confirm New Supervisor Password you are asked to confirm the password.
►
Enter the password again and press the Enter key.
With Password Installed you receive a confirmation that the new password has been saved.
►
To assign the user password, select the field Change User Password and proceed exactly as
when configuring the supervisor password.
If you do not want to make any other settings, you can exit BIOS Setup Utility.
►
Select the Save Changes and Exit field under Exit.
►
Press the Enter key.
The notebook is rebooted and the new password is effective. If you now want to open the BIOS Setup
Utility, you must first enter your supervisor or user password. Please note that you only have access
to a few BIOS settings with the user password.
Change supervisor or user password
►
Run the BIOS Setup Utility again.
►
When changing the password, proceed exactly as for password assignment.
You can only change the supervisor password when you have logged into the BIOS Setup Utility with
the supervisor password.
10600416171
37
Security functions
Cancelling passwords
To cancel a password (without setting a new password) run the following steps:
►
Call BIOS Setup Utility and select the Security menu.
►
Mark the Change Supervisor Password or Change User Password field and press the Enter key.
With Enter New Password you will then be asked to enter a password.
►
Press the Enter key twice.
►
Select the Save Changes and Exit field under Exit.
►
Press the Enter key.
The notebook is rebooted and the password is cancelled.
With the supervisor password you simultaneously deactivate the user password.
Password protection of operating system
i
With the supervisor password or the user password, you have assigned in the BIOS Setup
Utility (see "Set the supervisor and user password" section), you can also prevent booting
of the operating system.
Activating system protection
►
Call BIOS Setup Utility and select the Advanced CMOS Setup menu.
►
Mark the field Password Check.
►
Select the entry Always.
►
Select the Save Changes and Exit field under Exit.
►
Press the Enter key.
The notebook reboots and you are asked to enter your password (the supervisor or user password).
Deactivating system protection
►
Call BIOS Setup Utility and select the Advanced CMOS Setup menu.
►
Mark the field Password Check.
►
Select the entry Setup.
►
Select the Save Changes and Exit field under Exit.
►
Press the Enter key.
The notebook reboots and there is no longer any password protection for the operating system.
38
10600416171
Connecting external devices
!
Under all circumstances, please observe the safety notes provided in the "Important
notes" chapter.
Read the documentation on the external device before connecting it.
Do not connect or disconnect cables during a thunderstorm.
Do not pull on the cable when disconnecting a cable. Always take hold of the actual plug.
Adhere to the order described in the following when you connect external devices to the
notebook or separate them from the notebook:
Connecting devices to notebook
1.
Turn off all power and equipment switches.
2.
Remove all power plugs from the mains outlets.
3.
Connect all the cables to the notebook and the external devices.
4.
Plug all data communication cables into the utility sockets.
5.
Plug all power cables into the mains supply.
Disconnecting devices from notebook
i
1.
Turn off all power and equipment switches.
2.
Remove all power plugs from the mains outlets.
3.
Unplug all data communication cables from the utility sockets.
4.
Disconnect all the cables from the notebook and the external devices.
Some of the external devices require special drivers (see the operating system and
external device documentation).
Connecting an external monitor
An external monitor can be connected to the notebook.
•
Using the Fn + F4 key combination you can switch back and forth between the external
monitor and the LCD screen.
•
You can display the same picture on the external monitor and the LCD screen simultaneously.
►
Switch off the notebook and the external monitor.
►
Connect the external monitor to the monitor port (see chapter "Notebook views", Number 18)
on your notebook.
►
First switch on the monitor and then the notebook.
10600416171
39
Connecting external devices
Setting the refresh rate for your external monitor
The refresh rate must be correctly set so that the image does not flicker.
►
Select the monitor type in the menu Start - Control Panel - Appearance and Themes - Display Settings - Advanced - Display.
►
Now select the Adapter tab.
►
Adjust the refresh rate and then click Apply.
!
If the refresh rate set is too high, the monitor may be damaged. Please see the
documentation included with your monitor for the maximum possible refresh rate.
Using the parallel port
►
Switch the notebook off.
►
Connect the data cable of the printer to the parallel port (see chapter "Notebook views",
Number 17) on the notebook.
►
Plug the printer power cable into the mains outlet.
►
First switch the printer on, then the notebook.
Connecting USB devices
You can connect external devices to the USB ports (see chapter "Notebook views", Numbers 20, 27
and 28) which also have a USB interface (e.g. a printer, a scanner or a modem).
i
USB devices are hot-pluggable. This allows cables from USB devices to be connected
and disconnected with the system switched on.
USB 1.x has a maximum data transfer rate of 12 Mbit / s.
USB 2.x has a data transfer rate of up to 480 Mbit / s.
Additional information can be found in the documentation for the USB devices.
►
Connect the data cable to the external device.
►
Connect the data cable to a USB port of the notebook.
i
40
Device drivers
The devices you connect to the USB ports usually require no driver of their own, as the
required software is already included in the operating system. However, if the USB device
requires its own software, please install it from the data carrier provided with the USB
device.
10600416171
Connecting external devices
Connecting external audio devices
SPDIF Out/Headphones socket
Via the SPDIF Out/Headphones socket (see chapter "Notebook views", Number 13) you can
connect headphones, external speakers or audio devices with a digital optical output to your
notebook.
Line In socket
Via the Line In socket (see chapter "Notebook views", Number 14) you can connect audio devices
with an analog output to your notebook.
Microphone jack
Via the microphone port (see chapter "Notebook views", Number 15) you can connect an external
microphone to your notebook.
Adjusting the volume
►
To adjust the volume use the Windows volume control from the Start menu - Programs Accessories - Multimedia - Volume Control.
Connecting an external device to S-Video Out
You can connect an external device (e.g. a television set) to the S-Video Out socket (see chapter
"Notebook views", Number 21) of your notebook.
►
Switch off the notebook and the external device.
►
Connect the external device to the S-Video Out socket of your notebook.
►
First switch the external device on and then the notebook.
Activating television set
►
Select the monitor type in the menu Start - Control Panel - Appearance and Themes - Display Settings - Advanced - Displays.
►
Click on Apply.
With the key combination Fn + F4 you can switch between the television set and the LCD
screen of the notebook.
Connecting an external device to IEEE1394 (FireWire)
Peripheral devices such as digital audio/video devices or other high-speed devices can be
connected to the IEEE1394 FireWire port. Your notebook is equipped with a FireWire port, which
operates at 400 Mbit per second.
►
Connect the peripheral device to the FireWire port (see chapter "Notebook views", Number 32)
of your notebook.
10600416171
41
Settings in BIOS Setup Utility
In BIOS Setup Utility you can set the system functions and the hardware configuration of the
notebook.
When it is delivered, the notebook is set to factory default settings. You can change these settings
in BIOS Setup Utility. Any changes you make take effect as soon as you save and quit the BIOS Setup
Utility.
The BIOS Setup Utility programme contains the following menus:
Main:
For system settings such as time and date and information about the
notebook
Advanced:
For system settings such as interfaces, keyboard and hard disks
Boot:
For specifying the start order
Security:
For security settings such as passwords
Power:
For setting the energy saving functions
Exit:
For saving the changes and terminating the BIOS Setup Utility
Start BIOS Setup Utility
►
Restart the notebook (switching ON/OFF or warm boot).
The following or a similar display appears on the screen during booting:
F2: Setup
►
F12: Boot Menu
When this message appears, press the function key F2 .
i
If a password has been assigned:
►
Enter the password and press the Enter key.
If you have forgotten the password, contact your system administrator or contact our
customer service centre.
10600416171
43
Settings in BIOS Setup Utility
Operating BIOS Setup Utility
i
Press the F1 key to display help on the operation of BIOS Setup Utility.
The description of the individual settings is shown in the right-hand window of the BIOS
Setup Utility.
►
Mark the menu in which you want to make settings with the cursor keys.
►
Press the Enter key.
The menu is displayed on the screen.
►
Use the cursor keys to select the field you wish to change.
►
Change the field entries with the keys PgUp or PgDn .
►
Press the Enter key to confirm your selection.
►
Press the Esc key to exit the selected menu.
►
For future reference, make a note of the changes you have made (for example, in this manual).
Exiting BIOS Setup Utility
You have to mark the desired option in the Exit menu and activate it with the enter key.
Save the settings and exit the BIOS Setup Utility - Save Changes and Exit
Select Save Changes and Exit and Yes to save the current settings and exit the BIOS Setup Utility. The
device is rebooted and the new settings come into effect.
Reject the changes and exit the BIOS Setup Utility - Exit without Saving
Select Discard Changes and Exit and Yes to discard the changes you have made. The settings which
were in force when BIOS Setup Utility was called remain effective. BIOS Setup Utility is terminated
and the device is rebooted.
44
10600416171
Troubleshooting and tips
!
Take note of the hints in the "Important notes" chapter, when you connect or disconnect
cables.
If a fault occurs, try to correct it as described. If you fail to correct the problem, proceed as follows:
►
Make a note of the steps and the circumstances that led to the fault. Also make a note of any
error messages displayed.
►
Switch the notebook off.
►
Contact your sales outlet or our hotline/help desk.
Restoring operating system
Using the Windows Recovery CD and the Drivers & Utilities CD, you can restore the operating
system of your notebook.
When restoring the operating system the contents of your hard disk will be overwritten. After this,
operating system, drivers and software utilities will be reinstalled. For this reason you should try to
save important data to a backup medium before you restore the hard disk contents.
►
Insert the Windows Recovery CD into the combo drive.
►
Start the Setup programme on the CD.
i
Detailed PC knowledge is required for manual partitioning.
You must then reinstall all the drivers. Use the "Drivers & Utilities" CD.
The notebook's date or time is incorrect
►
Set the time and/or date in the BIOS Setup Utility under Standard CMOS Setup.
i
If the date and time are repeatedly incorrect when you switch on the notebook, the buffer
battery that supplies the internal clock is dead.
Connect the notebook via its power adapter to a grounded mains outlet or install a fresh
battery. The buffer battery will take approximately two days to complete its recharge. If the
problem persists, contact your sales office or our hotline/help desk.
10600416171
45
Troubleshooting and tips
The LCD screen of the notebook remains blank
Monitor is switched off
►
Press a key or enter the password
External monitor or television set connected
►
Press the key combination Fn + F4 (selecting internal/external display).
The LCD screen is difficult to read
Reflection
►
Turn the notebook or alter the tilt of the LCD screen.
The external monitor stays blank
If your screen remains blank this may be due to the following:
Monitor is switched off
►
Switch the external monitor on.
Power saving has been activated (screen is blank)
►
Press any key to continue.
Brightness is set too dark
►
Adjust the brightness of the monitor.
Screen output is set to the notebook’s LCD screen
►
Press the key combination Fn + F4 (selecting internal/external display).
The external monitor's power cable or data cable is not connected properly
►
Switch off the external monitor and the notebook.
►
Check whether the power cable is plugged properly into the external monitor and into the power
socket.
►
Check whether the data cable is properly connected to the notebook and the external monitor
(if it is plugged in with a connector).
►
Switch on the external monitor and the notebook.
46
10600416171
Troubleshooting and tips
The external monitor is blank or the image is unstable
The wrong external monitor has been selected or the wrong screen resolution has been set for the
application programme.
►
Terminate the application programme under Windows with Alt + F4 . If the fault continues to
occur after ending the programme, switch over to the notebook's internal LCD screen with Fn
+ F4 . Change the following setting:
►
Select the correct monitor or set the correct screen resolution.
−
Setting the screen resolution: Select Start - Control Panel - Appearance and Themes Advanced - screen resolution and then the screen resolution you require.
−
Selecting the monitor: Select the correct monitor under Start - Control Panel - Appearance
and Themes - Display - Settings - Advanced - Display.
The notebook cannot be started
The battery is not installed correctly
►
Switch the notebook off.
►
Check whether the battery is installed correctly in its compartment.
►
Switch the notebook on.
The battery is dead
►
Charge the battery.
Or
►
Install a charged battery.
Or
►
Connect the power adapter to the notebook.
The power adapter is not connected correctly
►
Switch the notebook off.
►
Check whether the power adapter is connected correctly to the notebook.
►
Switch the notebook on.
10600416171
47
Troubleshooting and tips
The notebook stops working
The notebook is in Standby or Suspend mode
►
Reactivate the notebook by pressing a key (Standby mode) or by switching it back on (Suspend
mode).
An application programme has caused the malfunction
►
Close the application programme or restart the notebook by switching it on/off or with a warm
boot.
The battery is dead
►
Charge the battery.
Or
►
Install a charged battery.
Or
►
Connect the power adapter to the notebook.
The printer does not print
►
Make sure that the printer is switched on and is on-line (see the manuals supplied with the
printer).
►
Check that the cable connecting the notebook and the printer is connected properly.
►
Check that the correct printer driver is installed.
The DVD film does not continue to play
Should the picture freeze when playing some DVD films, deactivate the accelerated hardware
decryption (it is activated in the default setting; this can be recognised from the checkmark in the
corresponding checkbox).
►
Open the drive tray.
►
Place the DVD in the drive tray with the label facing upwards.
►
Push in the drive tray until you feel it lock into place.
►
Wait until the WinDVD starts.
►
Press the right mouse button or touchpad key.
A context menu appears.
►
Click on Configuration and then on Video.
►
Click on the checkmark in the checkbox of Hardware Acceleration.
The checkmark disappears.
►
Click on OK.
The function is now deactivated.
48
10600416171
Troubleshooting and tips
Acoustic warnings
A beep sounds every few seconds
The battery is almost flat.
►
Charge the battery.
System configuration contains invalid data
►
Switch the notebook off.
►
Switch the notebook on.
►
Enter the BIOS Setup Utility programme by pressing F2 .
►
Select the Load Optimal Defaults entry in the Exit menu to restore the default settings.
►
Press the Enter key.
►
Confirm this question with Yes.
►
Press the Enter key.
If the error message appears repeatedly, please contact the place of purchase or our
hotline/help desk.
10600416171
49
Technical data
Notebook
Processor:
AMD Athlon 64 with PowerNow!™ technology,
2.4 GHz or higher
Main memory:
Maximum of 1 Gbyte DDR266 SDRAM (PC2100)
or DDR333 SDRAM (PC2700)
2 slots for 256 or 512-Mbyte modules
Disk drives:
Hard disk drive
Optical drive
Electrical data
Regulations complied with:
CE!
Maximum power draw:
(notebook on with battery charging)
approx. 160 W
LCD screen
Display diagonal:
15.4 inch WXGA TFT
15.4 inch WSXGA TFT
Graphics
Chip:
ATI MOBILITY RADEON 9700
Video memory:
128 MB
Supported resolutions on external monitor:
Colour depth:
1600 x 1200
32 bit
Audio
Sound:
16-bit stereo audio (AC’97)
Input devices
Keyboard:
88 keys
Touchpad:
4 keys
Slots
PC Card slot (CardBus/PCMCIA):
PCMCIA 1 x Type I or II
Memory card reader
Flash Card Port SD/MS/MMC
10600416171
51
Technical data
Ports
Monitor port:
15-pin female connector
Microphone jack:
connector, mono
Line In
connector, stereo
SPDIF Out/Headphones socket
connector, stereo, digital
Video port:
4-pin mini DIN female connector
USB port (Universal Serial Bus):
3x 2.0
LAN connector:
Female connector, RJ-45
Modem port:
Female connector, RJ-11
FireWire port:
S400, 4-pin
Parallel port:
25-pin female connector, bi-directional, ECP
capable
Infrared interface:
Fast IrDA 4Mbits/s
Kensington Lock
Environmental conditions
Environment class 7K1
Environment class 7M2
Temperature
Operation (7K1):
Transport (2K2):
5 °C .... 35 °C
-15 °C .... 60 °C
Dimensions
Width/depth/height:
358 mm, 269 mm, 35.8 mm
Weight (depending on configuration):
approx. 3.5 kg
Battery
Charging time (when not in operation):
approx. 3 hours
Operating time
approx. 1.5 hours (depending on application)
Power adapter 160 W
Primary
•
•
•
Rated voltage:
100 V to 240 V (automatic)
Frequency:
50 Hz to 60 Hz (automatic)
Max. rated current:
1.6 A
Secondary
•
•
52
Rated voltage:
20 V
Max. rated current:
8A
10600416171
Index
56k modem 33
A
Acoustic warnings 49
Alt+Tab 22
Anti-theft protection 36
Audio devices, connecting 41
AutoPlay function 33
B
Battery 25
capacity 11
caring for 25
charge level 25, 26
charge metre 25
charging 25, 49
compartment 5
important notes 25
indicator 18
installing 26
lifetime 25
lock 5
removing 26
self-discharge 11
storing 11
warning tone 25
switching off/on 21
Beep, error message 49
BIOS Setup Utility
cancel supervisor password 38
cancel user password 38
change supervisor password 37
change user password 37
exiting 44
operating 44
protect with password 37
set supervisor password 37
set user password 37
settings 43
starting 43
Blank 31
Board 8
Buffer battery, load 45
Built-in
loudspeakers 3
microphone 3
C
Caps Lock indicator 18
CardBus, see PC card
10600416171
CD blank 31
CD/DVD
AutoPlay function 33
emergency removal 32
inserting 31
removing 31
working with 31
CD-R 29
CD-ROM 29
CD-RW 29
CE marking 10
Changing font size 24
Cleaning 13
Combo drive 30
AutoPlay function 33
Configuration, BIOS Setup Utility 43
Connecting digital audio devices 41
Content type, CD/DVD 33
Contents of delivery 15
Copyright-protected technology 9
Ctrl+Alt+Del 22
Cursor keys 20
D
Data transfer, infrared connection 34
Date, not correct 45
Date/Time incorrect 45
DC IN jack 4
Devices
connecting 39
disconnecting 39
Digital video devices, connecting 41
Display output, switch between 21
Disposal 10
Drive, indicator 18
Driver CD 45
Drivers & Utilities 45
DVD 29
blank 31
film, picture frozen 48
film, regional codes 32
regional codes 32
video 29
DVD+R 29
DVD+RW 30
DVD+RW drive 30
AutoPlay function 33
DVD±RW dual drive 30
DVD-R 29
DVD-ROM 29
DVD-RW 30
53
Index
E
Easy Launch keys 3, 22
Eject button, PC card 27
Electromagnetic compatibility 10
E-mail, Easy Launch key 22
Emergency removal, CD/DVD 32
Energy
energy saving 9
energy saving functions 9, 26
power consumption 26
Energy-saving mode indicator 18
Enter key 19
Error message, acoustic 49
Error, correction 45
ESD 8
Ethernet LAN 34
External loudspeaker, connecting 41
F
FireWire port 4, 41
Fn+F1 21
Fn+F3 21
Fn+F5 21
Fn+F6 21
Fn+F7 21
Fn+F8 21
Front, view 3
H
Hard disk 29
restoring the operating system 45
Hardware, configuring 43
Headphone port 3, 41
Headphones, connecting 41
High-speed devices, connecting 41
Hole for manual ejection 4
I
Important notes 7
Indicator
Caps Lock 18
drive 18
Num Lock 18
Scroll 18
Infrared
connection 34
interface 4
Insert/eject button 4
Internet, Easy Launch key 22
K
Kensington Lock 4, 35
applying 36
Kensington MicroSaver 35, 36
54
Key 19
Backspace 19
Caps Lock 20
combination 21
cursor control keys 20
Enter 19
Fn key 20
Fn+F4 21
Return 19
Shift 20
Shift+Tab 22
Tab key 19
Keyboard 19
cleaning 13
L
LAN port 4
LCD screen
cleaning 13
increasing the brightness 21
is blank 46
is difficult to read 46
notes 24
reducing the brightness 21
reflected glare 46
remains blank 46
setting the font size 24
settings 24
synchronising the display 24
Left-hand side, view 4
Lifetime, battery 25
Line In 3
socket 41
Location, selecting the 16
M
Manual removal, CD/DVD 32
Memory card
inserting 28
Memory Stick 28
MultiMediaCard 28
reader 4
inserting memory card 28
removing memory card 28
supported formats 28
removing 28
Secure Digital 28
working with 28
Memory Stick 28
Menu key 20
Microphone
connecting 41
jack 3
Mobile operation 12
10600416171
Index
Modem 33
connecting 34
port 4
Monitor
connecting 39, 41
port 4, 39
refresh rate 40
remains blank 46
screen
drifting display 47
no screen display 47
synchronising the display 24
MultiMediaCard 28
N
Notational conventions 2
Notebook
before you travel 12
cleaning 13
not starting 47
ON/OFF switch 3
operating 17
placing in service 15
setting up 16
stops working 48
switching off 18
transporting 12
views 3
Notes 7
battery 25
boards 8
CE marking 10
cleaning 13
disposal 10
energy saving 9
manufacturer 9
safety 7
transporting 12
Num Lock indicator 18
Numeric keypad 19, 20
O
ON/OFF switch 17
Open notebook, view 3
Operating system
activating system protection 38
cancel system protection 38
protecting with password 38
restoring 45
Operation, preparing for 16
Optical data storage media
handling 31
overview 29
10600416171
Optical drive 4, 29
AutoPlay function 33
P
Packing material 15
Parallel port 4, 40
Password
cancelling 38
changing 37
enter 37
protection 35, 36
BIOS Setup Utility 35
Operating system 35
Pause key 20
PC card 27
eject button 27
installing 27
removing 27
slot 4
PCMCIA, see PC card
Peripheral devices
connecting 39
disconnecting 39
Picture frozen, DVD film 48
Power adapter
connecting 16
setting up 16
Power-on indicator 18
Preparing for use 15
Printer
connecting 40
does not print 48
R
Rear, view 4
Recovery CD 45
Recycling 10
Regional codes 32
Restoring, operating system 45
Right-hand side, view 4
S
S Video Out socket 4, 41
Safety 7
Screen brightness
decreasing 21
increasing 21
Scroll indicator 18
(Scroll Lock) 18
Secure Digital 28
Security functions 35
overview 35
survey 36
Self-discharge, battery 11
55
Index
Setup, see BIOS Setup Utility
Shift key 20
Signs and symbols 2
Slots, memory card 28
SPDIF Out 3, 41
Speaker, connecting 41
Standby mode, terminating 48
Start key 20
Status indicators 3, 18
Storage, battery 11
Summer time 45
Survey, security functions 36
Suspend mode
switching on 21
terminating 48
Synchronisation, screen display 24
System configuration 43
System settings, BIOS Setup Utility 43
T
Technical data 51
Time
daylight savings 45
not correct 45
Tips 45
Touchpad 3, 23
buttons 3
cleaning 13
dragging items 23
executing commands 23
moving the pointer 23
scroll bar 3
scroll buttons 3
scrolling 24
selecting items 23
56
Transport 12
damages 15
Travel, notebook 12
Troubleshooting 45
TV set, connecting 41
U
Underside, view 5
USB port 4, 40
V
VGA port, see monitor port
Video devices, connecting 41
Video output, see S-Video Out socket
Volume
adjustment 33, 41
decreasing 21
increasing 21
W
Warm boot 22
Wireless data transfer 34
Wireless LAN 34
ON/OFF switch 3
10600416171