1
Avaya
User’s Guide
AVAYA™ X330W2-DS1
MULTISERVICE WAN ACCESS ROUTER MODULE
SOFTWARE VERSION 3.9
May 2002
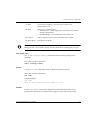
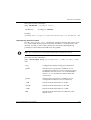
Contents
List of Tables....................................................................................................... ix
List of Figures ..................................................................................................... xi
Preface ................................................................................................................... I
About This Guide
I
Objectives .................................................................................................I
Audience ..................................................................................................I
Conventions used in the Documentation ...........................................I
CLI ........................................................................................................I
Notes, Cautions and Warnings ...................................................... II
Before You Install
II
Notice ..................................................................................................... II
Your Responsibility for Your System’s Security .............................. II
Important Safety Information ............................................................ III
Requirements and Specifications
III
Technical Specifications ...................................................................... III
Power & Heat Dissipation ..................................................................IV
X330WAN Standards Supported ......................................................IV
Standards and Compliance
V
Safety Standards Compliance ............................................................VI
Electromagnetic Compatibility Standards .......................................VI
Telecommunication Standards ........................................................ VII
NEBS Compliance Standards ......................................................... VIII
How to Contact Us
VIII
Chapter 1
Overview............................................................................................................... 1
Branch Office Connectivity to Headquarters .................................... 1
Small/Medium Business Connectivity Directly to a
Service Provider .................................................................................... 1
Functional Concepts
2
WAN Access ........................................................................................... 2
Routing .................................................................................................... 2
Security ................................................................................................... 2
Convergence ........................................................................................... 2
Features
3
Layer 1 Features ..................................................................................... 3
Layer 2 Features ..................................................................................... 3
Layer 3 Features ..................................................................................... 4
Avaya X330W-2DS1 User’s Guide
i
Contents
Convergence Features ...........................................................................4
QoS Features ...........................................................................................5
Policy .......................................................................................................5
Controlling Network Access to the X330WAN ............................6
Avaya X330WAN Network Management .........................................7
Command Line Interface (CLI) .......................................................7
Avaya P330 Device Manager (Embedded Web) ...........................7
VisAbility™ ........................................................................................7
Interfaces.............................................................................................................. 8
Physical Interfaces .................................................................................8
Virtual Interfaces ....................................................................................8
Data Flow
10
Front Panels and LEDs
10
X330W-2DS1 Front Panel ....................................................................11
X330WAN LEDs ...................................................................................11
ii
Chapter 2
Installation .......................................................................................................... 13
Safety Information
13
Device Support
13
Before You Install
13
Installing an X330WAN Module into an Avaya P330 Switch
14
Power On Self Test ...............................................................................14
Avaya P330 LEDs
15
Removing an X330WAN Module from an Avaya P330 Switch
16
Chapter 3
Initial Configuration......................................................................................... 19
Connecting the X330WAN
19
Connecting the E1/T1 Ports ...............................................................19
Connecting the Ethernet Port .............................................................19
Connecting the Console Port ..............................................................19
Console Pin Assignments ...................................................................20
Configuring the X330WAN
21
Establishing a Serial Connection .......................................................21
Establishing a Modem Connection ...................................................22
Checking the Modem Configuration ................................................23
Configuring Fast Ethernet Interfaces ................................................23
Configuring E1/T1 Interfaces ............................................................23
Configuring Loopback Interfaces ......................................................26
Checking the Loopback/Fast Ethernet/T1/E1/IP Interface
Configuration ......................................................................................26
Saving Your Configuration ................................................................27
Establishing a Telnet Connection ......................................................27
X330WAN Default Settings
28
Chapter 4
Common Configurations ................................................................................. 29
Avaya X330W-2DS1 User’s Guide
Contents
Connecting Branch Offices to Headquarters
Connecting a Small Office to the Internet
Using the X330WAN with Security
29
31
32
Chapter 5
Troubleshooting ................................................................................................ 33
Monitoring Traffic
33
Handling E1/T1 Alarms
33
Alarm Conditions ................................................................................ 34
LOS .................................................................................................... 34
LOF/Red .......................................................................................... 34
High Ber/Major ............................................................................... 35
RAI/Yellow ..................................................................................... 35
AIS/Blue .......................................................................................... 35
Alarm Detection ................................................................................... 36
Using Loopbacks
36
Troubleshooting VoIP Transmission
37
Chapter 6
Embedded Web Manager ................................................................................
System Requirements
Running the Embedded Manager
Installing the Java Plug-in
Installing the On-Line Help and Java Plug-In on your Web Site
Documentation and Online Help
Software Download
Chapter 7
X330WAN CLI Commands.............................................................................. 45
Introduction: About CLI
45
X330WAN CLI Prompts ..................................................................... 46
General: Device Commands
47
clear screen ........................................................................................... 47
clear snmp trap .................................................................................... 47
clear timezone ...................................................................................... 47
copy running-config startup-config .................................................. 47
copy running-config tftp .................................................................... 48
copy startup-config tftp ...................................................................... 48
copy tftp startup-config ...................................................................... 48
copy tftp EW_archive .......................................................................... 49
copy tftp SW_image ............................................................................ 49
dir ......................................................................................................... 50
erase startup-config ............................................................................. 51
get time .................................................................................................. 51
hostname ............................................................................................... 51
no hostname ......................................................................................... 52
nvram initialize .................................................................................... 52
reset ....................................................................................................... 52
Avaya X330W-2DS1 User’s Guide
39
39
40
42
43
43
43
iii
Contents
set boot bank .........................................................................................53
set logout ...............................................................................................53
set snmp trap ........................................................................................54
set snmp trap auth ...............................................................................55
set system contact ................................................................................55
set system location ...............................................................................55
set system name ...................................................................................56
set time client ........................................................................................56
set time protocol ...................................................................................56
set time server .......................................................................................57
set timezone ..........................................................................................57
show boot bank ....................................................................................57
show copy status ..................................................................................58
show dev log file ..................................................................................58
show erase status .................................................................................58
show image version .............................................................................59
show module-identity .........................................................................59
show running-config ...........................................................................59
show snmp ............................................................................................60
show startup-config .............................................................................60
show system .........................................................................................60
show tftp download software status .................................................61
show tftp download/upload status ..................................................61
show time ..............................................................................................62
show time parameters .........................................................................62
show timezone .....................................................................................62
sync time ...............................................................................................62
tech .......................................................................................................63
terminal length .....................................................................................63
terminal width ......................................................................................63
Layer 3 CLI Commands
64
arp ........................................................................................................64
arp timeout ..........................................................................................64
clear arp-cache ......................................................................................65
clear ip route .........................................................................................65
default-metric (Interface context) ......................................................65
default-metric (Router-OSPF context) ..............................................66
default-metric (Router-RIP Mode) ....................................................66
distribution-list (Router-RIP Mode) ..................................................66
ip address ..............................................................................................67
ip admin-state (Interface context) ......................................................68
ip bootp-dhcp network (Interface context) ......................................68
ip bootp-dhcp relay .............................................................................68
ip bootp-dhcp server (Interface context) ..........................................69
iv
Avaya X330W-2DS1 User’s Guide
Contents
ip broadcast-address (Interface Context) ......................................... 69
ip default-gateway .............................................................................. 70
ip directed-broadcast (Interface context) ......................................... 71
ip icmp-errors ....................................................................................... 71
ip max-arp-entries ............................................................................... 71
ip max-route-entries ............................................................................ 72
ip netbios-rebroadcast (Interface context) ........................................ 72
ip netmask-format ............................................................................... 73
ip ospf authentication-key (Interface context) ................................. 73
ip ospf cost (Interface context) ........................................................... 74
ip ospf dead-interval (Interface context) .......................................... 74
ip ospf hello-interval (Interface Mode) ............................................ 74
ip ospf priority (Interface Mode) ....................................................... 75
ip ospf router-id ................................................................................... 75
ip proxy-arp (Interface context) ......................................................... 76
ip redirect (Interface context) ............................................................. 76
ip rip authentication key (Interface context) ................................... 77
ip rip authentication mode (Interface context) ................................ 77
ip rip default-route-mode (Interface context) ................................. 78
ip rip poison-reverse (Interface Context) ......................................... 78
ip rip rip-version (Interface context) ................................................. 79
ip rip send-receive (Interface context) .............................................. 79
ip rip split-horizon (Interface Context) ............................................ 80
ip route ................................................................................................. 81
ip routing .............................................................................................. 82
ip routing-mode (Interface Context) ??? .......................................... 82
ip vrrp (Interface Context) ................................................................. 82
(ip vrrp) address .................................................................................. 83
(ip vrrp) auth-key ................................................................................ 83
(ip vrrp) override addr owner ........................................................... 84
(ip vrrp) preempt ................................................................................. 84
(ip vrrp) primary ................................................................................. 85
(ip vrrp) priority .................................................................................. 85
(ip vrrp) timer ...................................................................................... 86
network (Router-OSPF context) ........................................................ 86
network (Router-RIP Context) ........................................................... 87
ping ........................................................................................................ 87
redistribute (Router-OSPF context) .................................................. 88
redistribute (Router-RIP context) ...................................................... 88
router ospf ............................................................................................ 89
router rip ............................................................................................... 89
router vrrp ............................................................................................ 89
show ip arp ........................................................................................... 89
show ip icmp ........................................................................................ 90
Avaya X330W-2DS1 User’s Guide
v
Contents
show ip interface .................................................................................91
show ip ospf ..........................................................................................92
show ip ospf database .........................................................................92
show ip ospf interface .........................................................................93
show ip ospf neighbor .........................................................................93
show ip protocols ................................................................................94
show ip reverse-arp .............................................................................95
show ip route ........................................................................................96
show ip route best-match ...................................................................96
show ip route static ..............................................................................96
show ip route summary ......................................................................97
show ip vrrp detail ..............................................................................98
timers basic (Router-RIP context) ......................................................99
timers spf (Router-OSPF context) ....................................................100
traceroute ............................................................................................100
Policy CLI Commands
101
ip access-default-action .....................................................................101
ip access-group ...................................................................................101
ip access-list ........................................................................................102
ip access-list-cookie ...........................................................................103
ip access-list-copy ..............................................................................103
ip access-list-dscp operation ............................................................104
ip access-list-dscp name ....................................................................104
ip access-list-dscp precedence ..........................................................105
ip access-list-dscp trust .....................................................................105
ip access-list-name .............................................................................106
ip access-list-owner ............................................................................106
ip composite-op access ......................................................................107
ip composite-op dscp ........................................................................107
ip composite-op name .......................................................................108
ip composite-op notify ......................................................................108
ip composite-op priority ...................................................................109
ip distribution access-default-action ...............................................110
ip distribution access-list ..................................................................110
ip distribution access-list-cookie .....................................................111
ip distribution access-list-copy ........................................................111
ip distribution access-list-name .......................................................112
ip distribution access-list-owner ......................................................112
ip simulate ...........................................................................................113
no ip composite-op ............................................................................114
no ip distribution access-list .............................................................114
set qos policy-source .........................................................................115
show ip access-group ........................................................................115
show ip access-list-dscp ....................................................................116
vi
Avaya X330W-2DS1 User’s Guide
Contents
show ip access-lists ............................................................................ 117
show ip access-lists details ............................................................... 117
show ip access-list-summary ........................................................... 118
show ip active-access-groups .......................................................... 118
show ip composite-op ....................................................................... 118
validate-group .................................................................................... 119
WAN CLI Commands
120
async mode interactive (Console interface context) ..................... 120
async mode terminal (Console interface context) ......................... 120
async reset-modem (FastEthernet interface context) ................... 120
autoneg ................................................................................................ 120
bandwidth (Interface context) ......................................................... 120
cablelength long (Controller Context) ............................................ 121
cablelength short (Controller Context) ........................................... 122
channel-group (Controller context) ................................................ 123
clear fragment .................................................................................... 124
clock source (Controller Context) ................................................... 124
controller ............................................................................................. 125
description (Controller context) ...................................................... 125
description (Interface context) ......................................................... 126
ds-mode .............................................................................................. 126
duplex (FastEthernet interface context) ......................................... 127
encapsulation ppp (Serial interface context) ................................. 128
fragment chain ................................................................................... 128
fdl ......................................................................................................... 128
fragment size ...................................................................................... 129
fragment timeout ............................................................................... 129
framing (Controller context) ............................................................ 130
interface Console ............................................................................... 131
interface FabricFastEthernet ............................................................ 131
interface FastEthernet ....................................................................... 132
interface Loopback ............................................................................ 132
interface Serial .................................................................................... 133
keepalive (Serial interface context) ................................................. 133
linecode (Controller context) ........................................................... 133
loopback diag (Controller Context only) ....................................... 134
loopback local(Controller context) .................................................. 135
loopback remote (Controller context) ............................................. 135
mtu (Serial interface context) ........................................................... 136
no channel group (Controller context) ........................................... 136
no loopback (Controller context) ..................................................... 136
ppp authentication (Console interface context) ............................ 137
ppp timeout ncp (Serial interface context) ..................................... 137
ppp timeout retry (Serial interface context) ................................... 138
Avaya X330W-2DS1 User’s Guide
vii
Contents
queue-limit (Serial interface context) ..............................................138
remote (Controller context) ..............................................................138
show controllers .................................................................................139
show controllers remote ...................................................................143
show fragment ....................................................................................144
show interfaces ...................................................................................144
show ip distribution access-lists ......................................................146
show line console ...............................................................................146
show logout ........................................................................................147
show queueing ...................................................................................147
shutdown (Controller context) ........................................................148
shutdown (Interface context) ...........................................................148
speed (Console context) ....................................................................148
speed (FastEthernet interface context) ............................................149
timeout absolute (Console interface context) ................................149
voip-queue (Serial interface context) ..............................................150
How to Contact Us ..................................................................................................................... 151
In the United States ...........................................................................151
In the EMEA (Europe, Middle East and Africa) Region ..............151
In the AP (Asia Pacific) Region ........................................................153
In the CALA (Caribbean and Latin America) Region ..................153
viii
Avaya X330W-2DS1 User’s Guide
List of Tables
Table 1.1
Table 3.1
Table 3.2
Table 5.1
Table 7.1
Avaya X330W-2DS1 User’s Guide
X330WAN LED Descriptions ................................................... 11
Pinout of the Required Connection for Console
Communications ...................................................................... 20
X330WAN Default Settings ...................................................... 28
Alarms.......................................................................................... 33
X330WAN-2DS1 CLI Prompts ................................................. 46
ix
List of Tables
x
Avaya X330W-2DS1 User’s Guide
List of Figures
Figure 1.1
Figure 1.2
Figure 1.3
Figure 1.4
Figure 2.1
Figure 4.1
Figure 4.2
Figure 4.3
Figure 6.1
Figure 6.2
Figure 7.1
Avaya X330W-2DS1 User’s Guide
Serial Interfaces............................................................................. 9
Fabric Fast Ethernet Interfaces ................................................... 9
Fast Ethernet Interfaces ............................................................. 10
X330W-2DS1 Front Panel .......................................................... 11
LED Indicators for a WAN Access Router Module on the
Avaya P330 Front Panel1 ........................................................ 16
Branch Office to Headquarters................................................. 29
Small Office to the Internet ....................................................... 31
X330WAN with Security ........................................................... 32
The Welcome Page ..................................................................... 40
Web-based Manager .................................................................. 41
X330WAN CLI Contexts ........................................................... 46
xi
List of Figures
xii
Avaya X330W-2DS1 User’s Guide
Preface
Preface
About This Guide
This guide describes the functioning and features of the X330WAN expansion
module, and its basic and common configurations. The commands specific to the
X330WAN module are listed and described in a separate chapter of this guide, as
well as included in the basic and common configuration chapters.
Objectives
The purpose of this guide is to describe the concepts used in the X330WAN, and
provide the necessary information to configure and manage the X330WAN module.
Audience
This guide is intended for customers of Avaya who have networking experience,
and are familiar with router-based internetworking.
Conventions used in the Documentation
Documentation for this product uses the following conventions to convey
instructions and information:
CLI
•
•
•
•
•
•
•
Mandatory keywords are in the computer bold font.
Information displayed on screen is displayed in computer font.
Variables that you supply are in pointed brackets <>.
Optional keywords are in square brackets [].
Alternative but mandatory keywords are grouped in braces {} and separated by
a vertical bar |.
Lists of parameters from which you should choose are enclosed in square
brackets [ ] and separated by a vertical bar |.
If you enter an alphanumeric string of two words or more, enclose the string in
inverted commas.
Avaya X330W-2DS1 User’s Guide
I
Preface
Notes, Cautions and Warnings
Note: Notes contain helpful information or hints or reference to material in other
documentation.
Caution: You should take care. You could do something that may damage
equipment or result in loss of data.
Warning: This means danger. Failure to follow the instructions or warnings may
result in bodily injury. You should ensure that you are qualified for this task and
have read and understood all the instructions
Before You Install
Notice
Every effort was made to ensure that the information in this book was complete and
accurate at the time of printing. However, information is subject to change.
Your Responsibility for Your System’s Security
Toll fraud is the unauthorized use of your telecommunications system by an
unauthorized party, for example, persons other then your company’s employees,
agents, subcontractors, or persons working on your company’s behalf. Note that
there may be a risk of toll fraud associated with your telecommunications system
and, if toll fraud occurs, it can result in substantial additional charges for your
telecommunications services. You and your system manager are responsible for the
security of your system, such as programming and configuring your equipment to
prevent unauthorized use. The system manager is also responsible for reading all
installation, instruction, and system administration documents provided with this
Product in order to fully understand the features that can introduce risk of toll fraud
and the steps that can be taken to reduce that risk. Avaya does not warrant that this
product is immune from or will prevent unauthorized use of common-carrier
telecommunication services or facilities accessed through or connected to it. Avaya
will not be responsible for any charges that result from such unauthorized use.
If you suspect that you are being victimized by toll fraud and require assistance,
contact the Toll Fraud Intervention Hotline at +1 800 643 2353 or contact your local
Avaya representative.
II
Avaya X330W-2DS1 User’s Guide
Requirements and Specifications
Important Safety Information
You must read the following safety information before carrying out any installation
or removal of components, or any maintenance procedures.
Warning: Warnings contain directions that you must follow for your personal
safety. Follow all instructions carefully.
Caution: The Avaya P330 switches and modules contain components sensitive to
electrostatic discharge. Do not touch the circuit board unless instructed to do so.
Please read the following safety information thoroughly in conjunction with the
safety information supplied with the Switch before installing an X330WAN.
• This unit operates under SELV (Safety Extra Low Voltage) conditions,
according to IEC 950, the conditions of which are maintained only if the
equipment to which it is installed is also operational under SELV.
Requirements and Specifications
This section provides the technical requirements and specifications of the
X330WAN.
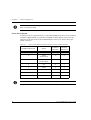
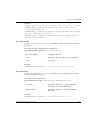
Technical Specifications
This section provides the technical specifications for all Avaya X330WAN access
router modules currently available.
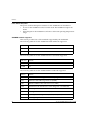
The following table shows the X330WAN operating specifications.
Item
Value
Operating Temperature
-5 to 50° C (23–122°F)
Operating Humidity
5% to 95% relative humidity, non-condensing
Mechanical Shocks
TR-NWT-000063 - Network Equipment Building
System, Generic Equipment Requirements,
chapters:
4.4.1 Shock Criteria
4.4.2 Vibration Criteria
5.4.1 Shock and Vibration Test Methods
Avaya X330W-2DS1 User’s Guide
III
Preface
Power & Heat Dissipation
The power and heat dissipation statistics for the X330WAN are listed below.
• Power for the X330WAN comes from the P330. The X330WAN requires 45
Watts.
• Heat dissipation: the X330WAN conforms to the P330 operating temperature
range.
X330WAN Standards Supported
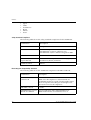
This section provides lists of the standards supported by the X330WAN.
The following table shows the X330WAN ANSI standards supported.
ANSI #
Details
T1.231
T1
T1.403
T1
The following table shows the X330WAN ITU-T standards supported.
ITU-T #
Details
G.703
E1
G.704
E1
The following table shows the X330WAN RFC standards supported.
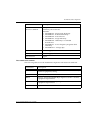
IV
RFC #
Details
791
Internet Protocol Datagram Reassembly Algorithms
792
Internet Control Message Protocol (ICMP)
826
Ethernet Address Resolution Protocol (ARP)
894
Standard for the transmission of IP datagrams over Ethernet
951
Bootstrap Protocol
1058
Routing Information Protocol (RIP)
1213
MIB-II, System Group IP MIB, SNMP, TCP, UDP, ICMP
1215
Defining Traps for use with the SNMP
Avaya X330W-2DS1 User’s Guide
Standards and Compliance
RFC #
Details
1471
Definitions of Managed Objects for the IP Network Control
Protocol of the Point-to-Point Protocol
1473
Definitions of Managed Objects for the IP Network Control
Protocol for the Point-to-Point Protocol
1533
DHCP Options and BOOTP Vendor Extensions
1534
Interoperation Between DHCP and BOOTP
1541
Dynamic Host Configuration Protocol (DHCP)
1542
Clarifications and Extensions for the Bootstrap Protocol
1724
RIP2
1757
Monitoring and Statistics
1812
IPv4
1850
OSPF Version 2 Management Information Base
1858
Security Considerations for IP Fragment Filtering
2096
ipCidRoute Table
2338
VRRP
2494
Definitions of Managed Objects for the DS0 and DS0 Bundle
Interface Type
2495
Definitions of Managed Objects for the DS1, E1, DS2, and E2
Interface Types
2508
Compressing IP/UDP/RTP Headers for Low-Speed Serial Links
2863
The Interfaces Group MIB
3128
Protection Against a Variant of the Tiny Fragment Attack
Standards and Compliance
The X330WAN has undergone all required regulatory compliance test procedures
(EMC, Telco, Safety) for Type Approval in the following countries:
• USA
• Canada
• European Union
Avaya X330W-2DS1 User’s Guide
V
Preface
•
•
•
•
•
•
Japan
China
South Korea
Brazil
Mexico
Israel
Safety Standards Compliance
The following table shows the safety standards compliance for the X330WAN.
Certification
Description
CE
Europe
EN60950
Western Europe
Amendments A1,A2,A3 - Effective now.
Amendments A4,A11 - Effective August 1st 2003.
UL60950
Global IEC, CB Schema
report IEC 950
IEC 950 with country deviations for: EU, Japan,
South Korea, Brazil, and China
NOM 16 and 19
Mexico
Electromagnetic Compatibility Standards
The following table shows the X330WAN compliance with EMC standards.
VI
Certification
Description
FCC Part 15, Class A
and Class B
USA Outdoors.
Note: Class B compliance is obtained with one
X330WAN module in a stack of P330 switches. More
than one expansion module per stack might cause
deviation from Class B compliance.
IECS 003, Class B
Canada.
EN55022(1998) Class B
Based on CISPR 22.
Europe. Radiation and Conducted Emissions.
Note: P330 switches are certified as Class A.
Avaya X330W-2DS1 User’s Guide
Standards and Compliance
Certification
Description
EN55024
Based on CISPR 24.
Europe.
Immunity Characteristics.
Includes:
• IEC61000-4-2 - Electrostatic discharge
• IEC61000-4-3 - Radiated immunity
• IEC61000-4-4 - Fast transient
• IEC61000-4-5 - Surge immunity
• IEC61000-4-6 - Immunity to conducted
disturbances
• IEC61000-4-8 - Power frequency magnetic field
immunity
• IEC61000-4-11 - Voltage dips.
EN61000-3-2
Power supply - harmonic current.
EN61000-3-3
Power supply - flicker.
VCCI Class B
Japan.
Telecommunication Standards
The following table shows the X330WAN compliance with Network standards.
Certification
Description
FCC Part 68
USA. Protection of telephone networks from harm caused by
terminal equipment/wiring.
CS03
Industry Canada. Similar to FCC Part 68.
TBR12
Europe. Unstructured 2048 Kbps digital leased line - terminal
equipment requirements.
TBR13
Europe. Structured 2048 Kbps digital leased line - terminal
equipment requirements.
JATE
Japan.
Avaya X330W-2DS1 User’s Guide
VII
Preface
NEBS Compliance Standards
The following table shows the X330WAN compliance with NEBS standards.
Certification
Description
NEBS level 3
USA Electrical and Physical.
How to Contact Us
If you need additional help, the following services are available. You may need to
purchase an extended service agreement to use some of these services. Contact your
Avaya representative for more information.
To contact Avaya’s technical support, please call:
• From the United States: 1-800-237-0016, press 0, then press 73300
• From South America and Central & Latin America (CALA): 1-727-217-2425 for
Spanish
• Outside North America: +972-3-645-8458
For updated information, visit http://www.avaya.com/support.
All trademarks, registered trademarks, service names, product and/or brand names are the sole property of
their respective owners.
Copyright © 2002 Avaya Inc. All rights reserved.
VIII
Avaya X330W-2DS1 User’s Guide
Chapter 1
Overview
Avaya presents the X330WAN, a series of WAN Edge Router expansion modules
for the P330 Stackable Switching System and G700 Gateway. The X330WAN is part
of Avaya’s Converged Networks Solution that includes IP telephones, data switches
and IP exchanges.
Each X330WAN access router module contains its own powerful onboard CPU and
software, which functions as a dedicated WAN Edge Router.
The X330WAN is designed around the following concepts:
• WAN access
• Routing
• Security
• Convergence
The first of the X330WAN series is the X330W-2DS1 access router module, with 2
E1/T1 interfaces, a single 10/100Base-T Fast Ethernet port, and a serial Console
port.
The primary uses of the X330WAN are the following:
• Branch Office connectivity to Headquarters.
• Small/Medium Business connectivity directly to an ISP (Internet Service
Provider).
Branch Office Connectivity to Headquarters
The X330WAN enables connecting the LAN of branch offices based on the P330
switch to the headquarters office, connecting to the corporate WAN. Each branch
office in this solution would use the Internet services supplied via the headquarters
ISP, or connect directly to the Internet independently.
Installing an X330 WAN Access Router in a a G700 Gateway, provides cost-effective
and space-saving IP Telephony and WAN routing for SMEs.
The G700 and P330 can be stacked together, to provide a comprehensive converged
solution.
Small/Medium Business Connectivity Directly to a Service Provider
The X330WAN access router enables SMEs (Small/Medium Enterprises) to connect
their LAN directly to an ISP using a P330 switch. This solution provides
independence and flexibility to the SMEs in the flow of data and other Internet
services.
Avaya X330W-2DS1 User’s Guide
1
Chapter 1
Overview
Functional Concepts
One basis for success in today’s business world is combining resources. The
X330WAN supplies you with combined required access functionality for branch
offices and SMEs. The X330WAN was designed and developed to include all of the
functions necessary for branch offices and SMEs.
The following sections describe the overall concepts that together comprise the
functioning of the X330WAN access router.
For examples of common configurations using the following concepts, refer to
Chapter 4: Common Configurations.
WAN Access
WAN access provides a link for routing packets between their WAN and
Ethernet/LAN interfaces, enabling heavy data transfer. WAN access can connect
branch offices to headquarters, and provide fast access to the Internet and e-mail.
When combined with the Avaya G700 Gateway or to the Avaya DEFINITY VoIP
services are provided.
Routing
The X330WAN access router modules provides routing capabilities in a P330
device. They route packets between their WAN and Ethernet/LAN interfaces.The
X330WAN access router modules’ routing software is based on the routing software
of the Avaya P333R and P333R-LB. It provides support for the major routing
protocols. It also provides a L3/L4 Policy classifier working per Layer 2
interface/direction, controlling access and QoS (tagging and mapping to internal
queuing mechanism). The X330WAN independently controls all traffic flow in the
P330 from the LAN to the WAN.
Security
The X330WAN currently contains the infrastructure for all security functionality
planned for future releases, such as Firewall and VPN. Licenses will be issued for
different security options, when development is completed.
Security currently can be achieved with the X330WAN for the initial release by
connecting the Fast Ethernet port of the X330WAN via an external firewall to a port
on the P330 switch. The X330WAN module is connected to the Internet via it’s
WAN ports.
Convergence
The X330WAN enables a combined data and VoIP solution when used in
conjunction with a VoIP gateway, such as the G700. This is achieved by connecting
the G700 to the LAN’s P330 stack, and inserting the X330WAN in one of the
2
Avaya X330W-2DS1 User’s Guide
Features
expansion slots, either of the P330 stack or of the G700. Standard IP phones can be
connected to the P330 stack, or Avaya Legacy phones can be connected directly to
the G700 Gateway. In this solution the X330WAN provides access to the corporate
WAN, while end-to-end QoS and Policy ensure that the IP telephony functions
flawlessly.
Features
An Avaya P330 stack may have X330WAN access router modules inserted in each
of the switches in the stack with an expansion slot. A maximum stack configuration
of 10 P334T switches using the X330W-2DS1 provides 480 Ethernet 10/100 ports,
and 20 E1/T1 ports. The X330W-2DS1 is the first product of the X330WAN series.
The following is a list of X330W-2DS1 features.
Layer 1 Features
• 2 channelized/fractionalized E1/T1 ports, RJ-48 connectors.
• 10/100Base-T Auto Negotiation Fast Ethernet port.
• 100 Mbps, Full Duplex Fabric Fast Ethernet interface (for internal connection to
the P330).
• Serial RS-232, RJ-45 port for console and dial-in modem connection.
Layer 2 Features
• PPP over channeled and fractional E1/T1. The X330WAN has the ability to map
several PPP sessions to a single E1/T1 interface.
• Support for up to 253 VLANs on the Fabric Fast Ethernet LAN interface. Any
combination of these VLANs can be configured to the X330WAN module.
• Auto-Negotiation - the 10/100 port on the X330WAN supports
Auto-Negotiation which automatically detects and supports the duplex mode
and speed of a connected device. This means that you can simply connect the
X330WAN to Ethernet or Fast Ethernet equipment at full or half duplex without
configuration.
• VLANs - VLANs assigned on the Fabric Fast Ethernet port enable the
X330WAN to perform inter-VLAN routing. This enables the user to configure
specific VLANs to access the X330WAN, while the remaining VLANs are
denied access to the WAN.
Avaya X330W-2DS1 User’s Guide
3
Chapter 1
Overview
Layer 3 Features
• Supports RIP v1/v2 routing protocols
• Supports Single Area OSPF routing protocol - the X330WAN can be configured
as an OSPF Autonomous System Boundary Router (ASBR) by configuration of
route redistribution. The X330WAN can be installed in the OSPF backbone area
(area 0.0.0.0) or in any OSPF area that is part of a multiple areas network. The
X330WAN cannot be configured to be an OSPF area border router itself.
• Supports VRRP redundancy protocol - supported only on the X330WAN’s LAN
(Fast Ethernet and Fabric Fast Ethernet) ports.
• Supports Equal-Cost MultiPath (ECMP) - allows load balancing by splitting
traffic between several equivalent paths.
• Supports Distribution Lists - these lists define which routers are trusted
regarding OSPF. Routing information is only allowed to be transmitted to or
received from the trusted routers.
Convergence Features
• Priority queueing - the X330WAN supports the ability to separate traffic into 4
strict priority queues per interface. The assignment of placement in the queues
is performed using Policy.
• Guaranteed delay for VoIP traffic - the X330WAN supports VoIP Queue mode.
In this mode traffic labelled as voice traffic receives preference to all other
traffic. The X330WAN default mode is optimized for the G.729 codec.
• Random Early Detect (RED) - the X330WAN uses RED in order to improve the
performance of the network when overloaded. RED sends signals to
transmitting hosts stating that the bandwidth is limited, and that they should
reduce their transmission speed.
• RTP Header Compression - The Real Time Protocol (RTP) is the basis of
common VoIP traffic. RTP runs over UDP, and incurs a 12-byte header on top of
other (IP, UDP) headers. Running on PPP or Frame-Relay, this protocol can be
compressed.
X330WAN RTP Header Compression process is based on the fact that the
packet order on a PPP link is preserved. As a result, many times only the
“deltas” from the previous packet’s header needs to be sent, and not the full
header. Moreover, since the “deltas” are often constant, the second order
“delta” is 0 and does not need to be transmitted. In many cases, all three
headers (IP+UDP+RTP~40 bytes) can be reduced to a size of 2-4 bytes.
• Fragmentation and Reassembly - the X330WAN supports:
— Fragmentation of IP packets according to RFC 791.
— Reassembly of IP packets destined only to the X330WAN (i.e., packets that
have its IP address as their destination address).
Fragmented IP packets with destinations other than this X330WAN will NOT be
reassembled by this X330WAN.
4
Avaya X330W-2DS1 User’s Guide
Features
•
Reassembly is associated with the following user configurable parameters:
— The number of maximum possible concurrent reassembled packets:
Min=0; Max=200; Default=100.
— The time, in seconds, to wait for a packet to be reassembled:
Min=5; Max=120; Default=10.
— The maximum number of fragments allowed per packet:
Min=2; Max=2048; Default=64.
In addition, it is possible to restore the reassembly parameters to their default
values. This discards all packets currently waiting to be reassembled.
Access Control and QoS per interface and direction - the X330WAN supports
individual Access Control and QoS lists per interface, and per direction. This
enables the user to configure access and QoS for each direction
(transmit/receive) of each session.
QoS Features
Efficient use of QoS enables the X330WAN to assign the proper priority to different
incoming and outgoing traffic flows to minimize the affect of one flow on the other,
and to prevent a low priority traffic flow from affecting a high priority traffic flow
and the like. To achieve this, the X330WAN implements multiple receiving queues
and configurable transmitting queues (4 queues per interface).
Priority queuing is implemented among the four queues on each interface:
• Voice (highest priority)
• High priority data
• Better than best effort
• Best effort (low priority)
To insure minimal affect of one flow to the other, the following priority order (from
highest to lowest) is always maintained:
• Transmit tasks - highest priority.
• Receive tasks - medium priority.
• Router tasks - lowest priority.
Note: You can adjust the queue length for different needs. Queue length should
always be kept a small as possible, while still maintaining a flow. It is recommended
to always use the default queue length, as this is the optimal calculated length.
Policy
In the X330WAN a policy list contains:
• A set of classification rules based on a source IP, destination IP, source port,
destination port, protocol, and TCP Established bit. The IP addresses can
include wildcards.
Avaya X330W-2DS1 User’s Guide
5
Chapter 1
Overview
•
•
A set of possible actions arranged in a Composite Operations Table.
A set of DSCP mappings.
Several policy lists can be activated concurrently, with each list applied to a
different interface and direction.
Each Serial interface (PPP session), the Fast Ethernet port, and the
FabricFastEthernet interface can have an ingress and egress active Policy list. For the
FabricFastEthernet interface, this list applies to all L2 interfaces (VLANs) mapped to
this interface.
A default Policy list (list 0) is always present and active until a different Policy list is
activated. The default list has one rule (permit all), a default DSCP mapping, and a
default Composite Operations table.
Whenever a new Policy list is created, it contains a copy of the list 0 components.
Policy rules and the Composite Operations Table include the following actions:
• Access Control actions (for all types of interfaces):
— Drop
— Drop and Notify
— Forwarding
• QoS actions:
— DSCP coloring (value changing) for all types of interfaces.
— Priority tag modifications for:
— Packets that traverse the inband LAN or the Ethernet port. This will be
marked as the IEEE 802.1p tag in the packet (only on the
FabricFastEthernet interface).
— Classification into one of the 4 transmit queues.
The Composite Operation Table contains pre-defined entries for the basic policies
that existed in the P333R. These entries are created by the agent for each Access List
and are Read Only.
Controlling Network Access to the X330WAN
Using Policy lists, you can control all traffic designated to and from the X330WAN’s
CPU, including management and routing protocols traffic. By activating Policy
rules defined for a Loopback interface, you can control all traffic entering/leaving
the CPU from/to all X330WAN interfaces. Rules governing traffic to the CPU can be
defined at a single point, regardless of the actual interface which the packet entered
and the specific IP address being managed.
Note: A Policy list activated on a Loopback interface does not apply to packets
routed by the CPU.
6
Avaya X330W-2DS1 User’s Guide
Features
Avaya X330WAN Network Management
Comprehensive network management is a key component of today’s networks.
Avaya provides multiple ways of managing the X330WAN to suit your needs.
Command Line Interface (CLI)
The Avaya P330 CLI provides a terminal type configuration tool for local or remote
configuration of X330WAN features and functions. X330WAN configurations are
saved in the format of CLI commands.
The CLI is accessed by performing one of the following:
• Telnet to one of the IP interfaces of the X330WAN.
• Use the session wan command from the Layer 2 agent of the stack.
• Use the serial Console port on the X330WAN.
Avaya P330 Device Manager (Embedded Web)
The built-in Avaya P330 Device Manager (Embedded Web Manager) allows you to
manage an X330WAN using a Web browser without purchasing additional
software. This application works with the Microsoft® Internet Explorer and
Netscape® Navigator web browsers and Sun Microsystems Java™ Plug-in.
The Device Manager is accessed by performing one of the following:
• Using your Web browser, browse to the IP interface configured on the
X330WAN.
• Using your Web browser, browse to the Layer 2 agent (stack) IP address.
For more information on the Embedded Web Manager, refer to Chapter 6,
Embedded Web Manager.
VisAbility™
When you need extra control and monitoring or wish to manage other Avaya LAN
backbone and wireless equipment, then the Avaya Multiservice Network Manager
(MSNM) is the answer. This suite provides the ease-of-use and features necessary
for optimal network utilization. MSNM supports the following operating
environments:
• Windows NT®/2000 and Solaris 8.
• Stand-Alone mode with Windows® NT®/2000.
• HP OpenView for Windows NT/2000 and Solaris 8.
Avaya X330W-2DS1 User’s Guide
7
Chapter 1
Overview
Interfaces
The X330WAN includes Physical and Virtual interfaces.
Physical Interfaces
The following are the X330WAN physical interfaces:
• WAN Interfaces – 2 ports, configurable for E1 or T1.
• LAN Interface – FastEthernet interface.
This interface is an autosensing 10/100Mbps Ethernet port. It can be used to
connect to a LAN or to a firewall/VPN.
• P330 Switching Fabric – FabricFastEthernet interface.
This is an internal 100Mbps connection to the P330 switching fabric. It supports
VLANs, and is compatible with the P330.
When connecting the X330WAN in Access-Router Only mode (e.g., no VPN or
firewall), this interface can be used to connect to the hosting P330 switch.
• Console Interface – used to connect a terminal for local management, or a
modem for remote management.
Virtual Interfaces
The following are the X330WAN virtual interfaces:
• Loopback – This interface is a logical interface that is not mapped to any
physical interface. Its purpose is to represent the router with an IP address that
is always reachable. This is mainly used for network troubleshooting. It also
provides a ‘Router ID’ in the OSPF routing protocol.
Since the Loopback Interface is not connected to any physical interface, an entry
in the routing table cannot have the loopback interface’s subnet as its next hop.
Note: The first interface created in the X330WAN should be an IP interface defined
over the Loopback interface.
•
•
8
VLAN (on the FabricFastEthernet Interface) – The P330 can have multiple
VLANs defined within its switching fabric. To connect to the switching fabric,
the X330WAN supports up to 253 VLANs.
Serial Link – This is a virtual interface that is created over a portion of an E1 or
a T1.
This interface is used to directly connect the X330WAN to another device at the
other end of a leased line, and supports Encapsulation PPP and Frame Relay
protocols.
Avaya X330W-2DS1 User’s Guide
Interfaces
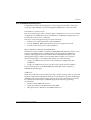
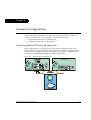
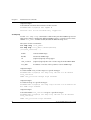
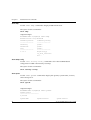
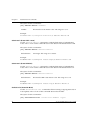
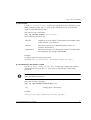
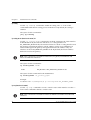
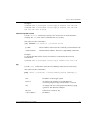
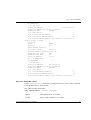
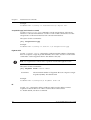
Figure 1.1 provides a graphic representation of the serial interfaces.
Figure 1.1
Serial Interfaces
IP Interface 1
TS
4-9
Channel Group 1
PPP Session 1
IP Interface 2
IP Interface 3
E1/T1
Layer 1
Interface
IP Interface 4
TS
15-20
Channel Group 2
PPP Session 2
IP Interface 5
IP Interface 6
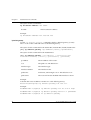
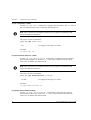
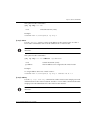
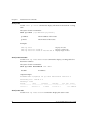
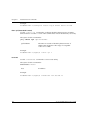
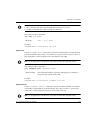
Figure 1.2 provides a graphic representation of the Fabric Fast Ethernet interfaces.
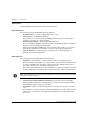
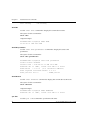
Figure 1.2
Fabric Fast Ethernet Interfaces
Fabric
Fast Ethernet
Interface
Avaya X330W-2DS1 User’s Guide
IP Interface 1
Channel Group 1
Fabric
1.0 2
Virtual
Layer
Interface
IP Interface 2
Cannel Group 2
Fabric
1.1 2
Virtual
Layer
Interface
IP Interface 5
IP Interface 3
IP Interface 4
IP Interface 6
9
Chapter 1
Overview
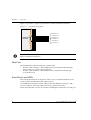
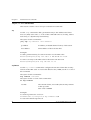
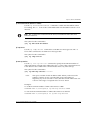
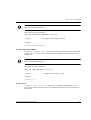
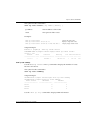
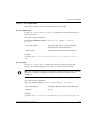
Figure 1.3 provides a graphic representation of the Fast Ethernet interfaces.
Figure 1.3
Fast Ethernet Interfaces
IP Interface 1
Fast Ethernet
Interface
Channel Group 1
Virtual Layer 2
Interface
IP Interface 2
IP Interface 3
IP Interface 4
IP Interface 5
IP Interface 6
Note: One or more IP interfaces can be defined over each virtual, Fast Ethernet, or
Fabric Fast Ethernet interfaces.
Data Flow
The X330WAN has the following major traffic paths:
• WAN to LAN (external) – The X330WAN can route WAN traffic through a
firewall and/or a Virtual Private Network.
• WAN to LAN (internal) – The X330WAN can route WAN traffic directly
to/from the LAN.
Front Panels and LEDs
This section illustrates the front panels of the various available X330WAN access
router modules and describes their LED functions.
An X330WAN front panel contains LEDs, WAN and Ethernet connectors, and a
console connector. The status LEDs provide at-a-glance information.
The front panel LEDs consist of Port LEDs which display information for each port.
10
Avaya X330W-2DS1 User’s Guide
Front Panels and LEDs
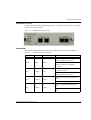
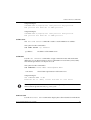
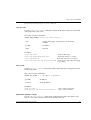
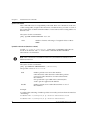
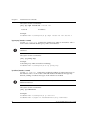
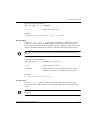
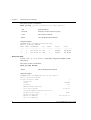
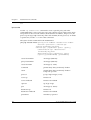
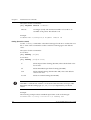
X330W-2DS1 Front Panel
On the front panel of the X330W-2DS1, there is a column of four LEDs for each port
in the access router module.
Figure 1.4
X330W-2DS1 Front Panel
X330WAN LEDs
The following table describes of the LEDs on the front panel of the X330WAN.
Table 1.1
X330WAN LED Descriptions
LED Name
Color
Description
LED Status
ON – The port is reset or an E1/T1
alarm condition is present.
ALM
Red
Alarm
TST
Green
Test
ACT
Yellow
Active
OFF – Initialization is successful
and the software is running
correctly.
ON – Port is being initialized or
loopback is active.
OFF – Port initialization completed
and loopback is not active.
ON – At least one PPP session is
active.
OFF – No active PPP session.
SIG
Green
Avaya X330W-2DS1 User’s Guide
Signal
ON – A signal is detected on the
port.
OFF – No signal is detected on the
port.
11
Chapter 1
12
Overview
Avaya X330W-2DS1 User’s Guide
Chapter 2
Installation
This chapter describes the X330WAN installation procedure.
Safety Information
Warning: Installation and removal of the X330WAN must only be implemented by
qualified personnel.
Caution: Hold the X330WAN only by the edges to avoid damage from static
electricity. Do not touch the top or bottom of the circuit board. If possible, wear a
wrist-strap and use an anti-static bag.
Device Support
The X330WAN enables you to connect your Avaya P330 switch to a WAN.
The X330WAN can be inserted into switches of the Avaya P330 product line which
include an expansion slot. These include the following Avaya P330 family switches:
• Avaya P333T Embedded S/W Ver. 3.9 and higher
• Avaya P334T Embedded S/W Ver. 3.9 and higher
• Avaya P332MF Embedded S/W Ver. 3.9 and higher
• Avaya P333R Embedded S/W Ver. 3.9 and higher
• Avaya P333R-LB Embedded S/W Ver. 3.9 and higher
• Avaya P333T-PWR Embedded S/W Ver. 3.9 and higher
Before You Install
The X330WAN can only be installed in the above Avaya switches using firmware
ver. 3.9 or higher. If you need to upgrade the software, obtain the latest version of
the software from http://www.avaya.com/support and download it according to
the instructions found in the User’s Guide that accompanies your Avaya P330
switch.
You can see the firmware version of your Avaya switch using the
"show image version" command.
Avaya X330W-2DS1 User’s Guide
13
Chapter 2
Installation
Installing an X330WAN Module into an Avaya P330 Switch
Note: Like all other P330 expansion modules, the X330WAN modules are NOT hot
swappable. Removing/inserting an X330WAN with the power on resets the
enclosing P330 switch.
To install an X330WAN access router module:
1 Remove the blanking plate or other sub-module from the P330 switch assigned
to house the X330WAN module, if there is one installed.
2 Insert the X330WAN module gently into the slot, ensuring that the lower
printed circuit board (PCB) is aligned with the guide rails.
The PCB, not the metal base plate, fits into the guide rail.
3 Press the X330WAN module in firmly until it is completely inserted into the
P330 switch. If the module is not inserted completely, the P330 switch will not
successfully reset.
4 Gently tighten the two screws on the front panel of the access router module.
Note: The Avaya P330 switch must not be operated with the expansion slot open.
The expansion slot should either include a sub-module, or be covered with the
supplied blanking plate.
5
6
Power up the P330 switch.
Follow the post-installation checks, as described in “Power On Self Test” below.
Power On Self Test
When you power up the Avaya P330 switch with a X330WAN module inserted,
both perform a self test. This test takes about 40 seconds to complete, and includes:
• Checksum tests of boot and system areas of Flash memory
• System memory tests
• MAC address verification test
• System timer test
• CAM (Contents Addressable Memory) tests
• Console Port tests
• Internal packet forwarding tests
• Switch and sub-module ASIC (Application Specific Integrated Circuit) tests
• Switch and sub-module ASIC memory tests
• Sub-module interface tests
• Sub-module packet forwarding tests
14
Avaya X330W-2DS1 User’s Guide
Avaya P330 LEDs
After you insert an X330WAN access router module into a powered P330 switch
causing a reset, or after a user-initiated reset is performed, the X330WAN Startup
sequence is as follows:
1 Ten seconds after startup, the ALM LED lights ON for ten seconds, then
switches OF.F
2 The TST LED then lights for twenty seconds and afterwards switches off.
3 Thirty seconds after startup, the ALM LED lights ON again.
Note: LED Number 51 on the Avaya P330 switch should be ON during the self-test
procedure.
The X330WAN module must be inserted completely for the P330 switch to
successfully reset.
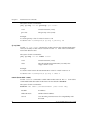
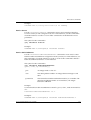
Avaya P330 LEDs
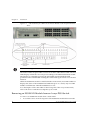
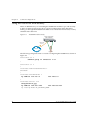
Figure 2.1 shows an Avaya P330 Switch front panel and a detailed view of the LEDs
used when an X330WAN is installed. The Avaya P330 Console port is located on the
lower right of the P330 switch.
Another group of LEDs is located on the X330WAN itself.
For a description of the X330WAN’s front panel LEDs, see “X330WAN LEDs” in
Chapter 1, Overview.
Avaya X330W-2DS1 User’s Guide
15
Chapter 2
Installation
Figure 2.1
LED Indicators for a WAN Access Router Module on the Avaya P330 Front
Panel
Note: All LEDs light while the P330 resets.
The P330 switch front panel LEDs consist of Port LEDs and Function LEDs. The Port
LEDs display information for each port according to the illuminated function LED.
The function is selected by pressing the Left/Right switch until the desired
parameter LED is illuminated. Pressing the same switch again will move to the next
function.
When the X330WAN module is installed inside a P330 switch, Port LED number 51
displays the status of the X330WAN Fast Ethernet port. As a result, only Port LED
number 51 illuminates when the X330WAN is in use.
For a description of the other LEDs on the front panel of the Avaya P330 switch,
refer to the User’s Guide that accompanies your switch.
Removing an X330WAN Module from an Avaya P330 Switch
To remove an X330WAN module from a P330 switch:
1 Loosen the screws on the front panel of the X330WAN module that secure the
16
Avaya X330W-2DS1 User’s Guide
Removing an X330WAN Module from an Avaya P330 Switch
2
3
module to the P330 switch.
Grasp the two screw knob and pull gently but firmly towards yourself.
The X330WAN module is removed.
Insert another WAN access router module or the blanking plate into the switch.
Avaya X330W-2DS1 User’s Guide
17
Chapter 2
18
Installation
Avaya X330W-2DS1 User’s Guide
Chapter 3
Initial Configuration
This chapter describes the initial configuration of the X330WAN, and includes the
following sections:
• "Connecting the X330WAN" - Describes the cables used to connect the
X330WAN.
• "Configuring the X330WAN" - Describes how to configure an X330WAN Fast
Ethernet, T1/E1 interface, or Loopback, and which commands to use to check
and save your configuration.
• "X330WAN Default Settings" - Lists the default settings of the X330WAN.
Connecting the X330WAN
This section describes the cables used to connect the X330WAN.
Connecting the E1/T1 Ports
To connect a E1/T1 module to a network, use an RJ-48C cable, minimum 26 gauge,
to connect the E1/T1 port to an RJ-48C wall jack.
Connecting the Ethernet Port
The X330WAN includes a 10/100Base-T port.
Connect a UTP Category 5 cable with an RJ-45 connector to the 100Base-TX port.
The maximum UTP cable length connected to the 10/100Base-T port is 100 m
(328 ft.).
You can obtain appropriate cables from your local supplier.
Connecting the Console Port
Each Avaya X330WAN module has one serial port on the front panel for connecting
a terminal, a terminal emulator, or a modem.
The serial port on the front panel is labelled “Console” and has an RJ-45 connector.
Connect the X330WAN module to a terminal or a terminal emulator using the
supplied Console cable and the RJ-45 to DB-9 adaptor. To connect a modem, use the
supplied cable and an RJ-45 to DB-25 adaptor.
Avaya X330W-2DS1 User’s Guide
19
Chapter 3
Initial Configuration
Note: The cable and two adaptors can be found in the Avaya P330 accessory set, and
they are clearly marked.
Console Pin Assignments
For direct Console communications, connect the X330WAN to the Console Terminal
using the supplied RJ-45 crossed cable and RJ-45 to DB-9 adapter. The following
table shows the pinout from the X330WAN RJ-45 connector to both a DB-9 and
DB-25 connector.
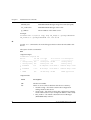
Table 3.1
Pinout of the Required Connection for Console Communications
X330WAN RJ-45 Pin
Name
Terminal
DB-9 Pin
Modem
DB-25 Pin
1
For future use
NC
See note
2
TXD
(P330 input)
3
3
3
RXD
(P330 output)
2
2
4
CD
4
8
5
GND
5
7
6
DTR
1
20
7
RTS
8
4
8
CTS
7
5
Note: Pin 1 of the Modem DB-25 connector is internally connected to Pin 7 GND.
20
Avaya X330W-2DS1 User’s Guide
Configuring the X330WAN
Configuring the X330WAN
An X330WAN can be configured using the Command Line Interface (CLI) utility,
the built-in Avaya P330 Device Manager (Embedded Web), or Avaya MultiService
Network Manager™.
For instructions on using the CLI, refer to Chapter 7, "X330WAN CLI Commands."
For instructions on using the Device Manager or Avaya MultiService Network
Manager™, refer to the Avaya MultiService Network Manager P330 Device
Manager User’s Guide on the Documentation and Utilities CD.
The CLI is command-line driven and does not have any menus. To activate a
configuration option, type the desired command at the prompt and press Enter.
The rest of this section describes the following:
• How to establish a Serial and Modem connection using the CLI.
• How to configure an X330WAN Fast Ethernet, T1/E1 interface, or loopback,
using the CLI.
• How to check and save your configuration using the CLI.
• How to establish a Telnet session using the CLI.
Establishing a Serial Connection
Perform the following steps to connect a terminal to the Console port of the
X330WAN module for configuration of WAN parameters using the CLI:
1 Use the supplied serial cable to attach the RJ-45 console connector to the
Console port on the X330WAN module. Connect the DB-9 connector to the
serial (COM) port on your PC/terminal.
2 Use the following serial port settings on the terminal:
— Baud Rate - 9600 bps
— Character Size - 8
— Parity - None
— Stop Bit - 1
— Flow Control - None
— Terminal Emulation - VT-100
Note: The terminal connected to the Console port must be configured with these
settings.
3
4
5
Press Enter.
When prompted for a Login Name, enter the default name root.
When promoted for a password, enter the password root.
Avaya X330W-2DS1 User’s Guide
21
Chapter 3
Initial Configuration
Establishing a Modem Connection
A PPP connection with a modem can be established only after the X330WAN is
configured with an IP address and net-mask. Also, the parameters used in the
X330WAN must be compatible with the modem’s parameters.
All CLI commands mentioned in this section are described in the Chapter 7,
"X330WAN CLI Commands."
To configure a modem interface:
1 Connect a terminal to the console port of the X330WAN as described in
"Connecting the Console Port" on page 19.
2 When prompted for a Login Name, enter the default name root.
3 When prompted for a password, enter the password root. You are now in
Supervisor mode.
4 At the prompt, type: "interface Console"“speed” and press Enter.
5 Enter an IP address and subnet mask for the X330WAN to connect via its PPP
interface using the "ip address" <ip address> <mask> command.
Note: The PPP interface configured with the interface console command
must be on a different subnet from the router interfaces.
6
Set the baud rate, ppp authentication, and ppp time out required to match your
modem using the following commands:
“speed” <9600|19200|38400>
"ppp authentication" <chap|none|pap>
“timeout absolute” <time>. The time entered is in seconds.
7 Type: "async mode interactive"
The CLI responds with the following:
Entering the Modem mode will occur automatically upon
proprietary modem-cable plug-in into the console port. The
terminal mode would be restarted automatically upon
insertion of proprietary terminal-cable.
8 Use the DB-25 to RJ-45 connector to plug the console cable to the modem’s
DB-25 connector. Plug the other end of the cable RJ-45 connector to the Console
port on the X330WAN module.
9 The X330WAN enters Modem mode.
10 You can now dial into the module from a remote station, and open a Telnet
session to the PPP interface IP address configured in step 5.
22
Avaya X330W-2DS1 User’s Guide
Configuring the X330WAN
Checking the Modem Configuration
After establishing a modem connection, use the "show interface" console
command to display information regarding your network interface. Verify that the
output information is correct.
Configuring Fast Ethernet Interfaces
Before configuring Fast Ethernet interfaces, make sure the X330WAN is inserted in
the P330 switch and the power is turned on.
All CLI commands mentioned in this section are described in Chapter 7, "X330WAN
CLI Commands."
To configure Fast Ethernet interfaces:
1 Type "interface FastEthernet" 1 to enter the Interface Configuration
mode.
The prompt changes to X330WAN-2DS1-N(super-if:FastEthernet1)#
2 Use the "ip address" <ip address> <mask> command to assign an IP
address and subnet mask to the interface.
3 Type exit to return to Supervisor mode.
The prompt returns to X330WAN-2DS1-N(super)#
Note: For the first inteface to be configured the following message appears:
The primary management interface has changed.
For this change to take effect, you need to copy runningconfig startup-config and then reset the device.
You need to issue the "copy running-config startup-config" and
"reset" commands.
Note: You cannot delete an interface if there is a primary management IP (PMI
defined on it).
Configuring E1/T1 Interfaces
Before configuring E1/T1 interfaces, make sure the X330WAN is inserted in the
P330 switch and the power is turned on.
All CLI commands mentioned in this section are described in Chapter 7, "X330WAN
CLI Commands."
For a list of X330WAN default settings, see "X330WAN Default Settings" on page 28,
or use the "show controllers" [<port>] command to display all of the
current settings.
Avaya X330W-2DS1 User’s Guide
23
Chapter 3
Initial Configuration
To configure E1 or T1 interfaces:
1 Use the "show controllers" [<port>] command to check if your
controller’s mode is configured as E1 or T1.
Use the "ds-mode" [e1|t1]command to set the controller’s mode to E1 or T1.
Changing the line type causes the module to reset.
2 Use the "controller" {e1|t1} <port-number> command to set the port
number to be configured.
The prompt changes to X330WAN-2DS1-N(super-controller:n)#
where N is the switch number and n is the port number.
3 Use the following commands if you want to change the clock source, frame type
and linecode parameters from their default settings:
"clock source" {line|internal}
"framing" {sf|esf} for T1 lines or "framing" {crc4|no-crc4} for E1
lines.
"linecode" {ami|b8zs} for T1 lines or "linecode" {ami|hdb3} for E1
lines.
“cablelength” {long|short} for T1 lines.
If you are working in E1 mode, go to step 4, otherwise go to step 5.
4 Use the channel-group channel-no timeslots timeslot-list command to specify
the channel group and time slots to be mapped. For example, typing
channel group 1 timeslots 1,3-5,7 configures time slots numbered 1,
3-5 and 7 to be mapped in channel-group number 1.
Proceed to step 6.
5 Use the channel-group channel-no timeslots timeslot-list
speed <56|64> command to specify the channel group, time slots to be
mapped and DS0 speed in kbps. For example, typing
channel group 1 timeslots 1,3-5,7 speed 64 configures time slots
numbered 1, 3-5 and 7 to be mapped in channel-group number 1 and the DS0
speed to 64 kbps.
The default DS0 speed is 56 kbps
6 Type exit to return to Supervisor mode.
The prompt returns to X330WAN-2DS1-N(super)#
7 Use the
"interface Serial" [port:channel-group[.ip-interface]]
command to configure each channel group as a virtual serial interface. Specify
the port number and channel group number to modify.
For example, typing interface Serial 1:1 configures a serial interface on
port number 1 with a channel group number 1.
8 Use the "ip address" <ip address><mask> command to assign an IP
address and subnet mask to the interface.
9 Repeat steps 2 through 8 if you want to configure another E1 or T1 interface.
10 Type exit to return to Supervisor mode.
The prompt returns to X330WAN-2DS1-N(super)#
24
Avaya X330W-2DS1 User’s Guide
Configuring the X330WAN
Note: For the first inteface to be configured the following message appears:
The primary management interface has changed.
For this change to take effect, you need to copy runningconfig startup-config and then reset the device.
You need to issue the "copy running-config startup-config" and
"reset" commands.
Note: You cannot delete an interface if there is a primary management IP (PMI
defined on it).
Avaya X330W-2DS1 User’s Guide
25
Chapter 3
Initial Configuration
Configuring Loopback Interfaces
Before configuring Loopback interfaces, make sure the X330WAN module is
inserted in the P330 switch and the power is turned on.
All CLI commands mentioned in this section are described in Chapter 7, "X330WAN
CLI Commands."
To configure Loopback interfaces:
1 Enter the Interface Loopback mode using the
"interface Loopback" [<interface number>[.ip-interface]]
command.
For example, typing interface loopback 1 configures a loopback with a
Loopback interface number 1.
The prompt changes to X330WAN-2DS1-N(super-if:Loopbackn)#
where N is the switch number and n is the loopback interface number.
2 Use the "ip address" <ip address> <mask> command to assign an IP
address and subnet mask to the interface.
3 Type exit to return to Supervisor mode.
The prompt returns to X330WAN-2DS1-N(super)#
Note: For the first inteface to be configured the following message appears:
The primary management interface has changed.
For this change to take effect, you need to copy runningconfig startup-config and then reset the device.
You need to issue the "copy running-config startup-config" and
"reset" commands.
Note: You cannot delete an interface if there is a primary management IP (PMI
defined on it).
Checking the Loopback/Fast Ethernet/T1/E1/IP Interface Configuration
After configuring the new interface, you can perform the following tests to verify
that the new interface is operating correctly.
• Use the "show ip interface" [<interface-name>|
<IP interface>|<ip-address>] command to display IP interface
configured serial and Ethernet ports.
• Use the "show controllers" [<port>] command to display the status of
the controller for T1/E1 interfaces.
• Use the "show interfaces" [<type>] [<identifier>] command to
display information on all interfaces: Fast Ethernet, Fabric, Serial, Console, and
26
Avaya X330W-2DS1 User’s Guide
Configuring the X330WAN
•
•
•
Loopback. Verify that the output information is correct.
Use the "show running-config" command to display the configuration
running on the switch.
Use the "show startup-config" command to display the configuration
loaded at startup.
Use the "ping" <host> [<interval> [<size>]] command to send
ICMP echo request packets to another node on the network. Each node is
periodically pinged and checked if an answer was received. This checks host
reachability and network connectivity.
Saving Your Configuration
It is advisable to save your configuration.
Note: Your configurations are lost after each reset or after a power failure.
To save your configuration, type "copy running-config startup-config".
This copies your X330WAN configuration from the current VRAM Running
Configuration to the Startup Configuration NVRAM.
Establishing a Telnet Connection
Perform the following steps to establish a Telnet connection to the X330WAN for
configuration of WAN parameters. Telnet directly to one of the Router IP addresses:
1 Connect your station to the network.
2 Verify that you can communicate with the X330WAN using the
"ping" <host> [<interval> [<size>]] command to the IP of the
X330WAN. If there is no response, check the IP address and default gateway of
both the X330WAN and the station.
3 From the Microsoft Windows® taskbar of your PC, click Start and then Run (or
from the DOS prompt of your PC), then start the Telnet session by typing:
telnet <X330WAN_IP_address>
For example: telnet 149.49.32.134
Note: You can also Telnet the IP address of the P330 stack. If you Telnet the IP
address of the stack, a connection is established with the Switch CLI entity of the
Master module of the stack.
If you want to connect to the X330WAN CLI entity, use the "session" wan
<module number in stack> command.
4
When prompted for a Login Name, enter the default name root.
Avaya X330W-2DS1 User’s Guide
27
Chapter 3
Initial Configuration
5
6
When prompted for a password, enter the User Level password root in lower
case letters (do NOT use uppercase letters).
You can now configure the X330WAN.
X330WAN Default Settings
The default settings for the X330WAN and its ports are determined by its firmware.
These default settings are subject to change. Newer versions of the software for the
X330WAN can be downloaded from the Avaya Network Software Download Web
site (http://www.avaya.com/support).
Table 3.2
28
X330WAN Default Settings
Function
Default Setting
Port Speed (Fast Ethernet)
100 Mbps
Port Duplex (Fast Ethernet)
Full Duplex
Auto-Negotiation (Fast Ethernet)
Enabled
WAN mode (WAN)
T1
Framing (WAN)
SF for T1, CRC4 for E1
Linecode (WAN)
AMI for T1, HDB3 for E1
Clock Source (WAN)
line
Cable Length (for T1)
long, gain26, 0db
Speed (for T1)
56
SNMP Community
public
Avaya X330WAN CLI Entry Login
Login name: root
Password: root
Avaya X330W-2DS1 User’s Guide
Chapter 4
Common Configurations
An X330WAN access router module can be used in any situation where E1/T1
WAN connectivity is needed for an office. The following situations are the most
common configurations for connecting to a WAN using the P330:
• Connecting Branch Offices to Headquarters
• Connecting a Small Office to the Internet
Connecting Branch Offices to Headquarters
Many companies have a centralized location for their headquarters and small
branch offices. It is important that communication between the headquarters and
the branches flows quickly. The following figure shows a typical configuration of
the network connecting the headquarters with branch offices.
Figure 4.1
Branch Office to Headquarters
Avaya X330W-2DS1 User’s Guide
29
Chapter 4
Common Configurations
The following configuration file is a result of configuring X330WAN1 as shown in
Figure 4.1:
controller t1 1
channel-group 12 timeslots 1-31
!
controller t1 2
!
interface FabricFastEthernet 1
!
interface FabricFastEthernet 1:30
ip address 135.20.7.8
255.255.0.0
!
interface FastEthernet 1
!
interface Serial 1:12
encapsulation ppp
ip address 194.49.1.249
255.255.255.252
ip routing-mode RT_PRIMARY_MGMT
30
Avaya X330W-2DS1 User’s Guide
Connecting a Small Office to the Internet
Connecting a Small Office to the Internet
A small office requires a reliable and fast connection to the Internet to maintain fast
communication times and have access to information on the World Wide Web. The
following figure shows a typical configuration of the network connecting a small
office to the Internet.
Figure 4.2
Small Office to the Internet
Avaya P330 Switch
with X330WAN
135.20.7.8
255.255.0.0
194.49.0.3
255.255.0.0
PPP over
E1/T1
Firewall
Internet
The following configuration file is a result of configuring the X330WAN for the
network shown in Figure 4.2:
controller t1 1
channel-group 12 timeslots 1-31
!
controller t1 2
!
interface FabricFastEthernet 1
shutdown
!
interface FastEthernet 1
ip address 135.20.7.8
255.255.0.0
!
interface Serial 1:12
encapsulation ppp
ip address 194.49.1.249
255.255.255.252
ip routing-mode RT_PRIMARY_MGMT
Avaya X330W-2DS1 User’s Guide
31
Chapter 4
Common Configurations
Using the X330WAN with Security
There are different ways of connecting the X330WAN modules to provide security
to the local network. Figure 4.3 shows a typical configuration where the WAN
traffic goes through the X330WAN module out to an external firewall and/or VPN,
and then enters the LAN
Figure 4.3
X330WAN with Security
Avaya P330 Switch
with X330WAN
PPP over
E1/T1
Internet
Firewall
The following configuration file is a result of configuring the X330WAN as shown in
Figure 4.3:
controller t1 1
channel-group 12 timeslots 1-31
!
controller t1 2
!
interface FabricFastEthernet 1
shutdown
!
interface FastEthernet 1
ip address 135.20.7.8
255.255.0.0
!
interface Serial 1:12
encapsulation ppp
ip address 194.49.1.249
255.255.255.252
ip routing-mode RT_PRIMARY_MGMT
32
Avaya X330W-2DS1 User’s Guide
Chapter 5
Troubleshooting
This chapter provides an explanation of how to troubleshoot operational difficulties
with the X330WAN.
Troubleshooting the X330WAN should be performed according to layers. When a
problem appears you should start isolating it by troubleshooting Layer 1 - the
controller’s alarms and errors first, then Layer 2, and finally Layer 3.
Monitoring Traffic
You can monitor the state of the X330WAN’s E1/T1 ports using the
show controllers command. The command can be entered via the CLI. The
resulting output provides information about the state of the E1/T1 controller and
reports alarms. In addition, the output provides statistics on the state of the
controller over the last 24 hour period. To receive output for a specific port, enter
the port number after the show controllers command.
For information on the fields in the output from the show controllers
command, see Chapter 7, "X330WAN CLI Commands."
Handling E1/T1 Alarms
Alarms are reported by the LEDs on the X330WAN and via the CLI. When an alarm
condition is detected by an X330WAN, the module sends a signal to all E1/T1
devices to which it is attached. Alarms can therefore be categorized as one of the
following:
• Local Alarm Indication - Generated by the X330WAN as a result of a line status
problem sensed by the X330WAN.
• Remote Alarm Request - Received by the X330WAN from the remote module.
The following table provides a list of alarms, the type of alarm, and the alarm
condition on the module from which the alarm originates.
Table 5.1
Alarms
Alarm (E1/T1)
Alarm Type
Originating Alarm
LOS/LOS
Local Alarm Indicator
N/A
LOF/Red
Local Alarm Indicator
N/A
High Ber/Major
Local Alarm Indicator
N/A
Avaya X330W-2DS1 User’s Guide
33
Chapter 5
Handling E1/T1 Alarms
Table 5.1
Alarms
Alarm (E1/T1)
Alarm Type
Originating Alarm
Low Ber/Minor
Local Alarm Indicator
N/A
RAI/Yellow
Remote Alarm Request
LOS, LOF, BER, AIS
AIS/Blue
Remote Alarm Request
Maintenance request
Alarm Conditions
The following section discusses the different types of alarms, how each alarm type
is indicated, and possible corrective actions to end the alarm.
LOS
Definition: Loss of Signal. This alarm is the result of a loss of the clock
synchronization signal. The alarm severity is Major.
Indication: The alarm is indicated when the SIG LED is not lit and the ALM LED is
lit.
Corrective Actions:
•
•
•
•
Check that the E1/T1 cable is properly connected to the E1/T1 ports at both
ends of the connection.
Check the integrity of the cable and pinouts.
Ensure that the receiving and transmitting pairs are not reversed.
If regenerators are used, check the integrity of the regenerators.
LOF/Red
Definition: Loss of Frame. This alarm is the result of a loss of the frame
synchronization signal. The alarm severity is Major.
Indication: The alarm is indicated when the ALM LED lights.
Corrective Actions:
Ensure that the line settings are compatable on both sides of the line. For example:
• Ensure that both sides of the connection are configured to use the same line
code and framing configuration. Use the show controllers command to
view the current line code. Use the framing command to configure the framing
mode and the line code command to configure the line code.
• For T1lines, ensure that the line is configured for the cable length in use. Use the
show controllers command to view the current configuration. Use the
cablelength long and cablelength short commands to change the
cable length configuration.
34
Avaya X330W-2DS1 User’s Guide
Handling E1/T1 Alarms
For detailed information on CLI commands, see Chapter 7, "X330WAN CLI
Commands."
Note: After clearing the condition causing the LOF alarm, the module will continue
to indicate an LOF condition for approximately 10 seconds.
High Ber/Major
Definition: High threshold Bit Error Rating. This alarm is the result of an average
error rate of 1 bit per 1000 for 10 seconds. The alarm severity is Major.
Indication: The alarm is indicated using the show controllers command from
the CLI. For more information, refer to "Monitoring Traffic" on page 33.
Corrective Actions:
•
•
•
Check the integrity of the physical E1/T1 line.
If regenerators are used, check the integrity of the regenerators.
Use loopbacks to help pinpoint the cause of the alarm condition. For
information on using loopbacks, refer to "Using Loopbacks" on page 36.
Note: After clearing the condition causing the High BER/Major alarm, the module
will continue to indicate an High BER/Major condition for approximately
11 seconds.
RAI/Yellow
Definition: Remote Alarm Indication. Local Rx line is down. There is a problem
with the remote module. The alarm severity is Major.
Indication: The alarm is indicated when the ALM LED lights up or by using the
show controllers command from the CLI. For more information,
refer to "Monitoring Traffic" on page 33.
Corrective Action:
•
Check your configuration (for example, framing) to verify that it matches the
configuration of the remote end.
AIS/Blue
Definition: Alarm Indication Signal. Local Rx line is down. The administrator of the
remote module cut your line. The alarm severity is Major.
Avaya X330W-2DS1 User’s Guide
35
Chapter 5
Using Loopbacks
Indication: The alarm is indicated when the ALM LED lights up or by using the
show controllers command from the CLI. For more information,
refer to "Monitoring Traffic" on page 33.
Corrective Actions:
•
•
Call the administrator of the remote module.
Wait for the signal to return.
Alarm Detection
Alarms can be identified on the X330WAN either using the LEDs on the front panel
or using the CLI.
The X330WAN front panel LEDs can indicate two types of Local Alarms:
• If a LOS is sensed by a E1/T1 port, its SIG LED will be off and the ALM LED
will be on.
• When all other alarms are sensed by a E1/T1 port, the ALM LED will light.
In addition, an Alarm condition will be indicated by a message on the CLI screen,
for example, “Controller T1 1 changed state to down (LOS)”.
More detailed information about alarms can be obtained using the
show controllers CLI command.
Using Loopbacks
The X330WAN supports the following Loopback types:
• Diag Loopback (E1/T1) - The X330WAN CPU instructs the Line Framer to
create a loop towards the CPU. A Blue Alarm (AIS) is sent on the line to the peer
module.
• Local Line Loopback (E1/T1) - The X330WAN Line Framer creates a loop on the
line towards the other peer module.
• Local Payload Loopback (E1/T1) - The X330WAN Line Framer creates a loop
through itself and re-frames the signal on its way back from the peer module.
• Remote Line Loopback (T1 only) - The X330WAN sends the remote peer
module a request to create a line loop. A Line Loopback signal is used to
indicate the request.
• Remote Payload Loopback (T1 only) - The X330WAN sends the remote peer
module a request to create a loop through its Line Framer. A Payload Loopback
signal is used to indicate the request. The Remote Payload Loopback type is
only available in ESF framing.
To instruct the X330WAN to perform a loopback, use the loopback diag,
loopback local, and loopback remote command. For more information
about these commands, see Chapter 7, "X330WAN CLI Commands."
36
Avaya X330W-2DS1 User’s Guide
Troubleshooting VoIP Transmission
Troubleshooting VoIP Transmission
To enable VoIP, the following must be configured on the devices at both ends of the
connection:
• VoIP must be enabled on both ends.
• The RTP port range must be the same on both ends.
• The devices on both ends must be configured according to the running voice
applications.
When the device on the other end is a non-Avaya device:
• Configure the non-Avaya device for the maximum amount of connections (255).
• Configure the port range of the Avaya device to: 49152 - 65535.
• Configure the "non-ietf" working mode using the command:
ip rtp non-tcp mode
Avaya X330W-2DS1 User’s Guide
37
Chapter 5
38
Troubleshooting VoIP Transmission
Avaya X330W-2DS1 User’s Guide
Chapter 6
Embedded Web Manager
The Embedded Web Manager for the X330WAN provides the following:
• Expansion module configuration.
• E1/T1 port configuration.
• Channel group management.
• Channel group wizard.
System Requirements
Minimum hardware and Operating System requirements are:
• One of the following operating systems:
— Windows® 95
— Windows 98 SP1
— Windows 98 OSR (Second Edition)
— Windows ME
— Windows NT® Workstation or Server
— Windows 2000 Professional or Server
• Pentium® II 400 Mhz-based computer with 256 Mb of RAM
(512 Mb recommended)
• Minimum screen resolution of 1024 x 768 pixels
• Sun Microsystems Java™ plug-in version 1.3.1_02 (supplied)
• Microsoft® Internet Explorer® or Netscape Navigator/Communicator® (see
table)
Windows 95 or NT
Windows 98, ME or 2000
Internet Explorer
5.0 or higher
5.01 or higher
Netscape Navigator/
Communicator
4.7
4.73
Note for users of Netscape Navigator: The Java plug-in requires certain services from
Windows 95 which are not present if Internet Explorer is not installed. In order to
add these services to the operating system, please install Internet Explorer version 3
or higher. You can then use either browser to manage the switch.
Avaya X330W-2DS1 User’s Guide
39
Chapter 6
Embedded Web Manager
Running the Embedded Manager
Note: You should assign an IP address to the X330WAN before beginning this
procedure.
1
2
Open your browser.
Enter the url of the switch in the format http://aaa.bbb.ccc.ddd where
aaa.bbb.ccc.ddd is the IP address of the switch.
Note: The user name is “root”
The default password for read-write access is “root”.
Note: The Web management passwords are the same as those of the CLI. If you
have created additional CLI user names or changed the default passwords then you
can use those passwords for Web management as well.
The welcome page is displayed:
Figure 6.1
40
The Welcome Page
Avaya X330W-2DS1 User’s Guide
Running the Embedded Manager
— If you have the Java plug-in installed, the Web-based manager should open
in a new window (see Figure 6.2).
Figure 6.2
Web-based Manager
— If you do not have the Java plug-in installed, follow the instructions on the
Welcome page that offer a variety of options to install the plug-in (see
Figure 6.1), or see Installing the Java Plug-in on page 42.
Avaya X330W-2DS1 User’s Guide
41
Chapter 6
Embedded Web Manager
Installing the Java Plug-in
If the network manager has configured the system, the plug-in should be installed
automatically.
Note: Ensure that Java or JavaScript is enabled on your Web browser. Please refer to
your browser on-line help or documentation for further information.
If the plug-in is not installed automatically, then you have three options for
installing it manually:
1 Installing from the Avaya P330 Documentation and Utilities CD
1 Close all unnecessary applications on your PC.
2 Insert the “Avaya P330 Documentation and Utilities” CD into the CD drive.
3 Click Start on the task bar.
4 Select Run.
5 Type x:\emweb-aux-files\plug-in_1_3_1_02.exe where x is the CD
drive letter.
6 Follow the instructions on screen.
2 Install from the Avaya Site
Click link in the Welcome page.
3 Install from your Local Web Site
Click link in the Welcome page.
Note: This option is only available if the network manager has placed the files on
the local Web server.
42
Avaya X330W-2DS1 User’s Guide
Installing the On-Line Help and Java Plug-In on your Web Site
Installing the On-Line Help and Java Plug-In on your Web Site
Note: This procedure is optional.
Copying the help files and Java plug-in to a local Web server allows users to access
the on-line help for the Embedded Manager and enables automatic installation of
the Java plug-in the first time the users tries to manage the device.
1 Copy the emweb-aux-files directory from the “Avaya P330 Documentation
and Utilities” CD to your local Web server. Please refer to your Web server
documentation for full instructions.
2 Define the URL in the Avaya P330 using the following CLI command:
set web aux-files-url //IP address/directory name
where //IP address/directory name is the location of the directory
from the previous step.
Documentation and Online Help
Refer to the Avaya P330 Documentation and Utilities CD.
Software Download
You can perform software download using the CLI or Avaya UpdateMaster.
Avaya X330W-2DS1 User’s Guide
43
Chapter 6
44
Embedded Web Manager
Avaya X330W-2DS1 User’s Guide
Chapter 7
X330WAN CLI Commands
This chapter provides a complete list of all WAN related CLI commands. Each
command that appears on the list is accompanied by a detailed description,
including the proper syntax. The list is presented in alphabetical order to help you
locate commands easily.
Introduction: About CLI
The CLI is command-line driven and does not have any menus. To activate a
configuration option, type the desired command at the prompt and press Enter.
To exit a context, type exit.
You can use all show commands in User mode.
To configure the X330WAN, you must either be in Supervisor mode, or enter the
Configure context. Generic commands are performed from the Configure context.
If you are in Supervisor mode or have entered the Configure context, you can enter
any of the following contexts:
• Controller
• Interface Console
• Interface Fast Ethernet
• Interface Fabric Fast Ethernet
• Interface Serial
• Interface Loopback
• Other contexts
Layer 1 (E1/T1) commands are performed from the Controller context, and Layer
2/Layer 3 (Fabric, PPP) commands are performed from the various Interface
contexts.
For a list of all Controller commands, see General: Device Commands on page 47.
For a list of all Interface Fast Ethernet commands, see "interface FastEthernet on
page 132".
For a list of all Interface Fabric Fast Ethernet commands, see interface
FabricFastEthernet on page 131.
For a list of all Interface Loopback commands, see async mode interactive (Console
interface context) on page 120.
For a list of all Interface Serial commands, see interface Serial on page 133.
Avaya X330W-2DS1 User’s Guide
45
Chapter 7
X330WAN CLI Commands
The following figure illustrates this introduction.
Figure 7.1
X330WAN CLI Contexts
User Mode
Configure Context
Controller Context
-
Interface
Interface
Interface
Interface
Interface
Other Contexts
Console Context or
Fast Ethernet Context or
Fabric Fast Ethernet Context or
Loopback Context or
Serial Context
X330WAN CLI Prompts
The following table displays examples of X330WAN-2DS1 CLI prompts.
Table 7.1
X330WAN-2DS1 CLI Prompts
Mode/Context
Prompt
User
X330WAN-2DS1-N>
Supervisor
X330WAN-2DS1-N(super)#
Configure
X330WAN-2DS1-N(configure)#
Controller
X330WAN-2DS1-N(config-controller:n)#
Interface
Console
X330WAN-2DS1-N(config-if:CON)#
Interface Fast
Ethernet
X330WAN-2DS1-N(config-if:FastEthernet1)#
Interface Fabric
Fast Ethernet
X330WAN-2DS1-N(config-if:FabricFastEthernetn)#
Interface
Loopback
X330WAN-2DS1-N(config-if:LoopbackZ)#
Interface Serial
X330WAN-2DS1-N(config-if:Serialn:x)#
N is the number of the device in a stack of WAN devices, n is the number of the
WAN port ("1" or "2"), Z is the interface number, and x is the number of the channel
group.
46
Avaya X330W-2DS1 User’s Guide
General: Device Commands
General: Device Commands
This section contains a list of all general device CLI commands.
clear screen
The clear screen command clears the current terminal display.
The syntax for this command is:
clear screen
clear snmp trap
Use the clear snmp trap command to clear an entry from the SNMP trap
receiver table.
The syntax for this command is:
clear snmp trap {<rcvr_addr>|all}
rcvr_addr
IP address or IP alias of the trap receiver (the SNMP management
station) to clear
all
Keyword that specifies every entry in the SNMP trap receiver table
Output Example:
X330WAN-2DS1-1(super)# clear snmp trap 192.122.173.82
SNMP trap receiver deleted.
clear timezone
Returns the timezone to its default, Coordinated Universal Time (UTC).
The syntax for this command is:
clear timezone
copy running-config startup-config
Use the copy running-config startup-config command to copy the
device configuration from the current RAM Running Configuration to the Startup
Configuration NVRAM.
The syntax for this command is:
copy running-config startup-config
Avaya X330W-2DS1 User’s Guide
47
Chapter 7
X330WAN CLI Commands
copy running-config tftp
Use the copy running-config tftp command to copy the device
configuration from the current RAM Running Configuration to the TFTP file.
The syntax for this command is:
copy running-config tftp <filename> <ip>
filename
The file name (full path)
ip
The IP address of the host
Examples:
X330WAN-2DS1-1(configure)# copy running-config tftp
c:\p332\router1.cfg 192.168.49.10
copy startup-config tftp
Use the copy startup-config tftp command to copy the device
configuration from the NVRAM Startup Configuration to the TFTP file.
The syntax for this command is:
copy startup-config tftp <filename> <ip>
filename
The file name (full path)
ip
The ip address of the host
Examples:
X330WAN-2DS1-1(configure)# copy startup-config tftp
c:\p332\router1.cfg 192.168.49.10
copy tftp startup-config
Use the copy tftp startup-config command to copy the device
configuration from the saved TFTP file to the Startup Configuration NVRAM.
The syntax for this command is:
copy tftp startup-config <filename> <ip>
48
filename
The file name (full path)
ip
The ip address of the host
Avaya X330W-2DS1 User’s Guide
General: Device Commands
Examples:
X330WAN-2DS1-1(configure)# copy tftp startup-config
c:\p332\router1.cfg 192.168.49.10
copy tftp EW_archive
Use the copy tftp EW_archive command to download the WAN Device
Manager application into the device via TFTP. To use this command, you need to
have an active TFTP server, and to create a file into which to download the data. If
Avaya MultiService Network Manager is running, an additional TFTP server is not
required.
The syntax for this command is:
copy tftp EW_archive <filename> <ip> <mod_num>
filename
Embedded Web Manager image file name (full path)
ip
The ip address of the TFTP server
mod_num
Target device number
Example:
X330WAN-2DS1-1(configure)# copy tftp EW_archive
c:\p330\p330web201 192.168.49.10 5
copy tftp SW_image
Use the copy tftp SW_image command to update the software image and the
device manager applications of a designated device. To use this command, you
need to have an active TFTP server, and to create a file into which to download the
data. If Avaya MultiService Network Manager is running, an additional tftp server
is not required.
The syntax for this command is:
copy tftp SW_image <sw-image-file> EW_archive <EmWeb_File>
<ip_address>
The syntax for this command for the X330WAN is:
copy tftp SW_image <sw-image-file> EW_archive <ew_archivefile> <ip_address>
sw-image-file
Avaya X330W-2DS1 User’s Guide
Common name for the files that contain the Software
Image and Embedded Web archive (full path).
49
Chapter 7
X330WAN CLI Commands
EmWeb_File
Embedded Web Manager image file name (full path).
ew_archive-file
Embedded Web Manager archive file.
ip_address
The IP address of the TFTP server.
Example:
X330WAN-2DS1-1(super)# copy tftp SW_image c:\p330\p330web101
EW_archive c:\p330\p330web201 192.168.49.10
dir
Use the dir command to show the file types that have been downloaded to the
device.
The syntax for this command is:
dir
Output Example:
X330WAN-2DS1-1(super)# dir
M# file
ver num
-- ----
--------
file type
file location
file description
----------
-------------
---------------Startup Config
1
startup-config
N/A
Startup Conf
Nv-Ram
1
running-config
N/A
Running Conf
Ram
1
A
X330WAN-A
N/A
SW Component
Flash Bank A
Software Image - Bank
1
B
X330WAN-B
3.9.5
SW RT Image
Flash Bank B
Software Image - Bank
1
P3WAN
N/A
SW Web Image
Nv-Ram
Running Config
EmWeb application
Output Fields:
50
Field
Description
M#
The device number
file
There are several files loaded into the device’s memory:
• module-config – file which contains the configuration
settings made to this device
• stack-config – file which contains the configuration settings
made at the stack level (for example IP address of the stack)
• EW_Archive – file which contains the Device Manager
(Embedded Web) software
Avaya X330W-2DS1 User’s Guide
General: Device Commands
ver num
S/W Version number – relevant only for the Device
Management S/W
file type
There are several file types:
• Running Conf – the configuration currently in use and the
startup configuration
• SW Web Image – Device Manager S/W archive file
file location
Type of internal memory into which the file is loaded
file description
Description of the file
Note: If the N/A is displayed for the EW_Archive file, this means that the Device
Manager S/W is not loaded correctly. Download the Device Manager S/W again.
erase startup-config
The erase startup-config command erases the startup configuration
NVRAM.
The syntax for this command is:
erase startup-config
get time
Use the get time command to retrieve the time from the network.
The syntax for this command is:
get time
Output Example:
get time
Time is being acquired from server 0.0.0.0!
hostname
Use the hostname command to change the Command Line Interface (CLI)
prompt. The current device number always appears at the end of the prompt.
Avaya X330W-2DS1 User’s Guide
51
Chapter 7
X330WAN CLI Commands
The syntax for this command is:
hostname [<hostname_string>]
hostname_string
none – displays current hostname
string – the string to be used as the hostname
(up to 20 characters).
no hostname
Use the no hostname command to return the CLI prompt to its default.
The syntax for this command is:
no hostname
nvram initialize
Use the nvram initialize command to reset the WAN parameters to the
factory defaults.
The syntax for this command is:
nvram initialize
Output Example:
X330WAN-2DS1-1(super)# nvram initialize
This command will restore factory defaults, and can disconnect
your telnet session
*** Reset *** - do you want to continue (Y/N)?
Connection closed by foreign host.
host%
reset
Use the reset command to restart the system.
If you want to keep changes you made to the current running configuration use the
copy running-config startup-config command first.
Note: You should perform a reset after downloading software to the device.
The syntax for this command is:
reset
52
Avaya X330W-2DS1 User’s Guide
General: Device Commands
Output Example:
X330WAN-2DS1-1(super)# reset
This command will reset the module and may disconnect your
telnet session.
*** Reset the device *** - do you want to continue (Y/N)? y
Connection closed by foreign host.
set boot bank
Use the set boot bank command to configure the software bank from which the
device will boot at the next boot process.
The syntax for this command is:
set boot bank <value>
value
{bank-a | bank-b}
Output Example:
X330WAN-2DS1-1(super)# set boot bank bank-a
Boot bank set to bank-a
set logout
The set logout command is used to set the number of minutes until the system
automatically disconnects an idle session.
The syntax for this command is:
set logout [timeout]
timeout
Number of minutes (0 to 999) until the system automatically
disconnects an idle session. Setting the value to 0 disables the
automatic disconnection of idle sessions (default is 15 minutes).
Output Example:
To set the number of minutes until the system disconnects an idle session
automatically:
X330WAN-2DS1-1(super)# set logout 20
Sessions will be automatically logged out after 20 minutes of
idle time.
Avaya X330W-2DS1 User’s Guide
53
Chapter 7
X330WAN CLI Commands
Output Example:
To disable the automatic disconnection of idle sessions:
X330WAN-2DS1-1(super)# set logout 0
Sessions will not be automatically logged out.
set snmp trap
Use the set snmp trap commands to add an entry into the SNMP trap receiver
table and to enable or disable the different SNMP traps for a specific receiver. First
add the rcvr_addr and then enable/disable the different traps for it.
The syntax for this command is:
set snmp trap <rcvr_addr>
set snmp trap <rcvr_addr> {enable|disable}
{all|vlan_violation|...}
enable
Activate SNMP traps
disable
Deactivate SNMP traps
all
(Optional) Specify all trap types
vlan_violation
(Optional) Specify the vlan violation trap from the TRAP-MIB.
rcvr_addr
IP address or IP alias of the system to receive SNMP traps
Output Example:
To enable SNMP vlan_violation traps to a specific manager:
X330WAN-2DS1-1(super)# set snmp trap 192.168.173.42 enable
vlan_violation
SNMP vlan_violation change traps enabled.
Output Example:
To enable all traps to a specific manager:
X330WAN-2DS1-1(super)# set snmp trap 192.168.173.42 enable all
All SNMP traps enabled.
Output Example:
To disable SNMP vlan_violation traps to a specific manager:
X330WAN-2DS1-1(super)# set snmp trap 192.168.173.42 disable
vlan_violation
SNMP vlan_violation traps disabled.
54
Avaya X330W-2DS1 User’s Guide
General: Device Commands
Output Example:
To add an entry in the SNMP trap receiver table with default:
X330WAN-2DS1-1(super)# set snmp trap 192.168.173.42
SNMP trap receiver added.
set snmp trap auth
Use the set snmp trap auth commands to enable/disable the sending of
SNMP traps upon SNMP authentication failure.
The syntax for this command is:
set snmp trap {enable|disable} auth
Output Example:
X330WAN-2DS1-1(super)# set snmp trap enable auth
Authentication trap enabled
set system contact
Use the set system contact command to set mib2 system contact MIB
variable.
The syntax for this command is:
set system contact [contact string]
contact string
Contact person. The contact person field is cleared if this field is
blank. A string of 2 words or more must be type in quotation
marks – e.g. “Yigdal Naouri”.
Example:
set system contact "Gabby ext.545"
set system location
Use the set system location command to set the mib2 system location MIB
variable.
Avaya X330W-2DS1 User’s Guide
55
Chapter 7
X330WAN CLI Commands
The syntax for this command is:
set system location [location string]
location string
Location name. The location name is cleared if this field is left
blank. A string of 2 words or more must be type in quotation
marks – e.g. “Operations Floor”.
Example:
set system location "Floor 5,Room 12"
set system name
Use the set system name command to set mib2 system name MIB variable.
The syntax for this command is:
set system name [name string]
name string
System name. The system name is cleared if this field is left
blank. A string of 2 words or more must be type in quotation
marks – e.g. “Backbone Stack”.
Example:
set system name "Banking System"
set time client
The set time client command is used to enable or disable the periodic
network time acquisition by the device from the network time server (SNTP or
TIME protocol).
The syntax for this command is:
set time client {enable|disable}
set time protocol
Use the set time protocol command to set the protocol for use in the system as either
SNTP protocol or TIME protocol.
The syntax for this command is:
set time protocol
56
[sntp-protocol|time-protocol]
Avaya X330W-2DS1 User’s Guide
General: Device Commands
Output Example:
X330WAN-2DS1-1(super)# set time protocol sntp-protocol
The protocol has been set to SNTP protocol
Output Example:
X330WAN-2DS1-1(super)# set time protocol time-protocol
The protocol has been set to TIME protocol
set time server
The set time server command is used to set the TIME server address.
The syntax for this command is:
set time server <ip address>
ip address
IP address of the TIME server.
set timezone
Use the set timezone command to assign a timezone name and set the time
difference of your WAN relative to the Coordinated Universal Time (UTC/GMT).
The minutes parameter can only be set to 30.
The syntax for this command is:
set timezone <zone name> <hours|hours:min>
zone name
Three letter representation of the time zone.
Output Example:
set timezone GMT -3:30
Timezone set to 'GMT', offset from UTC is -3:30 hours
Note: If you wish to define a name which includes spaces, you must enclose the
entire name in quotation marks, e.g. "new york".
show boot bank
Use the show boot bank command to display the software bank from which the
Avaya X330W-2DS1 User’s Guide
57
Chapter 7
X330WAN CLI Commands
device will boot at the next boot process.
The syntax for this command is:
show boot bank
Output Example:
show boot bank
Boot bank set to bank-a
show copy status
Use the show copy status command to show the status of the local
configuration copy operation.
The syntax for this command is:
show copy status
Output Example:
X330WAN-2DS1-1(super)# show copy status
Module #1
===========
Module
: 1
Source file
: startup-config
Destination file : running-config
Host
: -
Running state
: Idle
Failure display
: (null)
Last warning
: No warning
show dev log file
Use the show dev log file command to display the encrypted device’s log file.
The syntax for this command is:
show dev log file
show erase status
Use the show erase status command to view the status of the erase Startup
Configuration operation.
58
Avaya X330W-2DS1 User’s Guide
General: Device Commands
The syntax for this command is:
show erase status
show image version
Use the show image version command to display the software version of the
image on both memory banks of the device.
The syntax for this command is:
show image version
Output Example:
X330WAN-2DS1-1(super)# show image version
Mod
Module-Type
Bank
Version
------
-----------
----
-------
1
Avaya X330W-2DS1 WAN Router
A
N/A
1
Avaya X330W-2DS1 WAN Router
B
3.9.5
show module-identity
Use the show module identity command to display the device identity
required for acquiring a license.
The syntax for this command is:
show module-identity
Output Example:
show module-identity
X330WAN-2DS1-1(super)# show module-identity
Mod
Module Identity
---
---------------
1
1234567
show running-config
Use the show running-config command to show the RAM based
configuration currently running on the device.
The syntax for this command is:
show running-config
Avaya X330W-2DS1 User’s Guide
59
Chapter 7
X330WAN CLI Commands
show snmp
Use the show snmp command to display SNMP information.
The syntax for this command is:
show snmp
Output Example:
X330WAN-2DS1-1(super)# show snmp
Authentication trap disabled
Community-Access
Community-String
------------------------------read-only
public
read-write
public
trap
public
------------------------------1.1.1.1
duplicate_ip
ip_vlan_violation
etc...
show startup-config
Use the show startup-config command to show the NVRAM based
configuration loaded automatically at startup.
The syntax for this command is:
show startup-config
show system
Use the show system command to display the up time, system name, location,
and contact person.
The syntax for this command is:
show system
Output Example:
X330WAN-2DS1-1(super)# show system
Uptime d,h:m:s
-----------------------0,2:40:55
System Name
60
System Location
System Contact
Avaya X330W-2DS1 User’s Guide
General: Device Commands
--------------------- ------------------------- ------------------------P332_version-3.0.5
Alpha LAB
Ygdal Naouri
show tftp download software status
Use the show tftp download software status commands to display the
status of the current TFTP Device Manager S/W (Embedded Web) download
process into the device.
The syntax for this command is:
show tftp download software status
Output Example:
X330WAN-2DS1-1(super)# show tftp download software status
Module #1
===========
Module
: 1
Source file
: d:\p340sw\gt-ml\3.5.18\p340.web
Destination file : EW_Archive
Host
: 149.49.70.61
Running state
: Writing ...
Failure display
: (null)
Last warning
: No-warning
show tftp download/upload status
Use the show tftp download status and show tftp upload status
commands to display the status of the current TFTP configuration file copy process
into/from the device.
The syntax for this command is:
show tftp {download|upload} status
Output Example:
X330WAN-2DS1-1(super)# show tftp upload status
Module
: 1
Source file
: stack-config
Destination file : c:\conf.cfg
Host
: 149.49.36.200
Running state
: Executing
Failure display : (null)
Avaya X330W-2DS1 User’s Guide
61
Chapter 7
X330WAN CLI Commands
Last warning
: No-warning
show time
Use the show time command to display the current device time.
The syntax for this command is:
show time
Output Example:
X330WAN-2DS1-1(super)# show time
10:32:34 27 JAN 2000 GMT
show time parameters
Use the show time parameters command to display the status and
parameters.
The syntax for this command is:
show time parameters
X330WAN-2DS1-1(super)# show time parameters
Client status: Enabled
Current time : L:01:38:31 01 JAN 1970 GMT
Timezone set to 'GMT', offset from UTC is 0 hours
Time-Server : 0.0.0.0 (I.e. broadcast address)
Time acquired from Time-Server: 0.0.0.0
Time protocol set to
: TIME protcol
show timezone
Use the show timezone command to display the current device timezone.
The syntax for this command is:
show timezone
Output Example:
X330WAN-2DS1-1(super)# show timezone
Timezone set to 'GMT', offset from UTC is 0 hours
sync time
Use the sync time command to synchronize the time.
62
Avaya X330W-2DS1 User’s Guide
General: Device Commands
The syntax for this command is:
sync time
Output Example:
X330WAN-2DS1-1(super)# sync time
Time has been distributed.
tech
Use the tech command to enter tech mode. This command is reserved for service
personnel use only.
terminal length
Use the terminal length command to set the length of the terminal display in
characters.
The syntax for this command is:
terminal length [<screen-length>]
screen-length
none - Displays the current length.
number - Set the new screen length.
Example:
X330WAN-2DS1-1(super)# terminal length 24
terminal width
Use the terminal width command to set the width of the terminal display in
characters.
The syntax for this command is:
terminal width [<character>]
character
none - Displays the current width.
number - Set the new screen width.
Example:
X330WAN-2DS1-1(super)# terminal width 6
Avaya X330W-2DS1 User’s Guide
63
Chapter 7
X330WAN CLI Commands
Layer 3 CLI Commands
This section contains a list of all Layer 3 related CLI commands.
arp
Use the arp command to add a permanent entry to the Address Resolution
Protocol (ARP) cache. The no form of this command removes an entry, either a
static entry or a dynamically learned entry.
The syntax for this command is:
[no] arp <ip-address> <mac-address>
ip-address
IP address, in dotted decimal format, of the station
mac-address
MAC address of the local data link
Examples:
To add a permanent entry for station 192.168.7.8 to the ARP cache:
Router(configure)# arp 192.168.7.8 00:40:0d:8c:2a:01
To remove an entry to the ARP cache for the station 192.168.13.76:
Router(configure)# no arp 192.168.13.76
arp timeout
Use the arp timeout command to configure the amount of time that an entry
remains in the ARP cache. To restore the default value, 14400, use the no form of
this command.
The syntax for this command is:
arp timeout <seconds>
The syntax for the no form of this command is:
no arp timeout
seconds
The amount of time, in seconds, that an entry remains
in the arp cache.
Max value is 604800
Examples:
To set the arp timeout to one hour:
X330WAN-2DS1-1(configure)# arp timeout 3600
To restore the default arp timeout:
64
Avaya X330W-2DS1 User’s Guide
Layer 3 CLI Commands
Router-N(configure)# no arp timeout
clear arp-cache
Use the clear arp-cache command to delete all dynamic entries from the ARP
cache and the IP route cache.
The syntax for this command is:
clear arp-cache[<vlan>|<ip addr>[<mask>]]
vlan
VLAN string (up to 16 characters) or VLAN ID
number
ip addr
IP address
mask
IP mask
Examples:
clear
clear
clear
clear
arp-cache
Flush all ARP entries.
arp-cache marketing_vlan
Flush ARP entries for a VLAN.
arp-cache 30
Flush ARP entries for a VLAN ID.
arp-cache 192.168.0.0 255.255.0.0 Flush range of ARP entries belonging
to one subnet.
clear ip route
Use the clear ip route command to delete all the dynamic routing entries from
the Routing Table.
The syntax for this command is:
clear ip route * | <ip-addr> [<ip-mask>]
ip-addr
IP address
ip-mask
IP mask address
Examples:
clear ip route *
clear ip route 192.168.49.1 255.255.255.0
Clears all the routing table.
Clears a range of entries.
default-metric (Interface context)
Use the default-metric command to set the interface RIP route metric value.
The no form of this command restores the default value (1).
Avaya X330W-2DS1 User’s Guide
65
Chapter 7
X330WAN CLI Commands
The syntax for this command is:
[no] default-metric <number>
number
The interface route metric value. The range is 1 to 15.
Example:
X330WAN-2DS1-1(configure:interface)# default-metric 10
default-metric (Router-OSPF context)
Use the default-metric command to set the default metric of redistributed
routes. The no form of this command restores the default. The default metric is 20.
The syntax for this command is:
[no] default-metric <default metric>
default metric
An integer. The range is 1 to 65535.
Example:
X330WAN-2DS1-1(configure router:ospf)# default-metric 50
default-metric (Router-RIP Mode)
Use the default-metric command to set the default metric of redistributed
routes. The no form of this command restores the default. The default metric is 1.
The syntax for this command is:
[no] default-metric <default metric>
default metric
The interface RIP route metric value. The range is 1 to 16.
Example:
X330WAN-2DS1-1(configure router:rip)# default-metric 5
distribution-list (Router-RIP Mode)
Use the distribution-list command to filter incoming/outgoing networks in
route updates. The no form of this command deactivates the filter.
The syntax for this command is:
[no] distribution-list <access-list-number> <type>
66
Avaya X330W-2DS1 User’s Guide
Layer 3 CLI Commands
[<interface>|<protocol>]
access-list-number
An integer. The range is 1 to 99.
type
[in | out]
interface-type
The interface type, a string.
interface-number
The interface number.
protocol
[static | ospf]
Protocol is only relevant for outgoing (out) list entries.
Examples:
X330WAN-2DS1-1(configure router:rip)# distribution-list 10 in
"FabricFastEthernet 1"
X330WAN-2DS1-1(configure router:rip)# distribution-list 20 out
"Serial 1:1"
X330WAN-2DS1-1(configure router:rip)# distribution-list 40 out
ospf
ip address
Use the ip address command to assign an IP address and mask to an interface.
The no form of the command deletes an IP interface.
The syntax for this command is:
[no] ip address <ip-address> <mask> [<admin-state>]
ip address
The IP address assigned to the interface
mask
Mask for the associated IP subnet
admin-state
The administration status – either Up or Down (default is Up).
This parameter is not applicable for the Console interface of the
X330WAN.
Example:
To assign the IP address 192.168.22.33 with mask 255.255.255.0 to the interface
“marketing”:
X330WAN-2DS1-1(configure)# ip address 192.168.22.33
X330WAN-2DS1-1(configure)# ip address 255.255.255.0
Avaya X330W-2DS1 User’s Guide
67
Chapter 7
X330WAN CLI Commands
ip admin-state (Interface context)
Use the ip admin-state command to set the administrative state of an IP
interface. The default state is up.
The syntax for this command is:
ip admin-state <up/down>
up/down
Administrative state of the interface. The choices are
up (active) or down (inactive).
ip bootp-dhcp network (Interface context)
Use the ip bootp-dhcp network command to select the network from which
the bootp/dhcp server shall allocate an address. This command is required only
when there are multiple interfaces over the Fabric. The no form of this command
restores to the default.
Note: This command is executed from the Fast Ethernet and Fabric Fast Ethernet
interfaces.
The syntax for this command is:
[no] ip bootp-dhcp network <ip net>
ip net
The IP subnet
Example:
To select the network 192.168.169.0 as the network from which an address shall be
allocated for bootp/dhcp requests:
X330WAN-2DS1-1(configure)# ip bootp-dhcp network 192.168.169.0
ip bootp-dhcp relay
Use the ip bootp-dhcp relay command to enable relaying of bootp and dhcp
requests to the bootp/dhcp server. The no form of this command disables bootp/
dhcp relay. The default state is: disabled.
The syntax for this command is:
[no] ip bootp-dhcp relay
68
Avaya X330W-2DS1 User’s Guide
Layer 3 CLI Commands
Examples:
To enable relaying of BOOTP and DHCP requests:
X330WAN-2DS1-1(configure)# ip bootp-dhcp relay
To disable relaying of bootp and dhcp requests:
X330WAN-2DS1-1(configure)# no ip bootp-dhcp relay
ip bootp-dhcp server (Interface context)
Use the ip bootp-dhcp server command to add a bootp/dhcp server to
handle bootp/dhcp requests received by this interface. The no form of this
command removes the server. A maximum of two servers can be added to a single
interface. Using the X330WAN, the no form of this command remove a bootp
server.
Note: This command is executed from the Fast Ethernet and Fabric Fast Ethernet
interfaces.
The syntax for this command is:
[no] ip bootp-dhcp server <ip-address>
ip-address
The IP address of the server
Example:
To add station 192.168.37.46 as a bootp/dhcp server to handle bootp/dhcp requests
arriving at the interface “marketing”:
X330WAN-2DS1-1(configure)# ip bootp-dhcp server 192.168.37.46
ip broadcast-address (Interface Context)
Use the ip broadcast-address command to update the interface broadcast
address. The Broadcast address must be filled in with 0s or 1s, for example,
10.255.255.255 or 10.0.0.0.
Note: This command is executed from the Serial, Fast Ethernet and Fabric Fast
Ethernet interfaces.
Avaya X330W-2DS1 User’s Guide
69
Chapter 7
X330WAN CLI Commands
The syntax for this command is:
ip broadcast-address <bc addr>
bc addr
The broadcast IP address
Example:
ip broadcast-address 192.168.255.255
ip default-gateway
Use the ip default-gateway command to define a default gateway (router).
The no form of this command removes the default gateway.
The syntax for this command for the P332G-ML/P332GT-ML/P333R/P333R-LB is:
[no] ip default-gateway <ip-address>[<cost>][<preference>]
The syntax for this command for the X330WAN is:
[no] ip default-gateway {<ip-address> | <interface-type>
<interface-number>} [<cost>] [<preference>] [permanent]
ip-address
The IP address of the router.
cost
The path cost. The default is 1.
interface-type
The interface type.
interface-number
The interface name.
preference
Preference, either High or Low. The default is Low.
permanent
The route will not be disabled if the interface is down.
Example:
To define the router at address 192.168.37.1 as the default gateway:
Router-N(configure)# ip default-gateway 192.168.37.1
Example:
X330WAN-2DS1-1(super)# ip default-gateway 132.55.4.45 4 high
X330WAN-2DS1-1(super)# ip default-gateway Serial 1:1 permanent
X330WAN-2DS1-1(super)# no ip default-gateway
70
Avaya X330W-2DS1 User’s Guide
Layer 3 CLI Commands
ip directed-broadcast (Interface context)
Use the ip directed-broadcast command to enable net-directed broadcast
forwarding. The no form of this command disables net-directed broadcasts on an
interface.
Note: This command is executed from the Serial, Fast Ethernet and Fabric Fast
Ethernet interfaces.
The syntax for this command is:
[no] ip directed-broadcast
ip icmp-errors
Use the ip icmp-errors command to set ICMP error messages ON. The no
form of this command to set ICMP error messages OFF.
The syntax for this command is:
[no] ip icmp-errors
ip max-arp-entries
Use the ip max-arp-entries command to specify the maximum number of
ARP cache entries allowed in the ARP cache. The no form of this command restores
to the default value of 4096. This command takes effect only after start-up.
The syntax for this command is:
[no] ip max-arp-entries <value>
value
The space available for the IP address table. When you decrease the
number of entries, it may cause the table to be relearned more
frequently. If you do not enter a value, then the current ARP Cache size
is shown. The range of accepted values is 128 to 16384.
Examples:
To set the maximum number of ARP cache entries to 8000:
X330WAN-2DS1-1(configure)# ip max-arp-entries 8000
To restore the maximum number of ARP cache entries to its default:
X330WAN-2DS1-1(configure)# no ip max-arp-entries
Avaya X330W-2DS1 User’s Guide
71
Chapter 7
X330WAN CLI Commands
ip max-route-entries
This command exists for compatibility with P550. There is no limitation on the size
of the routing table, except for the amount of available memory. Use the no form of
this command to set the maximum number of route entries in the routing table to its
default value.
The syntax for this command is:
[no] ip max-route-entries <value>
value
number of entries. The range of accepted values is 100 to
20000.
ip netbios-rebroadcast (Interface context)
Use the ip netbios-rebroadcast command to set NETBIOS rebroadcasts
mode on an interface. The no form of this command disables NETBIOS
rebroadcasts on an interface.
Note: This command is executed from the Serial, Fast Ethernet and Fabric Fast
Ethernet interfaces.
The syntax for this command is:
[no] ip netbios-rebroadcast [<direction>]
The possible values of direction is:
both
Netbios packets received on the interface
rebrodcasted to other interfaces and netbios packets
received on other interfaces are rebroadcasted into
this interface.
If no parameter is provided in the command, the
"both" optionis applied as the default.
disable
Netbios packets are not rebroadcasted into or out of
this interface.
Example:
To enable rebroadcasting of netbios packets received by and sent from the interface
“marketing”:
X330WAN-2DS1-1(configure)# ip netbios-rebroadcast both
X330WAN-2DS1-1(configure)# ip netbios-rebroadcast
72
Avaya X330W-2DS1 User’s Guide
Layer 3 CLI Commands
ip netmask-format
Use the ip netmask-format command to specify the format of netmasks in the
show command output. The no form of this command restores to the default,
which is a dotted decimal format.
The syntax for this command is:
[no] ip netmask-format <mask-format>
The possible mask formats are:
bitcount
Addresses are followed by a slash and the total number of bits
in the netmask, for example, 17.
decimal
The network masks are in dotted decimal notation. For
example, 255.255.255.0.
hexadecimal
The network masks are in hexadecimal format as indicated by
the leading 0X. For example, 0XFFFFFF00.
Example:
To display netmasks in bitcount format:
X330WAN-2DS1-1(configure)# ip netmask-format bitcount
ip ospf authentication-key (Interface context)
Use the ip ospf authentication-key command to configure the interface
authentication password. The no form of this command removes the OSPF
password.
Note: This command is executed from the Serial, Loopback, Fast Ethernet and
Fabric Fast Ethernet interfaces.
The syntax for this command is:
[no] ip ospf authentication-key <key>
key
A string (up to 8 characters)
Example:
config-if:ip ospf authentication-key my_pass
Avaya X330W-2DS1 User’s Guide
73
Chapter 7
X330WAN CLI Commands
ip ospf cost (Interface context)
Use the ip ospf cost command to configure interface metric. The no form of
this command sets the cost to its default. The default is 1.
Note: This command is executed from the Serial, Loopback, Fast Ethernet and
Fabric Fast Ethernet interfaces.
The syntax for this command is:
[no] ip ospf cost <cost>
cost
An integer in the range 1 to 65535.
Example:
ip ospf cost 10
ip ospf dead-interval (Interface context)
Use the ip ospf dead-interval command to configure the interval before
declaring the neighbor as dead. The no form of this command sets the deadinterval to its default. The default is 40.
Note: This command is executed from the Serial, Loopback, Fast Ethernet and
Fabric Fast Ethernet interfaces.
The syntax for this command is:
[no] ip ospf dead-interval <seconds>
seconds
An integer in the range 1 to 65535.
Example:
ip ospf dead-interval 15
ip ospf hello-interval (Interface Mode)
Use the ip ospf hello-interval command to specify the time interval
between hello's the router sends. The no form of this command sets the hellointerval to its default. The default is 10.
74
Avaya X330W-2DS1 User’s Guide
Layer 3 CLI Commands
Note: This command is executed from the Serial, Loopback, Fast Ethernet and
Fabric Fast Ethernet interfaces.
The syntax for this command is:
[no] ip ospf hello-interval <seconds>
seconds
An integer in the range 1 to 65535.
Example:
ip ospf hello-interval 5
ip ospf priority (Interface Mode)
Use the ip ospf priority command to configure interface priority used in DR
election. The no form of this command sets the OSPF priority to its default. The
default is 1.
Note: This command is executed from the Serial, Loopback, Fast Ethernet and
Fabric Fast Ethernet interfaces.
The syntax for this command is:
[no] ip ospf priority <priority>
priority
An integer in the range 1 to 255.
Example:
priority 17
ip ospf router-id
Use the ip ospf router-id command to configure router identity. The no
form of this command returns the router identity to its default (lowest IP interface
that exists).
Avaya X330W-2DS1 User’s Guide
75
Chapter 7
X330WAN CLI Commands
The syntax for this command is:
[no] ip ospf router-id <router id>
router id
IP address
Example:
X330WAN-2DS1-1(configure)# ip ospf router-id 192.168.49.1
ip proxy-arp (Interface context)
Use the ip proxy-arp command to enable proxy ARP on an interface. The no
form of this command disables proxy ARP on an interface.
Note: This command is executed from the Fast Ethernet and Fabric Fast Ethernet
interfaces.
The syntax for this command is:
[no] ip proxy-arp
Example:
To disable proxy ARP on interface marketing:
X330WAN-2DS1-1(configure)# no ip proxy-arp
ip redirect (Interface context)
Use the ip redirect command to enable the sending of redirect messages on
the interface. The no form of this command disables the redirect messages. By
default, sending of redirect messages on the interface is enabled.
Note: This command is executed from the Serial, Fast Ethernet and Fabric Fast
Ethernet interfaces.
The syntax for this command is:
[no] ip redirects
Examples:
X330WAN-2DS1-1(configure)# ip redirect
X330WAN-2DS1-1(super-if:FastEthernet1)# ip redirects
76
Avaya X330W-2DS1 User’s Guide
Layer 3 CLI Commands
ip rip authentication key (Interface context)
Use the ip rip authentication key command to set the authentication
string used on the interface. The no form of this command clears the password.
Note: This command is executed from the Serial, Loopback, Fast Ethernet and
Fabric Fast Ethernet interfaces.
The syntax for this command is:
[no] ip rip authentication key <password>
password
The authentication string for the interface. Up to 16 characters are
allowed.
Example:
X330WAN-2DS1-1(configure)# ip rip authentication key hush-hush
ip rip authentication mode (Interface context)
Use the ip rip authentication mode command to specify the type of
authentication used in RIP Version 2 packets. The no form of this command restores
the default value of none.
Note: This command is executed from the Serial, Loopback, Fast Ethernet and
Fabric Fast Ethernet interfaces.
The syntax for this command is:
[no] ip rip authentication mode [simple|none]
simple|none
The authentication type used in RIP Version 2 packets:
• simple - clear text authentication.
• none - no authentication.
Example:
To specify simple authentication to be used in RIP Version 2 packets on the interface
“marketing”.
X330WAN-2DS1-1(configure)# ip rip authentication mode simple
Avaya X330W-2DS1 User’s Guide
77
Chapter 7
X330WAN CLI Commands
ip rip default-route-mode (Interface context)
Use the ip rip default-route-mode command to enable learning of the
default route received by the RIP protocol. The default state is talk-listen. Using the
X330WAN, the no form of the command disables listening to default routes.
Note: This command is executed from the Serial, Loopback, Fast Ethernet and
Fabric Fast Ethernet interfaces.
The syntax for this command is:
[no] ip rip default-route-mode <mode>
The possible default route modes on an interface are:
talk-listen
Set RIP to send and receive default route updates on
the interface.
talk-only
Set RIP to send but not receive default route updates
on the interface.
Example:
X330WAN-2DS1-1(configure)# ip rip default-route-mode talk-only
ip rip poison-reverse (Interface Context)
Use the ip rip poison-reverse command to enable split-horizon with
poison-reverse on an interface. The no form of this command disables the poisonreverse mechanism.
The split-horizon technique prevents information about routes from exiting the
router interface through which the information was received. This prevents routing
loops.
Poison reverse updates explicitly indicate that a network or subnet is unreachable
rather than implying they are not reachable. Poison reverse updates are sent to
defeat large routing loops.
Note: This command is executed from the Serial, Loopback, Fast Ethernet and
Fabric Fast Ethernet interfaces.
The syntax for this command is:
[no] ip rip poison-reverse
78
Avaya X330W-2DS1 User’s Guide
Layer 3 CLI Commands
ip rip rip-version (Interface context)
Use the ip rip rip-version command to specify the RIP version running on
the interface basis.
Note: This command is executed from the Serial, Loopback, Fast Ethernet, and
Fabric Fast Ethernet interfaces.
The syntax for this command is:
ip rip rip-version [1|2]
The possible versions of the RIP packets received and sent on an interface are:
[1]
RIP Version 1 packets
[2]
RIP Version 2 packets.
Example:
To specify that RIP version 2 should be running on the basis of the interface
“marketing”:
X330WAN-2DS1-1(super-if:Serial:1:1)# ip rip rip version 2
ip rip send-receive (Interface context)
Use the ip rip send-receive command to set the RIP Send and Receive mode
on an interface. The default state is talk-listen.
Note: This command is executed from the Serial, Loopback, Fast Ethernet and
Fabric Fast Ethernet interfaces.
The syntax for this command is:
[no] ip rip send-receive-mode <mode>[<default route metric>]
where the no form of this command sets the RIP to talk (send report).
mode
talk-listen - Set RIP to receive and transmit
updates on the interface.
talkdefault-listen - Set RIP to receive
updates on the interface and send only a default
route.
Avaya X330W-2DS1 User’s Guide
79
Chapter 7
X330WAN CLI Commands
listen-only - Set RIP to only receive updates on
the interface and not transmit them (for Avaya
P332G-ML/P332GT-ML devices only).
default route metric
Integer value
Example:
To set the RIP Send and Receive mode on the interface “marketing” to be listen-only:
X330WAN-2DS1-1(super-if:Serial:1:1)# ip rip send-receive talklisten
ip rip split-horizon (Interface Context)
Use the ip rip split-horizon command to enable split-horizon mechanism.
The no form of this command disables the split-horizon. By default split-horizon is
enabled.
The split-horizon technique prevents information about routes from exiting the
router interface through which the information was received. This prevents routing
loops.
Note: This command is executed from the Serial, Loopback, Fast Ethernet and
Fabric Fast Ethernet interfaces.
The syntax for this command is:
[no] ip rip split-horizon
Example:
X330WAN-2DS1-1(super-if:Serial:1:1)# no ip rip split-horizon
80
Avaya X330W-2DS1 User’s Guide
Layer 3 CLI Commands
ip route
Use the ip route command to establish a static route. The no form of this
command removes a static route.
The syntax for this command is:
[no] ip route <ip addr> <mask> {{<next-hop> [<next-hop>
[<next-hop>]] | <interface-type> <interface-number>} [<cost>]
[<preference>] [permanent] | Null0}
ip-address
The IP address of the network.
mask
Mask of the static route.
next-hop
The next hop address in the network.
cost
The path cost. The default is 1.
preference
Preference, either High or Low. Default is Low.
Null0
Creates a static discard route.
interface-type
The interface type.
interface-number
The interface number.
permanent
The route will not be disabled if the interface is down.
Examples:
X330WAN-2DS1-1(configure)# ip route 132.55.0.0 255.255.0.0
132.55.4.45 3 high
X330WAN-2DS1-1(configure)# no ip route 134.66.0.0 255.255.0.0
X330WAN-2DS1-1(configure)# ip route 135.0.0.0 255.0.0.0 Serial
1:1 permanent
X330WAN-2DS1-1(configure)# ip route 134.66.0.0 255.255.0.0
Null0
Avaya X330W-2DS1 User’s Guide
81
Chapter 7
X330WAN CLI Commands
ip routing
Use the ip routing command to enable IP routing. The no form of this
command disables the IP routing process in the device. By default, IP routing is
enabled.
The syntax for this command is:
[no] ip routing
ip routing-mode (Interface Context) ???
Use the ip routing-mode command to set the IP routing mode of the interface.
In RT-MGMT mode, the interface functions as a routing interface. In
RT_PRIMARY_MGMT mode, the interface function as both a routing interface and
the primary management interface. The IP address used in Avaya MultiService
Network Manager is the primary management interface IP address. Only one
interface can be in RT_PRIMARY_MGMT mode. By default, the first IP address
defined is used as the primary.
Note: This command is executed from the Serial, Loopback, Fast Ethernet and
Fabric Fast Ethernet interfaces.
The syntax for this command is:
ip routing-mode <mode>
mode
RT_MGMT or RT_PRIMARY_MGMT mode
The syntax for this command for the X330WAN is:
ip routing-mode <rt_primary_mgmt>
Example:
X330WAN-2DS1-1(configure)# ip routing-mode RT_PRIMARY_MGMT
ip vrrp (Interface Context)
Use the ip vrrp command to create a virtual router on the interface. Use the no
form of this command to delete a virtual router.
Note: This command is executed from the Fast Ethernet and Fabric Fast Ethernet
interfaces.
82
Avaya X330W-2DS1 User’s Guide
Layer 3 CLI Commands
The syntax for this command is:
[no] ip vrrp <vr-id>
vr-id
Virtual Router ID (1-255)
Example:
X330WAN-2DS1-1(configure)# ip vrrp 1
(ip vrrp) address
Use the address option to assign an IP address to the virtual router. Use the no
form of this command to remove an IP address from a virtual router.
Note: This command is executed from the Fast Ethernet and Fabric Fast Ethernet
interfaces.
The syntax for this command is:
[no] ip vrrp <vr-id> address <ip-address>
vr-id
Virtual Router ID (1-255)
ip-address
The IP address to be assigned to the virtual router
Example:
To assign address 10.0.1.2 to virtual router 1:
X330WAN-2DS1-1(configure)# ip vrrp 1 address 10.0.1.2
(ip vrrp) auth-key
Use the ip vrrp auth-key command to set the virtual router simple password
authentication for the virtual router ID. Use the no form of this command to disable
simple password authentication for the virtual router instance.
Note: This command is executed from the Fast Ethernet and Fabric Fast Ethernet
interfaces.
Avaya X330W-2DS1 User’s Guide
83
Chapter 7
X330WAN CLI Commands
The syntax for this command is:
[no] ip vrrp <vr-id> auth-key <key-string>
vr-id
Virtual Router ID (1-255)
key-string
Simple password string
ip vrrp 1 primary 192.168.66.23
(ip vrrp) override addr owner
Use the ip vrrp override addr owner command to accept packets
addressed to the IP address(es) associated with the virtual router, such as ICMP,
SNMP, and TELNET (if it is not the IP address owner). Use the no form of this
command to discard these packets.
Note: This command is executed from the Fast Ethernet and Fabric Fast Ethernet
interfaces.
The syntax for this command is:
[no] ip vrrp <vr-id> override addr owner
vr-id
Virtual Router ID (1-255)
Example:
X330WAN-2DS1-1(configure)# ip vrrp 1 override addr owner
(ip vrrp) preempt
Use the ip vrrp preempt command to configure the router to preempt a lower
priority master for the virtual router ID. Use the no form of this command to disable
preemption for the virtual router instance. By default, preemption is enabled.
Note: This command is executed from the Fast Ethernet and Fabric Fast Ethernet
interfaces.
84
Avaya X330W-2DS1 User’s Guide
Layer 3 CLI Commands
The syntax for this command is:
[no] ip vrrp <vr-id> preempt
vr-id
Virtual Router ID (1-255)
Example:
X330WAN-2DS1-1(configure)# ip vrrp 1 preempt
(ip vrrp) primary
Use the ip vrrp primary command to set the primary address that shall be
used as the source address of VRRP packets for the virtual router ID. Use the no
form of this command to return to the default primary address for the virtual router
instance. By default, the primary address is selected automatically by the device.
Note: This command is executed from the Fast Ethernet and Fabric Fast Ethernet
interfaces.
The syntax for this command is:
[no] ip vrrp <vr-id> primary <ip-address>
vr-id
Virtual Router ID (1-255)
ip-address
Primary IP address of the virtual router. This address
should be one of the router addresses on the Fabric.
Example:
ip vrrp 1 primary 192.168.66.23
(ip vrrp) priority
Use the priority option to set the virtual router priority value used when
selecting a master router. Use the no form of this command to restore the default
value.
Note: This command is executed from the Fast Ethernet and Fabric Fast Ethernet
interfaces.
Avaya X330W-2DS1 User’s Guide
85
Chapter 7
X330WAN CLI Commands
The syntax for this command is:
[no] ip vrrp <vr-id> priority <pri-value>
vr-id
Virtual Router ID (1-255)
pri-value
The priority value (1-254)
Example:
To set the priority value for virtual router 1 to 10:
X330WAN-2DS1-1(configure)# ip vrrp 1 priority 10
(ip vrrp) timer
Use the ip vrrp timer command to set the virtual router advertisement timer
value (in seconds) for the virtual router ID. Use the no form of this command to
restore the default value.
The syntax for this command is:
[no] ip vrrp <vr-id> timer <value>
vr-id
Virtual Router ID (1-255)
value
The advertisement transmit time (seconds). The
range is from 1 to 255.
Example:
To set the virtual router advertisement timer value for virtual router 3 to 2:
X330WAN-2DS1-1(configure)# ip vrrp 3 timer 2
network (Router-OSPF context)
Use the network command to enable OSPF in this network. The no form of this
command disables the OSPF in this network. The default is disabled.
The syntax for this command is:
network <net addr> [<wildcard-mask> [area <area id>]]
86
net addr
IP address
wildcard-mask
Wildcard mask address
area id
Area ID. This parameter exists for compatibility with
the P550.
Avaya X330W-2DS1 User’s Guide
Layer 3 CLI Commands
Examples:
X330WAN-2DS1-1(configure router:ospf)# network 192.168.0.0
X330WAN-2DS1-1(configure router:ospf)# network 192.168.0.0
0.0.255.255 area 0.0.0.0
network (Router-RIP Context)
Use the network command to specify a list of networks on which the RIP is
running. The no form of this command removes an entry.
The syntax for this command is:
[no] network <ip-address> [<wildcard-mask>]
ip addr
The IP address of the network of directly connected networks
wildcard-mask
Wildcard mask address. Exists for compatibility with P550.
Example:
To specify that RIP will be used on all interfaces connected to the network
192.168.37.0:
X330WAN-2DS1-1(configure router:rip)# network 192.168.37.0
ping
Use the ping command to check host reachability and network connectivity.
The syntax for this command is:
ping <host> [<interval> [<size>[timeout[source address]]]]
host
IP address of the target system.
interval
An integer, the number of seconds between
successive ping messages. The default is 1 second.
size
An integer, the size of the packet sent during a ping
operation. The default is 50 bytes.
timeout
Timeout in seconds (1-10).
source address
IP address.
Avaya X330W-2DS1 User’s Guide
87
Chapter 7
X330WAN CLI Commands
Example:
X330WAN-2DS1-1(configure)# ping 149.49.50.13 5 8
Output Example:
X330WAN-2DS1-1(configure)# ping 149.49.54.1
Reply from 149.49.54.1: bytes=32 time=17ms TTL=64
Reply from 149.49.54.1: bytes=32 time=1ms TTL=64
Reply from 149.49.54.1: bytes=32 time=17ms TTL=64
Ping statistics for 149.49.54.1:
Packets: sent = 3, Received = 3, Lost = 0 (0% loss)
Approximate round trip times in milli-seconds:
Minimum = 1, Maximum = 17, Average = 9
redistribute (Router-OSPF context)
Use the redistribute command to redistribute routing information from other
protocols into OSPF. The no form of this command disables redistribution by
OSPF.
The syntax for this command is:
[no] redistribute <protocol>
protocol
[static|connected|rip]
Example:
X330WAN-2DS1-1(configure router:ospf)# redistribute static
redistribute (Router-RIP context)
Use the redistribute command to redistribute routing information from other
protocols into RIP. The no form of this command disables redistribution by RIP.
The default is disabled.
The syntax for this command is:
[no] redistribute <protocol>
protocol
Either Static or OSPF
Example:
X330WAN-2DS1-1(configure router:rip)# redistribute ospf
88
Avaya X330W-2DS1 User’s Guide
Layer 3 CLI Commands
router ospf
Use the router ospf command to enable OSPF protocol on the system and to
enter the Router Configuration context. . The no form of this command disables it
globally. The default is disabled.
The syntax for this command is:
[no] router ospf
router rip
Use the router rip command to enable the Routing Information Protocol (RIP)
and to emter tje Router Configuration context. The no form of this command
disables RIP. The default state is disabled.
The syntax for this command is:
[no] router rip
Example:
To enable the RIP protocol:
X330WAN-2DS1-1(configure)# router rip
X330WAN-2DS1-1(configure)# router: rip #
router vrrp
Use the router vrrp command to enable VRRP routing globally. Use the no
form of this command to disable VRRP routing.
Note: You cannot activate both VRRP and SRRP protocols at the same time.
The syntax for this command is:
[no] router vrrp
show ip arp
Use the show ip arp command to display the Address Resolution Protocol
(ARP) cache.
The syntax for this command is:
show ip arp [<interface>| <IP interface> | <ip addr> [<ip mask>] | static]
interface
Avaya X330W-2DS1 User’s Guide
String up to 32 characters
89
Chapter 7
X330WAN CLI Commands
IP interface
String up to 32 characters
ip-addr
The IP address of the station(s)
ip-mask
The IP mask of the routes
static
Display static IP ARP information
Examples:
show
show
show
show
show
show
ip
ip
ip
ip
ip
ip
arp
arp
arp
arp
arp
arp
marketing
192.168.49.1
192.168.49.1 255.255.255.0
marketing_vlan
static
Displays all ARP mapping.
Displays an interface ARP mapping.
Displays one host ARP mapping.
Displays a range of ARP mapping.
Displays Fabric ARP mapping.
Displays static ARP mapping.
Note: If you wish to define a name which includes spaces, you must enclose the
entire name in quotation marks, e.g. "new york".
show ip icmp
Use the show ip icmp command to display the status (enabled/disabled) of ICMP
error messages.
The syntax for this command is:
show ip icmp
90
Avaya X330W-2DS1 User’s Guide
Layer 3 CLI Commands
show ip interface
Use the show ip interface command to display information for an IP interface.
The syntax for this command for the X330WAN is:
show ip interface [<interface-name>|<IP interface>|<ipaddress>]
interface-name
The name of the interface whose information you
want to display
ip-address
The IP address of the interface whose information
you want to display
IP interface
A string (up to 32 characters).
Note: If you wish to define a name which includes spaces, you must enclose the
entire name in quotation marks, e.g. "new york".
Example:
To display all IP interfaces:
X330WAN-2DS1-1(configure)# show ip interface
Example:
To display all IP interfaces on one interface:
X330WAN-2DS1-1(configure)# show ip interface "FastEthernet 1"
Example:
To display specific IP interface information:
X330WAN-2DS1-1(configure)# show ip interface "FastEthernet
1.0"
Example:
To display the IP's interface:
X330WAN-2DS1-1(configure)# show ip interface 192.168.49.1
Output Example:
X330WAN-2DS1-1(super)# show ip interface
Showing 2 Interfaces
Serial 1:1 is down
Avaya X330W-2DS1 User’s Guide
91
Chapter 7
X330WAN CLI Commands
Internet address is 2.2.2.2
, subnet mask is 255.255.255.0
Advertised IPCP address
Broadcast address is 2.2.2.255
Directed broadcast forwarding is disabled
Proxy ARP is disabled
Primary management IP interface
FastEthernet 1 is up
Internet address is 149.49.75.71
, subnet mask is 255.255.255.0
Broadcast address is 149.49.75.255
Directed broadcast forwarding is disabled
Proxy ARP is disabled
show ip ospf
Use the show ip ospf command to display general information about OSPF
routing.
The syntax for this command is:
show ip ospf
Output Example:
X330WAN-2DS1-1(super router:ospf)# show ip ospf
Routing Process OSPF with ID 149.49.75.71
Number of areas in this router is 1
Area 0.0.0.0
Number of Interfaces in this area 0
SPF algorithm executed 1 times
SPF hold time is 3 sec
show ip ospf database
Use the show ip ospf database command to display lists of information
related to the OSPF database for a specific router.
The syntax for this command is:
show ip ospf database
[{asbr-summary|router|network|network-summary|external}]
asbr-summary
92
Displays information only about the autonomous
system boundary router summary LSAs. Optional.
Avaya X330W-2DS1 User’s Guide
Layer 3 CLI Commands
external
Displays information only about the external LSAs.
Optional.
network
Displays information only about the network LSAs.
Optional.
network-summary
Displays information only about the network LSAs
summary. Optional.
router
Displays information only about the router LSAs.
Optional.
Output Example:
X330WAN-2DS1-1(super router:ospf)# sho ip ospf database
Showing 1 rows
Area
Type
LSA ID
Router ID
Sequence Age Cksm
--------------- ----- --------------- --------------- -------- ----- ---0.0.0.0
RTR
149.49.75.71
149.49.75.71
80000001 567
139b
show ip ospf interface
Use the show ip ospf interface command to display the OSPF-related
interface information.
The syntax for this command is:
show ip ospf interface [<interface-name>]
interface-name
A string, the OSPF interface name
Note: If you wish to define a name which includes spaces, you must enclose the
entire name in quotation marks, e.g. "new york".
Output Example:
X330WAN-2DS1-1(super router: ospf)# show ip ospf interface
There are no OSPF interfaces
show ip ospf neighbor
Use the show ip ospf neighbor command to display OSPF-neighbor
information on a per-interface basis.
Avaya X330W-2DS1 User’s Guide
93
Chapter 7
X330WAN CLI Commands
The syntax for this command is:
show ip ospf neighbor
[<interface-name>] [<neighbor-id>]
interface-name
A string, the OSPF interface name
neighbor-id
Neighbor ID, an IP address.
Note: If you wish to define a name which includes spaces, you must enclose the
entire name in quotation marks, e.g. "new york".
Output Example:
X330WAN-2DS1-1(super router:ospf)# show ip ospf neighbor
There are no ospf neighbors
show ip protocols
Use the ip protocols command to display parameters and statistics of the IP
routing protocol process.
The syntax for this command is:
show ip protocols [<protocol>]
protocol
RIP | OSPF
Examples:
94
show ip protocols
Displays all running protocols details.
show ip protocols RIP
Displays RIP details.
Avaya X330W-2DS1 User’s Guide
Layer 3 CLI Commands
Output Example:
Routing Protocol is "rip"
Sending updates every 30 seconds, next due in 0 seconds
Invalid after 180 seconds, flushed after 300
Redistributing: rip
Default version control: rip version 1
Interface
Version
Key
Routing for Networks:
Routing Information Sources:
Gateway
Last Update
Note: entire name in quotation marks, e.g. "new york".
show ip reverse-arp
Use the show ip reverse-arp command to display the IP address of a host,
based on a known MAC address.
The syntax for this command is:
show ip reverse-arp <mac addr> [<match len>]
mac addr
MAC address
match len
The number of bytes in the address to match
Examples:
show ip reverse-arp 00:40:0d:67:53:04
show ip reverse-arp 00:40:0d:00:00:00 3
List IP's that match the MAC
List IP's that match a vendor MAC.
Output Example:
X330WAN-2DS1-1(super)#
sh ip reverse-arp 00:10:a4:98:97:e0
Showing 1 rows
Address
MAC Address
I/F
Type
TTL
--------------- ----------------- ----------- ------- -------149.49.70.68
Avaya X330W-2DS1 User’s Guide
00:10:a4:98:97:e0
e-70
Dynamic
14355
95
Chapter 7
X330WAN CLI Commands
show ip route
Use the show ip route command to display information about the IP routing
table.
The syntax for this command is:
show ip route [<ip-address>[<ip-mask>]
ip-address
The IP address of the routes
ip-mask
The IP mask of the routes
Examples:
show ip route
show ip route 137.32.50.13
show ip route 137.44.50.13 255.255.255.0
Display all routes
Display a single route
Display range of routes
show ip route best-match
Use the show ip route best-match command to display a routing table for a
destination address.
The syntax for this command is:
show ip route best-match <dst addr>
dst addr
IP address
Output Example:
X330WAN-2DS1-1(super)# sh ip route best-match 199.93.0.0
Searching for: 199.93.0.0
Showing 1 rows
Network
Mask
Interface
Next-Hop
Cost TTL Source
--------------- --------------- ------------ --------------- ----- --- ----199.93.0.0
255.255.0.0
e-135new
135.64.76.1
1 n/a STAT-HI
show ip route static
Use the show ip route static command to display the static routes.
96
Avaya X330W-2DS1 User’s Guide
Layer 3 CLI Commands
The syntax for this command is:
show ip route static [<ip addr> [<mask>] ]
ip-address
The IP address of the routes
mask
The ip mask of the routes
Examples:
show ip route static
show ip route static 137.32.50.13
show ip route static 137.44.50.13 255.255.255.0
Display all static routes
Display a single static route
Display range of static routes
Output Example:
Router-1 (super)#
show ip route static
X330WAN-2DS1-1(super router:ospf)# show ip route static
Showing 1 rows
Network
Mask
Interface
Next-Hop
Cost Pref Perm Active
--------------- ---- -------------------- --------------- ---- ---- ---- ---0.0.0.0
0
FastEth
1
149.49.75.1
1
low
No
Yes
show ip route summary
Use the show ip route summary command to display the number of routes
known to the device.
The syntax for this command is:
show ip route summary
Output Example:
X330WAN-2DS1-1(super router:ospf)# show ip route summary
X330WAN-2DS1-1(super)# show ip route summary
Route Source
Networks
Subnets
---------------- ---------------- ---------------Local
0
1
Static
0
1
Total
0
2
Use the show ip vrrp command to display VRRP information.
Avaya X330W-2DS1 User’s Guide
97
Chapter 7
X330WAN CLI Commands
The syntax for this command is:
show ip vrrp [<vlan> [router-id <vr-id>]][detail]
vlan
Filter by Fabric.
router-id
Filter by virtual router ID (1-255).
vr-id
The virtual router ID.
detail
Provide detailed information.
Output Example:
X330WAN-2DS1-1(configure)#
VRRP is globally enabled
VLAN VRID IP Address
----- ----- ------------1
1
192.168.66.23
1
2
192.168.66.24
show ip vrrp
Pri
---255
100
Timer
------1
1
State
--------MASTER
BACKUP
Since
----------00:00:00
00:00:00
show ip vrrp detail
Use the show ip vrrp detail command to display full VRRP-related
information
The syntax for this command is:
show ip vrrp detail
detail
Show full detail information
Output Example:
X330WAN-2DS1-1(configure)# show ip vrrp detail
VRRP is globally enabled
Virtual Router on VLAN:
1
Router-id:
1
State:
MASTER
Priority:
255
Advertisement Interval:
1
Last State Change:
00:00:00
Override Address Ownership Rule: No
Authentication Type:
None
Authentication Key:
""
Master IP Address
192.168.66.23
Has 1 IP addresses
98
Avaya X330W-2DS1 User’s Guide
Layer 3 CLI Commands
IP addresses:
192.168.66.23
Primary IP Address:
192.168.66.23
Primary IP Address was chosen by default
Preemption Mode:
enabled
# of times Master:
2
# of received Advertisements:
0
# of transmitted Advertisements:
20
# of received Advertisements with Security Violations: 0
Virtual Router on VLAN:
1
Router-id:
2
State:
BACKUP
Priority:
100
Advertisement Interval:
1
Last State Change:
00:00:00
Override Address Ownership Rule: No
Authentication Type:
None
Authentication Key:
""
Master IP Address
0.0.0.0
Has 1 IP addresses
IP addresses:
192.168.66.24
Primary IP Address:
192.168.66.23
Primary IP Address was chosen by default
Preemption Mode:
enabled
# of times Master:
1
# of received Advertisements:
0
# of transmitted Advertisements:
13
# of received Advertisements with Security Violations: 0
timers basic (Router-RIP context)
Use the timers basic command to set RIP timers. The no form of this command
to set the RIP timers to their default.
The syntax for this command is:
[no] timers basic <update> <invalid>
update
RIP update timer, in seconds.
invalid
RIP invalid route timer, in seconds.
Avaya X330W-2DS1 User’s Guide
99
Chapter 7
X330WAN CLI Commands
Example:
X330WAN-2DS1-1(configure router:rip)# timers basic 30 180
timers spf (Router-OSPF context)
Use the timers spf command to configure the delay between runs of OSPF’s
SPF calculation. Use the no form of this command to restore the default (3 seconds).
The syntax for this command is:
[no] timers spf <spf-holdtime>
spf-holdtime
The time in seconds of the delay between runs of
OSPF’s SPF calculation. The range of acceptable
values is 1 to 3600.
Example:
X330WAN-2DS1-1(super)# timers spf 5
traceroute
Use the traceroute command as a trace route utility.
The syntax for this command is:
traceroute <host>
host
IP address
Example:
X330WAN-2DS1-1(super)# traceroute 192.168.50.13
100
Avaya X330W-2DS1 User’s Guide
Policy CLI Commands
Policy CLI Commands
This section contains a list of all Policy related CLI commands.
ip access-default-action
Use the ip access-default-action command to set the default action for a
specific policy list.
The syntax for this command is:
ip access-default-action <policy-list-number> <defaultaction>
policy-list-number
An integer (100..199), or for the X330WAN
(100..149) where 0 is the default list.
default-action
default-action-deny|default-action-permit
Example:
X330WAN-2DS1-1 ip access-default-action 101 default-actiondeny
ip access-group
Use the ip access-group command to activate a specific policy list and
direction. To suspend the policy list, use the no version of this command.
Note: This command can only be executed from inside the interface context, such as:
the Serial, Loopback, Fast Ethernet and Fabric Fast Ethernet interfaces of the
X330WAN.
The syntax for this command is:
[no] ip access-group <policy-list-number> <direction>
policy-list-number
An integer (100..149) where 0 is the default list.
direction
in|out
Example:
X330WAN-2DS1-1(config-if:FastEthernet1)# ip access-group 110
Avaya X330W-2DS1 User’s Guide
101
Chapter 7
X330WAN CLI Commands
out
ip access-list
Use the ip access-list command to create a specific policy rule. This
command defines a policy rule. The access list contains several of these rules. Each
rule pertains to the source IP address, the destination IP address, the protocol, the
protocol ports (tcp/udp if relevant), and to the ACK bit (in TCP protocol). To delete
a specific rule, use the no form of this command.
The syntax for this command for the X330WAN is:
[no] ip access-list <policy-list-number> <access-list-index>
<action> <protocol> {<source-ip>
<source-wildcard>|any|host
<source-ip>} [<operator> <port> [<port]]
{<destination-ip> <destinationwildcard>|any|host
<destination-ip>}[<operator> <port>
[<port>]][established] [precedence]
102
access-list-number
An integer (100..149)
policy-list-number
An integer (100..149)
access-list-index
An integer (1...9999)
command
permit|deny|deny-and-notify|fwd0-7
action
permit|deny|deny-and-notify|fwd0-7|
composite op name
protocol
ip|tcp|udp|integer (1..255)
source-ip
IP network
source-wildcard
IP network wildcard
operator
eq|lt|gt|range
port
An integer (1..65535)
destination-ip
IP network
destination-wildcard
IP network wildcard
precedence
mandatory|optional
Avaya X330W-2DS1 User’s Guide
Policy CLI Commands
Example:
Router-N>ip access-list 101 23 deny ip any 1.2.0.0 0.0.255.255
X330WAN-2DS1-1(super)# ip access-list 101 23 deny ip any
10.10.0.0 0.0.255.255
X330WAN-2DS1-1(super)# ip access-list 101 24 fwd3 udp any host
10.1.1.1 range 20 23 optional
X330WAN-2DS1-1(super)# ip access-list 101 25 permit tcp any
any eq 23 established
ip access-list-cookie
Use the ip access-list-cookie command to set the list cookie for a specific
policy list.
The syntax for this command for the X330WAN is:
ip access-list-cookie <list-id> <cookie>
policy-list-number
An integer (100..199)
list-id
An integer (100..149) where 0 is the default list.
cookie
An integer
Example:
X330WAN-2DS1-1(super)# ip access-list-cookie 101 12345
ip access-list-copy
Use the ip access-list-copy command to copy a configured source policy
list to a destination policy list.
The syntax for this command is:
ip access-list-copy <source-list> <destination-list>
source-list
An integer (100..199), or for the X330WAN
(100..149) where 0 is the default list.
destination-list
An integer (100..199), or for the X330WAN
(100..149).
Example:
X330WAN-2DS1-1(super)# ip access-list-copy 100 101
Avaya X330W-2DS1 User’s Guide
103
Chapter 7
X330WAN CLI Commands
ip access-list-dscp operation
Use the ip access-list-dsc operation command to set a DSCP to action.
Note: This command is only supported by the P333R-LB device and X330WAN
module.
The syntax for this command is:
ip access-list-dscp operation <policy-list-number> <dscp>
<action>
policy-list-number
An integer (100..199), or for the X330WAN
(100..149), where 0 is the default list.
dscp
Range of DSCP
action
Action name
Example:
X330WAN-2DS1-1(super)# ip access-list-dscp operation 101 9-16
fwd3
ip access-list-dscp name
Use the ip access-list-dscp name command to set a DSCP name.
Note: This command is only supported by the P333R-LB device and X330WAN
module.
The syntax for this command is:
ip access-list-dscp name <policy-list-number> <dscp> <name>
104
policy-list-number
An integer (100..199), or for the X330WAN
(100..149), where 0 is the default list.
dscp
DSCP entry (0-63)
name
Entry name
Avaya X330W-2DS1 User’s Guide
Policy CLI Commands
Example:
X330WAN-2DS1-1(super)# ip access-list-dscp name 101 16
“special”
ip access-list-dscp precedence
Use the ip access-list-dsc precedence command to set a DSCP
precedence.
Note: This command is only supported by the P333R-LB device and X330WAN
module.
The syntax for this command is:
ip access-list-dscp precedence <policy-list-number> <dscp>
<precedence>
policy-list-number
An integer (100..199), or for the X330WAN
(100..149), where 0 is the default list.
dscp
DSCP entry (0-63)
precedence
mandatory|optional
Example:
X330WAN-2DS1-1(super)# ip access-list-dscp precedence 101 16
mandatory
ip access-list-dscp trust
Use the ip access-list-dscp trust command to set a DSCP trust.
Note: This command is only supported by the P333R-LB device and X330WAN
module.
The syntax for this command is:
ip access-list-dscp trust <policy-list-number> {untrusted |
Avaya X330W-2DS1 User’s Guide
105
Chapter 7
X330WAN CLI Commands
trust-cos | trust-dscp | trust-cos-dscp}
policy-list-number
An integer (100..199), or for the X330WAN
(100..149) where 0 is the default list.
Example:
X330WAN-2DS1-1(super)# ip access-list-dscp trust 101 trustdscp
ip access-list-name
Use the ip access-list-name command to set a name for a policy list.
The syntax for this command is:
ip access-list-name <policy-list-number> <name>
policy-list-number
An integer (100..199), or for the X330WAN
(100..149) where 0 is the default list.
name
List name
Example:
X330WAN-2DS1-1(super)# ip access-list-name 101 morning
Note: If you wish to define a name which includes spaces, you must enclose the
entire name in quotation marks, e.g. "new york".
ip access-list-owner
Use the ip access-list-owner command to set the owner for a specific policy
list.
The syntax for this command is:
ip access-list-owner <policy-list-number> <owner>
106
policy-list-number
An integer (100..199), or for the X330WAN
(100..149) where 0 is the default list.
owner
List owner
Avaya X330W-2DS1 User’s Guide
Policy CLI Commands
Example:
X330WAN-2DS1-1(super)# ip access-list-owner 101 admin
ip composite-op access
Use the ip composite-op access command to set the access value of a policy
operation.
Note: This command is only supported by the X330WAN module.
The syntax for this command is:
ip composite-op access <policy-list-number> <compositeoperation-index> <access>
policy-list-number
An integer (100..149), where 0 is the default list
composite-operation-index
Index of operation in the table.
access
forward | deny
Example:
X330WAN-2DS1-1(configure)# ip composite-op access 101 17
forward
ip composite-op dscp
Use the ip composite-op dscp command to set the DSCP value of a policy
operation.
Note: This command is only supported by the X330WAN module.
The syntax for this command is:
ip composite-op dscp <policy-list-number> <composite-op-index>
<dscp value>
policy-list-number
An integer (100..149), where 0 is the default
list.
composite-op-index
Index of operation in the table.
Avaya X330W-2DS1 User’s Guide
107
Chapter 7
X330WAN CLI Commands
dscp value
DSCP entry, an integer (0-63), where 64 - no
change).
Example:
X330WAN-2DS1-1(configure)# ip composite-op dscp 101 17 52
ip composite-op name
Use the ip composite-op name command to set the name of a policy operation.
Note: This command is only supported by the X330WAN module.
The syntax for this command is:
ip composite-op name <policy-list-number> <composite-op-index>
<OpName>
policy-list-number
An integer (100..149), where 0 is the default
list.
composite-op-index
Index of operation in the table.
OpName
The name you are givng the policy operation.
Example:
X330WAN-2DS1-1(configure)# ip composite-op name 101 17 goldaccount
ip composite-op notify
Use the ip composite-op notify command to set the trap mode of a composite
operation in a policy list.
Note: This command is only supported by the X330WAN module.
108
Avaya X330W-2DS1 User’s Guide
Policy CLI Commands
The syntax for this command is:
ip composite-op notify <policy-list-number> <compositeoperation-index> <notify>
policy-list-number
An integer (100..149), where 0 is the default
list.
composite-operation-index
Index of operation in the table.
notify
send-trap | no-trap
Example:
X330WAN-2DS1-1(configure)# ip composite-op notify 101 17 sendtrap
ip composite-op priority
Use the ip composite-op priority command to set the Layer 2 priority of a
policy operation.
Note: This command is only supported by the X330WAN module.
The syntax for this command is:
ip composite-op priority <list-number> <composite-op-index>
<priority>
policy-list-number
An integer (100..149), where 0 is the default
list.
composite-operation-index
Index of operation in the table.
priority
fwd0-7|no-change
Example:
X330WAN-2DS1-1(configure)# ip composite-op priority 101 17
fwd1
Example:
X330WAN-2DS1-1(configure)# ip composite-op name 101 17 goldaccount
Avaya X330W-2DS1 User’s Guide
109
Chapter 7
X330WAN CLI Commands
ip distribution access-default-action
Use the ip distribution access-default-action command to set the
default action for a specific policy list.
Note: This command is only supported by the X330WAN module.
The syntax for this command is:
ip distribution access-default-action <list-number> <defaultaction>
policy-list-number
An integer (1..99)
default-action
default-action-deny|default-action-permit
Example:
X330WAN-2DS1-1(configure)# ip distribution access-defaultaction 1 default-action-deny
ip distribution access-list
Use the ip distribution access-list command to create a distribution
policy statement.
Note: This command is only supported by the X330WAN module.
The syntax for this command is:
ip distribution access-list <policy-list-number>
<access-list-index> <action>
{<dest-ip> [<dest-wildcard>]|any}
110
policy-list-number
An integer (1..99)
access-list-index
An integer
action
permit|deny
dest-ip
IP network address
dest-wildcard
IP network wildcard address
Avaya X330W-2DS1 User’s Guide
Policy CLI Commands
Examples:
X330WAN-2DS1-1(configure)# ip distribution access-list 1 23
deny 10.10.0.0 0.0.255.255
X330WAN-2DS1-1(configure)# ip distribution access-list 2 24
permit 10.1.1.1
X330WAN-2DS1-1(configure)# ip distribution access-list 20 4
permit any
ip distribution access-list-cookie
Use the ip distribution access-list-cookie command to set the cookie
list.
Note: This command is only supported by the X330WAN module.
The syntax for this command is:
ip distribution access-list-cookie <list-id> <cookie>
list-id
An integer (1..99)
cookie
An integer
Example:
X330WAN-2DS1-1(configure)# ip distribution access-list-cookie
4 12345
ip distribution access-list-copy
Use the ip distribution access-list-copy command to copy the
distribution access-list.
Note: This command is only supported by the X330WAN module.
The syntax for this command is:
ip distribution access-list-copy <source-list> <destinationlist>
source-list
Avaya X330W-2DS1 User’s Guide
An integer (1..99)
111
Chapter 7
X330WAN CLI Commands
destination-list
An integer (1..99)
Example:
X330WAN-2DS1-1(configure)# ip distribution access-list-copy 1
3
ip distribution access-list-name
Use the ip distribution access-list-name command to set the distribution
list name.
Note: This command is only supported by the X330WAN module.
The syntax for this command is:
ip distribution access-list-name <distribution-list-number>
<name>
distribution-list-number
An integer (1..99)
name
List name
Note: If you wish to define a name which includes spaces, you must enclose the
entire name in quotation marks, e.g. "new york".
Example:
X330WAN-2DS1-1(configure)# ip distribution access-list-name 5
"evening"
ip distribution access-list-owner
Use the ip distribution access-list-owner command to set the policy list
owner.
Note: This command is only supported by the X330WAN module.
112
Avaya X330W-2DS1 User’s Guide
Policy CLI Commands
The syntax for this command is:
ip distribution access-list-owner <policy-list-number> <owner>
policy-list-number
An integer (1..99)
owner
List owner
Note: If you wish to define a name which includes spaces, you must enclose the
entire name in quotation marks, e.g. "new york".
Example:
X330WAN-2DS1-1(configure)# ip distribution access-list-owner
78 "admin"
ip simulate
Use the ip simulate command to check the policy for a simulated packet. The
command contains the addressed list number, and the packet parameters.
Note: This command can only be executed from inside the interface context, such as:
the Serial, Loopback, Fast Ethernet and Fabric Fast Ethernet interfaces of the
X330WAN.
The syntax for this command is:
ip simulate <policy-list-number> <direction> [<priority>]
[<dscp-value>]<source> <destination> [<protocol> [<source
port> <destination port> [<established>]]]
policy-list-number
An integer (100..199) where 0 is the default list.
direction
in|out
priority
fwd0|fwd1|..|fwd7
dspc value
dscp0|dscp1|..|dscp63
source
Source IP address
destination
Destination IP address
protocol
ip|tcp|udp|integer (1..255)
Avaya X330W-2DS1 User’s Guide
113
Chapter 7
X330WAN CLI Commands
source port
An integer (1..65535)
destination port
An integer (1..65535)
established
Value of TCP established bit
Example:
X330WAN-2DS1-1(config-if:FastEthernet1)# ip simulate 100 in
192.67.85.12 193.76.54.25
no ip composite-op
Use the no ip composite-op command to delete a composite operation from a
policy list.
Note: This command is only supported by the X330WAN module.
The syntax for this command is:
no ip composite-op monitor <policy-list-number> <compositeoperation-index>
policy-list-number
An integer (100..149), where 0 is the default
list.
composite-operation-index
Index of operation in the table to be deleted.
Indices 0 - 12 can not be deleted.
Example:
X330WAN-2DS1-1(configure)# no ip composite-op 101 15
no ip distribution access-list
Use the no ip distribution access-list command to delete a distribution
list statement.
Note: This command is only supported by the X330WAN module.
The syntax for this command is:
no ip distribution access-list <access-list-number>
114
Avaya X330W-2DS1 User’s Guide
Policy CLI Commands
[<access-list-index>
access-list-number
An integer (1..99)
access-list-index
An integer
Examples:
X330WAN-2DS1-1(configure)# no ip distribution access-list 1
X330WAN-2DS1-1(configure)# no ip distribution access-list 2 25
Note: If a list index is not given the no ip distribution access-list , all
rules will be deleted.
set qos policy-source
Use the set qos policy-source command to set the policy source. The default
policy source is policy-server.
Note: Before configuring the IP access list, you must change the policy source mode
to local.
The syntax for this command is:
set qos policy-source <source>
source
local | policy-server
Example:
X330WAN-2DS1-1(configure)# set qos policy-source local
show ip access-group
Use the show ip access-group command to display information about the
configured active access groups.
The syntax for this command for the X330WAN is:
show ip access-group <interface name> [<directions>]
Avaya X330W-2DS1 User’s Guide
115
Chapter 7
X330WAN CLI Commands
interface name
string (e.g."FastEthernet 0")
direction
in | out
Output Example:
X330WAN-2DS1-1(configure)# show ip access-group "FastEthernet
1" in
Note: This command is available out of context only.
show ip access-list-dscp
Use the show ip access-list-dscp command to display the DSCP table of a
given policy list.
Note: This command is only supported by the X330WAN module.
The syntax for this command is:
show ip access-list dscp <policy-list-number> [<dscp>]
policy-list-number
The policy list number (integer from 100 to 199).
Entering 0 displays the default list.
dscp
DSCP entry (integer from 0 to 63).
Example:
X330WAN-2DS1-1(configure)# show ip access-list-dscp 101 63
116
Avaya X330W-2DS1 User’s Guide
Policy CLI Commands
show ip access-lists
Use the show ip access-lists command to see all the current policy lists.
The syntax for this command is:
show ip access-lists[<policy-list-number>]
policy-list-number
The policy list number (integer from 100 to 199 where
0 is the default list).
Output Example:
X330WAN-2DS1-1(configure)# show ip access-lists
ip access-list 100
192.168.55.0
any range 7000
ip access-list 100
any
any
optional
ip access-list 100
any
any
ip access-list 100
host 192.168.3.4
host 10.6.7.8
default action for
10 deny-and-notify tcp
0.0.0.255
range
8000
30 deny udp
5000
6000
35 deny ip
55 fwd7 tcp
eq
33333
list 100 is permit
show ip access-lists details
Use the show ip access-lists details command to view complete data of
a policy list (including DSCP and composite operation tables).
Note: This command is only supported by the X330WAN module.
The syntax for this command is:
show ip access-lists details [<policy-list-number>]
policy-list-number
Avaya X330W-2DS1 User’s Guide
The policy list number (integer from 100 to 199).
Entering 0 displays the default list.
117
Chapter 7
X330WAN CLI Commands
Example:
X330WAN-2DS1-1(configure)# show ip access-list details 101
show ip access-list-summary
Use the show ip access-list-summary command to display the policy list
summary.
Note: This command is only supported by the X330WAN module.
The syntax for this command is:
show ip access-list-summary
show ip active-access-groups
Use the show ip active-access-groups command to display all activated
lists on all interfaces.
Note: This command is only supported by the X330WAN module.
The syntax for this command is:
show ip active-access-groups
show ip composite-op
Use the show ip composite-op command to show a composite operation of a
policy list.
Note: This command is only supported by the X330WAN module.
The syntax for this command is:
show ip composite-op [<policy-list-number>] [<compositeoperation-index>
policy-list-number
118
The policy list number (integer from 100 to 199).
Entering 0 displays the default list.
Avaya X330W-2DS1 User’s Guide
Policy CLI Commands
composite-operationindex
Index of the operation in the table.
Example:
X330WAN-2DS1-1(configure)# show ip composite-op 101 11
validate-group
Use the validate-group command to verify that all the rules in a priority list
are valid.
Note: This command can only be executed from the Serial, Loopback, Fast Ethernet
and Fabric Fast Ethernet interfaces of the X330WAN.
The syntax for this command is:
validate-group <policy-list-number> <direction> [quiet]
policy-list-number
An integer (100..149) where 0 is the default list.
direction
in|out
quiet
Error messages not displayed.
Example:
X330WAN-2DS1-1(config-if:Serial1:1)# validate-group 101 in
Avaya X330W-2DS1 User’s Guide
119
Chapter 7
X330WAN CLI Commands
WAN CLI Commands
This section contains a list of all WAN related CLI commands.
async mode interactive (Console interface context)
Use the async mode interactive command to enter Modem mode every time
the proprietary modem cable is plugged into the Console port.
The syntax for this command is:
async mode interactive
async mode terminal (Console interface context)
Use the async mode terminal command to disable interactive mode on the
Console, disabling the use of PPP and entering Terminal mode.
The syntax for this command is:
async mode terminal
async reset-modem (FastEthernet interface context)
Use the async reset-modem command to reset the connected modem.
The syntax for this command is:
async reset-modem
autoneg
Use the autoneg command to set the port speed and duplex to auto negotiation
mode. Use the no form of this command to disable auto negotiation mode.
The syntax for this command is:
[no] autoneg
bandwidth (Interface context)
Use the bandwidth command to set the bandwidth informational parameter. Use
the no form of this command to set the bandwidth informational parameter to the
default.
Note: This command is executed from the Serial, Loopback, Fast Ethernet and
Fabric Fast Ethernet interfaces.
120
Avaya X330W-2DS1 User’s Guide
WAN CLI Commands
The syntax for this command is:
[no] bandwidth [<kilobits size>]
kilobits size
An integer (1-10000000)
Example:
X330WAN-2DS1-1(super-if:FabricFastEthernet1:1)# bandwidth 100
cablelength long (Controller Context)
Use the cablelength long command to configure transmit and receive levels
for a cable length (line build-out) longer than 655 feet for a T1 trunk with a CSU
interface. Use the no form of this command to restore the cablelength long
parameters to their default (Tx=0db level, Rx=gain26).
Note: This command can only be performed if the controller is set to T1.
The syntax for this command is:
[no] cablelength long {gain26|gain36} {-15db|-22.5db|-7.5db|
0db}
long
Configures parameters using gain/attenuation.
gain26
Sets the receive sensitivity to 26 dB if you can
configure the hardware’s receive sensitivity. This is
the default value. However, it is recommended to
enter gain26 so that the CLI entry matches the
actual value.
gain36
Sets the receive sensitivity to 36 dB if you can
configure the hardware’s receive sensitivity.
-15db
Sets the transmit attenuation to 15 dB.
-22.5db
Sets the transmit attenuation to 22.5 dB.
-7.5db
Sets the transmit attenuation to 7.5 dB.
0db
Sets the transmit attenuation to 0 dB. This is the
default value.
Avaya X330W-2DS1 User’s Guide
121
Chapter 7
X330WAN CLI Commands
Note: If you cannot configure the hardware’s receive sensitivity, the receive
sensitivity is fixed at 36 dB and is unaffected if you enter gain26 or gain36.
Example:
The following example changes the CLI receive sensitivity to match the actual
receive sensitivity of the hardware and adds 15 dB of attenuation to the transmit
signal:
X330WAN-2DS1-1(config-controller:1)# cablelength long
gain36 -15db
Example:
no cablelength
cablelength short (Controller Context)
Use the cablelength short command to configure transmit attenuation for a
cable length (line build-out) of 655 feet or shorter for a T1 trunk with a DSX-1
interface. Use the no form of this command to restore the default value.
Note: This command can only be performed if the controller is set to T1.
The syntax for this command is:
cablelength short {133ft|266ft|399ft|533ft|655ft}
122
short
Configures parameters using the loop length.
133
Cable length of 0 to 133 feet. This is the default value.
266
Cable length of 134 to 266 feet.
399
Cable length of 267 to 399 feet.
533
Cable length of 400 to 533 feet.
655
Cable length of 534 to 655 feet.
Avaya X330W-2DS1 User’s Guide
WAN CLI Commands
Note: The transmit attenuation value is best obtained by experimentation. If the
signal received by the far-end equipment is too strong, reduce the transmit level by
entering additional attenuation.
Example:
The following example sets the transmit attenuation to the appropriate levels for a
cable between 134 and 266 feet long:
X330WAN-2DS1-1(config-controller:1)# cablelength short 266ft
channel-group (Controller context)
Use the channel group command to create a channel-group (also referred to as
"ds0 bundle"). A channel group can be the underlying interface for a PPP session.
This command creates a logical interface, which is identified by a port number, a
colon, and a channel group number. For example, channel-group 8 on E1 port 2
would be referred to as "2:8" in all places where a channel-group is needed as a
parameter.
The syntax for this command is:
channel-group <channel-num> timeslots <timeslot-list> speed {56
| 64}
Note: The Speed option can be performed only when the controller is set to T1.
channel-num
ID number to identify the channel group. The valid
range is from 0 to 23 for T1 lines and from 0 to 30 for
E1 lines.
timeslot-list
Timeslots (DS0s) to include in this channel group.
The valid timeslots are:
• 1 to 24 for T1
• 1 to 31 for E1
Values can be either separated by a "," (to indicate a
list) or a "-" (to indicate a range)
speed
Acceptable values are 56 or 64.
Avaya X330W-2DS1 User’s Guide
123
Chapter 7
X330WAN CLI Commands
Note: If the user has an active ppp session over this channel-group, a warning is
issued.
Note: If a user issues this command with an existing channel-num, it is assumed
that the timeslot-list is a list of timeslots that should replace the current list of
timeslots already defined for that channel-group.
Note: Channel groups, voice groups, and TDM groups all use group numbers. All
group numbers configured for channel groups, voice groups, and TDM groups
must be unique. For example, you cannot use the same group number for a channel
group and a TDM group.
Examples:
X330WAN-2DS1-1(config-controller:1)# channel-group 10
timeslots 10-24
X330WAN-2DS1-1(config-controller:1)# channel-group 2
timeslots 5-6,8,20-24
clear fragment
Use the clear fragment command to clear the fragment database and restore
its defaults.
Note: No fragmentation will be done of packets in transit through the router.
The syntax for this command is:
clear fragment
clock source (Controller Context)
Use the clock source command to configure the clock source for an E1/ T1
controller. Use the no form of this command to return the value to the default.
124
Avaya X330W-2DS1 User’s Guide
WAN CLI Commands
The syntax for this command is:
[no] clock source {line|internal}
line
The controller recovers the external clock from the line and
provides the recovered clock to the internal (system) clock
generator. This is the default value.
internal
The controller synchronizes itself to the internal (system) clock.
Note: Only one E1/T1 controller at a time can recover the network clock and
distribute it to the internal clock generator.
Examples:
X330WAN-2DS1-1(config-controller:1)# clock source internal
X330WAN-2DS1-1(config-controller:1)# no clock source
controller
Use the controller command to enter the specified controller's mode.
Note: You cannot configure one controller as E1 and the other as T1.
The syntax for this command is:
controller { e1 | t1 } <port>
e1
This is an E1 port.
t1
This is a T1 port.
port
The number of the port that is being configured.
Example:
X330WAN-2DS1-1(configure)# controller E1 2
description (Controller context)
Use the description command to set the description of the E1/T1 interface. This
description appears both in the ifAlias and the circuitIdentifier MIB
values for that interface. Use the no form of this command to remove the
Avaya X330W-2DS1 User’s Guide
125
Chapter 7
X330WAN CLI Commands
controller’s description.
Note: This command can also be executed from the Serial, Loopback, Fast Ethernet
and Fabric Fast Ethernet interfaces.
The syntax for this command is:
[no] description <desc>
desc
A string describing the E1/T1 interface. The string may contain
blanks and is up to 255 characters long.
Examples:
X330WAN-2DS1-1(config-controller:1)# description "E1
controller"
X330WAN-2DS1-1(config-controller:1)# no description
description (Interface context)
Use the description command to set the description of the interface. Use the no
form of this command to remove the interface’s description.
Note: This command can also be executed from the Serial, Loopback, Fast Ethernet
and Fabric Fast Ethernet interfaces.
The syntax for this command is:
[no] description <desc>
desc
A string describing the interface.
Examples:
X330WAN-2DS1-1(config-if:FastEthernet1)# description vlan5
ds-mode
Use the ds-mode command to set the controller’s mode.
126
Avaya X330W-2DS1 User’s Guide
WAN CLI Commands
Note: After setting the controller’s mode, this command will:
1. Perform the copy running-config startup-config command.
2. Erase startup-config.
3. Reset the device.
The syntax for this command is:
ds-mode [e1|t1]
e1
Sets the device in E1 mode. All controllers are set to operate as E1.
t1
Sets the device in T1 mode. All controllers are set to operate as T1.
This is the default.
Output Example:
X330WAN-2DS1-1(configure)# ds-mode e1
Your startup-config file will be erased!
Your telnet session will be disconnected.
This operation may take a few minutes
The WAN module will reset, in order to make the required
change.
Do you want to continue (Y/N)?
Note: If this command is entered when the correct mode is selected (for example,
entering ds1-mode e1 when the device is already in E1 mode) no errors are
generated.
duplex (FastEthernet interface context)
Use the duplex command to control the duplex setting for the interface.
The syntax for this command is:
duplex {full|half}
full
Full duplex
half
Halp duplex
Avaya X330W-2DS1 User’s Guide
127
Chapter 7
X330WAN CLI Commands
Example:
X330WAN-2DS1-1(config-if:FastEthernet1)# duplex full
encapsulation ppp (Serial interface context)
Use the encapsulation ppp command to set the encapsulation of the Serial
interface to a Router PPP interface. Use the no form of this command to close the
encapsulation of the Serial interface from a Router PPP interface.
The syntax for this command is:
[no] encapsulation ppp
Example:
X330WAN-2DS1-1(config-if:Serial1:1)# encapsulation ppp
fragment chain
Use the fragment chain command to set the maximum number of fragments
that can comprise a single IP packet destined to the router. Use the no form of this
command to set the fragment chain to the default value (64).
Note: No fragmentation will be done of packets in transit through the router.
The syntax for this command is:
[no] fragment chain <chain-limit>
chain-limit
The maximum number of fragments that can comprise a single
IP packet (2-2048). The default is 64.
Example:
X330WAN-2DS1-1(configure)# fragment chain 30
fdl
Use the fdl command to define an fdl type. Fdl is used to define a remote
loopback for the module or in order to receive the far-end counters.
To disable the fdl, use the no command.
128
Avaya X330W-2DS1 User’s Guide
WAN CLI Commands
Note:
1. This command can only be performed if the controller is set to T1.
2. Use this command only when framing esf is defined.
The syntax for this command is:
[no] fdl <fdl-mode>
fdl-mode
ansi | att | both
Example:
X330WAN-2DS1-1(configure)# fdl ansi
fragment size
Use the fragment size command to set the maximum number of fragmented IP
packets, destined to the router, to reassemble at any given time. Use the no form of
this command to set the fragment size to the default value (100).
Note: No fragmentation will be done of packets in transit through the router.
The syntax for this command is:
[no] fragment size <database-limit>
database-limit
The maximum number of packets undergoing re-assembly at
any given time. The default is 100.
Example:
X330WAN-2DS1-1(configure)# fragment size 150
fragment timeout
Use the fragment timeout command to set the maximum number of seconds to
reassemble a fragmented IP packet destined to the router. Use the no form of this
command to set the fragment timeout to the default value (10).
Note: No fragmentation will be done of packets in transit through the router.
Avaya X330W-2DS1 User’s Guide
129
Chapter 7
X330WAN CLI Commands
The syntax for this command is:
[no] fragment timeout <timeout>
timeout
An integer (5-120). The maximum number of seconds to reassemble an IP packet. The default is 10.
Example:
X330WAN-2DS1-1(configure)# fragment timeout 30
framing (Controller context)
Use the framing command to select the frame type for the E1 or T1 data line. Use
the no form of this command to set the controller’s framing type to the default
value.
The syntax for this command is:
For T1 lines:
[no] framing {sf|esf}
For E1 lines:
[no] framing {crc4|no-crc4}
sf
Selects Super frame framing (dsx1D4). This is the default value
for T1 lines.
esf
Selects Extended super frame framing (dsx1ESF).
crc4
Selects CRC4 framing. (dsx1E1-CRC-MF). This is the default
value for E1 lines.
no-crc4
Selects no-CRC4 framing (dsx1E1-MF).
Note: Use this command in configurations where the router or access server is
intended to communicate with E1 or T1 fractional data line. The service provider
determines which framing type (sf, esf, or crc4) is required for your E1/T1
circuit.
Example:
The following example selects extended super frame as the T1 frame type:
X330WAN-2DS1-1(config-controller:1)# framing esf
130
Avaya X330W-2DS1 User’s Guide
WAN CLI Commands
Example:
X330WAN-2DS1-1(config-controller:1)# no framing
interface Console
Use the interface Console command to enter Console interface (Interface
Console context) to PPP configure mode. For LAN interfaces, use this command to
create the interface. Use the no form of this command to set the default Console
parameters.
The syntax for this command is:
[no] interface Console
Example:
X330WAN-2DS1-1(configure)# interface Console
interface FabricFastEthernet
Use the interface FabricFastEthernet command to create and/or enter
Interface Fabric Fast Ethernet configuration mode (context). For LAN interfaces, use
this command to create the interface. Use the no form of this command to delete a
Fabric Fast Ethernet interface or an IP interface.
The syntax for this command is:
[no] interface FabricFastEthernet
[port[:vlan[.ip-interface]]]
port
An integer with a value of 1.
vlan
The 802.1q Fabric number. An integer between integer 1 and
3071.
ip-interface
The IP interface number within this interface (as a number of IP
interfaces might be bound to an L3 interface). An integer
between 0 and 1024.
Example:
To enter Interface Fabric Fast Ethernet context for port 1, vlan 1, with an IP-interface
of 1:
interface FabricFastEthernet 1:1.1
Examples:
X330WAN-2DS1-1(configure)# interface FabricFastEthernet 1
Avaya X330W-2DS1 User’s Guide
131
Chapter 7
X330WAN CLI Commands
X330WAN-2DS1-1(configure)# interface FabricFastEthernet 1:1
X330WAN-2DS1-1(configure)# no interface FabricFastEthernet 1.1
interface FastEthernet
Use the interface FastEthernet command to create and/or enter Interface
Fast Ethernet configuration mode (context). For LAN interfaces, use this command
to create the interface. Use the no form of this command to delete an IP interface.
The syntax for this command is:
[no] interface FastEthernet [interface number[.ip-interface]]
interface
number
An integer with a value of 1.
ip-interface
The IP interface number within this interface (as a number of IP
interfaces might be bound to an L3 interface). An integer
between 0 and 1024.
Examples:
X330WAN-2DS1-1(configure)# interface FastEthernet 1
X330WAN-2DS1-1(configure)# interface FastEthernet 1.1
X330WAN-2DS1-1(configure)# no interface FastEthernet 1.1
interface Loopback
Use the interface Loopback command to create and/or enter interface
Loopback configuration mode (context). Use the no form of this command to delete
a Loopback interface or an IP interface.
The syntax for this command is:
[no] interface Loopback [<interface number>[.ip-interface]]
interface
number
An integer between 0 and 99.
ip-interface
The IP interface number within this interface (as a number of IP
interfaces might be bound to an L3 interface). An integer
between 0 and 1024.
Examples:
X330WAN-2DS1-1(configure)# interface Loopback 1
132
Avaya X330W-2DS1 User’s Guide
WAN CLI Commands
X330WAN-2DS1-1(configure)# interface Loopback 1.0
X330WAN-2DS1-1(configure)# no interface Loopback 1.0
interface Serial
Use the interface Serial command to create and/or enter Interface Serial
configuration mode (context). For LAN interfaces, use this command to create the
interface. Use the no form of this command to delete an IP interface.
The syntax for this command is:
[no] interface Serial [port:channel-group[.ip-interface]]
port
The controller number (port number) for this serial port. For
the X330W-2DS1, this value is either 1 or 2.
channel-group
An integer. For E1, between 0 and 30; for T1, between 0 and 23.
ip-interface
The IP interface number within this interface (as a number of IP
interfaces might be bound to an L3 interface). An integer
between 0 and 1024.
Example:
To enter Interface Serial mode port 1, channel-group 4 in ip-interface 1:
X330WAN-2DS1-1(configure)# interface Serial 1:4.1
Example:
X330WAN-2DS1-1(configure)# no interface Serial 1:4.1
keepalive (Serial interface context)
Use the keepalive command to enable keepalive. Use the no form of this
command to disable keepalive.
The syntax for this command is:
[no] keepalive [<Seconds>]
Seconds
An integer (0-32767). Entering keepalive without a
parameter will return the keepalive to its default of 10 seconds.
Entering keepalive 0 will disable keepalive.
linecode (Controller context)
Use the linecode command to select the line-code type for an E1 or T1 line. Use
Avaya X330W-2DS1 User’s Guide
133
Chapter 7
X330WAN CLI Commands
the no form of the command to restore the default line-code type of transmission.
The syntax for this command is:
For T1 lines:
linecode {ami|b8zs}
For E1 lines:
linecode {ami|hdb3}
ami
Alternate Mark Inversion line-code type. Valid for both T1 and
E1 controllers.
b8zs
B8ZS line-code type. Valid for T1 controller only. This is the
default value for T1 lines.
hdb3
High-Density Bipolar 3 line-code type. Valid for E1 controller
only. This is the default value for E1 lines.
Note: Use this command in configurations where the router or access server must
communicate with E1 or T1 fractional data lines. The T1 service provider
determines which line-code type, ami or b8zs, is required for your T1 circuit. The
E1 service provider determines which line-code type, ami or hdb3, is required for
your E1 circuit.
Example:
The following example specifies B8ZS as the line-code type for a T1 line:
X330WAN-2DS1-1(config-controller:1)# linecode b8zs
Example:
X330WAN-2DS1-1(config-controller:1)# no linecode
loopback diag (Controller Context only)
Use the loopback diag command to put the T1 or E1 line into loopback mode.
Note: Regarding the use of loopbacks during line setup and maintenance, only one
type of loopback can be defined at any given time.
134
Avaya X330W-2DS1 User’s Guide
WAN CLI Commands
Note: Use this command during line set up and maintenance.
The syntax for this command is:
loopback diag
loopback local(Controller context)
Use the loopback local command to put the T1 or E1 line into loopback mode.
Note: Regarding the use of loopbacks during line setup and maintenance, only one
type of loopback can be defined at any given time.
Note: Use this command during line set up and maintenance.
The syntax for this command is:
loopback local {line|payload}
line
The controller loops the external line signal back toward the
network without reframing the DS1 signal.
payload
The controller loops the external line signal back toward the
network and reframes the DS1 signal.
Example:
X330WAN-2DS1-1(config-controller:1)#loopback local line
loopback remote (Controller context)
Use the loopback remote command to ask the far end to put itself into loopback
mode.
Note:
1. This command can only be performed if the controller is set to T1.
2. Use this command during line set up and maintenance.
Avaya X330W-2DS1 User’s Guide
135
Chapter 7
X330WAN CLI Commands
loopback remote {line|payload}
line
The controller loops the external line signal back toward the
network without reframing the DS1 signal.
payload
The controller loops the external line signal back toward the
network and reframes the DS1 signal. (This option is available
in the framing esf mode and only when fdl is defined.)
Example:
X330WAN-2DS1-1(config-controller:1)#loopback remote line
mtu (Serial interface context)
Use the mtu command to set the interface Maximum Transmission Unit (MTU). Use
the no form of this command to restore interface MTU to the default value (1500).
The syntax for this command is:
[no] mtu <size in bytes>
size in bytes
Range from 64-1500
Example:
X330WAN-2DS1-1(config-if:Serial1:1)# mtu 1000
no channel group (Controller context)
Use the no channel group command to delete a channel group.
The syntax for this command is:
no channel-group <channel-num>
channel-num
ID number to identify the channel group. The valid
range is from 0 to 23 for T1 lines and from 0 to 30 for
E1 lines.
Example:
X330WAN-2DS1-1(config-controller:1)# no channel-group 2
no loopback (Controller context)
Use the no loopback command to disable the loopback mode.
136
Avaya X330W-2DS1 User’s Guide
WAN CLI Commands
The syntax for this command is:
no loopback
ppp authentication (Console interface context)
Use the ppp authentication command to set if and what type of password
should be sent for authentication.
The syntax for this command is:
ppp authentication {pap|chap|none}
pap
Password Authentic Protocol. Unencrypted password sent for
authentication.
chap
Challenge Handshake Authentication Protocol. Encrypted
password sent for authentication.
none
No password sent.
Example:
To select the chap authentication protocol:
X330WAN-2DS1-1(config-if:CON)# ppp authentication chap
ppp timeout ncp (Serial interface context)
Use the ppp timeout ncp command to set the maximum time, in seconds, that
the PPP should allow for negotiation of a network layer protocol. Use the no form of
this command to disable the maximum time that the PPP should allow for
negotiation.
The syntax for this command is:
[no] ppp timeout ncp <Seconds>
Seconds
The maximum time, in seconds, PPP should allow for
negotiation of a network layer protocol. If no network protocol
is negotiated within the given time, the connection is
terminated. An integer from 1 to 65535.
Example:
X330WAN-2DS1-1(config-if:Serial1:1)# ppp timeout ncp 10
Avaya X330W-2DS1 User’s Guide
137
Chapter 7
X330WAN CLI Commands
ppp timeout retry (Serial interface context)
Use the ppp timeout retry command to set the maximum time, in seconds, to
wait for a response during PPP negotiation. Use the no form of this command to
restore the maximum time to wait for a response during PPP negotiation to the
default value (2 seconds).
The syntax for this command is:
[no] ppp timeout retry <Seconds>
Seconds
The maximum time, in seconds, to wait for a response during
PPP negotiation. An integer from 1 to 255.
Example:
X330WAN-2DS1-1(config-if:Serial1:1)# ppp timeout retry 10
queue-limit (Serial interface context)
Use the queue-limit command to set the packet size of the various queues.
The syntax for this command is:
[no] queue-limit <queue id> <size>
queue id
The queue priority ID (1 - highest, 4 - lowest).
size
The size, in packets, of the queue. The total amount of packets
in all queues cannot exceed 500.
Example:
X330WAN-2DS1-1(config-if:Serial1:1)# queue-limit 1 200
remote (Controller context)
Use the remote command to reset the far-end counters.
Note:
1. This command can only be performed if the controller is set to T1.
2. This command is used only when the fdl at&t option is defined.
138
Avaya X330W-2DS1 User’s Guide
WAN CLI Commands
The syntax for this command is:
remote <fdl-request-type>
fdl-requesttype
Reset Performance Monitoring Counters | Reset Errorred ESF
Data
Example:
X330WAN-2DS1-1(super)# remote Reset-errored-ESF-data
show controllers
Use the show controllers command to display the status of the controller.
The syntax for this command is:
show controllers [<port>]
port
The port number.
Example:
X330WAN-2DS1-1(configure)# show controllers
Output Example:
E1 1 is up.
No alarms detected.
Framing is CRC4, Line Code is HDB3, Clock Source is
Line.
channel-group 1 timeslots 1-31
Data in current interval (778 seconds elapsed):
0 Line Code Violations, 0 Path Code Violations
0 Slip Secs, 0 Fr Loss Secs, 0 Line Err Secs, 0
Degraded Mins
0 Errored Secs, 0 Bursty Err Secs, 0 Severely Err
Secs, 0 Unavail Secs
Total Data (last 92 15 minute intervals):
19958 Line Code Violations, 38 Path Code Violations
0 Slip Secs, 5 Fr Loss Secs, 6 Line Err Secs, 0
Degraded Mins
Avaya X330W-2DS1 User’s Guide
139
Chapter 7
X330WAN CLI Commands
6 Errored Secs, 1 Bursty Err Secs, 5 Severely Err
Secs, 0 Unavail Secs
E1 2 is administratively down.
Output Example:
T1 1 is down.
Cablelength is long gain26 0db.
Transmitter is sending remote alarm.
Receiver has loss of signal.
Framing is SF, Line Code is AMI, Clock Source is Line.
channel-group 1 timeslots 1-6
Data in current interval (347 seconds elapsed):
0 Line Code Violations, 0 Path Code Violations
0 Slip Secs, 0 Fr Loss Secs, 0 Line Err Secs, 0
Degraded Mins
0 Errored Secs, 0 Bursty Err Secs, 0 Severely Err
Secs, 0 Unavail Secs
Total Data (last 24 hours):
0 Line Code Violations, 0 Path Code Violations
0 Slip Secs, 0 Fr Loss Secs, 0 Line Err Secs, 0
Degraded Mins
0 Errored Secs, 0 Bursty Err Secs, 0 Severely Err
Secs, 0 Unavail Secs
Note: When this command is used with the port parameter, information about all
statistics intervals is displayed.
140
Avaya X330W-2DS1 User’s Guide
WAN CLI Commands
The following are the show controllers command output fields:
Field
Description
T1 1 is down
Displays that the T1 controller 1 is not operating. The
controller’s state can be: up, down, or administratively down.
Loopback conditions are shown either as being locally looped
or remotely looped.
Cablelength
Displays the current line buildout. Relevant for T1 lines only.
Remote alarm
Any alarms detected by the controller are displayed. The
possible alarms are:
• Transmitter is sending remote alarm.
• Transmitter is sending alarm indication signal (AIS).
• Receiver has loss of signal.
• Receiver is getting AIS.
• Receiver has loss of frame.
• Receiver has remote alarm.
• Receiver has no alarms.
• Receiver has major alarm.
Framing
Shows the current framing type. The default framing type for
E1 is CRC4. The default framing type for T1 is SF.
Line Code
Displays the current line code. The default line code for E1 is
HDB3. The default line code for T1 is AMI.
Clock Source
Displays the current clock source. The possible clock sources
are either Line or Internal.
Channel
Group
Displays the channel group number and timeslots.
Data in current
interval
(347 seconds
elapsed)
Displays the current accumulation period (from 1-900 seconds),
which rolls into a 24 hour accumulation every 15 minutes. The
oldest 15 minute period falls off the back of the 24 hour
accumulation buffer.
Line Code
Violations
Displays either no line code violations, the occurrence of a
Bipolar Violation, or the occurrence of an Excessive Zeros error
event.
Avaya X330W-2DS1 User’s Guide
141
Chapter 7
142
X330WAN CLI Commands
Path Code
Violations
Displays one of the following:
• No path code violations.
• A frame synchronization bit error in the SF (for T1) and
no- CRC4 (for E1) frame types.
• A CRC4 error in the ESF (for T1) and CRC4 (for E1) frame
types.
Slip Secs
Displays if there is a replication or deletion of the payload bits
of a domestic trunk interface (DS1) frame. A slip might happen
when there is a difference between the timing of a synchronous
receiving terminal and the received signal.
Fr Loss Secs
Displays the number of seconds an Out of Frame (OOF) error is
detected.
Line Err Secs
Displays the number of seconds one or more Line Code
Violations are detected.
Degraded
Mins
Displays the number of minutes where the estimated error rate
is between 1E-6 and 1E-3.
Errored Secs
In ESF (T1) and CRC4 (E1) links, displays the number of
seconds one of the following is detected:
• One or more path code violations.
• One or more Out of Frame defects.
• One of more Controlled Slip events.
• An AIS defect.
In SF (T1) and no-CRC4 (E1) links, displays the presence of
bipolar violations.
Bursty Err Secs
Displays the number of seconds with:
• Path Coding Violation errors (between1 -320).
• No Severely Errored Frame defects.
• No detected incoming AIS defects.
The number of controlled slips are not displayed.
Avaya X330W-2DS1 User’s Guide
WAN CLI Commands
Severly Err
Secs
For ESF (T1) signals, displays the number of seconds one of the
following is detected:
• 320 or more Path Code Violation Errors.
• One or more Out of Frame defects.
• An AIS defect.
For SF (T1) signals, displays the number of seconds one of the
following is detected:
• 1544 Line Code Violations.
• A count of one second intervals with Framing Errors.
• An Out of Frame defect.
For CRC (E1) signals, displays the number of seconds one of
the following is detected:
• 832 or more Path Code Violation errors.
• One or more Out of Frame defects.
For no-CRC (E1) signals, displays the number of seconds with
2048 or more Line Code Violations.
Unavail Secs
Displays the total number of seconds on the interface,
calculated by counting the number of seconds that the interface
is unavailable.
show controllers remote
Use the show controllers remote command to display far end performance
data through an fdl message.
Note: This command is used when the fdl at&t option is defined.
The syntax for this command is:
show controllers remote <port> <fdl-request-type>
port
Number of the port.
fdl-requesttype
Request types include:
• 1h-data
• Enhanced-CI-configuration
• Enhanced-1h
• Errored-ESF-data
Example:
X330WAN-2DS1-1(super)# show controllers remote 1 1h-data
Avaya X330W-2DS1 User’s Guide
143
Chapter 7
X330WAN CLI Commands
show fragment
Use the show fragment command to display information regarding fragmented
IP packets that are destined to the router.
Note: No fragmentation will be done of packets in transit through the router.
This command displays the following information:
• Size - Maximum number of packets set by the size option.
• Chain - Maximum number of fragments for a single packet set by the chain
option.
• Timeout - Maximum number of seconds set by the timeout option.
• Queue - Number of packets currently awaiting reassembly.
• Assemble - Number of packets successfully reassembled.
• Fail - Number of packets which failed to be reassembled.
• Overflow - Number of packets which overflowed the fragment database.
The syntax for this command is:
show fragment
Example:
X330WAN-2DS1-1(configure)# show fragment
Max number of concurrently reassembled packets is 100
Max number of fragments per packet is 64
Fragment timeout is 10 sec
Number of packets waiting to be reassembled is 0
Number of successfully reassembled packets is 11954
Number of packets which failed to be reassembled is 0
Number of packets which overflowed the database is 0
show interfaces
Use the show interfaces command to display information on all interfaces in
the X330WAN, starting at the first Layer 2 interface. If the type is specified, only
interfaces of that type are shown. If no type is specified, all interfaces are shown.
144
Avaya X330W-2DS1 User’s Guide
WAN CLI Commands
The syntax for this command is:
show interfaces [<type>] [<identifier>]
type
The type of this interface. Select one of the following:
FastEthernet | Serial | FabricFastEthernet | Loopback | Console
identifier
• For a FastEthernet interface - An integer (1)
• For a Serial interface - <port>:<channel-group>
<port> - Either 1 or 2
<channel-group> - For E1, an integer, 0-30
For T1, an integer, 0-23
• For a FabricFastEthernet interface - 1[:<vlan>]
<vlan> - An integer, 1-3071
• For a Loopback interface - An integer, 0-99
Examples:
X330WAN-2DS1-1(super)# show interfaces
FabricFastEthernet 1:1 is up, line protocol is up
Physical address is 00.40.0d.bf.3b.01,
MTU 1500 bytes, Bandwidth 100000 Kbit,
Encapsulation ARPA,
0 packets input, Received 0 broadcasts,
33175 input errors,
0 packets output,
0 output errors
FastEthernet 1 is up, line protocol is up
Physical address is 00.40.0d.bf.3b.fe,
Internet address is 149.49.75.71
, mask is 255.255.255.0
MTU 1500 bytes, Bandwidth 100000 Kbit,
Encapsulation ARPA,
Full-duplex, 100Mb, 100BaseTX/FX
ARP type: ARPA, ARP Timeout 04:00:00
680031 packets input, Received 661406 broadcasts,
17 input errors,
5569 packets output,
0 output errors
FabricFastEthernet 1 is up, line protocol is up
MTU 0 bytes, Bandwidth 100000 Kbit,
Encapsulation ARPA,
0 packets input, Received 0 broadcasts,
0 input errors,
Avaya X330W-2DS1 User’s Guide
145
Chapter 7
X330WAN CLI Commands
0 packets output,
0 output errors
Serial 1:1 is down, line protocol is down
Internet address is 2.2.2.2
, mask is 255.255.255.0 (advertised IPCP)
MTU 1500 bytes, Bandwidth 256 Kbit,
Encapsulation PPP,
LCP
REQsent
IPCP Starting
0 packets input, Received 0 broadcasts,
0 input errors,
3872 packets output,
0 output errors
Console asynchronous mode is terminal
Terminal baud rate is 9600
show ip distribution access-lists
Use the show ip distribution access-lists command to display the
content of all current distribution lists or of a specific list.
The syntax for this command is:
show ip distribution access-lists [<distribution-list-number>]
distribution list number
The distribution list number. An integer from 1 to 99.
Example:
To display the content of distribution list number 1:
X330WAN-2DS1-1(configure)# show ip distribution access-lists 1
Example:
To display the content of all current distribution lists:
X330WAN-2DS1-1(configure)# show ip distribution access-lists
show line console
Use the show line console command to display the console interface.
The syntax for this command is:
show line console
146
Avaya X330W-2DS1 User’s Guide
WAN CLI Commands
Output Example:
X330WAN-2DS1-1(configure)# show line console
Console
ppp state disable
Asynchronic mode terminal
Baud rate is 38400
Timeout is 0
ppp authentication none
show logout
Use the show logout command to display the CLI logout.
The syntax for this command is:
show logout
Output Example:
X330WAN-2DS1-1(configure)# show logout
CLI timeout is 15 minutes
show queueing
Use the show queueing command to display the priority queue size, in packets.
The syntax for this command is:
show queueing [<interface type> <identifier>]
interface
type
The type of this interface. Select one of the following:
FastEthernet | Serial | FabricFastEthernet
identifier
• For a FastEthernet interface - An integer (1)
• For a Serial interface - <port>:<channel-group>
<port> - Either 1 or 2
<channel-group> - For E1, an integer, 0-30
For T1, an integer, 0-23
• For a FabricFastEthernet interface - An integer (1)
Avaya X330W-2DS1 User’s Guide
147
Chapter 7
X330WAN CLI Commands
Examples:
X330WAN-2DS1-1(super)# show queueing
Interface Name
Voip mode Queue 1 (High)
Queue 2
Queue 3
Queue 4 (Low)
---------------- --------- -------------- ----------- ----------- ----------Serial 1:1
OFF
64
64
64
64
shutdown (Controller context)
This command shuts down the E1/T1 link. This has the effect of administratively
bringing the line down. In effect, it sends a 'blue alarm' on the line. Use the no form
of this command to reconnect the E1/T1 link.
The syntax for this command is:
[no] shutdown
shutdown (Interface context)
Use the shutdown command to shutdown the selected interface. Use the no form of
this command to activate the selected interface.
Note: This command is executed from the Serial, Loopback, Fast Ethernet, and
Console interfaces.
The syntax for this command is:
[no] shutdown
Note: The no shutdown option is not available in the Console interface.
speed (Console context)
Use the speed command to set the PPP baud rate to be used by asynchronous PPP
ports.
Note:
1. This command is executed from the Console interface.
2. The peer baud-rate must be set to the same value.
148
Avaya X330W-2DS1 User’s Guide
WAN CLI Commands
The syntax for this command is:
speed {9600|19200|38400}
9600
Sets a speed of 9600 bits per second.
19200
Sets a speed of 19200 bits per second.
38400
Sets a speed of 38400 bits per second.
Example:
X330WAN-2DS1-1(config-if:CON)# speed 9600
speed (FastEthernet interface context)
Use the speed command to control the speed setting for the interface.
Note: This command is executed from the Fast Ethernet interface.
The syntax for this command is:
speed {10MB|100MB}
10MB
Sets a speed of 10 Mbps.
100MB
Sets a speed of 100 Mbps.
Example:
X330WAN-2DS1-1(config-if:FastEthernet1)# speed 100MB
timeout absolute (Console interface context)
Use the timeout absolute command to set the number of minutes until the
system automatically disconnects an idle PPP incoming session.
The syntax for this command is:
timeout absolute <time>
time
Avaya X330W-2DS1 User’s Guide
Number of minutes (0-999) where 0 means no timeout should
occur at all.
149
Chapter 7
X330WAN CLI Commands
voip-queue (Serial interface context)
Use the voip-queue command to select custom queueing and queue sizes for VoIP
traffic. Use the no form of this command to restore the default priority queues size
to the default.
The syntax for this command is:
[no] voip-queue
150
Avaya X330W-2DS1 User’s Guide
How to Contact Us
To contact Avaya’s technical support, please call:
In the United States
Dial 1-800-237-0016, press 0, then press 73300.
In the EMEA (Europe, Middle East and Africa) Region
Local Dial-In
Number
Country
Country
Local Dial-In
Number
Albania
+31 70 414 8001
France
+33 1 4993 9009
Austria
+43 1 36 0277 1000
Germany
+49 69 95307 680
Azerbaijan
+31 70 414 8047
Ghana
+31 70 414 8044
Bahrain
+800 610
Gibraltar
+31 70 414 8013
Belgium
+32 2 626 8420
Greece
+00800 3122 1288
Belorussia
+31 70 414 8047
Hungary
+06800 13839
Bosnia
Herzegovina
+31 70 414 8042
Iceland
+0800 8125
Bulgaria
+31 70 414 8004
Ireland
+353 160 58 479
Croatia
+31 70 414 8039
Israel
+1 800 93 00 900
Cyprus
+31 70 414 8005
Italy
+39 02 7541 9636
Czech Rep.
+31 70 414 8006
Jordan
+31 70 414 8045
Denmark
+45 8233 2807
Kazakhstan
+31 70 414 8020
Egypt
+31 70 414 8008
Kenya
+31 70 414 8049
Estonia
+372 6604736
Kuwait
+31 70 414 8052
Finland
+358 981 710 081
Latvia
+371 721 4368
Avaya X330W-2DS1 User’s Guide
151
How to Contact Us
Country
Local Dial-In
Number
Country
Local Dial-In
Number
Lebanon
+31 70 414 8053
Slovakia
+31 70 414 8066
Lithuania
+370 2 756 800
Slovania
+31 70 414 8040
Luxemburg
+352 29 6969 5624
South Africa
+0800 995 059
Macedonia
+31 70 414 8041
Spain
+34 91 375 3023
Malta
+31 70 414 8022
Sweden
+46 851 992 080
Mauritius
+31 70 414 8054
Switzerland
+41 22 827 8741
Morocco
+31 70 414 8055
Tanzania
+31 70 414 8060
Netherlands
+31 70 414 8023
Tunisia
+31 70 414 8069
Nigeria
+31 70 414 8056
Turkey
+800 4491 3919
Norway
+47 235 001 00
UAE
+31 70 414 8036
Oman
+31 70 414 8057
Uganda
+31 70 414 8061
Pakistan
+31 70 414 8058
UK
+44 0207 5195000
Poland
+0800 311 1273
Ukraine
+31 70 414 8035
Portugal
+351 21 318 0047
Uzbekistan
+31 70 414 8046
Qatar
+31 70 414 8059
Yemen
+31 70 414 8062
Romania
+31 70 414 8027
Yugoslavia
+31 70 414 8038
Russia
+7 095 733 9055
Zimbabwe
+31 70 414 8063
Saudi Arabia
+31 70 414 8022
Email: [email protected]
152
Avaya X330W-2DS1 User’s Guide
How to Contact Us
In the AP (Asia Pacific) Region
Local Dial-In
Number
Country
Country
Local Dial-In
Number
Australia
+1800 255 233
Malaysia
+1800 880 227
Hong Kong
+2506 5451
New
Zealand
+00 800 9828 9828
Indonesia
+800 1 255 227
Philippines
+1800 1888 7798
Japan
+0 120 766 227
Singapore
+1800 872 8717
Korea
+0 80 766 2580
Taiwan
+0 80 025 227
Email: [email protected]
In the CALA (Caribbean and Latin America) Region
Email: [email protected]
Hot Line:+1 720 4449 998
Fax:+1 720 444 9103
For updated information, visit www.avaya.com/support.
Avaya X330W-2DS1 User’s Guide
153
How to Contact Us
All trademarks, registered trademarks, service names, product and/or brand names are the sole property of
their respective owners.
Copyright © 2002 Avaya Inc. All rights reserved.
154
Avaya X330W-2DS1 User’s Guide