1
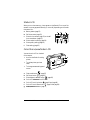
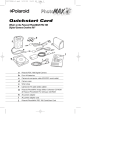
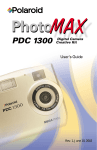
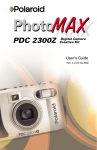
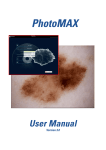
Introducing Your Polaroid PhotoMAX
PDC 640CF Digital Camera
Your Polaroid PhotoMAX PDC 640CF Digital Camera Kit contains
everything you need to take digital photos, transfer them to your computer,
change them in many creative ways, include them in e-mails, print them, and
find other great ways to use them.
Note: To install the PhotoMAX software that comes with the camera, see
page 22.
a
b
c
d
e
f
g
h
i
Camera case
Polaroid 640CF Digital Camera
Wrist strap
User’s Guide
Polaroid PhotoMAX Image Maker
Software CD-ROM
Four AA batteries
AC power adapter
Camera-to-computer RS-232 Serial
cable
Camera-to-computer USB cable
c
b
a
f
e
d
g
i
h
Your Camera
Front view
a
Optical viewfinder
b
Flash
Lens cover and on/off switch
c
d
e
f
g
h
i
Tripod mount
Self-timer LED
Battery compartment
Wrist strap slot
Lens
Hand grip
b
a
i
h
c
g
f
e d
Rev. 1, June 10, 2002
Polaroid PhotoMAX PDC 640CF Digital Camera User’s Manual
1
Rear view
e
Status LCD
bc d
a
b Flash status LED
c Camera power/status
LED
d Optical viewfinder
k
n
e Shutter button
l
o
m
Color LCD on/off button
f
p
(DISPLAY)
j
g Color LCD scroll up
button
h Color LCD scroll down button
Menu on/off and selection button (MENU/SELECT)
i
Color LCD (menu/viewfinder)
j
k Flash setting button
Self-timer button
l
m Photo delete (trashcan) button
n USB and RS-232 Serial connection
o AC power adapter connection
p Memory card slot
a
f
g
h
i
Note: For a detailed list of camera specifications, see the PhotoMAX PDC
640CF Digital Camera Specifications section of the online Polaroid
PhotoMAX Image Maker User’s Guide.
2
Polaroid PhotoMAX PDC 640CF Digital Camera User’s Manual
Status LCD
When you turn the camera on, icons appear on the Status LCD on top of the
camera. Icons may appear differently (or not at all), depending on the mode
the camera is in.
a
b
c
d
e
f
Battery status (page 12)
Self-timer status (page 13)
Photos in the camera (page 13) or the selftimer countdown (page 13).
Photo resolution setting (page 14)
Photo quality setting (page 14)
Flash setting (page 15)
a
b
c
f
e
d
Color Menu/viewfinder LCD
You use the color LCD on the back
of the camera:
•
As a live viewfinder for taking
photos
•
To review photos you have
taken
•
To change camera settings and
menus
a
Flash mode button
(page 15)
Self-timer button
(page 13)
Photo delete (trashcan) button
(page 20)
Color LCD DISPLAY on/off button
Color LCD scroll up button (page 11 and pag e19)
Color LCD scroll down button (page 11 and pag e19)
MENU/SELECT button (page 11)
b
c
d
e
f
g
a
b
c
Polaroid PhotoMAX PDC 640CF Digital Camera User’s Manual
d
e
f
g
3
Preparing to Take Photos
Power supply
You can operate the camera using batteries or the AC adapter provided. To
conserve battery life, the camera shuts off after 30 seconds of inactivity, if the
menu/viewfinder LCD is on. The camera then shuts off after 3 minutes of
inactivity. To activate the camera again, close and reopen the lens cover.
Note: Use the AC adapter whenever possible to extend the life of your
batteries. Keep a set of extra batteries handy, especially on a trip, when
it may not be possible to find replacement batteries easily.
When not using the camera, close the lens cover. And when not using
the camera for more than a few days, remove the batteries.
Loading batteries
1
Open the battery compartment cover on the
bottom of the camera by sliding the cover out to
the side as far as it will go and lifting it.
2
Insert four AA batteries with the + and –
terminals oriented as shown inside the battery
compartment.
3
•
Use only AA high-capacity super alkaline
or lithium disposable batteries or NiCad or
NiMH rechargeable batteries.
•
Never mix old batteries with new batteries,
different types of batteries, or batteries
from different manufacturers.
Close the battery compartment cover securely.
If you feel resistance, do not force the cover.
Slide it out to the side as far as it will go, press it
down flat against the camera base, and slide it
back into the base to lock it closed.
Note: For important information about using batteries properly and safely,
see the Tips, Tricks, Terms, and Techniques section of the online
Polaroid PhotoMAX Image Maker User’s Guide.
4
Polaroid PhotoMAX PDC 640CF Digital Camera User’s Manual
Using the AC adapter
To maximize the life of your camera batteries, use the AC adapter whenever
possible. For example, always use the AC adapter when reviewing stored
photos on the LCD or transferring photos into your computer.
Note: The AC adapter may become warm to the touch after extended
periods of use. This is no cause for alarm.
If you are using rechargeable batteries, using the AC adapter will not
recharge them. For more information about how to recharge the
batteries, see the instructions provided by the battery manufacturer.
1
Close the lens cover to turn the camera off.
2
Connect one end of the AC adapter (a) to
the AC connection on the camera.
3
Connect the other end of the AC adapter to
a grounded electrical outlet.
4
a
Slide the lens cover open to turn the camera
on.
Note: For important information about using
the AC adapter properly and safely, see the Tips, Tricks, Terms, and
Techniques section of the online Polaroid PhotoMAX Image Maker
User’s Guide.
Turning the camera on
Slide the lens cover to the right to turn the
camera on.
Close the lens cover to turn the camera off.
Polaroid PhotoMAX PDC 640CF Digital Camera User’s Manual
5
Photo storage
The PhotoMAX PDC 640CF Digital Camera is ready to store your photos in
2 MB of internal memory (or in any optional ATA Type I CompactFlash
memory card, as described below).
Depending on the camera’s photo-quality setting (page 14), its internal
memory normally stores from 16 to 33 photos at 640 x 480 resolution or 64
to 132 photos at 320 x 240 resolution.
Note: For more information about the camera’s storage capacity, see the
Tips, Tricks, Terms, and Techniques section of the online Polaroid
PhotoMAX Image Maker User’s Guide.
Using an optional CompactFlash card
The PhotoMAX PDC 640CF Digital Camera includes a slot for an optional
ATA Type I CompactFlash memory card of any size.
Note: For more information about CompactFlash memory cards, visit your
local computer retailer.
If you insert a CompactFlash memory card into the camera, photos are
stored on the card, and not in the camera’s internal memory. Photos already
in the camera’s internal memory are not lost, however. You can still access
them by removing the CompactFlash card.
Caution:Do not insert or remove a memory card while the camera power is on.
Doing so may damage the memory card or corrupt photos stored on it.
6
Polaroid PhotoMAX PDC 640CF Digital Camera User’s Manual
Installing and Removing a CompactFlash card
1
Turn the camera off.
2
To install a memory card:
Open the memory compartment cover
on the side of the camera ( a).
b Insert the card carefully, but firmly,
into the slot with the raised lip on the
edge of the card facing the front of the
camera (b).
The card fits completely into the slot in
only one way. When the card is inserted
correctly, the eject button above the card
pops up (c).
a
a
c
b
Note: If the card does not seem to fit correctly, do not force it.Turn the
card over and retry.
Close the memory compartment cover.
To remove a memory card:
c
3
Open the memory compartment cover
on the side of the camera ( a).
a
b Push the eject button above the
b
memory card (b).
c Grasp the edge of the memory card
c
and pull it out (c).
d Close the memory compartment cover.
Note: For a description of card-related error
messages that may appear on the color LCD, see page 26.
a
Polaroid PhotoMAX PDC 640CF Digital Camera User’s Manual
7
Formatting a CompactFlash card
You may need to format a new memory card before you can use it. Also, you
may need to reformat a card (or the camera’s internal memory) to eliminate
corrupted files.
Note: If you are using a CompactFlash memory card, any photos on the
card are deleted, but photos stored in the camera’s internal memory
are not. You must remove the memory card to format the camera’s
internal memory.
1
Insert the new CompactFlash memory card.
2
Turn the camera on.
3
Press the MENU/SELECT button to display the MAIN MENU.
4
Use the LCD scroll buttons to highlight FORMAT MEDIA in green.
5
Press the MENU/SELECT button to display the FORMAT MEDIA
options.
The camera displays a CONTINUE FORMAT OF MEDIA? message.
6
7
Use the LCD scroll buttons to highlight OK or CANCEL (the default)
and press the MENU/SELECT button to make your selection.
•
If you select OK, the camera displays FORMATTING CARD and
then turns the LCD off.
•
If you select CANCEL, the camera returns to the MAIN MENU
without formatting memory.
If you are finished with the MAIN MENU, use the LCD scroll buttons
to highlight DONE and press the MENU/SELECT button to exit the
MAIN MENU and turn the LCD off.
Note: For a description of card-related error messages that may appear on
the color LCD, see page 26.
Note: If you cannot format the card, it may be defective. Return it to the
retailer where you purchased it.
8
Polaroid PhotoMAX PDC 640CF Digital Camera User’s Manual
Taking Photos
Now that you have prepared your PhotoMAX PDC 640CF Digital Camera
for action, it’s time to take some photos! For your convenience, this section
briefly describes the entire process:
•
Taking photos
•
Reviewing photos in the camera
•
Deleting unwanted photos
•
Transferring photos to your computer
This section also tells you where go in this guide for detailed explanations of
each step.
You can take photos using either the optical viewfinder or the LCD
viewfinder. Use the optical viewfinder:
•
For faster processing and flash recycle time
•
To optimize battery life
To take a photo
To take a photo, set up the camera for the first time, or to redefine camera
settings after changing the batteries:
1
Turn the camera on (page 5).
2
Set the flash mode, if needed (pag e15).
3
Set the photo resolution (pag e14).
Note: You need not set every parameter for every photo. You can often
use camera default settings. Some settings (like resolution) also
remain at their current value until you change them or remove
the camera’s batteries.
4
Set the photo quality (pag e14).
5
Set the exposure-value brightness compensation, if needed (pa ge16).
6
Set the white-balance compensation, if needed (pag e17).
7
Set the preview mode, if desired (pag e18).
8
Activate the self-timer, if desired (page 13).
Polaroid PhotoMAX PDC 640CF Digital Camera User’s Manual
9
9
Stand at the proper distance from the subject:
•
Outdoors: 2 feet (60 cm) or more from the subject
•
Indoors: 3 to 10 ft. (1 to 3 m) from the subject (see page 15)
10 Frame the subject:
•
Within the yellow framing lines in the optical viewfinder
•
Within the color LCD screen
11 Press the shutter button down fully to take the photo.
Hold the camera steady until you hear a beep followed by two quick
beeps.
Note: If the camera’s internal memory (or CompactFlash card) is full,
the camera will not take more photos. For a description of
storage-related error messages that may appear on the color LCD,
see page 26. When a card is full, you must review and delete some
photos before taking more (see page 19).
Note: After you take a photo, the green power/status LED immediately
to the left of the optical viewfinder blinks while the camera
processes and saves the photo. Wait until the power/status LED
stops blinking before you turn the camera off or take another
photo. If you used the flash, the flash LED to the far left of the
optical viewfinder also blinks after the power/status LED stops
blinking.
12 Review and delete unwanted photos from the camera to regain storage
space (page 19).
13 Transfer photos from the camera to your computer and delete unwanted
photos using the PhotoMAX software (page 22).
Note: For more information about taking better photos, see the Tips,
Tricks, Terms, and Techniques section of the online Polaroid
PhotoMAX Image Maker User’s Guide.
10
Polaroid PhotoMAX PDC 640CF Digital Camera User’s Manual
Using Camera Controls and Functions
Camera menus
Here is the general procedure for using the camera menus:
1
Turn the camera on.
2
Press the MENU/SELECT button to display the MAIN MENU.
3
Use the LCD scroll buttons to highlight, in green, a menu option you
want to use (CAMERA SETUP, DELETE ALL, or FORMAT
MEDIA).
Note: The DELETE ALL and FORMAT MEDIA commands operate
differently than discussed here, and are described on page 20 and
page 21.
4
To change CAMERA SETUP options:
5
With CAMERA SETUP highlighted in green, press the MENU/
SELECT button to go to the CAMERA SETUP page.
b Use the LCD scroll buttons to highlight, in green, a camera-setup
command you want to configure (in the left-hand column). For
example: QUALITY.
c Press the MENU/SELECT button to highlight, in green, the
command’s current setting (in the right-hand column). For
example: HIGH, NORMAL, or LOW.
d Use the LCD scroll buttons to display and highlight, in green, the
new setting you want to use (in the right-hand column). For
example: NORMAL.
e Press the MENU/SELECT button to select this new setting, which
reverts to white text on the screen.
Repeat step 4 for all menu options that you want to change.
6
Use the LCD scroll down button to highlight SAVE in green.
7
Press the MENU/SELECT button to implement your menu selections
and return to the MAIN MENU.
8
If you are finished with the MAIN MENU, use the LCD scroll buttons to
highlight DONE and press the MENU/SELECT button to exit the
MAIN MENU.
a
The LCD viewfinder turns off or returns to a live LCD viewfinder,
depending on its state when you opened the MAIN MENU in step 2.
Polaroid PhotoMAX PDC 640CF Digital Camera User’s Manual
11
Battery status indicator
Note: This is an automatic indicator that you do not configure.
The battery status icon on the Status LCD shows how much energy remains
in the batteries:
Status LCD Icon
Battery Status
Fully charged
Low charge—You can still take photos, but the
flash and LCD viewfinder cannot be used. As
battery power drops still lower, the camera
eventually shuts down, and you need to replace all
four batteries.
Note: For important information about using batteries properly and safely,
see the Tips, Tricks, Terms, and Techniques section of the online
Polaroid PhotoMAX Image Maker User’s Guide.
12
Polaroid PhotoMAX PDC 640CF Digital Camera User’s Manual
Self-timer
Note: You configure this setting with the self-timer button on the
camera back.
Use the self-timer feature to take a photo ten seconds after you press the
shutter button. The self-timer works only for the next photo taken, and then
turns itself off.
Note: For best results, mount the camera on a tripod for self-timed photos.
1
Turn the camera on.
2
Press the self-timer button
( a).
The self-timer icon
appears on
the Status LCD (and on the menu/
viewfinder LCD, if it is on).
a
Note: To cancel the self-timer, press
the self-timer button again.
3
Frame the photo using the optical
viewfinder or the LCD viewfinder.
4
Press the shutter button.
The red self-timer LED on the front of the camera blinks for ten seconds
before the photo is taken and blinks rapidly immediately before the
photo is taken. A ten-second countdown also appears on the Status LCD
(where the number of stored photos normally appears)
:
Stored photos indicator
Note: This is an automatic indicator that you do not configure.
The Status LCD shows the number of photos stored in the camera’s internal
memory (or in an installed CompactFlash card). When the number of
photos exceeds 99, a small plus sign appears beside the number. For example:
•
This icon shows that the number of stored photos is
•
This icon shows that the number of stored photos is 108, 208, 308,
etc.:
8:
Note: This icon also appears at the bottom of the menu/viewfinder LCD.
Note: For more information about the camera’s storage capacity, Tips,
Tricks, Terms, and Techniques section of the online Polaroid
PhotoMAX Image Maker User’s Guide.
Polaroid PhotoMAX PDC 640CF Digital Camera User’s Manual
13
Photo resolution setting
Note: You configure this setting with the CAMERA SETUP RES menu,
using the general procedure described on page 11.
The PhotoMAX PDC 640CF Digital Camera offers two resolution settings:
RES Menu Setting
Status LCD Icon
LARGE (default)
Pixels in Photo
640 x 480
Note: Use for best results.
SMALL
320 x 240
Note: For more information about digital photo resolution, see the Tips,
Tricks, Terms, and Techniques section of the online Polaroid
PhotoMAX Image Maker User’s Guide.
Photo quality setting
Note: You configure this setting with the CAMERA SETUP QUALITY
menu, using the general procedure described on page 11.
The PhotoMAX PDC 640CF Digital Camera offers three quality settings:
QUALITY
Status LCD Icon
JPEG Compression Ratio
Menu Setting
HIGH
Low compression for best
photo quality
NORMAL
Medium compression
(default)
LOW
High compression for smallest
file size
Note: These icons also appear at the bottom of the menu/viewfinder LCD.
You can apply these quality settings at either resolution.
Note: For more information about digital photo quality, see the Tips,
Tricks, Terms, and Techniques section of the online Polaroid
PhotoMAX Image Maker User’s Guide.
14
Polaroid PhotoMAX PDC 640CF Digital Camera User’s Manual
Flash setting
Note: You configure this setting with the
flash button
back (a).
on the camera
The Flash mode button lets you cycle
through the flash-mode icons on the
Status LCD. The default setting is
No Flash.
a
Note: The optimum camera-to-subject
flash range is 3 to 7 feet.
(1 to 2 m). In very dark lighting, stand 3 to 6 feet from the subject. In
bright indoor lighting, stand 3 to 10 feet (1 to 3 m) from the subject.
Status LCD Icon
(default)
Flash Setting
No Flash
• The flash does not fire.
• Use in places where flash is prohibited or may be
distracting. Also use when shooting toward a
reflective surface, such as a window or mirror.
• If you don’t have enough light when using the No
Flash setting, your photos will be too dark.
• Use for outdoor photos.
Auto Flash
• Use this setting to take most photos.
• The flash fires automatically as needed.
Forced Flash
• The flash fires for every photo.
• Use indoors in low light. Using Forced Flash in
bright light may overexpose the photo.
Note: These icons also appear at the bottom of the menu/viewfinder LCD.
Note: For more information about using the camera’s flash properly, see the
Tips, Tricks, Terms, and Techniques section of the online Polaroid
PhotoMAX Image Maker User’s Guide.
Polaroid PhotoMAX PDC 640CF Digital Camera User’s Manual
15
Exposure-value brightness compensation
Note: You configure this setting with the CAMERA SETUP EXP menu,
using the general procedure described on page 11.
Exposure-value compensation works best when you don’t use the flash. If a
photo comes out too dark or too light, change this setting and try again.
The PhotoMAX PDC 640CF Digital Camera offers nine exposure-value
settings:
EXP Menu Setting
Brightness Compensation
NORMAL (default)
No compensation
-0.5 to -2.0
Makes photos progressively darker
+0.5 to +2.0
Makes photos progressively lighter
Note: Each time you turn the camera off and on again, exposure-value
compensation resets to the default, NORMAL.
Note: For more information about using exposure-value brightness
compensation, see the Tips, Tricks, Terms, and Techniques section
of the online Polaroid PhotoMAX Image Maker User’s Guide.
16
Polaroid PhotoMAX PDC 640CF Digital Camera User’s Manual
White balance compensation
Note: You configure this setting through the CAMERA SETUP
WHT BAL menu, using the general procedure described on page 11.
If you are shooting indoors without a flash, or in other unusual lighting
conditions, your photos may be tinted with strange colors (such as orange,
green, or blue). If this happens, use this setting to fix the problem.
Note: Leave the white-balance setting at AUTO (the default) for most
photos. If flash is prohibited or if the flash is not used indoors, you
may want to try the FLRSCN or TUNGST settings, depending on
the source of prevailing lighting.
The PhotoMAX PDC 640CF Digital Camera offers six white-balance
settings:
WHT BAL
Lighting Conditions
Menu Setting
Automatic compensation for most situations
AUTO
(default)
OFF
No compensation
Note: Use this setting when you do NOT want the
camera to change the photo’s lighting and color, such as
when shooting sunsets.
SUN
Outdoors in sunlight
SHADE
Outdoors in shade
FLRSCN
Indoors in fluorescent illumination
TUNGST
Indoors in light-bulb illumination
Note: Each time you turn the camera off and on again, white balance resets
to the default, AUTO.
Note: For more information about using white-balance compensation, see
the Tips, Tricks, Terms, and Techniques section of the online
Polaroid PhotoMAX Image Maker User’s Guide.
Polaroid PhotoMAX PDC 640CF Digital Camera User’s Manual
17
Photo preview mode
Note: You configure this setting through the CAMERA SETUP
PREVIEW menu, using the general procedure described on page 11.
When the PREVIEW mode is ON, the camera displays a photo after it is
taken and gives you a chance to delete it immediately.
The PhotoMAX PDC 640CF Digital Camera offers two preview settings:
PREVIEW
Camera Action
Menu Setting
OFF (default)
The camera automatically saves each photo taken.
ON
The camera displays the photo just taken on the
viewfinder LCD, and lets you delete or save it.
At the prompt, use the LCD scroll buttons to
highlight DELETE or SAVE (the default) and
quickly press the MENU/SELECT button.
• If you select DELETE, the camera discards the photo
and turns the LCD off.
• If you select SAVE, the camera stores the photo in
memory and turns the LCD off.
If you do not select DELETE or SAVE within 3
seconds, the camera automatically saves the photo for
you.
18
Polaroid PhotoMAX PDC 640CF Digital Camera User’s Manual
Reviewing and Deleting Photos
Reviewing stored photos
You can review one photo at a time using the menu/viewfinder LCD.
Note: To maximize battery life, use the AC adapter whenever possible while
you review your photos.
1
Turn the camera on.
2
Press the DISPLAY button to turn the menu/viewfinder LCD on.
3
Use the LCD scroll buttons to display a stored photo on the LCD.
4
Use the LCD scroll buttons to scroll through the stored photos.
5
Press the DISPLAY button or turn the camera off to stop reviewing
your photos.
Deleting photos from the camera
To free up space in your camera for more photos, delete some photos from
the camera as described here, or transfer photos from the camera to your PC
(page 22) and then delete them.
Note: When you delete one or more photos, the remaining photos are
renumbered.
Note: If you are using a CompactFlash memory card, only the photos on the
card are deleted. Photos stored in the camera’s internal memory are
not erased; you must remove the memory card to delete these photos.
Warning: Once you delete a photo, is cannot be retrieved—it is gone
forever!
You can delete photos from the camera using the camera’s:
•
Delete button (page 20)
•
DELETE ALL command (page 20)
•
FORMAT MEDIA command (page 21)
•
PhotoMAX Image Maker Software (page 25)
Polaroid PhotoMAX PDC 640CF Digital Camera User’s Manual
19
Using the camera’s delete button:
1
When a photo is displayed on the
LCD as described above:
•
To delete only the displayed
photo, quickly press and release
the delete button
( a).
•
To delete all photos from the
camera’s internal memory (or
from a CompactFlash card),
press and hold the delete
button
(a) for at least 3 seconds.
a
The DELETE menu option appears, highlighted in green on the LCD.
If you change your mind about deleting the photo or photos, use the
LCD scroll buttons to highlight CANCEL.
2
Press the MENU/SELECT button to implement your choice.
3
If you are deleting photos individually, repeat steps 1 and 2 for each
photo that you want to delete.
Using the camera’s DELETE ALL command:
1
Turn the camera on.
2
Press the MENU/SELECT button to display the MAIN MENU.
3
Use the LCD scroll buttons to highlight DELETE ALL in green.
4
Press the MENU/SELECT button to display the DELETE ALL options.
The camera displays a CONTINUE DELETE OF ALL IMAGES?
message.
5
6
20
Use the LCD scroll buttons to highlight OK or CANCEL (the default)
and press the MENU/SELECT button to make your selection.
•
If you select OK, the camera displays an ERASING message, deletes
all photos, and returns to the MAIN MENU.
•
If you select CANCEL, the camera returns to the MAIN MENU
without deleting photos.
If you are finished with the MAIN MENU, use the LCD scroll buttons to
highlight DONE and press the MENU/SELECT button to exit the
MAIN MENU.
Polaroid PhotoMAX PDC 640CF Digital Camera User’s Manual
The LCD viewfinder turns off or returns to a live LCD viewfinder,
depending on its state when you opened the MAIN MENU in step 2.
Note: You can also delete all photos from the camera’s internal memory or a
CompactFlash card using the FORMAT MEDIA command (see the
following section).
Using the camera’s FORMAT MEDIA command:
You may need to format a new memory card before you can use it. You may
also need to reformat a card (or the camera’s internal memory) to delete
corrupted files.
Note: If you are using a CompactFlash memory card, only photos on the
card are deleted. Photos stored in the camera’s internal memory are
not erased; you must remove the memory card to delete these photos.
1
Turn the camera on.
2
Press the MENU/SELECT button to display the MAIN MENU.
3
Use the LCD scroll buttons to highlight FORMAT MEDIA in green.
4
Press the MENU/SELECT button to display the FORMAT MEDIA
options.
The camera displays a CONTINUE FORMAT OF MEDIA? message.
5
Use the LCD scroll buttons to highlight OK or CANCEL (the default)
and press the MENU/SELECT button to make your selection.
•
If you select OK, the camera displays a FORMATTING MEMORY
message (or FORMATTING CARD if you are using a
CompactFlash card) and turns the LCD off.
•
If you select CANCEL, the camera returns to the MAIN MENU
without formatting memory.
If you are finished with the MAIN MENU, use the LCD scroll
buttons to highlight DONE and press the MENU/SELECT button
to exit the MAIN MENU and turn the LCD off.
Note: You can also delete all photos from the camera’s internal memory or a
CompactFlash card using the DELETE ALL command (see page 20).
Using the PhotoMAX software:
You can also delete photos from the camera when it is connected to the
Polaroid PhotoMAX software. For more information, see the next section.
Polaroid PhotoMAX PDC 640CF Digital Camera User’s Manual
21
Transferring Photos to Your Computer
The following sections describe how to transfer photos from the Polaroid
PhotoMAX PDC 640CF Digital Camera to your computer. The TWAIN
driver for the camera is automatically installed with the Polaroid PhotoMAX
Image Maker Software included in your kit. The TWAIN software allows you
to transfer photos from your camera into another software application.
Installing the software
Before installing the software that came with your camera, be sure that your
computer meets these minimum requirements:
•
200 MHz Pentium processor or equivalent
•
Microsoft Windows 95, 98, or Me
•
32 MB RAM
•
210 MB available hard disk space
•
Available USB port (Windows 98 or Me only) or RS-232 Serial port
•
High-color display with 800 x 600 DPI resolution or higher
•
2x or faster CD-ROM drive
•
Mouse
Note: If you have any questions about the capabilities of your computer,
read the documentation that came with the computer or contact its
manufacturer.
To install the software
1
Insert the software CD in your PC’s CD-ROM drive.
If the installation program does not start automatically:
a
b
c
d
Select Run from the Windows Start menu.
Click Browse to locate your CD-ROM drive.
Select Setup.exe from the CD-ROM.
Click Open.
Click OK. The installation program begins.
Follow the instructions on your computer screen.
e
2
22
Polaroid PhotoMAX PDC 640CF Digital Camera User’s Manual
Transferring Photos to Your Computer
Caution:Reboot your computer after installing the PhotoMAX software and
BEFORE connecting the camera to the computer’s USB port.
1
Turn the camera off.
2
If you are using the camera’s USB cable, leave your computer on.
If you are using the camera’s Serial cable, turn off your computer and all
its peripherals (scanner, printer, etc.).
3
Insert the round connector on the USB
or Serial cable into the connection on
the side of the camera ( a).
Note: Insert the connector straight into
the camera without twisting, so
that the flat side of the connector
(the side with the arrow on it)
faces toward the front of the
camera. If you encounter
resistance, do not force the
connector, but reposition it and try again.
4
a
b
Connect the other end of the cable to the appropriate port on your
computer:
•
Connect the rectangular connector on the USB cable to the USB
port on your computer.
•
Connect the 9-pin female Serial connector to the Serial port on your
computer.
5
Insert one end of the AC power adapter ( b) into the power port on the
side of the camera (page 5) and plug the other end of the adapter into a
grounded electrical outlet.
6
Turn the computer on, if you turned it off to attach the Serial cable.
7
Turn the camera on.
8
Open the PhotoMAX Image Maker Software by double-clicking the
PhotoMAX software icon on your desktop.
Polaroid PhotoMAX PDC 640CF Digital Camera User’s Manual
23
The Get Photo button is
automatically selected.
Get
Photo
This button lets you acquire
images from several sources:
Selection:
Used To:
Album
Open an image file from a PhotoMAX photo album
From File
Open a recently used image or any image file on your
computer
Camera/
Scanner
Transfer a photo from your camera, scanner, or other
TWAIN-compatible device
Create New
Create a new image file
Screen
Capture
Grab an entire computer screen or active window
Get From Web
Gets images from your Storage Room on the
www.PolaroidDigital.com Web site
9
Click Camera/Scanner.
The Select Source list appears.
10 Select Polaroid 640CF Digital
Camera.
11 Choose the destination album for
your photos from the
Select Album list.
Acquire button
Select Album list
Select Source list
Camera/Scanner button
Note: To create a new album,
select [New] and use the
album named NewAlbum1 or enter a different album name.
12 Click the Acquire button.
The digital camera TWAIN software
window opens. TWAIN software is
used to transfer, delete, and save
photos from your camera.
24
Polaroid PhotoMAX PDC 640CF Digital Camera User’s Manual
13 Click Refresh Thumbnails to display your photos in the TWAIN
window.
14 Select photos for transfer to your computer:
•
To select a single photo, click on the photo thumbnail. A red border
appears around the photo.
•
To select more that one photo, press Control (Ctrl) on your
keyboard while you click on each thumbnail image. Red borders
appear around all selected thumbnails.
•
To select all photos, click Select All. Red borders appear around
all thumbnails in the camera.
15 Click Get Photos.
The photos transfer into your computer and appear in the active photo
album.
Note: To delete photos from the camera using the PhotoMAX software:
Select one or more photos for deletion as described in step 14.
Click Delete Selected.
16 Double-click on an image to open it in the image tray.
a
b
The image can be manipulated using the PhotoMAX tools.
For more information about using PhotoMAX
software tools:
•
Select the ? button to open the
PhotoMAX Online User’s Guide, which
provides a searchable topic index and
step-by-step procedures for using your
Polaroid PhotoMAX Image Maker
Software.
•
You can also get help with any button or feature in the software by
moving your mouse cursor over it and clicking your right mouse button.
This brings up context-sensitive help that explains the software button
or feature.
•
Visit our Help site on the Web for more information.
? button
Polaroid PhotoMAX PDC 640CF Digital Camera User’s Manual
25
Camera Troubleshooting
Your PhotoMAX PDC 640CF Digital Camera may display the following error
messages on its color LCD:
LCD Message
Meaning and Corrective Action
MEMORY FULL
• Memory may be full. Transfer
PRESS SHUTTER RELEASE
TO CONTINUE
CARD FULL
PRESS SHUTTER RELEASE
TO CONTINUE
photos to your computer (page 22)
or delete some images from the
memory (page 19).
• The CompactFlash card may be
full. Transfer photos to your
computer (page 22) or delete some
images from the card (page 19).
• The CompactFlash card may have
become unstable. Install a new card
(page 6).
COMPACT FLASH CARD
FAIL!
• The CompactFlash card may be
COMPACT FLASH CARD
FAIL!
• The CompactFlash card is
POWER OFF AND REMOVE
CARD
NEW CARD
PRESS SHUTTER RELEASE
TO CONTINUE
NO CARD
PRESS SHUTTER RELEASE
TO CONTINUE
26
unstable or inserted incorrectly.
Reinsert the card or install a new
card (page 6).
corrupted or damaged. Install a
new card (page 6).
• The CompactFlash card was
inserted while the camera was on.
Press the shutter button to
continue storing photos in this new
card.
• The CompactFlash card was
removed while the camera was on.
Press the shutter button to
continue storing photos in the
camera’s internal memory.
Polaroid PhotoMAX PDC 640CF Digital Camera User’s Manual
Camera Precautions
Observe the following precautions when you use this digital camera:
•
This camera is battery operated. Supervise children when the camera is
operated by them or used in their presence. To avoid electrical shock, do
not expose the camera to or immerse it in water or other fluids. Do not
disassemble or operate the camera if dropped or damaged. Contact a
Polaroid Service Center for repair information.
•
Do not open the camera case or attempt your own repairs. High-voltage
internal components create the risk of electrical shock when exposed.
Return your camera to authorized Polaroid service providers for all
maintenance and repairs.
•
Keep the camera away from water and other liquids. Moisture creates the
danger of fire and electrical shock. Do not use the camera in the rain, at
the seashore, or any location where there is the possibility of exposure to
liquids.
•
Turn the camera off, unplug the AC adapter, and remove the batteries
immediately if the camera is exposed to water or any other liquid.
•
Do not open the battery compartment, unplug the AC adapter, or
remove an internal memory card while the camera is on. If the camera
loses power while processing a new photo, the photo cannot be stored
and may cause corruption of other stored photos.
Polaroid PhotoMAX PDC 640CF Digital Camera User’s Manual
27
FCC Notice
This device complies with Part 15 of the FCC rules. Operation is subject to
the following two conditions: (1) This device may not cause harmful
interference, and (2) This device must accept any interference received,
including interference that may cause undesired operation.
Warning: Changes or modifications to this equipment not expressly
approved by the party responsible for compliance could void
the user's authority to operate the equipment.
Note: This equipment has been tested and found to comply with the limits
for a Class B digital device, pursuant to Part 15 of the FCC rules.
These limits are designed to provide reasonable protection against
harmful interference when the equipment is operated in a residential
installation.
This equipment generates, uses, and can radiate radio frequency energy and,
if not installed and used in accordance with the instruction manual, may
cause harmful interference to radio communications. However, there is no
guarantee that interference will not occur in a particular installation.
If this equipment does cause harmful interference to radio or television
reception, which can be determined by turning the equipment off and on,
the user is encouraged to try to correct the interference by one or more of the
following measures:
•
Reorient or relocate the receiving antenna.
•
Increase the separation between the equipment and the receiver.
•
Connect the equipment into an outlet on a circuit different from that to
which the receiver is connected.
•
Use the USB or RS232 serial cable shipped with this unit, which must be
used to ensure compliance with the Class B FCC limits.
•
Consult the dealer or an experienced radio/TV technician for help.
28
Polaroid PhotoMAX PDC 640CF Digital Camera User’s Manual
Warranties
One Year Limited Warranty
Polaroid PhotoMAX PDC 640CF Digital Camera
Polaroid will, at our option, repair or replace any unit found defective in
manufacture within the warranty period. The warranty period is determined
by the date of purchase. Keep the receipt as proof of purchase. Otherwise, the
warranty period is determined by the date of manufacture. This warranty
does not apply to damage caused by accident, misuse or tampering, and
excludes all consequential damages except in jurisdictions not allowing such
exclusions or limitations.
Ninety Day Limited Warranty
Polaroid PhotoMAX Image Maker Software
Polaroid warrants that the software media will be free of defects in materials
and workmanship for a period of 90 days from the date of purchase.
Polaroid's entire liability and your exclusive remedy shall be to repair or
replace the software that does not meet Polaroid's Limited Warranty and is
returned to Polaroid with a copy of your sales receipt. This Limited Warranty
is void if failure of the software has resulted from accident, abuse, or
misapplication. Any replacement software will be warranted for the
remainder of the original warranty period or 30 days, whichever is longer.
Polaroid makes no other warranties with respect to the software, either
express or implied, including but not limited to implied warranties of
merchantability and fitness for a particular purpose.
Polaroid PhotoMAX PDC 640CF Digital Camera User’s Manual
29
Contacting Polaroid
Polaroid Corporation provides technical support for digital cameras at
www.PolaroidDigital.com, and within the United States by calling 800-8970356 from 8 A.M. to 8 P.M. EST, 7 days a week. Please note that phonesupport and repair services are regional and may not be available for a
particular product outside the country where it was purchased. To obtain
parts for cameras purchased in the United States, call 800-343-4846 (9 a.m.
to 5 p.m. EST, Mon. - Fri.). A list of Polaroid International sales and
customer support offices is available at www.polaroid.com/service/
phone.html.
©1999-2000 Polaroid Corporation, Cambridge, MA 02139, U.S.A., owner of
the trademarks “Polaroid”, “PhotoMAX”, and “PDC”. All other product
names may be the property of their respective owners. All rights reserved,
Printed in the U.S.A.
PU-21741M-0 01/01
30
Polaroid PhotoMAX PDC 640CF Digital Camera User’s Manual
PDC 640 CF
Technical Support Information
(This information replaces that found on Page 30)
Polaroid Corporation provides technical support for digital cameras at
http://www.polaroid.com/, and within the United States by calling
800-897-0356 from 10 A.M. to 7 P.M. EST, (Mon - Fri) and 10 A.M.
to 4 P.M. EST (Sat). Please note that phone support and repair services are
regional and may not be available for a particular product outside the
country where it was purchased. To obtain parts for cameras purchased in
the United States, call 800-343-4846 from 9 a.m. to 5 p.m. EST, Mon. - Fri.
(Note: No technical support is available at this number.) A list of Polaroid
international sales and customer support offices is available at
http://www.polaroid.com/service/phone.html.