1
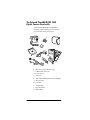
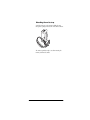
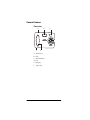
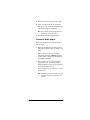
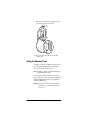
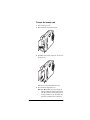
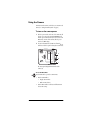
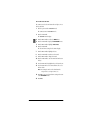
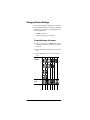
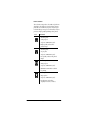
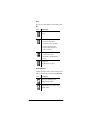
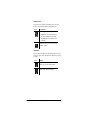
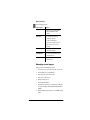
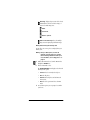
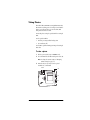
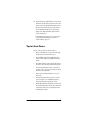
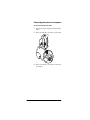
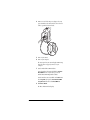
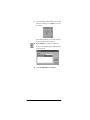
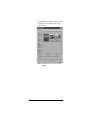
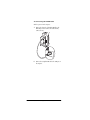
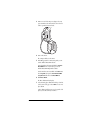
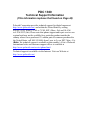
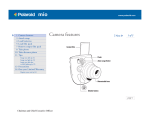
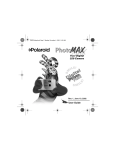
PDC 1300
Digital Camera
Creative Kit
User's Guide
Rev. 1, June 10, 2002
Contents
Introduction . . . . . . . . . . . . . . . . . . . . . . . . . . . . . . . . . . . . . . .1
The PhotoMAX PDC 1300 Digital Camera Creative Kit . . .2
Attaching the wrist strap . . . . . . . . . . . . . . . . . . . . . . . . . .3
Camera Features . . . . . . . . . . . . . . . . . . . . . . . . . . . . . . . . . . .4
Power Supply . . . . . . . . . . . . . . . . . . . . . . . . . . . . . . . . . . . . . .6
To load the batteries . . . . . . . . . . . . . . . . . . . . . . . . . . . . .6
To connect the AC adapter . . . . . . . . . . . . . . . . . . . . . . . .7
Using the Memory Card . . . . . . . . . . . . . . . . . . . . . . . . . . . . .8
Using the Camera . . . . . . . . . . . . . . . . . . . . . . . . . . . . . . . . .11
Changing Camera Settings . . . . . . . . . . . . . . . . . . . . . . . . . .14
To switch between the menus: . . . . . . . . . . . . . . . . . . . .14
Changing camera settings . . . . . . . . . . . . . . . . . . . . . . . .15
Managing stored images . . . . . . . . . . . . . . . . . . . . . . . . .19
Taking Photos . . . . . . . . . . . . . . . . . . . . . . . . . . . . . . . . . . . . .25
Tips for Great Photos . . . . . . . . . . . . . . . . . . . . . . . . . . . . . .26
Installing Polaroid PhotoMAX Image Maker Software . . .27
Minimum System Requirements . . . . . . . . . . . . . . . . . .27
To install the software . . . . . . . . . . . . . . . . . . . . . . . . . . .27
Transferring Photos to Your Computer . . . . . . . . . . . . . . . .29
Connecting the camera to a computer . . . . . . . . . . . . .30
Troubleshooting . . . . . . . . . . . . . . . . . . . . . . . . . . . . . . . . . . .38
FCC Notice . . . . . . . . . . . . . . . . . . . . . . . . . . . . . . . . . . . . . . .43
Camera Precautions . . . . . . . . . . . . . . . . . . . . . . . . . . . . . . . .43
Battery Handling . . . . . . . . . . . . . . . . . . . . . . . . . . . . . . . . . .44
Contacting Polaroid . . . . . . . . . . . . . . . . . . . . . . . . . . . . . . . .44
Internet support . . . . . . . . . . . . . . . . . . . . . . . . . . . . . . . . . . .44
One Year Limited Warranty . . . . . . . . . . . . . . . . . . . . . . . . .45
i
Introduction
Thank you for purchasing the Polaroid PhotoMAX PDC
1300 Digital Camera Creative Kit. This kit contains
everything you need to enter the world of digital imaging.
After you take photos, you will find it easy to transfer them
to your computer, edit and correct your images!
Once the images are on your computer, use the Polaroid
PhotoMAX Image Maker Software version 3.3 (or later) to
change them in many creative ways, include them in email,
or use them to create greeting cards and T-shirts.
Polaroid digital cameras and Polaroid PhotoMAX Image
Maker Software are easy to use, and are designed to work
together to produce high-quality results. Use your
imagination. Have fun!
This user’s guide covers basic camera features, startup, and
installation procedures, and how to take photos and transfer
them to your computer.
Please fill out and mail in your registration card!
1
The Polaroid PhotoMAX PDC 1300
Digital Camera Creative Kit
Your Polaroid PhotoMAX PDC 1300 Digital Camera
Creative Kit contains everything you need to take digital
photos and transfer them to your computer.
d
a
e
b
c
f
g
h
i
k
j
a
b
c
d
e
f
g
h
i
j
k
2
Polaroid PDC 1300 Digital Camera
Wrist strap (and removable memory clip)
8 MB removable memory card
Four AA batteries
Camera case
Polaroid PhotoMAX Image Maker Software CD-ROM
AC power adapter
User’s Guide
Quickstart Card
RS-232C serial cable
Mini-USB cable
Polaroid PDC 1300 Digital Camera User’s Guide
Attaching the wrist strap
Attach the wrist strap to the camera by sliding the strap
through the opening on the bottom of the camera as shown.
The wrist strap includes a clip to use when removing the
memory card from the camera.
3
Camera Features
Front view
a
b
c
d
f
a
b
c
d
e
f
4
e
Shutter button
Flash
Optical viewfinder
Lens
Hand grip
Tripod socket
Polaroid PDC 1300 Digital Camera User’s Guide
Back view
a b c
d
e
f
h
g
1300
Optical viewfinder
Ready indicator
a
b
Wait indicator
Status panel
LCD
Power switch
LCD switch
Menu Dial
c
d
e
f
g
h
Side view
c
b
d
a
e
a
b
c
d
e
AC adapter connection
Serial cable connection
Mini-USB cable connection
Memory card slot
Battery compartment
5
Power Supply
You can operate the Polaroid PDC 1300 Digital Camera on
battery power or with the AC adapter. To conserve battery
life, the camera shuts itself off after 3.5 minutes of inactivity
and the LCD shuts off after 30 seconds of inactivity. To turn
on the camera power, slide the power switch (back of
camera) to the middle (OFF) position.
The camera displays a low battery icon on the LCD menu
when battery power is weak. When you see this icon, replace
the batteries as soon as possible.
Using AA batteries, the camera operates for about 30
minutes in RECORD mode.
Note: For longer battery life use high-capacity super
alkaline, lithium disposable, or NiMH rechargeable
batteries with your camera.
Note: Limiting the use of the LCD also saves batteries.
Use the AC adapter whenever possible to extend the life of
your batteries. It is a good idea to keep a set of extra batteries
handy, especially on a trip when it may not be possible to
find replacement batteries easily.
To load the batteries
1
Open the battery compartment (side of camera) by
sliding the cover lock to the unlocked position (a).
b
a
6
Polaroid PDC 1300 Digital Camera User’s Guide
2
Slide the cover forward so that it can swing open (b).
3
Insert four AA-size batteries into the compartment.
Make sure the + and – terminals are oriented correctly
as shown inside the battery compartment.
Note: Do not mix old batteries with new batteries, or
different types of batteries together.
4
Close and lock the battery compartment cover.
To connect the AC adapter
Here are some important notes for using the AC adapter
with your camera:
•
Only use the AC adapter that came with your camera.
Using a different AC adapter may cause damage to your
camera.
•
Turn the camera power off before connecting or
disconnecting the AC adapter. Warning: Unplugging
the camera with its power turned on may damage the
CompactFlash memory card.
•
Grasp the plug, not the cord, when you unplug the
adapter from an outlet. Avoid bending, pulling, or
twisting the AC adapter cord. Do not try to lengthen the
cord by splicing it with another wire.
•
Replace a damaged power cord with a new one (to avoid
electrical shock).
Note: The AC adapter may become warm to the touch
after extended periods of use. This is no cause
for alarm.
7
1
Connect one end of the AC power adapter to the AC
power adapter connector on the camera.
2
Connect the other end of the cable to a grounded
electrical outlet.
Using the Memory Card
The images you take with your PDC 1300 camera are stored
on a removable CompactFlash memory card. An 8MB
memory card is provided with the camera.
Note: The PDC 1300 camera is compatible with all Type I
CompactFlash memory cards.
You must insert the memory card before you can use the
camera. If the memory card is not installed, the Status panel
displays a flashing CF symbol and a zero representing the
number of available photos.
Caution: Do not insert or remove the CompactFlash card
while the power is on. Doing so may damage the
memory card.
8
Polaroid PDC 1300 Digital Camera User’s Guide
To insert the memory card
1
2
Turn the camera power off.
Open the memory compartment as shown:
3
Carefully insert the memory card into the slot. The card
fits only one way.
4
Make sure the card is pushed firmly into the slot.
Close the memory compartment cover.
Note: If the CE icon flashes on the status display, the
memory card must be reformatted. The memory
card will be unable to contain as many photos as
an empty (reformatted) card. The memory card
must also be reformatted in the event that the
9
memory card becomes corrupted and unusable.
For more information, see “Delete photos from
your memory card” on page 21.
To remove the memory card
10
1
Turn off the camera.
2
Open the memory compartment on the side of the
camera.
3
Use the clip on the wrist strap to pull out the memory
card.
4
Close the memory compartment cover.
Polaroid PDC 1300 Digital Camera User’s Guide
Using the Camera
You must insert the memory card before you can turn on the
camera (see “Using the Memory Card” on page 8).
To turn on the camera power
1
Slide the power switch on the rear of the camera (a) all
the way up to turn on the camera in RECORD mode;
slide the power switch all the way down to activate it in
PLAY mode. To turn off the camera, slide the power
switch to the OFF setting.
2
To turn on the LCD, slide the LCD on/off switch (b) up
and release it (slide it up and release again to turn it off).
a
b
1300
c
The Status panel displays information about the
camera (c).
To use the Menu Dial
Use the Menu Dial to operate the camera menu:
•
•
Press the Menu Dial to:
•
Display camera menus
•
Make a menu selection
Turn the Menu Dial to scroll between different menu
choices and settings.
11
a
c
d
e f
a
Memory card and battery status
b
Number of images remaining in memory
Pixel resolution setting
Flash setting
Lens setting
Exposure setting
Self timer
c
d
e
f
g
12
b
Polaroid PDC 1300 Digital Camera User’s Guide
g
To set the date and time
The camera records a date and time with each photo. To set
the date and time:
1
Slide the power switch to RECORD mode.
The camera turns on in RECORD mode.
2
Press the Menu Dial.
The RECORD menu displays.
3
Turn the Menu Dial to scroll to the MENU icon.
4
Press the Menu Dial to display the ADVANCED menu.
5
Turn the Menu Dial to highlight Time & Date.
6
Press the Menu Dial.
The date and time settings for the camera display.
7
Turn the Menu Dial to highlight the date.
8
Press the Menu Dial to underscore the month.
9
Turn the Menu Dial to change the month.
10 Press the Menu Dial to enter the month and underscore
the day.
11 Use the Menu Dial to highlight and set the day and year.
12 Use the Menu Dial to set the time. All times are set to a
24-hour clock.
Note: For example, a 24-hour clock understands
1:30pm as 13:30, 2:30pm as 14:30, etc.
13 Press Set to save your date and time settings and return
to the ADVANCED menu.
14 Press Exit.
13
Changing Camera Settings
Using options on the PDC 1300 LCD menu you can change
camera settings for taking and reviewing photos. Depending
on which mode you switch it to, the camera displays one of
the following LCD menus:
•
RECORD to take photos.
•
PLAY to review photos stored in memory.
To switch between the menus:
1
Slide the power switch up to RECORD mode, or down
to PLAY mode. (Slide the power switch to the middle to
turn it off.)
2
Press the Menu Dial to display the menu of the current
mode.
3
Turn the Menu Dial to select a menu icon and press to
select.
RECORD
PLAY
14
Polaroid PDC 1300 Digital Camera User’s Guide
To display the RECORD menu
1
Slide the power switch to RECORD mode.
2
Press the Menu Dial (a).
The RECORD menu is displayed (b). Use these menu
options to change camera settings.
a
b
1300
Changing camera settings
The first time you turn on the camera, the camera settings
allow you to take pictures in most indoor and outdoor
conditions. These settings are the default settings. You can
change any of the default settings by using the RECORD
menu:
1
Slide the power switch to RECORD mode.
2
Press the Menu Dial.
The RECORD menu displays.
3
Turn the Menu Dial to highlight the item you want to
change.
4
Press the Menu Dial to display the possible settings.
5
Turn the Menu Dial once again to highlight the setting
you want to use.
6
Press the Menu Dial to select the setting and save it.
All of the available LCD menu camera settings are described
below.
15
Pixel resolution
The resolution setting refers to the number of pixels in a
digital photo. The higher the pixel resolution, the more
pixels that are contained in your photo. A higher pixel
resolution takes up more space on the memory card, but
produces a higher quality digital image when printed.
Icon
Resolution
• 1280X960 pixels
• 600K per photo
• 12 photos (8 MB memory card)
• Highest quality resolution for
printed images
• 1280X960 pixels
• 360 per photo
• 18 photos (8 MB memory card)
• Good quality resolution for printed
images
• 1024x768 pixels
• 240K per photo
• 32 photos (8 MB memory card)
• Minimum recommended resolution
for printing.
• 640x480 pixels
• 90K per photo
• 78 photos (8 MB memory card)
• Best for images used online
(digitally) in web sites, email, etc.
16
Polaroid PDC 1300 Digital Camera User’s Guide
Flash
Choose how the camera flash is used. The default setting is
Auto.
Icon
Flash setting
The flash fires automatically when
needed.
• The flash does not fire.
• Use in places where flash is
prohibited or may be distracting.
• Use when shooting toward a
reflective background, such as a
window or a mirror.
• Each flash is preceded by a preflash
to reduce red-eye effect.
• The flash fires automatically when
needed.
• Flash is on.
• Flash fires for every photo.
Focusing distance
Determine the distance from the camera at which a subject
will be properly in focus. The default setting is Autofocus.
Icon
For subjects
From 2 feet to infinity (60 cm to
infinity) from the camera.
From 4 inches to 3 feet (10 cm to 1 m)
from the camera
17
Digital zoom
Zoom in on your subject when taking a photo. For best
results, use the LCD viewfinder with digital zoom.
Icon
For subjects
Enable digital zoom 2x to:
• Magnify the center of the image by
2x (capture smaller area in detail).
• Automatically sets resolution to low
(640x480).
From 8 inches to 3 feet (20 cm to 1 m)
from the camera
Self timer
Set the camera self-timer. The self-timer applies to the next
picture you take. Set the self-timer for each photo you want
to delay.
Icon
Action
Delays the camera shutter 10 seconds
when you press the shutter button.
Turns off the camera self timer.
18
Polaroid PDC 1300 Digital Camera User’s Guide
Advanced Menu
Set the following options:
Menu choice
Used to
Quick review
• Turn on to review and delete
images immediately after
taking.
Exposure
• To override the camera’s
automatic exposure.
• To take a darker photo,
increase the settings. To take a
lighter photo, decrease the
settings.
Reset default
• To reset all camera settings to
the default settings.
Time & date
• To set the date and time stored
with each photo.
Exit
• To close a menu and return to
taking photos.
Managing stored images
When you select the PLAY menu, you can:
•
View photos stored on the memory card one at a time
•
View multiple photos as thumbnails
•
Delete photos from the memory card
•
Lock photos (cannot delete)
•
Enlarge an image by 2X
•
Select image information
•
Determine the order that your digital photos will print
on a printer enabled with Digital Print Order Interface
(DPOF)
•
Print thumbnails of specific photos on a DPOF-enabled
printer
19
To display the PLAY menu
1
Slide the power switch down to PLAY mode.
The last photo taken displays in the LCD.
2
Press the Menu Dial.
The PLAY menu displays.
3
Use the options to change the camera play settings.
4
Press the Menu Dial again to set the camera to PLAY
mode and close the menu.
The last photo taken appears in the LCD.
Viewing images on the LCD
You can view images stored in memory on the LCD.
1
Slide the power switch to PLAY mode.
The last photo taken appears in the LCD.
2
Turn the Menu Dial to scroll through all of the photos
in memory.
Viewing images
In PLAY mode, you can turn the Menu Dial to view stored
images one at a time or view thumbnails of the images:
1
With the PLAY menu selected, turn the Menu Dial to
highlight the MULTI icon.
2
Press the Menu Dial to select.
A set of thumbnail images displays. The following icons
display on the left side of the LCD:
•
20
Up/down arrows: turn the Menu Dial to highlight
one of these arrows. Continue to turn the Menu
Dial to scroll through your photos.
Polaroid PDC 1300 Digital Camera User’s Guide
•
Edit image: displays a larger version of the selected
thumbnail. You can delete or lock the image, or
return to the multi-image view.
Delete.
Lock/unlock.
Return to previous.
•
Return to full-sized image: closes the multipleimage view and displays single full-sized images.
Delete photos from your memory card
You can delete one or more photos completely from your
memory card.
Warning: Once you delete a photo, it cannot be
retrieved. You can lock photos to prevent
them from being deleted from memory. For
more information, see “Locking photos” on
page 22.
1
With the PLAY menu selected, turn the Menu Dial to
highlight the DELETE icon.
2
Press the Menu Dial to select.
The DELETE PICTURES menu displays. Select from the
following menu options:
3
•
Current: Delete the currently selected photo.
•
All: Delete all photos.
•
Reformat: Delete all photos and reformats the
memory card.
•
Exit: Cancel the operation and close the PLAY
menu.
For each menu option, you are prompted to confirm
your choice.
21
Locking photos
You can prevent photos from being accidently deleted by
locking them:
1
With the PLAY menu selected, turn the Menu Dial to
highlight the LOCK icon.
2
Press the Menu Dial to select.
The LOCK/UNLOCK menu is displayed. Select from the
following:
•
Lock current: Change the status of the currently
selected photo (from an unlocked photo to locked).
•
Lock all: Lock all photos on the memory card.
•
Unlock all: Unlock all photos on the memory card.
•
Exit: Cancel the operation and close the PLAY
menu.
Tag photos to print on a DPOF-enabled printer
The Digital Print Order Interface (DPOF) function allows
you to “tag” a photo to specify it to print directly a DPOFenabled printer, on a separate page by itself or in a group of
thumbnails. The photos you tag are the only ones that will
print.
Note: A DPOF-enabled printer allows you to print your
photos directly from your memory card to the
printer.
1
Make sure the LCD is displaying the photo you want to
include in your DPOF-printer print list (either as a
thumbnail or in specific order). For more information,
see “Viewing images on the LCD” on page 20.
2
With the PLAY menu selected, turn the Menu Dial to
highlight the DPOF icon.
3
Press the Menu Dial to select.
The Set DPOF menu is displayed. Select from the
following:
•
22
Index: Check this box to tag the displayed photo to
print as a thumbnail.
Polaroid PDC 1300 Digital Camera User’s Guide
4
•
Standard: Designate the print order of the
displayed photo when it prints on its own page.
Press the Menu Dial to underscore the number next
to the selection (the default is 0). Rotate the Menu
Dial to change the numbers. Press the Menu Dial
again to set the order.
•
Exit: Save DPOF changes for the displayed photo
and return to the PLAY menu.
Repeat steps 1 through 3 with each photo you want to
tag.
When you want to print your photos, remove the
memory card from the camera and insert it into your
DPOF-enabled printer. For more information on
removing the memory card from the camera, see “To
insert the memory card” on page 9. For more
information on using the memory card and printing
with a DPOF-enabled printer, see the user manual or
online help for your printer.
Use digital zoom to enlarge a photo
You can enlarge any photo displayed on the LCD by one or
two times.
1
Make sure the LCD is showing the photo you want to
enlarge. For more information, see “Viewing images on
the LCD” on page 20.
2
With the PLAY menu selected, turn the Menu Dial to
highlight the ZOOM 2x icon.
3
Press the Menu Dial to select.
The photo is enlarged by a factor of two. Scroll bars are
displayed that you can use to view the entire image.
23
Set information display
You can display information about each photo you take on
the LCD. For example, you can display the date and time a
photo was taken.
1
With the PLAY menu selected, turn the Menu Dial to
highlight the INFO icon.
2
Press the Menu Dial to display the CHECK INFO menu.
Select the options that you want to display with each
photo:
•
Pic. index: Number of the photo and the total
number of photos in memory
•
Date: Date the image was taken
•
Lock mark: If a photo is locked, a lock icon displays
•
Resolution: Resolution setting
•
Flash: Picture flash setting
•
DPOF: DPOF setting tagged for photo
•
Save and quit: Saves settings and closes the menu
Choose a logo
You can select one of your own photos to use as the logo that
appears on the LCD when you turn on the camera.
24
1
Display the image you want to use as a logo on the LCD.
2
Display the PLAY menu and turn the Menu Dial to
highlight the LOGO icon.
3
Press the Menu Dial to display the logo options:
•
Set as logo: Sets the displayed image as the logo
•
Default logo: Restores the original Polaroid logo
•
Exit: Closes the menu
Polaroid PDC 1300 Digital Camera User’s Guide
Taking Photos
The Polaroid PhotoMAX PDC 1300 Digital Camera Creative
Kit contains everything you need to take photos and transfer
them to your computer where you can edit them, email
them, print them, and store them.
You can take photos using the optical viewfinder or using the
LCD.
Use the optical viewfinder:
•
For faster processing and flash recharge time
•
To extend battery life
Use the LCD to optimize framing your image when using the
macro lens.
To take a photo
1
Slide the power switch (a) up to RECORD mode.
2
To use the LCD, slide the LCD switch up and release (b).
Note: To change the camera settings see “Changing
Camera Settings” on page 14.
3
Frame the subjects of your photo in the optical
viewfinder (c) or in the LCD.
c e f
d
a
b
1300
25
4
Press the shutter button (d) halfway to focus the camera
and measure the light level. The camera is ready to take
a photo when the green LED indicator lights (e). Press
the shutter button all the way down to take the photo.
The red Wait indicator light (f ) is on and the image
displays on the LCD. Wait until the light is off before
you take another photo.
If the Quick Review setting is on, you can review and
delete an image immediately after you take it (see
“Advanced Menu” on page 19).
Tips for Great Photos
Here are some tips to help you take better photos!
26
•
Keep the sun behind you or at your side. Avoid having
the sun directly overhead or in front of you.
•
Use the fill flash setting if there is light behind your
subject or if your subject is strongly illuminated from
the side.
•
In low light conditions or when using the self-timer, use
the tripod to avoid camera movement during exposure.
•
Avoid extreme temperatures (below 13 degrees C (55
degrees F) or above 35 degrees C (95 degrees F), which
can affect battery performance.
•
Keep the subject within the flash range (3 ft. to 10 ft.
[1m to 3m]).
•
Avoid shooting toward reflective objects to avoid hot
spots in your photos. Use the fill flash setting if you
cannot avoid shooting toward reflective objects.
•
Periodically clean the lens, the LED area on the front of
the camera, and the LCD on the back of the camera with
a soft, lint-free cloth. Do not use cleaning solutions or
chemically-treated tissues.
Polaroid PDC 1300 Digital Camera User’s Guide
Installing Polaroid PhotoMAX Image
Maker Software
This section describes how to install Polaroid PhotoMAX
Image Maker Software and get help when using the software.
Minimum System Requirements
•
PC with Pentium class processor
•
Microsoft Windows 95, Windows 98, or above
•
32 MB RAM
•
85 MB available hard drive space
•
2x or faster CD-ROM drive
•
Available RS-232C serial or mini-USB port
•
Set monitor display to High Color display settings at
1024 x 768 pixels
•
Sound card
•
Mouse
To install the software
1
Insert the Polaroid PhotoMAX CD in your CD-ROM
drive.
2
If the installation program does not start automatically,
do the following:
Select Run from the Windows Start menu.
Click Browse to locate your CD-ROM drive.
c
Select Setup.exe from the CD-ROM.
d Click Open.
e Click OK and follow the instructions on your
computer screen.
Follow the instructions on your computer screen.
a
b
3
27
To get help
To get help while using Polaroid PhotoMAX Image Maker
software:
•
Click the Help button on the left side of the Polaroid
PhotoMAX window or click the ? button in the corner.
•
Move your mouse cursor over any button or feature in
the software and right click your mouse to display
context-sensitive help that explains the software button
or feature.
You can use Polaroid PhotoMAX Image Maker software to:
•
•
Create digital photo albums that you can use to sort and
organize your photos.
•
Click Photo Album to open and explore this
screen.
•
For online help, click the Help button and then
click on Using Polaroid PhotoMAX Image Maker
Software for a list of topics.
Delete and take pictures with your PDC 1300 camera:
•
Transfer images from your camera’s memory card
to your computer
•
Delete images from your camera’s memory
To access these features, click the Photo Album button
on the main screen and click on the Acquire button.
For more information, see “Transferring Photos to Your
Computer” on page 29.
28
Polaroid PDC 1300 Digital Camera User’s Guide
Transferring Photos to Your Computer
The following sections describe how to transfer images from
the Polaroid PDC 1300 Digital Camera to your computer.
The drivers for the Polaroid PDC 1300 Digital Camera are
automatically installed with the Polaroid PhotoMAX Image
Maker Software included in your kit.
To transfer photos from your Polaroid PDC 1300 Digital
Camera to your computer you can use one of the following
methods:
•
Serial port (cable provided with camera).
•
Mini-USB port (cable provided). USB is supported only
for Windows 98 and above.
•
Optional CompactFlash card readers that connect
through a mini-USB port, parallel port, or a PCMCIAslot (available for purchase).
Note: Use the AC adapter whenever possible to extend the
life of your batteries.
29
Connecting the camera to a computer
To connect using the serial cable
30
1
Turn off your computer and all its peripherals (scanner,
printer).
2
Connect the serial cable to the serial port on the camera.
3
Connect the serial cable to the serial port on the back of
your computer.
Polaroid PDC 1300 Digital Camera User’s Guide
4
Connect one end of the AC power adapter to the AC
power terminal on the camera and the other end of the
cable to a grounded electrical outlet.
5
Turn on your camera.
6
Turn on your computer.
The Status panel on your camera displays a PC message
when the camera is properly connected to your
computer.
7
Start the Polaroid PhotoMAX software:
From the Windows desktop: Double-click the Polaroid
PhotoMAX 3.3 icon on your desktop to start the
Polaroid PhotoMAX Image Maker Software.
From the Windows Start menu: Click on the Start menu,
select Programs then open the Polaroid PhotoMAX
3.3 by ArcSoft folder and select PhotoMAX 3.3.
8
Click Photo Album.
The Photo Album window displays.
31
9
Select an existing photo album from the drop-down list
at the bottom of the page or select New to create a new
photo album.
A photo album is a file that you use to keep track of the
photos you download from your camera.
10 Click the Acquire icon at the bottom of the screen.
The Select Source dialog box appears displaying the list
of supported devices.
11 Select Polaroid PDC 1300 and click Select.
32
Polaroid PDC 1300 Digital Camera User’s Guide
The Polaroid PDC 1300 TWAIN software opens. From
this dialog box, you can manage the photos in the
camera’s memory.
Note: The TWAIN software can be used with other
applications.
33
To connect using the mini-USB cable
With the power on in the computer:
34
1
Connect the other end of the mini-USB cable to the
mini-USB port on the camera. The cable will only
connect one way.
2
Connect the rectangular USB cable to the USB port on
the computer.
Polaroid PDC 1300 Digital Camera User’s Guide
3
Connect one end of the AC power adapter to the AC
power terminal on the camera and the other end of the
cable to a grounded electrical outlet.
4
Turn on the camera.
The computer will detect the camera.
5
When PC appears in the camera status panel, you can
start the Polaroid PhotoMAX software:
From the Windows desktop: Double-click the Polaroid
PhotoMAX 3.3 icon on your desktop to start the
Polaroid PhotoMAX Image Maker Software.
From the Windows Start menu: Click on the Start menu,
select Programs then open the Polaroid PhotoMAX
3.3 by ArcSoft folder and select PhotoMAX 3.3.
6
Click Photo Album.
The Photo Album window displays.
7
Select an existing photo album from the drop-down list
at the bottom of the page or select New to create a new
photo album.
A photo album is a file that you use to keep track of the
photos you download from your camera.
35
8
Click the Acquire icon at the bottom of the screen.
The Select Source dialog box appears displaying the list
of supported devices.
9
Select PDC 1300. Click Select.
The Polaroid PDC 1300 TWAIN window opens. From
this window, you can manage the photos in the camera’s
memory.
36
Polaroid PDC 1300 Digital Camera User’s Guide
Transferring images to the computer
With a cable connection established between your computer
and the PDC 1300 and the Polaroid PDC 1300 dialog box
displayed, you can transfer images to your computer. To
transfer images:
1
Ensure that the Photo tab is displayed. Thumbnail
images of the photos in the camera memory are
displayed on this tab.
2
Click on the thumbnail images you want to transfer to
computer.
Use Shift-click or Control-click to select multiple
images.
3
When you’ve selected all of the images you want to
transfer, click the Get Selected Photos button.
Note: A Get Photos dialog box appears. The transfer
process begins. This process can take several minutes
over a serial connection. Use the AC adapter
whenever possible to extend the life of your batteries.
4
When the transfer is complete, the image appears in a
Photo Album page at the bottom of the screen.
Deleting images in the camera memory
You can also delete the images stored on the camera memory
from the Photo tab.
•
By selecting thumbnail images displayed on this tab and
clicking the Delete Selected Photos from Camera
button you can delete those photos from the camera’s
memory.
•
Click Delete All Photos from Camera to clear the
camera memory.
37
Troubleshooting
Problem
Solution
The digital camera
has no power.
• Turn off and then turn on the digital camera.
The digital camera may have automatically
turned off to save battery power.
• Check to make sure that the battery terminals
(+ and -) are correctly orientated as shown
inside the battery compartment.
• The batteries are dead. Replace all four AA
batteries. Do not mix old batteries with new
batteries, or use different manufacturer’s
batteries together. Purchase rechargeable NiMH
batteries to extend battery life.
• Use the AC adapter whenever possible. Check to
make sure that the AC adapter is firmly attached
to the digital camera.
38
Polaroid PDC 1300 Digital Camera User’s Guide
Problem
Solution
Polaroid
PhotoMAX Image
Maker Software
does not see the
PDC 1300 Digital
Camera.
• Ensure that the digital camera power is turned
on and a PC message appears on the Status
panel. Use the AC adapter when downloading
images.
• For serial port connections, connect one end of
the serial cable to the computer serial port.
Connect the other end of the cable to the serial
cable connector on the digital camera. Make sure
that the cables are firmly attached to the digital
camera and to the computer.
• For serial port connections, turn off the
computer and all peripherals and connect the
camera. Turn on the computer. Turn on the
camera.
• For mini-USB port connections, connect one
end of the mini-USB cable to the computer USB
port. Connect the other end of the cable to the
mini-USB cable connector on the digital camera.
Make sure that the cables are firmly attached to
the digital camera and to the computer. If you
cannot establish a connection, turn off and on
the computer. Launch the software.
• Your serial port may have a conflict. Another
software application or hardware device (such as
a hand-held computer device) may be using your
COMM port settings. Turn off these other
software and hardware devices when the digital
camera is connected to your computer.
• Your computer may have an internal BIOS
conflict. Read the instructional manual and
other documentation that came with your
computer, or check with the computer
manufacturer for more information.
• Purchase an optional external memory card
device. See your local computer retailer for more
information.
39
Problem
Solution
Cannot take a
photo.
• Press the shutter button down halfway to focus
the camera. Wait until the LED indicator light is
steady green. Press the shutter button all the way
down to take a photo.
• The flash is charging. The flash icon blinks in the
Status display. Wait until the flash icon displays
without blinking (the flash is charged) and then
take a photo.
• The digital camera is processing an image. The
red LED light displays while an image is being
processed. Wait until the image has finished
processing before taking another photo.
• Check to make sure that the memory card is
properly inserted. If the CF icon blinks in the
Status display, the memory card is not inserted.
Turn off the camera, reinsert the memory card
and turn on the camera.
• The memory card is full. Connect the digital
camera to your computer and download the
images on the card. Delete images from the card
to free up space and then take photos.
• The digital camera is connected to your
computer. Use the software controls to take a
photo while the digital camera is connected to a
computer.
• The memory card is corrupt. Reformat the
memory card or purchase a new memory card.
The LCD does not
turn on.
• Turn the LCD on/off switch to the on position.
• The digital camera is connected to a computer.
Disconnect the digital camera to turn on the
LCD.
• The batteries are weak. Replace the batteries or
use the AC adapter. To save battery power, use
the optical viewfinder when composing photos.
40
Polaroid PDC 1300 Digital Camera User’s Guide
Problem
Solution
The live picture in
the LCD looks
"jumpy."
• The LCD is being used in low light conditions.
The flash doesn’t
work.
• The flash is turned off. Press the Menu Dial to
change the flash setting. Use the Autoflash
Increase the amount of light, or use the optical
viewfinder to compose your photo.
setting for best results.
• The camera is set to the Autoflash setting. The
autosensor determined that there was sufficient
light in the setting to take a photo without the
flash.
My photo looks
blurry.
• The subject of your photo moved while the
photo was being taken. Remember to have your
subjects remain still while a photo is being taken.
• The digital camera moved while the photo was
being taken. Hold the camera steady while taking
a photo, or use a tripod. There is a tripod mount
on the bottom of the camera.
• The wrong focal setting was used. Press the
Menu Dial to change the focal setting in the LCD
menu. Use the Autofocus (AF) setting for best
results.
41
Problem
Solution
My photo looks
dark.
• There was not enough light available when the
photo was taken. Use the Autoflash setting and
increase the amount of light (if possible).
• The subject was too far away from the camera.
The flash range is 3 – 10 feet.
• The Exposure advanced menu setting was
changed. Press the Menu Dial and open the
ADVANCED menu to change the Exposure
setting to Auto.
My photo looks too
light.
• The flash fired when lighting conditions didn’t
need it. Use the Autoflash setting.
• The digital camera was focused on a bright
object or light. Try taking the photo from a
different angle to avoid bright spots in photos.
• The subject was too close to the flash when the
photo was taken. Turn off the flash when using
the Macro lens setting, or take the photo from a
greater distance.
• The Exposure advanced menu setting was
changed. Press the Menu Dial and open the
ADVANCED menu to change the Exposure
setting to Auto.
42
Polaroid PDC 1300 Digital Camera User’s Guide
FCC Notice
This equipment has been tested and found to comply with
the limits for a Class B digital device, pursuant to part 15 of
the FCC Rules.
For detailed information about FCC compliance, see the
online Polaroid PhotoMAX Image Maker Products User’s
Guide.
Camera Precautions
Observe the following precautions when you use the
Polaroid PDC 1300 Digital Camera:
•
Do not open the camera case or attempt your own
repairs. High-voltage internal components create the
risk of electrical shock when exposed. Return your
camera to authorized Polaroid service providers for all
maintenance and repairs.
•
Keep the camera away from water and other liquids.
Moisture creates the danger of fire and electrical shock.
Do not use the camera in the rain, at the seashore, or
any location where there is the possibility of exposure to
liquids.
•
Turn the camera power off, unplug the AC adapter, and
remove the batteries immediately if camera is exposed
to water or any other liquids. Using the camera under
these conditions creates the danger of electrical shock or
fire.
•
Do not open the battery compartment or unplug the AC
adapter while the red LCD light on the back of the
camera is on. If the camera loses power while processing
a new image, the new image cannot be stored and may
cause corruption of other stored images.
43
Battery Handling
When using batteries:
•
Use only AA high-capacity super alkaline or lithium
disposable batteries or NiCad or NiMH rechargeable
batteries with the camera.
•
Never mix old batteries with new batteries, or use
different types of batteries together.
•
Do not expose batteries to direct heat or dispose of
them by burning. Dispose of batteries according to local
laws and regulations.
•
Remove batteries from the camera if you are not going
to use the camera for an extended period of time.
•
Remove dead batteries from the camera. Dead batteries
are susceptible to leakage, and may cause significant
damage to your camera.
Caution: Camera damage caused by misuse of batteries is
not covered under the terms of the One Year
Limited Warranty.
Contacting Polaroid
Polaroid Corporation provides technical support for digital
cameras at www.PolaroidDigital.com or
www.photomaxhelp.com, and within the United States by
calling 800-897-0356 from 8 A.M. to 8 P.M. EST, 7 days a
week. Please note that phone-support and repair services are
regional and may not be available for a particular product
outside the country where it was purchased. To obtain parts
and service for cameras purchased in the United States, call
800-343-4846. A list of Polaroid International sales and
customer support offices is available at www.polaroid.com/
service/phone.html.
Internet support
Technical support is available via the Internet. Visit our Web
site at: www.PolaroidDigital.com or
www.photomaxhelp.com
44
Polaroid PDC 1300 Digital Camera User’s Guide
One Year Limited Warranty
Polaroid will, at our option, repair or replace any unit found
defective in manufacture within the warranty period. The
warranty period is determined by the date of purchase. Keep
the receipt as proof of purchase. Otherwise, the warranty
period is determined by the date of manufacture. This
warranty does not apply to damage caused by accident,
misuse or tampering, and excludes all consequential
damages except in jurisdictions not allowing such
exclusions or limitations.
Caution
This camera unit is battery operated. Supervise children
when camera is operated by them or used in their presence.
To avoid electrical shock, do not expose to or immerse in
water or other fluids, disassemble, or operate if dropped or
damaged. Contact a Polaroid Service Center for repair
information.
©1999-2000 Polaroid Corporation, Cambridge, MA 02139,
U.S.A., owner of the trademarks “Polaroid”, “PhotoMAX”
and “PDC”. All other product names may be the property of
their respective owners. Printed in the U.S.A. PU-216060M0 8/00
45
©2000 Polaroid Corporation, Cambridge, MA 01239, U.S.A., owner
of the trademarks “Polaroid”, “Polaroid PhotoMAX” and “PDC”.
All other product names may be the property of their respective owners.
Printed in the U.S.A. All rights reserved.
PU21605M-0
09/00
PDC 1300
Technical Support Information
(This information replaces that found on Page 44)
Polaroid Corporation provides technical support for digital cameras at
http://www.polaroid.com/, and within the United States by calling
800-897-0356 from 10 A.M. to 7 P.M. EST, (Mon - Fri) and 10 A.M.
to 4 P.M. EST (Sat). Please note that phone support and repair services are
regional and may not be available for a particular product outside the
country where it was purchased. To obtain parts for cameras purchased in
the United States, call 800-343-4846 from 9 a.m. to 5 p.m. EST, Mon. - Fri.
(Note: No technical support is available at this number.) A list of Polaroid
international sales and customer support offices is available at
http://www.polaroid.com/service/phone.html.
Technical support is available via the Internet. Visit our Website at
http://www.polaroid.com/.