1
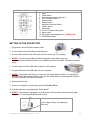
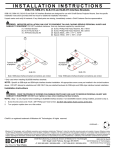
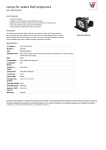
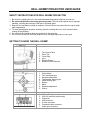
DELL 2200MP PROJECTOR USER GUIDE
SAFETY INSTRUCTIONS FOR DELL 2200MP PROJECTOR
1. Be careful in handling the unit - the surface beneath the projector might be hot with use.
2. Do not touch the bulb or the lamp glass at any time. The bulb may explode due to improper
handling, including the touching of the bulb or the lamp glass.
3. Remove lens cap before turning on projector. Failure to do so may cause the lens cap to reach
high temperatures.
4. To avoid damaging the projector and lamp, allow the cooling fan to run for 2 minutes before
turning off the projector.
5. Do not block the ventilation slots and openings on the projector.
6. Do not look into the lens while the projector is on; the bright light may hurt your eyes.
GETTING TO KNOW THE DELL 2200MP
1. Main Unit
1.
2.
3.
4.
5.
6.
The Control Panel
Zoom Tab
Focus Ring
Lens
Elevator Button
Remote Control Receiver
1.
2.
3.
4.
5.
6.
7.
8.
9.
Power button
Four directional keys
Keystone adjustment
Temperature warning light
Lamp warning light
Resync
Menu
Keystone adjustment
Source
1.
2.
3.
4.
5.
6.
7.
VGA in (D-sub) connector
VGA Out (monitor loop-through)
IR receiver
USB connector
S-video connector
Composite video connector
Audio input connector
2. Control Panel
3. Connection Ports
4. Remote Control
1. Light
2. Power button
3. Previous page button (page up) **
4. Four Direction buttons
5. Source button
6. Resync button
7. Keystone Correction button
8. Volume button
9. Hide button
10. 4:3/16:19 (aspect ratio) button
11. Menu button
12. Next page button (page down) – USB Needed
13. Video Mode button
SETTING UP THE PROJECTOR
1. Plug power cord into Projector and an outlet
2. Put one ends of the VGA cable into the Monitor-in
3. Put the other blue end of the VGA cable into the correct port of your laptop.
4. NOTE!! If you are using a Mac and have a digital port rather than analog, you
need a converter that will connect from your digital port to the VGA cable. (Included in projector
case)
5. Put the small end of the USB cable in its port on the projector
6. Plug the USB end of the USB cable into your computer
7. NOTE!! The projector can hook up to many sources using different cables. For a laptop, the
USB and VGA cables should suffice, unless you are adding audio using the projector. Refer to
the Owner’s Manual for further instructions.
8. Remove the lens cap
9. Once your computer is on and ready, push the Function-F8 key
10. Turn the projector on by pressing the Power button
1
11. NOTE!! If the projector is plugged in and the power is off, the power button may blink greenthis is fine, it is just recognizing the power source
If your image is blurry, try twisting the
focus ring
Y/AC/Staff/Documentation/ProjectorGuideShort 11/05 cc
2
USING THE PROJECTOR
1. Control Panel
to step through Analog, RGB, Composite,
a. Source: Press
Component-I, S-video, and Analog YpbPr sources when
multiple sources are connected to the projector.
b. Resync: Press
to synchronize the projector to the input
source. Resync will not operate if the On-Screen Display is
displayed.
to activate the OSD (On-screen display). Use the directional keys
c. Menu: Press
and the Menu button to navigate through the OSD.
d. Four Directional keys: The four directional keys can be used to toggle through the
tabs in the OSD.
e. Keystone: Press either of the
the projector.
buttons to adjust image distortion caused by tilting
2. Remote Control
a. Power: See installing the projector, step 1 and 8, as well as Powering off you
projector (later in this section)
b. Press the Source button to step through Analog, RGB, Composite, Component-I, Svideo, and Analog YpbPr sources when multiple sources are connected to the
projector.
c. Resync: Press
to synchronize the projector to the input source. Resync will not
operate if the On-Screen Display is displayed.
d. Directional keys: Use the up and down arrows to select OSD (On screen display)
items, use “left” and “right” button to make adjustments.
e. Hide: Press the Hide button to hide the image, press again to resume display of the
image. (Video mute).
f. Video Mode: The Dell 2200MP Microprojector has preset configurations that are
optimized for displaying data (PC Graphics) or video (movies, games, etc.). Press
Video Mode button to toggle between PC mode, Movie mode, sRGB, or User mode
(for user to setup and save preferred settings). Pressing the Video Mode button
once will show the current display mode. Pressing the Video Mode button again will
switch between modes.
g. Previous Page: Press the Previous Page button to page up. (USB must be
connected for this feature)
Y/AC/Staff/Documentation/ProjectorGuideShort 11/05 cc
3
h. Next Page: Press the Next Page button to page down. (USB must be connected for
this feature)
i.
Menu: Press the Menu button to activate the OSD. Use the directional keys and
Menu button to navigate through the OSD.
j. Volume up/down: Press the up button to increase the volume, press the down
button to reduce the volume.
k. 4:3/16:9: Press the 4:3/16:9 to switch the image aspect ratio from 4:3 to 16:9. (The
most popular aspect ratio is 4:3 (4 by 3). Early television and computer video
formats are in 4:3 aspect ratio, which means that the width of the image is 4/3 times
the height.
l. Keystone: Adjusts image distortion caused by tilting the projector. ( ±16 degrees)
3. On Screen Display
a. The projector has a multi-language On-Screen Display (OSD) that can only be
displayed when an input source is present.
b. The OSD allows you to make image adjustments and change a variety of settings. If
the source is a computer, the OSD allows changes to the Computer Image tab.
When using a video source, the OSD allows changes to the Video Image tab. The
projector automatically detects the source.
c. When the OSD is on the screen, press up or down to navigate through the OSD
tabs.
Example: All Images--> Computer Image--> Audio--> Management-->
Language--> Factory Reset. To make a selection in a tab, press on
keypad or "Menu" on remote controller.
or
to make a selection and adjust the settings by pressing
or
d. Press
on keypad or Left and Right button on the remote controller. When an item is
selected, the color of the item will change to dark gray.
e. To exit the OSD, go to "Exit" tab and press
remote controller.
Y/AC/Staff/Documentation/ProjectorGuideShort 11/05 cc
button on keypad or "Menu" on
4
f. Brightness: Adjusts the brightness of the image
i.
Press
to darken the image.
ii. Press
to lighten the image.
g. Contrast: Controls the degree of difference between the lightest and darkest parts of
the picture. Adjusting the contrast changes the amount of black and white in the
image.
i.
Press
to decrease the contrast
ii. Press
to increase the contrast.
h. Keystone: Adjusts image distortion
cause by tilting the projector.
i.
Aspect Ratio: Select this function to fit 16:9U,
1:1, 16:9, and 4:3 aspect ratios. In order to use
the 1:1 aspect ratio, the input must be a computer signal (through VGA cable) of
resolution less than SVGA (800 x 600), component 576p/ 480i / 480p, S-Video, or
Video (composite). If the input signal is a computer signal greater than SVGA or
component 1080i / 720p, only 16:9, 16:9U or 4:3 aspect ratio will be available.
When an icon is selected, the color of the icon will change to dark blue.
i. 16:9U The input source will be displayed in wide screen mode (16:9) without
scaling. Some pixels will be truncated accordingly.
ii. 1:1 The input source will be displayed without scaling.
iii. 16:9 The input source will be displayed in wide screen mode (16:9) without
scaling. The source will be scaled to fit the width of the screen.
iv. 4:3 The input source will be scaled to fit the screen.
j. Video Mode: Select this function to optimize the
display image for home use (Movie Mode),
conference use (PC Mode), standard color use (sRGB), or as user preferable
settings (User Mode). When an icon is selected, the color of the icon will change to
dark blue. The default setting is PC Mode. Adjusting the settings of White Intensity
or Degamma tab will select User Mode automatically.
4. Management Menu
Y/AC/Staff/Documentation/ProjectorGuideShort 11/05 cc
5
a. Menu Location: Select the location of the onscreen display on the screen.
b. Projection Mode:
i.
Front Projection-Desktop: The default setting.
ii.
Rear Projection-Desktop: The projector reverses the image so you can
project from behind a translucent screen.
iii.
Front Projection-Ceiling Mount: The projector turns the image upside down
for ceiling-mounted projection.
iv.
Rear Projection-Ceiling Mount: The projector simultaneously reverses and
turns the image upside down. You can project from behind a translucent screen
with a ceiling-mounted projection.
c. To adjust the size of the projected image, move the projector closer or further away
from the surface on which you are projecting.
For any further settings changes, please refer to the Owners’ Manual included
with the projector.
TROUBLESHOOTING
1. No image appears on the screen
a. Ensure that the lens cap is removed and the projector is turned on
b. Ensure the external graphics port is enabled. If you are using a Dell portable
computer, press the F8 key. For other computers, consult your owner’s manual.
c. Ensure that all the cables are securely connected as described in the installation
section.
d. Ensure that the pins of the connectors are not bent or broken
2. Partial scrolling, or incorrectly displayed image
a. Press the Resync button on the remote control or the control panel
b. If you are using a Dell portable computer: (for other computers consult your owner’s
manual)
i. Set the resolution of the computer to SVGA (800 x 600):
(1) Right click on the unused portion of your Windows desktop Æ Properties Æ
Settings tab.
(2) Verify the “Screen area” slide bar is set to 800 x 600 pixels.
ii. Press Function-F8
Y/AC/Staff/Documentation/ProjectorGuideShort 11/05 cc
6
c. If you experience difficulty in changing the resolutions or your monitor freezes,
restart all the equipment and the projector.
3. The screen does not display your presentation
a. If you are using a portable computer, press Function-F8
4. Image is unstable or flickering
a. Adjust the tracking in the OSD “Computer Image” tab.
5. Image color is not correct
a. If your graphic card output signal is “sync on Green”, and you would like to display
VGA at 60Hz signal, please go into “OSD Æ Management Æ Signal Type” and
select “RGB”.
6. Image is out of focus
a. Adjust the focus ring on the projector lens
b. Ensure that the projection screen is within the required distance from the projector
(3.9 ft [1.2m] to 39.4 ft [12m]).
7. The image is stretched when displaying 16:9 DVD
a. The projector automatically detects 16:9 DVD and adjusts the aspect ratio to full
screen with a 4:3 (letter-box) default setting. If the image is still stretched, adjust the
aspect ratio as follows:
i. If you are playing a 16:9 DVD, select 4:3 aspect ratio type on your DVD player if
capable.
ii. If you cannot select 4:3 aspect ratio on type on your DVD player, select 4:3
aspect ratio in the “All Images” menu within the OSD function
8. Image is reversed
a. Select Management from the OSD and adjust the projection mode
9. Lamp is burned out or makes a popping sound
a. Please return the projector to IT immediately so that we can take care of the lamp
change.
10. Noise made when turning projector upside down
a. This is normal. This feature inside the projector allows for proper cooling in ceiling
mount applications.
For any further information or problems please consult the owner’s
manual or call Scripps AV at x73193.
Y/AC/Staff/Documentation/ProjectorGuideShort 11/05 cc
7