1
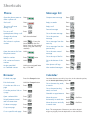
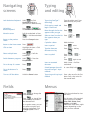
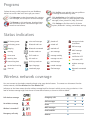
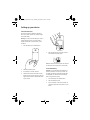
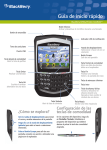
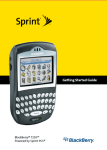
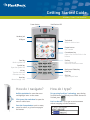
Getting Started Guide
BlackBerry 7100v™ from Vodafone
Power button
Notification LED
Headset jack
USB port
Trackwheel
Select or click an item
Escape button
Exit a screen
Convenience key
Open a list of useful links in the
browser
Send key
Make a phone call
End key
End a phone call
Return to the Home screen
Symbol key
Open the symbol list
Backspace/Delete key
Alt key
Type the alternate
character on a key
Next key
Move through a list
Enter key
Shift key
Type a capital letter
How do I navigate?
How do I type?
Roll the trackwheel to move the cursor
and highlight items on the screen.
To type using SureType™ technology, press the key
for each letter of a word only once. When the word is
finished, press
.
Click (press) the trackwheel to open the
menu or select items.
Press the Escape button to exit a screen,
cancel an action, or go back one page in
the browser.
Put it to the test! Try to type an entire sentence
without stopping to make corrections.
Shortcuts
Phone
Message list
Open the phone screen or
make a phone call
Press
Compose new message
Press
End a call
Press
Reply to sender
Press
Turn on or off mute
during a call
Press
Reply to all
Press
Forward message
Press
Turn on or off
Press
speakerphone during a call
Go to the next message
Press
Change the volume
during a call
Roll the trackwheel
Go to the previous
message
Press
Dial a letter in a phone
number
Hold
+ Press the
letter (once for the first
letter, twice for the second
letter, using the multi-tap
method)
Go to messages from the
next day
Press
Go to messages from the
previous day
Press
Go to the next unread
message
Press
Go to the top of the list
Press
Go to the bottom of the
list
View phone call logs
Press
Press
+
View received messages
Press
+
Open the contact list from Hold
the phone screen
Redial a number
Press
twice
Call a voice mail access
number
Hold
Assign speed dial
to a selected contact
Hold an unassigned letter
key > Click OK
Browser
Calendar
For these shortcuts to work in Day view, in the calendar options,
set the Enable Quick Entry field to No.
Go back one page
Press the Escape button
Exit the browser
Hold the Escape button
Press
Go to the next day, week,
or month
Press
Go to the next link on a
page
Press
Go to the previous day,
week, or month
Press
Go to the previous link on
a page
Schedule an appointment
Press
Open a selected link
Press
Switch between normal
and full-screen view
Press
Move the cursor
horizontally in week view
Hold
+ Roll the
trackwheel
Go down one page
Press
Move the cursor vertically
in month view
Hold
+ Roll the
trackwheel
Go up one page
Press
Go to a specific web page
Press
Note: The arrangement of letters on your device keypad
might vary slightly from the depictions on this document.
Typing
and editing
Navigating
screens
Lock the device/keyboard
Hold
or Click
Keyboard Lock (set a
password for added security.
Unlock the
device/keyboard
Press
+
or
Double-click the trackwheel
Move the cursor
Roll the trackwheel or Press
+ Roll the trackwheel
Return to the previous
screen
Press the Escape button
Return to the Home screen Press
Click an item
Highlight the item > Click
the trackwheel
Select multiple items
Hold
+ Roll the
trackwheel
Type using SureType™
technology
Type the whole word. Press
each letter key only once.
Finish typing a word and
begin a new word
Press
Move through the list that Press
appears when you type
Select an item from the list Press
that appears when you
type
or
Capitalize a letter
Hold the letter
Insert a period
Press
twice
Type the alternate
character on a key
Press
+ the key
Insert a symbol
Press
+
>
Press a letter
or
Press
again to see
Switch between programs Hold
+ Press the
Escape button
Go to the top of a screen
Press
Insert an accented
character
Hold a letter + Roll the
trackwheel
Go to the bottom of a
screen
Press
Switch between the multitap and SureType™ input
methods
In a text field, hold
Turn on/off the device
Hold the Power button
Type using multi-tap input Press a key once for the first
method
letter. Press a key twice for
the second letter.
Menus
Fields
Press
to change the
value in a field.
Click the trackwheel to view
the menu.
Press
to view all the
values that are available in
the selected field.
On the menu, click standard
menu items such as New,
View, Edit, Delete, Save,
Options, and Help.
Additional menu items might
appear depending on the
item you have selected.
In an option screen, you can
also select an option and
click the trackwheel. Click
Change Option. Click a
value.
Programs
Explore the many useful programs that your BlackBerry
device has to offer. Here are a few to get you started.
Click Profiles to set and edit ring tone profiles or
to manage downloaded ring tones.
Click Messages to view the messages list, compose
new messages, and set options for email messages.
Click Applications to find additional programs
including the memos list, search program, saved
messages, alarm, pictures list, help, and more!
Click Browser to visit web pages, download items,
and set browser options. Your device might have
more than one browser.
Click Settings to find the main list of device
options, Bluetooth® settings, and wireless settings.
Status indicators
full battery power
voice mail message
placed call
low battery power
Bluetooth radio on
missed call
charging
Bluetooth connected
received call
roaming
Number mode on
sent message
message includes
attachment
SMS message
MMS message
system busy
Home zone
Shift mode on
message sending
receiving data
Alt mode on
message not sent
transmitting data
Multi-tap mode on
read message
service book waiting
input language
unread message
alarm set
saved web page
filed message
notification LED
low battery LED
wireless coverage
LED
Bluetooth connected
LED
Wireless network coverage
You must connect to the wireless network to begin using many device features. To connect to or disconnect from the
wireless network, click Turn Wireless On/Turn Wireless Off.
Indicators on the Home screen show the wireless coverage level for the area in which you are using your device. A low
level of wireless coverage might limit the use of some device features, as shown in the chart below.
Full wireless coverage
Emergency calls
No wireless coverage
Phone
SMS messages
Wireless is turned off
MMS messages
Email and PIN
Emergency calls only
Browser
getting_started.book Page 1 Monday, December 19, 2005 2:23 PM
Contents
Welcome to BlackBerry!
3
Send PIN messages
15
About SureType
3
Send SMS (text) messages
15
Setting up your device
5
Insert the SIM card
5
Insert the battery
5
Charge the battery
6
Connect to the wireless network
6
Choosing your email setup option
Send MMS (multimedia) messages
16
Add contacts
16
Add SIM card contacts to your address book
16
Go to web pages
16
Type passwords
17
Set a device password
17
7
Lock and unlock the device
17
BlackBerry Internet Service option
7
Set the date and time
17
BlackBerry Enterprise Server option
7
Enable profiles
17
Setting up for email using BlackBerry Internet
Service
9
Turn on or off the Bluetooth radio
17
Pair with another Bluetooth-enabled device
17
Create an account
Find help with other features
18
Frequently asked questions
19
Log in to your account
9
9
Receive messages from other email accounts
10
Set account options
11
Install the BlackBerry Desktop Software
11
BlackBerry Internet Service - frequently asked
questions
21
Setting up for email using BlackBerry Enterprise
Server
13
Use enterprise activation
13
Use the BlackBerry Desktop Software
13
How do I...
15
Make phone calls
15
Type using SureType
15
Send email messages
15
©2005 Research In Motion Limited. All Rights Reserved. Published in XXXXXX. PRINTSPEC-004. MAT-10971-001
1
getting_started.book Page 2 Monday, December 19, 2005 2:23 PM
2
getting_started.book Page 3 Monday, December 19, 2005 2:23 PM
Welcome to BlackBerry!
Whether you plan to use your BlackBerry® device
for business or personal productivity, you have
made an excellent choice! With powerful pushmessaging, voice, web, and organizer features,
BlackBerry is the all-in-one solution that is
designed to keep you connected to the people,
data, and resources that you need every day.
To begin using your BlackBerry device, you must
set up and turn on the device, connect to the
wireless network, and set up your supported email
account. You can also choose to install the
BlackBerry Desktop Software so that you can
connect your device to your computer for data
synchronization and charging.
Take a moment to read this guide and any
documents provided by your service provider.
These resources provide important setup
information and are designed to help you get the
most from your BlackBerry device! Additional
resources are listed in the back of this guide.
About SureType
Your BlackBerry device is equipped with
SureType™ innovative keyboard technology, which
integrates a traditional phone keypad and a
familiar keyboard layout with intuitive software. It
“learns” as you type, recognizing word patterns and
enabling you to type information easily.
When you type, the letters on screen change
automatically—by the time you’ve finished typing a
word, SureType has probably already figured out
the word you want to type. It's that smart! This
evolutionary technology enables you to easily,
quickly, and accurately type words without having
to get used to an unfamiliar keyboard layout.
See "Type using SureType" on page 15 for more
information about typing.
3
getting_started.book Page 4 Monday, December 19, 2005 2:23 PM
4
getting_started.book Page 5 Monday, December 19, 2005 2:23 PM
Setting up your device
Insert the SIM card
Your SIM card contains important information
about your wireless service. Your SIM card might
be inserted already.
Warning: Turn off your device before you insert or
remove the SIM card. Do not scratch, bend, or
expose the SIM card to static electricity or wet
conditions.
1.
Press the battery cover release button.
5.
Slide the SIM card into the holder so that it
lies flat below the metal guide.
Note: To remove the SIM card, press the tab. Slide
the SIM card over the tab and out of the holder.
2.
Slide off the battery cover.
3.
If the battery is inserted, remove it.
4.
Hold the SIM card with the metal contacts
facing down so that the notches on the card
align with the notches in the SIM card holder
on your device.
Insert the battery
Warning: Use only the battery that Research In
Motion® specifies for use with your device. See
the Safety and Product Information booklet that
accompanied your device for more information
about using the battery safely.
1.
Press the battery cover release button.
2.
Slide off the battery cover.
3.
Insert the battery so that the connectors on
the battery align with the connectors on your
device.
5
getting_started.book Page 6 Monday, December 19, 2005 2:23 PM
3.
Plug the power adapter into a power outlet.
4.
Charge the battery to full power.
Note: If you install the BlackBerry Desktop
Software, you can charge your device by
connecting it to your computer. See “Can I charge
my device by connecting it to my computer?” on
page 19 for more information.
Connect to the wireless network
On the device, if the power is off, press the Power
button. Your device should connect to the wireless
network automatically.
4.
Replace the battery cover.
5.
If the battery is charged, your device turns on
and the confirm date and time dialog box
appears.
• If the date and time are incorrect, click
Edit. See “Set the date and time” on
page 17 for more information.
• If the date and time are correct, click OK.
Charge the battery
1.
Connect the small end of the USB cable to
your device.
2.
If required, slide the plug blade attachment
into the power adapter.
PUSH
6
To connect to the wireless network successfully,
your wireless service must be active, and you must
be in a wireless network coverage area. See the
wireless network coverage chart on the inside
front cover of this guide for more information.
When your device is not connected to the wireless
network, you can continue to use features that do
not require a connection to the wireless network.
For example, you can type and save draft email
messages, manage tasks, or use the calculator.
Note: If you use BlackBerry Internet Service, the
account setup process should begin automatically
the first time that your device connects to the
wireless network. See “Setting up for email using
BlackBerry Internet Service” on page 9 for more
information.
getting_started.book Page 7 Monday, December 19, 2005 2:23 PM
Choosing your email setup option
To begin sending and receiving email messages
on your BlackBerry device, you must integrate
your device with an email account using one of
the following options.
BlackBerry Internet Service option
Use this option if one or more of the following
situations apply:
•
You purchased your device in a store.
•
You want to set up a new email account for
use with your device.
•
You want to send and receive email
messages on your device from one or more
existing supported email accounts.
•
Your supported email account resides on a
Microsoft Exchange, IBM Lotus®Domino®, or
Novell GroupWise email server.
•
You subscribe to a wireless service that
supports account setup using the BlackBerry
Enterprise Server.
If this setup option applies to you, see “Setting up
for email using BlackBerry Enterprise Server” on
page 13 for more information.
Note: To use this option, you must subscribe to a
wireless service that supports email setup using
BlackBerry Internet Service.
If this setup option applies to you, see “Setting up
for email using BlackBerry Internet Service” on
page 9 for more information.
BlackBerry Enterprise Server option
Use this option if all the following situations
apply:
•
A system administrator is managing a
BlackBerry Enterprise Server™ within your
company.
•
A system administrator has confirmed that
you are permitted to use the BlackBerry
Enterprise Server.
•
You want to receive messages from a
corporate Microsoft® Outlook®, IBM® Lotus
Notes®, or Novell® GroupWise® email
account.
7
getting_started.book Page 8 Monday, December 19, 2005 2:23 PM
8
getting_started.book Page 9 Monday, December 19, 2005 2:23 PM
Setting up for email using BlackBerry Internet Service
Create an account
• Password: Type a personal login
password. Passwords must contain
between 4 and 16 characters. Passwords
are case sensitive and cannot contain
accented characters.
You must create an account to begin using email
on your BlackBerry device. The account that you
create supplies the default email address for your
device.
1.
• Re-enter Password: Retype your personal
Verify that your device is connected to the
wireless network and that you are in a
wireless coverage area.
login password.
Note: Write down your user ID and password
and keep the information in a safe place. You
must type this information every time that
you log in to your BlackBerry Internet Service
account.
If the Sign In screen does not appear
automatically, click Mobile Email.
2.
On the Sign In screen, click Create Your
Account.
Note: To follow a link in the browser, click
the link. Click Get Link.
6.
Select a secret question.
If you forget your password, you are
prompted with this question.
3.
Click Continue.
7.
Type an answer to your secret question.
4.
Read the legal terms and conditions
carefully. Perform one of the following
actions:
8.
Click Submit.
9.
Click Done.
• To decline the legal terms and conditions
and stop the setup process, click I
Disagree.
• To accept the legal terms and conditions
and continue the setup process, click I
Agree.
5.
Type your account information.
• User ID: Type a personal user ID for your
account. This user ID will be your login
name and the first part of the default
email address for your device.
• Friendly Name: Type the name that you
want to appear in the From field of
messages that you send. If you do not
type a name, the default email address for
your device appears in the From field.
10. Perform one of the following actions:
• To receive email on your device from
other supported accounts, click Add
Account. See "Receive messages from
other email accounts" on page 10 for
more information.
• To log in to your account without adding
other email accounts, click Continue.
Tip: If you have problems creating your account
using your device, create your account using a
desktop browser. See “Set account options” on
page 11 for more information.
Log in to your account
Log in to your BlackBerry Internet Service account
to manage settings and message options.
9
getting_started.book Page 10 Monday, December 19, 2005 2:23 PM
1.
Verify that your device is connected to the
wireless network and that you are in a
wireless coverage area.
• User Name: Type the login ID (for
example, kateturner or
domain1kateturner).
2.
Click Mobile Email.
• Password: Type the password.
3.
On the Sign In screen, type your account
information.
• User ID: Type the login name for your
account.
• Re-enter Password: Retype the password.
5.
Click Submit.
6.
Depending on the account that you add, you
might be prompted to select an account
type.
7.
Depending on the account type that you
select, you might be prompted for the
following information:
• Password: Type the password for your
account.
4.
Click Submit.
Note: To follow a link in the browser, click
the link. Click Get Link.
Receive messages from other email
accounts
Set up your BlackBerry Internet Service account to
retrieve messages from an existing supported
email account and deliver them to your device.
Add up to ten different existing supported
accounts.
• Email Server: Type the messaging and
collaboration server address for your
Internet service provider (for example,
mail.ispname.com). If you do not know
the address, contact your Internet service
provider.
• Port Number: Type the appropriate port
number. If you do not know the number,
contact your Internet service provider.
Note: Depending on your Internet service provider
(ISP) or system administrator, you might not be
able to add some types of accounts.
• Outlook Web Access URL: Type the web
1.
• Mailbox Name: Type the mailbox name
2.
3.
Verify that your device is connected to the
wireless network and that you are in a
wireless coverage area.
Log in to your BlackBerry Internet Service
account. See “Log in to your account” on
page 9 for more information.
Click Add Account.
Note: To follow a link in the browser, click
the link. Click Get Link.
4.
Type the information for the account that
you want to add.
• Email Address: Type the full email
address of the account.
10
address for your Microsoft Outlook
account.
for your Microsoft Outlook account.
• iNotes™ URL: Type the web address for
your IBM Lotus Notes account.
• Leave messages on mail server: Clear
this check box if you do not want to save
messages that are sent to your device on
the messaging server.
Note: If you delete a message from your
device, you cannot recover it.
• Utilize SSL: Turn on Secure Sockets Layer
encryption for retrieving messages from
getting_started.book Page 11 Monday, December 19, 2005 2:23 PM
this account, if SSL is supported by your
Internet service provider.
www.mobileemail.vodafone.ie
Italy:
www.mobileemail.vodafone.it
Netherlands:
www.mobileemail.vodafone.nl
Portugal:
www.mobileemail.vodafone.pt
South Africa:
www.mobileemail.vodafonesa.co.za
Spain:
www.mobileemail.vodafone.es
Sweden:
www.mobileemail.vodafone.se
United Kingdom:
www.mobileemail.vodafone.net
Note: If you add a corporate Microsoft
Outlook or IBM Lotus Notes email account,
you might be prompted to install the
BlackBerry Mail Connector application on
your computer. Complete the on-screen
instructions. See "What is the BlackBerry
Mail Connector?" on page 21 for more
information.
8.
Click Submit.
Set account options
Set additional account and message options by
logging into your account using a desktop
browser.
To access your account using a desktop browser,
the following system requirements apply:
•
1.
Log in to your account.
3.
Use this web site to set additional account
options, which include
• reactivating your account
Internet browser: Microsoft® Internet
Explorer version 5.01, 5.5, or 6.0 (or later) or
Netscape® Communicator version 4.08 to
4.58 with JavaScript™ enabled
Note: Netscape Communicator version 6 (or
later) is not supported.
•
2.
Operating system: Microsoft® Windows®
95, Windows 98, Windows ME, Windows
NT® (version 4), Windows 2000, Windows
XP, or Mac OS® 9.0 or 10.0
In your desktop browser, type the
appropriate web address:
Australia:
www.mobileemail.vodafone.com.au
France:
www.mobileemail.vodafone.fr
Germany:
www.mobileemail.vodafone.de
Greece:
www.mobileemail.vodafone.gr
Ireland:
• changing your password
• creating an auto signature
• setting options for sent messages
• switching to a new device
See the BlackBerry Internet Service Online Help
for more information about setting these options.
Install the BlackBerry Desktop
Software
Install the BlackBerry Desktop Software to perform
any of the following actions:
•
synchronize personal information
management (PIM) data such as contacts,
tasks, and appointments
•
backup and restore device data
•
load new device programs such as updated
system software, games, and third-party
personal information management programs
•
charge your device using your computer
11
getting_started.book Page 12 Monday, December 19, 2005 2:23 PM
To install the desktop software, the following
system requirements apply:
•
Intel®-compatible 486 or higher computer
that is compliant with USB 1.1 or later
•
Windows®98, Windows ME, Windows 2000,
or Windows XP
•
Available USB port
•
If you use Windows 98 (not Windows 98
Second Edition), you must download the
DCOM 98 version 1.3 update from
www.microsoft.com/com/default.mspx for
the USB driver to operate as expected.
1.
Insert the BlackBerry Desktop Software
Installation CD into your CD drive.
2.
Complete the on-screen instructions.
• Select BlackBerry Internet Service as
your account integration option.
3.
When the installation is complete, connect
the smaller end of the USB cable to your
device.
4.
Connect the larger end of the USB cable to
an available USB port on your computer.
5.
On the Windows taskbar, click Start.
6.
Click Programs > BlackBerry > Desktop
Manager.
Note: To find more information about the features
of the BlackBerry Desktop Software, click Help >
Desktop Help Contents.
12
getting_started.book Page 13 Monday, December 19, 2005 2:23 PM
Setting up for email using BlackBerry Enterprise Server
Your system administrator might set up your
device for email on your behalf, or you might need
to integrate your BlackBerry device with a
supported email account yourself using one of the
methods described here.
•
Windows 98, Windows ME, Windows 2000,
or Windows XP
•
Available USB port
•
If you use Windows 98 (not Windows 98
Second Edition), you must download the
DCOM 98 version 1.3 update from
www.microsoft.com/com/default.mspx for
the USB driver to operate as expected.
1.
Insert the BlackBerry Desktop Software
Installation CD into your CD drive.
2.
Complete the on-screen instructions.
Use enterprise activation
If your system administrator has provided you with
an enterprise activation password, you can
integrate your supported email account directly
from your device.
1.
Verify that your device is connected to the
wireless network and that you are in a
wireless coverage area.
2.
On your device, click Enterprise Activation.
3.
Type your supported corporate email account
address.
4.
Type the enterprise activation password
provided by your system administrator.
5.
Click Activate.
Note: Your system administrator might request
that you install the BlackBerry Device Manager
program on your computer to reduce the amount
of data that is sent over the wireless network
when your device is connected to your computer.
Use the BlackBerry Desktop Software
If your system administrator does not provide you
with an enterprise activation password, you can
install the BlackBerry Desktop Software on your
computer to integrate your device with your
supported email account.
• Select BlackBerry Enterprise Server or
BlackBerry Desktop Redirector as your
account integration option.
• Select BlackBerry Enterprise Server as
your email redirection option.
3.
When the installation is complete, connect
the smaller end of the USB cable to your
device.
4.
Connect the larger end of the USB cable to
an available USB port on your computer.
5.
On the Windows taskbar, click Start.
6.
Select Programs > BlackBerry > Desktop
Manager.
• When you are prompted to generate an
encryption key, complete the on-screen
instructions.
Note: To find out more information about the
features of the BlackBerry Desktop Software, click
Help > Desktop Help Contents.
To install the desktop software, the following
system requirements apply:
•
Intel-compatible 486 or higher computer
that is compliant with USB 1.1 or later
13
getting_started.book Page 14 Monday, December 19, 2005 2:23 PM
14
getting_started.book Page 15 Monday, December 19, 2005 2:23 PM
How do I...
Make phone calls
Send email messages
On the Home screen, type a phone number. Press
the Send key. To end the call, press the End key.
You must set up a supported email account to use
with your device before you can send and receive
email messages. See "Choosing your email setup
option" on page 7 for more information.
Notes: Press the Send key on any screen to open
the phone.
Select a contact, call log, or phone number link on
any screen and press the Send key to make a call.
1.
In the messages list, click the trackwheel.
2.
Click Compose Email.
To turn on speakerphone during a call, click the
trackwheel. Click Activate Speaker. To turn off
speakerphone, click the trackwheel. Click Activate
Handset.
3.
In the To field, type an email address or a
contact name.
4.
Type a message.
5.
Click the trackwheel.
Type using SureType
6.
Click Send.
To type in most fields, use the SureType input
method. Press the key for each letter of a word
once until you have typed an entire word. When
you use SureType technology, the letters on the
screen change automatically until the word is
complete.
Note: If your device is integrated with more than
one email account, you can select an account to
send the message from. At the top of the
message, in the Send Using field, press the Space
key until the preferred email account appears.
For example, to type the word run, press ER + UI
+ BN. Press the Space key.
Send PIN messages
If you type all the letters in a word and the word
does not appear correctly, or if more than one
word is available for the keys that you pressed, use
the list to build a word.
•
To move through selections in the list, press
the Next key. You can also roll the trackwheel
to move forward and backward in the list.
•
To choose a selection from the list and
continue typing the same word, press the
Enter key or click the trackwheel.
•
To choose a selection from the list and begin
typing a new word, press the Space key.
•
To delete letters that you have typed, press
the Backspace/Delete key.
A personal identification number (PIN) uniquely
identifies each BlackBerry device on the network.
If you know the PIN of another BlackBerry device
user, you can send a PIN message to that person.
To find your PIN, in the device options, click
Status.
1.
In the messages list, click the trackwheel.
2.
Click Compose PIN.
3.
In the To field, type a PIN or a contact name.
4.
Type a message.
5.
Click the trackwheel.
6.
Click Send.
Send SMS (text) messages
1.
In the messages list, click the trackwheel.
15
getting_started.book Page 16 Monday, December 19, 2005 2:23 PM
2.
Click Compose SMS.
3.
Click [Use Once].
4.
Click SMS.
5.
Click Phone.
Add contacts
6.
Type an SMS-compatible phone number.
1.
In the address book, click the trackwheel.
7.
Click the trackwheel.
2.
Click New Address.
8.
Click Continue.
3.
Type the contact information.
9.
Type a message.
4.
Click the trackwheel.
10. Click the trackwheel.
5.
Click Save.
11. Click Send.
Add SIM card contacts to your
address book
Note: If you have added contacts to the address
book, you can select a contact from the list after
you click Compose SMS.
Send MMS (multimedia) messages
Note: If you have added contacts to the address
book, you can select a contact from the list after
you click Compose MMS.
If you have saved contact information on your SIM
card, you can copy that information into the
address book on your device.
1.
In the messages list, click the trackwheel.
1.
In the address book, click the trackwheel.
2.
Click Compose MMS.
2.
Click SIM Phone Book.
3.
Click [Use Once].
3.
4.
Click MMS.
Click the trackwheel. Click Copy All To
Address Book.
5.
Select a send method for your MMS message.
Go to web pages
6.
Type an MMS-compatible phone number or
an email address.
1.
In the browser, click the trackwheel.
2.
Click Go To.
7.
Click the trackwheel.
3.
Type a web address.
8.
Click Continue.
4.
Click the trackwheel.
9.
Type a message.
5.
Click OK.
10. Click the trackwheel.
Notes: To insert a period, press the Space key.
11. Click Attach Address, Attach Appointment,
or Attach Picture.
To insert a slash mark (/), press the Shift key +
the Space key.
12. Click a contact, appointment, or image.
The Go To dialog box tracks the web addresses
that you type. To go to a web page on the list,
click the web address. Click OK.
13. Click Continue.
14. Click the trackwheel.
15. Click Send.
16
getting_started.book Page 17 Monday, December 19, 2005 2:23 PM
Type passwords
4.
Click the trackwheel.
To type passwords, use the multi-tap input
method. Press the key once to type the first letter
on the key, or press the key twice to type the
second letter on the key. If the password contains
capital letters, hold the letter key. When you have
finished typing your password, press the Enter key.
5.
Click Update Time.
6.
Click the trackwheel.
7.
Click Save.
Set a device password
1.
In the device options, click Security Options.
2.
Click General Settings.
3.
Set the Password field to Enabled.
4.
Set the other security options.
5.
Click the trackwheel.
6.
Click Save.
7.
Type a device password.
8.
Click the trackwheel.
9.
Retype the device password.
10. Click the trackwheel.
Lock and unlock the device
With a device password set, on the Home screen,
click Lock.
To unlock your device, on the Lock screen, roll the
trackwheel. Click Unlock. Type your password.
Press the Enter key.
Note: When the device is locked, you should be
able to make an emergency call without dialing
the emergency access number. Click Emergency
Call. Click Yes.
Set the date and time
1.
In the device options, click Date/Time.
2.
Set the Time Zone field.
3.
In the Date/Time Source field, set a date
and time source.
Note: To set the date and time yourself, set the
Date/Time Source field to Off. Set the other
fields on the Date/Time screen to display the
correct date and time. Save your changes.
Enable profiles
In the profiles list, click a notification profile. Click
Enable.
Note: To change the current notification profile
quickly, select a profile. Press the Space key.
Turn on or off the Bluetooth radio
To turn on the Bluetooth® radio, in the device
options, click Bluetooth. Click the trackwheel.
Click Enable Bluetooth.
To turn off the Bluetooth radio, in the device
options, click Bluetooth. Click the trackwheel.
Click Disable Bluetooth.
Pair with another Bluetooth-enabled
device
1.
In the device options, click Bluetooth.
2.
Click the trackwheel.
3.
Click Add Device.
4.
Click the name of a Bluetooth-enabled
device.
5.
In the Enter passkey for <device name>
field, type a passkey.
6.
Type the same passkey on the Bluetoothenabled device to which you are pairing.
Notes: Verify that the Bluetooth-enabled device
that you want to pair with is in the correct mode
for pairing.
17
getting_started.book Page 18 Monday, December 19, 2005 2:23 PM
The names of Bluetooth-enabled devices with
which you have already paired appear in the list of
paired Bluetooth-enabled devices. They do not
appear in the list of Bluetooth-enabled devices
that appears when you click Add Device.
Find help with other features
To access a list of topics that are associated with
the program that you are using, in a program, click
the trackwheel. Click Help.
To open the main list of topics for all programs, on
any Help Screen, click the trackwheel. Click Index.
18
getting_started.book Page 19 Monday, December 19, 2005 2:23 PM
Frequently asked questions
Why does my device not turn on?
Why can I not send or receive email messages?
The power might be off. Press the Power button.
Verify that your device is connected to the wireless
network and that you are in a wireless coverage
area. See “Connect to the wireless network” on
page 6 for more information.
The battery might not be charged. See “Charge
the battery” on page 6 for more information.
Why does my device not charge?
A connection might not be complete. Check that
all cables and plugs are fully inserted into ports
and power outlets. See "Charge the battery" on
page 6 for more information.
The battery might not be inserted properly.
Remove and reinsert the battery. Verify that the
connectors align. See “Insert the battery” on
page 5 for more information.
If you connect your device to the computer to
charge, verify that the computer is turned on. If
you connect your device to the computer using a
USB hub, the hub must be self powered to provide
enough power to charge your device.
Can I charge my device by connecting it to my
computer?
If you have installed the BlackBerry Desktop
Software or the BlackBerry Device Manager on
your computer you can connect your device to the
computer to charge the battery.
1.
Verify that the computer is turned on.
2.
Connect the smaller end of the USB cable to
your device.
3.
Connect the larger end of the USB cable to
an available USB port on your computer.
Note: To find more help with connecting your
device to the computer, in the desktop software,
click Help to view the BlackBerry Desktop
Software Online Help.
Verify that you have set up a supported email
account for use with your device. See “Choosing
your email setup option” on page 7 for more
information.
If you are using BlackBerry Internet Service, log in
to your account using a desktop browser. See “Set
account options” on page 11 for more information.
•
Verify that your BlackBerry Internet Service
account mailbox has not exceeded its size
limit.
•
Send a service book to reactivate your
account.
If you continue to be unable to send and receive
messages, reset your device by removing and
reinserting the battery.
Note: To find more help with sending and
receiving email messages, in messages list, click
the trackwheel. Click Help > Email Messages.
Can I integrate my device with a corporate
email account if I do not have access to a
BlackBerry Enterprise Server?
If you use Microsoft Outlook (Workgroup
installation) with an email account on a Microsoft
Exchange Server version 5.5 or later and your
device does not have access to a BlackBerry
Enterprise Server, your system administrator might
permit you to install the BlackBerry Desktop
Redirector on your computer to integrate your
device with your supported email account.
19
getting_started.book Page 20 Monday, December 19, 2005 2:23 PM
To integrate your device with a supported email
account using the BlackBerry Desktop Redirector,
when you install the BlackBerry Desktop Software,
select BlackBerry Desktop Redirector as your
message redirection option. See “Use the
BlackBerry Desktop Software” on page 13 for
more information about installing the BlackBerry
Desktop Software.
Your computer must be on and the BlackBerry
Desktop Redirector must be running to send and
receive messages on your device.
Where can I buy accessories for my device?
You can buy approved accessories for your device
online at:
www.shopblackberry.com
Note: Use only those accessories approved by
Research In Motion (RIM) for use with your
particular device model. Using any accessories not
approved by RIM for use with your particular
device model might invalidate any approval or
warranty applicable to the device and might be
dangerous.
Can I set up for email using both the BlackBerry
Enterprise Server and BlackBerry Internet
Service?
Where can I download games and ring tones for
my device?
If your wireless service permits email setup using
more than one service, complete the steps in
“Setting up for email using BlackBerry Enterprise
Server” on page 13 followed by the steps in
“Setting up for email using BlackBerry Internet
Service” on page 9.
Many third-party vendors offer games, ring tones,
and other programs for your device online. You
can download new programs using your device
browser, or download them using your computer
and load them onto your device using the
Application Loader tool of the BlackBerry Desktop
Software.
Contact Vodafone customer support for more
information about availability and the fees that
might be associated with email setup using both
BlackBerry Enterprise Server and BlackBerry
Internet Service.
How do I reset my device?
To reset your device hardware and programs,
remove and then reinsert the battery.
How do I clean the screen?
Clean the screen and device using only a soft dry
cloth. Do not use liquid, aerosol cleaners, or
solvents on or near your device. Disconnect any
cables from the computer and unplug any
charging accessories from the electrical outlet
before cleaning.
Note: See the BlackBerry Wireless Device Safety
and Product Information for more information
about caring for your device.
20
For example, you can visit the following web site
using the browser on your device:
mobile.blackberry.com
Note: Your use of third party software shall be
governed by and subject to you agreeing to the
terms of separate software licenses, if any, for
those products or services. Any third party
products or services that are provided with RIM's
products and services are provided "as is". RIM
makes no representation, warranty or guarantee
whatsoever in relation to the third party products
or services and RIM assumes no liability
whatsoever in relation to the third party products
and services even if RIM has been advised of the
possibility of such damages or can anticipate such
damages.
getting_started.book Page 21 Monday, December 19, 2005 2:23 PM
Why does the screen on my device turn off?
Why can I not add a third-party email account?
When you do not use your device for a period of
time, the screen turns off to conserve battery
power. Roll the trackwheel or press any key to turn
the screen on again.
Verify that the third-party email account supports
POP3 or IMAP4. Contact your Internet service
provider for more information about the account
types that you can add.
BlackBerry Internet Service frequently asked questions
How do I update my account information?
1.
Log in to your BlackBerry Internet Service
account. See “Log in to your account” on
page 9 for more information.
2.
Click View/Modify.
How do I open BlackBerry Internet Service?
See “Log in to your account” on page 9 for more
information.
Why does the Mobile Email option not appear
on the Home screen?
Verify that your device is connected to the wireless
network and that you are in a wireless coverage
area. See “Connect to the wireless network” on
page 6 for more information.
If your device uses a theme, the option might
appear in a folder or list instead of on the Home
screen. The option might also use a different
name.
If the option still does not appear, contact
Vodafone customer support.
Note: To follow a link in the browser, click
the link. Click Get Link.
3.
Edit your account information.
4.
Click Submit.
I use multiple accounts. How do I set the email
address that appears in the From field of
messages that I send?
1.
Log in to your BlackBerry Internet Service
account. See “Log in to your account” on
page 9 for more information.
2.
In the Send From Address option, click the
here link.
Note: To follow a link in the browser, click
the link. Click Get Link.
What is the BlackBerry Mail Connector?
The BlackBerry Mail Connector is a program that
you might have to install on your local computer
to enable BlackBerry Internet Service to access
your corporate Microsoft Outlook or IBM Lotus
Notes email account when the corporate
messaging server is behind a firewall.
The BlackBerry Mail Connector is designed to
access and copy your messages that are on a
messaging server and send them to BlackBerry
Internet Service.
The BlackBerry Internet Service email account
setup process is designed to automatically detect
whether the BlackBerry Mail Connector is required
and to prompt you to install the application.
3.
On the Sent From Address screen, perform
one of the following actions:
• To use your default BlackBerry Internet
Service account as your Sent From
Address, select I want my Sent From
Address to be my handheld email
address.
• To use an address from one of the email
accounts that you have added, select I
want to choose one of the email
accounts I have set up to be my Sent
From Address. Click Submit. Select an
account.
21
getting_started.book Page 22 Monday, December 19, 2005 2:23 PM
• To use another email address, select I
want to customize my Sent From
Address setting to use an email address
that I’ll enter. Click Submit. Type the
email address.
4.
Click Submit.
How do I remove an account that I no longer
want to access with my device?
1.
Log in to your BlackBerry Internet Service
account. See “Log in to your account” on
page 9 for more information.
2.
Select an email address.
Note: You cannot delete your default email
account.
3.
Click Delete.
Note: To follow a link in the browser, click
the link. Click Get Link.
4.
Click Yes.
How do I change the device that I want to use
with my account?
Your account is linked to your particular device. If
you switch devices, update the device PIN that is
associated with your account, or call Vodafone
customer support to delete your account.
1.
Use your new device to log in to your
BlackBerry Internet Service account. See “Log
in to your account” on page 9 for more
information.
2.
Click Change handheld that works with the
accounts listed above.
Note: To follow a link in the browser, click
the link. Click Get Link.
3.
On the Change Handheld screen, verify that
the new device information is correct.
• PIN: personal information number (PIN)
for your device
22
• IMEI: The international mobile equipment
identity (IMEI) number for your device.
Note: To find your PIN and IMEI, in the
device options, click Status.
4.
Click Submit.
5.
Click Done.
Why is my mailbox full?
Your BlackBerry Internet Service account has a size
limit. To avoid reaching the limit, delete items
from your mailbox regularly or set up auto-aging
rules for message deletion.
To view the available space in your mailbox or to
set up auto-aging rules, log in to your BlackBerry
Internet Service account. Click Manage Folders.
See the BlackBerry Internet Service Online Help
for information on managing your account by
deleting messages.
How do I find more information on managing
my account?
Log in to your BlackBerry Internet Service account
using a desktop browser. See “Log in to your
account” on page 9 for more information.
See the BlackBerry Internet Service Online Help
for more information on managing your account.
getting_started.book Page 23 Monday, December 19, 2005 2:23 PM
Vodafone customer support web site:
Australia:
www.vodafone.com.au/blackberry
Belgium:
corporate.proximus.be
Hungary:
www.vodafone.hu
Germany, Ireland, Netherlands, Spain:
www.office.vodafone.com
Italy:
www.190.it
Portugal:
www.vodafone.pt
South Africa:
www.vodacom.co.za/blackberry
Sweden:
www.vodafone.se/200.jsp
United Kingdom:
www.vodafone.co.uk/blackberry
For additional BlackBerry help and
troubleshooting information:
www.blackberry.com/support
23
getting_started.book Page 24 Monday, December 19, 2005 2:23 PM
24
© 2005 Research In Motion Limited. All Rights Reserved. The BlackBerry and RIM families of related marks, images and
symbols are the exclusive properties of Research In Motion Limited. RIM, Research In Motion, ‘Always On, Always
Connected’, the “envelope in motion” symbol and BlackBerry are registered with the U.S. Patent and Trademark Office and
may be pending or registered in other countries.
The Bluetooth word mark and logos are owned by the Bluetooth SIG Inc. and any use of such marks by Research In Motion
Limited is under license. IBM, Lotus Notes, Lotus, Domino, and iNotes are registered trademarks of International Business
Machines Corporation in the United States and/or other countries. Intel is a registered trademark of Intel Corporation or its
subsidiaries in the United States and other countries. JavaScript is a trademark of Sun Microsystems Inc. in the United States
and other countries. Mac OS is a trademark of Apple Computer Inc. registered in the United States and other countries.
Microsoft, Windows, Windows NT and Outlook are either registered trademarks or trademarks of Microsoft Corporation in
the United States and/or other countries. Netscape is a registered trademark of Netscape Communication Corporation.
Novell and GroupWise are registered trademarks of Novell Inc. in the United States and other countries. All other brands,
product names, company names, trademarks, and service marks are the properties of their respective owners.
The BlackBerry device and/or associated software are protected by copyright, international treaties and various patents,
including one or more of the following U.S. patents: 6,278,442; 6,271,605; 6,219,694; 6,075,470; 6,073,318; D445,428;
D433,460; D416,256. Other patents are registered or pending in various countries around the world. Visit
www.rim.com/patents.shtml for a current listing of applicable patents.
This document is provided “as is” and Research In Motion Limited and its affiliated companies (“RIM”) assume no
responsibility for any typographical, technical or other inaccuracies in this document. RIM reserves the right to periodically
change information that is contained in this document; however, RIM makes no commitment to provide any such changes,
updates, enhancements or other additions to this document to you in a timely manner or at all. RIM MAKES NO
REPRESENTATIONS, WARRANTIES, CONDITIONS OR COVENANTS, EITHER EXPRESS OR IMPLIED (INCLUDING WITHOUT
LIMITATION, ANY EXPRESS OR IMPLIED WARRANTIES OR CONDITIONS OF FITNESS FOR A PARTICULAR PURPOSE, NONINFRINGEMENT, MERCHANTABILITY, DURABILITY, TITLE, OR RELATED TO THE PERFORMANCE OR NON-PERFORMANCE
OF ANY SOFTWARE REFERENCED HEREIN OR PERFORMANCE OF ANY SERVICES REFERENCED HEREIN). IN
CONNECTION WITH YOUR USE OF THIS DOCUMENTATION, NEITHER RIM NOR ITS RESPECTIVE DIRECTORS, OFFICERS,
EMPLOYEES OR CONSULTANTS SHALL BE LIABLE TO YOU FOR ANY DAMAGES WHATSOEVER BE THEY DIRECT,
ECONOMIC, COMMERCIAL, SPECIAL, CONSEQUENTIAL, INCIDENTAL, EXEMPLARY OR INDIRECT DAMAGES, EVEN IF RIM
HAS BEEN ADVISED OF THE POSSIBILITY OF SUCH DAMAGES, INCLUDING WITHOUT LIMITATION, LOSS OF BUSINESS
REVENUE OR EARNINGS, LOST DATA, DAMAGES CAUSED BY DELAYS, LOST PROFITS, OR A FAILURE TO REALIZE
EXPECTED SAVINGS.
This document might contain references to third party sources of information, hardware or software, products or services
and/or third party web sites (collectively the “Third-Party Information”). RIM does not control, and is not responsible for,
any Third-Party Information, including, without limitation the content, accuracy, copyright compliance, compatibility,
performance, trustworthiness, legality, decency, links, or any other aspect of Third-Party Information. The inclusion of ThirdParty Information in this document does not imply endorsement by RIM of the Third Party Information or the third party in
any way. Installation and use of Third Party Information with RIM's products and services may require one or more patent,
trademark or copyright licenses in order to avoid infringement of the intellectual property rights of others. Any dealings
with Third Party Information, including, without limitation, compliance with applicable licenses and terms and conditions,
are solely between you and the third party. You are solely responsible for determining whether such third party licenses are
required and are responsible for acquiring any such licenses relating to Third Party Information. To the extent that such
intellectual property licenses may be required, RIM expressly recommends that you do not install or use Third Party
Information until all such applicable licenses have been acquired by you or on your behalf. Your use of Third Party
Information shall be governed by and subject to you agreeing to the terms of the Third Party Information licenses. Any
Third Party Information that is provided with RIM's products and services is provided "as is". RIM makes no
representation, warranty or guarantee whatsoever in relation to the Third Party Information and RIM assumes no liability
whatsoever in relation to the Third Party Information even if RIM has been advised of the possibility of such damages or can
anticipate such damages.
Check with your service provider for availability, roaming arrangements, service plans and features.
Certain features outlined in this document require a minimum version of BlackBerry Enterprise Server Software, BlackBerry
Desktop Software, and/or BlackBerry Handheld Software and may require additional development or third-party products
and/or services for access to corporate applications.
BlackBerry 7100v™
Model number: RAQ40GW
Published in XXXXXX
PRINTSPEC-005
Where can I find more
information?
Typing tutorial
Use the typing tutorial to learn important typing tips! The tutorial appears
automatically the first time that you turn on your device. Click Help >
Typing Tutorial to restart the tutorial at any time.
User guide
The user guide is only a few clicks away on your device! To learn more
about how to use your device, click Applications > Help.
In the menu on your device, click Help to see help topics associated with
the program that you are using.
Additional resources
If you use the BlackBerry Internet Service™, log in to your account using a
desktop browser. On the menu bar, click Help to view the BlackBerry
Internet Service Online Help.
If you use the BlackBerry Desktop Software, on the menu bar, click Help to
find the BlackBerry® Desktop Software Online Help and the BlackBerry
User Guide.
MAT-10970-001