1
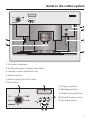
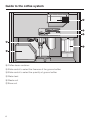
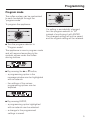
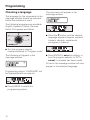
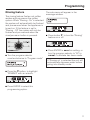
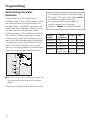
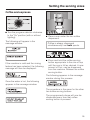
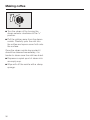
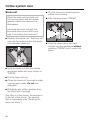
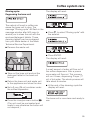
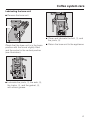
Operating and Installation
Instructions
Coffee System
CVA 615
To prevent accidents and
machine damage,
read these instructions
before installation or use.
UV
M.-Nr. 06 494 750
Contents
IMPORTANT SAFETY INSTRUCTIONS . . . . . . . . . . . . . . . . . . . . . . . . . . . . . . . . . 4
Guide to the coffee system . . . . . . . . . . . . . . . . . . . . . . . . . . . . . . . . . . . . . . . . . . 7
Programming . . . . . . . . . . . . . . . . . . . . . . . . . . . . . . . . . . . . . . . . . . . . . . . . . . . . . 9
Program mode . . . . . . . . . . . . . . . . . . . . . . . . . . . . . . . . . . . . . . . . . . . . . . . . . . . . . 9
Choosing a language . . . . . . . . . . . . . . . . . . . . . . . . . . . . . . . . . . . . . . . . . . . . . . 10
Rinsing feature . . . . . . . . . . . . . . . . . . . . . . . . . . . . . . . . . . . . . . . . . . . . . . . . . . . . 11
Determining the water hardness . . . . . . . . . . . . . . . . . . . . . . . . . . . . . . . . . . . . . . 12
Setting the water hardness . . . . . . . . . . . . . . . . . . . . . . . . . . . . . . . . . . . . . . . . . . 13
Setting the drink temperatures. . . . . . . . . . . . . . . . . . . . . . . . . . . . . . . . . . . . . . . . 14
Pre-brewing feature . . . . . . . . . . . . . . . . . . . . . . . . . . . . . . . . . . . . . . . . . . . . . . . . 15
Pre-grinding feature . . . . . . . . . . . . . . . . . . . . . . . . . . . . . . . . . . . . . . . . . . . . . . . . 16
Hot water feature . . . . . . . . . . . . . . . . . . . . . . . . . . . . . . . . . . . . . . . . . . . . . . . . . . 17
Total coffee counter . . . . . . . . . . . . . . . . . . . . . . . . . . . . . . . . . . . . . . . . . . . . . . . . 18
Setting the standby timer . . . . . . . . . . . . . . . . . . . . . . . . . . . . . . . . . . . . . . . . . . . . 19
System lock . . . . . . . . . . . . . . . . . . . . . . . . . . . . . . . . . . . . . . . . . . . . . . . . . . . . . 20
Before using the coffee system . . . . . . . . . . . . . . . . . . . . . . . . . . . . . . . . . . . . . 21
Water tank. . . . . . . . . . . . . . . . . . . . . . . . . . . . . . . . . . . . . . . . . . . . . . . . . . . . . . . 22
Coffee bean container . . . . . . . . . . . . . . . . . . . . . . . . . . . . . . . . . . . . . . . . . . . . . 23
Setting the serving sizes. . . . . . . . . . . . . . . . . . . . . . . . . . . . . . . . . . . . . . . . . . . 24
Coffee and espresso . . . . . . . . . . . . . . . . . . . . . . . . . . . . . . . . . . . . . . . . . . . . . . . 25
Hot water . . . . . . . . . . . . . . . . . . . . . . . . . . . . . . . . . . . . . . . . . . . . . . . . . . . . . . . . 26
Making coffee . . . . . . . . . . . . . . . . . . . . . . . . . . . . . . . . . . . . . . . . . . . . . . . . . . . . 27
Pre-warming. . . . . . . . . . . . . . . . . . . . . . . . . . . . . . . . . . . . . . . . . . . . . . . . . . . . . . 27
Preparing two cups simultaneously . . . . . . . . . . . . . . . . . . . . . . . . . . . . . . . . . 28
Cappuccino . . . . . . . . . . . . . . . . . . . . . . . . . . . . . . . . . . . . . . . . . . . . . . . . . . . . . . 29
Dispensing hot water. . . . . . . . . . . . . . . . . . . . . . . . . . . . . . . . . . . . . . . . . . . . . . 31
Setting the coffee grinder . . . . . . . . . . . . . . . . . . . . . . . . . . . . . . . . . . . . . . . . . . 32
Adjusting the coffee grinder . . . . . . . . . . . . . . . . . . . . . . . . . . . . . . . . . . . . . . . . . 32
Setting the quantity . . . . . . . . . . . . . . . . . . . . . . . . . . . . . . . . . . . . . . . . . . . . . . . . 33
2
Contents
Coffee system care . . . . . . . . . . . . . . . . . . . . . . . . . . . . . . . . . . . . . . . . . . . . . . . 34
Daily care . . . . . . . . . . . . . . . . . . . . . . . . . . . . . . . . . . . . . . . . . . . . . . . . . . . . . . . . 34
Exterior . . . . . . . . . . . . . . . . . . . . . . . . . . . . . . . . . . . . . . . . . . . . . . . . . . . . . . . . . . 35
Stainless steel . . . . . . . . . . . . . . . . . . . . . . . . . . . . . . . . . . . . . . . . . . . . . . . . . . . . 35
Stainless steel colored controls . . . . . . . . . . . . . . . . . . . . . . . . . . . . . . . . . . . . . . . 35
Interior . . . . . . . . . . . . . . . . . . . . . . . . . . . . . . . . . . . . . . . . . . . . . . . . . . . . . . . . . . 35
Drip catch . . . . . . . . . . . . . . . . . . . . . . . . . . . . . . . . . . . . . . . . . . . . . . . . . . . . . . . 36
Waste unit . . . . . . . . . . . . . . . . . . . . . . . . . . . . . . . . . . . . . . . . . . . . . . . . . . . . . . . 37
Steam valve . . . . . . . . . . . . . . . . . . . . . . . . . . . . . . . . . . . . . . . . . . . . . . . . . . . . . . 37
Brew unit . . . . . . . . . . . . . . . . . . . . . . . . . . . . . . . . . . . . . . . . . . . . . . . . . . . . . . . . 38
Rinsing cycle:
Degreasing the brew unit . . . . . . . . . . . . . . . . . . . . . . . . . . . . . . . . . . . . . . . . . 39
Cleaning the brew unit filters . . . . . . . . . . . . . . . . . . . . . . . . . . . . . . . . . . . . . . 40
Lubricating the brew unit . . . . . . . . . . . . . . . . . . . . . . . . . . . . . . . . . . . . . . . . . 41
Change the gaskets. . . . . . . . . . . . . . . . . . . . . . . . . . . . . . . . . . . . . . . . . . . . . . . . 42
Changing the light bulb . . . . . . . . . . . . . . . . . . . . . . . . . . . . . . . . . . . . . . . . . . . . . 43
Descaling the appliance . . . . . . . . . . . . . . . . . . . . . . . . . . . . . . . . . . . . . . . . . . . 44
Automatic descaling . . . . . . . . . . . . . . . . . . . . . . . . . . . . . . . . . . . . . . . . . . . . . . . 44
Fault messages . . . . . . . . . . . . . . . . . . . . . . . . . . . . . . . . . . . . . . . . . . . . . . . . . . 47
Frequently asked questions . . . . . . . . . . . . . . . . . . . . . . . . . . . . . . . . . . . . . . . . 48
After sales service . . . . . . . . . . . . . . . . . . . . . . . . . . . . . . . . . . . . . . . . . . . . . . . . 52
Installation instructions . . . . . . . . . . . . . . . . . . . . . . . . . . . . . . . . . . . . . . . . . . . 53
Caring for the environment . . . . . . . . . . . . . . . . . . . . . . . . . . . . . . . . . . . . . . . . . 54
Electrical connection . . . . . . . . . . . . . . . . . . . . . . . . . . . . . . . . . . . . . . . . . . . . . . 55
Installation . . . . . . . . . . . . . . . . . . . . . . . . . . . . . . . . . . . . . . . . . . . . . . . . . . . . . . 56
Installation options . . . . . . . . . . . . . . . . . . . . . . . . . . . . . . . . . . . . . . . . . . . . . . . . 56
Coffee glossary . . . . . . . . . . . . . . . . . . . . . . . . . . . . . . . . . . . . . . . . . . . . . . . . . . 59
3
IMPORTANT SAFETY INSTRUCTIONS
When using electrical appliances, basic safety precautions should always be
followed, including the following:
Read all instructions before installation or use of the coffee system.
Electrical safety
Please read these instructions
carefully to prevent accidents and
machine damage.
This appliance is for household use
only. Any other use is not
recommended by the manufacturer
and could be dangerous.
This appliance complies with current
safety requirements. Improper use of
the appliance can cause personal
injury and material damage.
The manufacturer cannot be held
responsible for damage caused by
improper use of the appliance.
Before connecting the appliance to
the electrical supply, make sure
that the voltage and frequency listed on
the data plate correspond with the
household electrical supply. If in doubt,
consult a qualified electrician.
Be certain your appliance is
properly installed and grounded by
a qualified technician.
To guarantee the electrical safety of this
appliance, continuity must exist
between the appliance and an effective
grounding system. It is imperative that
this basic safety requirement be met. If
there is any doubt, have the electrical
system of the house checked by a
qualified electrician. The manufacturer
cannot be held responsible for
damages caused by the lack, or
inadequacy, of an effective grounding
system.
The appliance must be built into
cabinetry before operation to
ensure that no electrical components
are accessible. Ensure that electrical
power is not supplied to the appliance
while installation work, repairs or
maintenance is performed.
Do not use an extension cord to
connect the appliance to electricity.
Extension cords do not guarantee the
required safety of the appliance
(danger of overheating).
4
IMPORTANT SAFETY INSTRUCTIONS
Never open the housing of the
appliance. Tampering with
electrical connections or components
and mechanical parts is dangerous and
may cause machine damage.
Before service or maintenance,
disconnect the power supply by
either removing the fuse, "tripping" the
circuit breaker or unplugging the unit.
Never use a steam cleaner to clean
the appliance. Pressurized steam
could damage electrical components
and cause a short circuit.
To protect against fire, electric
shock and injury do not submerge
the cord or plugs in water or other
liquids.
Do not operate the appliance if the
cord or plug has been damaged,
or if the appliance malfunctions or is
damaged in any way. Please contact
the Miele Technical Service
Department.
Do not let the cord hang over the
edge of the table or counter, or
touch hot surfaces.
Installation
Installation work and repairs should
only be performed by a trained
technician to ensure safety. Repairs
and other work by unauthorized
persons could be dangerous.
This equipment has not been
designed for maritime use or for
use in mobile installations such as
aircraft or recreational vehicles.
However, under certain circumstances
it may be possible for installation in
these applications. Please contact the
Miele Technical Service Department
with specific requirements.
Before the appliance is connected,
the steam selector must be in the
off position to prevent an uncontrolled
escape of steam or hot water and
possible burns.
Always attach the plug to the
appliance first, then plug the cord
into the wall outlet. To disconnect, turn
the program selector to "Off", then
remove the plug from the wall outlet.
5
IMPORTANT SAFETY INSTRUCTIONS
Use
The coffee system must be cleaned
daily to prevent the growth of
harmful bacteria and mold. Please
read the "Coffee system care"
section of this manual.
Warning: Danger of scalding. The
liquids dispensed and the nozzles
themselves are very hot.
The hot water and steam
dispensed from the machine could
cause burns. Use these functions
carefully. Never direct the steam nozzle
towards your body or use this machine
to clean objects.
To prevent burns, turn the steam
selector to the "o" position when not
needed.
The steam nozzle and hot water
dispensers become very hot
during use. Always grip the steam
nozzle by the insulated collar.
Do not touch hot surfaces. Use the
handles or knobs.
6
Allow the coffee system to cool
before putting on or taking off
parts, and before cleaning.
Children should not use the
appliance unsupervised.
Do not use
outdoors.
The use of accessory attachments
not recommended by the
appliance manufacturer may result in
fire, electric shock or injury.
The water lines must be flushed
and the machine cleaned
thoroughly before the first coffee is
prepared.
Only fill the water tank with cold,
fresh drinking water. The water
must be changed daily to prevent
bacteria or mold growth.
SAVE THESE
INSTRUCTIONS
Guide to the coffee system
a Hot water dispenser
b Coffee dispensers (height-adjustable)
c Handle to open appliance front
d Steam selector
e Steam nozzle with milk frother
f Drip catch
g Program selector
h Message window
i Coffee serving buttons
j Rinse/Pre-warm button
k Hot water button
7
Guide to the coffee system
l Coffee bean container
m Slide control to select the fineness of the ground coffee
n Slide control to select the quantity of ground coffee
o Water tank
p Waste unit
q Brew unit
8
Programming
Program mode
The coffee system can be customized
to each household through the
"program mode."
To program the appliance:
If a setting is accidentally changed,
turn the program selector to "0ff"
instead of confirming it with ENTER.
The changed setting will not be saved
and the original setting will be retained.
^ Turn the program selector to
"Program mode".
The appliance is now in program mode
and will respond according to the
symbols shown under the coffee
serving buttons.
^ By pressing the - or e button,
– a programming option in the
message window can be highlighted
with an asterisk.
– the settings of the various
programming options can be
adjusted.
^ By pressing ENTER,
– a programming option highlighted
with an asterisk can be selected.
– a change to the programmed
settings is saved.
9
Programming
Choosing a language
The language for the commands in the
message window should be selected
before the machine is used.
The sub-menu will appear in the
message window.
The following languages are available:
English, Spanish, French, German,
Dutch, Portuguese and Italian.
^ Press the e button until the desired
language appears (english, espanol,
francais, deutsch, nederlands,
portugues or italiano).
^ Turn the program selector
counterclockwise to "Program mode."
The following will appear in the
message window:
^ Press ENTER to save this setting, or
turn the program selector to "0ff" to
cancel if a mistake has been made.
All text in the message window will now
appear in the selected language.
Programming option "LANGUAGE" will
be highlighted with an asterisk.
^ Press ENTER to select this
programming option.
10
Programming
Rinsing feature
The rinsing feature flushes out coffee
residue and pre-warms the coffee
system. When "Rinsing - On" is selected
the system will automatically be flushed
and pre-warmed when the appliance is
turned on. If this feature is set to
"Rinsing - Off" the system will only be
flushed and pre-warmed when the
rinse/pre-warm button is pressed.
^ Turn the program selector
counterclockwise to "Program mode."
The sub-menu will appear in the
message window.
^ Press button e, to turn the "Rinsing"
feature on or off.
^ Press ENTER to save this setting, or
turn the program selector to "0ff" to
cancel if a mistake has been made.
If "Rinsing on" is selected the unit will
automatically dispense water before
going into standby mode.
^ Press the e button, to highlight
"RINSING" with an asterisk.
^ Press ENTER to select this
programming option.
11
Programming
Determining the water
hardness
The hardness of the water (tap or
bottled) used in the coffee system must
be determined and programmed into
the appliance. The water hardness will
determine how frequently the unit must
be descaled to maintain the coffee
system properly. The machine monitors
the volume of water passing through it
in conjunction with the hardness of the
water and will indicate when descaling
is necessary. Your local water authority
can tell you the hardness of your tap
water or you can measure the hardness
yourself using the enclosed test strip.
^ Dip the strip in your drinking water for
one second, then shake off excess
water.
The result will be evident after a minute.
12
If the water hardness is greater than
40 gr/gal (700 ppm), the water must
be mixed in equal parts with
non-carbonated mineral water to
prevent excessive limescale
build-up. Never use distilled water.
Program
setting
Water
Hardness
gr/gal
ppm
Hardness 1 1 (soft)
0-3
0 - 130
Hardness 2 1 (soft)
4-7
130 - 250
Hardness 3 2 (medium)
7 - 14
250 - 380
14 - 21
over 21
over 380
Hardness 4 3 (hard)
4 (very hard)
Programming
Setting the water hardness
^ Press ENTER to save this setting, or
turn the program selector to "0ff" to
cancel if a mistake has been made.
^ Turn the program selector
counterclockwise to "Program mode."
^ Press the e button to highlight
"WATER HARDN." with an asterisk.
^ Press ENTER to select this
programming option.
The sub-menu will appear in the
message window.
^ Press the e button to set the water
hardness level (hardness 1 - 4).
13
Programming
Setting the drink temperatures
The appliance can be set at different
temperatures to suit varying coffee
drinking preferences.
Five temperature levels are available for
each drink option.
Depending on the programming option
selected, the sub-menu is shown in the
message window as follows:
^ Press the e button to set the temperature to minimum, low, medium,
high or maximum.
^ Turn the program selector
counterclockwise to "Program mode."
^ Press the e button to highlight a
drink option
"TEMP. L. COFFEE" (long),
"TEMP COFFEE" (regular) or
"TEMP. S. COFFEE" (espresso)
with an asterisk.
A different temperature can be
programmed for each drink.
^ Press ENTER to select the option.
14
^ Press ENTER to save this setting, or
turn the program selector to "0ff" to
cancel if a mistake has been made.
Programming
Pre-brewing feature
When the pre-brewing feature is on, the
freshly ground coffee is moistened with
a little hot water to allow the aroma and
crema of the coffee to fully develop.
The sub-menu will appear in the
message window.
When the pre-brewing feature is off, the
hot water is forced through the coffee
immediately.
^ Press the e button to set the
pre-brewing process on, off or to
"long" (an extra long pre-brew).
^ Turn the program selector
counterclockwise to "Program mode."
^ Press the e button to highlight
"PREBREWING" with an asterisk.
^ Press ENTER to save this setting, or
turn the program selector to "0ff" to
cancel if a mistake has been made.
When making coffee with the
prebrewing feature on, "PREBREWING"
will appear in the message window
after the coffee has been ground.
^ Press ENTER to select this option.
15
Programming
Pre-grinding feature
The pre-grinding feature allows a new
portion of beans to be ground after
each coffee is dispensed, so there is
always ground coffee ready. This saves
time if coffee is dispensed frequently.
To preserve aroma, the pre-grinding
feature should be turned off when only
preparing coffee occasionally.
The sub-menu will appear in the
message window.
^ Press the e button to turn the
pre-grinding feature on or off.
^ Turn the program selector
counterclockwise to "Program mode".
^ Press the e button to highlight
"PREGRINDING" with an asterisk.
^ Press ENTER to select this option.
16
^ Press ENTER to save this setting, or
turn the program selector to "0ff" to
cancel if a mistake has been made.
Programming
Hot water feature
When the feature "Programmed hot
water" is turned on, the machine will
dispense a precise, pre-programmed
quantity of hot water when the hot water
button d is pressed. When the feature
is turned off, the machine will dispense
hot water until the hot water button d
is pressed again. A max. amount of
9 oz. can be dispensed from the
machine.
The sub-menu will appear in the
message window.
^ Press the e button to set the feature
on or off.
^ Press ENTER to save this setting, or
turn the program selector to "0ff" to
cancel if a mistake has been made.
^ Turn the program selector
counterclockwise to "Program mode".
^ Press the e button to highlight
"PROG. H. WATER" with an asterisk.
^ Press ENTER to select this option.
17
Programming
Total coffee counter
The feature "Total coffee" will display the
number of cups of coffee (espresso,
coffee and long coffee) that have been
dispensed to date.
The number of coffees that have been
dispensed will be displayed in the
message window.
^ Press ENTER to return to the main
menu.
^ Turn the program selector
counterclockwise to "Program mode."
^ Press the e button to highlight
"TOTAL COFFEE" with an asterisk.
^ Press ENTER to select this option.
18
Programming
Setting the standby timer
To help create a more energy efficient
coffee system the machine can be set
to power down after a programmed
time period.
The standby time can be set in
15 minute increments up to 3 hours.
The time is measured from the last time
a drink was dispensed.
^ Turn the program selector
counterclockwise to "Program mode".
^ Press the e button to highlight
"TIMER" with an asterisk.
The sub-menu will appear in the
message window.
^ Press the e or - button to select the
required length of time. The time can
be set in 15 minute increments.
^ Press ENTER to save this setting, or
turn the program selector to "0ff" to
cancel if a mistake has been made.
If the rinse feature is set to "On" and a
drink was already dispensed, the
system will be rinsed automatically
before going into standby.
^ Press ENTER to select this option.
19
System lock
The coffee system can be locked so
that it cannot be used by children or
those not familiar with the operating
instructions.
Deactivating the system lock
Activating the system lock
^ Turn the program selector
counterclockwise to the "Lock"
position.
^ Turn the program selector
counterclockwise to the "Lock"
position.
The following will appear in the
message window:
The following will appear in the
message window:
^ Press and hold the - button for
10 seconds.
The following appears in the message
window:
^ Press and hold the - button for
10 seconds.
The following appears in the message
window:
The appliance is now locked and will
not operate. The system will remain
locked and the lighting will remain
turned off even if the program selector
is turned.
20
The machine is now unlocked and
ready for use.
Before using the coffee system
The appliance must be correctly
installed and connected before the
first use. Please see the “Installation
instructions.”
Before using the coffee system, certain
parts need to be cleaned and the water
lines need to be flushed.
^ Hand wash with hot water and liquid
dish soap or if removable place in the
dishwasher:
– coffee bean container,
– coffee and hot water dispensers,
– steam nozzle.
Be aware that with frequent cleaning
in the dishwasher food remnants
e.g. tomato sauce, may cause parts
to discolor.
^ Hand wash with hot water and liquid
dish soap:
– water tank.
^ Rinse thoroughly with warm water:
– brew unit,
– drip sponge.
^ Flush the system twice to make sure
that all water lines are clean.
See "Coffee system care" for more
information.
21
Water tank
Filling the water tank
The water tank must be washed and
filled with fresh drinking water before
each day of use.
A reminder will appear in the message
window when the unit is first turned on.
^ Open the lid and fill the container
with cold drinking water to within
about 1" (2 cm) of the top.
Never add hot water or any other
liquid except cold water to the water
tank.
^ Close the lid and place the tank in
the machine, pushing it straight
back.
^ Open the front of the machine.
^ Lift the water tank up and out of the
appliance.
22
Coffee bean container
Filling the coffee bean
container
Only put pure espresso or coffee
beans in the container. Anything else
will damage the grinder, i.e. ground
coffee, hot cocoa, instant coffee, or
treated coffee beans (flavorings,
caramel, or sugar).
Do not remove the coffee bean
container from the appliance unless
it is completely empty, otherwise
coffee beans will spill out.
^ Carefully pull the container out as far
as it will go so that the lid is visible.
Lift the lid.
^ Fill the container with coffee beans to
within about 1" (2 cm) of the top.
^ Close the lid and push the container
back into place.
^ Shut the appliance door.
23
Setting the serving sizes
The flavor of the coffee depends on the
type of coffee, how finely the beans are
ground and the quantity of water used.
To ensure the machine uses exactly the
amount of water to suit your taste and
your cups, there is a choice of three
serving sizes for espresso/coffee.
Adjusting the coffee dispensers
The height of the coffee dispensers are
adjustable to suit different cup sizes.
The espresso button a dispenses a
standard size espresso.
The coffee button b dispenses coffee
for a standard size coffee cup. It uses
the same quantity of ground coffee as
an espresso, but adds more water.
The long coffee button c dispenses
more water, suitable for a large coffee
cup or mug. Only the volume of water is
increased, resulting in a milder flavor.
The volume of water dispensed by
each button can be adjusted to your
taste.
24
^ Gently pull the dispensers up or
down.
Setting the serving sizes
Coffee and espresso
^ Turn the program selector clockwise
to the "On" position (with or without
lighting).
The following will appear in the
message window:
If the machine is cold and the rinsing
feature has been selected, the following
message will then be displayed:
^ Place a cup under the two coffee
dispensers.
Coffee is always dispensed
simultaneously from both spouts.
^ Press and hold the coffee serving
button appropriate to the size of cup
until the cup is full as desired. A max.
amount of 9 oz. can be dispensed
from the machine. Release the coffee
serving button.
The following appears in the message
window during this process:
Once the water is hot, the following
appears in the message window:
The procedure is the same for the other
two coffee serving buttons.
The programmed volume will now be
dispensed every time that coffee
serving button is pressed.
25
Setting the serving sizes
Hot water
To program the volume of hot water
dispensed, the hot water feature must
be programmed "on".
(See "Programming/Hot water feature").
Once the water is hot, the following will
appear in the message window:
^ Turn the program selector clockwise
to the "On" position (with or without
lighting).
The following will appear in the
message window:
If the machine is cold and the rinsing
feature has been selected, the following
message will then be displayed:
^ Place a cup under the hot water
dispenser.
^ Press and hold the hot water button
d. There will be a few seconds
delay before water is dispensed.
When the cup is full as desired
release the hot water button d. A
max. amount of 9 oz. can be
dispensed from the machine.
The following appears in the message
window during this procedure:
If the feature "Prog. hot water" is "off",
the machine will continue to dispense
hot water until the hot water button d
is pressed again.
26
Making coffee
Pre-warming
Pre-warming the system
The pre-warm feature allows the system
and the cups to be pre-warmed to fully
develop the flavor and aroma of your
coffee.
Pre-warming cups
^ Place a cup or container under the
two coffee dispensers.
^ Place the cup under the hot water
dispenser.
^ Press the rinse/pre-warm button e.
The following will appear in the
message window:
^ Press the hot water button d and
half fill the cup.
^ Press the hot water button d again
to stop.
^ Leave the cup for a few seconds to
warm, then pour the water away.
^ Press ENTER to start the rinsing
process.
Hot water will be dispensed from both
nozzles, warming the system. The
message window will read:
^ Place the empty, pre-warmed cup
under the coffee dispensers, and
prepare the coffee as you normally
would.
27
Making coffee
Espresso or coffee
^ Place a cup under both coffee
dispensers.
Preparing two cups simultaneously
^ Place a cup under each of the coffee
dispensers.
2x
^ Press the desired coffee button once.
The coffee will be prepared.
The following message will appear in
the message window, depending on
the button pressed:
^ Press the desired coffee button twice
in quick succession to bring up two
cups g in the message window.
The cups will be filled in two stages
with a slight pause in between.
Depending on the serving selected, the
following will appear in the message
window:
If "Pre-brewing" is turned on, the
following will appear in the message
window:
Canceling preparation
^ To cancel a coffee being dispensed,
press any one of the coffee buttons to
stop preparation immediately.
28
If "Pre-brewing" is on, the following will
appear in the message window after
the grinding process:
Making coffee
Cappuccino
Cold, skim milk is best for creating
froth. Ideally it should be prepared in a
cold, stainless steel pitcher.
^ As soon as steam appears from the
nozzle, shut the steam off by turning
the steam selector clockwise, to the
"o" position.
^ Fill a small, cold, stainless steel
pitcher a third of the way with cold
milk while dispensing espresso.
^ Position the steam nozzle just below
the surface of the milk in the pitcher
and slowly turn the steam selector
counterclockwise.
^ Direct the steam nozzle toward the
drip tray and slowly turn the steam
selector counterclockwise.
Any condensed water in the nozzle will
be expelled.
^ Move the pitcher in circles until a
thick froth appears, then lower the
nozzle deeper into the milk to heat
the rest.
Do not allow the milk to boil. The
foam will collapse and a skin will
form.
29
Making coffee
^ Turn the steam off by turning the
steam selector clockwise to the "o"
position.
^ Pull the pitcher away from the steam
nozzle. Carefully pour the milk into
the coffee and spoon some froth onto
the surface.
Once the steam nozzle has cooled it
should be cleaned immediately, it is
harder to clean once the milk has dried.
^ Dispense a quick spurt of steam into
an empty cup.
^ Wipe milk off the nozzle with a damp
sponge.
30
Dispensing hot water
Hot water
^ Place a cup under the hot water
dispenser.
^ Press the hot water button d.
Hot water will be dispensed.
^ Press the hot water button d again
to stop the hot water flow.
The machine will stop automatically
if a volume has been programmed in
for hot water and feature "Prog. hot
water" is activated.
31
Setting the coffee grinder
Adjusting the coffee grinder
To adjust the grinder setting
To prevent machine damage, the
slide control for the coffee grinder
setting should be moved carefully
and in small adjustments.
– If the espresso flows too quickly into
the cup, the beans have been
ground too coarsely. The grinder
should be adjusted to a finer setting.
– If the espresso only trickles into the
cup, the beans have been ground
too fine and the coffee will be bitter.
The grinder should be adjusted to a
coarser setting.
– If the crema is evenly colored but
pale, the ground coffee is too coarse.
– If the crema is very dark brown on
one side, graduating almost to white
on the other, the ground coffee is too
fine.
32
^ Push the upper slide control to the
left for finer grinding or to the right for
coarser grinding.
You should be able to feel the
notches when moving the slide
control.
If the slide control will not move:
^ Close the machine and dispense a
cup of coffee. Then try to move the
slide control again.
Setting the coffee grinder
Setting the quantity
To adjust the quantity setting:
Both the flavor and crema of the coffee
depend on the quantity of ground
coffee used. The greater the quantity,
the stronger the flavor will be.
The quality of the crema is also affected
by the quantity:
– If the crema is evenly colored but
pale, increase the quantity setting.
– If the crema is very dark brown on
one side, graduating almost to white
on the other, decrease the quantity
setting.
^ Push the lower slide control to the left
to grind less coffee or to the right to
grind more coffee.
33
Coffee system care
Daily care
At the end of each day, the coffee
dispensers and the brew unit must be
flushed clean.
,Warning! Allow the appliance to
cool before cleaning. Hot surfaces
can cause burns.
The components of the coffee system
must be cleaned after each day of use
to prevent mold and bacteria growth.
^ The following components can either
be hand washed with hot water and
liquid dish soap or placed in the
dishwasher if removable:
– coffee and hot water dispensers,
– steam nozzle,
– waste unit,
– metal grate and plastic tray.
^ Press the Rinse/pre-warm button.
The message window will read:
Be aware that with frequent cleaning
in the dishwasher food remnants
e.g. tomato sauce, may cause parts
to discolor.
^ Hand wash with warm water and
liquid dish soap:
– water tank,
^ Press ENTER and the display will
change to:
– drip catch.
^ Rinse thoroughly with warm water:
– brew unit,
– drip sponge.
Hot water will flow through and clean
the brew unit and coffee dispensers.
34
Coffee system care
Exterior
Interior
^ The exterior can be cleaned with hot
water and liquid dish soap applied
with a soft sponge. Do not use
abrasive cleansers or scrubbers.
The interior can be cleaned with hot
water and liquid dish soap. Wipe dry
using a soft cloth.
^ Wipe dry using a soft cloth.
Stainless steel
Stainless steel surfaces can be cleaned
using a non-abrasive stainless steel
cleaner.
To help prevent resoiling, a conditioner
for stainless steel can also be used.
Apply sparingly with even pressure.
A funnel is situated on the inside of the
door. A sponge under this funnel
catches drips. Rinse the sponge after
each day of use.
Stainless steel colored
controls
These controls may become discolored
or damaged if not cleaned regularly
with hot water and liquid soap.
Do not use a stainless steel cleaner on
these controls.
Wipe up any spills of descaling
solution immediately!
35
Coffee system care
Drip catch
The drip catch has a red float that will
rise when the catch is full. The catch
should be cleaned when the float rises
and at the end of each day to prevent
spills and odors.
^ Take the drip catch out of the
appliance. Clean it by hand with
warm water and liquid dish soap or
place in the dishwasher.
^ Dry all parts and replace them in the
reverse order.
^ Close the door.
^ Remove the metal grate and plastic
tray from the drip catch and clean by
hand with warm water and liquid dish
soap or place in the dishwasher. Be
careful not to loose the red float.
^ Open the appliance door.
36
Coffee system care
Waste unit
Steam valve
Clean the steam valve after every use, it
becomes harder to clean once the milk
has dried.
^ Lift the waste unit up and out.
^ Clean the waste unit by hand with hot
water and liquid dish soap or place in
the dishwasher.
^ Loosen the upper screw, a, and pull
the sleeve of the steam valve down,
b.
^ Clean the sleeve with warm water
and liquid dish soap (or in the
dishwasher) and dry.
^ Push the waste unit back into place,
positioning it over the notches.
If "WASTEUNIT MISSING" appears
in the message window after
cleaning, the waste unit was not
seated correctly. Reposition the unit.
Close the door and press ENTER.
^ Push the sleeve onto the steam
nozzle, a, and tighten the screw, b.
The appliance will not operate when
this message appears.
37
Coffee system care
Brew unit
Clean the brew unit by hand only.
The moving parts and the rubber
gaskets cannot be cleaned in a
dishwasher.
^ Dry the funnel to prevent ground
coffee from sticking.
^ After cleaning press "PRESS".
Lubricate the brew unit with the
enclosed silicon every 500 cups
(see "Lubricating the brew unit").
^ Remove the waste unit. The brew unit
can only be removed after the waste
unit has been taken out.
^ Hold the brew unit with the handle
and press down with your thumb on
"PRESS".
^ Pull the brew unit out.
^ Clean the brew unit thoroughly under
running warm water. Do not use
detergent.
^ Rub away any coffee residues from
the filters with a sponge.
One filter is in the funnel, the second is
to the left of the funnel. The second
filter is removable (see "Cleaning the
brew unit filters".)
38
^ Push the brew unit in the track
straight into the appliance without
pressing "PRESS" until it clicks into
place.
Coffee system care
Rinsing cycle:
Degreasing the brew unit
The natural oil found in coffee can
cause the brew unit to clog. The
message "Rinsing cycle" will flash in the
message window after 500 cups to
remind you to clean the unit with the
enclosed detergent tablets. These
cleaning tablets can be purchased
from your Miele dealer or the Miele
Technical Service Department.
The display will read:
^ Press e, to select "Rinsing cycle" with
the asterisk.
^ Remove the waste unit.
^ Press ENTER.
The display will read:
^ Take out the brew unit and put the
detergent tablet in the brew unit
funnel.
^ Return the brew unit and waste unit
to the appliance and close the door.
^ Set a 3 cup (25 oz) container under
the coffee dispensers.
^ Press the rinse/pre-warm button e.
(The unit must be pre-heated and
ready to use otherwise the button will
not respond.)
A small amount of water will flow out of
the coffee dispensers. After a pause
more water will flow out. This process
will run 4 times, dispensing 2 cups (17
oz) of hot water. The whole process will
take about 5 minutes.
^ At the end of the cleaning cycle the
display will read:
The brew unit is now clean and ready to
use.
39
Coffee system care
Cleaning the brew unit filters
^ Wipe away any coffee residues from
the steel filter in the funnel of the
brew unit with a sponge.
The chrome filter to the left of the
funnel can be removed for thorough
cleaning. Check and clean the chrome
filter regularly.
^ Remove the brew unit.
^ Fit the enclosed allen wrench to the
connection point (see illustration) in
the brew unit. Turn it
counterclockwise while supporting
the chrome filter from below.
^ Remove the chrome filter with the
screw.
^ Clean the filter with hot water and dry.
^ Return the chrome filter to the brew
unit and secure it by turning the allen
wrench clockwise. Press slightly
against the filter to allow threading.
40
Coffee system care
Lubricating the brew unit
^ Remove the brew unit.
^ Clean and lubricate the bolt, a, and
the joints, b.
Check that the brew unit is in the basic
position with the funnel slightly lifted
and the socket in the vertical position
(see illustration).
^ Return the brew unit to the appliance.
^ Lubricate the joints, a, the axle, b,
the tracks, c, and the gasket, d,
with silicon grease.
41
Coffee system care
Resetting the brew unit’s basic
position:
Change the gaskets
^ Press on the latch, a, and press the
funnel down, b.
^ If a leak occurs change the gaskets.
^ Push the connection piece to the far
left, c.
^ Press "PRESS" once.
The basic position shown above is
reset and the brew unit can be set back
into the machine.
42
Three gaskets are enclosed with the
machine. One gasket is located
between the steam valve and the
sleeve. The other two gaskets are
located behind the brew unit at the
water feed tube.
Coffee system care
Changing the light bulb
^ Open the appliance door.
Before changing the light bulbs,
disconnect the appliance from the
power supply by either removing the
fuse, unplugging it, or manually
"tripping" the circuit breaker.
When in use the halogen bulbs
become extremely hot, and they can
burn your hands. Do not attempt to
change the bulbs until they have
had sufficient time to cool.
^ Insert a small screw driver into the
opening and carefully press up, a.
^ At the same time pull the light cover
down, b.
Do not touch the bulb surface.
Fingerprints or body oils deposited
on the bulb will decrease its life.
Please follow the bulb
manufacturer’s instructions.
^ Pull the old bulb out of its socket.
^ Replace with a new bulb
(12 V, 5 watts).
^ Close the lamp cover.
43
Descaling the appliance
The coffee system must be descaled
regularly. The time period depends on
the water hardness set. The appliance
will display a reminder message and
will eventually lock if not descaled.
^ Add 1 liter of water to the water
tank. Dissolve two of the enclosed
descaling tablets in the water.
The message window will first display:
"DESCALE AFTER COFFEES: 100“.
^ Close the door.
^ Close the water tank and insert into
position.
The descaling will take place in the
automatic descaling program.
This message will appear until the
appliance is descaled or locks. When
the count is down to zero, the
appliance will lock and the message
window displays:
The appliance can only be used again
once descaling has been performed.
Let the machine cool before
descaling. Remove the sleeve of the
steam nozzle to avoid damage from
the descaling agent.
Only use the enclosed descaling
tablets for descaling.
The descaling tablets are specially
designed for descaling this coffee
system. Other agents may damage
the machine and affect the taste of
the coffee and hot water. The
descaling tablets can be purchased
from Miele.
To prevent damage to the exterior of
the machine wipe up any descaling
solution spills immediately!
44
Automatic descaling
^ Turn the program selector
counterclockwise to the "Program
mode" position.
^ Press e, to select "Descaling" with
the asterisk.
^ Press ENTER.
Descaling the appliance
The message window will read:
^ Place a 1 liter container below the hot
water dispenser.
The coffee system will begin the
automatic descaling. The display will
read:
Do not open the door during
descaling and do not turn the
program selector to "0ff". This will
interrupt the descaling process. If
the process is interrupted, add water
to the reservoir, turn the program
selector back to "Program mode"
and close the door. Also, empty the
containers under the dispensers and
steam nozzle as more water will be
expelled.
The pump will introduce a small amount
of descaling solution into the system,
then rest briefly to allow the solution to
take effect. The process lasts about
30 minutes.
Throughout the process, check the
collecting containers to make sure that
they do not overflow.
^ Place a 1 liter container below the
steam nozzle and turn the steam
selector counterclockwise.
When descaling is complete, the
display will read:
45
Descaling the appliance
When the water tank is empty, the
display will read.
^ Turn the steam selector clockwise to
the "o" position.
^ Press ENTER.
^ Turn the steam selector clockwise to
position "o" and press ENTER.
^ If the program selector is on
"Program mode", the display will
read:
The display will read:
The unit is now descaled and ready for
use.
The machine needs to be rinsed to
clean out the descaling residue.
^ Fill the water tank three quarters of
the way with cold water and place it
back into the machine.
^ Place the empty 1 liter containers
below the hot water dispenser and
the steam nozzle and turn the steam
selector counterclockwise.
^ Allow the water to run through the
spout and nozzle completely.
46
Fault messages
If an error occurs a fault message will appear. With the following guide, minor
problems can be fixed without a service call.
Message
Possible fault
Fix
Fill coff. beans
Ready for use
Coffee bean container is empty.
Refill with coffee beans.
Brew unit block.
The brew unit is clogged.
Clean and lubricate the brew unit. See
"Coffee System Care".
Brew unit miss.
The brew unit is not properly seated.
Take out the brew unit and reseat.
Descale
The unit needs to be descaled.
Descale the unit.
Expel air
Air has built up in the system. The unit
is blocked.
–
–
–
–
Fill the water tank.
Turn the program selector to "On with
light" and place containers below the
hot water dispenser and the steam
nozzle.
Press the hot water button, turn the
steam selector counterclockwise
and let water run out until it streams
steadily.
Press the hot water button again.
Turn the steam selector to "o" to shut
off the water.
Fresh water?
A reminder to fill the water tank with
fresh water.
Waste unit miss.
The waste unit is missing or not seated
properly.
Return or reposition the waste unit.
Empty waste unit
press ENTER.
The waste unit is full. The system will
not dispense coffee until the waste unit
is emptied.
Empty waste unit and press ENTER.
Energy-save
mode . . .
press ENTER
The unit is in the energy-save mode.
Light is off.
Press ENTER.
Watersystem
fault
There is a problem in the water lines.
Call Miele Technical Service.
Fill watertank
The water tank is empty or missing or
the float in the water tank is stuck.
Empty water tank, rinse, fill with fresh
water and replace.
47
Frequently asked questions
What if...
Possible fault
. . . there is no prompt The unit has no
in the message
power.
window?
. . . the light does not
illuminate?
– Is the door open?
– Is the unit in
standby mode?
– Is the unit locked?
Fix
Is the door closed?
Check that the circuit has not
tripped, the fuse has blown or
that the appliance is unplugged.
Otherwise contact the Miele
Technical Service Department.
If not, the light bulb has burned
out.
See "Changing the light bulb".
. . . nothing comes out The steam nozzle is
of the steam nozzle? clogged.
Carefully poke the opening with
a pipe cleaner.
. . . the grinding is
louder that normal?
There could be
pebbles among the
coffee beans.
Immediately turn off the unit.
Call the Miele Technical Service
Department.
. . . there is a low
grinding noise?
The coffee bean
Wait until the sound stops. Refill
container is empty. A the coffee bean container.
message appears in
the message window.
. . . the display shows
"Fill coff. beans
Ready for use" but
there are still beans in
the coffee bean
container?
The grinder has
overheated. This
happens after
brewing 40 cups in
quick succession.
Turn the coffee system off and
let the grinder cool.
. . . the unit suddenly
turns off?
Is the door closed?
Close the door properly.
The water temperature could be too
high.
The unit stops until the water
has cooled.
There could be stones In this case the unit shuts off
in the coffee beans.
after 20 secs. to prevent
damage. Call Technical Service.
48
Frequently asked questions
What if...
Possible fault
Fix
. . . the espresso is
dispensed too
quickly?
The grinder is set to Select a finer setting.
too coarse of a
setting.
. . . the espresso is
dispensed too
slowly?
– The grinder is set – Select a coarser setting.
to too fine of a
setting.
– The brew unit
– See "Coffee system care".
needs to be
cleaned.
. . . the coffee is not
hot enough?
Was the system
warmed?
Pre-warm the system and cups.
Check the temperature setting of
the coffee selected.
Check if the brew unit is clogged.
Clean the brew unit.
. . . coffee was not
dispensed although
the beans were
ground and the water
tank is full?
Was the grinder set
to the finest and to
the maximum
quantity of coffee?
Press ENTER once.
The program will stop.
If descaling agent is in the water
tank, empty the water tank and
rinse thoroughly with fresh water to
clean away any descaling agent.
The descaling process cannot be
canceled once the steam selector
is turned. The process must be
completed. This is a safety feature
so that the unit descales
completely.
. . . the descaling
process was started
accidently?
. . . the warm up time
is longer, less water
is dispensed and the
machine is not
working properly?
The grinding process might have
taken too long not allowing time for
brewing.
Set the grind size or the grinding
amount to a different position.
The unit needs
descaling.
Descale the machine.
See "Descaling the appliance."
49
Frequently asked questions
What if...
Possible fault
. . . no water runs out of
the dispensers?
The brew unit is clogged. Clean the brew unit filters.
. . . there is no crema?
Check if the grinder is set Adjust the coffee grinder
to the coarsest or finest
setting.
setting.
The coffee is not fresh.
Fix
Use fresh coffee beans.
The coffee dispensers are Lower the height
set too high.
adjustable dispensers.
Check the temperature
setting of each drink
option.
If the temperature is too
high, the crema will
collapse.
. . . the grinder setting
slide won’t move?
Coffee beans are
blocking movement.
Close the unit and
dispense a coffee.
The slide control can now
be moved.
. . . water appears in the
waste unit?
This is not a fault. This is
water residue from the
cleaning process.
Empty the waste unit.
. . . the brew unit cannot The brew unit is only
be removed?
accessible, when the
waste unit is removed.
If the brew unit cannot be
removed even when the
waste unit is removed it is
not in the basic position.
Close the door and turn
the appliance on.
The brew unit will
reposition itself to the
basic position.
. . . the brew unit cannot The brew unit is not in the The funnel must be lifted
be pushed into the
basic position.
up and the connection
appliance?
piece must be in an
upright position.
See "Coffee system care/
Resetting the basic
position."
50
Frequently asked questions
What if the display shows the
alternating messages "RINSING
CYCLE" and "SELECT PRODUCT
READY FOR USE"?
The display will read:
This is a reminder to run the rinse cycle
before the next use.
To clear the message a rinse cycle
must be run.
^ Fill the water container with fresh tap
water.
^ Press e, to select "Rinsing cycle" with
an asterisk.
^ Set a container (34 ounces [1 liter])
under the spouts.
^ Press the rinse button.
^ Press ENTER.
The rinse cycle lasts about 5 minutes.
When complete, the coffee system is
ready to use.
51
After sales service
In the event of a fault which you cannot
easily fix yourself, please contact the
Miele Technical Service Department at
the contact information on the back of
this booklet.
When contacting the Technical Service
Department, please quote the model
and serial number of your appliance
given on the data plate inside the
appliance.
MieleCare
MieleCare, our Extended Service
Contract program, gives you the
assurance of knowing that your
appliance investment is covered by
5 years of worry free ownership.
MieleCare is the only Extended Service
Contract in the industry that guarantees
repairs by a Miele Authorized Service
Provider using genuine Miele parts.
Only genuine Miele parts installed by
factory trained professionals can
guarantee the safety, reliability, and
longevity of your Miele appliance.
Please note that unless expressly
approved in writing by Miele’s Service
department, Extended Service
Contracts offered by other providers for
Miele products will not be recognized
by Miele. Our goal is to prevent
unauthorized (and untrained) service
personnel from working on your Miele
products, possibly doing further
damage to them, you and/or your
home.
To learn more about MieleCare
Extended Service Contracts, please
contact your appliance dealer or visit
us online at:
www.store.miele.com
52
Installation instructions
Caring for the environment
Disposal of packing material
Disposal of an old appliance
The cardboard box and packing
materials protect the appliance during
shipping. They have been designed to
be biodegradable and recyclable.
Please recycle.
Old appliances may contain materials
that can be recycled. Please contact
your local recycling authority about the
possibility of recycling these materials.
Ensure that any plastic wrappings,
bags, etc. are disposed of safely and
kept out of the reach of children.
Danger of suffocation!
54
Ensure that the appliance presents no
danger to children while being stored
for disposal. Before discarding an old
appliance, unplug it from the outlet, cut
off its power cord and remove any
doors to prevent hazards.
Electrical connection
Important
All electrical work should be
performed by a qualified electrician
in strict accordance with national
and local safety regulations.
Installation, repairs and other work
by unqualified persons could be
dangerous. The manufacturer
cannot be held responsible for
unauthorized work.
The coffee system comes equipped
with a 6 ft (1.8 m) power cord with a
NEMA 5-15P molded plug for
connection to a 120 V, 15 A, 60 Hz
power supply.
Ensure that power is not supplied to
the appliance while installation or
maintenance work is performed.
Verify that the voltage, load and circuit
rating information found on the data
plate, match the household electrical
supply before installing the coffee
system.
If there is any question concerning the
electrical connection of this appliance
to your power supply, please consult a
licensed electrician or call Miele’s
Technical Service Department.
U
V
1-800-999-1360
1-800-565-6435
WARNING:
THIS APPLIANCE MUST BE
GROUNDED
55
Installation
Installation options
The coffee system is designed to be built into cabinetry.
56
Installation
A speciality display cabinet is also available from your dealer or Miele’s Technical
Service Department as an installation option.
57
Installation
,Make sure power is not supplied
to the appliance while installation or
maintenance work is performed.
Disconnect the power supply to the
work area by unplugging the unit,
tripping the circuit breaker or
removing the fuse.
The coffee system must be installed
into cabinetry before being used.
^ Plug the appliance into the electrical
outlet.
^ Push it all the way back into the
cabinet, until there is resistance.
^ Open the front of the machine and
partially tighten the screws.
58
^ Carefully turn the lower screws, a, to
center the machine in the cabinet.
^ To secure the appliance in the
cabinet, tighten the upper screws, b,
carefully by hand. Do not use an
electric screwdriver.
Coffee glossary
Arabica is a high quality coffee bean. It
is long and flat and with a groove
running around it. The caffeine content
is between 0.8 and 1.3 %. It is strong
and aromatic, but less bitter than the
Robusta bean.
Caffè is the Italian term for a standard
espresso.
Caffè americano is a thin espresso
with water added.
Caffè corretto is espresso with a dash
of something stronger such as a
liqueur.
Caffè freddo is iced espresso. An
extended version of espresso served
with ice.
Caffè latte is a double espresso in a
large cup filled with hot milk, topped
with little or no foam.
Caffè mocha consists of one third
espresso, one third hot milk and one
third cocoa.
Caffè ristretto is the strongest most
concentrated espresso. The water is
reduced to 2 tablespoons (30 ml) per
serving.
Caffeine - the caffeine content of
espresso is only a third or half the
caffeine found in coffee. The stronger
the roast, the less caffeine the espresso
will contain.
Cappuccino is espresso with frothed
milk. It is equal parts espresso, hot milk
and foam.
Cappuccino scuro is a "dark"
cappuccino with more espresso and
less hot milk.
Cappuccino senza schiuma is a
cappuccino without the froth.
Crema is the sign of the perfect cup of
espresso - a fine, nut or cinnamon
brown foam on the surface of the
espresso, which is only created when
the pressure is sufficiently high. The
crema contains foamed oils which are
rich in flavor and aroma.
Espresso, see Caffè.
Espresso corto is a "short", strong
espresso.
Espresso doppio is a double portion of
espresso.
Espresso lungo is a longer, less
concentrated version of espresso
served in a standard coffee cup.
Espresso ristretto is a double
strength, bitter tasting espresso.
Macchiato is espresso with a dollop of
hot, foamed milk giving a dappled
(macchiato) appearance.
Pre-warming the cups is
recommended to prevent the espresso
from cooling too quickly.
Robusta is a round and convex coffee
bean with an almost straight groove.
The caffeine content is around 2 to
2.5%. It is more bitter than the Arabica
bean.
Cappuccino chiaro is a "light"
cappuccino with less espresso and
more hot milk.
59
Alteration rights reserved / 44 / USA/CDN - 4606
For most updated manual check Miele website.
M.-Nr. 06 494 750 / 02