1
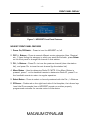
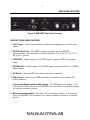
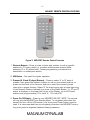
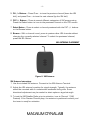
Magnum Dynalab MD 606T
XM Satellite Radio
INSTRUCTION MANUAL
-2TABLE OF CONTENTS
INTRODUCING XM SATELLITE RADIO
3
How to Subscribe
3
THE MD-606T – INTRODUCTION
4
Product Overview
4
FRONT PANEL DISPLAY
6
REAR PANEL FEATURES
7
MD-606T REMOTE CONTROL FEATURES
8
XM ANTENNA PLACEMENT
9
LCD DISPLAY FEATURES
10
TUNER CONFIGURATION & OPERATION
11
XM Satellite Radio Activation
11
Tuning XM Channels
11
Programming & Recalling XM Preset Channels
11
RS232 PROTOCOL
RS-232 Commands & Syntax
12
13
ERROR MESSAGES
14
TROUBLESHOOTING
15
SPECIFICATIONS
16
LIMITED WARRANTY
17
IMPORTANT SAFETY INSTRUCTIONS
18
-3-
INTRODUCING XM SATELLITE RADIO
It’s a new vision of distributed audio. XM Satellite radio features a stirring
collection of channels with Jazz, Classical, Rock and a variety of other music
stations, plus news, sports, comedy, talk and entertainment, all with coverage
across Continental North America.
Questions? Visit www.magnumdynalab.com/xmradio-faq.htm or
www.xmradio.com in the USA or www.xmradio.ca in Canada.
How to Subscribe
When you first unpack your MD-606T, you can listen to your device by tuning to
the XM Preview station, but to unlock its full station assortment, you will have to
subscribe to the XM Radio service. To do so, visit XM on the Web at
www.xmradio.com in the USA or www.xmradio.ca in Canada or by calling XM’s
Listener Care at 1-800-XM-RADIO (1-800-967-2346). Customers should have
their Radio ID ready; the Radio ID can be found by selecting channel 0 on the MD606T.
A Warning Against Reverse Engineering:
Technology. It is prohibited to copy, decompile, disassemble, reverse engineer,
or manipulate any technology incorporated in receivers compatible with the XM
Satellite Radio system. Furthermore, the AMBE (R) voice compression software
included in this product is protected by intellectual property rights including patent
rights, copyrights, and trade secrets of Digital Voice Systems, Inc. The user of
this or any other software contained in an XM Radio is explicitly prohibited from
attempting to copy, decompile, reverse engineer, or disassemble the object code,
or in any other way convert the object code into human-readable form. The
software is licensed solely for use within this product.
-4THE MD-606T – INTRODUCTION
Welcome to Magnum Dynalab and congratulations on your purchase of the MD-
606T XM Satellite Radio.
Magnum Dynalab has been designing and manufacturing high-performance audio
equipment for over 20 years. Our commitment to our customers has been to use
only the world’s finest components, to consistently deliver outstanding build
quality, and to provide exceptional customer service, whether your product has
been in use for one month, one year or over a decade.
The MD-606T includes the high-performance analog circuitry our customers have
come to expect from us, and in addition, the device is XM Ready, only requiring a
quick activation to receive over 170 XM stations in the USA and over 100
stations in Canada.
The MD-606T has an IR input, enabling control and complete functionality of the
device with a remote from a pragmatic range. The front panel controls also allow
selection of XM Categories and Channels, with an option to load up to 20 preset
stations.
The easy to read blue backlit LCD front panel display shows XM metadata for
channel, category, artist and track along with satellite signal strength. This
special LCD screen has been selected for its long-life, and the mellow moodlighting it bestows during listening sessions.
The rear panel features an XM antenna terminal, plus IR and RS232 inputs for
control of the device from whole-house systems, making the MD-606T an
incredibly versatile device. We hope you enjoy your purchase.
Product Overview
•
•
•
•
•
Access to over 170 XM radio channels in the USA, and up to 100 XM
radio channels in Canada, all 100% commercial free.
XM Category Search, 20 XM radio station presets, and bright 4.2" blue
LED screen showcasing all relevant music metadata.
Unique 2 tube audio stage featuring our MD Triode Reference 6922
vacuum tubes.
RS232 port and supporting protocols enabling control of the MD 606T
from just about any hard-wired device capable of outputting RS232
commands.
Torroidal transformer employed to provide a pure, consistent power supply
to all components.
-5•
•
•
•
Both single-ended and balanced analog outputs.
17" faceplate with precision machined buttons ensuring responsive
sensitivity.
External IR remote with complete functionality.
Future upgrade possibilities: The digital satellite receiver has been designed
in such a way to be replaceable according to any changes to the way in
which satellite radio technology evolves over time.
-6FRONT PANEL DISPLAY
Figure 1. MD-606T Front Panel Features
MD-606T FRONT PANEL FEATURES
1. Power On/Off Switch – Press to turn the MD-606T on/off.
2. CAT-/+ Buttons – Press to search different music categories (Jazz, Classical
etc..). Upon finding the category to which you would like to listen, press Select
on the front panel to change the channel to that station.
3. CH -/+ Buttons – Press Ch– to tune the previous channel (down the station
list), and press Ch+ to tune the next channel (up the station list).
4. Menu Button – Used to determine Radio ID. NOTE: If the Menu Button is
pressed, press 1 on the handheld remote to determine Radio ID, press 2 on
the handheld remote to return to regular operation.
5. Select Button – Press to select a channel previewed with the Cat -/+ Buttons.
6. IR Sensor – Positioned on the right-hand side of the faceplate, the infrared eye
‘sees’ the IR commands from a MD-606T remote or another properly
programmed controller for remote control of the device.
-7REAR PANEL FEATURES
Figure 2. MD-606T Rear Panel Features
MD-606T REAR PANEL FEATURES
1. 12V Trigger – Used in selected home automation systems for control of the
device.
2. RS-232 Serial Port – One DB9 connector provides two-way RS-232
communication with like featured control systems. Pinout: Pin 2 = Tx; Pin 3 =
Rx; Pin 5 = ground.
3. COAX OUT – Digital output of a S/PDIF signal to external DAC via a coaxial
cable.
4. OPTICAL OUT – Digital output of a S/PDIF signal to external DAC via a TOSlink
optical cable.
5. AC Power – Standard IEC 3-conductor line cord receptacle.
6. XM Antenna – One mini pin SMB connector connects to the included XM
indoor antenna.
7. Unbalanced (Single-ended) analog outputs – Two RCA-type jacks output L & R
channels line level audio from the MD-606T for connection to a stereo preamp
or another controlling device.
8. Balanced analog outputs – Two 3-pin XLR connectors output L & R channels
from the MD-606T for connection to a stereo preamp or another controlling
device.
-8MD-606T REMOTE CONTROL FEATURES
Figure 3. MD-606T Remote Control Features
1. Numeric Buttons – Press to enter a three digit number to call up specific
stations (in ‘D’ tuning mode), or to select stored preset stations (after
selecting ‘A’ or ‘B’ preset bank). Preset programming and selection is
described in a subsequent section.
2. XM Button – Not used for regular operation.
3. Presets (A, B and D (direct) Buttons) – Press to select ‘A’ or ‘B’ bank of
presets, then press the Numeric buttons to call up your preset stations, or
press and hold one of the Numeric buttons to store the currently tuned
channel to a preset location. Select ‘D’ for direct tuning with a three digit entry
of the Numeric Buttons followed by a press of the Select Button. ‘A’, ‘B’ and ‘D’
status is displayed in the lower left corner of the Display. Up to 20 Preset
stations are programmable (10 in bank ‘A’, 10 in bank ‘B’).
4. Power On/Off Switch – Press to turn MD-606T ON/OFF. NOTE: The remote
will only put the MD-606T into Standby Mode. To completely shut-down the
device (and turn off the LCD screen), the front panel Power button must be
used. It is recommended that you completely shut-down the MD-606T when a
long time period is expected between listening sessions.
-9-
5. CH -/+ Buttons – Press Chan – to tune the previous channel (down the XM
dial), and press Chan + to tune the next channel (up the XM dial).
6. CAT-/+ Buttons – Press to search different categories of XM programming.
Press the Select button to tune to the previewed channel on the LCD screen.
7. Select Button – Press to select a channel previewed with the CAT -/+ buttons
or the Browse button.
8. Browse – With a channel tuned, press to preview other XM channels without
changing the currently selected channel. To select the previewed channel,
press the SEL Button.
XM ANTENNA PLACEMENT
Figure 4. XM Antenna
XM Antenna Instructions
1. Use the included XM antenna. Connect to the XM Antenna Terminal.
2. Adjust the XM antenna’s position for signal strength. Typically, the antenna
should be mounted with an unobstructed southeast facing view. Some
directional adjustment may be needed to attain optimum signal strength.
3. To test the XM Satellite Radio prior to activation, tune to Channel 1 (XM
Preview). If the Preview Channel plays, the antenna is positioned correctly and
the tuner is ready for activation.
- 10 LCD DISPLAY FEATURES
Figure 5. LCD Display
Display Features
1. Channel – Displays the XM Channel number and Channel Name of the
currently tuned channel, or a Previewed channel using the Category -/+ button
or the Browse -/+ button.
2. XM Antenna Confirm & Signal Strength – Indicates connection of XM Antenna,
and displays the strength of signal being received from the XM Satellite. If four
bars are not showing at any time reposition the antenna to improve signal
strength.
3. Preset Station (if applicable) – If the currently selected channel has been
programmed as a Preset, its location (‘A1’ represents the Preset 1 in bank
‘A’) is shown.
4. Preset Status Indicator – ‘A’ and ‘B’ indicate Preset Banks ‘A’ and ‘B’.’D’
indicates Direct Tune Mode.
5. Category (Genre) – Displays the genre or type of music or program, (classical,
jazz, rock, comedy, talk, traffic, etc) for the currently selected channel.
Channels can be selected by genre (rock channels, jazz channels, comedy
channels etc) by using the Category -/+ buttons.
6. Artist – Displays the Artist Name for the currently playing track, or the artist
of a previewed station.
7. Song Title – Displays the Song Name of the currently playing Track, or the
name of the song playing on the previewed station.
- 11 TUNER CONFIGURATION & OPERATION
XM Satellite Radio Activation
The XM Tuner requires subscription service from XM Satellite Radio to be able to
receive program. To activate an XM Satellite Radio Subscription, call 1.800.XMRADIO (1.800.967.2346) or visit www.xmradio.com and have Radio ID ready. To
find Radio ID:
1. Press the Chan +/- Buttons to tune Channel 000. The Radio ID will appear on
the Display.
2. Press Chan + to tune Channel 001 (XM Preview) until subscription service is
activated.
or:
1. Press the Menu Button.
2. Press Numeric Button ‘1’. The Radio ID will appear on the Display.
3. Press any Numeric Button to return to operational mode.
4. Press Chan +/- to tune Channel 001 (XM Preview) until subscription service is
activated.
Tuning XM Channels
1. Press the CAT +/- Buttons to preview XM Categories (genres) such as Rock,
Country, Jazz & Blues, Classical, News, Sports, Comedy etc. Press the Select
button to tune to the previewed Category.
2. Press the CH +/- Buttons to change XM Channels. As channels are selected,
the Channel Number and Name will be displayed on the LCD screen.
3. Press the Browse +/- Buttons to preview XM Channels on the LCD screen.
Press the Select button to tune to the previewed Channel
Programming & Recalling XM Preset Channels
1. Tune to the desired XM channel as described in Tuning XM Channels, above.
2. Press the Preset Button to select ‘A’ or ‘B’ bank of presets. ‘A’ and ‘B’ status
is displayed in the lower left corner of the LCD screen.
3. Press and hold one of the Numeric buttons (0-9) to store the currently tuned
channel to a preset location. The MD-606T can store up to 20 preset
channels, 10 in bank A and 10 in bank B.
4. To recall Preset channels in bank ‘A’, press Preset ‘A’ on the remote. The
Preset Status Indicator will show ‘A’ in the lower left corner of the LCD screen.
Select the desired Preset using the Numeric Buttons. To recall Preset
channels in bank ‘B’, press Preset ‘B’ on the remote. The Preset Status
Indicator will show ‘B’ in the lower left corner of the LCD screen. Press the
Direct Button to return to direct tuning of the MD-606T.
- 12 RS232 PROTOCOL
The MD-606T Tuner has an RS-232 port that allows control of the Tuner from a
variety of controllers including Whole-House A/V Distribution and Home
Automation Systems, or any just about any hard-wired device capable of
outputting RS232 commands.
The MD-606T Serial Port allows control of all functions including: Power ON/OFF,
Channel Selection, Preset selection, Modes and Direct Numeric Tuning.
The Serial Port on the MD-606T uses a female DB9 connector wired in a DTE
configuration. Tx (transmit) = pin 2, Rx (receive) = pin 3, Ground = pin 5.
Communication settings are 9600 baud, 8 bits, no parity, no handshake.
Figure 6: RS-232 Port Pin Out
Baud Rate
9600
Parity
None
Data Bits
8 bits
Stop Bits
Flow Control
None
Each command must be terminated with a carriage return: <cr>. If an invalid
command is sent, the MD-606T will respond with ERR. If a valid command is
sent, the MD-606T will respond with information. Every response from the MD606T is terminated with CR.
The device sends out unsolicited information whenever it is operated. The syntax
is the same as that used for controlling the MD-606T. For instance, if someone
turns the Tuner ON, the MD-606T will transmit “PWR1” out of the serial port.
The string will be terminated with <cr>.
- 13 RS-232 Commands & Syntax
Command
Turn Radio ON
Syntax
PW1<cr>
Parameters
N/A
Turn Radio OFF
PW0<cr>
N/A
Query Radio
Power Status
XM Channel Up
PW?<cr>
PW0=off; PW1=on
CH+<cr>
XM Channel
Down
CH-<cr>
Query XM
Channel
CH?<cr>
Direct Select
XM Channel
Query Current
XM Channel
SID (Station ID)
Direct Select
XM Channel by
SID (Station ID)
CHxxx<cr>
No reply, unless monitor is
turned on, then reply is:
(example) “CH?|046|Top
Tracks|Rock|Doors|20th
Century Fox<cr>
No reply, unless monitor is
turned on, then reply is
same as above (different
channel).
Reply is: (example)
“CH?|045|XM
Cafe|Rock|Louque|Cry
Cry<cr>
xxx=Channel. valid range:
001-247
Reply is: (example) SID045
SIDxxx<cr>
xxx=SID. valid range: 001247
Turn on XM
Channel
Monitoring
MON1<cr
>
Turn off XM
Channel
Monitoring
Query XM
Channel
Monitor Mode
Query XM
Radio Serial
Number
Recall XM
Preset From
Bank A
MON0
<cr>
Reply is: (example)
“CH?|045|XM
Cafe|Rock|Louque|Cry
Cry<cr>
Reply is: MON0<cr>
Recall XM
Preset From
Bank B
PRBx<cr>
SID?<cr>
Description
Similar to pushing the power button
on Front Panel/Remote.
Similar to pushing the power button
on Front Panel/Remote.
Use for if/then power management.
Similar to pushing CH+ Button on
Front Panel or Remote.
Similar to pushing CH- Button on
Front Panel or Remote.
Use to identify channel.
Similar to pressing numeric buttons
on Front Panel/Remote.
Identifies permanent XM Station ID
for currently selected station.
Tune XM Channels by permanent
SID. Channel numbers may change.
SID does not. Eliminates reprogramming of channel numbers.
Allows display of XM metadata on a
display. A new string is sent out
every time the song or channel
changes.
Turn off display of XM metadata
when changing control modes.
MON?
MON0<cr> = monitor off
MON1<cr> = monitor on
Use to determine XM monitor mode.
ID?<cr>
Reply is: (example)
MT3LT21RV<cr>
Required for subscription activation.
PRAx<cr>
x=0-9. Reply is: (example)
“CH?|046|Top
Tracks|Rock|Doors|20th
Century Fox<cr>
x=0-9. Reply is same as
above.
Similar to pushing a Preset Button
on the Front Panel or Remote.
Similar to pushing a Preset Button
on the Front Panel or Remote.
- 14 ERROR MESSAGES
Error Message
CHECK ANTENNA
Condition
Problem with antenna
connection
UPDATING
User encryption code
has changed and is
being updated
Signal is too weak to
tune in
NOSIGNAL
LOADING
OFF AIR
--- or CHANNNEL ---
---
Audio and or text
information are being
loaded for selected
channel
Selected channel is not
currently broadcasting
Channel SID is no longer
available
Metadata not available
for Artist
Name/Feature, or
Song/Program title
Solution
a)Check antenna
connection
b)Check antenna
cable for shorts
Wait for encryption
code to finish
updating
Confirm that
antenna has not
moved or is being
obstructed from ‘line
of sight’ to satellite
Wait until program
information has been
received
Tune to another
channel
Tuner will switch
automatically to
Channel 1, or to the
previous channel
after 2 seconds
No action required
- 15 TROUBLESHOOTING
PROBLEM
Power
Tuner will not Power up
SOLUTION
MD-606T must be plugged into an
AC outlet.
Power cord must be plugged into C6 Controller
Tuner
Poor reception
No stations in presets
Audio
No Audio From Tuner
RS-232 Control
MD-606T does not Respond to RS232 Commands from control
device
Are antennas connected?
Reposition antennas to improve
reception.
Stations must be stored in Presets.
See Instruction section:
Programming Preset Channels.
Is tuner ON?
Is tuner line audio out connected to
appropriate source input on
Controller or Preamp?
Is a proper channel tuned?
Is control device ON?
Is MD-606T ON?
Is control device connected with a
DB9 Serial cable? (NOT NULL)
Is control device properly configured
to send/receive?
Are ASCII text commands properly
entered in control device?
See Instruction section: RS-232
Protocol
- 16 SPECIFICATIONS
XM Module and RS-232 Specifications
Satellite RF Sensitivity: -92.2 dBm
Tuning Range: 2332.5 to 2345.0 MHz
RS-232: DB9F Terminal, 9600 Baud, Asynchronous, 8 Bits, No Parity, No
HandshakeNexLink
Audio Specifications
Signal to noise ratio: 90dB
Audio frequency response (+/- .1 dB): 20Hz - 20KHz
Line audio output (RCA): 1.5V
Balanced line out: 3.0V between pin 2 and 3 of XLR
Line power (Must be specified) (110/220/230/240): VAC
Power consumption (Typ/Max) – 50w/100w
Tube Specifications
Total harmonic distortion: <.5%
Tubes position 1 and 2 – MD Triode Reference 6922
- 17 -
LIMITED WARRANTY
Register your product at www.magnumdynalab.com
Magnum Dynalab Ltd. herein referred to as the “manufacturer” guarantees
this product to be free of defect in both material and workmanship and agrees to
remedy any such defect or replace any defective component at no charge for a
period of two years from date of sale to the first end user. This warranty is void if
the product has been found to be subjected to misuse, abuse, lightning strike,
unauthorized service, damaged in transit or has been altered or repaired in such
a way as to detract from its performance, reliability or its safe operation. All
tubes are covered for 12 months.
Should such defect be discovered and it falls within the terms of this
guarantee, the manufacturer will correct the defect in workmanship and/or
replace any defective component with a new one of similar capability and value.
This warranty does not apply to the cabinet or appearance items such as the
faceplate, control knobs or meter lenses nor does it cover any expenses in
shipping the unit to the appropriate service depot.
The foregoing is in lieu of any other warranties expressed, implied or
statutory and the manufacturer neither assumes nor authorizes any person to
assume for it any other obligation or liability in the connection with the sale of this
product. This warranty is not transferable except by written authorization from
the manufacturer.
In order to qualify under the terms of the above warranty, all items must be
returned to the appropriate factory service depot with all shipping charges
prepaid in lieu of having previously registered the purchase of the unit by
completing and returning the attached Registration Card, the unit must be
accompanied by proof from an authorized Magnum Dynalab Ltd. dealer.
YOUR LOCATION
Within the USA
Within Canada
RETURN SHIPPING ADDRESS
Magnum Dynalab c/o Trans American
2775 Broadway, Buffalo, NY, USA
14227-1043
PHONE: 1-800-551-4130
Magnum Dynalab Ltd.
8 Strathearn Avenue, Unit # 9
Brampton, ON, Canada
L6T 4L9
PHONE: 1-800-551-4130
TO PREVENT FIRE SHOCK OR HAZARD, DO NOT EXPOSE THIS APPLIANCE TO
RAIN OR MOISTURE. TO REDUCE THE RISK OF ELECTRIC SHOCK, DO NOT
REMOVE COVER OR FACEPLATE, NO USER SERVICEABLE PARTS INSIDE. REFER
SERVICING TO QUALIFIED SERVICE PERSONNEL.
- 18 IMPORTANT SAFETY INSTRUCTIONS
1.
2.
3.
4.
5.
6.
7.
Read these instructions.
Keep these instructions.
Heed all warnings.
Follow all instructions.
Do not use this apparatus near water.
Clean only with dry cloth.
Do not block any ventilation openings. Install in accordance with the
manufacturer's instructions.
8. Do not install near any heat sources such as radiators, heat registers, stoves,
or other apparatus (including amplifiers) that produce heat.
9. Do not defeat the safety purpose of the polarized or grounding-type plug. A
polarized plug has two blades with one wider than the other. A grounding type
plug has two blades and a third grounding prong. The wide blade or the third
prong are provided for your safety. If the provided plug does not fit into your
outlet, consult an electrician for replacement of the obsolete outlet.
10. Protect the power cord from being walked on or pinched particularly at
plugs, convenience receptacles, and the point where they exit from the
apparatus.
11. Only use attachments/accessories specified by the manufacturer.
12. Use only with the cart, stand, tripod, bracket, or table specified by the
manufacturer, or sold with the apparatus. When a cart is used, use caution
when moving the cart/apparatus combination to avoid injury from tip-over.
13. Unplug this apparatus during lightning storms or when unused for long
periods of time.
14. Refer all servicing to qualified service personnel. Servicing is required when
the apparatus has been damaged in any way, such as power-supply cord or
plug is damaged, liquid has been spilled or objects have fallen into the
apparatus, the apparatus has been exposed to rain or moisture, does not
operate normally, or has been dropped.
- 19 The lightning flash with arrowhead symbol within an
equilateral triangle, is intended to alert the user to the
presence of uninsulated "dangerous voltage " within the
product's enclosure that may be of sufficient magnitude
to constitute a risk of electric shock to persons.
The exclamation point within an equilateral triangle is
intended to alert the user to the presence of important
operating and maintenance (servicing) instructions in the
literature accompanying the product.
WARNING: To reduce the risk of fire or electric shock, do not expose this
apparatus to rain or moisture.
Do not expose this equipment to dripping or splashing and ensure that no objects
filled with liquids, such as vases, are placed on the equipment.
To completely disconnect this equipment from the AC mains, disconnect the
power supply cord plug from the AC receptacle.
The mains plug of the power supply cord shall remain readily operable.