1
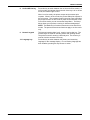
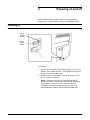
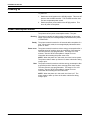
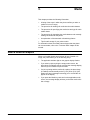
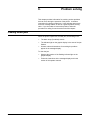
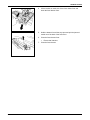
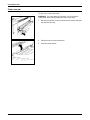
XES Synergix
8850 Printer
Operator Manual
701P36587
July 2001
Prepared by:
Xerox Corporation
Global Knowledge & Language Services
800 Phillips Road
Building 845-17S
Webster, New York 14580-9791
USA
©XESystems Inc. 2001. All rights reserved.
Printed in the United States of America
XEROX®, 8850, XES Synergix 8850 Digital Solution,
Synergix Scan System, the digital box icon, AccXES, and
acronym, XES, are trademarks of XEROX
CORPORATION.
701P36587
7/2001
Table of contents
EMC notices............................................................................................................................................................. iii
Australia/New Zealand........................................................................................................................................iii
European Union..................................................................................................................................................iii
Canada ...............................................................................................................................................................iii
Japan ..................................................................................................................................................................iv
USA.....................................................................................................................................................................iv
Safety notes.............................................................................................................................................................. v
Introduction ............................................................................................................................................................ vii
Organization and content of this manual ...........................................................................................................vii
Terminology used in this manual...................................................................................................................... viii
Conventions used in this manual...................................................................................................................... viii
1.
Printer overview................................................................................................................................................ 1
Printer orientation ............................................................................................................................................... 1
Main components ............................................................................................................................................... 2
Control panel ...................................................................................................................................................... 4
2.
Powering on and off ......................................................................................................................................... 7
Powering on ........................................................................................................................................................ 7
Powering off........................................................................................................................................................ 8
Power consumption modes ................................................................................................................................ 8
3.
Media.................................................................................................................................................................. 9
When a media roll empties ................................................................................................................................. 9
Loading the roll media ...................................................................................................................................... 10
Changing the roll media size and type ............................................................................................................. 14
Using the cut sheet feed-in shelf ...................................................................................................................... 16
Automatic media roll switching ......................................................................................................................... 17
Media storage tips ............................................................................................................................................ 17
4.
Off-line Setup Menu........................................................................................................................................ 19
Setup Menu options.......................................................................................................................................... 19
Printer Menu ..................................................................................................................................................... 20
Accessing the Printer Menu ....................................................................................................................... 22
Enabling or disabling the audible indicators ............................................................................................... 22
Setting the timers........................................................................................................................................ 23
Adjusting the print density .......................................................................................................................... 23
Specifying the finisher configuration type................................................................................................... 24
Performing printer diagnostics.................................................................................................................... 24
Printing a test plot................................................................................................................................. 24
Viewing the recent fault log .................................................................................................................. 25
Displaying the billing meter counts............................................................................................................. 25
5.
Care .................................................................................................................................................................. 27
When the toner cartridge needs replacement .................................................................................................. 27
Replacing the toner cartridge............................................................................................................................ 28
Replacing the toner waste bottle ...................................................................................................................... 31
Cleaning the printer surface ............................................................................................................................. 33
Ordering supplies.............................................................................................................................................. 34
Supply order list.......................................................................................................................................... 34
Supply order procedure .............................................................................................................................. 34
XES SYNERGIX 8850 PRINTER OPERATOR MANUAL
i
TABLE OF CONTENTS
6.
Problem solving.............................................................................................................................................. 35
Clearing media jams ......................................................................................................................................... 35
Fuser area jam ........................................................................................................................................... 36
Cutter area jam........................................................................................................................................... 38
Roll media drawer jams.............................................................................................................................. 39
Status codes ..................................................................................................................................................... 42
Error messages ................................................................................................................................................ 43
Problem solving table ....................................................................................................................................... 44
Calling for service ............................................................................................................................................. 45
7.
Technical data................................................................................................................................................. 47
Product specifications....................................................................................................................................... 47
Media specifications ......................................................................................................................................... 49
Space requirements.......................................................................................................................................... 50
ii
XES SYNERGIX 8850 PRINTER OPERATOR MANUAL
EMC notices
Australia/New Zealand
Changes or modifications to this equipment not specifically
approved by Fuji Xerox Australia PTA. Limited may void the user’s
authority to operate this equipment.
Shielded cables must be used with this equipment to maintain
compliance with the Radiocommunications Act 1992.
European Union
WARNING
This is a Class A product. In a domestic environment this
product may cause radio interference in which case the user
may be required to take adequate measures.
Changes or modifications to this equipment not specifically
approved by Xerox Europe may void the user’s authority to
operate this equipment.
Shielded cables must be used with this equipment to maintain
compliance with the EMC Directive (89/336/EEC).
WARNING
In order to allow this equipment to operate in proximity to
Industrial, Scientific and Medical (ISM) equipment, the
external radiation from ISM equipment may have to be limited
or special mitigation measures taken.
Canada
This Class "A" digital apparatus complies with Canadian ICES0003.
Cet appareil numérique de la classe "A" est conforme à la norme
NMB-003 du Canada.
XES SYNERGIX 8850 PRINTER OPERATOR MANUAL
iii
EMC NOTICES
Japan
This is a Class A product based on the standard of the Voluntary
Control Council for Interference by Information Technology
Equipment (VCCI). If this equipment is used in a domestic
environment, radio disturbance may arise. When such trouble
occurs, the user may be required to take corrective actions.
Changes or modifications to this equipment not specifically
approved by Fuji Xerox Limited may void the user’s authority to
operate this equipment.
Shielded cables must be used with this equipment to maintain
compliance with the Voluntary Control Council for Interference by
Information Technology Equipment regulations.
USA
This equipment has been tested and found to comply with the
limits for a Class A digital device, pursuant to Part 15 of the FCC
Rules. These limits are designed to provide reasonable protection
against harmful interference when the equipment is operated in a
commercial environment. This equipment generates, uses, and
can radiate radio frequency energy and, if not installed and used in
accordance with the instruction manual, may cause harmful
interference to radio communications. Operation of this equipment
in a residential area is likely to cause harmful interference in which
case the user will be required to correct the interference at his own
expense.
Changes or modifications to this equipment not specifically
approved by the Xerox Corporation may void the user’s authority
to operate this equipment.
Shielded cables must be used with this equipment to maintain
compliance with FCC regulations.
iv
XES SYNERGIX 8850 PRINTER OPERATOR MANUAL
Safety notes
Your system has been designed and tested to meet strict safety
requirements. These include safety agency examination and
approval plus compliance with established environmental
standards.
Please read the following instructions carefully before operating
the printer and refer to them as needed to ensure continued safe
operations.
Follow all warnings and instructions marked on or supplied with the
product.
Unplug the units from the wall outlet before cleaning the exterior.
Always use materials specifically designated for the printer. Use of
other materials may result in poor performance and could create a
hazardous situation.
Do not use aerosol cleaners. Follow the instructions in this
operator guide for the proper cleaning methods.
Never use supplies or cleaning materials for purposes other than
what they were intended. Keep all supplies and materials out of
the reach of children.
Do not use the units near water, wet locations, or outdoors.
The components of this product are equipped with a three-wire,
grounding-type plug (i.e., a plug having a grounding pin). This
plug will only fit into a grounding-type power outlet. This is a safety
feature. To avoid the risk of electric shock, contact your electrician
to replace the receptacle if you are unable to insert the plug into
the outlet.
Never use a ground adapter plug to connect the system to a power
source that lacks a ground connection terminal.
This system should be operated from the type of power source
indicated on the marking label. If you are not sure of the type of
power available, consult your local power company.
The power supply cord is the disconnect device for this equipment.
Make sure that the installation is near the socket outlet and is
easily accessible.
Do not allow anything to rest on the power cord. Do not locate the
units where someone will step on the cord.
The units should not be placed in a built-in installation unless
proper ventilation is provided.
XES SYNERGIX 8850 PRINTER OPERATOR MANUAL
v
SAFETY NOTES
Never push objects of any kind into the slots of the units as they
may touch dangerous voltage points or short out parts that could
result in a risk of fire or electric shock.
Never spill liquid of any kind on the units.
Never remove any covers or guards that require a tool for removal.
There are no operator serviceable areas within these covers.
Never attempt any maintenance function that is not specified in
this operator guide.
Never defeat interlock switches. Machines are designed to
prevent operator access to unsafe areas. Covers, guards, and
interlock switches are provided to ensure that the system will not
operate with the covers opened.
Unplug the reprographic system from the wall outlet and refer
servicing to a qualified service individual under the following
conditions:
•
When the power cord is damaged or frayed.
•
If liquid has been spilled into the product.
•
If the units have been exposed to rain or water.
•
If the units are producing unusual noises or odors.
•
If the units or the cabinets have been damaged.
If you need additional safety information concerning the printer or
XES supply materials, you may call:
Within the United States:
1-800-828-6571 toll free
In other countries:
Please call your local Xerox Engineering Systems service office for
help.
vi
XES SYNERGIX 8850 PRINTER OPERATOR MANUAL
Introduction
Congratulations on acquiring your new XES Synergix 8850 Printer.
Xerox Engineering Systems looks forward to supporting you and
helping you increase your printing productivity.
The XES Synergix 8850 Printer is available as a standalone printer
with an embedded AccXES controller or as a multi-function device
with a Synergix Scan System and an embedded AccXES
controller. The Synergix Stacker and a full-featured folder are
optional accessories for either configuration.
The printer has a throughput of 10 D-size (A1) prints per minute
and a process speed of 4.5 inches per second. It is equipped with
three roll media drawers that can hold roll media from 11 to 36
inches wide and up to 500 feet long. An optional sealed media
drawer is available in place of one of the standard media drawers
for locations that experience humidity extremes.
For jobs requiring non-standard media sizes, the printer has a cut
sheet feed-in shelf that enables you to bypass the media drawers.
It also has a standard catch tray that can accommodate up to 100
prints of all sizes.
Organization and content of this manual
The XES Synergix 8850 Printer Operator Manual provides the
information you need to become familiar with the components,
features, operation, and specifications of your printer. It contains
the following chapters:
Chapter 1
Printer overview
This chapter shows the orientation of the printer. It illustrates and
describes the main components of the printer and the control
panel.
Chapter 2
Powering on and off
This chapter provides instructions for powering on and powering
off and explains the power consumption modes of the printer.
Chapter 3
Media
This chapter explains what happens when a media roll empties,
how to load a media roll, and how to specify the size and type of a
media roll. It provides the procedure for using cut sheet media
and describes the automatic roll-switching feature. Additionally, it
lists some tips for storing your media.
Chapter 4
Off-line Setup Menu
This chapter lists the Setup Menu options and provides detailed
instructions for using the Printer Menu sub-option.
XES SYNERGIX 8850 PRINTER OPERATOR MANUAL
vii
INTRODUCTION
Chapter 5
Care
This chapter contains instructions for replacing the toner cartridge
and toner waste bottle and cleaning the printer surface. It also
lists the supplies needed and the procedure for ordering them.
Chapter 6
Problem solving
This chapter provides the procedures for clearing jams. It contains
status code and error message tables, as well as a general
problem-solving table. For problems you are unable to resolve by
using this manual, it also explains the procedure for placing a call
for service.
Chapter 7
Technical data
This chapter contains product and paper specifications, as well as
space requirements for operation of the printer.
Terminology used in this manual
Printer
Whenever the term "printer" appears in this manual, it refers to the
XES Synergix 8850 Printer.
Conventions used in this manual
This manual uses the following conventions:
Bold
WARNING:
A WARNING indicates an operation, maintenance procedure,
practice, condition or statement that, if not strictly followed, could
result in personal injury. When included within a procedure,
warnings always precede the step to which they refer.
CAUTION:
A CAUTION encourages strict compliance with an operation,
maintenance procedure, practice, condition or statement to
prevent damage to the equipment. When included within a
procedure, cautions always precede the step to which they refer.
NOTE:
viii
Boldface characters in the middle of a text string refer to selections
on the control panel (for example, "press the Enter key").
A NOTE highlights an operating or maintenance procedure, a
condition or a statement.
XES SYNERGIX 8850 PRINTER OPERATOR MANUAL
1.
Printer overview
This chapter shows the orientation of the printer. It also illustrates
and describes its main components, as well as the elements of the
control panel.
Printer orientation
The illustration below shows the printer orientation. You must be
familiar with this orientation when following the messages in the
message display and the instructions in this guide.
3
2
4
1
1.
Left side
2.
Back
3.
Right side
4.
Front
XES SYNERGIX 8850 PRINTER OPERATOR MANUAL
1
PRINTER OVERVIEW
Main components
1
8
7
6
2
3
5
4
2
1. Output tray
Prints exit the printer face up onto this tray. This tray holds up to
100 prints of all sizes (including mixed sizes). The tray can be
raised for access to the cut sheet feed-in shelf and the media
supply drawers.
2. Drawer 1
Open to load paper rolls and to clear media jams in drawer 1.
3. Drawer 2
Open to load paper rolls and to clear media jams in drawer 2.
4. Drawer 3
Open to load paper rolls and to clear media jams in drawer 3.
5. Front door
Open to access the toner waste bottle and to view the product
serial number.
6. Cut sheet feed-in shelf
Insert cut sheets here to bypass the roll media in the drawers.
Use this bypass when the drawers do not contain the correct
media size or a nonstandard media size is required.
7. Fuser drawer
Open to clear jams in the fuser area.
8. Control panel
Contains the graphic display, message display, menu access and
navigation keys, and numeric keypad.
XES SYNERGIX 8850 PRINTER OPERATOR MANUAL
PRINTER OVERVIEW
6
1
5
4
2
3
1. Cutter drawer
Open to clear media jams in the cutter area.
WARNING: The cutter blade is very sharp. Do not touch the
cutter blade when clearing media jams in the cutter area.
2. Printer on/off switch (white)
Press to switch the printer on or off.
3. Power cord connection
Connect the power cord here and to a suitable power outlet.
4. Circuit breaker switch (black)
Press to turn power to the AccXES controller on or off.
5. AccXES controller
Interfaces with the client/host and formats incoming prints.
6. Toner supply access cover
Open to replace the toner cartridge.
XES SYNERGIX 8850 PRINTER OPERATOR MANUAL
3
PRINTER OVERVIEW
Control panel
The control panel is located on top of the front side of the printer.
It consists of a graphic display, a message display, several
function keys, and a numeric keypad.
/C
1
4
2
3
4
5
6
7
8
9
10
1. Graphic display
This is an illustration of the printer with indicator lights for the front
door, the cutter drawer, the toner supply access cover, the cut
sheet feed-in shelf, drawer 1, drawer 2, and drawer 3. The
indicator lights have three states. "Off" is the normal state and
signifies that no operator attention is required. "On" signifies that
the associated interlock is open. "Flashing" signifies that operator
attention is required.
2. Media key
Press this key to display and modify the current width (if
applicable) and type settings for the media sources (drawer 1,
drawer 2, drawer 3, and cut sheet feed-in shelf). This key is active
from both on-line and off-line modes. Pressing this key while in
off-line mode always displays the media settings regardless of
which off-line menu is currently active.
3. Message display
This is a 2-line, 40-character-per-line display.
4. Previous key
Press this key to move backward through the printer menus and
selections. For numeric values, pressing this key decreases the
value by one unit.
5. Next key
Press this key to move forward through the printer menus and
selections. For numeric values, pressing this key increases the
value by one unit.
6. Enter key
Press this key to select the current menu item or value.
7. Exit key
Press this key to undo the previous selection or to return to the
next higher menu level. If you have modified a parameter, the
parameter will remain unchanged.
XES SYNERGIX 8850 PRINTER OPERATOR MANUAL
PRINTER OVERVIEW
8. On-line/Off-line key
Press this key to switch between the on-line and off-line modes. In
on-line mode, the indicator light to the left of the key is lit. In off-line
mode, the indicator light is not lit.
When in on-line mode, the printer accepts and processes print
requests. When in off-line mode, the printer holds print requests in
the print queue. The requests remain in the print queue until either
the printer returns to on-line mode or power to the controller is lost.
From off-line mode, you can access the Setup Menu. The Setup
Menu allows you to perform a variety of utilities and diagnostics.
NOTE: The Media key is functional from both on-line and off-line
modes. The power saver and rest functions apply to on-line mode
only.
9. Numeric keypad
This keypad contains digits 0 to 9, a period, and a clear key. The
numeric keys are used for selecting menus and inputting values.
The period is used for entering a decimal point. The clear key is
used to clear the contents of an entry.
10. Language key
Press this key to switch between the primary and secondary
language for the message display. If no secondary language has
been installed, pressing this key causes no action.
XES SYNERGIX 8850 PRINTER OPERATOR MANUAL
5
PRINTER OVERVIEW
This page has been intentionally left blank.
6
XES SYNERGIX 8850 PRINTER OPERATOR MANUAL
2.
Powering on and off
This chapter describes the procedures for powering on and
powering off. It also describes the power consumption modes.
Powering on
Circuit
breaker
switch
Printer
power
switch
To power on:
1. Switch the circuit breaker to the On (I) position. This turns on
power to the AccXES controller. The AccXES controller does
not have a separate power switch.
2. Switch the printer power switch to the On (I) position. This
turns on power to the printer.
NOTE: During the warm-up cycle, the message display
provides a "printer is warming up" message and decreasing
fuser warm-up codes of L9 to L0. When the warm-up
completes, the printer is on-line and ready to print. The
message display indicates, "XES SYNERGIX 8850 IDLE."
XES SYNERGIX 8850 PRINTER OPERATOR MANUAL
7
POWERING ON AND OFF
Powering off
To power off:
1. Switch the circuit breaker to the Off (O) position. This turns off
power to the AccXES controller. The AccXES controller does
not have a separate power switch.
2. Switch the printer power switch to the Off (O) position. This
turns off power to the printer.
Power consumption modes
The printer has four power consumption modes. They are:
Running
The printer is capable of making prints immediately in this mode.
When in this mode, the message display indicates that the printer
is "PRINTING."
Ready
The printer enters this mode 2 to 30 seconds after completion of a
print. When in this mode, the message display indicates that the
printer is "IDLE."
Power saver
The printer enters this mode to reduce energy consumption after a
specified period of inactivity since the completion of the last print.
This time period is user-programmable. The range is 5 to 50
minutes. See the "Off-line Setup Menu" chapter for more
information about setting the power saver timer.
NOTE: When the printer is in this mode, the fuser is at low power.
The printer needs to warm up from an L3 status code before being
ready to print.
Rest
The printer enters this mode to minimize energy consumption after
a specified period of inactivity since entering power saver mode.
This time period is user-programmable. The range is 15 to 150
minutes. See the "Off-line Setup Menu" chapter for more
information about setting the rest mode timer.
NOTE: When the printer is in this mode, the fuser is off. The
printer needs to warm up from an L9 status code before being
ready to print.
8
XES SYNERGIX 8850 PRINTER OPERATOR MANUAL
3.
Media
This chapter provides the following information:
•
A listing of the ways in which the printer notifies you when a
media roll is low or empty
•
The procedure for loading roll media into the media drawers
•
The procedure for specifying the media size and type for each
media drawer
•
The procedure for bypassing the media drawers and manually
feeding cut sheets into the printer
•
An explanation of the automatic roll switching feature
•
Tips for safe storage of your printer media.
For information about the media sizes and types that the printer
can accommodate, refer to the "Technical data" chapter of this
manual.
When a media roll empties
When a roll media drawer has less than 30 feet of media or is
empty, the printer alerts you in the following ways:
XES SYNERGIX 8850 PRINTER OPERATOR MANUAL
•
The applicable indicator light on the graphic display flashes.
•
If you submit a job requiring the empty media source, the
alarm beep (if enabled) sounds once and the message display
instructs you to install the required media.
•
If a job is printing and the media roll empties, the alarm beep
(if enabled) sounds steadily and a C[1,2,3].04 or C[1,2,3].05
status code and a message instructing you to re-feed the roll
appear in the display.
•
If you press the Media key and scroll to the applicable media
source, the message display advises you that the media roll is
low or empty.
9
MEDIA
Loading the roll media
To load a media roll:
1. Raise the output tray all the way so that it rests on top of the
printer.
2. Lift the handle of the applicable drawer and open the drawer
all the way.
NOTE: In some locations, high or low humidity affects the media
and causes print quality problems. To resolve the problems, a
sealed media drawer can be installed on the printer in place of one
of the standard media drawers.
3. Do one of the following:
•
If the drawer is a sealed media drawer, raise the Plexiglas
cover until it holds in place.
•
If the drawer is not a sealed media drawer, proceed to
step 4.
4. Squeeze the baffle release and raise the baffle until it locks in
place.
10
XES SYNERGIX 8850 PRINTER OPERATOR MANUAL
MEDIA
5. Rotate the media roll to wind the end of the media onto the
roll.
6. Lift the media roll out of the drawer.
7. Lay the media roll on a flat, horizontal surface.
8. Squeeze the lever at the end of the media roll support tube
and remove the tube from the media roll.
9. Lay the new media roll on a flat, horizontal surface.
10. Slide the end of the media roll support tube without the lever
into the new media roll as far as it will go.
XES SYNERGIX 8850 PRINTER OPERATOR MANUAL
11
MEDIA
11. Squeeze the lever at the end of the media roll support tube
and position the tube until the size indicators on the tube
match the size of the roll.
•
For example, if the media roll is 36 inches, the ends of the
media roll should be at the 36-inch markers on the media
roll support tube.
12. Place the new media roll into the media drawer so that the
lead edge of the paper is on the underside of the roll and
toward the printer.
13. Position the media roll support tube so that the ends of the
tube rest within the support rollers at the sides of the drawer.
•
Ensure that the tube falls into place within the support
rollers.
14. Remove the tape from the lead edge of the media roll.
15. If the lead edge of the media roll contains debris from the
adhesive or is torn or uneven, trim the lead edge.
NOTE: Trimming is not usually necessary for a new roll of
media.
12
XES SYNERGIX 8850 PRINTER OPERATOR MANUAL
MEDIA
16. Rotate the media roll to feed the media under the baffle and
beyond the registration window.
NOTE: Ensure that the lead edge of the media is flat and is
not folded over itself.
17. Squeeze the baffle release and lower the baffle until it locks in
place on both sides.
18. Slowly rotate the media roll until the lead edge of the media is
centered in the registration window.
19. Do one of the following:
•
If the drawer is a sealed media drawer, close the Plexiglas
cover.
•
If the drawer is not a sealed media drawer, proceed to
step 20.
20. Close the roll media drawer.
21. Lower the output tray.
22. If the size or type of the new media roll is different from that of
the old media roll, you must specify the new size and type.
Refer to "Changing the roll media size and type" in this chapter
for instructions on entering the new roll media information.
XES SYNERGIX 8850 PRINTER OPERATOR MANUAL
13
MEDIA
Changing the roll media size and type
Whenever you open a media drawer, the message display
prompts you to change the type or width of the media. If you have
not changed the type or width of the roll media in the drawer, press
the Exit key. If you have changed the type or width, you must
enter the new information.
To change the roll media size and type:
1. Press the Media key. The message display indicates the
width and type of roll media last specified for drawer 1.
NOTE: The Media key is active from either on-line or off-line
mode.
2. Press the Previous or Next key to scroll through the media
source selections. The selections are ROLL1, ROLL2,
ROLL3, and BYPASS SHELF (cut sheet feed-in shelf).
3. When you scroll to the media source you want to change,
press the Enter key. The message display instructs you to
select the media width. It indicates the current media width.
NOTE: Media width does not apply to the BYPASS SHELF
selection. If you have selected BYPASS SHELF as the media
source, the message display instructs you to select the media
type. Proceed to step 6.
4. Press the Previous or Next key to scroll through the media
width selections. The width selections are:
11.0 INCH
297 MM.
12.0 INCH
353 MM.
17.0 INCH
420 MM.
18.0 INCH
500 MM.
22.0 INCH
594 MM.
24.0 INCH
620 MM.
30.0 INCH
707 MM.
34.0 INCH
750 MM.
36.0 INCH
841 MM.
860 MM.
880 MM.
900 MM.
5. When you scroll to the desired media width, press the Enter
key. The message display instructs you to select the media
type. It indicates the current media type.
14
XES SYNERGIX 8850 PRINTER OPERATOR MANUAL
MEDIA
6. Press the Previous or Next key to scroll through the media
type selections. The media type selections are BOND,
VELLUM, and FILM.
7. When you scroll to the desired media type, press the Enter
key.
8. Do one of the following:
XES SYNERGIX 8850 PRINTER OPERATOR MANUAL
•
Press the Media key or the Exit key to save your
selections and return to the system prompt
•
Press the Enter key to return to the media size and type
selection process and change the selections you just
made.
15
MEDIA
Using the cut sheet feed-in shelf
When the correct media size or type is not loaded in the printer,
you can bypass the media drawers and manually load cut sheets
into the printer.
To manually feed cut sheets into the printer:
1. Raise the output tray all the way until it rests on top of the
printer.
2. Select the appropriate cut sheet for the print job.
NOTE: The minimum size for a cut sheet is 8-1/2 x 11 inches
(216 x 279 mm) fed short edge lead.
3. Set the BYPASS media type on the printer control panel to the
correct one for the print job. See "Changing the roll media
size and type" for further information.
NOTE: The printer will accept whatever media type you
manually feed into it, regardless of the media type you
specify. You should ensure that the media type is correct,
however, as the printer uses the media type to determine
the fuser temperature. The wrong fuser temperature could
cause poor print quality. It could also result in a
maintenance service call, if any toner rubs off the media
onto the fuser roll.
4. Center the media between the size indicators on the cut sheet
feed-in shelf.
5. Feed the lead edge of the media squarely into the printer until
the printer grabs and advances the media.
6. From the client workstation, specify Manual Feed as the media
source.
7. Submit the print job.
8. When you are finished manually feeding cut sheets, lower the
output tray.
16
XES SYNERGIX 8850 PRINTER OPERATOR MANUAL
MEDIA
Automatic media roll switching
The printer has an automatic roll-switching feature that allows it to
switch to another roll when the roll in use empties. This feature
provides for longer continuous operation of the printer.
Automatic switching is possible only if the following conditions are
met:
•
Another drawer contains a media roll of the identical size and
type as the roll in use.
•
The print job has not specified a particular roll (e.g., roll 1).
If both of the remaining media drawers contain the identical media
size and type as the roll is in use, the printer will select the lowest
numbered drawer first. If, for example, roll 3 empties and both roll
1 and roll 2 contain the same media size and type, the printer will
switch to roll 1. If roll 1 then empties, the printer will switch to roll
2.
Media storage tips
To obtain maximum results from your print media, follow these
media storage tips:
XES SYNERGIX 8850 PRINTER OPERATOR MANUAL
•
Store cut sheet media flat, not on edge, in a closed cut sheet
media package.
•
Store roll media on end in an appropriately sealed media bag.
•
Store the media in a cool, dry environment.
17
MEDIA
This page has been intentionally left blank.
18
XES SYNERGIX 8850 PRINTER OPERATOR MANUAL
4.
Off-line Setup Menu
The printer has an off-line Setup Menu that allows you to
customize the printer and the AccXES controller to meet your
particular requirements.
Setup Menu options
The Setup Menu has the following options:
•
Utilities
•
Setup I/O Ports
•
Setup Printers
•
Processing Defaults
•
System Administration
•
Printer Menu
Each of the Setup Menu options has a number of sub-options.
This chapter documents the Printer Menu option in detail.
For information about the remaining Setup Menu options, refer to
the XES Synergix 8825/8830/8850 Controller Setup Manual for
Firmware 7.0 or the Web Printer Manager Tool User Guide.
XES SYNERGIX 8850 PRINTER OPERATOR MANUAL
19
OFF-LINE SETUP MENU
Printer Menu
The Printer Menu allows you to control the operation of the printer.
This menu contains six options. The table below describes the
Printer Menu options and their sub-options.
Table 1.
Option
AUDIBLE INDICATORS
Printer Menu options
Sub-option
Function
KEYPRESS
Enables or disables an audible beeper when a
control panel key is pressed.
Settings:
ON and OFF
Default: ON
ALARM
Enables or disables an audible beeper when
the printer experiences a condition requiring
immediate attention.
Settings:
ON and OFF
Default: ON
READY TO POWER SAVER
Controls the length of time the printer will
remain idle before entering power saver
mode.
Settings: 5 to 50 minutes in 5-minute intervals
Default: 50 minutes
NOTE: A value of 0 prevents the printer from
entering power saver mode.
POWER SAVER TO REST
Controls the length of time the printer will
remain idle in power saver mode before
entering rest mode.
Settings: 15 to 150 minutes in 15-minute
intervals
Default: 150 minutes
NOTE: A value of 0 prevents the printer from
entering rest mode.
PRINTER ADJUSTMENTS
DENSITY
Increases or decreases the print density.
Settings:
0 (lightest) to 10 (darkest)
Default: 5
FINISHER SETTINGS
FINISHER CONFIG TYPE
Specifies the folder configuration type.
Settings: NONE (no finisher) and 003
(Generic Finisher Interface)
Default: NONE
TIMERS
20
XES SYNERGIX 8850 PRINTER OPERATOR MANUAL
OFF-LINE SETUP MENU
Table 1. Printer Menu options (continued)
Option
DIAGNOSTICS
BILLING METERS
Sub-option
Function
TEST PLOT
Allows you to run a test print in off-line mode
from each media source. The selections are
ROLL 1, ROLL 2, ROLL 3, and BYPASS.
PRINTER DIAGNOSTICS
Reserved for use by the service
representative and is password protected.
RECENT FAULT LOG
Displays a record of the last 99 printer faults.
You may be asked to provide information from
this log when placing a call for service.
METER A
Provides a record of the total number of
square feet/meters of prints produced. This
number is useful for both billing and service
purposes.
METER B
Provides a record of the total number of linear
feet/meters of prints produced. This number
is useful for both billing and service purposes.
XES SYNERGIX 8850 PRINTER OPERATOR MANUAL
21
OFF-LINE SETUP MENU
Accessing the Printer Menu
To access the Printer Menu:
1. Press the On-line/Off-line key to enter off-line mode.
•
The on-line/off-line indicator will go out.
•
The display will indicate "XES SYNERGIX 8850
PAUSED."
2. Press the Enter key to access the XES SYNERGIX 8850
SETUP MENU.
3. Press the Previous or Next key until <PRINTER MENU> is
displayed.
4. Press the Enter key to access the PRINTER MENU.
•
The display will indicate "PRINTER MENU <AUDIBLE
INDICATORS>." This is the first PRINTER MENU option.
Enabling or disabling the audible indicators
To enable or disable the Audible Indicators:
1. Access the PRINTER MENU. See "Accessing the Printer
Menu" in this chapter.
2. Press the Enter key to select AUDIBLE INDICATORS. The
current setting for the KEYPRESS option is displayed.
3. Do one of the following:
•
To select the KEYPRESS option, press the Enter key.
•
To select the ALARM option:
-
Navigate to it by pressing the Previous or Next key.
The current setting for the ALARM option is displayed.
-
Press the Enter key to select the option.
4. Press the Previous or Next key to switch between ON and
OFF.
5. Press the Enter key to save your selection.
6. Press the On-line/Off-line key to return to on-line mode.
22
•
The on-line/off-line indicator will light.
•
The display will indicate "XES SYNERGIX 8850 IDLE."
XES SYNERGIX 8850 PRINTER OPERATOR MANUAL
OFF-LINE SETUP MENU
Setting the timers
To set the Power Saver mode and Rest mode timers:
1. Access the PRINTER MENU. See "Accessing the Printer
Menu" in this chapter.
2. Press the Previous or Next key until TIMERS is displayed.
3. Press the Enter key to select TIMERS. The current setting for
the READY TO POWER SAVER option is displayed.
4. Do one of the following:
•
To select the READY TO POWER SAVER option, press
the Enter key.
•
To select the POWER SAVER TO REST option:
-
Navigate to it by pressing the Previous or Next key.
-
Press the Enter key to select the option.
5. Press the Previous or Next key to scroll through the range of
values.
6. When you scroll to the desired value, press the Enter key to
save your selection.
7. Press the On-line/Off-line key to return to on-line mode.
•
The on-line/off-line indicator will light.
•
The display will indicate "XES SYNERGIX 8850 IDLE."
Adjusting the print density
To adjust the print density:
1. Access the PRINTER MENU. See "Accessing the Printer
Menu" in this chapter.
2. Press the Previous or Next key until PRINTER
ADJUSTMENTS is displayed.
3. Press the Enter key to select PRINTER ADJUSTMENTS. The
current setting for the DENSITY option is displayed.
4. Press the Enter key to select DENSITY.
5. Press the Previous or Next key to scroll through the range of
values.
6. When you scroll to the desired value, press the Enter key to
save your selection.
7. Press the On-line/Off-line key to return to on-line mode.
XES SYNERGIX 8850 PRINTER OPERATOR MANUAL
•
The on-line/off-line indicator will light.
•
The display will indicate "XES SYNERGIX 8850 IDLE."
23
OFF-LINE SETUP MENU
Specifying the finisher configuration type
To specify the finisher configuration type:
1. Access the PRINTER MENU. See "Accessing the Printer
Menu" in this chapter.
2. Press the Previous or Next key until FINISHER SETTINGS is
displayed.
3. Press the Enter key to select FINISHER SETTINGS.
4. Press the Enter key to select FINISHER CONFIG TYPE. The
current value for the FINISHER CONFIG TYPE option is
displayed.
5. Press the Previous or Next key to switch between NONE and
003.
6. Press the Enter key to save your selection.
7. Press the On-line/Off-line key to return to on-line mode.
•
The on-line/off-line indicator will light.
•
The display will indicate "XES SYNERGIX 8850 IDLE."
Performing printer diagnostics
The DIAGNOSTICS option has two operator-accessible suboptions – TEST PLOT and RECENT FAULT LOG.
NOTE: A third DIAGNOSTICS option, PRINTER DIAGNOSTICS,
is restricted to the service representative. If you select it, you will
be asked to enter a password. Press the Exit key to exit the
option.
Printing a test plot
To print a test plot:
1. Access the PRINTER MENU. See "Accessing the Printer
Menu" in this chapter.
2. Press the Previous or Next key until DIAGNOSTICS is
displayed.
3. Press the Enter key to select DIAGNOSTICS.
4. Press the Enter key to select TEST PLOT.
5. Press the Previous or Next key to scroll through the media
sources.
6. Press the Enter key to select the media source. The printer
will initialize the media supply and print the test plot.
7. Press the On-line/Off-line key to return to on-line mode.
24
•
The on-line/off-line indicator will light.
•
The display will indicate "XES SYNERGIX 8850 IDLE."
XES SYNERGIX 8850 PRINTER OPERATOR MANUAL
OFF-LINE SETUP MENU
Viewing the recent fault log
To view the recent fault:
1. Access the PRINTER MENU. See "Accessing the Printer
Menu" in this chapter.
2. Press the Previous or Next key until DIAGNOSTICS is
displayed.
3. Press the Enter key to select DIAGNOSTICS.
4. Press the Previous or Next key until RECENT FAULT LOG is
displayed.
5. Press the Enter key to select RECENT FAULT LOG.
6. Press the Next key to display the two most recent faults.
7. Press the Previous or Next key to scroll through the fault
listing.
8. When you are finished viewing the fault listing, press the Online/Off-line key to return to on-line mode.
•
The on-line/off-line indicator will light.
•
The display will indicate "XES SYNERGIX 8850 IDLE."
Displaying the billing meter counts
To display the billing meter counts:
1. Access the PRINTER MENU. See "Accessing the Printer
Menu" in this chapter.
2. Press the Previous or Next key until BILLING METERS is
displayed.
3. Press the Enter key to select BILLING METERS. The value
for METER A is displayed. METER A provides the square
footage of prints produced.
4. To view the value for METER B, press the Previous or Next
key. METER B provides the linear feet of media produced.
5. When you are finished viewing the meter counts, press the
On-line/Off-line key to return to on-line mode.
XES SYNERGIX 8850 PRINTER OPERATOR MANUAL
•
The on-line/off-line indicator will light.
•
The display will indicate "XES SYNERGIX 8850 IDLE."
25
OFF-LINE SETUP MENU
This page has been intentionally left blank.
26
XES SYNERGIX 8850 PRINTER OPERATOR MANUAL
5.
Care
The printer requires a minimum of operator maintenance. You will
need to replace the toner cartridge and toner waste bottle when
the cartridge empties. You also will need to clean the outside
surface of the printer when necessary.
This chapter provides the procedures for performing the required
tasks and for ordering supplies.
When the toner cartridge needs replacement
When the toner cartridge is empty, the following occur:
•
The toner supply access cover indicator on the graphic display
flashes.
•
The alarm beep (if enabled) sounds.
•
A J1.01 status code and a message instructing you to replace
the dry ink cartridge and waste bottle appear in the message
display.
To replace the toner cartridge and toner waste bottle, follow the
instructions in the "Replacing the toner cartridge" and "Replacing
the toner waste bottle" sections of this chapter.
XES SYNERGIX 8850 PRINTER OPERATOR MANUAL
27
CARE
Replacing the toner cartridge
To replace the toner cartridge:
CAUTION: Toner identified for use in the XES Synergix 8850
Printer is a two-component material made specifically for this
printer. Use of toner not identified for the XES Synergix 8850
Printer will damage the printer.
1. Open the replacement toner carton.
•
Remove the replacement toner cartridge.
•
Remove the replacement toner waste bottle.
•
Save all the replacement toner packaging for recycling the
used toner cartridge and toner waste bottle.
2. Open the toner supply access cover.
3. Slide the gold cartridge dispenser patch cover to the left to
expose the dispenser patch.
4. Pull the plunger to the right and lift the front end of the toner
cartridge.
5. Release the plunger and rest the cartridge on the plunger
mechanism.
28
XES SYNERGIX 8850 PRINTER OPERATOR MANUAL
CARE
6. Carefully lift the used toner cartridge out of the printer.
•
Try not to tilt the cartridge too much to avoid toner
spillage.
7. Wipe any excess toner off the used toner cartridge.
8. Seal the used toner cartridge dispenser patch with tape.
9. Place the used toner cartridge in the empty replacement toner
carton.
•
Do not seal the carton until you have added the toner
waste bottle to it as well. Recycle the used cartridge and
waste bottle according to the instructions provided with the
replacement carton.
10. Hold the new toner cartridge horizontally and shake it side to
side 10 or 12 times.
11. Install the new toner cartridge so that the end containing the
cover tape is toward the front of the printer.
•
XES SYNERGIX 8850 PRINTER OPERATOR MANUAL
Ensure that the cover tape is facing up.
29
CARE
12. Lower the toner cartridge into position while pushing the
plunger to the left.
13. Release the plunger.
14. Rotate the toner cartridge back and forth until the cartridge
locks into position.
CAUTION: Remove the cover tape carefully. Do not remove the
clear, perforated seal.
15. Remove the cover tape from the toner cartridge.
•
Do not remove the seal under the tape.
16. Slide the gold cartridge dispenser patch cover to the right to
conceal the cartridge patch.
•
Ensure that the cartridge patch is completely covered.
17. Close the toner supply access cover.
30
XES SYNERGIX 8850 PRINTER OPERATOR MANUAL
CARE
Replacing the toner waste bottle
Each time you replace the toner cartridge, you must replace the
toner waste bottle as well.
To replace the toner waste bottle:
1. Open the front door.
.
CAUTION: Pull the toner waste bottle out gently to avoid spillage
of toner.
2. Carefully remove the toner waste bottle.
•
Pull the waste bottle forward until it disengages from the
mounting bracket.
.
3. Remove the stopper from the side of the used toner waste
bottle.
XES SYNERGIX 8850 PRINTER OPERATOR MANUAL
31
CARE
CAUTION: Ensure that the stopper is firmly in place to avoid
spillage of toner.
4. Snap the stopper into place on the top of the used toner waste
bottle.
5. Remove the stopper from the top of the new toner waste
bottle.
6. Snap the stopper into place on the front of the new toner
waste bottle.
7. Slide the new toner waste bottle onto the mounting bracket.
•
Push the bottle forward until you feel it snap into place.
8. Close the front door.
CAUTION: Do not reuse the contents of the toner waste bottle.
Reuse of this material will damage the printer.
9. Place the used toner waste bottle in the plastic bag provided in
the replacement carton.
10. Place the used toner waste bottle in the replacement toner
carton.
•
32
Ensure that the carton contains the used toner cartridge
as well. Recycle the used cartridge and waste bottle
according to the instructions provided with the
replacement carton.
XES SYNERGIX 8850 PRINTER OPERATOR MANUAL
CARE
Cleaning the printer surface
As needed, clean the outside surfaces of the printer. Use a clean
cloth dampened with mild soap and water. Do not pour or spray
liquid directly on any part of the printer.
XES SYNERGIX 8850 PRINTER OPERATOR MANUAL
33
CARE
Ordering supplies
This section provides information for obtaining supplies for your
printer.
Supply order list
The XES Synergix 8850 Printer uses the following supplies:
•
Toner cartridge and toner waste bottle:
The printer is shipped with one toner cartridge and one toner
waste bottle. Each time the toner cartridge empties, you must
replace both the cartridge and the waste bottle. The two items
are packaged together as one part number. When ordering,
use the following part number:
United States – 6R989
Europe – 6R90302
•
Bond paper, vellum/tracing paper, and film
Xerox offers the above media in various sizes, weights, and
grades to meet your printing needs.
Supply order procedure
To order supplies for the XES Synergix 8850 Printer, call your local
Xerox Engineering Systems sales office.
Local telephone number: ________________________________
When ordering supplies, please be prepared to provide the
following information to the sales representative:
•
Customer account number: ___________________________
•
Machine type: XES Synergix 8850 Printer
•
Item descriptions/part numbers and quantities required
For more information, visit the Xerox Engineering Systems web
site at www.xes.com.
34
XES SYNERGIX 8850 PRINTER OPERATOR MANUAL
6.
Problem solving
This chapter provides information for resolving various problems
that can occur during the operation of the printer. It contains
instructions for clearing media jams. It also includes status code
and error message tables, as well as a general problem-solving
table. If you are unable to resolve the problem, follow the
procedure for calling for service at the end of the chapter.
Clearing media jams
When the printer experiences a media jam, the following occur:
•
The alarm beep (if enabled) sounds.
•
The indicator light on the graphic display in the area of the jam
flashes.
•
A status code and instructions for resolving the problem
appear in the message display.
To clear the jam:
XES SYNERGIX 8850 PRINTER OPERATOR MANUAL
•
Observe the location of the flashing indicator light on the
graphic display
•
Follow the instructions in the message display and in this
section of the operator manual.
35
PROBLEM SOLVING
Fuser area jam
To clear a jam in the fuser area:
1. Raise the output tray all the way so that it rests on top of the
printer.
WARNING: Do not touch the fuser roll while clearing media jams
in the fuser area. The fuser roll is very hot and can cause severe
burns.
2. Open the fuser drawer all the way.
3. Do one of the following:
36
•
Turn the green knob at the end of the fuser drawer and, if
you can, pull the jammed media out the back of the fuser
area. Go to step 7.
•
If you cannot pull the jammed media out of the fuser area,
go to step 4.
XES SYNERGIX 8850 PRINTER OPERATOR MANUAL
PROBLEM SOLVING
4. Lift the latches on each side of the fuser drawer front and
lower the fuser drawer front.
5. Hold the drawer front all the way open and pull the jammed
media out of the back of the fuser area.
6. Close the fuser drawer front.
•
Ensure that it latches.
7. Close the fuser drawer.
XES SYNERGIX 8850 PRINTER OPERATOR MANUAL
37
PROBLEM SOLVING
Cutter area jam
To clear a jam in the cutter area:
WARNING: The cutter blade is very sharp. Do not touch the
cutter blade when clearing media jams in the cutter area.
1. Squeeze the latches on the cut sheet feed-in drawer and open
the drawer all the way.
2. Pull the media out of the cutter area.
3. Close the cutter drawer.
38
XES SYNERGIX 8850 PRINTER OPERATOR MANUAL
PROBLEM SOLVING
Roll media drawer jams
To clear a jam in a roll media drawer:
1. Raise the output tray all the way so that it rests on top of the
printer.
2. Lift the handle of the applicable drawer and open the drawer
all the way.
NOTE: In some locations, high or low humidity affects the media
and causes print quality problems. To resolve the problems, a
sealed media drawer can be installed on the printer in place of one
of the standard media drawers.
3. Do one of the following:
•
If the drawer is a sealed media drawer, raise the Plexiglas
cover until it snaps in place.
•
If the drawer is not a sealed media drawer, proceed to
step 4.
4. Squeeze the baffle release and raise the baffle until it locks in
place.
XES SYNERGIX 8850 PRINTER OPERATOR MANUAL
39
PROBLEM SOLVING
5. Rotate the media roll to wind the end of the media onto the
roll.
6. Examine the lead edge of the media for tears.
•
If the lead edge of the media is torn, folded, creased or
uneven, trim the lead edge.
7. Rotate the media roll to feed the media under the baffle and
beyond the registration window.
8. Squeeze the baffle release and lower the baffle until it locks in
place on both sides.
40
XES SYNERGIX 8850 PRINTER OPERATOR MANUAL
PROBLEM SOLVING
9. Slowly rotate the media roll until the lead edge of the media is
centered in the registration window.
10. Do one of the following:
•
If the drawer is a sealed media drawer, close the Plexiglas
cover.
•
If the drawer is not a sealed media drawer, proceed to
step 11.
11. Close the roll media drawer.
12. Lower the output tray.
XES SYNERGIX 8850 PRINTER OPERATOR MANUAL
41
PROBLEM SOLVING
Status codes
The status codes shown in the table below may appear on the
message display. Follow the instructions in the table before calling
for service.
Table 2. Status code table
Status code
Explanation
C0.--
This code indicates a cutter problem. Follow the instructions on the message display.
C1.--
This code indicates a problem with roll 1. Follow the instructions on the message display.
C2.--
This code indicates a problem with roll 2. Follow the instructions on the message display.
C3.--
This code indicates a problem with roll 3. Follow the instructions on the message display.
C4.--
This code indicates a problem at the cut sheet feed-in shelf. Follow the instructions on
the message display.
E2.--
This code indicates a problem in the paper path. Follow the instructions on the message
display.
E4.--
This code indicates a problem in the fuser area. Follow the instructions on the message
display.
E5.--
This code indicates an interlock problem. Follow the instructions on the message display.
E6.--
This code indicates a problem in the paper path. Follow the instructions on the message
display.
E7.--
This code indicates a communication failure with the AccXES controller. Switch the
printer and controller off. Wait a few seconds. Then switch the controller and printer on.
E9.--
Switch the printer off. Wait a few seconds. Then switch the printer on.
F1.--
This code indicates a problem in the finisher. Follow the instructions on the message
display.
F2.--
This code indicates a problem in the finisher. Follow the instructions on the message
display.
J1.01
This code indicates that the toner cartridge should be replaced. Refer to the "Replacing
the toner cartridge" section of this manual.
J2.02
This code indicates that the toner cartridge is not installed correctly. Refer to the
"Replacing the toner cartridge" section of this manual.
LL.--
Switch the printer off. Wait several seconds. Then switch the printer on.
42
XES SYNERGIX 8850 PRINTER OPERATOR MANUAL
PROBLEM SOLVING
Error messages
The error messages shown in the table below may appear on the
message display. Follow the instructions in the table before calling
for service.
Table 3. Error message table
Error Message
CHECK FOLDER
FOLDER COMMUNICATIONS ERROR #17
Problem
FINISHER CONFIG TYPE
enabled, but no folder is
installed.
Solution
1. Press the On-line/Off-line
key to take the printer offline.
2. Reset the value to NONE.
Refer to "Specifying the
finisher configuration
type" in this manual for
instructions.
F2-01 CHECK FOLDER
FOLDER COMMUNICATOINS ERROR #01
FINISHER CONFIG TYPE
enabled, but no folder is
installed.
1. Switch the printer Off.
2. Wait five seconds. Then
switch the printer On.
3. As soon as the Printer
Firmware Version
message is displayed,
press the On-line/Offline
key to take the printer offline.
4. Reset the value to NONE.
Refer to "Specifying the
finisher configuration
type" in this manual for
instructions.
XES SYNERGIX 8850 PRINTER OPERATOR MANUAL
43
PROBLEM SOLVING
Problem solving table
The table below lists some conditions that may occur during the
operation of the printer. You may be able to resolve the problems
by following the suggested solutions in the table. For problems
beyond the scope of this table, call for service.
Table 4. Problem-solving table
Condition
Causes
Suggested Solutions
Portions of the prints are deleted.
The media may be damp.
Check the condition of the media. If
damp, replace it.
The prints are light overall.
The print density may be too light.
Use the Printer Menu to adjust the
print density. Refer to "Adjusting
the print density" in this manual.
The media may be too damp.
Use a sealed media drawer.
The media may be too dry.
Use a sealed media drawer.
The tracing paper has wrinkles.
Store the media in a sealed
package or bag.
44
XES SYNERGIX 8850 PRINTER OPERATOR MANUAL
PROBLEM SOLVING
Calling for service
When you experience a problem with the printer, you may be able
to resolve it by referring to the procedures and tables in this
chapter.
If you are unable to resolve the problem, call your local Xerox
Engineering Systems office.
Local telephone number: ________________________________
A customer service representative will answer any questions you
may have and, if necessary, arrange for a customer service
engineer to service your equipment.
Be prepared to provide the following information to the customer
service representative:
•
Customer account number: ___________________________
•
Machine type: XES Synergix 8850 Printer
•
Machine serial number: ______________________________
NOTE: The serial number is located behind the front door as
shown in the illustration below.
Serial
number
•
A description of the problem
•
If applicable, the status code and message that appear on the
message display. Be sure to note the location of any flashing
indicator lights as well.
For more information, visit the Xerox Engineering Systems web
site at www.xes.com.
XES SYNERGIX 8850 PRINTER OPERATOR MANUAL
45
PROBLEM SOLVING
This page has been intentionally left blank.
46
XES SYNERGIX 8850 PRINTER OPERATOR MANUAL
7.
Technical data
This chapter provides the product and media specifications for the
XES Synergix 8850 Printer. It also provides the space
requirements for normal operation after product installation.
Product specifications
Table 5. Hardware specifications
Process speed
4.5 ips
Resolution
400 dpi
Environmental requirements
Minimum: 60° F (10° C) at 20% relative humidity
Maximum: 80° F (27° C) at 80% relative humidity
Maximum elevation: 10,000 feet (3048 meters)
Weight
575 lbs (261 kg)
Dimensions
Width:
As delivered - 23 inches (584 mm)
With output tray and AccXES controller installed - 62 inches (1575 mm)
Depth: 57 inches (1448 mm)
Height: 42.5 inches (1080 mm)
Audible noise
67 db @ Max.
Power consumption
Typical power consumption for US 220V @ 20A:
Warm-up – 4660 watts
Standby – 1000 watts
Operating – 2100 watts
Rest - 120 watts
Heat output
Warm-up: 14,500 BTU/hour
Standby mode: 4,000 BTU/hour
Print mode: 7,200 BTU/hour
Finishing
Standard catch tray
Optional on-line folder
Optional Synergix Stacker
XES SYNERGIX 8850 PRINTER OPERATOR MANUAL
47
TECHNICAL DATA
The XES Synergix 8850 Printer will operate within the
specifications indicated in the table below for the respective
markets. Current limit will be set as part of the installation
procedure. The printer is not sensitive to the AC power service
frequency and can operate at either 50hz or 60hz.
Table 6. Operating power
Market area
AC power service
rating
Maximum current
consumption
First Print Out Time
US/Canada
115V @ 20A
208V – 240V @ 20A
208V – 240V @ 15A
17.6A
17.6A
13.2A
Less than 5 minutes*
Less than 3 minutes
Less than 4 minutes
European Operations Common Market
230V – 240V @ 16A
16.0A
Less than 3 minutes
United Kingdom
230V – 240V @ 13A
13.0A
Less than 3.5 minutes
Switzerland
220V @ 10A
10.0A
Less than 5 minutes*
Central/South America
220V – 240V @ 20A
15A
Less than 3 minutes
*Continuous operation at the rate of 10 "D" prints per minute cannot be assured at this power service.
The table below shows maximum print engine throughput in prints
per minute. It assumes continuous printing from a single roll with
no AC power limitation.
Table 7. Maximum prints per minute
US
48
Europe/Central and South America
Portrait
Landscape
Portrait
Landscape
N/A
A = 23
N/A
A4 = 24
B = 13
B = 18
A3 = 13
A3 = 18
C = 10
C = 13
A2 = 10
A2 = 13
D=7
D = 10
A1 = 7
A1 = 10
E=5
N/A
A0 = 5
N/A
XES SYNERGIX 8850 PRINTER OPERATOR MANUAL
TECHNICAL DATA
Media specifications
Table 8. Media specifications
Media type
Recommended media types:
Bond – 20 to 24 lb (80 to 90 gsm) xerographic roll paper or cut sheets
Vellum/tracing – 20 lb (80 gsm)
Film - 4-millimeter thickness, double matte, heat stable
Media supply
3 rolls/500 feet (152 meters) each
Standard manual bypass for cut sheets
Media size
Roll feed:
Width - 11 to 36 inches ( 279 to 914 mm)
Core diameter – 3 to 6.7 inches (76 to 170 mm)
Manual cut sheet feed:
Width - 11 to 36 inches (279 to 914 mm)
Minimum length – 8-1/2 inches (216 mm)
Print size
Minimum:
Manual cut sheet feed (portrait) - 8-1/2 x 11 inches (216 x 279 mm)
Roll feed (landscape) – 11 x 8-1/2 inches (279 x 216 mm)
Maximum:
Manual cut sheet feed – 36 x 48 inches (914 x 1219 mm)
Roll feed - 36 inches x 80 feet (914 mm x 24 meters)
XES SYNERGIX 8850 PRINTER OPERATOR MANUAL
49
TECHNICAL DATA
Space requirements
The illustration below shows the space requirements for normal
operation of the printer after installation.
The height clearance from the floor to the nearest overhead
obstruction within the floor space requirement is 78 inches (1981
mm).
24" (610 mm)
36" (914 mm)
Top view
36" (914 mm)
83"
(2108 mm)
36" (914 mm)
129"
(3277 mm)
NOTE: Once installed, this machine is not considered movable. If
moved, re-leveling of the machine will be required.
50
XES SYNERGIX 8850 PRINTER OPERATOR MANUAL