1
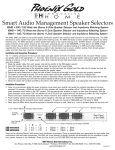
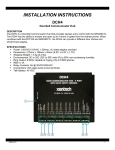
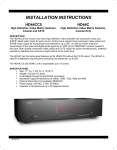
TYPICAL SYSTEM CONNECTIONS
ISM4 INTELLIGENT SYSTEM MANAGER
PROGRAMMING QUICK START GUIDE
Front
Rear
This ISM4 Programming Quick Start Guide provides the basic instruction to programming an ISM4. To use the Quick Start Guide, fill
out the Macro Programming Table and follow the Programming Instructions. For complete instructions on installation, connections and
additional programming capabilities, refer to the ISM4 Installation & Programming Manual.
The System shown on the back cover illustrates a typical Home Theater System. In the configuration as shown, when the TV is turned
ON, the ISM4 will sense the TV ON state, look at Sources 2-4 (A/V Receiver, Cable Box and DVD Player) and if any of them are OFF,
automatically output the Source ON Macros for those devices to turn them ON. If at any time, while the TV is ON, any of Sources 2-4
turns OFF, the ISM4 will automatically turn it back ON. When the TV is turned OFF, the ISM4 will sense the TV OFF state, look at
Sources 2-4, and if any of them are ON, automatically output the Source OFF Macros for those devices to turn them OFF.
There are endless applications for this type of power management. Two other system examples are shown in the ISM4 Installation &
Programming Manual for reference. See Section: System Applications.
IR
Command
Brand
Device
Command
MACRO PROGRAMMING TABLE
Source 1
Source 2
Source 3
ON OFF ON OFF ON OFF
Source 4
ON OFF
PROGRAMMING INSTRUCTIONS
The following instructions cover the basic Source programming procedure. Each Source ON and OFF Macro can include up to five IR
Commands. Please refer to the ISM4 Installation & Programming Manual for complete programming instructions.
To properly Program and Test IR Commands, each of the Source IR Emitters must be connected to the appropriate ISM4 Source IR
Out Port, and attached to the appropriate device over the IR Eye.
If Source 1 is going to be turned ON/OFF manually or with a remote control, and there are no additional commands in the ON
or OFF Macros, it is not necessary to program the Source 1 ON or OFF Macros. The ISM4 will sense the ON or OFF condition of
Source 1 and automatically sync Sources 2-4.
Learn IR
1. Enter Edit Mode: Press and hold the SEQUENCE button until Source 1 LED blinks once and release. The ISM4 will
default to the SOURCE 1 (ON Macro). SOURCE 1 and PROGRAM LED’s will turn ON solid green.
Note: Read Steps 2 and 3 before entering macro commands.
2. Teach Command (SOURCE 1 (ON Macro)): Press and release the SEQUENCE button again to enter IR Learn
Mode for SOURCE 1 (ON Macro). The Source 1 LED will flash for about 5 seconds. This is the amount of time
allowed to teach an IR Command.
3. Position the remote control for the System Reference Device (Source 1) directly in front of the IR Learn window on
the ISM4 (1- 4 inches depending on the remote) and press and hold the ON or Power button on the remote control
until the PROGRAM LED flashes green three times. If the PROGRAM LED flashes red three times (the IR command
was not learned), return to Step 2.
4. Test Command: Press the TEST button and confirm the function of the learned command on the SOURCE 1 device.
5. Save Command: If the SOURCE 1 device responded properly to the learned command press and release the
SEQUENCE button again to save the command. The PROGRAM LED will flash once. The ISM4 will automatically
return to Edit Mode upon save. To return to Edit Mode without saving, press the PREV Button.
6. Repeat Steps 3-5 as necessary until the command is learned, tested, confirmed and saved.
Note 1: If a delay is required proceed to Step 9.
7. If there is no delay required for IR Macro Command 1, and there is at least one more IR Command in the Macro,
press and release the NEXT button. SOURCE 1 LED will flash twice indicating the ISM4 is ready to learn the IR
Command for IR Macro Command 2. Repeat Steps 2-5 to add the IR Command.
Note 2: To add IR commands 3-5 repeat the sequence (Step 7). The selected source LED will blink the number of
times for the IR command that it is presently on.
8. Teach Command (SOURCE 1 (OFF Macro)): To enter SOURCE 1 (OFF Macro) press and hold the NEXT button
until the SOURCE 1 LED blinks once and release. SOURCE 1 LED will turn ON solid green and PROGRAM LED will
turn ON solid orange. Repeat Steps 2–7.
Adding Delays
9. To add a DELAY after the IR Command (following Step 5), press the DELAY button. The PROGRAM LED will flash
once to indicate that the ISM4 has entered delay mode.
10. Press the NEXT button once for each second of delay to be added to the IR Macro Command. Press the PREV
button once for each second of delay to be subtracted. To save the Delays, press and release the SEQUENCE
button.
NOTE: The first press of the NEXT button will add one second of delay. Each additional press will add one second up
to 60 seconds after which the timer will reset back to 0 seconds. The first press of the PREV Button will add 60
seconds of delay. Each additional press will subtract one second down to 0 seconds after which the timer will reset to
60 seconds.
Test Macro
11. A fully programmed (Source ON or OFF) Macro can be tested by pressing the TEST button while in EDIT mode.
NOTE 1: If the IR Commands and Delays within the IR Macro Commands were not properly saved, the Macro cannot
be tested and the Program LED will flash red to indicate error.
NOTE 2: To Test a Macro starting from Normal Operation Mode, Press and hold SEQUENCE until the active source
blinks once and release to enter Edit Mode, (Source 1 and Program LEDs will turn ON solid green), Navigate to the
Macro to be tested (2 second press of PREV or NEXT) and then press the TEST button.
Advance to Source 2 – 4
12. To advance to SOURCE 2 (from Source 1 (OFF Macro)), press and hold the NEXT button again until the SOURCE 1
LED blinks once and release. The SOURCE 2 LED and the PROGRAM LED will turn ON solid green. Repeat the
sequence to advance to SOURCES 3 and 4.
NOTE: Pressing and holding the PREV button until the active Source LED blinks once, will shift programming to the
previous Macro. (i.e. pressing and holding the PREV button while in SOURCE 1 (ON Macro) Edit Mode, will shift Edit
Mode to the SOURCE 4 OFF Macro. (SOURCE 4 LED will turn ON solid green and the PROGRAM LED will turn on
solid orange.)
13. Repeat Steps 2-11 above until all SOURCE ON and OFF Macros have been programmed, tested and saved. It is
vitally important to program both the SOURCE ON and OFF Macros. The ISM4 will not function properly if both sets
of Macros have not been programmed.
Exit Edit Mode
14. To exit Edit Mode, press and hold the PREV button, release after the selected SOURCE LED blinks a second time
(about 2 seconds apart). The ISM4 will return to Normal Operating Mode.
Test ISM4 (All Macros)
NOTE: All system devices and components must be properly setup and connected to test ISM4 Macro Programming. Be
sure that all Sensors are connected to the appropriate device and the Source Sense Input Ports on the ISM4. Also be
sure all IR Emitters are connected to the appropriate Source “IR Out “ Ports on the ISM4 and attached to the correct
device over the IR eye for that device.
15. With all Sources OFF, turn the System Reference Device (SOURCE 1) ON. All Sources should turn ON and any
additional setup programming (source select, play, etc) should execute as programmed. If any functions were ‘missed’,
test the individual ON Macro for that Source. Re-learn IR Commands and adjust delays as necessary until the
system powers up correctly.
16. Repeat Step 15 for System OFF. (Turn the System Reference Device, SOURCE1, OFF).
Deleting IR Commands and Macros
17. Delete a Single IR command (must be in EDIT mode): Press and release the DELETE button. The PROGRAM
LED will blink once indicating that the IR command was deleted.
18. Delete a Macro: Press and hold (approximately 2 seconds) the DELETE button until the SOURCE (active Source)
blinks once. The PROGRAM LED will blink once indicating that the Macro was deleted.
19. Delete All Macros: Press and hold (approximately 4 seconds) the DELETE button until the SOURCE (active Source)
blinks twice. The PROGRAM LED will blink once indicating that all Macros were deleted.
Quick Start Manual, ISM4 Intelligent System Manager
© 2008 Xantech Corporation, Document #08905137D
NOTES
NOTES
(Effective for products sold after October 1, 2006) Xantech Corporation (“Xantech”) warrants to the holder of a valid proof of purchase as the first
end-user purchaser (“You”), its products to be free from defects in materials and workmanship as defined herein, for the periods specified below from
the date of purchase. This limited warranty extends only to You for product purchased and used in the United States of America. For product
purchased outside of the United States of America, the terms of this warranty apply EXCEPT that You must contact the Xantech Authorized
Distributor in your region for warranty services. Product is not intended for end user installation. If within the applicable warranty period above You
discover such item was not as warranted above and You promptly notify Xantech in writing, Xantech shall repair or replace the items at its option.
Xantech may elect which remedy or combination of remedies to provide in its sole discretion. Xantech may use functionally equivalent
reconditioned/refurbished/pre-owned or new products or parts under this limited warranty. This warranty shall not apply (a) to product which shall
have been installed by other than an authorized Xantech installer, (b) to installed product which is not installed to Xantech’s specifications, (c) to
product which shall have been repaired or altered by others than Xantech, (d) to charges for installation or set up or adjustment of customer controls,
(e) to product that has suffered normal cosmetic deterioration (f) to product which shall have been subjected to negligence, misuse, abuse, accident,
or damage by circumstances beyond Xantech’s control, including, but not limited to, lightning, flood, electrical surge, tornado, earthquake, or any
other catastrophic events beyond Xantech’s control, or (g) to product which shall have been subjected to improper operation, connected equipment
failure or malfunction, inadequate packing or shipping damage, maintenance or storage, or to other than normal use of service. (h) if parts are no
longer available to repair, or replace the product or to provide a functionally equivalent product. The foregoing warranties do not cover
reimbursement for labor, transportation, shipping, removal, installation, or other expenses which may be incurred in connection with repair or
replacement. All claims for product shipping damage must be processed within 3 days of receipt by You. Supplied batteries are not covered by this
warranty. For the purpose of this warranty, Lifetime is defined as seven (7) years from the discontinuance of sales of that product by Xantech.
A Xantech Return Authorization (RA) must be obtained from Xantech by You, your installer or your distributor for product covered under this
warranty. Covered product must be sent to Xantech together with proof of purchase, RA number, prepaid and insured to Xantech. Freight collect
shipments will be refused. Risk of loss or damage in transit is borne by the sender. Xantech’s warranty does not cover products which have been
received improperly packaged, altered, or physically damaged. Products will be inspected upon receipt.
Except as may be expressly provided and authorized in writing by Xantech, Xantech shall not be subject to any other obligations or liabilities
whatsoever with respect to equipment manufactured or sold by Xantech or services rendered by Xantech.
THE FOREGOING WARRANTIES ARE EXCLUSIVE AND IN LIEU OF ALL OTHER EXPRESSED AND IMPLIED WARRANTIES, INCLUDING
BUT NOT LIMITED TO IMPLIED WARRANTIES OF MERCHANTABILITY AND FITNESS FOR A PARTICULAR PURPOSE.
ATTENTION: TO OUR VALUED CONSUMERS To insure that consumers obtain quality pre-sale and after-sale support and service, Xantech
products are sold exclusively through authorized dealers and authorized distributors. Xantech products are not sold online. The warranties on
Xantech products are NOT VALID if the products have been purchased from an unauthorized distributor or an online e-tailer. In order to determine
if your Xantech re-seller is authorized, please call Xantech (800) 843-5465.
XANTECH PRODUCT (go to
xantech.com/warranty for model numbers)
IR Receivers and IR Emitters
A/V Distribution and Control
Remote Control Switchers
Modules and Connecting Blocks
Accessories
Speakers
Volume Controls and Speaker Selectors
MRC, BX, ZPR and Commercial Products
Amplifiers
Control Interfaces
Hand Held Remote Controls
SPLCD Products
Source Components
HDMI
WARRANTY DURATION
Limited Lifetime
Limited Lifetime
Limited Lifetime
Limited Lifetime
Limited Lifetime
Limited Lifetime
5 year Limited
2 year Limited
2 year Limited
2 year Limited
1 year Limited
1 year Limited
1 year Limited
2 year Limited
Xantech Corporation | 13100 Telfair Avenue, Sylmar CA 91342-3573 | 800.843.5465 | FAX 800.492.6832 | www.xantech.com