1
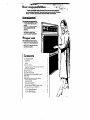
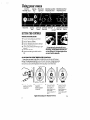
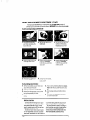
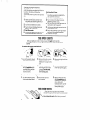
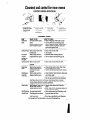
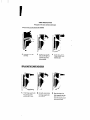
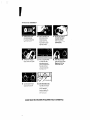
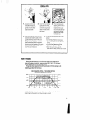
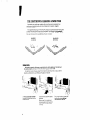
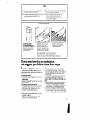
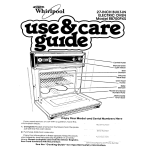
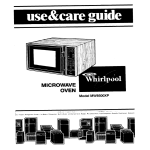
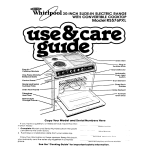
WhirlpOd
*
274NCH BtiIllhi
CONTINUOUS-CLEANING
ELECTRIC OVENS Model RBf70PXL
:n
Automatic
oven
LlQht SWttCh
-upper
Manual
Oven
LlQht Switch
M-Flow
FlberQlaSS
Copy
II you need
~nlormal~on 16
or call with a quesllon.
and Serial Numbers
Door
Heat
Seal
Here
have lhls
Model Numbe!
1 Complete
Model and Serlol Numbers
tust behlnd the upper oven door]
2 Purchase
Your Model
Oven
or rwallatlon
(from the plate
serm Number
dale trom your sales slip
Copy this uVormatlon in these spaces Keep this book,
your warranty and the sales slip together r a handy
plOCe
sewce Compon” an* Ph”n* Numbfr
See
!he
“Caoklng
Guldo”tor
imporbnt
sofe?y
Inlo:m&t~~.
I
II
Gulcte”carefulty
for Important we and safety Intormatlon.
You must be sure your oven la...
‘
D installed
and leveled
In a wall
or cabinet
that wtll hold the
1.,.,
weight;
. Inslolled
In o well-ventilated
iy;:‘7&
orea protected
womrne :. .“.
weather:
8 property
connected
to the correct ektrtc
supply
and
groundlng.
(See ‘Installatton
tnstructtons.“l
You must bo awe your own
. usad only for jobs expected
home
ovens;
. used only by people
who
oparote
It property;
. properly
malritalned.
I’E
kr
ta...
of
con
1
le ontents
YourResponsibilitIes
.......
............
lnsiallatlon
Proper Use ........
.......
Safety
Using YourOvens
Bakrng in EItherOven
Adtusting theOven Temperature C&irOts’ :
..........
Broiling in EitherOven.
Oven Rock Positrons
Setting the Clock ............
....
Using the Mrnute fimer
Using the Automatic MEALilMER Clock : ...
Oven Vents ...............
................
Oven tights
.....
Cleantng and Caring For Your Ovens
Control Panel and Knobs ...........
.,,,,,
..........
Cleaning Chart
The LowerOven
Door ........
The Self-Cleaning
UpperOven
...
The Continuous-Cleaning
LowerOven
: ..
If You Need Service or Assistance
........
1. Before Callrng for Assistance ........
2 II You Need Assistance
............
3. If You Need Service ...............
4. if You Have a Problem ............
Page
2
z
3
4
4
4
5
5
6
6
7
8”
9
99
10
11
14
15
15
16
16
16
Using your ovens
Aulomallc
MEALTIMER- Clock
rm&
Timer
Manual
Oven
LtQht Swllch
Slop Time
Knob
Sld
nme
Knob
Lower oven
Selector
AdJustable
Temperalure
Lower
slgld
Oven
LlQhl
Clean
Lower Oven
Conlrol
Light
Lock
/
LlQhl
Adjustable
Upper Oven
Temperalure
Conlrol
upper
SIgnal
oven
LlQhl
upper oven
Seleclor
SETTING THE CONTROLS
BAKING IN EITHER OVEN
i.
Put oven racks where you want them
[See poge 6 for suggestions.]
2. Set Oven Selector to BAKE
3. Sef Oven Temperature Conlrol to Ihe bakrng temperature
you wanl.
4. Let the oven preheat until the Signal Lrght
goes
During
baking,
the elements
will turn on
and ott to help hold the oven temperature
at
the setting.
[The top element
will never
turn
red, but will be hot.) The Slgnal
Light will turn
on and ott wlth the elements.
ofl
5.
Pul food rn the oven.
6. When done baking, turn both knobs lo
OFF
ADJUSTING THE OVEN TEMPERATURE ___--CONTROLS
Does either oven seem lo be hotter or colder than your old oven a1 the some
settings? The temperature
setting in your old oven may have changed gradually
over the years. The accurate setting of your new ovens can seem different. If you
think either or both oven temperatures
need adjusting. follow these steps:
1.
Pull the Oven Ternperolure
Control
straight off
2. Loosen the locking screw;
NOTICE posilron
of notches
llghten
4
the
locking
3.
screw.
lo lower the fernperalure, move
black part of
knob closer lo LO
Each notch
equals about 10 F
I5 Cl
Replace
the
knob.
4. To rarse Ihe lemperolure, move
black part of
knob closer lo HI
Each notch
equals aboul10 F
I5 Cl
Tmk
BROILING IN EITHER OVEN
1. Place the rack where You
want it for broiling. [See
below for suggestions )
2. Put broiler pan and food
on the rack
4.
5. During broiling the oven
door must be portly open
A built-rn stop wrll hold It
there
Set Oven Temperature
Control lo BROIL [Set on a
lower temperature
for
slower brorltng See
below ]
BROIL.
6.
When broiling IS done,
turn both knobs lo OFF
Brolllng can be slowed
by setting the Oven Temperature Control lo a selling
lower than BROIL When II’S on BROIL, the broil element is on all the flme. When it’s
on a temperature,
the element turns ofi and on The lower the temperature
seltlng,
the shorter are the limes when the element IS on
The Oven
Selector
must be on BROIL and
open for all brolllng
temperahrer.
the
door
partly
OVEN RACK POSITIONS
Posltlon
racks
before
hrrnlng
on the
oven.
Brorl Element
Lift rack al front and pull out
BAKING OR ROASTING
Food for baking or roastrng should be
placed rn the center of the oven
Always leave at least 1% to 2 inches
(4-5 cm] between the sides of a pan and the
oven wall and another pan For more InformaIron, see the “Cookrng Guide.”
P.djust the lop rack so the food ro be brolled IS
at 0 suggested distance from the broil element.
(see page 6) ALWAYS broil with the door open
to the brorl-stop
5
Suggested
oven-rack
positions
and brolllng
times
Approrlmate
Food
Steaks
Rare
Medium
Well done
Beef Steaks
Rare
Medium
Well Done
Hamburgers
Lamb Chops
Medium
Horn slice, precooked
or tendered
Canadian
Bacon
Pork Rlb or loin Chop
Well done
Chicken
Selector
IsI ride
Mlnuter -
wf lo SPOIL
2nd mlde
Descrlptlon
Inches cm) tram top
of food \ o Broil Element
1 (2 5cm)
1 (2.5cm)
1’ (2Scm)
3 (8cm)
3 (8cm)
3 (Bcm)
7-v
9-t 1
il.13
3-5
4-J
5-J
1%
1%
1%
%
4
4
4
3
13-15
17.19
19.21
6-0
8-10
14.16
4-5-
6-B
4-5
Beef
Fish
Liver
(4cm)
(4cm)
(4cmJ
(1 cm1
1 [2.5cm)
% -1
(l-2.5 cm)
% (1 -mm)
cm)
% -1
(2-2.5 cm)
2-3 lb
(l-1.5 kg)
cut in half
whole
fillets
% -%
(l-2 cm)
Fronklurters
-5 (10.13 cm)
-5 (10.13 cm)
-5 (10.13 cmJ
(Bcm)
-6-8
3 (8cm)
3 (8 cm)
4 -5’ (lo-13
6-8
6
.____~__
cm)
4-5
4
15
10
7 -9 f18-23 cml
3 (8cm)
3 (Bcm)
25-30
11-16
J-0
IO-12
9-14
5-J
3 (Bcm)
4 .5 (10.13 cm)
3
6-J
3
4-5
SETTING THE CLOCK
1.
Push In Minute
Timer Knob and turn
until clock digits show the
clockwlse
2.
nghl
time of day.
Mlnule Timer Knob pop out. Turn
counlerclockwise
unlil the Minute Timer
dial IS on OFF. If you push m on the knob. you
Let Ihe
WI// change
USING THE MINUTE
1.
WIthout
pushing
In the
knob,
Minute limer hand clockwise
settrng you want.
Ihe time
of day
TIMER
turn the
posl fhe
2.
3.
Turn the hand back lo the setting you want.
When lhe set lime is up, a buzzer will sound
4.
Turn the dial lo OFF lo slop the buzzrng
I
I I’
USING THE AUTOMATIC
MEALTIMER*
CLOCK
The Automatic MEALTIMER Clock is designed to turn the upper oven on and off
al times you set...even when youore not around. IMPORTANT:Follow
these steps In order.
To start
and
stop
baklng
automatIcallY:
1.
Put the racks where you
want them and place the
food in the oven.
2.
Set the Oven Selector
TIMED BAKE.
on
3.
Set the Oven Temperature
Control on the baking
temperature
you want
4.
Make sure the clock is set
to the right time of day
5.
Push in and turn the Start
Time Knob clockwlre
lo the time you want bokmg lo start
6.
Push in and turn the Stop
iTme Knob clockwlse
to the time you want the
oven to shul otf
8.
To slop the oven betore
the presel Irme. turn both
knobs lo OFF
To stop
baklng
automatlcally:
1.
Put the racks where you want them and
place the food rn the oven
2. Set the Oven Selector on TIMED BAKE
3. Set ihe Oven Temperature Control on the
baking temperature
you want
4. Make sure the clock IS set to the right time
of day
SPECIAL CAUTION:
Use foods that watt not go bad or spoil
whrte walling for cooking to start. Avoid
using dishes wilh milk or eggs, cream
soups, cooked meats or fish, or any item
wrth baking powder or yeast
Smoked or frozen meats moy be used,
so con vegetables.
frurts and casserolelype foods. Vegetables
can be cooked in
5.
Push rn and turn the Slop Trme Knob clockwise to the time you want Ihe oven to shut
Otl
6. After baking is done, turn both knobs to
OFF
7. To stop Ihe oven before the preset trme.
turn both knobs to OFF
o covered
baking dtsh with about a holfcup (118 ml] of water for 1 to I’/, hours.
Any food that has to wail for cooking to
start should be very cold or lrozen belore
It is put In Ihe oven. MOST UNFROZEN
FOODS SHOULD NEVER STAND MORE THAN
IWO HOURS BEFORE COOKING STARTS.
If the steps for usrng Ihe Automatic
MEALTIMER Clock are not followed in
order, the electric oven door lock moy be
turned on The door will then erther
l not open;
* not close all the way (the oven light stays
on1
If the
Door
Won’t
Stop limes are set to the right trme of
day
2. Turn the Oven Selector to CLEAN
3. Push in ond turn the Stop fime Knob
past the right time of day.
Walt
1.
2.
3.
Open:
1. Make sure the Clock and Start and
4.
If the
4.
5.
6.
30 seconds.
5. Turn the Oven Selector to OFF; the door
wilt be unlocked within 10 seconds.
7.
Door
Won’t
Close:
Make sure the Clock and Start and
Stop i7mes are set to the rrght time ot
day. open the oven door
Turn the Oven Selector to CLEAN
Push in and turn the Stop Time Knob
past the right time of day
Push the automatic
oven light switch I”
and hold it in for 10 seconds
Let the oven lighl switch go and turn the
Oven Selector to OFF
Push I” the automatic
oven light switch
and hold II for another10 seconds
Close the oven door
THE OVEN LIGHTS
Both oven lights will come on when you push the Light Switch. Push the
switch again to shut them OH Both lights will also come on when an oven door IS
opened.
To replace
the
upper
-
I,
oven
light
bulb:
1. Turn oh’the electric
2. Remove the bulb cover by
pulling oul on the wire
holder and moving It to Ihe
side
3. Remove the Ilght bulb tram
its socket
4. Replace the bulb with o
40.wall appliance
bulb
available
from most grccery, variety and
hardware stores.
5. Replace the bulb cover
and snop the wire holder
in place The bulb must
6. Turn electrical power back
on at morn power supply.
power
at the main power supply
To replace
the
lower
oven
1. Turn off the electric power
at the main power supply
have
oven
light
this cover
when
Is being
used.
the
bulb:
3. Replace
the bulb with o
appliance
bulb
available
from most grocery, variety and
hardware stores Turn the
power back on al the
main power supply
2. Remove the llghl bulb
,
from Its socket
IO-watt
THE OVEN VENTS
When the oven is on. hot air and molsfure
escape through a vent on top ot Ihe control
These vents are needed for olr clrculatlon
Do not
block
the
vents.
Poor baktng
panel
can resull
Qeaning and caring for your ovens
CONTROL PANEL AND KNOBS
1.
First make
sure
knobs
are on OFF
then pull knob
stralght
off.
2. Use worm soapy
3. Wash knobs I”
waler and o sot1
cloth to wipe
the panel Rinse
and wipe dry
CLEANING
Outslde
oven
Control
of
soapy
scouring
spots
sudsy
brush
Porcelain.
dnamel
broiler pan
and arld
Warm,
soapy
soapy water or
steel wool pads
Control
Warm, soapy
Commercial
cleaner
panel
door
water
and
water
glass
Warm, soapy woter or
plastic scrubbing
pad
Commercial
glass
cleaner
Contlnuouscleaning
lower oven
Warm,
soapy
Oven
Self-Cleanlng
Oven cycle
Warm, soapy water or
soapy steel wool pads
racks
Self-Cleaning
Upper Oven
~__
CHART
Wipe off regularly
when oven Is cool.
Do not allow food contalnlng
acids
[such as vlnegar,
tomato,
lemon juice
milk) to remain on surface.
Acids will
remove
the glossy flnlsh.
. Do not use abrasive
or harsh cleansers.
. Wash, rinse and dry well
l
Do not soak.
-
l
l
Warm,
bristle
Oven
glass
knobs
Sott cloth, warm
water
Nylon or plastic
pad for stubborn
straight bock on
Make sure they
ore on OFF
HOW TO CLEAN
WHAT TO USE
PART
4. Push knobs
worm soapy
waler Rinse well
and dry
l
l
or
Wash wlth other cooklng
utensils.
Do not clean in selt-cleaning
cycle.
. Wosh, rinse and
. Follow directions
dry wilh soft cloth.
with cleaner.
.
Make certain
oven Is cool. Wash, rinse
and dry well with sott cloth.
. Follow directlons
provided
wlth cleaner.
soapy water or
scrubbing
pad
. Clean stubborn
spots or stains. Rlnse well
with clean water.
. Follow dlrectlons
given on page 15.
. Do not use commercial
oven cleanen.
Most fat spatters
on the continuous-cleaning
porcelain-enamel
lnterlor surface
gradually
reduce
to a presentably
clean condltlon
durlng normal
baking
or roostlng
operations.
. leave
in oven during Self-Cleanlng
cycle.
l Wash,
rinse and dry. Use soapy steel
pads for stubborn
areas.
wool
For areas outside Self. Clean before using Self-Cleanlng
cycle
Cleanlng
area use warm,
to prevent
burn-on ot soll.
. Follow dlrectlons
glven on page 11.
soapy wafer or soapy
steel wool pads
. Do not use commercial
oven cleaners.
Do not use toll to tine the bottom
ot your Selt-Cleantng
Oven.
9
THE OVEN DOOR
The upper
oven
door
cannot
be removed.
REMOVING THE LOWER OVEN DOOR
Hinge Support Stop
1.
Open the door to the
broil stop
2.
Hold
sides
clear
hinge
the door on both
and 1111
slightly to
the stops in Ihe
supports
3.
Pull the door, with the
hinges, straight away
from the oven.
REPLACING THE LOWER OVEN DOOR
1.
10
Frt the hinge supports
the openrngs at the
bottom oven comers
Into
2.
Lrlt slightly while sliding
the hrnge supports Into
the openings
3.
When the stops ln the
hrnge supports slide Into
the oven openings, the
door will snap into place
and can be closed.
THE SELF-CLEANING
UPPER OVEN CYCLE
The upper oven selt-cleaning
cycle uses very
soil. Before you start, make sure you understand
cycle safely.
hlgh heat to burn away
exactly
how to use the
BEFORE YC3U START
1.
Clean areas that may not be cleaned
durrng the cycle Use hot water and detergent or a Soapy steel-wool bad on.
DO NOT try to clean the flberglass
NOT move It or bend It.
2.
Remove anv sots or aans YOU mav I have
stored rn the oven. They can’t stand the
htgh heat
3. w Ipe
Clean Door
seal. DO
Out any IOOSe sorl or grease This wrll
help reduce smoke dunng the cleaning
cycle
SPECIAL CAUTIONS
DO MOT block the vent
during the cleanrng cycle
Air must move freely for
best results
DO NOT touch the oven
durrng the cleanrng cycle
it can burn you
DO NOT use commercral
oven cleaners rn your oven
Damage to the porcelarn
finrsh may occur
DO NOT use forI or other
liners rn the oven Durrng
the cleaning cycle. they
can burn or melt,
II
SETTING THE CONTROLS
1.
Make sure the clock
and start and stop
lime dials all have the
right time of day
2.
Push rn the Stop lime
Knob and turn the
hand clockwrse
about two or three
hours [Two hours for
Irghtsorl. threeor
more lor heavrer so11)
3.
Set the Oven Selector
to CLEAN. The Clean
Light will come on
and the door will lock
automatically.
4.
Set the Oven Temperature Control to CLEAN
5.
The Lock Light comes
on when the oven
gels above normal
baking temperatures
The door can’t be
unlocked when the
Lock Light IS on
6.
When the Lock Light
goes oft turn the Oven
Selector to OFF This
unlocks the door
7.
Turn the Oven Temperature Control to OFF
8.
After
DO
12
NOT
TOUCH
THE OVEN
the
oven
Is cool,
wtpe off any residue
or ash wrth a damp
cloth II needed
touch up spots with
cleanser or soapy
steel-wool pad
DURING
THE CLEANING
CYCLE.
IT CAN
BURN
YOU.
2.
1.
Keep the kitchen well
ventrtated during the
cleanrng cycle to help
get rid of normal heat
odors and smoke
4.
Oven racks lose therr shine, drscolor
and become harder to slrde on therr
gudes when they are left in the oven
dunng the cleanrng cycle To make
them slrde easier, polish the edges of
the racks and rack gurdes wrth a soapy
steel-wool pad, rinse well, and wrpe
on a thrn coat of salad oil
Clean the oven before
It gets heavrly soiled
Cleanrng a very sorled
oven takes longer and
results rn more smoke
than usual
5.
3.
If the cleanrng cycle
doesn’t get the oven as
clean as you
expected
the cycle
mav not have been set
tong enough Set the
cleaning trme longer
for heavrer solI
To stop the cleaning cycle otter It has
started
l Turn the Stop nme Knob clockwrse
untrl the hand pants to the rrght time
of day
l Turn the Over- Selector
and Oven
, Temperature Control to OFF
l When the oven
cools you can
open the door Wait untrl the oven IS cool
HOW IT WORKS
___~
During the self-cleaning
cycle, the oven gets much hotter than it
does for baking
or broiling...approximately
830 F (433 C). This heat
breaks up grease and soil, and burns it off.
The graph shows approximate
femperotures
and times during a selfcleaning
cycle set for two hours.
SELF-CLEANING
CYCLE-TWO
HOUR SETTING
(Approximate Temperatures and rimes]
Notice that the heatrng stops when the two-hour settrng IS up. but that rt takes a
whrle longer for the oven to cool down enough to unlock.
13
THE CONTINUOUS-CLEANING
LOWER OVEN
Standard oven walls are coaled wrth smooth porcelarn-enamel.
Your
contrnuous-cleanrng
oven walls are coated with a special, rougher
porcelarn-enamel
A fat spatter beads up on the smooth surface, but spreads out on the rougher
surface The bead of lal chars and turns black The spread-out fat gradually
burns away at medtum
to hlgh baklng
temperatures
(350 -475°F. 176’.231
C) so
the oven can relurn to a presentably
clean condrtron
Fat spatter
Beads Up,
Turns Black
Fat Spatter
Spreads Out.
Burns Away
Standard porcelain-enamel
Conttnuous.cteontng
porceloln.enamel
USING FOIL
Foil must
be used
011 the
lower
oven
bottom
to catch
splllovers.
The toll
must
used properly.
Usrng loll rn the sell-cleanrng
upper oven is not
recommended.
Cut fort from a roll of heavy-duty
18.Inch 145 cm] alumrnum loll, or buy a forI krt
(Part No 2414301 from Your Whrrlpool Applrance
dealer
be
Liltthe
cool
bake
element
slrghtlY to 1111the feet OH the
oven bottom
14
Slrde the loll under the bake
element
Make sure loll IS centered,
long enough to start up both
sides, and lying flat without
wrinkles
For proper bakrng. lower the
bake element so all teet
rest
solldly
on the
toll.
”
TIPS
1.
The oven wlndow and racks are not
coated
Clean Itrem by hand
3. If you do mom hroifrnq than haklnq.
clconlng may be necdcd
2.
The oven door does not gel as hot as the
walls Some hand cleaning may
be needed
4.
hand
Use allrmrnum foil on the oven bottom accordrng
lo inslruclions.
Sprllovers do nol burn away and
may starn the bottom
HAND CLEANING
DO NOT USE OVEN
CLEANING
PRODUCTS.
Some can be trapped
the porcelain-enamel
surface and give oft
harmful fumes
rn
WINDOW-Keep
clean
with hot sudsy wafer
Do not use steel wool or
abrasrve cleansers Use a
plastic scouring pad for
stubborn spots Rrnse well
RACKS-Use
a soapy
steel-wool pad for best
results Rrnse well
WALLS AND DOOR-Wash
wrth hot soapy
waler Use a soapy steel-wool pad or
plastrc scouring pad for stubborn spots Rrnse well
If you need servke or assistance,
we suggest you foflow these four steps:
1 . Before calling
for assistance.. .
Performance
problems often result from
little things you can find and fix yourself without tools of any kind.
II nothlng
operates:
. Is the oven correctly wired to a lrve circuit
wlfh the proper voltage? (See lnstallatlon
Instmctloru.)
l
Have you checked
breaker box?
It the
l
l
upper
oven
will
the main fuse or circuitnot
operate:
Is the Upper Oven Selector turned to a settlng [BAKE or BROIL, but not TIMED BAKE]?
Is the Upper Oven Temperature Control
turned to a lemperature
setting?
It the
lower
oven
wlll
not operate:
If the
self-cleaning
cycle
will
not
operate:
. Are the Upper Oven Selector and Upper
Oven Temperature Controls set to “CLEAN”?
. Does the Start lime dial show the correct
time of day?
l Is the Stop Bme dial set ahead
to the time
you want the cleaning cycle to stop?
It solI
tlnlsh:
Is vlslble
on continuous-cleaning
oven
. The special finish is designed to gradually
reduce oven soil during normal baking
or roasting. It is not deslgned to keep your
oven spotless...only
presentably
clean
. If you broil often, you may see oven soil
. The door is cooler than oven walls Soil will
be more visible on the doorthan
otherareas
in the oven See page 15, “Hand Cleaning.”
Is the Lower Oven Selector turned to a settlng [BAKE or BROIL]?
. Is the Lower Oven Temperature
Control
turned lo a temperature
setting?
l
15
It cooktng
l
Is the
results
oven
aren’t
what
you
expect:
level?
. Are You using pans recommended
Cooktng
in the
Gutde?
If baking, have You allowed 1112to 2 Inches
(4-5 cm] on all sides of the pans for air
circulatron~
. Does the oven temperature
seem too low or
too hrgh? See page4. “Resetting the oven
temperature
controls.”
l
Have You preheated
the oven as the recipe calls for?
l
Are the pans the size called for in the
recipe?
l
Are You following a tested recipe lrom a
reliable source?
l
Do the cooking utensils have smooth, flat
bottoms?
See the Cooktng
Gutde
for more information
on cookrng problems and how tosolve them.
l
2.
3.
If you need service”‘. . .
Whirlpool
has a
natronwrde
network of franchised
TECH-CARE * Service
Companies.
TECH-CARE service
technicians
are
trained to fulfill the
product
warranty
and provide afterwarranty
service,
anywhere
in the United
States. To locate TECH-CARE service in Your
area, call our COOL-LINE service assistance
telephone number [see Step 2) or look in Your
telephone directory Yellow Pages under:
Ifyou need assistance ’ . . .
Call the Whlrlpool
COOL-LINE’
servtce
asslsiance
telephone
number.
Dtat free tram:
Contlnentat
U.S.
.
(800) 253-l
301
Mlchtgan
.... ... .
. (800) 632-2243
Alaska
6 Hawall
(900) 253-l
121
and talk with one of our trarned Consultants
The Consultant can instruct You tn how to obtarn satrsfactory
operatlon
from Your applronce or II service IS necessary, recommend
a
quaIlfred service company
rn Your area
Call our CCCL-LINE servtce assistance telephone number lsee Stea 21 and talk with one
of our Consultants or if Y’ou prefer. write to:
Mr Guy Turner, iice Prestdent
Whirlpool Corporation
Administrative
Center
2000 US-33 North Benton Harbor, Ml 49022
If You must call or wrote. please provide: model
number, serial number, date of purchase, and
a complete
desctrption
of the problem. This
rnformatron
is needed
in order to better respond to Your request for assistance
PO,, NO
1324013
077626
Oual~ty
Our way of hfe
Prlnled
I” U S A