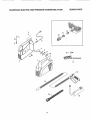
1
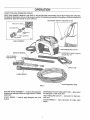
OWNER'S
MANUAL
MODEL
NO.
580.751330
®
11 O0 PSi AT 1.6 GPM
ELECTRnC HnGH PRESSURE
WASHER
DOUBLE nNSULATED
HOURS:
o
Assembly
Mon.- FrL 8 a.m. to 5 p.m
(CST)
°
Operation
o
Customer
,
Service and Adjustment
.
Repair Parts
CAUTION:
Read and Follow
all Safety Rules
and Instructions
Responsibilities
Before Operating
This Equipment
SEARS,
ROEBUCK
Part No 97068 Revision 1 (12/15!95)
and
CO.,
Hoffman
Estates,
IL
60179
U.S.A.
iMPORTANT
SAFETY INSTRUCT ONS
Save these
_
RISK
WARNING
instructions
e
Highpressurespraycan cause paintchipsor other particlesto
become airborne and fly at high speeds
OF ELECTROCUTION
e
Always wear eye protection when you use this equipment
when you are in vicinity where the equipment is in use
or
e
Operate the pressure at no more than the PSI fluid pressure
rated for your pressure washer
•
inspect cord before every use Do not use if cord is damaged
e
Keep all connections dry and off the ground
e
Do not touch plug with wet hands
e
Double-insulated
ment parts
-- When servicing, use only identical replace-
e
Never move the machine by pulling on high pressure hose
the handle provided on the top of the unit
e
This product shait only be connected to a power supply receptacle protected by a Ground Fault Circuit Interrupter (GFCI)
e
e
Read instruction manual before using
Use a respirator or mask whenever there is a chance that vapors
may be inhaled Read all instructions with the mask so you are
certain the mask will provide the necessary protection against
inhaling harmful vapors
_
WARNING
e
High pressure spray may damage fragile items including glass
Do not point spray gun at glass when in the high pressure mode
e
Keep the hose connected to machine or the spray gun while the
system is pressurized Disconnecting the hose while the unit is
pressurized is dangerous
•
Hold the spray gun firmly in your hand before you start the unit
Failure to do so could result in an injury from a whipping spray
gun Do not leave the spray gun unattended while the machine
is running
o
Cleaning area should have adequate slopes and drainage to
reduce possibility of a fal! due to slippery surfaces
When usin 9 this p.roduct
basic I_recautions
ways be followed,
including the fo owing:
e
Read all instructions before using the product
should
al-
WARNING
To reduce
sary when
the risk of injury close supervision
product Is used near ch dren.
is neces-
Use
e
Know how to stop the product and bleed the pressure quickly
Be thoroughly familiar with controls
e
Stay alert Watch what you are doing
e
Do not operate the product when fatigued or under the influence
of alcohol or drugs
e
Keep water spray away from elect dc wiring or fatal electdc shock
may result
e
Keep operating area clear of al! persons
e
Do not by-pass any safety device on this machine
e
Do not leave gun in closed position for more than 5 minutes with
pressure washer running
This could damage pump
_WARNING
Risk of injury or injection
stream at persons,
e
e
to persons
- Do not discharge
MAINTENANCE
High pressure hose can develop leaks from wear, kinking,
abuse, etc. Water spraying from a leak is capable of injecting
mateda! into skin Do not point the pressure washer spray at
people or animals
Do not overreach or stand on unstable
footing and balance at all times
Operate and store this unit on a stable surface
e
Inspect hose each time before using it Check all hoses for cuts,
leaks, abrasions or bulging of cover, or damage or movement of
couplings If any of these conditions exist, replace hose immediately. Never repair high pressure hose. Replace it with another
hose that meets minimum pressure rating of your pressure
washer
e
Store in a clean, dry area Ideally, the unit should be stored in a
frost-frae room
Keep good
e
Follow the maintenance
e
This product shall only be connected to a power supply receptacle protected by a Ground Fault Circuit thterruptor (GFCI). This
is done to comply with National Electrical Code (NFPA 70) and
to provide additional protection from risk of electrical shock
e
instructions
support
specified in the manual
Save these instructions
TRAINING:
e
Locate this pressure washer in areas away from combustible
materials, combustible fumes or dust
e
Some chemicals or detergents may be harmful if inhaled or
ingested, causing severe nausea, fainting or poisoning
The
harmful elements may cause property damage or severe injury
e
Do not allow CHILDREN
time
to operate the Pressure Washer at any
AND STORAGE:
e
SERVICING OF A DOUBLE-INSULATED
In a double-inselated product, two systems of insulation are provided
instead of grounding. No means of grounding is provided on a
double-insulated
product, nor should a means for grounding be
added
Servicing a double-insulated
product requires extreme care and
knowledge of the system and should be done only by qualified service
personnel. Replacement parts for a double-insulated product must be
identical to the parts they replace, use only genuine replacement
parts A double-insulated product Is marked with the words DOUBLE
INSULATION" or "DOUBLE INSULATED"
The symbol _may
PREPARATION:
EXTENSION
•
Before starting the Pressure Washer in cold weather, check all
parts of the equipment and be sure ice has not formed there
•
Units with broken or missing parts, or without protective housing
or covers should NEVER be operated
OPERATION:
e
Do not spray flammable liquids
e
Never aim the gun at people, animals or plants
•
For household
e
High pressure stream of fluid that this equipment can produce
can pierce skin and its underlying tissues, leading to serious
injury and possible amputation
use For indoor or outdoor use
PRODUCT
also be marked on the product
CORDS
Use only extension cords that are intended for outside use. These
extension cords are Identified by a marking "ACCEPTABLE FOR USE
WITH OUTDOOR APPLIANCES; STORE iNDOORS WHILE NOT IN
USE" Use only extension cords having an electrical rating not less
than the rating of the product. Do not use damaged extension cords.
Examine extension cord before using and replace if damaged. Do not
abuse extension cord and do not yank on any cord to disconnect it.
Keep cord away from heat and sharp edges. Always disconnect the
extension cord from the receptecie before disconnecting the pressure
washer from the extension cord
LOOK FOR THIS BECOME
SYMBOL ALERT!!!
TO POINT YOUR
OUT IMPORTANT
SAFETY PRECAUTIONS.
"ATI'ENTION!!!
SAFETY IS INVOLVED,"
IT MEANS
CONGRATULATIONS on your purchase of a Sears Craftsman high pressure washer. It has been designed, engineered and manufactured to give you the best possible
dependability and performance.
Should you experience any problem you cannot easily
remedy, please contact your nearest Sears Service Center/Department or call the 1-800 number listed on the front
of this manual. We have competent, well-trained technicians and the proper tools to service or repair this uniL
Please read and retain this manual, The instructions will
enable you to assemble and maintain your high pressure
washer properly. Always observe the "SAFETY RULES."
MODEL
NUMBER
OUTLET PRESSURE
1100 psi
FLOW RATE
t .6 gpm
DETERGENT MIX
Use undiluted detergent
DETERGENT RATIO
17.1
WATER SUPPLY
TEMPERATURE
Not to exceed 104°F
MOTOR
Brush type (universal)
RATED VOLTAGE
120 volts
CURRENT
13 amperes
580.751330
MAgNTENANCE
AGREEMENT
SERIAL
NUMBER
A Sears Maintenance Agreement is available on this product. Contact your nearest Sears store for details.
DATE OF
CUSTOMER
PURCHASE
RESPONSIBILITIES
o
Read and observe the safety rules.
THE MODEL AND SERIAL NUMBERS WILL BE
FOUND ON A DECAL ATTACHED TO THE PRESSURE WASHER.
e
Follow regular schedule in maintaining, caring for and
using your high pressure washer_
YOU SHOULD RECORD BOTH SERIAL NUMBER
AND DATE OF PURCHASE AND KEEP IN A SAFE
PLACE FOR FUTURE REFERENCE.
e
Follow the instructions under"Customer
Responsibilities" and "Storage" sections of this Owner's Manual_
FULL ONE YEAR WARRANTY
ON CRAFTSMAN
HIGH PRESSURE
WASHER
Forone yearfromthe dateof purchase,when thisCraftsman HighPressureWasheris maintainedend operated accordingto
the instructionsinthe owner'smanual,Sears willrepair,freeof charge,any defect in material and workmanship
If this washeris used for commercialpurposes,this warrantyappliesfor only90 daysfrom the date of purchase If this high
pressurewasheris used for rental purposes,thiswarrantyapplies for only30 days afterdate of purchase,
This warranty does not cover:
Expendableitemssuch as spark plugsand air filters, which become worndudng normal use.
_epairs necessary because of operator abuse or negligence, including damage resulting from no water being supplied to pump or failure
maintain the equipment asoordlng to the instructionscontained in the owner's manual
WARRANTY SERVICE IS AVAILABLE BY RETURNING THE HIGH PRESSURE WASHER TO THE NEAREST
SERVICE CENTERJDEPARTMENT THROUGHOUT THE UNITED STATES.
This warranty gives you specific legal rights and you may also have other rights, which vary from state to state
SEARS, ROEBUCK AND CO., D/817 WA, Hoffman Estates, IL 60179
3
SEARS
TABLE OF CONTENTS
SAFETY RULES ..............................................................
CUSTOMER RESPONSIBILITIES
2
....................................10
STORAGE .....................................................................
11
CONTENTS OF HARDWARE PACK .............................. 5
TROUBLESHOOTING
12
ACCESSORIES
REPLACEMENT
PRODUCT SPECIFICATIONS
.............................................
3
AND ATTACHEMENTS
......................... 5
ASSEMBLY .......................................................................
..................................................
PARTS ............................................ 13-17
6
OPERATION .................................................................. 7-10
iNDEX
-AAccessories
...............
Assembly
Checklist ..........................
Removing from Carton ...........
Set Up ..........................
-R5
Replacement Parts .......
-H-
6
Hardware Pack ...........
6
6
High Pressure Hose .......
5
6, 7
-MMaintenance Agreement .....
Nozzle ..................
--Bin
Before starting ............
Before each use ..........
9
10
Cleaning Tips .............
Customer Responsibilities.
Check washe_components
Electrical supply ...........
Extension cords ...........
Extensions, wand ...........
Safety Rules ...............
Siphoning ................
Specifications ................
Storage ......................
2
10
3
11
Troubleshooting
..........
12
8
U
10
3,10
10
9
9
8
-OOperation
Detergent Application ...........
g
KnowYourPressureWasher. _ 7
Stopping........................
8
To Turn onWasher ................
9
Order Parts ........
back page
-GGround Fault
Gun and Wand Assembly_..
-S-
-T-NNozzle, adjustable ............
-C-
3
11
13-17
6-8
4
Utility brush .............
7, 8
-WWarranty ...................
3
CONTENTS OF HARDWARE PACK
Parts packed separately In carton
Spray Gun
Owner's Manual
Utility Bn_sh and Adaptor
High Pressure Hose
Cleaning Kit
Quick-Connect
ACCESSORIES AND ATTACHMENTS
These accessories and attachments were available when the high pressure washer was purchased_ They are also
available at most Sears retail outlets and service centers, Most Sears stores can order these items for you when you
provide the model number of your high pressure washer_ Some of these accessories may not apply to your pressure
washer_
QUICK CONNECT
WITH
2 ADAPTORS
GARDEN
HOSE
71 _75187
ROTATING
BRUSH KIT
71-75199
FLOOR/SIDING
BRUSH KIT
71-75190
MULTI-PURPOSE]HOUSE
WASH
71-75100
UTILITY BRUSH KIT
71-75189
5
DECK WASH
VEHICLE]BOAT
71-75101
WASH
71_75102
DEGREASER
71-75103
ASSEMBLY
Read these instructions and Operator's Manual in its entirety before you attempt to assemble or operate your new
high pressure washer. Your high pressure washer has, for
the most part, been assembled at the factory, except those
parts left unassembled_ Before you can operate your new
high pressure washer', you must properly connect the high
pressure hose.
IF YOU HAVE ANY PROBLEMS WITH THE ASSEMBLY
OF YOUR PRESSURE WASHER, PLEASE CALL THE
PRESSURE WASHER HELPLINE AT 1-800-222-3136.
TO REMOVE
CARTON
PRESSURE
WASHER
gun and wand assembly
FROM
,,
Remove
holder.
from cardboard
o
Remove all other packing material from box before
removing your high pressure washer.
FIG. 2
Refer to Page 5, "Contents of Hardware Pack" for an
illustrated listing of all the items included with your pressure
washer. Become familiar with each piece before assembling pressure washer. Check all contents against illustrations on Page 5 If any parts are missing or damaged, call
the Pressure Washer Helpline. at 1-800-222-3136
HOWTO
SET UP YOUR PRESSURE
HIGH PRESSURE
OUTLET
WASHER
Included with this unit is a quick-connect fitting that you
attach to the water inlet. It can separate into two parts
-- a male connector and a female connector that
contains an inlet screen. Make sure this screen, as well
as the intake supply filter, is clean. Attach the male
connector of the quick-connect to the intake supply
opening on the front of the pump (Fig 1). The water
supply will be attached to the female connector.
FIG. 3
INTAKE SUPF
INTAKE SUPPLY
FILTER
FEMALE
CONNECTOR
INLET SCREEN
FIG. 1
FIG. 4
=
Unravel high pressure hose and attach to spray gun
(Fig. 2). Tighten with two adjustable wrenches as illustrated, Do not try to tighten without holding second nut.
o
To attach the high pressure hose to the unit (Fig 3) push
the "O"-ring connector of the hose.into the high pressure
outlet and then hand tighten until secure.
,,
Attach adjustable nozzle extension to spray gun by
inserting threaded end of extension into end of spray
gun and tightening the extension by hand until it locks
in place (Fig. 4).
CHECKLIST
6
,,
Check for proper hose connections (high pressure and
water supply) and for tight connections and that there
are no kinks, cuts, or damage to the high pressure
hose_
,,
Provide proper water supply (not to exceed 104°F)_
,,
Be sure to read "Safety Rules" and "Operation"
tions before using the pressure washer,
sec-
OPERATION
KNOW YOUR HIGH PRESSURE WASHER
READ THIS OWNER'S MANUAL AND SAFETY RULES BEFORE OPERATING YOUR HIGH PRESSURE WASHER.
Compare the illustrations with your high pressure washer to familiarize yourself with the locations of various controls and
adjustments, Save this manual for future reference.
DETERGENT
INTAKE SUPPLY
OPENING
PICKUP TUBE AND FILTER
•
MALE CONNECTOR
RLTER
INLET SCREEN
"A"
QUICK-CONNECT
ESSURE OUTLET
WAND
(male connector,
see also Fig "A")
GUN
TURBO NOZZLE
FIG. 5
GUN AND WAND ASSEMBLY -- Controls the application
of water onto cleaning surface with tdgger device Includes
safety latch,
UTILITY BRUSH--Used
surface.
to apply detergent and scrub
PRESSURE HOSE
DETERGENT PICKUP TUBE AND FILTER-and detergent in outlet water flow,
Mixes water
HIGH PRESSURE OUTLET -- Connection for high pressure hose,
QUICK-CONNECT--Easy
supply_
connection
forintake
water
OPEBATBON
HOW TO USE YOUR WASHER
ADJUSTABLE
NOZZLE
IF YOU HAVE ANY PROBLEMS OPERATING YOUR
PRESSURE WASHER, PLEASE CALL THE PRESSURE
WASHER HELPLINE AT 1-800-222-3136.
UTILITY
STOPPING YOUR PRESSURE WASHER
,,F
ADAPTOR
FIG. 8
FIG. 7
HOW TO USE ADJUSTABLE
NOZZLE
FIG. 6
A
o
If the pressure washer is running, press the ON/OFF
switch (Fig 6)
o
Simply shutting OFF washer will not release pressure in the system. Pull the trigger on the spray wand
assembly to relieve the pressure in the hose_
NOTE: A small amount of water will squirt out when you
release the pressure
WAND EXTENSIONS
Your high pressure washer comes equipped with a choice
of three wand extensions -- one with an adjustable nozzle
(Fig. 7), one with a utility brush (Fig. 8) and turbo nozzle
(Not shown)_ Remove the adjustable nozzle extension if
you wish to use the utility brush. Attach the Brush Adaptor
to the utility brush and then insert the threaded end into the
spray gun and hand tighten.
NOZZLE IN HIGH
PRESSURE MODE
PUSH NOZZLE FORWARD FOR
LOW PRESSURE MODE AND
DETERGENT APPLICATION
WARNING:
NEVERNEVER
ADJUST
WHEN SPRAYING.
PUT SPRAY
HANDS PATTERN
IN FRONT
OF SPRAY NOZZLE TO ADJUST SPRAY PATTERN.
With the adjustable nozzle you can adjust the spray pattern
to be either high pressure or low pressure. You can also
adjust the spray so it is concentrated in a stream pattern or
expanded into a fan pattern. Use this nozzle to apply
detergent
=
Push the nozzle attachment forward when you wish to
adjust the spray to low pressure mode (Fig. 9) Pull the
nozzle backward to achieve high pressure.
,,
Twisting the nozzle adjusts the spray pattern from a
narrow stream to an expanded stream.
TWIST NOZZLE TO
EXPAND SPRAY STREAM
FIG. 9
TWIST NOZZLE TO NARROW
SPRAY STREAM
OPERATaON
APPLYING DETERGENT WITH ADJUSTABLE
NOZZLE
PRESSURE
A
IMPORTANT: USE SOAPS DESIGNED SPECIFICALLY
FOR PRESSURE WASHERS.
HOUSEHOLD DETERGENTS ARE NOT RECOMMENDED.
IMPORTANT:
YOU MUST ATTACH ALL HOSES BEFORE YOU STARTTHE PRESSURE WASHER. STARTING THE PRESSURE WASHER WITHOUT ALL THE
HOSES CONNECTED WILL DAMAGE THE PUMP,
Pressure washers are useful cleaning tools designed to
clean almost any surface in two easy steps,
o
o
o
The first step involves applying an appropriate detergent/solvent solution to penetrate and loosen grime.
The detergent is applied at low pressure to avoid
splashing, overspraying and waste, Leave the solution
on surface for 3 to 5 minutes to allow solution to work.
WASHING/RINSING
WARNING:
BE EXTREMELY CAREFUL IF YOU
MUST USE PRESSURE WASHER FROM LADDER
SCAFFOLD NG OR ANY OTHER RELATIVELY UNSTABLE LOCATION. PRESSURE IN A RUNNING
WASHER BUILDS IN THE WAND AS YOU CLIMB.
WHEN YOU PRESS THE TRIGGER, THE RECOIL
FROM THE INITIAL SPRAY COULD FORCE YOU
TO FALL, OR IF YOU ARE TOO CLOSE TO THE
CLEANING SURFACE, HIGH PRESSURE COULD
FORCE YOU OFF CLIMBING APPARATUS.
Hook up water supply (Fig, 12)
HIGH PRESSURE
HOSE
The second step involves cleaning the surface you
have prepared with the pressure washer and then
rinsing it clean.
To apply detergent follow these steps:
o
o
o
Prepare your detergent
solution as required by
your job.
Place small filter of the
clear, detergent syphoning tube into the detergent container (Fig. 10),
Set nozzle to low pressure mode, Detergent
cannot be siphoned with
nozzle in high pressure
mode (see Fig_9),
GARDEN HOSE
FIG. 12
o
Adjust nozzle to select high pressure mode (see Fig 9),
NOTE;
mode.
o
FIG. 10
o
Start washer and apply detergent to a dry surface,
starting from the bottom and working up
_,
Remove siphon from bottle to stop detergent in low
pressure mode.
Detergent will not flow when in the high pressure
Start washer and work from the top of the surface to
the bottom.
NOTE: The high pressure mode is most effective when the
tip of the wand is held between 8 to 24 inches from the
surface being cleaned_
BEFORE
STARTING
PRESSURE
WASHER
NOTE: Detergents are most effective applied to a dry surface.
To operate the unit you will need the following:
HOW TO USE UTILITY
o
Electrical supply rated for 120 volts at 15 amps,
o
If using an extension cord, observe the following specifications:
=
BRUSH
You can apply detergent with this nozzle, As you are
applying detergent to surface you want to clean, you
can also combine the liquid spray with scrubbing to
clean very dirty areas,
o
You cannot adjust the spray pattern with this nozzle.
o
Store utility brush on top of handle (Fig_ 11)_
I
o
FIG. 11
9
CABLE LENGTH
WIRE GAUGE
Up to33 ft (10m)
33 to 66 ft. (tOm to 20m)
14/3 AWG
12/3 AWG
Use only extension cords that are intended for outside
use. These extension cords are identified by a marking
"ACCEPTABLE FOR USE WITH OUTDOOR APPLIANCES; STORE iNDOORS WHILE NOT IN USE,"
Use only extension cords having an electrical rating not
lessthan the rating of the producL Do not use damaged
extension cord& Examine extension cord before using
and replace if damage& Do not abuse extension cord
and do not yank on any cord to disconnect iL Keep
cord away from heat and sharp edges Always disconnect the extension cord from the receptacle before
disconnecting the pressure washer from the extension
cord,
OPERATUON
TO TURN ON WASHER
WARNING:
NEVER ADJUST SPRAY PATTERN
WHEN WATER IS SPRAYING. NEVER PUT HANDS
IN FRONT OF SPRAY NOZZLE TO ADJUST SPRAY
PATTERN. ALWAYS KEEP HANDS IN THE POSITION SHOWN IN FIG. 9
CAUTION:
Gun Idcks back. Use both hands.
IMPORTANT:
DO NOT RUN PUMP WITHOUT THE
WATER SUPPLY CONNECTED AND TURNED ON OR
THE PUMP WILL BE DAMAGED°
SIPHONING
We do not recommend that you siphon your water supply
from sources other than from connecting to household
water supply.
TiPS
WARNING:
Risk of injury
-- Do not discharge
stream oratinjection
persons. to persons
e
Check that high pressure hose is attached to pump
outlet and that water supply is attached to pump inlet
(female connector of quick-connect).
o
Initially clean an area and then check the surface for
damage. If no damage is found, you can assume it is
okay to continue cleaning Detergents work best when
applied to dry surface.
o
For most effective cleaning, keep spray nozzle between 8 to 24 inches of cleaning surface.
o
Turn ON water.. Water supply should not exceed 104°F_
,=
Press trigger on gun and wand assembly to force air
from high pressure hose (Fig. 12).
o
Allow the detergent to soak in between 3-5 minutes
before washing and rinsing,
=
Maintain trigger as shown in Fig 12 and press ON/OFF
switch.
o
For cleaning, start at lower portion of area to be washed
and work upward, using long, even overlapping
strokes
For rinsing, push the nozzle sleeve to high pressure
and wait for detergent to clear. Start at the top of area
to be rinsed, working down with the same action as for
cleaning.
©
FIG. 13
CUSTONER
GENERAL
Never use the garden hose inlet to siphon detergent or
wax_
o
If you get the spray nozzle too close, especially using
high pressure mode, you may damage the cleaning
surface.
o
If you have the spray nozzle too far away, the cleaning
will not be as effective_
a
Do not get closer than 6 inches when cleaning automobile tires.
RESPONSIBILUTUES
Check and Clean Quick-Connect
Screen: Remove
quick-connect and examine the inlet screen on the female
connector. Clean if clogged or replace the quick-connect
inlet screen.
RECOMMENDATIONS
The warranty of the high pressure washer does not cover
items that have been subjected to operator abuse or negligence. To receive full value from the warranty, operator
must maintain high pressure washer as instructed in this
manual
BEFORE
o
Check High Pressure Hose: High pressure hose can
develop leaks from wear, kinking, abuse. Check all hoses
for cuts, leaks, abrasions or bulging of cover, or damage or
movement of couplings. If any of these conditions exist,
replace hose immediately.
EACH USE
DANGER : WATER SPRAYING FROM A LEAK IS
CAPABLE
OF INJECTING
MATERIAL
INTO
SKIN. INSPECT HOSE EACH TIME BEFORE USING
IT. NEVER REPAIR HIGH PRESSURE HOSE. REPLACE IT WITH ANOTHER HOSE THAT MEETS
MINIMUM PRESSURE RATING OF YOUR PRESSURE WASHER.
Check Detergent Hose: Examine the filter on the deter;
gent hose and clean if clogged. Hose should fit tightly on
barbed fitting Examine hose for leaks or tears. Replace
the filter or hose if either is damaged.
Check Gun and Wand: Examine hose connection and
make sure it is secure. Test trigger by pressing it and
making sure it springs back into place when released. Put
safety latch in ON position and test tdgger. You should not
be able to press tdgger.
]0
STORAGE
PRESSURE
WASHER
PUMP
Test the pressure washer by operating in the high and low
position.
Water should not remain in the unit for long periods of time.
Sediments of minerals can deposit on pump parts and
"freeze" pump action_ After each time you are finished using
your pressure washer, follow this procedure:
o
Flush detergent hose by placing the injector filter into
a pail of clear water while running Pressure Washer
with nozzle in low pressure mode Flush until you can
see clear water flowing through hose,
o
Shut off the pressure washer, unplug it and let it cool,
THEN REMOVE ALL HOSES_
o
Store the pressure washer and its components in such
a way as to protect it from freezing.
o
Store in a clean, dry araa. Ideally, the unit should be
stored in a frost-free room.
o
Coil the high pressure hose and inspect it for damage.
Cuts in the hose or fraying of it could result in leaks and
loss of pressure, Should any damage be found, replace
the hose. DO NOT attempt to repair a damaged hose
and use it, Replace the hose with the genuine Craftsman parL
o
FIG. 14
Insert wire into nozzle and turn back and forth to clear
obstruction.
Drain water from hose and properly store it to prevent
cuts and general wear_
NOZZLE
MAINTENANCE
If the nozzle becomes restricted or clogged with foreign
materials, such as din, excessive pump pressure may
develop. A partially clogged nozzle can cause a pulsing
sensation during use. This generally is not a pump related
problem, but rather a clogged or partially restricted nozzle,
If the nozzle becomes clogged or partially restricted immediately clean the nozzle.
o
Disconnect the power supply and tum off the water
supplyr
O
Separate the wand from the gun
o
Remove the nozzle from the end of the wand using a
2mm or 5/64 alien wrench.
o
Use a piece of wire or small paper clip to free the foreign
materials (Fig. 14) from clogging or restricting the nozzle.
,,
Use your water supply to back flush the wand removing
additional debris. Back flush for 30 seconds to 1 minute
(Fig. 15) Turn wand to stream spray position and move
from low to high pressure while flushing
°
Reinstall the nozzle into the wand, do not over tighten.
o
Reconnect wand to the gun,
o
Reconnect the water supply and turn on the water,
o
Reconnect the electrical power supply.
FIG. 15
]l
TF OUBLESHOOTnNG
WARNING:
MANY
THE
ACTIONS YOU
ARE ASKED
CORRECT
ARE
PROBLEMS
INVOLVE
A COMPONENT
OFOF
THE
PRESSURE
WASHER.
WHEN TO
CLEANING
ANY
PART
OF THIS THAT
UNIT, TURN
OFFCLEANING
THE UNIT
AND COMPLETELY DISCONNECT THE POWER SUPPLY.
PROBLEM
Pressure Washer will not start
CAUSE
CORRECTION
1
No electrical power is available.
1. Check cable, plug, power socket
and fuse.
2
Motor overheats.
2
3_ Low voltage
4_ Trigger not open
5. Electrical defect
Pressure Washer does not
come up to pressure
1. Spray gun is in low pressuremode,
2 Pumpis sucking all
3+ Water filter clogged
4 Pump not bled to remove air
High pressurespray is irregular_
No intakeof cleaning agent.
3
4
Press trigger of wand to relieve
pressure on the uni[
Allow unit to cool for about 2 min.
It should run when you turn it ON
again.
Length of extension cord is well
beyond 66 feel
Contact Sears Service Department
Open trigger
5
Contact Sears Sevice Department.
1_ Adjust nozzle to high pressure
mode.
2. Water hose must be 1/2" diameter
Make sure water supply is ON.
Make sure water supply is clean.
Check all connections for leaks or
blockage.
Tum OFF the unit, hold trigger in
OPEN position to relieve pressure
and allow air in line to escape With
tdgger still in OPEN position, tum
ON the unit Repeat if necessery_
3_ Clean filter_
4. Switch OFF washer, press trigger,
switch ON washer while pressing
tdgger Repeat if necessary.
5_ Pump is defective
5. Contact Sears Service Department.
1_ Nozzle or water supply is restricted.
1. Clean nozzle, check hose and
Screens_
2_ Water supply inadequate.
2. Tum ON water to full position.
Operate washer in suction
operation with open container.
1. Wrong nozzle setting
2. Nozzle clogged_
3, Detergent hose filter cloggecL
1, Adjust nozzle to low pressure mode_
2_ Clean nozzle.
]2
3_ Clean tilter in detergent hose.
CRAFSTIVlAN
ELECTRIC
HIGH PRESSURE
WASHER
580.751330
REPAIR
PARTS
15
13
9
ITEM
2
3
4
5
6
7
8
9
10
PART NO.
96154
96155
94313
94314
94315
96156
94316
94317
96157
DESCRIPTION
SCREW (4 REQ,)
MOTOR HOUSING (1 REQ+)
GEAR WHEEL (1 REQ,)
GASKET (1 REQ,)
O-RING (1 REQ)
ROTARY SHAFT SEAL (1 REQ,)
BEARING (1 REQ+)
SWASH PLATE (1 REQ+)
ITEM
11
12
13
_4
15
16
17
18
SCREW (1 REQ)
13
PART NO.
96156
94307
94308
94369
96159
94310
94312
94311
DESCRIPTION
MOTOR HOUSING (1 REQ)
CABLE (2 REQ)
SEAL (1 REQ )
CELLULAR RUBBER CORD (1 REQ+)
HOUSING COVER (1 REQ+)
_NSULATING MAT (1 REQ)
MOTOR (1 REQ,)
INSULATING MAT (1 REQ)
CRAFSTMAN
ELECTRIC
HiGH PRESSURE
WASHER
14
580.75"1330
REPAIR
PARTS
CRAFSTMAN
ITEM
1
ELECTRIC
HIGH PRESSURE
WASHER
PART NO.
DESCRIPTION
96160
HOUSING (1 REQ,)
580.751330
SPILL VALVE 1 (REQ,)
2
SLEEVE (1 REQ,)
3
4
96161
SELF-TAPPING
SCREW (2 REQ.)
5
96162
SPARE PARTS KIT (1 REQ,)
6
96163
PUMP COVER (1 REQ.)
19,3 x 2Atom O-RING (1 REQ_)
7
6
94304
NOZZLE INSERT (1 REQ,)
9
96164
OVAL HEAD SCREW (4 REQ)
10
94302
10 x 2,5ram O-RING (3 REQ)
VALVE (3 REQ)
11
76 x 2ram O-RING (1 REQ)
12
13
96165
CYLINDER HEAD (1 REQ)
14
94303
PISTON (3 REQ,)
15
94305
HELICAL SPRING (3 REQ)
16
96166
HOUStNG (1 REQ,)
17
94306
GROOVED RING (3 REQ,)
18
19
20
21
22
WASHER (3 REQ,)
GROOVED RING (3 REQ,)
O-RING (3 REQ,)
PRESSURE VALVE (3 REQ.)
GASKET (1 REQ.)
* -- Part Is included with Pump Repair Kit (Part No 94301)
]5
REPAIR
PARTS
CRAFSTIVIAN
ELECTRIC
HIGH PRESSURE
WASHER
4
580.751330
REPAIR
PARTS
21
5
18--
_Z_,_
I
1
17
14
16
16
CRAFSTMAN
ITEM
ELECTRIC
PART NO.
HIGH PRESSURE
WASHER
580.751330
DESCRIPTION
1
94293
COVER (1 REQ.)
2
94294
FILTER (1 REQ)
3
94295
HOSE (1 REQ)
4
96150
SCREW (7 REQ)
5
94296
ELECTRIC CORD (1 REQ)
6
94297
CORD BUSHING (1 REQ,)
7
94298
SWITCH (1 REQ)
8
96151
BRACKET (1 REQ )
9
94299
PROTECTING CAP (1 REQ,)
10
96152
SWITCH FRAME(1 REQ)
11
96153
RUBBER BUFFER(4 REQ)
12
96016
QUICK DISCONNECT ADAPTOR (1 REQ)
13
94306
WATER INLET FILTER (1 REQ.)
14
95602
WAND EXTENSION (1 REQ)
15
95563
SPRAY GUN (1 REQ,)
16
95604
HIGH PRESSURE HOSE [25 FT,] 1 (REQ.)
17
88185
UTILITY BRUSH (1 REQ,)
18
95577
ATTACHMENT ADAPTOR (1 REQr)
19
97068
OWNER'S MANUAL (1 REQ) [not shown]
20
95566
TURBO WAND (1 REQ)
21
96017
QUICK DISCONNECT ADAPTOR - MALE (1 REQ,)
17
REPAIR
PARTS
®
OWNER'S
MANUAL
1100 PSi AT 1.6 GPM
ELECTRIC
HiGH PRESSURE
DOUBLE iNSULATED
WASHER
[-_1
Each High Pressure Washer' has its own model number.
MODEL NO.
The model number for your pressure washer' will be found on a decal
attached to the unit.
580.751330
All parts listed herein may be ordered through Sears, Roebuck and Co
Service Centers and most Retail Stores.
IF YOU NEED
REPAIR SERVICE
WHEN ORDERING
REPAIR
LOWING INFORMATION:
OR PARTS
e
e
FOR REPAIR SERVICE CALL
THIS TOLL FREE NUMBER
PRODUCT--HIGH
MODEL
PARTS,
ALWAYS
PRESSURE
NUMBER--
GIVE THE FOL-
WASHER
580.751330
@ PARTNUMBER
1-800-4_REPAIR
e
PART DESCRIPTION
(1-800-473_7247)
FOR REPLACEMENT PARTS
INFORMATION AND ORDERING, CALL THIS TOLL FREE
NUMBER:
1-800-FON-PART
Your Sears merchandise has added value when you consider that Sears
has service units nationwide staffed with Sears trained technicians._.professiona! technicians specifically trained on Sears products, having the
parts, tools and the equipment to ensure that we meet our pledge to you,
we service what we sell
(1-800-366-7278)
SEARS,
ROEBUCK
Part No 97068 Revision 1 (12/15/95)
and
CO.,
Hoffman
Estates,
IL
60179
U.S.A.
Pdnted in US A