1
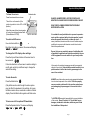
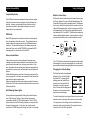
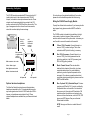
Important Safety Notices Quick Reference Guide To lower the screen: Release button Press the release button as shown. This will turn on the monitor (if the ignition key switch is in the ACC or RUN position). Adjust the screen for best viewing angle by turning the rotating adjustment here. (Not available on CV1005). To select an AUX source: Press the Source button. Each time the button is pressed, the screen will display AUX 1 AUX 2 “AUX 1” or “AUX 2”. To change the LCD display video settings: Press the Up and Down buttons at the same time for two seconds. Follow the directions on the screen to select a setting to modify, and use the Up and Down keys to change the value of the setting. To mute the audio: Press the Mute button. (Only affects audio routed through the video system may not affect the speakers in the vehicle). As long as the Mute mode is active, an asterisk is visible in the text display. Press the Mute button again to exit Mute mode. To turn on and off an optional FM modulator: Press the Speaker button. The screen will display Spkr On Spkr Off “Spkr On” or “Spkr Off”. Page 1 DANGER - AN IMPROPERLY LOCATED OR INSTALLED MONITOR CAN CAUSE DEATH OR SERIOUS BODILY INJURY READ THE FOLLOWING INFORMATION THOROUGHLY BEFORE INSTALLATION It is unlawful in most jurisdictions for a person to operate a motor vehicle equipped with a television monitor located where the operator can directly or indirectly view it. In some jurisdictions, television monitors in motor vehicles may be prohibited or may require the television monitor to be located behind the operators seat. Ensure that you are completely aware of and familiar with all applicable regulations and restrictions related to the use of this equipment in a motor vehicle for your local jurisdiction. In the event of an accident, passengers can be thrown against objects in the vehicle. Ensure that the monitor location is in a position where it will not be struck by a passenger in the event of an accident. ALWAYS mount the monitor securely using appropriate hardware to a structural component in the vehicle. Failure to properly secure a monitor could result in the monitor coming loose and endangering the passengers in the event of an accident. The INSTALLER accepts all responsibility for proper installation of the monitor. Rosen Products, LLC, is not liable for any damages, incidental or otherwise, which may result from the installation of this product. Page 6 Using the System System Compatibility Important Notices Compatibility Notice Monitor Control Keys The CV Monitors have been designed to have extensive compatibility with a variety of source equipment, audio interfaces and vehicles. However, some issues will arise from time to time, requiring the installer to take additional steps to ensure the highest level of user satisfaction. All ClearVue Series II monitors have five basic function keys: Up, Down, Speaker, Source, and Mute (labeled below). The Up and Down key are used to navigate menus. The Speaker key turns on and off an output that can be used to control an optional FM modulator (thus, in effect, turning on and off the vehicle speakers). The Source button switches the monitor input between AUX 1 and AUX 2. The Mute button mutes any audio routed through the system - it has no effect on vehicle sound system audio that is not routed though the monitor. DVD Audio Most DVD players produce relatively low levels of audio signals when compared to other video sources. The low level audio can create a higher than typical noise level on FM-Modulated radio interfaces. To improve this situation, the installer may use an audio Line Driver, such as AMP P/N BLD to increase the DVD audio signal prior to introduction to the CV4026. Video or Audio Noise Speaker Mute Up Down Source If minor video or audio noise is produced in the system once installed, the problem may be related to noise introduction from ground loops or because of non-uniform ground points. In this case, the installer should ensure that all system components are grounded to a common point, well attached to the vehicle ground system. Additional filtering may be required on the power input side of the source equipment. In this case, an automotive Power Noise Filter may be used to improve performance. Always avoid splicing into the power and ground wires at the rear of the radio. The Power and ground points should be as near to the battery as possible. Soft Dimming Dome Lights Some vehicles are equipped with Dome Lights, which feature a slow, “Soft Dimming” function. Many of these systems are incompatible with the CV1005 Lighting System. If the CV1005 system is wired to the Soft Dimming system, the lamps will blink during the dimming cycle. In this case, the installer should connect the CV1005 lamp circuit directly to a fused 12 volt supply. Page 5 The 10.4” ClearVue monitor also has two buttons that control the domelights - one turns the domelights on, and the other prevents the domelight from lighting when the door is opened. Changing the Video Settings The ClearVue monitor has adjustable settings for Color, Contrast, Bright ness, and Tint. To change these settings, press the Up and Down arrow keys on the monitor at the same time, and hold for two seconds. The menu will be displayed on the screen until you press the two keys for two seconds again. ***MENU*** >COLOR (32) CONTRAST(32) BRIGHT TINT (32) (32) To select the setting to be changed: Move the cursor up and down the menu list using the Source button on the monitor. To change value of the setting: Use the arrow buttons to decrease and increase the setting. The range of values is from zero to 63, with 32 as the default. Page 2 Wiring the System Connecting the System The CV 4026 module uses standard RCA connectors for A/V (audio/video) inputs. It also has an extra set of RCA A/V outputs, for connection to an optional second monitor. These outputs carry the same signals that are routed to the CV II monitor connected to the CV4026 with the yellow cable. This type of arrangement is often referred to as a slave monitor, since both monitors display the same image. DIN connector to yellow cable (to CV II monitor) 1 Yellow +12V 1 +12V Fuse 3A Remote Out Fuse 1A 2 2 Blue Remote Out 3 Red Accessory 3 A (R) 4 RPN 9000178 V Yellow - 12V(+) Constant. Connect this wire to a source of 12V(+) constant voltage. This is often referred to as BAT (short for battery), or memory. Red - 12V(+) Accessory. Connect this wire to a source of 12V(+) that is only powered when the ignition key switch is in the ACC (accessory) and RUN or IGN (Ignition) positions. Black - Chassis Ground. This wire should be attached to the chassis of the vehicle, to a clean, unpainted metal surface. It is good installation practice to ground all system components to the same point. If you have any questions about what constitutes a good grounding point, please consult an MECP-certified installer. Blue - Optional 12V(+) Switched Output. This wire provides up to 500mA of 12V(+), and is controlled by the Speaker button on the monitor. It is intended to allow user control of an optional FM modulator. FM modulators allow the vehicle sound system to play back sound from other devices, such as VCR’s, DVD players, and MP3 players. See your authorized Rosen dealer for details. REV A To ClearVue Monitor Serial No: YMMLLXXXX AV 2 Red: Right-channel audio Properly fuse all electrical connections. If you have any doubts about proper fusing, please consult an MECP-certified installer. OUT RCA connector color code: Yellow: Video signal A (L) 4 Black Ground Wiring the CV4026 Power Supply Module The CV4026 module is intended to be installed out of sight under a seat or behind a trim panel. Make sure that the module is within the reach of the yellow cable - otherwise, you won’t be able to connect the module to the monitor! A/V outputs to FM mod & second monitor Four-pin wiring harness connector For instructions on the physical installation of the monitor, please refer to the directions provided with the trim ring. V A (L) AV 1 A (R) V A (L) A (R) White: Left-channel audio A/V inputs #2 A/V inputs #1 Optional wireless headphones The ClearVue Series II monitors have an infrared wireless headphone transmitter built in. This automatically transmits any audio signals routed into the CV4026 audio input RCA’s however, no headphones are included in the kit. These optional headphones are available from your Rosen authorized dealer. NOTE: Never ground this wire - module failure will result! Page 3 Page 4