1
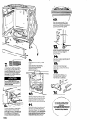
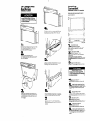
c
Installer:
Leave lnstallotion
Save Installation
Instructions
Instructions
for local
Undercounter
Dishwasher
Before vou start...
L
Proper installation is your responslblltty
Make sure you have everything
necessary for correct installation It is
the responsibility of the customer to
contact a qualified installer to assure
that the plumbing and electrical
lnSk3llO~iOnS
are adequate and meet
national and local codes and
ordlnonces.
Proper electrlcol, drain and water
lines must be ova~loble or must
be Installed. as speclfled. wlthin
shaded area. See “Electrical
requirements:’ “Water requirements:’
and “Drain requlrements”sectlons
Plumbing and wiring should not cross in
front of the motor or the dishwasher
legs
Take care not to damage
power cord during installation
or removal of dishwasher
SUPPIY
IMPORTANT: Observe all governing
codes and ordinances. Electrical ground
is required. See
“Elecfricol
requirements”
section.
l
wall
Do Not Install
dishwasher over
carpeted flwrlng.
Check location where dishwasher will be Installed.
The locofion should provide:
l Easy access to water, electricity
and drainage lines
l Convenient
loading the best position is lefl or right of kitchen sink
l Square opening
for proper dishwasher operation
and appearance
l Cabinet
front that is perpendicular
to floor.
l ProtectIon so that water Inlet valve
and drain cannot freeze
l A” mlnlmum clearance
between
motor and flooring to prevent motor overheatina.
Electrlcal Shock Hazard
Electrlcal wlrlng and
componenls must Nol contact
any plumbing material or draln
hose.
receptacle
Wllhhl3~ max.
horn fighl or
wIthInlO”
mar.
from ten of
Opellhp
dmln
.Iecm;al
llne -W
be-
exposed wlrlng. Failure to do so
could result In fire, electrlcal
shock, or other personal Injury
from exposed wlrlng.
hole of
whole,
Persanal Inlury/Product Damage
Avold openlng dlshwasher door
before dlshwasher Is Installed.
Dlshwasher may tlp over when
door is opened, resulting In
personal Injury or product
damage.
Read and follow the “Electrical
requirements:’ “Water requirements:’
and “Drain requirements” connection
section before installing the dishwasher
Tools needed for
installation:
Figure 2
Electrical
reqbements
Electdcal ground Is required on
thlr appliance.
l Check
with a quallfled
etectrtclan If you are In doubt
as to whether the aoallance
Is
properly grounded.
l Improper
cannectlon of the
equlpment-groundlng
conductor can result In fire,
electrical shock. or other
personal Injury.
l Disconnect
the power supply
at the junctlon box.
l Do Not connect
appliance
to electrical supply until
appliance
Is permanently
grounded.
l Do Not use an exienslon
cord
wlth this appliance.
l lhls appliance
must be
connected to a grounded.
metallic. permanent wlrtng
system or a grounding
conductor should be
COnneded
to the groundlng
terminal or wire lead on the
appliance.
l Do Not use a fuse In the neutral.
Fallure to follow these lnsttuctlons
could result In a fire. electrtcal
shock or other personal Inlulv.
l
PANEL A
A 120.volt. 60.Hz, AC only. 15. or 20.
ampere, fused, electrical supply is
required. Time-delay fuse or circuit
breaker is recommended. It is
recommended that a separate circuit
serving only this appliance be
provided
It is the personal responsibility and
obligation of the customer to contact
a qualifted electrician to assure the
electrical inslallotion is adequate and
in conformance with the National
Electrical Code ANSI/NFPA 70.latest
editIon. and local codesond
ordinances.
The dishwasher must be connected
with copper wire only.
2. Run flexible, armored or nonmetallic sheathed. copper cable
[with grounding wire] from the fused
disconnect, circuit breakerorjunction
box through the %” or larger cabinet
hole to the dishwasher location. The
cable must extend 24” frdm the back
wall.
The hole cut through a wood cabinet
should be sanded until smooth.
The hole cut through a metal cabinet
must be covered with a grommet
(Part No. 302797).
A U.L.-listed strain relief must be
;nstalled at each end of the power
supply cable (at the dishwasher and
at the junction box]. Wire sizes
(COPPER WIRE ONLY] must conform
with the rating of the dishwasher.
Wirrfng methods
Pick one method to follow depending
upon your dishwasher and local codes
A.
Direct wire method
(cable connecting
dishwasher
to a junction
box)
ReTt;rdmended
1. Disconnect
grounding
the power supply.
3. Remove the dlsh&her
t6minal box
cover. Connect the white and black
wires of the power supply cable to the
white and black leads in the terminal
box with twist-on wire connectors. [See
Figure 3.)
4. Connect the green, grounding wire
of the power supplY cable to the
grounding connection screw located
inside the terminal box. [See Figure 3 ]
5. Replace terminal box cover.
Alternate
groundlng
method
If the recommended
grounding
method is impossible-connect
a
separate. green. grounding wire [No 16
minimum] from grounding connection
screw located inside the termlnol box
to a grounded. copper, cold water
pipe’ (See Figures.)
Dishwashers equipped with a power
supply cord have a 3-prong.
grounding plug The power supply cord
must be plugged Into a mating. 3prong, grounding~type receptacle.
grounded In accordance
with the
National ElectrIcal Code ANSI/NFPA
70.latest edItIon. and all local codes
and ordlnonces If a mollng wall
receptacle ISnot available. It ISthe
personal responslblllty and obligation
of the customer to have a properly
grounded, 3.prong. wall receptacle
Installed by a quaIlfled electrIcIon
(See Figure 4 )
Do Not ground to a gas supply pipe
or hot water pipe.
If power cord cannot
be used...
When local codes do not permit use
of a power cord with an undercounter
dishwasher, the power cord must be
removed and dlshwasher wired
directly IF THE POWER SUPPLYCORD IS
REMOVED, THE DISHWASHER MUST BE
CONNECTED WITH COPPER WIRE ONLY
THIS, HOWEVER, IS NOT
RECOMMENDED.
Do Not connect to electrical supply
until dishwasher is permanently
grounded.
Do Not ground to a gas supply pipe
or hot water pipe.
hotfn~.
eleclrih
~onne~lor
shbuld de
,umped
w,lh o lenglh 01 NO -4 co,,,,er
WIE
securely Clom‘,ed
10 bare melol at bolh ends
(See FIgwe 5 )
1. Have a 3.prong. groundlng~type. wall
receptacle avaIlable or Installed by o
quaIlfled electrIcIon on the rear wall of
one cabinet next to dlshwasher
opening [See Figure 1. Panel A ]
B
. Power supply cord method
(connecting
dishwasher
to
outlet)
Local codes may permit the use of a
U.L.-listed, flexible, three-conductor,
power supply cord terminated with
o three-prong, grounding-type plug
It is recommended that cord kit,
Part No. 675d55, avallable from Your
Roper dealer or parts supplier. be
used If the cord kit is not available
IocallY, the flexible cord used must be
a lJ.L.-listed. three-conductor. l&gauge
cord that meets the Notional Electrical
Code ANSI/NFPA 70-latest edition. and
all local codes and ordinances. The
length of the cord must not exceed six
feet. ii must be routed so that it does not
touch the dlshwasher motor or the
lower portlon of the dlshwasher tub. A
grommet (Part No. 302797) must cover
the hole cut In a metal cabinet for the
flexible cord. The flexible cord must be
plugged Into a mating, three-prong.
grounding-type wall receptacle,
grounded in accordance with the
National Electrlcal Code ANSI/NFPA
70-latest edltion, and all local codes
and ordinances. Follow instructlons
packaged with the flexible cord.
Water
2. For added personal
safety use clomp and
green-COlOred.
1. Disconnect the power supply.
2. Remove terminal box cover
3. Remove wire connectors from the
power cord wires and grounding
we screw [See Figure 7.)
4. Disconnect the strain relief (behlnd
the terminal box] from the
dishwasher leg
5. Remove power cord and strain relief
from terminal box hole
6. See “A. Direct wire method:’
Panel A. for further Instructions
requirements
copper
grounding wfre Connect
the aroundina wire 1#16 mlnlmuml from
the &ernal grounding connecto;
screw inside the terminal box to a
grounded, cold water pipe’ [See
Figure 5 )
Do Not connect to electrical supply until
appliance is permanently grounded.
Do Not ground loo gas supply pipe
or hot water pipe.
I IOI
ends
Recommended
method
grounding
Temporary
groundlng
method
ElectrIcal Shock Hazard
ElectrIcal ground Is mqulred on
thls appllsnce.
l Improper connectlon
of the
equlpmentgmundlng
conductor
can result In a risk of electrlcal
shock.
l Check wlth a qualtfled electrlclan
It you are In doubt 8s to whether
the appliance Is pmperly
grounded. Do Not modify or
remove the power supply cord
plug. lt plug does not tit the outlet,
have a pmper outlet Installed by
s qualltled electrlclan.
l Do Not use an extension
cord
wlth thls appliance.
l Do Not have a fuse In the neutral.
Failure to follow these InstructIons
could result In a fire, electrlcal
shock or other personal injury.
l
Figure
6
The hot water line to the dishwasher
must p&de
between 15120 PSI
water pressure. The hof water heater
should be .M to deliver 140°F Water
temperature lo the dlshwasher for
besl results.
Use J/e”O.D. copper tubing or %” plastic
tubing minimum inlet line. Dishwasher
inlet Mlve has 3/a”internal pipe thread.
1. Rough In water line before installing
dlshwasher using one of the routing
methods shown In Figure 8. Cut a 5/e”or
larger hole In cabinet, rear wall or floor
for pipe
If changing and properly grounding
the electrical supply is impossible. and
where local codes permit (COnSUItYour
electrical inspector]. a temporary
adapter may be plugged into the 2prong, wall receptacle to mate with
the J-prong. power supply cord. (See
Figure 6.1
If this is done. you must connect a
separate copper grounding wire from
the external grounding connector
screw inslde the terminal box to the
grounded, cold water pipe.’ [See
Figure 5.)
Do Not connect fo electrical supply
until appliance is permanently
grounded.
2. Install a shutoff valve in the water line
where it can be easy to access
3, Flush water line into a bucket to get
rid of any particles that may clog
inlet valve.
Drain requirements
Insertin
Dishwas %er
in Opening
Some models ore not equipped with
a drain hose. A drain hose that meets
AHAM DW-I test standards must
be securely clamped to the pump’s
drain outlet. Drain hoses are available
through your Roper dealer. Drain
hose, when supplled, meets AHAM
DW-1 test standards.
1
Shut off water line valve Check
n that electric supply is off
Drain line connectIon to house
plumbing must be mlnlmum 20”
Cut 1%” hole in cabinet wall for drain
hose. Additional drain line (a minimum
of %” I.D. and no longer than 20 feet]
can be used if needed.
2
If color of door and access
n Dane1 ore to be chonaed or
custom baneIs Installed. change the
panels now See Panel E for detailed
Instructions.
Numbers
correspond
to steps.
Pick one method.
Recommended
Avoid opening dishwasher door
before dlshwasher is installed.
Dishwasher may tip over when
the door is opened, resulting
in personal injury or produc(
damage.
Install air gap
(Port No. 300096]: according to
kit inslructions. in the drain line
before line connects to household
plumbing. If other brands of air gaps
are used, they should be checked to
make sure they allow for the same
water flow.
Connect the air gap to a waste tee
(Part No. 675149)’ or disposer using
CIrubber connector (Part No. 6743811:
Most disposers have ‘/a” connectors or
special connectors are available at
plumbing supply houses. Be sure to
remove the disposer plug before
connecting the drain hose.
5
The dishwasher is shipped to
n be installed in 34” cabinet
opening. Measure height of cabinet
opening from underside of countertop
to floor. Check chart for that height
opening.
psitvm
Put the wheels in the required
and turn front IeveleR the
number of times indicated
3.
Alternate
methods
If local
plumbing codes
permit. the
20^mkt.’
blshwasher may
be connected to “z:z
P
the drain throuah
I
0 waste tee [Part No. 6751491 or
dlrectlv to a waste
disposer.
Flgurel2
The waste tee connection
MUST be made ahead of the trap and
o minimum of 20 inches above the
floor.
..
Most disposers have %” connectors or
special connecton ore avallable at
plumbing supply houses. Be sure to
remove the disposer plug before
connecting the drain hose.
‘Al po65 ore mllable
dealer.
PANEL C
thrwoh
ywr Roper
The carton and skid should have been
removed from the dlshwosher OS
described I” the instructions on the
carton If you have removed the carton
without removing the skid from the
dishwasher
CI Place two foam shipping pieces
behind dishwasher. Firmly grasp the
body of the dishwasher and gently
lay It on its bock on the foam
shipping pieces.
b. Use a YA”socket wrench or
screwdrlver to remove the screws
holding the skid to the bottom of
the dishwasher.
c. Stand dtshwasher uprlght
4.
Loosen, do not remove. the 4 screws
attaching access panel to dishwasher
using a ‘/4” socket wrench or Phillips
screwdriver. Remove access panel and
set aside.
Tilt dishwasher backwardson
wheels when moving ocmss floor.
Failure to do so moy cause
damage to floor COVednQ.
Untape drain hose. Close and latch
dlshwasher door. Push dishwasher into
place, sliding drain hose and power
cord (if available) through holes cut in
cabinet wall. Align dishwasher door
with cabinet front, not doors. so that
spacing is the same on both sides
and top to bottom. Center dishwasher
in cabinet opening. Check that front
leveling legs are firmly against the
floor.
Open door approximately
check for equal spacing
inner door ond tub sides.
loosen screws that fasten
countertop and shift tub.
screws.
3” and
b&Men
If necessary.
dishwasher to
Tighten
Check door for proper-&ration.
Door
should close easily without slamming
and open with its own weight. If
necessary. close door and adjust dooc
spring with pliers
14.
Take o few minutes to read the Use and
Care Guide to fully understand your
new dishwasher.
7,
To connect drain hose to an air-gap
or waste-tee, cut end of drain hose as
shown. Do Not cut drain hose when
connecting to a disposer. Knock out
plug from disposer Inlet. Secure drain
hose with hose clamp provided. Do
Not cu1 rlbbed sectlon lo shorten
drain hose. Coil and tape extra drain
hose under kitchen sink.
Make electrical connectlon or plug
power supply cord into the grounded
outlet.
CheckelectrIcal
requirements.
Be sure you have correct electrical
supply and recommended
grounding method.
15.
Check that all parts have been
installed and no steps were skipped.
Check that you hove all the tools you
started with.
16.
Turn on electric supply.
Start dishwasher and allow it to
complete a cycle. Check that
dishwasher is working properly and
that there are no water leaks.
Product Damage
Do Not solder wlthln 6” of plastic
water Inlet valve. Failure to follow
this lnshuctlon could result In
product damage.
Replace the access panel.
Remove all shipplng moteriols. Open
dishwasher door: remove bottom rock.
Place a newspaper or large sheet of
paper over bottom of dishwasher to
protect the pump area when securing
dishwasher10 countertop.
11w
Connect water pipe or tubing directly
to water Inlet valve. Do Not run pipe or
tubing across front of motor or dishwasher legs. Pierce a %” diameter hole
through the sound shield [sound shield
is not -&ailable on all models] for
water line See Fiaure 8. Panel 8. Turn
on water supply&d
check for leaks
PANEL D
Secure dishwasher to countertop with
two. No. 10 x %: PhilliDs-head screws
from paris bog. You’MUST secure
dishwasher to keep It from tilting when
door is opened or closed Do Nof drop
screws In dishwasher tub. If screws
should fall Into the pump, pump and
motor failure may occur. Remove
poperfrom bottom of dishwasher.
/
You have just flnlshed InsstallIng
your new Roper Undercounter
DIshwasher.
( Congratulations!
\
Keep Installa)lon lnshuctlona
a~llable
for easy reference.
)
J
Installing
Customized
Wood Door Panels
To Change Door
And Access
Panel Color
Dishwasher door panel and access
panel can be customized to match
wood cabinets.
l^t /---- -----------I
Hondle metal edges of panels
carefully. Cut metal edges may
cause personal InJury or domage
fo other materials.
t
Door pan-31
i :____-_-
k
Slide the side tram prece agarnst the
console or end cop Align side tram and
mounting holes in door frame Secure
trim to door wrth screws
‘il
Lt
-___I
1
~-clL-
I
Cut panels using
n specified dimensions
[ 23%” x 19%6” x I%“) Make sure wood
grain matches directron of cabinet
wood groin
Remove two screws securing one of the
srde trim pieces. Slide tram downward
until upper edge is free of console or
end cap. Lift off trim piece.
2
Rout all four sides
n of both panels t”x %”
deep to provrde room for installation
clearance.
Dlshwasher Is subject lo some
humldlly. Cover bofh sides and edges
of wood paneIS wlfh mOlSlUm
mSfSfOnf
Seder.
2
n
Slide out color panel(s) and
corrugated spacer. Select panel color
you wish to hove showing and place
on top of panels.
Loosen the upper access panel
screws and pull access panel outword.
Remove and save three screws
securing the top trim. Remove top trim.
3
Remove side trim
n piece OSdescribed
in Step 1, “To change access and door
panel color.”
hsonal
4
color
6.
Slide color ponel[sJ and spacer Into
the lower door trim and the groove on
underside of conSOle Gently push on
panel surface to fit panel under srde
trrm edge.
_---
; 1%”
Pull out desired color panel and place
rn front of other panels and corrugated
spacer wrth desired color facing out.
7
n
Replace top trim wrth three screws
Move access panel back into position
and tighten upper access panel
screws.
ln]ury Hazard
Remove corrugated
n spacer and all
panels and save for future use
Install custom punel and one
n color panel (color panel must
5
be used] as described in Steps 3 and 4.
“To change csccess and front panel
color.”
6
Repeat Steps 1 and
n 2 of this section for
cutting custom panels for the access
panel Use specified dimensions shown.
7
Remove top trim
n piece from access
panel as described in Step 5. “To
change door and access panei CObr.”
8
9
Remove corrugated
W spacer and all
color panels and save for future use.
Install custom panel and one
n color panel [color panel must
be used] cssdescribed in Steps 6 and Z
“To change door and access panel
color.”
PANEL E
IF THE
DISHW’HER
IS NOT
OPERATING
PROPERLY.. .
Check these points:
l Is the door closed
tightly and latched
securely?
l Has the cycle
been set correctly to
start the dishwasher?
l Is the water
turned on?
l Has a house fuse blown?
l Has electrical
power been
interrupted?
Note: If the motor has stopped
because of overload. it will
automatically
reset itself within a few
minutes. If after checking these points
the dishwasher still does not run or
complete a cycle, call for service.
ROPER
‘OrI No. 3369941
al989 Whirlpod Corporutim
Prepared by Whirlpool Corwmticm.
Ekntcm Honbor. Michigan
49022
Printed in U.S.A.