1
English
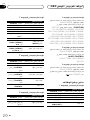
Operation Manual
Hide-away TV tuner
Español
GEX-P5750TVP
-
Contents
Thank you for buying this Pioneer product.
Please read through these operating instructions so you will know how to operate
your model properly. After you have finished reading the instructions, keep this manual in a safe place for future reference.
Precautions
IMPORTANT SAFEGUARDS 3
To ensure safe driving 3
To avoid battery exhaustion 4
Before You Start
About this unit 5
Video system of a connected component 5
About this manual 5
Resetting the microprocessor 5
Switching the operation mode 6
Use and care of the remote control 6
Installing the battery 6
Using the remote control 7
Whats What
Remote control 8
Other remote controls 8
When using a Pioneer car DVD
players remote control 9
When using a Pioneer car DVD
players remote control 9
TV tuner (SRC mode)
Whats What 10
Head unit (e.g., AVH-P5750DVD) 10
Operating with different head units 10
Function compatibility charts 11
Head unit group 1 11
Head unit group 2 11
Head unit group 3 11
Head unit group 4 11
Watching the television 12
Storing and recalling broadcast stations 13
Introduction of advanced TV tuner
operation 14
Storing the strongest broadcast stations
sequentially 14
Selecting the area group 14
2
En
Area group list and channel
name 14
TV tuner (STAND ALONE mode)
Watching the television 16
Storing the strongest broadcast stations
sequentially 16
Selecting the area group 16
Area group list and channel
name 17
Recalling broadcast stations 17
Confirming current channel and other
settings 17
Additional Information
Specifications 18
Section
01
Precautions
IMPORTANT SAFEGUARDS
1 Read this manual fully and carefully before operating your display.
2 Keep this manual handy as a reference for
operating procedures and safety information.
3 Pay close attention to all warnings in this
manual and follow the instructions carefully.
4 Do not allow other persons to use this system until they have read and understood
the operating instructions.
5 Do not install the display where it may (i)
obstruct the drivers vision, (ii) impair the
performance of any of the vehicles operating systems or safety features, including air bags, hazard lamp buttons or (iii)
impair the drivers ability to safely operate the vehicle.
6 As with any accessory in your vehicles interior, the display should not divert your
attention from the safe operation of your
vehicle. If you experience difficulty in operating the system or reading the display,
please park safely before making adjustments.
7 Please remember to wear your seat belt at
all times while operating your vehicle. If
you are ever in an accident, your injuries
can be considerably more severe if your
seat belt is not properly buckled.
8 Never use headphones while driving.
9 To promote safety, certain functions are
disabled unless the parking brake is on,
and the vehicle is not in motion.
10 Never set the volume of your display so
high that you cannot hear outside traffic
and emergency vehicles.
WARNING
! Do not attempt to install or service your
display by yourself. Installation or servicing of the display by persons without
training and experience in electronic
equipment and automotive accessories
may be dangerous and could expose you
to the risk of electric shock or other
hazards.
English
Please read all of these instructions regarding
your display and retain them for future reference.
To ensure safe driving
WARNING
! LIGHT GREEN LEAD AT POWER CONNECTOR IS DESIGNED TO DETECT
PARKED STATUS AND MUST BE CONNECTED TO THE POWER SUPPLY SIDE
OF THE PARKING BRAKE SWITCH. IMPROPER CONNECTION OR USE OF
THIS LEAD MAY VIOLATE APPLICABLE
LAW AND MAY RESULT IN SERIOUS INJURY OR DAMAGE.
! To avoid the risk of accident and the potential
violation of applicable laws, the front TV feature should never be used while the vehicle is
being driven. Also, rear displays should not be
in a location where it is a visible distraction to
the driver.
! In some countries or states the viewing of
images on a display inside a vehicle even by
persons other than the driver may be illegal.
Where such regulations apply, they must be
obeyed and this units TV features should not
be used.
This unit detects whether your vehicles parking brake is engaged or not, and prevents you
from watching TV on the front display while
driving. When you attempt to watch a TV, the
screen turns to black and nothing is displayed.
En
3
Section
01
Precautions
To watch TV on the front display, park your vehicle in a safe place and apply the parking
brake.
To avoid battery exhaustion
Be sure to run the vehicle engine while using
this unit. Using this unit without running the
engine can result in battery drainage.
WARNING
Do not use with vehicles that do not feature an
ACC position.
4
En
Section
02
Before You Start
About this unit
This unit is a TV tuner for reception of TV
broadcasts. Combining it with a separately
sold display with AV-BUS lets you enjoy TV entertainment (refer to this units installation
manual for details concerning the AV-BUS).
This unit features a REAR OUT, letting you
watch TV on a rear display (sold separately).
Video system of a
connected component
This unit is PAL/SECAM system compatible.
When connecting an external component to
this units REAR OUT, be sure the component
is compatible with the same video systems. If
it is not, images will not be correctly reproduced.
WARNING:
English
CAUTION
! Do not allow this unit to come into contact
with liquids. Electrical shock could result.
Also, this unit damage, smoke, and overheat
could result from contact with liquids.
! Keep this manual handy as a reference for operating procedures and precautions.
! Always keep the volume low enough so that
you can hear sounds from outside the vehicle.
! Protect this unit from moisture.
! If the battery is disconnected or discharged,
the preset memory will be erased and must be
reprogrammed.
! If this unit does not operate properly, contact
your dealer or nearest authorized Pioneer Service Station.
! Watching the TV while driving is dangerous
and could result in an accident.
! This units REAR OUT is for connection of a
display to enable passengers in the rear seats
to watch the TV.
NEVER install the rear display in a location
that enables the driver to watch the TV while
driving.
About this manual
This unit features a number of sophisticated
functions ensuring superior reception and operation. All the functions have been designed
for the easiest possible use, but many are not
self-explanatory. This operation manual will
help you benefit fully from this units potential
and to maximize your listening enjoyment.
We recommend that you familiarize yourself
with the functions and their operation by reading through the manual before you begin
using this unit. It is especially important that
you read and observe WARNINGs and CAUTIONs in this manual.
Resetting the microprocessor
Pressing RESET lets you reset the microprocessor to its initial settings.
The microprocessor must be reset under the
following conditions:
! Prior to using this unit for the first time
after installation
! If the unit fails to operate properly
! When strange or incorrect messages appear on the display
! When setting the position of the operation
mode switch on this unit
! Be sure to stop driving and park your vehicle
in a safe place before watching the TV.
En
5
Section
02
Before You Start
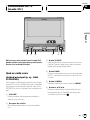
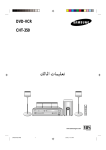
% Press RESET with a pen tip or other
pointed instrument.
% Use a thin standard tip screwdriver to
switch the operation mode switch.
RESET button
Note
If you reset the microprocessor, memorized
broadcast stations and other information is
erased, and this unit returns to its initial
settings.
Switching the operation mode
This unit features three operation modes:
SRC : OSD OFF mode, SRC : OSD ON mode
and STAND ALONE mode. Switch the mode
according to the combined components.
! After switching, reset the microprocessor.
Use and care of the remote
control
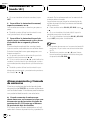
Installing the battery
Slide the tray out on the back of the remote
control and insert the battery with the plus (+)
and minus () poles pointing in the proper direction.
SRC : OSD OFF mode
! Using with a Pioneer head unit featuring
an IP-BUS input.
! Not using this units OSD (On Screen Display) indications in the display.
SRC : OSD ON mode
! Using with a Pioneer head unit featuring
an IP-BUS input.
! Using this units OSD (On Screen Display)
indications in the display.
STAND ALONE mode
! Using with a display featuring RCA video
input.
6
En
WARNING
Keep the battery out of the reach of children.
Should the battery be swallowed, immediately
consult a doctor.
CAUTION
! Use only one CR2025 (3 V) lithium battery.
! Remove the battery if the remote control is not
used for a month or longer.
! Do not recharge, disassemble, heat or dispose
of the battery in fire.
Section
02
Before You Start
English
! Do not handle the battery with metallic tools.
! Do not store the battery with metallic materials.
! In the event of battery leakage, wipe the remote control completely clean and install a
new battery.
! When disposing of used batteries, please
comply with governmental regulations or environmental public institutions rules that
apply in your country/area.
Using the remote control
Point the remote control in the direction of the
front panel to operate.
Important
! Do not store the remote control in high temperatures or direct sunlight.
! The remote control may not function properly
in direct sunlight.
! Do not let the remote control fall onto the
floor, where it may become jammed under the
brake or accelerator pedal.
En
7
Section
03
Whats What
3
1
4
2
5
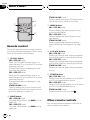
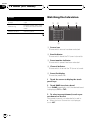
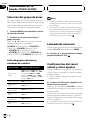
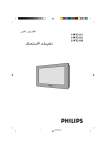
Remote control
This units supplied remote control is mainly
for use by rear seat passengers. When using,
point at the remote control sensor.
1 CH CALL button
SRC : OSD ON mode
When the TV is selected as a source, or,
when the rear TV is on and the TV is not selected as a source:
Channel information is displayed on the
front and rear display.
SRC : OSD OFF mode
When the TV is selected as a source, or,
when the rear TV is on and the TV is not selected as a source:
Channel information is displayed on the
rear display.
STAND ALONE mode
Press to display the current channel and
other settings (Confirming current channel
and other settings on page 17).
2 BAND button
SRC : OSD ON mode
Not used. Alternatively, use BAND on the
head unit.
SRC : OSD OFF mode
Not used. Alternatively, use BAND on the
head unit.
8
En
STAND ALONE mode
Press to select among two TV bands and to
cancel the control mode of functions.
3 MENU button
SRC : OSD ON mode
Press to display the menu screen on the
front and rear display.
SRC : OSD OFF mode
Press to display the menu screen on the
rear display.
STAND ALONE mode
Press to display the area group setting
screen (Selecting the area group on page
16).
4 a/b/c/d buttons
SRC : OSD ON mode
Press to do manual seek tuning and preset
tuning. Also used for controlling functions.
SRC : OSD OFF mode
Press to do manual seek tuning and preset
tuning. Also used for controlling functions.
STAND ALONE mode
Press to do manual seek tuning and preset
tuning.
5 POWER button
SRC : OSD ON mode
Press to turn the rear display on or off when
the TV is not selected as a source.
SRC : OSD OFF mode
Press to turn the rear display on or off when
the TV is not selected as a source.
STAND ALONE mode
Press to turn this unit on or off.
Other remote controls
You can also perform operations with the remote controls shown below.
Section
03
Whats What
English
When using a Pioneer car DVD
players remote control
When using a remote control supplied with
SDV-P7, AVX-P7300DVD, XDV-P9, XDV-P9 II.
1 r button
Press to display the current channel and
other settings when using this unit as
STAND ALONE mode (Confirming current
channel and other settings on page 17).
Press and hold to BSSM on or off.
2 PLAY/PAUSE (f) button
Press to display the area group setting
screen (Selecting the area group on page
16).
3 Remote control operation mode switch
When operating a TV, be sure to set the remote control operation mode switch to TV
position.
When using a Pioneer car DVD
players remote control
When using a remote control supplied with
AVH-P7650DVD, AVH-P7550DVD, AVHP6650DVD, AVH-P6550DVD.
1 16 buttons
Press to do direct channel select.
2 Joystick
Move to do manual seek tuning and preset
tuning. Click to recall menu screen. When
using this unit as STAND ALONE mode,
click to display the area group setting
screen. Also used for controlling functions.
3 Remote control operation mode switch
When operating a TV, be sure to set the remote control operation mode switch to TV
position.
En
9
Section
04
TV tuner (SRC mode)
1 2
3
Only when using this unit with SRC mode,
you can perform the following operations
by head unit.
Whats What
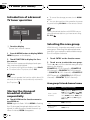
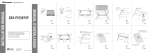
Head unit (e.g., AVH-P5750DVD)
Operate this unit (for TV reception) with the
connected head unit. Instructions in this manual use AVH-P5750DVD as an example of
head unit.
1 VOLUME
Press to increase or decrease the volume.
2 Signal receptor
Receives signals from a remote control.
3 SOURCE button
This unit is turned on by selecting a source.
Press to cycle through all the available
sources.
10
En
4
56
4 BAND button
Press to select among two TV bands and to
cancel the control mode of functions.
5 A.MENU button
Press to display MENU.
6 a/b/c/d buttons
Press to do manual seek tuning. Also used
for controlling functions.
Operating with different
head units
Head unit group 1
The following head units featuring touch
panel key operation.
AVH-P7650DVD, AVH-P7550DVD, AVHP6650DVD, AVH-P6550DVD, AVH-P5750DVD
Section
04
TV tuner (SRC mode)
Head unit group 3
When using the following head units, operation is different from AVH-P5750DVD.
The following head units featuring
MULTI-CONTROL operation.
DEH-P8650MP, DEH-P7750MP, DEH-P1Y
Head unit group 4
When using the following head units, operation is different from AVH-P5750DVD.
The following head units featuring remote control operation.
AVX-P7650DVD
Function compatibility charts
Head unit group 1
Controls
Select TV as a source
Press SOURCE.
Select a band
Touch BAND.
Preset tuning
Touch a or b.
Manual tuning (step
by step)
Touch c or d.
Seek tuning
Keep touching c or d.
Select a function
Touch A.MENU and then
touch FUNCTION.
Head unit group 2
English
Head unit group 2
When using the following head units, operation is different from AVH-P5750DVD.
The following head units featuring FUNCTION
button operation or SOFT KEY operation.
KEH-P7035, FH-P9200MP, FH-P6200, FHP5000MP, FH-P4200MP, DVH-P5650MP, DVHP5050MP, DEH-P9650MP, DEH-P7650MP, DEHP7550MP, DEH-P6750MP, DEH-P6550, DEHP5750MP, DEH-P5650MP, DEH-P5550MP, DEHP4750MP, DEH-P4650MP, DEH-P4550, DEHP3550MP, DEH-P2650MP, DEH-P2550
Controls
Select TV as a source
Press SOURCE.
Select a band
Press BAND.
Preset tuning
Press a or b.
Manual tuning (step
by step)
Press c or d.
Seek tuning
Press and hold c or d.
Preset memory
Press and hold 16.
Direct recall
Press 16.
BSSM
Press FUNCTION (FUNC)
(A.MENU).
a/b
Preset channel list
Press FUNCTION (FUNC)
(A.MENU).
a/b/c/d
Head unit group 3
Controls
Select TV as a source
Press SOURCE.
Select a band
Press BAND.
Preset tuning
Push MULTI-CONTROL up
or down.
Manual tuning (step
by step)
Push MULTI-CONTROL left
or right.
Seek tuning
Push and hold MULTI-CONTROL left or right.
Select a function
Use MULTI-CONTROL.
Head unit group 4
Controls
Select TV as a source
Press SOURCE.
Select a band
Press BAND.
Preset tuning
Move the joystick up or
down.
En
11
Section
04
TV tuner (SRC mode)
Watching the television
Controls
Manual tuning (step
by step)
Move the joystick left or
right.
Seek tuning
Hold the joystick left or right
for about one second and release.
Select a function
Use the joystick.
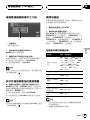
1
2
3
4
5
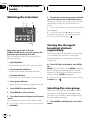
1 Source icon
Shows which source has been selected.
2 Band indicator
Shows which band the TV tuner is tuned to.
3 Preset number indicator
Shows which preset has been selected.
4 Channel indicator
Shows which channel the TV tuner is tuned.
5 Preset list display
Shows the preset list.
1 Touch the screen to display the touch
panel keys.
2 Touch BAND to select a band.
Touch BAND repeatedly until the desired band
is displayed, TV1 or TV2.
3 To select a preset channel, touch a preset channel on the list.
The preset channel you selected is tuned in.
# When the list of channels is not displayed,
touch LIST.
12
En
Section
04
TV tuner (SRC mode)
# You can also perform manual tuning by pressing c or d button.
Notes
! Up to 24 stations, 12 for each of two TV bands,
can be stored in memory.
! You can also use a and b to recall stations
assigned to preset tuning keys P1P12.
English
4 To perform manual tuning, briefly
touch c or d.
The channels move up or down step by step.
5 To perform seek tuning, keep touching
c or d for about one second and release.
The tuner will scan the channels until a broadcast strong enough for good reception is
found.
# You can cancel seek tuning by briefly touching
either c or d.
# If you keep touching c or d you can skip
broadcasting channels. Seek tuning starts as
soon as you release the keys.
# You can also perform seek tuning by pressing
and holding c or d button.
Storing and recalling
broadcast stations
If you touch any of the preset tuning keys
P1P12 you can easily store up to 12 broadcast stations for later recall with the touch of a
key.
% When you find a station that you want
to store in memory, keep touching one of
preset tuning keys P1P12 until the preset
number stops flashing.
The number you have touched will flash in the
preset number indicator and then remain lit.
The selected station has been stored in memory.
The next time you touch the same preset tuning key the station is recalled from memory.
# To switch between P1P6 and P7P12, touch
or .
# When the touch panel keys are not displayed,
you can display them by touching the screen.
# When P1P6 and P7P12 are not displayed,
you can display them by touching LIST.
En
13
Section
04
TV tuner (SRC mode)
Introduction of advanced
TV tuner operation
# To cancel the storage process, touch BSSM
again.
# You can also perform this operation by pressing and holding CH CALL on the remote control.
Note
Storing broadcast stations with BSSM may replace broadcast stations you have saved using
P1P12.
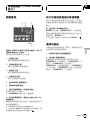
1
1 Function display
Shows the function names.
1 Press A.MENU button to display MENU.
MENU appears on the display.
2 Touch FUNCTION to display the function names.
The function names are displayed and operable ones are highlighted.
# To return to the previous display, touch BACK.
# To return to the TV picture, touch ESC.
Note
If you do not operate the function within about 30
seconds, the display is automatically returned to
the TV picture.
Storing the strongest
broadcast stations
sequentially
% Touch BSSM on the function menu to
turn BSSM on.
BSSM begins to flash. While BSSM is flashing
the 12 strongest broadcast stations will be
stored in order from the lowest channel up.
When finished, BSSM disappears.
14
En
Selecting the area group
With this unit, channels are preset for each
area group. Selecting the appropriate area
group for your reception area enables reception of multiple channels.
1
Touch CNTRY on the function menu.
2 Touch c or d to select the area group.
Touch c or d until the desired area group appears in the display.
COUNTRY 1 (CCIR channel)COUNTRY 2
(IN channel)COUNTRY 3 (CHN channel)
COUNTRY 4 (U.K. channel)COUNTRY 5
(OIRT channel)COUNTRY 6 (AUSTRALIA
channel)COUNTRY 7 (SAF channel)
Area group list and channel name
Area group
Display (area name)
Area 1 (CCIR
channel)
SIN(Singapore), MAS(Malaysia),
THA(Thailand), IND(India), PAK
(Pakistan), UAE(UAE), BRN(Bahrain), KUW(Kuwait), KSA(Saudi
Arabia), LIB(Libia), EGY(Egypt),
ISR(Israel)
Area 2 (IN channel)
INA(Indonesia)
Area 3 (CHN
channel)
CHN(China)
Section
04
TV tuner (SRC mode)
Display (area name)
Area 4 (U.K.
channel)
HKG(Hong Kong)
Area 5 (OIRT
channel)
CIS(CIS)
Area 6 (AUSTRALIA channel)
AUS(Australia)
Area 7 (SAF channel)
SAF(South Africa)
English
Area group
Notes
! You can use BSSM and other methods to
memorize broadcast stations in each of the
area groups.
! This unit is not compatible with channels in
France.
! Broadcast channels and broadcast systems
may vary from area to area. If reception is not
possible with the appropriate area group listed
above, try reception using another area
group.
En
15
Section
05
TV tuner (STAND ALONE
mode)
Watching the television
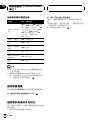
1 2
3
4 To perform seek tuning, press and hold
c or d for about one second and release.
The tuner will scan the channels until a broadcast strong enough for good reception is
found.
# You can cancel seek tuning by briefly pressing
either c or d.
# If you press and hold c or d you can skip
broadcasting channels. Seek tuning starts as
soon as you release the button.
4
Only when using this unit with
STAND ALONE mode, you can perform the
following operations by this unit.
Only the remote control can operate the following functions.
1 Band indicator
Shows which band the TV tuner is tuned to.
2 Preset number indicator
Shows which preset has been selected.
3 Channel indicator
Shows which channel the TV tuner is tuned.
Storing the strongest
broadcast stations
sequentially
BSSM (best stations sequential memory) lets
you automatically store the 12 strongest
broadcast stations in order from the lowest
channel up.
% Press CH CALL and hold to turn BSSM
on.
BSSM begins to flash. While BSSM is flashing
the 12 strongest broadcast stations will be
stored in order from the lowest channel up.
When finished, BSSM disappears.
# To cancel the storage process, press and hold
CH CALL again.
4 Area group indicator
Shows which area group has been selected.
1
Press POWER to turn the TV on.
2
Press BAND to select a band.
3 To perform manual tuning, briefly press
c or d.
The channels move up or down step by step.
# You can also perform manual tuning by pressing CHANNEL.
16
En
Selecting the area group
With this unit, channels are preset for each
area group. Selecting the appropriate area
group for your reception area enables reception of multiple channels.
1 Press MENU to display the area select
menu.
Section
05
TV tuner (STAND ALONE
mode)
Area group list and channel name
Area group
Display (area name)
Area 1 (CCIR
channel)
SIN(Singapore), MAS(Malaysia),
THA(Thailand), IND(India), PAK
(Pakistan), UAE(UAE), BRN(Bahrain), KUW(Kuwait), KSA(Saudi
Arabia), LIB(Libia), EGY(Egypt),
ISR(Israel)
Area 2 (IN channel)
INA(Indonesia)
Area 3 (CHN
channel)
CHN(China)
Area 4 (U.K.
channel)
HKG(Hong Kong)
Area 5 (OIRT
channel)
CIS(CIS)
Area 6 (AUSTRALIA channel)
AUS(Australia)
Area 7 (SAF channel)
SAF(South Africa)
Recalling broadcast stations
You can easily recall preset channels P1P12
stored by BSSM.
% Press a or b to recall preset channels
P1P12.
English
2 Press c or d to select the area group.
Press c or d until the desired area group appears in the display.
COUNTRY 1 (CCIR channel)COUNTRY 2
(IN channel)COUNTRY 3 (CHN channel)
COUNTRY 4 (U.K. channel)COUNTRY 5
(OIRT channel)COUNTRY 6 (AUSTRALIA
channel)COUNTRY 7 (SAF channel)
Confirming current channel
and other settings
You can display the reception information
such as the channel, band and preset channel
list.
! Only the remote control can operate this
function.
% Press CH CALL to display the reception
information.
Each press of CH CALL displays reception informations in the following order:
Current channel information (channel and
band)Preset channel listArea listReception informations disappear
# Reception informations are displayed for eight
seconds.
Notes
! You can use BSSM and other methods to
memorize broadcast stations in each of the
area groups.
! Broadcast channels and broadcast systems
may vary from area to area. If reception is not
possible with the appropriate area group listed
above, try reception using another area
group.
En
17
Appendix
Additional Information
Specifications
General
Rated power source ............... 14.4 V DC
(allowable voltage range:
12.0 14.4 V DC)
Grounding system ................... Negative type
Max. current consumption
..................................................... 0.6 A
Dimensions (W × H × D) ... 172 × 30 × 150 mm
Weight .......................................... 0.7 kg
TV tuner
Reception channel/TV system
(For each country group)
......................................................... Area 1 : (CCIR) : VHF 2 12
ch, UHF 21 69 ch
Area 2 : (IN) : VHF A H2 ch,
UHF 21 69 ch
Area 3 : (CHN) : VHF A K
ch, UHF 21 69 ch
Area 4 : (UK) : VHF R1 R12
ch, UHF 21 69 ch
Area 5 : (OIRT) : VHF 2 12
ch, UHF 21 69 ch
Area 6 : (AUSTRALIA) : VHF
0 11 ch, UHF 28 69 ch
Area 7 : (SAF) : VHF 4 11,
13 ch, UHF 21 69 ch
Color system .............................. PAL/SECAM compatible
Usable sensitivity ..................... 18 dBµ (75 W, Mono)
Video S/N ..................................... Over 37 dB (59 dBµ RF
input, White Peak 100%)
Video S/N 30 dB usable sensitivity
..................................................... 45 dBµ
Antenna input ........................... 4 ch Diversity (ø 3.5 mm
Mini plug type)
Rear display output
Video .............................................. 1 Vp-p/75W (TV: White 100%
Modulated)
Sound ............................................ 500 mVrms/Less than 1kW
(TV: 100% Modulated)
Infrared remote control
Wavelength ................................. 945 nm
Output ........................................... typ; 12 mw/sr per Infrared
LED
18
En
Note
Specifications and the design are subject to possible modifications without notice due to improvements.
Contenido
Gracias por haber comprado este producto Pioneer.
Lea con detenimiento estas instrucciones sobre el funcionamiento del aparato,
para que pueda dar el mejor uso posible a su modelo. Una vez que las haya leído,
guarde este manual en un lugar seguro para consultarlo en el futuro.
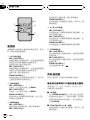
Precauciones
Antes de comenzar
Acerca de esta unidad 22
Sistema de vídeo de un componente
conectado 22
Acerca de este manual 22
Reinicialización del microprocesador 23
Cambio del modo de funcionamiento 23
Uso y cuidado del mando a distancia 24
Instalación de la batería 24
Uso del mando a distancia 24
Qué es cada cosa
Mando a distancia 25
Otros mandos a distancia 26
Al usar el mando a distancia de un
reproductor Pioneer de DVD para
automóvil 26
Al usar el mando a distancia de un
reproductor Pioneer de DVD para
automóvil 26
Español
INSTRUCCIONES DE SEGURIDAD
IMPORTANTES 20
Para garantizar la conducción segura del
vehículo 20
Para evitar la descarga de la batería 21
Almacenamiento y llamada de emisoras 30
Introducción a las funciones avanzadas del
sintonizador de TV 31
Almacenamiento consecutivo de las
emisoras con señales más fuertes 31
Selección del grupo de áreas 31
Lista de grupos de áreas y nombres de
canales 32
Sintonizador de TV (modo STAND
ALONE)
Uso del televisor 33
Almacenamiento consecutivo de las
emisoras con señales más fuertes 33
Selección del grupo de áreas 34
Lista de grupos de áreas y nombres de
canales 34
Llamada de emisoras 34
Confirmación del canal actual y otros
ajustes 34
Información adicional
Especificaciones 35
Sintonizador de TV (modo SRC)
Qué es cada cosa 27
Unidad principal (p. ej., AVHP5750DVD) 27
Funcionamiento con diferentes unidades
principales 28
Tablas de compatibilidad de funciones 28
Grupo 1 de unidades principales 28
Grupo 2 de unidades principales 28
Grupo 3 de unidades principales 29
Grupo 4 de unidades principales 29
Uso del televisor 29
Es
19
Sección
01
Precauciones
INSTRUCCIONES DE
SEGURIDAD IMPORTANTES
Lea todas estas instrucciones sobre el display
y consérvelas para consultarlas en el futuro.
1 Lea todo este manual con suma atención
antes de utilizar el display.
2 Conserve este manual a mano para que
pueda consultar los procedimientos de
operación y la información sobre seguridad cuando sea necesario.
3 Preste mucha atención a todas las advertencias que se indican en este manual y
siga las instrucciones con cuidado.
4 No permita que otras personas utilicen
este sistema hasta que hayan leído y comprendido las instrucciones sobre el funcionamiento del aparato.
5 No instale el display en un lugar que (i)
pueda obstaculizar la visión del conductor, (ii) pueda alterar el funcionamiento de
los sistemas operativos o los dispositivos
de seguridad del vehículo, en particular
las airbags y los botones de luces de seguridad o (iii) pueda afectar la capacidad
del conductor para manejar el vehículo de
manera segura.
6 Al igual que con cualquier accesorio ubicado en el interior del vehículo, el display
no debe desviar su atención del manejo
seguro del vehículo. Si tiene dificultades
para utilizar el sistema o leer el display,
estacione en un lugar seguro antes de
hacer algún ajuste.
7 Recuerde usar siempre el cinturón de seguridad cuando conduzca el vehículo. En
caso de accidente, las lesiones pueden ser
mucho más graves si el cinturón de seguridad no está debidamente abrochado.
8 Nunca use auriculares mientras conduce.
9 Para promover la seguridad, ciertas funciones están desactivadas a menos que se
active el freno de mano y el vehículo no
esté en movimiento.
20
Es
10 Nunca fije el volumen del display tan alto
que no pueda escuchar el tráfico exterior
y los vehículos de emergencia.
ADVERTENCIA
! No trate de instalar o reparar el display
usted mismo. La instalación o la reparación del display por parte de personas sin
capacitación y experiencia en equipos
electrónicos y accesorios para automóviles puede ser peligrosa y puede exponerlo
al riesgo de sufrir una descarga eléctrica o
a otros peligros.
Para garantizar la conducción
segura del vehículo
ADVERTENCIA
! EL CABLE VERDE CLARO DEL CONECTOR DE ALIMENTACIÓN ESTÁ DISEÑADO PARA DETECTAR SI EL VEHÍCULO
ESTÁ ESTACIONADO Y DEBE CONECTARSE CON EL LADO DE LA FUENTE DE
ALIMENTACIÓN DEL INTERRUPTOR
DEL FRENO DE MANO. LA CONEXIÓN O
EL USO INCORRECTO DE ESTE CABLE
PUEDE INFRINGIR LAS LEYES PERTINENTES Y OCASIONAR LESIONES FÍSICAS O DAÑOS GRAVES.
! Para evitar el riesgo de accidentes y la posible
violación de las leyes pertinentes, la función
de TV delantera nunca debe utilizarse mientras se maneja el vehículo. Además, los displays traseros no deben estar en un lugar
donde sean una distracción visual para el
conductor.
Sección
01
Precauciones
! En algunos países o estados, puede ser ilícita
la visualización de imágenes en un display
dentro de un vehículo, incluso por otras personas que no sean el conductor. En los casos en
que resulten aplicables, estas normas deben
respetarse y no deben usarse las funciones de
TV de esta unidad.
Español
Esta unidad detecta si el freno de mano del
automóvil está activado o no, y le impide ver
programas de TV en el display delantero mientras conduce. Si intenta ver un programa de
TV, la pantalla de ennegrecerá y no se mostrará nada en ella.
Para ver un programa de TV en el display delantero, estacione el automóvil en un lugar seguro y active el freno de mano.
Para evitar la descarga de
la batería
Utilice esta unidad con el motor del vehículo
encendido. De no hacerlo, se puede descargar
la batería.
ADVERTENCIA
No utilice la unidad con un vehículo que no cuente con la posición ACC.
Es
21
Sección
02
Antes de comenzar
Acerca de esta unidad
PRECAUCIÓN
! No permita que esta unidad entre en contacto
con líquidos, ya que ello puede producir una
descarga eléctrica. Además, el contacto con
líquidos puede causar daños en la unidad,
humo y recalentamiento.
! Conserve este manual a mano para que
pueda consultar los procedimientos de operación y las precauciones cuando sea necesario.
! Mantenga siempre el volumen lo suficientemente bajo como para que pueda escuchar
los sonidos que provienen del exterior del
vehículo.
! Proteja esta unidad de la humedad.
! Si se desconecta o se descarga la batería, la
memoria preajustada se borrará y deberá reprogramarla.
! Si esta unidad no funciona correctamente, comuníquese con su concesionario o el servicio
técnico oficial de Pioneer más próximo a su
domicilio.
Esta unidad es un sintonizador de TV para la
recepción de transmisiones de televisión. Al
combinarla con un display con AV-BUS (se
vende por separado), usted puede ver programas de televisión (consulte el manual de instalación de esta unidad para ver detalles sobre
el AV-BUS).
Esta unidad viene con un REAR OUT, que le
permite ver televisión en un display trasero (se
vende por separado).
Sistema de vídeo de un
componente conectado
Esta unidad es compatible con el sistema
PAL/SECAM. Al conectar un componente externo al REAR OUT de esta unidad, asegúrese
22
Es
de que sea compatible con los mismos sistemas de vídeo. De lo contrario, las imágenes
no se reproducirán correctamente.
! Asegúrese de detenerse y estacionar su
vehículo en un lugar seguro antes de ver un
programa de TV.
! Observar un programa de TV al conducir es
peligroso y puede causar un accidente.
! La salida REAR OUT de esta unidad sirve para
conectar un display que permita a los pasajeros de los asientos traseros ver un programa
de TV.
NUNCA instale el display trasero en un lugar
que permita al conductor ver un programa de
TV mientras conduce.
Acerca de este manual
Esta unidad incluye diversas funciones sofisticadas que garantizan una recepción y un funcionamiento de calidad superior. Por sus
características de diseño, todas las funciones
se pueden usar con gran facilidad; sin embargo, muchas de ellas necesitan una explicación. Este manual le ayudará a aprovechar
todo el potencial que ofrece esta unidad y a
disfrutar al máximo del placer de escuchar
música.
Recomendamos que se familiarice con las
funciones y su operación, leyendo el manual
antes de comenzar a usar esta unidad. Es particularmente importante que lea y tenga en
cuenta los mensajes de ADVERTENCIA y
PRECAUCIÓN en este manual.
Sección
02
Antes de comenzar
Reinicialización del
microprocesador
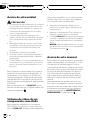
% Presione RESET con la punta de un lapicero u otro instrumento con punta.
Modo SRC : OSD ON
! Se usa con una unidad principal Pioneer
que viene con una entrada IP-BUS.
! Se usan en el display las indicaciones OSD
(On Screen Display) de esta unidad.
Modo STAND ALONE
! Se usa con un display que viene con una
entrada de vídeo RCA.
Español
Si se presiona RESET, se restablecerán los
ajustes iniciales del microprocesador.
Se debe reinicializar el microprocesador si se
presentan las siguientes condiciones:
! Antes de utilizar esta unidad por primera
vez después de su instalación
! Si la unidad no funciona correctamente
! Cuando aparecen mensajes extraños o incorrectos en el display
! Cuando se fija la posición del conmutador
de modo de funcionamiento de la unidad
Modo SRC : OSD OFF
! Se usa con una unidad principal Pioneer
que viene con una entrada IP-BUS.
! No se usan en el display las indicaciones
OSD (On Screen Display) de esta unidad.
% Utilice un destornillador de punta fina
estándar para cambiar el ajuste del conmutador de modo de funcionamiento.
Botón RESET
Nota
Si reinicializa el microprocesador, se borrarán las
emisoras y otra información guardada en la memoria, y la unidad volverá a su configuración
inicial.
! Después de realizar el cambio, reinicialice
el microprocesador.
Cambio del modo de
funcionamiento
Esta unidad ofrece tres modos de funcionamiento: modo SRC : OSD OFF, modo
SRC : OSD ON y modo STAND ALONE. Cambie el modo de acuerdo con los componentes
combinados.
Es
23
Sección
02
Antes de comenzar
Uso y cuidado del mando a
distancia
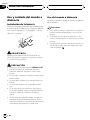
Instalación de la batería
Deslice y extraiga la bandeja de la parte posterior del mando a distancia y coloque la batería
con los polos positivo (+) y negativo () en la
dirección correcta.
ADVERTENCIA
Mantenga la batería fuera del alcance de los
niños. En caso de ingestión accidental, consulte
a un médico de inmediato.
PRECAUCIÓN
! Utilice una sola batería de litio CR2025 (3 V).
! Extraiga la batería si no piensa utilizar el
mando a distancia durante un mes o más
tiempo.
! No recargue, desarme, caliente ni arroje la batería al fuego.
! No manipule la batería con herramientas metálicas.
! No guarde la batería con materiales metálicos.
! En el caso de que se produzca una fuga de
fluido de la batería, limpie completamente el
mando a distancia e instale una batería
nueva.
! Al descartar las baterías usadas, cumpla con
los reglamentos gubernamentales o las normas de las instituciones públicas ambientales
pertinentes, aplicables en su país/zona.
24
Es
Uso del mando a distancia
Apunte el mando a distancia hacia la carátula
para utilizarlo.
Importante
! No guarde el mando a distancia en lugares expuestos a altas temperaturas o a la luz solar
directa.
! Es posible que el mando a distancia no funcione correctamente si lo expone a la luz solar
directa.
! No deje caer el mando a distancia al suelo, ya
que puede quedar atascado debajo del freno
o del acelerador.
Sección
03
Qué es cada cosa
3
1
4
2
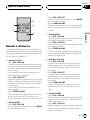
Mando a distancia
El mando a distancia que se incluye es principalmente para ser usado por los pasajeros de
los asientos traseros. Al usarlo, apunte al sensor del mando a distancia.
1 Botón CH CALL
Modo SRC : OSD ON
Cuando el televisor está seleccionado como
fuente, o cuando el televisor trasero está encendido y el televisor no está seleccionado
como fuente:
La información de canales aparece en el
display delantero y trasero.
Modo SRC : OSD OFF
Cuando el televisor está seleccionado como
fuente, o cuando el televisor trasero está encendido y el televisor no está seleccionado
como fuente:
La información de canales aparece en el
display trasero.
Modo STAND ALONE
Presione este botón para visualizar el canal
actual y otros ajustes (Confirmación del
canal actual y otros ajustes en la página 34).
2 Botón BAND
Modo SRC : OSD ON
No se utiliza. Otra alternativa es usar BAND
en la unidad principal.
3 Botón MENU
Modo SRC : OSD ON
Presione para visualizar la pantalla de menú
en el display delantero y trasero.
Modo SRC : OSD OFF
Presione para visualizar la pantalla de menú
en el display trasero.
Modo STAND ALONE
Presione para visualizar la pantalla de ajuste de grupo de áreas (Selección del grupo de
áreas en la página 34).
Español
5
Modo SRC : OSD OFF
No se utiliza. Otra alternativa es usar BAND
en la unidad principal.
Modo STAND ALONE
Presione para seleccionar entre dos bandas
de TV, y cancelar el modo de control de funciones.
4 Botones a/b/c/d
Modo SRC : OSD ON
Presione para realizar la sintonización por
búsqueda manual y el ajuste de presintonías. También se usan para controlar las
funciones.
Modo SRC : OSD OFF
Presione para realizar la sintonización por
búsqueda manual y el ajuste de presintonías. También se usan para controlar las
funciones.
Modo STAND ALONE
Presione para realizar la sintonización por
búsqueda manual y el ajuste de presintonías.
5 Botón POWER
Modo SRC : OSD ON
Presione para encender o apagar la pantalla
trasera cuando el televisor no está seleccionado como fuente.
Modo SRC : OSD OFF
Presione para encender o apagar la pantalla
trasera cuando el televisor no está seleccionado como fuente.
Es
25
Sección
03
Qué es cada cosa
Modo STAND ALONE
Presione este botón para encender o apagar
esta unidad.
Otros mandos a distancia
Al usar un mando a distancia de AVHP7650DVD, AVH-P7550DVD, AVH-P6650DVD,
AVH-P6550DVD.
También puede realizar operaciones con los
mandos a distancia que se muestran abajo.
1 Botones 16
Presione este botón para seleccionar un
canal directamente.
Al usar el mando a distancia de
un reproductor Pioneer de DVD
para automóvil
2 Joystick
Mueva para realizar la sintonización por
búsqueda manual y el ajuste de presintonías. Haga clic para llamar la pantalla de
menú. Al usar esta unidad como modo
STAND ALONE, haga clic para visualizar la
pantalla de ajuste de grupos de áreas. También se utiliza para controlar funciones.
Al usar un mando a distancia de SDV-P7, AVXP7300DVD, XDV-P9, XDV-P9 II.
1 Botón r
Presione para visualizar el canal actual y
otros ajustes al usar esta unidad como
modo STAND ALONE (Confirmación del
canal actual y otros ajustes en la página 34).
Presione y mantenga presionado para encender o apagar BSSM.
2 Botón PLAY/PAUSE (f)
Presione para visualizar la pantalla de ajuste de grupo de áreas (Selección del grupo de
áreas en la página 34).
3 Conmutador de modo de funcionamiento del mando a distancia
Al utilizar un televisor, asegúrese de cambiar el ajuste del conmutador del modo de
funcionamiento del mando a distancia a la
posición TV.
26
Al usar el mando a distancia de
un reproductor Pioneer de DVD
para automóvil
Es
3 Conmutador de modo de funcionamiento del mando a distancia
Al utilizar un televisor, asegúrese de cambiar el ajuste del conmutador del modo de
funcionamiento del mando a distancia a la
posición TV.
Sección
04
Sintonizador de TV
(modo SRC)
Español
1 2
3
Sólo al usar esta unidad con el modo SRC,
puede realizar las siguientes operaciones a
través de la unidad principal.
Qué es cada cosa
Unidad principal (p. ej., AVHP5750DVD)
Utilice esta unidad (para recepción de programas de TV) con la unidad principal conectada.
Las instrucciones de este manual usan AVHP5750DVD como un ejemplo de unidad principal.
1 VOLUME
Presione estos botones para aumentar o
disminuir el volumen.
4
56
3 Botón SOURCE
Esta unidad se enciende al seleccionar una
fuente. Presione este botón para visualizar
todas las fuentes disponibles.
4 Botón BAND
Presione para seleccionar entre dos bandas
de TV, y cancelar el modo de control de funciones.
5 Botón A.MENU
Presione este botón para visualizar MENU.
6 Botones a/b/c/d
Presione para realizar la sintonización por
búsqueda manual. También se usan para
controlar las funciones.
2 Receptor de señales
Recibe las señales de un mando a distancia.
Es
27
Sección
04
Sintonizador de TV
(modo SRC)
Funcionamiento con
diferentes unidades
principales
Grupo 1 de unidades principales
Las siguientes unidades principales utilizan el
teclado táctil.
AVH-P7650DVD, AVH-P7550DVD, AVHP6650DVD, AVH-P6550DVD, AVH-P5750DVD
Grupo 2 de unidades principales
Al usar las siguientes unidades principales, la
operación es diferente a la de AVH-P5750DVD.
Las siguientes unidades utilizan el botón
FUNCTION o utilizan una SOFT KEY (tecla de
función variable).
KEH-P7035, FH-P9200MP, FH-P6200, FHP5000MP, FH-P4200MP, DVH-P5650MP, DVHP5050MP, DEH-P9650MP, DEH-P7650MP, DEHP7550MP, DEH-P6750MP, DEH-P6550, DEHP5750MP, DEH-P5650MP, DEH-P5550MP, DEHP4750MP, DEH-P4650MP, DEH-P4550, DEHP3550MP, DEH-P2650MP, DEH-P2550
Grupo 3 de unidades principales
Al usar las siguientes unidades principales, la
operación es diferente a la de AVH-P5750DVD.
Las siguientes unidades principales utilizan el
MULTI-CONTROL.
DEH-P8650MP, DEH-P7750MP, DEH-P1Y
Grupo 4 de unidades principales
Al usar las siguientes unidades principales, la
operación es diferente a la de AVH-P5750DVD.
Las siguientes unidades principales utilizan el
mando a distancia.
AVX-P7650DVD
28
Es
Tablas de compatibilidad
de funciones
Grupo 1 de unidades principales
Controles
Seleccionar el televisor como fuente
Presione SOURCE.
Seleccione una
banda
Toque BAND.
Sintonización preajustada
Toque a o b.
Sintonización manual
(paso a paso)
Toque c o d.
Sintonización por
búsqueda
Continúe tocando c o d.
Seleccionar una función
Toque A.MENU y luego
FUNCTION.
Grupo 2 de unidades principales
Controles
Seleccionar el televisor como fuente
Presione SOURCE.
Seleccione una
banda
Presione BAND.
Sintonización preajustada
Presione a o b.
Sintonización manual
(paso a paso)
Presione c o d.
Sintonización por
búsqueda
Presione y mantenga presionado c o d.
Memoria de presintonías
Presione y mantenga presionado 16.
Llamada directa
Presione 16.
BSSM
Presione FUNCTION (FUNC)
(A.MENU).
a/b
Lista de canales presintonizados
Presione FUNCTION (FUNC)
(A.MENU).
a/b/c/d
Sección
04
Sintonizador de TV
(modo SRC)
Grupo 3 de unidades principales
Controles
Presione SOURCE.
Seleccione una
banda
Presione BAND.
Sintonización preajustada
Pulse MULTI-CONTROL
hacia arriba o abajo.
Sintonización manual
(paso a paso)
Pulse MULTI-CONTROL
hacia la izquierda o derecha.
Sintonización por
búsqueda
Pulse y mantenga pulsado
MULTI-CONTROL hacia la izquierda o derecha.
Seleccionar una función
Use MULTI-CONTROL.
Grupo 4 de unidades principales
Controles
1
2
3
4
Español
Seleccionar el televisor como fuente
Uso del televisor
5
1 Icono de fuente
Muestra la fuente seleccionada.
2 Indicador de banda
Muestra la banda actual del sintonizador de
TV.
3 Indicador del número de presintonía
Muestra la memoria seleccionada.
Seleccionar el televisor como fuente
Presione SOURCE.
Seleccione una
banda
Presione BAND.
Sintonización preajustada
Mueva el joystick hacia arriba o hacia abajo.
Sintonización manual
(paso a paso)
Mueva el joystick hacia la izquierda o hacia la derecha.
5 Visualización de la lista de presintonías
Muestra la lista de presintonías.
Sintonización por
búsqueda
Mantenga el joystick hacia la
izquierda o hacia la derecha
durante cerca de un segundo, y luego suelte.
1 Toque la pantalla para visualizar el teclado táctil.
Seleccionar una función
Use el joystick.
4 Indicador de canal
Muestra el canal actual del sintonizador de
TV.
2 Toque BAND para seleccionar una
banda.
Toque BAND repetidamente hasta que visualice la banda deseada: TV1 o TV2.
3 Para seleccionar un canal presintonizado, tóquelo en la lista.
El canal presintonizado que ha seleccionado
está sintonizado.
Es
29
Sección
04
Sintonizador de TV
(modo SRC)
# Si no se visualiza la lista de canales, toque
LIST.
4 Para utilizar la sintonización manual,
toque brevemente c o d.
Los canales aumentan o disminuyen paso a
paso.
# También puede utilizar la sintonización manual, presionando el botón c o d.
5 Para utilizar la sintonización por búsqueda, toque continuamente c o d durante alrededor de un segundo y libere la
tecla.
El sintonizador explorará los canales hasta
que encuentre una emisora con señales de suficiente intensidad como para asegurar una
buena recepción.
# Se puede cancelar la sintonización por búsqueda tocando brevemente c o d.
# Si toca continuamente c o d, podrá saltar los
canales. La sintonización por búsqueda comienza inmediatamente después de que libera las teclas.
# También puede utilizar la sintonización por
búsqueda, presionando y manteniendo presionado el botón c o d.
Almacenamiento y llamada
de emisoras
Si se toca cualquiera de las teclas de ajuste
de presintonías P1P12, se pueden almacenar
con facilidad hasta 12 emisoras para llamarlas
con posterioridad tocando una sola tecla.
% Cuando encuentre la emisora que
desea almacenar en la memoria, toque continuamente una de las teclas de ajuste de
presintonías P1P12 hasta que el número
de presintonía deje de destellar.
El número seleccionado destellará en el indicador del número de presintonía y quedará ilu-
30
Es
minado. Se ha almacenado en la memoria la
emisora seleccionada.
La próxima vez que toque la misma tecla de
ajuste de presintonías, la emisora se llamará
de la memoria.
# Para cambiar entre P1P6 y P7P12, toque
o .
# Si no se visualiza el teclado táctil, toque la
pantalla para poder visualizarlo.
# Si no se visualizan las teclas P1P6 y P7P12,
toque LIST para poder visualizarlas.
Notas
! Se pueden almacenar en la memoria hasta 24
emisoras, 12 por cada una de las dos bandas
de TV.
! También se pueden usar a y b para llamar
las emisoras asignadas a las teclas de ajuste
de presintonías P1P12.
Sección
04
Sintonizador de TV
(modo SRC)
Introducción a las
funciones avanzadas del
sintonizador de TV
Almacenamiento
consecutivo de las emisoras
con señales más fuertes
1
1 Visualización de función
Muestra los nombres de las funciones.
1 Presione el botón A.MENU para visualizar MENU.
MENU aparece en el display.
2 Toque FUNCTION para visualizar los
nombres de las funciones.
Se visualizan los nombres de las funciones y
las que se pueden usar aparecen resaltadas.
# Para volver a la visualización anterior, toque
BACK.
# Para volver a la imagen de TV, toque ESC.
Nota
Si no se utiliza la función en unos 30 segundos,
el display volverá automáticamente a la imagen
de TV.
Español
% Toque BSSM en el menú de funciones
para activar la función BSSM.
BSSM comienza a destellar. Mientras BSSM
está destellando, las 12 emisoras con señales
más fuertes se almacenarán en orden ascendente desde el canal más bajo. Una vez finalizada la operación, BSSM desaparece del
display.
# Para cancelar el proceso de almacenamiento,
vuelva a tocar BSSM.
# También puede realizar esta operación presionando y manteniendo presionando CH CALL del
mando a distancia.
Nota
Al almacenar emisoras con la función BSSM, se
pueden reemplazar las emisoras que se almacenaron con P1P12.
Selección del grupo de áreas
Con esta unidad, los canales están presintonizados para cada grupo de áreas. Si selecciona
el grupo de áreas correspondiente a su área
de recepción, podrá ver múltiples canales.
1
Toque CNTRY en el menú de funciones.
2 Toque c o d para seleccionar el grupo
de áreas.
Toque c o d hasta que el grupo de áreas deseado aparezca en el display.
COUNTRY 1 (Canal CCIR)COUNTRY 2
(Canal IN)COUNTRY 3 (Canal CHN)
COUNTRY 4 (Canal Reino Unido)
COUNTRY 5 (Canal OIRT)COUNTRY 6
(Canal AUSTRALIA)-COUNTRY 7 (Canal SAF)
Es
31
Sección
04
Sintonizador de TV
(modo SRC)
Lista de grupos de áreas y
nombres de canales
Grupo de áreas
Display (nombre de área)
Área 1 (canal
CCIR)
SIN(Singapur), MAS(Malasia),
THA(Tailandia), IND(India), PAK
(Paquistán), UAE(EAU), BRN
(Bahrein), KUW(Kuwait), KSA
(Arabia Saudita), LIB(Libia), EGY
(Egipto), ISR(Israel)
Área 2 (canal IN)
INA(Indonesia)
Área 3 (canal
CHN)
CHN(China)
Área 4 (canal
Reino Unido)
HKG(Hong Kong)
Área 5 (canal
OIRT)
CIS(CEI)
Área 6 (canal
AUSTRALIA)
AUS(Australia)
Área 7 (canal
SAF)
SAF(Sudáfrica)
Notas
! Puede usar BSSM y otros métodos para memorizar las emisoras de cada uno de los grupos de áreas.
! Esta unidad no es compatible con canales en
Francia.
! Los canales y sistemas de transmisión pueden variar de área en área. Si no es posible la
recepción con el grupo de áreas correspondiente indicado arriba, intente la recepción
utilizando otro grupo de áreas.
32
Es
Sección
05
Sintonizador de TV
(modo STAND ALONE)
Uso del televisor
1 2
3
3 Para utilizar la sintonización manual,
presione brevemente c o d.
Los canales aumentan o disminuyen paso a
paso.
# También puede utilizar la sintonización manual, presionando el botón CHANNEL.
Sólo al usar esta unidad con el modo
STAND ALONE, puede realizar las siguientes operaciones a través de esta unidad.
Sólo el mando a distancia puede utilizar las siguientes funciones.
1 Indicador de banda
Muestra la banda actual del sintonizador de
TV.
2 Indicador del número de presintonía
Muestra la memoria seleccionada.
3 Indicador de canal
Muestra el canal actual del sintonizador de
TV.
4 Indicador de grupo de áreas
Muestra el grupo de áreas que se ha seleccionado.
1 Presione POWER para encender el relevisor.
2 Presione BAND para seleccionar una
banda.
Español
4
4 Para utilizar la sintonización por búsqueda, presione c o d y mantenga presionado durante aproximadamente un
segundo, y libere el botón.
El sintonizador explorará los canales hasta
que encuentre una emisora con señales de suficiente intensidad como para asegurar una
buena recepción.
# Se puede cancelar la sintonización por búsqueda presionando brevemente c o d.
# Si presiona c o d y mantiene presionado,
podrá saltar los canales. La sintonización por
búsqueda comienza inmediatamente después de
que libera el botón.
Almacenamiento
consecutivo de las emisoras
con señales más fuertes
La BSSM (memoria consecutiva de las mejores emisoras) permite almacenar automáticamente las 12 emisoras con las señales más
fuertes, ordenadas de manera ascendente
desde el canal más bajo.
% Presione CH CALL y mantenga presionado para activar BSSM.
BSSM comienza a destellar. Mientras BSSM
está destellando, las 12 emisoras con señales
más fuertes se almacenarán en orden ascendente desde el canal más bajo. Una vez finalizada la operación, BSSM desaparece del
display.
# Para cancelar el proceso de almacenamiento,
vuelva a presionar CH CALL y manténgalo
presionado.
Es
33
Sección
05
Sintonizador de TV
(modo STAND ALONE)
Selección del grupo de áreas
Con esta unidad, los canales están presintonizados para cada grupo de áreas. Si selecciona
el grupo de áreas correspondiente a su área
de recepción, podrá ver múltiples canales.
1 Presione MENU para visualizar el menú
de selección de área.
2 Presione c o d para seleccionar el
grupo de áreas.
Presione c o d hasta que el grupo de áreas
deseado aparezca en el display.
COUNTRY 1 (Canal CCIR)COUNTRY 2
(Canal IN)COUNTRY 3 (Canal CHN)
COUNTRY 4 (Canal Reino Unido)
COUNTRY 5 (Canal OIRT)COUNTRY 6
(Canal AUSTRALIA)-COUNTRY 7 (Canal SAF)
Lista de grupos de áreas y
nombres de canales
34
Notas
! Puede usar BSSM y otros métodos para memorizar las emisoras de cada uno de los grupos de áreas.
! Los canales y sistemas de transmisión pueden variar de área en área. Si no es posible la
recepción con el grupo de áreas correspondiente indicado arriba, intente la recepción
utilizando otro grupo de áreas.
Llamada de emisoras
Puede llamar fácilmente los canales presintonizados P1P12 almacenados por BSSM.
% Presione a o b para llamar los canales
presintonizados P1P12.
Grupo de áreas
Display (nombre de área)
Confirmación del canal
actual y otros ajustes
Área 1 (canal
CCIR)
SIN(Singapur), MAS(Malasia),
THA(Tailandia), IND(India), PAK
(Paquistán), UAE(EAU), BRN
(Bahrein), KUW(Kuwait), KSA
(Arabia Saudita), LIB(Libia), EGY
(Egipto), ISR(Israel)
Puede visualizar la información de recepción,
como el canal, la banda y la lista de canales
presintonizados.
! Sólo el mando a distancia puede utilizar
esta función.
Área 2 (canal IN)
INA(Indonesia)
Área 3 (canal
CHN)
CHN(China)
Área 4 (canal
Reino Unido)
HKG(Hong Kong)
Área 5 (canal
OIRT)
CIS(CEI)
Área 6 (canal
AUSTRALIA)
AUS(Australia)
Área 7 (canal
SAF)
SAF(Sudáfrica)
Es
% Presione CH CALL para visualizar la información de recepción.
Cada vez que se presiona CH CALL, cambian
los datos de información de recepción en el siguiente orden:
Información de canal actual (canal y banda)
Lista de canales presintonizadosLista de
áreasDesaparición de los datos de información de recepción
# Los datos de información de recepción se visualizan durante ocho segundos.
Apéndice
Información adicional
Especificaciones
Generales
Las especificaciones y el diseño están sujetos a
posibles modificaciones sin previo aviso debido a
mejoras.
Español
Fuente de alimentación nominal
..................................................... 14,4 V CC
(gama de tensión permisible: 12,0 14,4 V CC)
Sistema de conexión a tierra
..................................................... Tipo negativo
Consumo máximo de corriente
..................................................... 0,6 A
Dimensiones (An × Al × Pr)
..................................................... 172 × 30 × 150 mm
Peso ............................................... 0,7 kg
Nota
Sintonizador de TV
Canal de recepción/Sistema de TV
(Para cada grupo de países)
......................................................... Área 1 : (CCIR) : VHF 2 12
ch, UHF 21 69 ch
Área 2 : (IN) : VHF A H2 ch,
UHF 21 69 ch
Área 3 : (CHN) : VHF A K
ch, UHF 21 69 ch
Área 4 : (UK) : VHF R1 R12
ch, UHF 21 69 ch
Área 5 : (OIRT) : VHF 2 12
ch, UHF 21 69 ch
Área 6 : (AUSTRALIA) : VHF
0 11 ch, UHF 28 69 ch
Área 7 : (SAF) : VHF 4 11,
13 ch, UHF 21 69 ch
Sistema en color ...................... PAL/SECAMCompatible
Sensibilidad utilizable ........... 18 dBµ (75 W, Mono)
Señal a ruido de vídeo ........... Más de 37 dB (Entrada de
RF 59 dBµ, Pico blanco
100%)
Sensibilidad utilizable de 30 dB de señal a ruido de
vídeo .............................................. 45 dBµ
Entrada de antena .................. Diversidad de 4 ch (ø 3,5
mm en tipo miniconector)
Salida del display trasero
Vídeo .............................................. 1 Vp-p/75W (TV: Blanco
100% Modulado)
Sonido ........................................... 500 mVrms/Menos de 1kW
(TV: 100% Modulado)
Es
35
î
àüHÒ"Á
Ë(ªøåã,_cºÍ\¹ÕbË¥ÝXå
åÃ
è
Íhª½ 37
ºÝhÕÛ 37
2bû`á 37
Ë(KM
ܼ,_ 38
#¥DöK;6 38
ܼ,ªø 38
Ín®Uh 38
ÛÍ\! 38
Y§hK(Ý
39
Ýû` 39
(Y§h 39
ý
Y§h 40
vÖY§h 40
v(HÒÊ(DVD>_Y§h
B 40
v(HÒÊ(DVD>_Y§h
B 41
ûç¿hSRC!
ý 42
;_AVH-P5750DVD 42
(;_2LÍ\ 42
ý|¹h 43
;_D1 43
;_D2 43
;_D3 43
;_D4 43
Àû 44
X2¿(ãûú 44
Üûç¿hÍ\KË9 45
!X2á_ 7ãûú 45
xÇ0@D 45
0@Dh;S1 45
36
Zhtw
ûç¿hSTAND ALONE!
Àû 47
!X2á_ 7ãûú 47
xÇ0@D 47
0@Dh;S1 48
¿(ãûú 48
ºvM;SvÖ- 48
D Ç
< 49
À
01
è
Íhª½
Ëo:UÜ:&v6Ï¥vå
åÃ
,_ïu,}ÊK^Ê/&_(&2b¨(
ÕÛBNMo:UÀûÀîå¨f
ÀûÀîo:UÑO&o:ûUg
¹
NMo:UÀûÀîBËÊÊ(
hMn&ÉwK^Ê
2bû`á
(,_BËÙÅ_Õ}ÊÎ(*_Õ}
ÊÎB(,_ û`>û
-
1 Í\o:UKMËt±,ª
ø
2 Ë,ªøÝX¼¨KïÖKUåå
±Í\e_ÊhÇ
3 Ëy%è,ªø-@fJ&´<
ug:Í\
4 Öº*±ã,ªøKMËÿv
Í\,_
5 Ëÿo:UÝ(1¨ø_Ú
2qÿÊûUÍ\ûqhÝn
ì#ÊqªfJÈI'ý3q
ÿø_hÕÛMn
6 cÊgvÖMö #o:UÉc
hÕÛèÍ\,_Ào:
UúþðãËÊ\}\¿t
7 ÕÊBËû}h6å|
EBh6*c}*-ó
8 ÿ(ÕÛB(-43_
9 ººÝhd^ÉwK^ÊÊ\
bLÛ&GÐý«(
10 ÿo:UóÏ¿NØåô¨!Õ
}0ʤÊ%ÊÕ\
Ëÿo:U>n(ïýqÿÕÛá
èMn
! (жÞsø_åX¢å(
ÊgNo:UÀqϦUÕ(æL
#Õ0¹ÅÕg¦É(
,_ûý
fJ
Ëÿ(*MACCMnÊ
fJ
! ËÿêLÝîo:Uå*û#}ÊMö¹bùwøÜ
å\Ws¿6Ýîo:UG
|qªôøûvÖE
ºÝhÕÛ
fJ
! û¥ãUú rÚ-(¼u,Ê
\>ÀKÅv#¥óK^ÊÜû
trÚå#¥(vUÍi(
Õ&ô´Íº«·³_hÞ
! ºM EåÊUÍi(Õ
¨ªÿ(ÕÊB(Mnûý&
Zhtw
37
À
02
Ë(KM
ܼ,_
Ã
! Ëÿ,_¥ø²ÔøûEï1d|
d²Ô¥øïô,_×
YÊN±
! Ë,ªøÝX¼¨KïÖKUåå
±Í\e_Êè
! ËÙÅÝ(ivóÏåý}Ê
rÿº
! Ëè,_2n
! û`*¥ûÏ(-¶«
¹»ÅÍ°è
! ,_!Õc8å\Ë·F1Ñ
HÒ
ÙÙok
,_/ >ûç¿h(¼¥6û
_
(AV-BUSvæ.o:UM(ï¹
¿¨ÀûÀîÜAV-BUSsÅËÃ
,_ݪø
,_REAR OUTﹿ¨(o:U
æ.
ÀûÀî
ܼ,ªø
,_w ûØýåºÝ¥6H
Í\'ýñs@ýGºáïý¹¿
(-Fv-x*ê6ª,(
ªø©¨E|î,_'ýr
s}º«×
úp¨(Ë(,_KMH,ª
øvýåÊøÜÍ\$ºÍ/
±&uª,ªø-fJÃ
Ín®Uh
RESETï®UhÍnºvË-
®Uh(åÅbÅÍn
! Ý,_!(KM
! ,_!Õc8å\
! vo:U
úþp8cº
oB
! v-,_
Í\!ÜMnB
% (FvÖ)åwÓRESET
#¥DöK;6
,_|¹PAL/SECAM6(è-#¥
ó,_REAR OUTBr-ÙÅ|¹ø
;6&GqÏïý!Õc8
þ
! ÀûÀîKMËÙÅ\bÕÛ&Ê
Ê(h4@
! (ÕÛN-ÀûÀî^8qª&ï
ý ¤E
! ,_REAR OUT(¼#¥o:U
X¢ïÀûÀî
ÿo:UÝ(ø_ÕÛBï0û
ÀîMn
38
Zhtw
RESET
è
¨Ín®Uh¶ãûðvÖÇ
«d&,_b©ºË-
ÛÍ\!
,_3.Í\!SRC : OSD OFF!
SRC : OSD ON!åÊSTAND ALONE!
Ë9Ú#¥ó,_DöÛ!
À
02
Ë(KM
SRC : OSD OFF!
! (IP-BUS8eïHÒ;_
! (,_(o:U
OSD¢Uo:
:
SRC : OSD ON!
! (IP-BUS8eïHÒ;_
! (,_(o:U
OSD¢Uo:
:
STAND ALONE!
! (RCA;8eïo:U
% Ë(As
Ü
-ºr
ÛÍ\!
fJ
Ëû``âRåû`«vËËs
1«
Ã
-
! ËÅ( ÀCR2025 (3 V)ðû`
! Y§hó (BËÖúû`
! Ëÿû`EûvÆ㠱ļk
-
! Ëÿ(ÑlåwÍ\û`
! Ëÿ(ÑlPÝXû`
! úþû`²ËY§h¹íè&
Ý
°û`
! U(Nû`BËuª´´0@
?Õ°lqDT
(Y§h
Y§hWMb2LÍ\
Í
! ÛËÍn®Uh
Y§hK(Ý
! ËÿY§hÝX(Ø«öô}I
! Y§h(ô}Iïý!Õc8å\
! ËÿY§h=(0
&Gïý
a(^ʹK
Ýû`
Y§hÌÑúû`§6cºcu
u¹Òeû`
Zhtw
39
À
03
ý
3
1
4
2
5
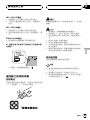
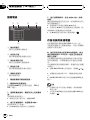
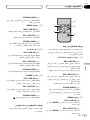
Y§h
,_D6Y§h;X¢((
BËY§É
1 CH CALL
SRC : OSD ON!
vxÖû\º>Bvnû
SFxÖû\º>B
Mo:U
o:;SÇ
SRC : OSD OFF!
vxÖû\º>Bvnû
SFxÖû\º>B
o:U
o:;SÇ
STAND ALONE!
ro:vM;SvÖ-,48
ºvM;SvÖ-
2 BAND
SRC : OSD ON!
*(_ï(;_
BAND
SRC : OSD OFF!
*(_ï(;_
BAND
STAND ALONE!
r(2û;6xÇ&ïÖ
ý§6!
3 MENU
SRC : OSD ON!
r(Mo:U
o:x®kb
SRC : OSD OFF!
40
Zhtw
r(o:U
o:x®kb
STAND ALONE!
ro:0@D-kb,47
x
Ç0@D
4 a/b/c/d
SRC : OSD ON!
r2LKÕ¿;-¿;_
ï(\§6ý
SRC : OSD OFF!
r2LKÕ¿;-¿;_
ï(\§6ý
STAND ALONE!
r2LKÕ¿;-¿;
5 POWER
SRC : OSD ON!
v*xÖû\º>BrÜ
o:U
SRC : OSD OFF!
v*xÖû\º>BrÜ
o:U
STAND ALONE!
rÜ,_
vÖY§h
¨_ï(@ðY§h2LÍ\
v(HÒÊ(DVD>_Y§hB
v(SDV-P7, AVX-P7300DVD, XDV-P9, XDVP9 IID6Y§hB
1 r
v(STAND ALONE!,48
ºv
M;SvÖ-(,_Br
o:vM;SvÖ- Or
ïÜBSSM
2 PLAY/PAUSEf
ro:0@D-kb,47
x
Ç0@D
À
03
ý
3 Y§hÍ\!Ü
Í\ûBËÙÅY§hÍ\!Ü
-0TVMn
v(HÒÊ(DVD>_Y§hB
v(AVH-P7650DVD, AVH-P7550DVD, AVHP6650DVD, AVH-P6550DVDD6Y§hB
1 1 6
rïô¥xÇ;S
-
2 Í1F
ûÕr2LKÕ¿;åÊ-¿;
®Êr¿úx®kbv(
STAND ALONE!(,_B®Êr
o:0@D-kbB_ï(\§6
ý
3 Y§hÍ\!Ü
Í\ûBËÙÅY§hÍ\!Ü
-0TVMn
Zhtw
41
À
04
ûç¿hSRC!
1 2
3
Åv(SRC(,_B¨MïN;_÷
LåÍ\
ý
;_AVH-P5750DVD
Ë(#¥;_Í\,_(¼¥6û
_,(ªø-:åAVH-P5750DVD
;_º
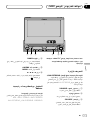
1 VOLUME
rï¿Ø¿NóÏ
2 á_¥6h
¥6Y§há_
3 SOURCE
xÇ >ï_,_rï(
@ï(>Kª°Û
42
Zhtw
4
56
4 BAND
r(2û;6xÇ&ïÖ
ý§6!
5 A.MENU
rïo:MENU
6 a/b/c/d
r2LKÕ¿;_ï(\§6
ý
(;_2LÍ\
;_D1
å;_wøxuÍ\
AVH-P7650DVD, AVH-P7550DVD, AVH-P6650DVD,
AVH-P6550DVD, AVH-P5750DVD
;_D2
v(å;_BÍ\(AVH-P5750DVD
å;_wFUNCTIONÍ\SOFT KEY
Í\
À
04
ûç¿hSRC!
KEH-P7035, FH-P9200MP, FH-P6200, FHP5000MP, FH-P4200MP, DVH-P5650MP, DVHP5050MP, DEH-P9650MP, DEH-P7650MP, DEHP7550MP, DEH-P6750MP, DEH-P6550, DEHP5750MP, DEH-P5650MP, DEH-P5550MP, DEHP4750MP, DEH-P4650MP, DEH-P4550, DEHP3550MP, DEH-P2650MP, DEH-P2550
;_D3
v(å;_BÍ\(AVH-P5750DVD
å;_wMULTI-CONTROLÍ\
DEH-P8650MP, DEH-P7750MP, DEH-P1Y
ý|¹h
;_D1
§6Í\
xÇû\º>
SOURCE
xÇ
øxBAND
âµ
-¿;
KÕ¿;e2
øxcd
Ocd
xÇý
øxA.MENU6øx
FUNCTION
;_D2
§6Í\
xÇû\º>
SOURCE
xÇ
BAND
-¿;
¿;
Ocd
-¶
O16
ô¥¿ú
16
BSSM
FUNCTION
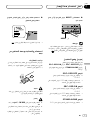
(A.MENU)
a/b
(FUNC)
n;Sh
FUNCTION
(A.MENU)
a/b/c/d
(FUNC)
;_D3
§6Í\
xÇû\º>
SOURCE
xÇ
BAND
âµ
-¿;
¨MULTI-CONTROL
KÕ¿;e2
æó¨MULTI-CONTROL
¿;
æó¨OMULTI-CONTROL
xÇý
(MULTI-CONTROL
øxab
¿;
âµ
cd
-
;_D4
v(å;_BÍ\(AVH-P5750DVD
å;_Y§hÍ\Ký
AVX-P7650DVD
§6Í\
KÕ¿;e2
;_D4
§6Í\
xÇû\º>
SOURCE
xÇ
BAND
âµ
-¿;
ûÕÍ1F
KÕ¿;e2
æóûÕÍ1F
¿;
Í1Fú(ætót
1Ò6
xÇý
(Í1F
ab
Zhtw
43
À
04
ûç¿hSRC!
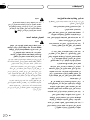
Àû
1
2
3
4
5 2L¿;BOcd' Ò
>
¿çhÏ;Sôó~0 6}H}
7á_ãÀî
# ¿;ïNëøxcdÖ
# OcdGï(ã;SKó
¿;(u>B_Õ
# cd#ï÷L¿;
5
1 >:
o:òxÇ>
2 âµ:h
o:ûç¿h6}âµ
3 -_¼:h
o:òxÇ-_¼
4 ;S:h
o:ûç¿h6;S
5 nho:
o:nh
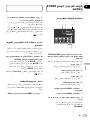
1
øx¢Uo:øxu
2 øxBANDxÇâµ
ÍøxBANDôó@ âµTV1
TV2o:
3 xÇn;SBøxh
n;
S
@xn;Ss¿e
# v;Sho:BËøxLIST
4 2LKÕ¿;Bëøxcd
;S
ûÕ
# cd#ï÷LKÕ¿;
44
Zhtw
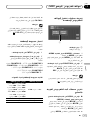
X2¿(ãûú
øx-¿;uP1P12-ûU ïX2 12ãûúåê øx
usïv¿ú
% v~02X2(¶Ô-ûúBO
-¿;uP1P12v- ôóv-_
¼\b
òøx_¼(-_¼:h-
6®w@xûúX2(¶Ô
-
åøxr-¿;uBûús¶Ô
-¿ú
# (P1P6P7P12KÛBËøx # vøxu*o:Bïøx¢Uvo
:
# P1P6P7P12o:BïNøxLISTv
o:
è
! ¶Ô- ïX224ûúiû;
612
! ¦ï(ab¿ú-¿;uP1P12
ûú
À
04
ûç¿hSRC!
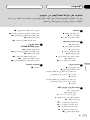
Üûç¿hÍ\KË9
xÇ0@D
,_º0@D-;SxÇ´0@(
0@Dï¥6;S
1
øxýx®
CNTRY
2 øxcdxÇ0@D
øxcdôó@ 0@D(o:U-úþ
COUNTRY 1CCIR;SCOUNTRY 2IN
;SCOUNTRY 3CHN;S
COUNTRY 4ñû;SCOUNTRY 5
OIRT;SCOUNTRY 6³')û
;SCOUNTRY 7SAF;S
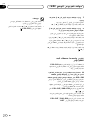
1
1 ýo:
o:ý1
0@Dh;S1
0@D
o:0@1
0@1CCIR;
S
SIN° aMAS¬
THAðINDp
¦PAKôú¯fUAE
?É/o'lBRN
ôKUWÑy
KSAÏ0?É/LIB
)ÔEGYÃÊ
ISRår
2 øxFUNCTIONo:ý1
ý1o:BïÍ\1Ø®o:
# ÔÞM o:kbBËøxBACK
# ÔÞûÏBËøxESC
è
(30ÒKgÍ\rýo:UêÕ
ÔÞûÏ
!X2á_
7ãûú
% øxýx®
BSSMï_BSSM
BSSMËvBSSMB12á_
7ãûú N;Sw!X2X
2P_BBSSM1
# ÖX22BË!øxBSSM
# OY§h
CH CALL#ï÷LdÍ\
è
(BSSMX2ãûúïýÿÛ(P1P12òX
eãûú
-
1 A.MENUo:MENU
MENU(o:U-úþ
0@2IN;S
INAp¦<
0@3CHN;
S
CHN-
0@4ñû
;S
HKG/
0@5OIRT;
S
CISCIS
0@6³')
û;S
AUS³')
0@7SAF;
S
SAFW^
è
! ¨ïå(BSSMvÖ¹Õãûú¶
ó0@D
! ,_Õû;S|¹
Zhtw
45
À
04
ûç¿hSRC!
! ã;Sã6ïýà0@
p(å
úÐ0@D!Õ¥
6Ëf(vÖ0@D
46
Zhtw
À
05
ûç¿hSTAND ALONE
!
Àû
!X2á_
1 2
3
7ãûú
BSSM s¥6Hûð!¶A1¨å
_71êÕ2X12
_ 7ã
ûð
% OCH CALL_BSSM
BSSMËvBSSMB12á_
7ãûú N;Sw!X2X
2P_BBSSM1
# ÖÝX2BË!OCH CALL
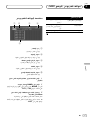
4
1 âµ:h
o:ûç¿h6}âµ
2 -_¼:h
o:òxÇ-_¼
3 ;S:h
o:ûç¿h6;S
,_º0@D-;SxÇ´0@(
0@Dï¥6;S
1
MENUo:0@xÇx®
-
Åv(STAND ALONE(,_B¨Mï
N,_÷LåÍ\
Åï(Y§hÍ\åý
xÇ0@D
2 cdxÇ0@D
cdôó@ 0@D(o:U-úþ
COUNTRY 1CCIR;SCOUNTRY 2IN
;SCOUNTRY 3CHN;S
COUNTRY 4ñû;SCOUNTRY 5
OIRT;SCOUNTRY 6³')û
;SCOUNTRY 7SAF;S
4 0@D:h
o:òxÇ0@D
1
POWERïÜû
2
BANDxÇâµ
3 2LKÕ¿;Bëcd
;S
ûÕ
# CHANNEL#ï÷LKÕ¿;
4 2L¿;BËOcd' Ò
~>
¿çhÏ;Sôó~0 6}H}
7á_ãÀî
# ¿;ïNëcdÖ
# OcdGï(ã;SKó
¿;(>B_Õ
Zhtw
47
À
05
ûç¿hSTAND ALONE
!
0@Dh;S1
0@D
o:0@1
0@1CCIR;
S
SIN° aMAS¬
THAðINDp
¦PAKôú¯fUAE
?É/o'lBRN
ôKUWÑy
KSAÏ0?É/LIB
)ÔEGYÃÊ
ISRår
0@2IN;S
INAp¦<
0@3CHN;
S
CHN-
0@4ñû
;S
HKG/
0@5OIRT;
S
CISCIS
0@6³')
û;S
AUS³')
0@7SAF;
S
SAFW^
è
! ¨ïå(BSSMvÖ¹Õãûú¶
ó0@D
! ã;Sã6ïýà0@
p(å
úÐ0@D!Õ¥
6Ëf(vÖ0@D
¿(ãûú
¨ï¿úBSSM2X-;SP1P12
% ab¿ú-;SP1P12
ºvM;SvÖ-
¨ïåo:;Sâµn;Shd^
¥6Ç
! Åï(Y§hÍ\dý
48
Zhtw
% CH CALLo:¥6Ç
Ï !CH CALLåo:¥6Ç
vM;SÇ
;Sâµn;Sh
0@h¥6Ç
1
# ¥6Ç
o:kÒ
D
D Ç
<
,
Mû ......................................14.4 V DC
¹1ûÓÄ 12.0
14.4 V DC
¥0ûq ...................................... u
'ûA ............................0.6 A
:øì × Ø × ñ ........172 × 30 × 150 mm
ÍÏ ................................................0.7 l¤
ûç¿h
-
¥6;Sû6
(¼¶D
.........................................................0@1CCIRVHF 2
-12chUHF 21-69 ch
0@2INVHF A-H2
chUHF 21-69 ch
0@3CHNVHF A-K
chUHF 21-69 ch
0@4UKVHF R1R12 chUHF 21-69 ch
0@5OIRTVHF 2
-12 chUHF 21-69 ch
0@6AUSTRALIA
VHF 0-11 chUHF 28-69 ch
0@7SAFVHF 41113chUHF 21-69 ch
riûq ......................................PAL/SECAM|¹
HHO¦ .................................18dBµ75W®rS
;S/N ........................................
N37dB59 dBµ RF8
e}rð<100%
;S/N 30dBHHO¦ .....45dBµ
)Ú8e ......................................4;Sh')Ú 3.5
mm®Ò-
o:U8ú
; ................................................1 Vp-p/75 Wû}r
100%¿6
ró ................................................500 mVrmsN¼1kWû
100%¿6
âw ................................................945 nm
è
à"Á92<Ê-åôUæL
å
Zhtw
49
±π
Ar
”dNH«
WOU{ô« UuKF*«
u½u ¨ÂË« ∑µ® q³#¹œ ËdJO ±∏ ÆÆÆ UN«bX²Ý« sJL*« WOÝU#(«
©©ÍœUŠ«®
u¹bOH« …—uB ZO−C«Ø…—Uýô« W³#½
ËdJO µπ® q³#¹œ ≥∑ ‚u ÆÆÆÆÆÆÆÆÆÆÆÆÆÆÆÆÆÆÆÆÆÆÆÆÆÆÆÆ
WLI« ¨RF u¹œ«d« Ãd) q³#¹œ
©•±∞∞ iOÐô«
ZO−{Ø…—Uý« W³#M UN«bX²Ý« sJL*« WOÝU#(«
u¹bOH« —uB q³#¹œ ≥∞
q³#¹œ ËdJO ¥µ ÆÆÆÆÆÆÆÆÆÆÆÆÆÆÆÆÆÆÆÆÆÆÆÆÆÆÆÆ
f³I0 “«dÞ® WŽuM² «uM ¥ ÆÆÆÆÆÆÆÆÆÆÆÆÆÆÆÆÆ wz«uN« qšœ
©3 ≥\µ dDIÐ wMO
WOHK)« ÷dF« WýUý Ãdš
ÂË√ ∑µØWL≠WL Xu ±\∞ ÆÆÆÆÆÆÆÆÆÆÆÆÆÆÆÆÆÆÆÆÆÆ u¹bOH«
•±∞∞ iOÐô« ∫Êu¹eHKð®
©‰b²F
w …—Ëœ Xu wKO µ∞∞ ÆÆÆÆÆÆÆÆÆÆÆÆÆÆÆÆÆÆÆÆÆÆ uB«
bŠ«Ë ÂË√uKOG s q«ØWIOb«
•±∞∞ iOÐô« ∫Êu¹eHKð®
©‰b²F
UH«u*«
WUŽ
Xu ±¥[¥ dýU³ —UOð ÆÆÆÆÆÆÆÆÆÆÆ …—bI*« WUD« —bB
∫ tÐ ÕuL#*« WODuH« Èb®
©dýU³ —UOð Xu ±¥\¥≠ ±≤\∞
VUÝ “«dÞ ÆÆÆÆÆÆÆÆÆÆÆÆÆÆÆÆÆ w{—ô« ÂUE½
dO³« ∞\∂ ÆÆÆÆÆÆÆÆ WUDK „öN²Ý« vB«
∫©oLF« ™ ŸUHð—ô« ™ ÷dF«® œUFÐô«
3 ±µ∞ ™ ≥∞ ™ ±∑≤ ÆÆÆÆÆÆÆÆÆÆÆÆÆÆÆÆÆÆÆÆÆÆÆÆÆÆÆÆ
rGG ∞\∑ ÆÆÆÆÆÆÆÆÆÆÆÆÆÆÆÆÆÆÆÆÆÆÆÆ Ê“u«
w½u¹eHK²« n«u*«
w½u¹eHK²« ÂUEM«Ø‰U³I²Ýô« «uM
©WËœ WŽuL− qJ®
«uM ∫(CCIR) ∫± WIDM*« ÆÆÆÆÆÆÆÆÆÆÆÆÆÆÆÆÆÆÆÆÆÆÆÆÆÆÆÆ
«uM ¨VHF ±≤≠≤
UHF ∂π≠≤±
H2≠A «uM ∫(IN) ∫≤ WIDM*«
UHF ∂π≠≤± «uM ¨VHF
WOÐdF«
WEŠö
÷dG o³# —UFý« ÊËbÐ dOOG²K W{dŽ rOLB²«Ë UHU«u*«
Æd¹uD²«
≠A «uM ∫(CHN) ∫≥ WIDM*«
UHF ∂π≠≤± «uM ¨VHF K
≠R1 «uM ∫(UK) ∫¥ WIDM*«
∂π≠≤± «uM ¨VHF R12
UHF
≠≤ «uM ∫(OIRT) ∫µ WIDM*«
∂π≠≤± «uM ¨VHF ±≤
UHF
∫(AUSTRALIA)∫∂ WIDM*«
«uM ¨VHF ±±≠dHU «uM
UHF ∂π≠≤∏
≠¥ «uM ∫(SAF) ∫∑ WIDM*«
∂π≠≤± «uM ¨VHF ±≥ \±±
UHF
‰UÐ Ê«uô« wUE½ l o«u²¹ ÆÆÆÆÆÆÆÆÆÆÆÆÆÆÆÆÆÆ Ê«uô« ÂUE½
SECAM ÂUJOÝØPAL
Ar
±∏
r%I«
STAND l?{u«® w½u¹eHKð n«u
©ALONE
∞µ
w?½u¹eHK²« Y³« UD× ¡UŽb²Ý«
—«—“ô« vKŽ UND³{ o³#*« «uMI« ¡UŽb²Ý« WuN#Ð pMJ1
UD;« qC« …dG«– WHOþË WDÝ«uÐ UNM¹eXð - w²«Ë P12-P1
Æ(BSSM) lÐU²²UÐ
o³%*« «uMI« ¡UŽb²Ýô ∞ Ë√ 5 —e« jG{« ÆP12-P1 —«—“ô« vKŽ UND³{
ŸU?{Ë«Ë WOU(« …UMI« s bHQ²«
Èdšô« j³C«
«uMI« WLzUË Włu*« ¨…UMI« q¦ ‰U³I²Ýô« UuKF ÷dŽ pMJ1
ÆUND³{ o³#*«
ÆjI bFÐ sŽ rJײ« …bŠË WDÝ«uÐ WHOþu« Ác¼ qOGAð sJ1 •
UuKF ÷dF CH CALL —e« jG{« ƉU³I²Ýô«
‰U³I²Ýô« UuKF ÷dFOÝ CH CALL —eK tDG{ qG
∫wU²« VOðd²UÐ
o³#*« «uMI« WLzU ≠ ©Włu*«Ë …UMI«® WOU(« …UMI« UuKF
‰U³I²Ýô« UuKF wH²X²Ý ≠ WIDM*« WLzU ≠ UND³{
Æw½«uŁ WO½ULŁ …b* ‰U³I²Ýô« UuKF ÷dŽ r²OÝ ÆWIDM*« WŽuL− —UO²šô 3 Ë√ 2 —e« jG{« ≤
vKŽ WÐužd*« WIDM*« WŽuL− dNEð v²Š 3 Ë√ 2 —e« jG{«
ÆWýUA«
COUNTRY 2 —©CCIR «uM® COUNTRY 1
— ©CHN «uM® COUNTRY 3—©IN «uM®
COUNTRY 5 —©U.K. «uM® COUNTRY 4
«uM® COUNTRY 6 — ©OIRT «uM®
©SAF «uM® COUNTRY 7 — ©AUSTRALIA
«u?MI« ¡ULÝ«Ë WIDM*« WŽuL− WLzU<
©WIDM*« rÝ«® ÷dF«
MAS ¨©…—uUGMÝ® SIN
¨©b½ö¹Uð® THA ¨©U¹eOU®
PAK ¨©bMN«® IND
«—Uô«® UAE ¨©ÊU²#GUЮ
BRN ¨©…bײ*« WOÐdF«
¨©X¹uJ«® KUW ¨©s¹d׳«®
WOÐdF« WJKL*«® KSA
¨©UO³O® LIB ¨©W¹œuF#«
©qOz«dÝ«® ISR ¨©dB® EGY
©UO#O½Ëb½«® INA
©5B«® CHN
©!uG !u¼® HKG
©UOÝË—® CIS
©UO«d²Ý«® AUS
©UOI¹d« »uMł® SAF
WIDM*« WŽuL−
©CCIR «uM® ± WIDM*«
©IN «uM® ≤ WIDM*«
©CHN «uM® ≥ WIDM*«
©U.K. «uM® ¥ WIDM*«
©OIRT «uM® µ WIDM*«
©AUSTRALIA «uM® ∂ WIDM*«
©SAF «uM® ∑ WIDM*«
UEŠö
lÐU²²UÐ UD;« qC« …dG«– WHOþË Â«bX²Ý« pMJ1 •
qG w w½u¹eHK²« Y³« UD× kH( Èdš« ‚dÞË (BSSM)
ÆWIDM WŽuL−
s w½u¹eHK²« Y³« WLE½«Ë w½u¹eHK²« Y³« «uM nK²Xð b •
w½u¹eHK²« Y³« ‰U³I²Ý« sJ1 ô ÊUG «–« ÆÈdš« v« WIDM
…—uGc*« WLzUI« w …œułu*«Ë W³ÝUM*« WIDM*« WŽuL− WDÝ«uÐ
WIDM WŽuL− «bX²ÝUÐ w½u¹eHK²« Y³« ‰U³I²Ý« ‰ËUŠ ¨ÁöŽ«
ÆÈdš«
±
Ar
r%I«
STAND l?{u«® w½u¹eHKð n«u ∞µ
©ALONE
2 —e« jG{ X³ŁË jG{« ¨Y׳UÐ WH«u ¡«dłô ¥
ÆÁ—dŠ rŁ …bŠ«Ë WO½UŁ w«u( 3 Ë√
…—uBÐ Íu w½u¹eHKð YÐ b−¹ v²Š «uMI« `#0 n«u*« ÂuIOÝ
ÆbOł ‰U³I²Ý« ¡UDŽô WOUG
Æ…eOłË W¼d³ 3 Ë√ 2 —e« fLKÐ Y׳UÐ WH«u*« ¡UG« pMJ1 «uM wDXð pMJLOÝ 3 Ë√ 2 —e« jG{ X³ŁË XDG{ «–« —d% w²« WE×K« w Y׳UÐ WH«u*« WOKLŽ √b³²Ý Æw½u¹eHK²« Y³«
Æ—«—“ô« UNO
W?¹uI« w½u¹eHK²« Y³« UD× s¹eSð
lÐU²²UÐ
s¹eX²Ð (BSSM) lÐU²²UÐ UD;« qC« …dG«– WHOþË p `L#ð
q« s VOðd²Ð WOJOðUuðË« …—uBÐ w½u¹eHKð YÐ UD× ±≤ Èu«
ÆU¼öŽ« v« «uMI« ÂU—«
STAND ALONE l{uÐ “UN'« «c¼ «bS²Ý« bMŽ
WDÝ«uÐ WOU²« qOGA²« UOKLŽ ¡«dł« pMJ1 ¨jI
Æ“UN'« «c¼
ÆjI bFÐ sŽ rJײ« …bŠË WDÝ«uÐ WOU²« nzUþu« qOGAð sJ1
Włu*« dýR 1
ÆUNOKŽ w½u¹eHK²« n«u*« WH«u - Włu Í√ 5³¹
tD³{ o³%*« r<d« dýR 2
ÆÁ—UO²š« - tD³{ o³# r— Í√ 5³¹
WOÐdF«
l{Ë qOGA² tDG{ X³ŁË CH CALL —e« jG{« Æ(BSSM) lÐU²²UÐ UD;« qC« …dH«–
iu²¹ ULMOÐ ÆWýUA« vKŽ iu²UÐ BSSM ÷dŽ √b³OÝ
w½u¹eHKð YÐ UD× Èu« ±≤ s¹eXð r²OÝ BSSM ÷dF«
¨WOKLF« ¡UN²½« bMŽË ÆU¼öŽ« v« «uMI« ÂU—« q« s VOðd²Ð
ÆWýUA« sŽ BSSM ÷dF« wH²XOÝ
tDG{ X³ŁË CH CALL —e« jG{« ¨s¹eX²« WOKLŽ ¡UGô ÆÈdš« …d
w?½u¹eHK²« n«u*« …b¼UA
…UMI« dýR 3
ÆUNOKŽ w½u¹eHK²« n«u*« WH«u - …UM Í√ 5³¹
W?IDM*« WŽuL− —UO²š«
ÆWIDM WŽuL− qG «uMI o³#*« j³C« - ¨“UN'« «c¼ WDÝ«uÐ
«uM ‰U³I²ÝUÐ p²IDM* WIDM*« WŽuL: `O×B« —UO²šô« `L#¹
Æ…œbF²
ÆWIDM*« —UO²š« WLzU< ÷dF MENU —e« f*«
±
WIDM*« WŽuL− dýR 4
ÆU¼—UO²š« - WIDM WŽuL− Í√ 5³¹
n«u*« qOGA² POWER —e« jG{« ±
Æw½u¹eHK²«
ÆWłu —UO²šô BAND —e« jG{«
≤
W¼d³ 3 Ë√ 2 —e« f*« ¨W¹Ëb¹ WH«u ¡«dłô ≥
Æ…eOłË
ÆWł—œ Wł—œ qHÝô« Ë√ vKŽô« v« «uMI« „dײ²Ý
—e« jGCÐ Y׳UÐ WH«u*« ¡«dł« UC¹√ pMJ1 ÆCHANNEL
Ar
±∂
r%I«
©SRC l?{u«® w½u¹eHKð n«u
∞¥
©WIDM*« rÝ«® ÷dF«
©!uG !u¼® HKG
©UOÝË—® CIS
©UO«d²Ý«® AUS
©UOI¹d« »uMł® SAF
WIDM*« WŽuL−
©U.K. «uM® ¥ WIDM*«
©OIRT «uM® µ WIDM*«
∂ WIDM*«
©AUSTRALIA «uM®
©SAF «uM® ∑ WIDM*«
UEŠö
lÐU²²UÐ UD;« qC« …dG«– WHOþË Â«bX²Ý« pMJ1 •
qJ w½u¹eHK²« Y³« UD× kH( Èdš« ‚dÞË (BSSM)
ÆWIDM WŽuL−
ÆWO#½dH« «uMI« ÂUE½ l “UN'« «c¼ o«u²¹ ô •
s w½u¹eHK²« Y³« WLE½«Ë w½u¹eHK²« Y³« «uM nK²Xð b •
w½u¹eHK²« Y³« ‰U³I²Ý« sJ1 ô ÊUG «–« ÆÈdš« v« WIDM
…—uGc*« WLzUI« w …œułu*«Ë W³ÝUM*« WIDM*« WŽuL− WDÝ«uÐ
WIDM WŽuL− «bX²ÝUÐ w½u¹eHK²« Y³« ‰U³I²Ý« ‰ËUŠ ¨ÁöŽ«
ÆÈdš«
±µ
Ar
r%I«
©SRC l?{u«® w½u¹eHKð n«u
—e« jG{ XO³¦ðË jGCÐ WOKLF« Ác¼ ¡«dł« UC¹« pMJ1 ÆbFÐ sŽ rJײ« …bŠË vKŽ œułu*« CH CALL
∞¥
n?«u*« qOGAð UOKLFÐ n¹dFð
WbI²*« w½u¹eHK²«
WEŠö
…dG«– WHOþË WDÝ«uÐ w½u¹eHK²« Y³« UD× s¹eXð qLF¹ b
w½u¹eHK²« Y³« UD× ‰«b³²Ý« v« (BSSM) UD;« qC«
ÆP12—P1 —«—“ô« «bX²ÝUÐ UI³# UN²½eš w²«
W?IDM*« WŽuL− —UO²š«
ÆWIDM WŽuL− qG «uMI o³#*« j³C« - ¨“UN'« «c¼ WDÝ«uÐ
«uM ‰U³I²ÝUÐ p²IDM* WIDM*« WŽuL: `O×B« —UO²šô« `L#¹
Æ…œbF²
ÆnzUþu« WLzU< w CNTRY —e« f*«
±
nzUþu« ÷dŽ 1
ÆnzUþu« ¡ULÝ√ 5³¹
ÆMENU WLzUI« ÷dF A.MENU —e« jG{« ±
ÆWýUA« vKŽ MENU ÷dF« dNEOÝ
œułu*« VFK« i³I vKŽ dIMUÐ MENU ÷dŽ UC¹√ pMJ1 ÆbFÐ sŽ rJײ« …bŠË vKŽ
ÆnzUþu« ¡ULÝ√ ÷dF FUNCTION —e« f*« ≤
ÆUN«bX²Ý« sJL*« nzUþu« ¡wC²ÝË nzUþu« ¡ULÝ√ ÷dŽ r²OÝ
ÆBACK —e« f*« ¨oÐU#« ÷dFK …œuFK ÆESC —e« f*« ¨WO½u¹eHK²« …—uB« ÷dF …œuFK WOÐdF«
ÆWIDM*« WŽuL− —UO²šô 3 Ë√ 2 —e« f*« ≤
vKŽ WÐužd*« WIDM*« WŽuL− dNEð v²Š 3 Ë√ 2 —e« f*«
ÆWýUA«
«uM® COUNTRY 2—©CCIR «uM® COUNTRY 1
COUNTRY 4—©CHN «uM® COUNTRY 3—©IN
—©OIRT «uM® COUNTRY 5—©U.K. «uM®
©AUSTRALIA «uM® COUNTRY 6
©SAF «uM® COUNTRY 7—
WEŠö
«u?MI« ¡ULÝ«Ë WIDM*« WŽuL− WLzU<
©WIDM*« rÝ«® ÷dF«
¨©U¹eOU® MAS ¨©…—uUGMÝ® SIN
¨©bMN«® IND ¨©b½ö¹Uð® THA
«—Uô«® UAE ¨©ÊU²#GUЮ PAK
¨©s¹d׳«® BRN ¨©…bײ*« WOÐdF«
WJKL*«® KSA ¨©X¹uJ«® KUW
¨©UO³O® LIB ¨©W¹œuF#« WOÐdF«
©qOz«dÝ«® ISR ¨©dB® EGY
©UO#O½Ëb½«® INA
©5B«® CHN
WIDM*« WŽuL−
©CCIR «uM® ± WIDM*«
©IN «uM® ≤ WIDM*«
©CHN «uM® ≥ WIDM*«
…—uBÐ WýUA« œuF²Ý ¨WO½UŁ ≥∞ ‰öš WHOþË qOGAð r²¹ r «–«
ÆWO½u¹eHK²« …—uB« ÷dŽ v« WOJOðUuðË«
W?¹uI« w½u¹eHK²« Y³« UD× s¹eSð
lÐU²²UÐ
qOGA² nzUþu« WLzU< w BSSM —e« f*« Æ(BSSM) UD;« qC« …dH«– l{Ë
iu²¹ ULMOÐ ÆWýUA« vKŽ iu²UÐ BSSM ÷dŽ √b³OÝ
w½u¹eHKð YÐ UD× Èu« ±≤ s¹eXð r²OÝ BSSM ÷dF«
¨WOKLF« ¡UN²½« bMŽË ÆU¼öŽ« v« «uMI« ÂU—« q« s VOðd²Ð
ÆWýUA« sŽ BSSM ÷dF« wH²XOÝ
ÆÈdš« …d BSSM —e« jG{« ¨s¹eX²« WOKLŽ ¡UGô Ar
±¥
r%I«
©SRC l?{u«® w½u¹eHKð n«u
∞¥
UEŠö
s Włu qJ WD× ±≤ ¨WD× ≤¥ v²ŠË s¹eXð pMJ1 •
Æ…dG«c« w w½u¹eHK²« Y³« w²łu
o³#*« «uMI« ¡UŽb²Ýô ∞ Ë√ 5 —e« «bX²Ý« UC¹√ pMJ1 •
ÆP12—P01 —«—“ô« vKŽ UND³{
W¼d³ 3 Ë√ 2 —e« f*« ¨W¹Ëb¹ WH«u ¡«dłô ¥
Æ…eOłË
ÆWł—œ Wł—œ qHÝô« Ë√ vKŽô« v« «uMI« „dײ²Ý
Æ3 Ë√ 2 —e« jGCÐ W¹ËbO« WH«u*« ¡«dł« UC¹« pMJ1 Ë√ 2 —e« f* w dL²Ý« ¨Y׳UÐ WH«u ¡«dłô µ
ÆÁ—dŠ rŁ …bŠ«Ë WO½UŁ w«uŠ …b* 3
…—uBÐ Íu w½u¹eHKð YÐ b−¹ v²Š «uMI« `#0 n«u*« ÂuIOÝ
ÆbOł ‰U³I²Ý« ¡UDŽô WOUG
Æ…eOłË W¼d³ 3 Ë√ 2 —e« fLKÐ Y׳UÐ WH«u*« ¡UG« pMJ1 «uM wDXð pMJLOÝ 3 Ë√ 2 —e« f* w X¹dL²Ý« «–« —d% w²« WE×K« w Y׳UÐ WH«u*« WOKLŽ √b³²Ý Æw½u¹eHK²« Y³«
Æ`OðUH*« UNO
2 —e« jG{ XO³¦ðË jGCÐ Y׳UÐ WH«u*« ¡«dł« UC¹« pMJ1 Æ3 Ë√
Y?³« UD× ¡UŽb²Ý«Ë s¹eSð
w½u¹eHK²«
P12—P01 UND³{ o³#*« WH«u*« —«—“√ s U¹√ XDG{ «–«
UNzUŽb²Ýô w½u¹eHKð YÐ WD× ±≤ v²ŠË s¹eXð WuN#Ð pMJ1
ÆbŠ«Ë —“ W#LKÐ bFÐ ULO
…dH«c« w UN½eSð Ê« b¹dð WD× b& UbMŽ UND³{ o³%*« WH«u*« —«—“√ bŠ« f* w dL²Ý«
ÆtD³{ o³%*« r<d« iuð n<u²¹ v²Š P12—P01
vI³¹ rŁ o³#*« j³C« r— dýR w t²DG{ Íc« rd« iu²OÝ
Æ…dG«c« w …—U²<« WD;« s¹eXð Êü« - ÆU¾OC
UND³{ o³#*« WH«u*« —“ fH½ UNO jGCð w²« WOU²« …d*« w
Æ…dG«c« s WD;« pKð ¡UŽb²Ý« r²OÝ
f*« ¨P12—P07Ë√ P06—P01 ŸU{Ëô« 5Ð q¹uײK Æ Ë√ —e«
¨W{ËdF fLKUÐ qLFð w²« WŠuK« `OðUH ÊuJð ô UbMŽ ÆWýUA« fLKÐ UN{dŽ pMJ1
P12—P07 Ë√ P06—P01 ŸU{Ëô« ÊuJð ô UbMŽ ÆLIST —e« fLKÐ UN{dŽ pMJ1 ¨W{ËdF
±≥
Ar
r%I«
©SRC l?{u«® w½u¹eHKð n«u
rJײ« `OðUH
w?½u¹eHK²« n«u*« …b¼UA
∞¥
—U#O« v« VFK« i³I „dŠ
Æ5LO« Ë√
—U#O« v« VFK« i³I X³Ł
rŁ …bŠ«Ë WO½UŁ w«u( 5LO« Ë√
ÆÁ—dŠ
ÆVFK« i³I ÂbX²Ý«
©…uDš …uDš® W¹ËbO« WH«u*«
Y׳UÐ WH«u*«
WHOþË d²š«
—bB*« e— 1
ÆÁ—UO²š« - —bB Í√ 5³¹
Włu*« dýR 2
ÆUNOKŽ Êu¹eHK²« “UNł WH«u - Włu Í√ 5³¹
tD³{ o³%*« r<d« dýR 3
ÆÁ—UO²š« - tD³{ o³# r— Í√ 5³¹
WOÐdF«
…UMI« dýR 4
ÆUNOKŽ Êu¹eHK²« “UNł WH«u - …UM Í√ 5³¹
o³%*« j³C« WLzU< dýR 5
Æo³#*« j³C« WLzU 5³¹
qLFð w²« WŠuK« `OðUH ÷dF WýUA« f*« ±
ÆfLKUÐ
ÆWłu —UO²šô BAND —e« f*« ≤
WÐužd*« Włu*« ÷dŽ dNE¹ v²Š …—dJ² …—uBÐ BAND —e« f*«
ÆTV2 Ë√ TV1 l{u« ¨WýUA« vKŽ
o³Ý …UM< f*« ¨UND³{ o³Ý …UM< —UO²šô ≥
ÆWLzUI« w UND³{
ÆU¼—UO²š« - w²« UND³{ o³#*« …UMI« …b¼UA r²OÝ
pMJ1 ¨W{ËdF UND³{ o³#*« «uMI« WLzU ÊuJð ô UbMŽ ÆLIST —e« fLKÐ UN{dŽ
Ar
±≤
r%I«
©SRC l?{u«® w½u¹eHKð n«u
∞¥
≤ W?ŽuL:« s WO%Ozd« …bŠu«
rJײ« `OðUH
ÆSOURCE —e« jG{«
ÆBAND —e« jG{«
Æ∞ Ë√ 5 —e« jG{«
Æ3 Ë√ 2 —e« jG{«
Æ3 Ë√ 2 —e« jG{ X³ŁË jG{«
—«—“ô« jG{ X³ŁË jG{«
Æ1-6 ∂≠±
1-6 ∂≠± —«—“ô« jG{«
FUNCTION —e« jG{«
Æ(FUNC) (A.MENU)
∞/5 —«—“ô«
FUNCTION —e« jG{«
Æ(FUNC) (A.MENU)
3/2/∞/5 —«—“ô«
qOGA²K —bBLG Êu¹eHK²« “UNł d²š«
Włu d²š«
UND³{ o³#*« WH«u*«
©…uDš …uDš® W¹ËbO« WH«u*«
Y׳UÐ WH«u*«
o³#*« j³C« …dG«–
dýU³*« ¡UŽb²Ýô«
UD;« qC« …dG«–
(BSSM) lÐU²²UÐ
UND³{ o³#*« «uMI« WLzU
≥ W?ŽuL:« s WO%Ozd« …bŠu«
rJײ« `OðUH
ÆSOURCE —e« jG{«
ÆBAND —e« jG{«
MULTI- ÕU²H lœ«
Ë√ vKŽô« v« CONTROL
ÆqHÝô«
MULTI- ÕU²H lœ«
Ë√ —U#O« v« CONTROL
Æ5LO«
MULTI- ÕU²H X³ŁË lœ«
Ë√ —U#O« v« CONTROL
Æ5LO«
MULTI- ÕU²H ÂbX²Ý«
ÆCONTROL
qOGA²K —bBLG Êu¹eHK²« “UNł d²š«
Włu d²š«
UND³{ o³#*« WH«u*«
©…uDš …uDš® W¹ËbO« WH«u*«
≤ WŽuL:« s WO%Ozd« …bŠu«
qOGA²« UOKLŽ ÊU ¨WOU²« WO#Ozd« «bŠu« «bX²Ý« bMŽ
ÆAVH-P5750DVD “UN−K UNMŽ nK²Xð
—eÐ qOGAð UOKLFÐ WOU²« WO#Ozd« «bŠu« “U²9
ÆSOFT KEY ÕU²H0 qOGAð UOKLŽ Ë√ FUNCTION
FH- ¨FH-P6200 ¨FH-P9200MP ¨KEH-P7035
DVH- ¨DVH-P5650MP ¨FH-P4200MP ¨P5000MP
¨DEH-P7650MP ¨DEH-P9650MP ¨P5050MP
¨DEH-P6550 ¨DEH-P6750MP ¨DEH-P7550MP
¨DEH-P5550MP ¨DEH-P5650MP ¨DEH-P5750MP
¨DEH-P4550 ¨DEH-P4650MP ¨DEH-P4750MP
ÆDEH-P2550 Ë ¨DEH-P2650MP ¨DEH-P3550MP
≥ WŽuL:« s WO%Ozd« …bŠu«
qOGA²« UOKLŽ ÊU ¨WOU²« WO#Ozd« «bŠu« «bX²Ý« bMŽ
ÆAVH-P5750DVD “UN−K UNMŽ nK²Xð
—eÐ qOGAð UOKLFÐ WOU²« WO#Ozd« «bŠu« “U²9
ÆMULTI-CONTROL
Ë ¨DEH-P7750MP ¨DEH-P8650MP
ÆDEH-P1Y
¥ WŽuL:« s WO%Ozd« …bŠu«
qOGA²« UOKLŽ ÊU ¨WOU²« WO#Ozd« «bŠu« «bX²Ý« bMŽ
ÆAVH-P5750DVD “UN−K UNMŽ nK²Xð
sŽ rJ% …bŠuÐ qOGAð UOKLFÐ WOU²« WO#Ozd« «bŠu« “U²9
ÆAVX-P7650DVD ÆbFÐ
Y׳UÐ WH«u*«
n?zUþu« o«uð ‰Ë«bł
WHOþË d²š«
± W?ŽuL:« s WO%Ozd« …bŠu«
rJײ« `OðUH
¥ W?ŽuL:« s WO%Ozd« …bŠu«
rJײ« `OðUH
ÆSOURCE —e« jG{«
ÆBAND —e« jG{«
vKŽô« v« VFK« i³I „dŠ
ÆqHÝô« Ë√
±±
Ar
qOGA²K —bBLG Êu¹eHK²« “UNł d²š«
Włu d²š«
UND³{ o³#*« WH«u*«
ÆSOURCE —e« jG{«
ÆBAND —e« f*«
Æ∞ Ë√ 5 —e« f*«
Æ3 Ë√ 2 —e« f*«
Æ3 Ë√ 2 —e« f* w dL²Ý«
f*« rŁ A.MENU —e« f*«
ÆFUNCTION —e«
qOGA²K —bBLG Êu¹eHK²« “UNł d²š«
Włu d²š«
UND³{ o³#*« WH«u*«
©…uDš …uDš® W¹ËbO« WH«u*«
Y׳UÐ WH«u*«
WHOþË d²š«
r%I«
©SRC l?{u«® w½u¹eHKð n«u
BAND Włu*« —“ 4
l{Ë ¡UGôË w½u¹eHK²« Y³« w²łu 5Ð s —UO²šö tDG{«
ÆnzUþu« w rJײ«
pMJLOÝ ¨jI SRC l{uÐ “UN'« «c¼ «bS²Ý« bMŽ
…bŠu« WDÝ«uÐ WOU²« qOGA²« UOKLŽ ¡«dł«
ÆWO%Ozd«
WOÐdF«
A.MENU t¹√ WLzUI« —“ 5
ÆMENU WLzUI« ÷dF tDG{«
3Ø2Ø∞Ø5 —«—“« 6
rJײK ÂbX²#¹ ¨pcGË ÆU¹Ëb¹ Y׳UÐ WH«u*« qLF tDG{«
ÆnzUþu« w
W?O%Oz— «bŠË WDÝ«uÐ qOGA²«
WHK²S
± WŽuL:« s WO%Ozd« …bŠu«
ÆfLKUÐ qLFð qOGAð `OðUH WŠuKÐ WOU²« WO#Ozd« «bŠu« “U²9
AVH- ¨AVH-P7550DVD ¨AVH-P7650DVD
ÆAVH-P5750DVD Ë AVH-P6550DVD ¨P6650DVD
∞¥
¡«ełôUÐ n¹dF²«
©AVH-P5750DVD “UN'« ö¦® WO?%Ozd« …bŠu«
…bŠu« WDÝ«uÐ ©w½u¹eHK²« Y³« ‰U³I²Ýô® “UN'« «c¼ qGý
qOGA²« qOœ w …—uGc*« qOGA²« «œUý—« ÆWKB²*« WO#Ozd«
‰U¦ WÐU¦0 ÂbX²#*« AVH-P5750DVD q¹œu “UN−K w¼ «c¼
ÆWO#Ozd« …bŠuK
VOLUME uB« Èu²% —“ 1
Æ uB« Èu²# iHš Ë√ ld tDG{«
…—Uýô« q³I²% 2
ÆbFÐ sŽ rJײ« …bŠË s «—Uýô« q³I²#¹
SOURCE —bB*« —“ 3
ÆqOGA²K —bB —UO²š« bMŽ “UN'« «c¼ qLF¹
Æ…du²*« —œUB*« qG ‰öš ‰UI²½ö tDG{«
Ar
±∞
r%I«
¡«ełôUÐ n¹dF²«
∞≥
ö?G?A* bFÐ sŽ rJײ« …bŠË «bS²Ý« bMŽ
dO½u¹UÐ s DVD W?OL<d« u¹bOH« U½«uDÝ«
«—U?O%« w WbS²%*«
¨SDV-P7 …eNłô« l WId*« bFÐ sŽ rJײ« …bŠË «bX²Ý« bMŽ
ÆXDV-P9II Ë XDV-P9 ¨AVX-P7300DVD
E —e« z
bMŽ Èdšô« j³C« ŸU{Ë«Ë WOU(« …UMI« ÷dF tDG{«
lł«—® STAND ALONE l{u« w “UN'« «c¼ «bX²Ý«
w Èdšô« j³C« ŸU{Ë«Ë WOU(« …UMI« s bGQ²« r#I«
Æ©±∑ W×HU
·UI¹«Ë qOGA²« wF{Ë 5Ð q¹uײK tDG{ X³ŁË tDG{«
Æ(BSSM) lÐU²²UÐ UD;« qC« …dG«– WHOþu qOGA²«
PLAY/PAUSE (6) X<R*« ·UI¹ô«Ø…b¼UA*« —“ x
lł«—® WIDM*« WŽuL− j³{ ŸU{Ë« WýUý ÷dF tDG{«
Æ©±∂ W×HU w WIDM*« WŽuL− —UO²š« r#I«
bFÐ sŽ rJײ« …bŠË qOGAð l{Ë ÕU²H c
qOGAð l{Ë ÕU²H j³{ s bGQð ¨Êu¹eHK²« qOGAð bMŽ
ÆTV l{u« vKŽ bFÐ sŽ rJײ« …bŠË
ö?G?A* bFÐ sŽ rJײ« …bŠË «bS²Ý« bMŽ
dO½u¹UÐ s DVD W?OL<d« u¹bOH« U½«uDÝ«
«—U?O%« w WbS²%*«
…eNłô« l WId*« bFÐ sŽ rJײ« …bŠË «bX²Ý« bMŽ
¨AVH-P7550DVD ¨AVH-P7650DVD
ÆAVH-P6550DVD Ë AVH-P6650DVD
6-1 ∂≠± —«—“_« z
ÆdýU³ «uMIK —UO²š« ¡«dłô UNDG{«
VFK« i³I x
ÁdI½« ÆU¹Ëb¹ j³C« WI³#*« WH«u*«Ë Y׳UÐ WH«u*« qLF tGdŠ
l{u« w “UN'« «c¼ «bX²Ý« bMŽ ÆWLzUI« WýUý ¡UŽb²Ýô
j³{ ŸU{Ë« WýUý ÷dF ÁdI½« STAND ALONE
ÆnzUþu« w rJײK ÂbX²#¹ ¨pcGË ÆWIDM*« WŽuL−
bFÐ sŽ rJײ« …bŠË qOGAð l{Ë ÕU²H c
qOGAð l{Ë ÕU²H j³{ s bGQð ¨Êu¹eHK²« qOGAð bMŽ
ÆTV l{u« vKŽ bFÐ sŽ rJײ« …bŠË
π
Ar
r%I«
¡«ełôUÐ n¹dF²«
STAND ALONE l{u«
l{Ë ¡UGôË w½u¹eHK²« Y³« w²łu 5Ð s —UO²šö tDG{«
ÆnzUþu« w rJײ«
MENU WLzUI« —“ 3
SRC: OSD ON l{u«
ÆWOHK)«Ë WOUô« WýUA« vKŽ WLzUI« WýUý ÷dF tDG{«
SRC: OSD OFF l{u«
ÆWOHK)« WýUA« vKŽ WLzUI« WýUý ÷dF tDG{«
STAND ALONE l{u«
lł«—® WIDM*« WŽuL− j³{ ŸU{Ë« WýUý ÷dF tDG{«
Æ©±∂ W×HU w WIDM*« WŽuL− —UO²š« r#I«
3Ø2Ø∞Ø5 —«—“√ 4
SRC: OSD ON l{u«
ÆU¹Ëb¹ j³C« WI³#*« WH«u*«Ë Y׳UÐ WH«u*« qLF UNDG{«
ÆnzUþu« w rJײK ÂbX²#¹ ¨pcGË
SRC: OSD OFF l{u«
STAND ALONE l{u«
ÆU¹Ëb¹ j³C« WI³#*« WH«u*«Ë Y׳UÐ WH«u*« qLF UNDG{«
POWER …—bI« —“ 5
SRC: OSD ON l{u«
UbMŽ WOHK)« ÷dF« WýUý qOGAð ·UI¹« Ë√ qOGA² tDG{«
ÆqOGA²K —bBLG «—U²X Êu¹eHK²« ÊuJ¹ ô
SRC: OSD OFF l{u«
UbMŽ WOHK)« ÷dF« WýUý qOGAð ·UI¹« Ë√ qOGA² tDG{«
ÆqOGA²K —bBLG «—U²X Êu¹eHK²« ÊuJ¹ ô
STAND ALONE l{u«
Æ“UN'« «c¼ qOGAð ·UI¹« Ë√ qOGA² tDG{«
Èd?šô« bFÐ sŽ rJײ« «bŠË
bFÐ sŽ rJײ« «bŠuÐ qOGA²« UOKLŽ ¡«dł« pcG pMJ1
ÆÁU½œ« W×{u*«
b?FÐ sŽ rJײ« …bŠË
…—uBР«bX²Ýö w¼ “UN'« «c¼ l WId*« bFÐ sŽ rJײ« …bŠË
v« UNNłË ¨Â«bX²Ýô« bMŽ ÆwHK)« bFI*« »UG— q³ s WO#Oz—
ÆbFÐ sŽ rJײ« ”U#Š
CH CALL «uMI« ¡UŽb²Ý« —“ 1
SRC: OSD ON l{u«
“UNł ÊuJ¹ UbMŽ Ë√ ¨qOGA²K —bBLG Êu¹eHK²« —UO²š« bMŽ
Êu¹eHK²« —UO²š« r²¹ rË qOGA²« l{Ë vKŽ wHK)« Êu¹eHK²«
∫qOGA²K —bBLG
ÆWOHK)«Ë WOUô« WýUA« vKŽ …UMI« UuKF ÷dŽ r²OÝ
WOÐdF«
ÆU¹Ëb¹ j³C« WI³#*« WH«u*«Ë Y׳UÐ WH«u*« qLF UNDG{«
ÆnzUþu« w rJײK ÂbX²#¹ ¨pcGË
∞≥
SRC: OSD OFF l{u«
“UNł ÊuJ¹ UbMŽ Ë√ ¨qOGA²K —bBLG Êu¹eHK²« —UO²š« bMŽ
Êu¹eHK²« —UO²š« r²¹ rË qOGA²« l{Ë vKŽ wHK)« Êu¹eHK²«
∫qOGA²K —bBLG
ÆWOHK)« WýUA« vKŽ …UMI« UuKF ÷dŽ r²OÝ
STAND ALONE l{u«
lł«—® Èdšô« j³C« ŸU{Ë«Ë WOU(« …UMI« ÷dF tDG{«
w Èdšô« j³C« ŸU{Ë«Ë WOU(« …UMI« s bGQ²« r#I«
Æ©±∑ W×HU
BAND Włu*« —“ 2
SRC: OSD ON l{u«
vKŽ œułu*« BAND —e« ÂbX²Ý« ¨p– s ôbÐ ÆÂbX²#¹ ô
ÆWO#Ozd« …bŠu«
SRC: OSD OFF l{u«
vKŽ œułu*« BAND —e« ÂbX²Ý« ¨p– s ôbÐ ÆÂbX²#¹ ô
ÆWO#Ozd« …bŠu«
Ar
∏
rI«
“U?N'« «c¼ «b²Ý« q³
∞≤
ÆWO½bF «Ëœ« WDÝ«uÐ W¹—UD³« l qUF²« ÂbŽ V−¹
ÆWO½bF œ«u Í√ l W¹—UD³« s¹eð ÂbŽ V−¹
s?Ž rJײ« …bŠË `(« ¨W¹—UD³« s »d?(ð Ÿu*Ë WUŠ w%
Æ…b¹bł W¹—UDÐ V8— rŁ UNHOEM² UU9 bFÐ
5½«uI« ŸU³ð« vłd¹ ¨Wb²(*« U¹—UD³« s hK²« bMŽ
UNIO³Dð r²¹ w²« WUF« W¾O³« W¹ULŠ U¾O¼ 5½«u* Ë√ WOuJ(«
ÆUNO% gOFð w²« WIDM*«ØWËb« w%
•
•
•
•
b?FÐ sŽ rJײ« …bŠË «b²Ý«
Æ“UN'« qOGA² WOUô« WŠuK« ÁU&« w% bFÐ sŽ rJײ« …bŠË tłË
ÂU¼
Wł—bÐ “U²1 ÊUJ w% bFÐ sŽ rJײ« …bŠË s¹eð ÂbŽ V−¹ •
Æ…dýU³*« fLA« WFýô ÷dF Ë√ WOUŽ …—«dŠ
W{dF X½U8 «–« W×O×V …—uBÐ rJײ« …bŠË qLFð ô b* •
Æ…dýU³*« fLA« WFýô
¨…—UO(« WO{—« vKŽ bFÐ sŽ rJײ« …bŠË ◊UIÝ« ÂbŽ V−¹ •
Æ©s¹eM³«® Ÿ—U(²« Ë√ q«dH« WÝ«Ëœ X% q*dF²ð b* YOŠ
Ar
rI«
“U?N'« «c¼ «b²Ý« q³
q¹uײ wÝUO oO— ”√dÐ wž«dÐ pH/ Âb²Ý« ÆqOGA²« l{Ë ÕU²H/
∞≤
rł Í√ Ë√ d³Š rK ”«dÐ RESET —e« jG{« Ædš« VÐb/
RESET —e«
Æ—u(OÝËdÐËdJO*« j³{ bŽ« ¨q¹uײ« ¡«dł« bFÐ •
s?Ž rJײ« …bŠuÐ W¹UMF«Ë «b²Ý«
bFÐ
WEŠö/
Y³« UD× `( r²OÝ ¨—u(OÝËdÐËdJO*« j³{ bŽ« «–«
«c¼ œuFOÝË ¨…d8«c« w% WþuH;« Èdšô« UuKF*«Ë w½u¹eHK²«
ÆlMB*« w% WÞu³C*« wËô« j³C« ŸU{Ë« v« “UN'«
q?OGA²« l{Ë q¹u%
U¹—UD³« VOBdð
∫qOGAð ŸU{Ë« Àö¦Ð “UN'« «c¼ “U²1
SRC: OSD ON l{u« ¨SRC: OSD OFF l{u«
œ«d*« “UN−K UI%Ë l{u« ‰uŠ ÆSTAND ALONE l{u«Ë
ÆtKOVuð
WOÐdF«
v« bFÐ sŽ rJײ« …bŠË WOHKš vKŽ …œułu*« WOMOB« oOe²Ð r*
W³U(«Ë ©´® W³łu*« UNÐUD*« ÊuJð ULMOÐ W¹—UD³« qšœ«Ë ×U)«
ÆW×O×V …—uBÐ WN−² ©≠®
SRC: OSD OFF l{u«
qšbÐ …eOL²*« WO(Ozd« dO½u¹UÐ «bŠË l Âb²(¹ •
ÆIP-BUS
vKŽ UuKF*« ÷dŽ® OSD WHOþË U×O{uð Âb²(¹ ô •
ÆWýUA« vKŽ “UN'« «cN ©WýUA«
tO³Mð
WUŠ w%Ë Æ‰UHÞô« Íb¹« ‰ËUM² sŽ …bOFÐ W¹—UD³« vKŽ k%UŠ
Æ«—u% VO³Þ …—UA²ÝUÐ r* ¨W¹—UD³« Ÿö²Ð«
d¹c%
…bŠ«Ë ©XuF ≥® CR2025 “«dÞ ÂuO¦O W¹—UDÐ Âb²Ý« •
ÆjI%
sŽ rJײ« …bŠË «b²Ý« ÂbŽ WUŠ w% W¹—UD³« ëdšUÐ r* •
Æd¦8« Ë√ dNý …b* bFÐ
W¹—UD³« s hK²« Ë√ 5(ð ¨p% ¨s×ý …œUŽ« ÂbŽ V−¹ •
Æ—UM« w% UNzUIUÐ
SRC: OSD ON l{u«
qšbÐ …eOL²*« WO(Ozd« dO½u¹UÐ «bŠË l Âb²(¹ •
ÆIP-BUS
vKŽ UuKF*« ÷dŽ® OSD WHOþË U×O{uð Âb²(¹ •
ÆWýUA« vKŽ “UN'« «cN ©WýUA«
STAND ALONE l{u«
ÆRCA u¹bO% qšbÐ …eOL²*« ÷dF« UýUý l Âb²(¹ •
Ar
∂
rI«
“U?N'« «c¼ «b²Ý« q³
∞≤
“UN'« «cN REAR OUT WOHK)« Ãd)« Wײ% Âb²(ð •
…b¼UA0 WOHK)« bŽUI*« »U8d `L(ð ÷dŽ WýUý qOVu²
ÆWO½u¹eHK²« Z«d³«
tO% `L(¹ l*u w% WOHK)« ÷dF« WýUý VO8dð ÂbŽ V−¹
ÆWO½u¹eHK²« Z«d³« …b¼UA0 ozU(K
q?Ob« «c¼ ‰uŠ
sLCð w²«Ë …—uD²*« nzUþu« s œbŽ vKŽ “UN'« «c¼ sLC²¹
qNÝô nzUþu« Ác¼ lOLł XLLV Æ5Fz«— ôU³I²Ý«Ë öOGAð
qOœ ·bN¹ «c Æt(HMÐ tKLŽ `{u¹ ô U¼d¦8« sJË ¨sJ2 Âb²Ý«
“UN'« UO½UJ« lOLł s …œUH²Ýö pðbŽU( v« «c¼ qOGA²«
ÆŸUL²Ýô« WF² Uł—œ vB*« vKŽ qB% wJ qUJUÐ
UNKOGAð ‚dÞË nzUþu« «b²Ý« vKŽ p(H½ œuFð ÊUÐ p×BM½
Ê«Ë ULOÝô Æ“UN'« «c¼ «b²ÝUÐ ¡b³« q³* UU9 qOb« «c¼ …¡«dIÐ
w% …œułu*« UÞUO²Šô«Ë UNO³M²« ŸU³ð«Ë …¡«d* «bł rN*« s
ÆqOb« «c¼
—u?OÝËdÐËdJO*« j³{ …œUŽ«
v« —u(OÝËdÐËdJO*« j³{ …œUŽUÐ RESET —e« jG{ p `L(¹
ÆWOËô« tD³{ ŸU{Ë√
∫WOU²« ·ËdE« w% —u(OÝËdÐËdJO*« j³{ …œUŽ« V−¹
Æt?³O8d?ð bFÐ …d? ‰Ëô “U?N?'« «c¼ «b²Ý« q³* •
ÆW×O×V …—uBÐ qLF« w% “UN'« oHš« «–« •
Æ÷dF« WýUý vKŽ W×O×V dOž Ë√ W³¹dž qzUÝ— —uNþ bMŽ •
«c¼ vKŽ œułu*« qOGA²« l{Ë ÕU²H l{u j³{ bMŽ •
Æ“UN'«
“U?N'« «c¼ ‰uŠ
d¹c%
b* YOŠ Æ“UN'« «c¼ vKŽ qz«uÝ ◊uI(Ð ÕUL(« ÂbŽ V−¹
sŽ Z²M¹ b* ¨pc8 ÆWOzUÐdN8 UbV Ÿu*Ë p– sŽ Z²M¹
ŸUHð—«Ë ¨s ÊUšœ —ËbV ¨qDFð “UN'« «c¼ vKŽ qz«uÝ ◊uIÝ
Æ“UN'« …—«dŠ Wł—œ
UOKLF UFłd ÊuJ¹ wJ „b¹ ‰ËUM² w% qOb« «cNÐ kH²Š«
Æ UÞUO²Šô«Ë qOGA²«
lL(² sJ« U UCHM uB« Èu²(0 ULz«œ kH²Š«
Æ…—UO(« ×Uš s …—œUB« «uVô«
ÆWÐuÞdK ÷dF²« s “UN'« wLŠ«
…d8«– `( r²OÝ ¨…—UO(« W¹—UDÐ WM×ý Xžd% Ë√ XKB% «–«
ÆUN²−dÐ …œUŽ« V−¹Ë o³(*« j³C«
wK;« pKO8uÐ qBð« ¨W×O×V …—uBÐ “UN'« «c¼ qLF¹ r «–«
ÆdO½u¹UÐ q³* s …bL²F W½UOV Ubš WD× »d*« Ë√
•
•
•
•
•
•
p `L(¹ Æw½u¹eHK²« Y³« ‰U³I²Ýô w½u¹eHKð n«u u¼ “UN'« «c¼
AV-BUS vKŽ Íu²% WKBHM …—uBÐ ŸU³ð ÷dŽ WýUý l t−œ
qOœ lł«—® WOK(*« WO½u¹eHK²« Z«d³« …b¼UA0 ŸU²L²Ýô« s
Æ©AV-BUS …eO0 WIKF²*« qOVUH²« s b¹e* “UN'« «cN VO8d²«
`L(¹ U2 ¨REAR OUT WOHKš Ãdš WײHÐ “UN'« «c¼ “U²1 UL8
ŸU³ð® WOHKš ÷dŽ WýUý vKŽ WO½u¹eHK²« Z«d³« …b¼UA0 p
Æ©WKBHM …—uBÐ
q?B²*« “UN−K u¹bOH« ÂUE½
ÆSECAM ÂUJOÝØPAL ‰UÐ Ê«uô« wUE½ l “UN'« «c¼ o%«u²¹
WOHK)« Ãd)« Wײ% v« WOł—Uš …eNł√ qOVuð bMŽ
fH½ l …eNłô« pKð o%«uð s b8Q𠨓UN'« «cN REAR OUT
ÃU²½« …œUŽ« r²¹ sK% ¨sJð r «–«Ë ÆÁöŽ« …—u8c*« u¹bOH« WLE½«
Æ`O×V qJAÐ —uV
∫tO³Mð
q³* s¬ ÊUJ w% pð—UOÝ ·UI¹«Ë …œUOI« sŽ n*uð s b8Qð •
ÆWO½u¹eHK²« Z«d³« …b¼UA
Z²M¹ b*Ë …dDš …œUOI« ¡UMŁ√ WO½u¹eHK²« Z«d³« …b¼UA d³²Fð •
ÆÀœ«uŠ Ÿu*Ë UNMŽ
µ
Ar
rI«
UÞUO²Š«
∞±
n*Ë√ ¨WOUô« ÷dF« WýUý vKŽ WO½u¹eHK²« Z«d³« …b¼UA*
Æ©W¹ËbO«® ·UI¹ô« q«d% Âb²Ý«Ë s¬ ÊUJ w% pð—UOÝ
W?¹—UD³« WM×ý –UHM²Ý« VM−²
«b²Ý« Æ“UN'« «c¼ Âb²(ð ULMOÐ …—UO(« „d× qOGAð s b8Qð
ÆW¹—UD³« WM×A m¹dHð tMŽ Z²M¹ b* „d;« qOGAð ÊËbÐ “UN'« «c¼
tO³Mð
l{Ë vKŽ Íu²% ô w²« «—UO(« l t«b²Ý« ÂbŽ V−¹
Æ©ACC® UI×K
WOÐdF«
Ar
¥
rI«
UÞUO²Š«
∞±
W?/öK W/U¼ WOzUË dOЫbð
tO³Mð
÷dF« WýUý W½UOm Ë√ VOBdð WËU×/ ÂbŽ V−¹
q³ s/ ÷dF« WýUý W½UOm Ë√ VOBd²Ð ÂUOI« ÆpHMÐ
WO½Ëd²JOô« …eNłô« wF …d³š Ë√ V¹—bð ÊËbÐ ’Uý«
v« p{dFð bË …dODš ÊuJð b «—UO« UIK×/Ë
Æ—UDšô« s/ U¼dOž Ë√ WOzUÐdNB U/bm
•
W?M/¬ …œUO ÊULC
UNÐ kH²Š«Ë ÷dF« WýUAÐ WVU)« «œUý—ô« Ác¼ q8 …¡«d* vłd¹
Æq³I²(*« w% UNO« ŸułdK
¡b³« q³ W¹UMFÐË U/U9 qOb« «c¼ √d«
Æ÷dF« WýUý «b²ÝUÐ
±
ÊuJ¹ wJ „b¹ ‰ËUM²/ wF qOb« «cNÐ kH²Š«
ÆW/ö« U/uKF/Ë qOGA²« UOKLF UFłd/
≤
«c¼ wF …œułu*« UNO³M²« qJ W/Uð W¹UMŽ cš
ÆWbÐ «œUý—ô« l³ð« rŁ qOb«
≥
«c¼ «b²ÝUÐ dš« hý Íô ÕUL« ÂbŽ V−¹
«œUý—« rNHðË √d b ÊuJ¹ v²Š ÂUEM«
ÆqOGA²«
¥
©±® YOŠ ÊUJ/ wF WýUA« VOBdð ÂbŽ V−¹
s/ ÂUE½ Í√ ¡«œ« qDFð ©≤® ¨ozU« W¹ƒ— oOFð
w²«Ë ¨W/ö« nzUþË Ë√ …—UO« qOGAð WLE½«
—«—“√ ¨WOz«uN« W¹UL(« ”UOB« vKŽ qL²Að
ozU« bIHð ©≥® Ë√ ¨dD)« «dýR/ `OÐUB/
Æ…—UOK WM/ô« …œUOI« vKŽ …—bI«
µ
¨pð—UOÝ qš«œ wF VBdð UI×K/ Í√ wF ULB
p¼U³²½« q¹u% v« ÷dF« WýUý qLFð ô« V−¹
WÐuFm XŁbŠ «–« Æpð—UO WM/ü« …œUOI« sŽ
vłd¹ ¨÷dF« WýUý …¡«d Ë√ ÂUEM« qOGAð wF
¡«dłUÐ p/UO q³ s/¬ ÊUJ/ wF …—UO« ·UI¹«
Æj³{ WOKLŽ Í√
∂
qB wF bFI*« «eŠ «b²Ýô „dBcð vłd¹
ÀœUŠ lË WUŠ wF Æpð—UOÝ œuIð ULMOÐ UËô«
WÝuLK/ …—uBÐ dDš« ÊuJð p²ÐUm« ÊUF ¨p
ÆW×O×m …—uBÐ U²³¦/ „bFI/ «eŠ ÊUB «–« ULŽ
∑
Æ…œUOI« ¡UMŁ√ ”√d« UŽULÝ Â«b²Ý« ÂbŽ V−¹
∏
iFÐ qOGAð nË« ¨W/ö« »U³Ý« e¹eF²
·UI¹ô« q/«dF «b²Ý« r²¹ r U/ nzUþu«
ÆWBd(« sŽ WHu²/ …—UO« ÊuJðË ¨©W¹ËbO«®
π
tO³Mð
qmu/ vKŽ œułu*« #UH« dCšô« pK« rLm
tKOmuð V−¹Ë …—UO« nuð WUŠ b¹bײ WUD«
·UI¹ô« q/«dF ÕU²H* WUDUÐ œËe²« V½Uł v«
Ë√ qOmu²« WOKLŽ pN²Mð b Æ©W¹ËbO«®
WF³²*« 5½«uI« pK« «cN QD)« «b²Ýô«
ƉUDŽ« Ë√ …dODš UÐUm« UNMŽ Z²M¹ bË
ÂbŽ V−¹ ¨WF³²*« 5½«uI« „UN²½« WOUL²Š«Ë Àœ«uŠ Ÿu*Ë lM*
¡UMŁ√ WOUô« WýUA« vKŽ WO½u¹eHK²« …b¼UA*« WHOþË Â«b²Ý«
÷dF« UýUý VO8dð ÂbŽ V−¹ ¨pc8 Æ…—UO(« …œUO*
ÆozU(« ÁU³²½« »c' WKOÝË tO% ÊuJð b* l*«u w% WOHK)«
WýUý vKŽ —uV …b¼UA d³²Fð U¹ôu« Ë√ ‰Ëb« iFÐ w%
dOž d« ozU(« dOž ’Uý√ q³* s v²Š …—UO(« qš«œ ÷dŽ
V−¹ ¨5½«uI« pKð UNO% o³Dð w²« s8Uô« w% ¨«c Æw½u½U*
U½«uDÝ« «eO2 «b²Ý« ÂbŽ V−¹ UL8 UN«d²Š« pOKŽ
Æ“UN'« «cN DVD
©W¹ËbO«® ·UI¹ô« q«d% X½U8 «–U b¹bײР“UN'« «c¼ ÂuI¹
vKŽ WO½u¹eHK²« …b¼UA*« s pFM1Ë ¨ô Â√ Wb²( pð—UO(
…b¼UA WËU× bMŽË Æ…—UO(« …œUO* ¡UMŁ√ WOUô« WýUA«
r²¹ sË œuÝô« ÊuK« v« WýUA« ‰uײ²Ý ¨WO½u¹eHK²« Z«d³«
Æ…—uV Í√ ÷dŽ
•
•
•
•
WýUý s/ —œUB« uB« Èu²/ j³{ ÂbŽ V×¹ ±∞
ŸULÝ pMJ1 ô YO×Ð WOUŽ U¹u²/ vKŽ ÷dF«
Æ∆—«uD« «—UOÝË —Ëd*« WBdŠ «um«
≥
Ar
U¹u²;«
ÆdO½u¹UÐ s “UN'« «cN pz«dý vKŽ „dJA½
Ác¼ …¡«d s) ¡UN²½ô« bFÐ ÆW×O×' …—uBÐ „“UNł qOGAð WOHO vKŽ ·dF²K
Ác¼ qOGA²
« ULOKFð …¡«d vłd¹
Æq³I²/*« w2 UNO
« ŸułdK
s)« ÊUJ) w2 UNF{ ¨ ULOKF²
«
±≥ w½u¹eHK²
« Y³
« UD×) ¡UŽb²Ý«Ë s¹eTð
±¥ W)bI²*« w½u¹eHK²
« n
«u*« qOGAð UOKLFÐ n¹dFð
±¥ lÐU²²
UÐ W¹uI
« w½u¹eHK²
« Y³
« UD×) s¹eTð
±¥ WIDM*« WŽuL−) —UO²š«
±¥ «uMI
« ¡ULÝ«Ë WIDM*« WŽuL−) WLzU –
w½u¹eHKð n«u ∞µ
©STAND ALONE l{u«®
±∂ w½u¹eHK²
« n
«u*« …b¼UA)
±∂ lÐU²²
UÐ W¹uI
« w½u¹eHK²
« Y³
« UD×) s¹eTð
±∂ WIDM*« WŽuL−) —UO²š«
±∑ «uMI
« ¡ULÝ«Ë WIDM*« WŽuL−) WLzU –
±∑ w½u¹eHK²
« Y³
« UD×) ¡UŽb²Ý«
±∑ Èdšô« j³C
« ŸU{Ë«Ë WO
U(« …UMI
« s) bQ²
«
“UN'« «c¼ «b#²Ý« q³' ∞≤
µ “UN'« «c¼ ‰uŠ
µ qB²*« “UN−K
u¹bOH
« ÂUE½
µ qO
b
« «c¼ ‰uŠ
µ —u/OÝËdÐËdJO*« j³{ …œUŽ«
∂ qOGA²
« l{Ë q¹u%
∂ bFÐ sŽ rJײ
« …bŠuÐ W¹UMF
«Ë «bT²Ý«
∂ U¹—UD³
« VOdð –
∑ bFÐ sŽ rJײ
« …bŠË «bT²Ý« –
¡«ełôUÐ n¹dF²« ∞≥
∏ bFÐ sŽ rJײ
« …bŠË
∏ Èdšô« bFÐ sŽ rJײ
« «bŠË
U½«uDÝ« öGA* bFÐ sŽ rJײ
« …bŠË «bT²Ý« bMŽ –
w2 W)bT²/*« dO½u¹UÐ s) DVD WOLd
« u¹bOH
«
π «—UO/
«
U½«uDÝ« öGA* bFÐ sŽ rJײ
« …bŠË «bT²Ý« bMŽ –
w2 W)bT²/*« dO½u¹UÐ s) DVD WOLd
« u¹bOH
«
π «—UO/
«
WOÐdF«
WO6U{ô« UuKF*«
±∏ UH'«u*«
UÞUO²Š« ∞±
≥ W)ö/K
W)U¼ WOzUË dOЫbð
≥ WM)¬ …œUO ÊULC
¥ W¹—UD³
« WM×ý –UHM²Ý« VM−²
©SRC l{u«® w½u¹eHKð n«u ∞¥
±∞ ¡«ełôUÐ n¹dF²
«
ö¦)® WO/Ozd
« …bŠu
« –
±∞ ©AVH-P5750DVD “UN'«
±∞ WHK²T) WO/Oz— «bŠË WDÝ«uÐ qOGA²
«
±± nzUþu
« o2«uð ‰Ë«bł
±± ± WŽuL:« s) WO/Ozd
« …bŠu
«
±± ≤ WŽuL:« s) WO/Ozd
« …bŠu
«
±± ≥ WŽuL:« s) WO/Ozd
« …bŠu
«
±± ¥ WŽuL:« s) WO/Ozd
« …bŠu
«
±≤ w½u¹eHK²
« n
«u*« …b¼UA)
Ar
≤
PIONEER CORPORATION
4-1, MEGURO 1-CHOME, MEGURO-KU, TOKYO 153-8654, JAPAN
PIONEER ELECTRONICS (USA) INC.
P.O. Box 1540, Long Beach, California 90801-1540, U.S.A.
TEL: (800) 421-1404
PIONEER EUROPE NV
Haven 1087, Keetberglaan 1, B-9120 Melsele, Belgium
TEL: (0) 3/570.05.11
PIONEER ELECTRONICS ASIACENTRE PTE. LTD.
253 Alexandra Road, #04-01, Singapore 159936
TEL: 65-6472-7555
PIONEER ELECTRONICS AUSTRALIA PTY. LTD.
178-184 Boundary Road, Braeside, Victoria 3195, Australia
TEL: (03) 9586-6300
PIONEER ELECTRONICS OF CANADA, INC.
300 Allstate Parkway, Markham, Ontario L3R OP2, Canada
TEL: 1-877-283-5901
PIONEER ELECTRONICS DE MEXICO, S.A. de C.V.
Blvd.Manuel Avila Camacho 138 10 piso
Col.Lomas de Chapultepec, Mexico, D.F. 11000
TEL: 55-9178-4270
HÒ¡ýPlø
=lø : ð-qïµ44_13
ûq : (02) 2521-3588
HÒûP/Plø
/]w/ÎLFm-Ã
9901-6¤
ûq : (0852) 2848-6488
Published by Pioneer Corporation.
Copyright © 2005 by Pioneer Corporation.
All rights reserved.
Printed in Japan
<KSNZF> <05C00000>
<CRD3995-B> ES