1
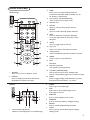
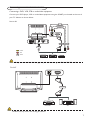
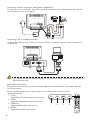
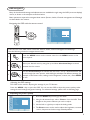
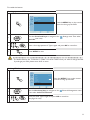
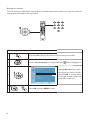
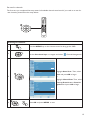
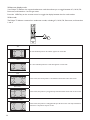
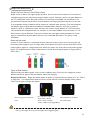
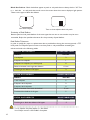
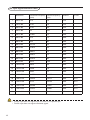
Introduction
Thank you for purchasing this television set.
This handbook has been designed to help you install and operate your TV Monitor set.
We would strongly recommend that you read it thoroughly.
We hope our technology meets entirely with your satisfaction.
Table of Contents
EN
FR
NL
DE
IT
Important safety information . . . . . . . . . . . . . . . . . . . . . . . . . . . . . . . . . . . . . . . . . . . . . 2
Packing checklist ...................................................... 3
Your TV Monitor overview . . . . . . . . . . . . . . . . . . . . . . . . . . . . . . . . . . . . . . . . . . . . . . . . . . . . . . . . . 3
Remote control keys . . . . . . . . . . . . . . . . . . . . . . . . . . . . . . . . . . . . . . . . . . . . . . . . . . . . . . . . . . . . . . 5
Basic connections . . . . . . . . . . . . . . . . . . . . . . . . . . . . . . . . . . . . . . . . . . . . . . . . . . . . . . . . . . . . . . . . 6
Enjoying analog TV Monitor . . . . . . . . . . . . . . . . . . . . . . . . . . . . . . . . . . . . . . . . . . . . . . . . . . . . . . . . . 6
Connecting external audio/video devices . . . . . . . . . . . . . . . . . . . . . . . . . . . . . . . . . . . . . . . . . . . 7
OSD navigation . . . . . . . . . . . . . . . . . . . . . . . . . . . . . . . . . . . . . . . . . . . . . . . . . . . . . . . . . . . . . . . . . . . . . 9
Advanced features . . . . . . . . . . . . . . . . . . . . . . . . . . . . . . . . . . . . . . . . . . . . . . . . . . . . . . . . . . . . . . . 10
Philips pixel Defect Policy . . . . . . . . . . . . . . . . . . . . . . . . . . . . . . . . . . . . . . . . . . . . . . . . .. . . . . . . . . . 15
ES
PT
CZ
DK
Tips . . . . . . . . . . . . . . . . . . . . . . . . . . . . . . . . . . . . . . . . . . . . . . . . . . . . . . . . . . . . . . . . . . . . . . . . . . . . . . . . 17
Glossary . . . . . . . . . . . . . . . . . . . . . . . . . . . . . . . . . . . . . . . . . . . . . . . . . . . . . . . . . . . . . . . . . . . . . . . . . . . . 17
PC Input Signal Reference Chart . . . . . . . . . . . . . . . . . . .. . . . . . . . . . . . . . . . . . . . . . . . . . . . . . . . 18
Product specifications . . . . . . . . . . . . . . . . . . . . . . . . . . . . . . . . . . . . . . . . . . . . . . . . . . . . . . . . . . . . . . . . 19
TR
GR
Recycling
The materials used in your set are either reusable or can be recycled.
To minimise environmental waste, specialist companies collect used appliances
and dismantle them after retrieving any materials that can be used again (ask your
dealer for further details).
1
IMPORTANT SAFETY INSTRUCTIONS
Read before operating equipment
Important
• For ventilation, leave at least 4” to 6” free all around
the TV monitor. Do not place the TV monitor on a
carpet.
• The equipment shall not be exposed to dripping or
splashing.
• The equipment shall not be exposed to rain or moisture and objects filled with liquids, such as vases, shall
be placed on the apparatus.
• The apparatus must be connected to a mains socket
outlet with a protected earthed connection.
• Do not touch the surface with bare hands or greasy cloth
(some cosmetics are detrimental to the screen).
• Unplug the TV monitor before cleaning the screen.
• When the surface becomes dusty, please wipe gently with
absorbent cotton or other soft materials like chamois soaks.
• Do not use acetone, toluene and alcohol because they
cause chemical damage.
• Do not use liquid cleaners or aerosol cleaners.Wipe off
saliva or water drops as soon as possible. Their long time
contact with the screen causes deformations and colour
fading.
• The appliance coupler is used as the disconnect device • IMPORTANT: Always activate a moving screen saver
of this apparatus, the disconnect device shall remain
readily operable.
General
Do not insert the power plug in a wall socket or
hang the TV monitor to the wall before all connections are made.
• Place or hang the TV monitor wherever you want,
but make sure that air can circulate freely through
the ventilation slots.
program when you leave your monitor unattended. Always
activate a periodic screen refresh application if your LCD
monitor will display unchanging static content. Uninterrupted display of still or static images over an extended
period may cause “burn in”, also known as “after-imaging”
or “ghost imaging”, on your screen. "Burn-in", "after-imaging", or "ghost imaging" is a well-known phenomenon in
LCD panel technology. In most cases, the “burned in” or
“after-imaging” or “ghost imaging” will disappear gradually
over a period of time after the power has been switched
off.
WARNING: Severe“ burn-in” or “after-image” or “ghost
image” symptoms will not disappear and cannot be repaired. The damage mentioned above is not covered under
your warranty.
Electric, Magnetic and Electromagnetic
Fields (“EMF”)
• Philips Royal Electronics manufactures and sells many pro• Do not install the TV monitor in a confined space such
as a book case or a similar unit.
• To prevent any unsafe situations, no naked flame
sources, such as lighted candles, should be placed in the
vicinity.
• Avoid heat, direct sunlight and exposure to rain or
water.
• The equipment shall not be exposed to dripping or
splashing.
Care of the screen
• Do not touch, push or rub or strike the screen with
anything hard as this may scratch, mar or damage the
screen permanently.
• And please do not rub with dust clothes with chemical
treatment.
2
ducts targeted at consumers, which, like any electronic
apparatus, in general have the ability to emit and receive
electromagnetic signals.
• One of Philips’ leading Business Principles is to take all
necessary health and safety measures for our products, to
comply with all applicable legal requirements and to stay
well within the EMF standards applicable at the time of
producing the products.
• Philips is committed to develop, produce and market
products that cause no adverse health effects.
• Philips confirms that if its products are handled properly
for their intended use, they are safe to use according to
scientific evidence available today.
• Philips plays an active role in the development of international
EMF and safety standards, enabling Philips to anticipate further
developments in standardisation for early integration in its
products.
Packing checklist
Your TV Monitor package should contain the following accessories, in addition to the accessory box.
Please ensure that they are all present. If any of the items is missing, then please contact your retailer.
•
Remote control (x1) / AAA batteries (x2)
•
PC Audio Cable
•
Quick Start Guide
•
Power cord (x1)*
•
User Manual
•
VGA Cable
* The power cord supplied varies according to your region.
Your TV Monitor overview
1
2
3
4
5
Side of set
1
Power On/Off
To switch TV monitor ON and OFF
2
Menu key
Turns the OSD menu ON and OFF
Channel up
When the OSD is on, functions the same as the Up arrow
Channel down
When the OSD is on, functions the same as the Down arrow
Volume up
When the OSD is on, functions the same as the Right arrow
Volume down
When the OSD is on, functions the same as the Left arrow
Input key
When the OSD is on, press this button to confirm selection
3
4
5
3
Rear of set
1
3
5
7
AC IN
D-SUB
AV-Audio L/R + CVBS + S-Video*
Analog tuner
1
2
3
2
4
6
8
HDMI
SPDIF-out + PC Audio-in
SCART
Headphone jack
4
5
* For AV: Composite and S-Video input use the same audio ports.
4
6
7
8
Remote Control Keys
General keys
3
4
SLEEP
Press to set a time period after which the
TV Monitor will switch itself to standby (15, 30,
45, 60, 90 or 120 minutes).
Input buttons (TV/AV/SCART/PC)*
Press to select correct input mode.
5
Number keys.
6
RECALL
Press to return to the previous channel.
7
ENTER
Press to confirm channel number selection.
8
MPX
Press to select the sound input, displayed
in the top right- hand corner (mono, stereo,
bilingual).
9
MUTE
Press to toggle audio on and off.
10 VOL (+/-)
Press to increase or decrease the volume.
11 CH (up/down)
Press to sequentially select the TV Monitor channel.
1
POWER
Press to turn your TV Monitor on/off.
2
DISPLAY
Press to display input/channel information
(dependent on input/source type).
Teletext
12
MENU
Press to open or close the Menu.
13
EXIT
Exit Menu.
14
Directional keys/OK
VOL (up/down), CH (up/down)
15 TTX/MIX (TELETEXT/MIX)
Press to switch from TV/AV to Teletext mode.
Press to overlay teletext page on the TV Monitor image.
16
WIDE
Press to toggle scaling mode between 4:3,16:10,
Full, Panorama and Letterbox 1, 2 modes.
2
INDEX
Press to go to the index page
3
SIZE
Press once to zoom teletext page to 2X.
Press again to resume.
4
SUBTITLE
Press to view subtitles on the screen.
5
SUBPAGE
Press to access the teletext’s subpages directly.
REVEAL
Press to reveal hidden telext information.
HOLD
Press to pause the current teletext page in multi-page
viewing mode.
6
1
Colour buttons (R/G/Y/B)
Operates corresponding button on the teletext page.
7
5
Basic connections
Connecting the power cord
1
2
Connect the AC cord into the AC input on the
back of the set.
Connect the plug to the wall outlet as shown.
Setting up the remote control
1
2
Open the cover on the back of the remote unit.
Insert two AAA batteries (supplied) to match the
polarity indicated inside the battery compartment.
Enjoying analog TV Monitor
Analog
Connecting an antenna/cable
Connect the antenna cable to the appropriate antenna
terminal on the back of the TV Monitor set as shown
below.
Getting started watching your TV Monitor
Step 1. Select the setup language you prefer.
Step 2. Please select country.
Step 3. Ensure that your co-axial cables are connected
correctly before proceeding.
1
Step 4. Scan for analog channels.
2
4
1
1 Power
a. Turn on the power switch beneath the screen.
1
3
Step 5. Setup is now complete. You are ready to
begin watching TV Monitor.
If you leave the setup process before it is complete,
you will be given a choice of options:
1. Resume setup
2. Resume setup wizard at next startup
3. Exit and do not remind me
Select an option and press OK to exit.
3 Changing channels
a. Press 0 - 9 on the remote control to select a
channel. The channel changes after 2 seconds.
b. Press the power button, number keys or channel
Press ENTER to select the channel immediately.
up / down button on the remote control.
b. Pressing the channel ( CH ) up / down button
2 Setup Wizard
on the remote control will also change the
channel.
The first time you switch on the TV Monitor, the Setup
Wizard will guide you to complete the language selection 4 Adjusting the volume
and channel scanning.
Adjust the volume level using the ( VOL ) up/down
Press the OK key to begin the setup process.
button on the remote control.
* You can also adjust these settings using the front control panel. Please see "Side of set" on page 3
for details.
* Setup may vary due to local broadcast differences.
6
Connecting external audio/video devices
Connecting a DVD, VCR, STB or audio/video equipment
Connect your DVD player, VCR or audio/video equipment using the SCART port located at the rear of
your TV Monitor as shown below.
Source-IN
AUDIO
COMPOSITE
S-Video
R
W Y
S-VIDEO
SPDIF-OUT
PC AUDIO-IN
SCART
AV
HDMI
Y
Y
Yellow
R
Red
W
White
or
or
VCR
DVD
W R
STB
* Philips recommends the following priority for connection types: HDMI ->SCART -> AV
TV-OUT
SCART
Recorder
AV
*SCART-out only works with analog broadcasts.
7
Connecting a camera, camcorder, video game or headphones
Connect your camera, camcorder, video game console or headphones to the video/audio ports on the rear
of the TV Monitor set as shown below.
w
w
Y
R
Y
R
Connecting a PC or notebook computer
To display PC output on your TV Monitor, connect your PC or notebook computer to the TV Monitor as
shown below.
SPDIF-OUT
PC AUDIO-IN
D-Sub
D-Sub
* For VGA input, Philips recommends setting your PC’s external monitor resolution to 1440 x 900 pixels
@ 60 Hz refresh rate.
Selecting the input source
Once you have connected your antenna or external equipment to the TV Monitor, you need to select the
correct input source.
Press the corresponding button on the remote control to select the correct input source.
Input button guide:
1
2
3
4
8
TV key
Toggle Analog TV (ATV) between input sources.
AV key
Toggle AV and HDMI between input sources.
SCART key
Toggle SCART between input sources.
PC key
Toggle VGA between input sources.
1
2
3
4
OSD navigation
Many of the advanced settings and adjustments are available through using the OSD (onscreen display)
menus, as shown in the example screenshot below.
Basic operations required to navigate these menus (Picture, Audio, Channel management and Settings)
are described in this section.
Navigating the OSD with the remote control
Picture
Brig htness
50
Contrast
60
Colour
30
Sharpness
80
70
Backlig ht
Colour Temp
Warm
Noise Reduction
Move
Low
Enter
Back
There are four main OSD menus. These are: Picture, Audio, Channel management and Settings.
Use the following method to navigate these menus.
1
Press the MENU button on the remote control or the MENU button on the
control panel.
2
Select your desired menu by using the up and down directional keys to switch
between the four menus.
3
Use the directional keys to interact with the menu. The up / down directions will
scroll through the menu options, while left/right will adjust the different settings (for
example, in the Picture menu, settings such as brightness, contrast, etc.). Press MENU
to exit.
Adjusting the OSD settings
The OSD can be used for adjusting the settings of your TV Monitor.
Press the MENU a key to open the OSD. You can use the OSD to adjust the picture quality, audio
settings,channel settings and general settings. For advanced settings, please refer to following page:
Adjusting the picture quality
1 Press the MENU key to bring up the OSD.
Picture
Brig htness
50
Contrast
60
Colour
30
80
Sharpness
70
Backlig ht
Colour Temp
Warm
Noise Reduction
Move
Low
Enter
Back
2 Using the directional keys, select Picture from the OSD. Then
navigate to the picture element you wish to adjust.
3 Use the left or right keys to adjust the sliding scales.
4 The Picture menu can be used to adjust the brightness, contrast,
colour, sharpness and other image-related qualities.
9
Adjusting the audio settings
1 Press the MENU key to bring up the OSD.
Audio
Treble
50
60
Bass
30
Balance
Sound Effect
Off
AVL
Off
Move
Enter
Back
2 Using the directional keys, select Audio from the on screen display.
Then navigate to the feature you wish to adjust.
3 Use the left or right keys to adjust the sliding scales.Press OK to
save.
4 The Audio menu can also be used to adjust the treble, bass,
balance, sound effect and AVL
Adjusting the channel management
Channel Management
Country
Germany
Skip
Off
1
Press the MENU key to bring up the OSD.
2
Using the directional keys, select Channel management from
the OSD.
3
Use the directional keys to navigate the menus.
4
The Channel management menu can be used to set the channel
namings, Auto Scan,Manual Scan channel and other related settings.
1
Press the MENU key to bring up the OSD.
2
Using the directional keys, select Settings from the OSD. Then
navigate to the feature you wish to adjust.
3
The Settings menu can be used to adjust the menu language and
other important settings.
Reorder
Name
639. 22Mhz
Frequency
Auto Scan
Manual Scan
Lock This Channel
Move
Enter
Back
Adjusting the settings
Setting s
English
Menu Language
Sleep
Off
Set PIN
Wide Mode
Full
Factory Default
Move
Enter
Back
* The options available on the OSD may vary depending on the TV Monitor signal source.
Advanced features
Lock This Channel
Lock This Channel allows you to enter a password and effectively stop anyone without the password from
watching TV Monitor Channel.
10
To enable this feature:
Setting a personal PIN
Settings
Menu Lang uag e
English
Sleep
Off
Set PIN
Wide Mode
1
Full
Factory Default
Move
Enter
Press the MENU key on the remote
control to bring up the OSD.
Back
2
Use the directional keys to navigate to the
Set PIN (see note)
3
Enter a four-digit password. Type it again and press OK to reconfirm.
4
Press MENU to exit.
.
Settings menu. Then select
* The default PIN for this TV Monitor is "0000." First enter "0000" when you want to change the PIN.
If youforget your PIN, please enter 6163 to reset.
Locking TV Channel
Channel Management
Country
Germany
Skip
Off
Reorder
1
Name
639. 22Mhz
Frequency
Auto Scan
Press the MENU key on the remote
control to bring up the OSD.
Manual Scan
Lock This Channel
Move
Enter
Back
2
Use the directional keys to navigate to the
.
Then select Lock
This Channel
3
Enter your PIN. Type it again and press OK to reconfirm.
(see page 10 note)
Channel Management menu.
11
Reorder for channels
The first time you completed the setup wizard, all available channels were listed. If you need to reorder for
new channels, please follow the steps below:
Reordering for channels
1
Press the MENU key on the remote control to bring up the OSD.
2
Use the directional keys to navigate and select
Channel Management
Country
Germany
Skip
Off
Reorder
3
Name
639. 22Mhz
Frequency
Auto Scan
Manual Scan
Lock This Channel
Move
4
12
Enter
Back
Select OK and press MENU to exit.
Channel Management.
Highlight Reorder. Then, select
the channel you wish to reorder
and press OK to confirm. Move
to the right channel number and
press OK to reconfirm.
Re-scan for channels
The first time you completed the setup wizard, all available channels were listed. If you need to re-scan for
new channels, please follow the steps below:
Scanning for channels
1
Press the MENU key on the remote control to bring up the OSD.
2
Use the directional keys to navigate and select
Channel Management.
Channel Manaaaement
Country
Germany
Skip
Off
Reorder
Name
639. 22Mhz
Frequency
Auto
Auto Scan
Scan
Highlight Auto Scan. Then, select
Manual Scan
Lock This Channel
Start and press OK to begin.
3
Move
Enter
or
Back
Highlight Manual Scan. Then, select
Channel Manag ement
Country
Germany
Skip
Off
Scan up,Scan down or Scan for
updates and press OK to begin.
Reorder
Name
639. 22Mhz
Frequency
Auto Scan
Manual Scan
Lock This Channel
Move
4
Enter
Back
Select OK and press MENU to exit.
13
Widescreen display mode
Your Philips TV Monitor has a special widescreen mode that allows you to toggle between 4:3, 16:10, Full,
Panorama, and Letterbox 1 and 2 type views.
Press the WIDE key on the remote control to toggle the display between the four wide modes.
Wide mode
The Philips TV Monitor contains four widescreen modes, including 4:3, 16:10, Full, Panorama, and Letterbox
1 and 2.
4:3
For 4:3 standard pictures. A side bar appears on each side.
16:10
For 16:10 standard pictures. A side bar appears on each side.
Full
In this mode, the whole picture is stretched toward each side of the screen.
Panorama
In this mode, the picture is progressively stretched toward each side of the screen.
Letterbox 1 and 2
In this mode, the picture is enlarged linearly to fit the screen. The top and bottom
portions of the picture may be cut off.
14
Philips Pixel Defect Policy
Philips' Flat Panel Monitors Pixel Defect Policy
Philips strives to deliver the highest quality products. We use some of the industry's most advanced
manufacturing processes and practice stringent quality control. However, pixel or sub pixel defects on
the TFT LCD panels used in flat panel monitors are sometimes unavoidable. No manufacturer can
guarantee that all panels will be free from pixel defects, but Philips guarantees that any monitor with
an unacceptable number of defects will be repaired or replaced under warranty. This notice explains
the different types of pixel defects and defines acceptable defect levels for each type. In order to
qualify for repair or replacement under warranty, the number of pixel defects on a TFT LCD panel
must exceed these acceptable levels. For example, no more than 0.0004% of the sub pixels on a 15"
XGA monitor may be defective. Furthermore, Philips sets even higher quality standards for certain
types or combinations of pixel defects that are more noticeable than others. This policy is valid
worldwide.
Pixels and Sub pixels
A pixel, or picture element, is composed of three sub pixels in the primary colors of red, green and
blue. Many pixels together form an image. When all sub pixels of a pixel are lit, the three colored sub
pixels together appear as a single white pixel. When all are dark, the three colored sub pixels together
appear as a single black pixel. Other combinations of lit and dark sub pixels appear as single pixels of
other colors.
Types of Pixel Defects
Pixel and sub pixel defects appear on the screen in different ways. There are two categories of pixel
defects and several types of sub pixel defects within each category.
Bright Dot Defects Bright dot defects appear as pixels or sub pixels that are always lit or 'on'. That is,
a bright dot is a sub-pixel that stands out on the screen when the monitor displays a dark pattern.
There are the types of bright dot defects:
Two adjacent lit sub pixels:
One lit red, green or blue sub
- Red + Blue = Purple
pixel
- Red + Green = Yellow
Three adjacent lit sub pixels
(one white pixel)
- Green + Blue = Cyan (Light Blue)
* A red or blue bright dot must be more than 50 percent brighter than neighboring dots
while a green bright dot is 30 percent brighter than neighboring dots.
15
Black Dot Defects Black dot defects appear as pixels or sub pixels that are always dark or 'off'. That
is, a dark dot is a sub-pixel that stands out on the screen when the monitor displays a light pattern.
These are the types of black dot defects:
One dark sub pixel
Two or three adjacent dark sub pixels
Proximity of Pixel Defects
Because pixel and sub pixels defects of the same type that are near to one another may be more
noticeable, Philips also specifies tolerances for the proximity of pixel defects.
Pixel Defect Tolerances
In order to qualify for repair or replacement due to pixel defects during the warranty period, a TFT
LCD panel in a Philips flat panel monitor must have pixel or sub pixel defects exceeding the
tolerances listed in the following tables.
BRIGHT DOT DEFECTS
MODEL
190TW8
1 lit subpixel
3
2 adjacent lit subpixels
1
3 adjacent lit subpixels (one white pixel)
0
Distance between two bright dot defects*
Total bright dot defects of all types
BLACK DOT DEFECTS
MODEL
15 mm
3
ACCEPTABLE LEVEL
190TW8
1 dark subpixel
5
2 adjacent dark subpixels
2
3 adjacent dark subpixels
0
Distance between two black dot defects*
Total black dot defects of all types
TOTAL DOT DEFECTS
MODEL
Total bright or black dot defects of all types
* 1 or 2 adjacent sub pixel defects = 1 dot defect
Your Philips monitor is ISO13406-2 Compliant
16
ACCEPTABLE LEVEL
15 mm
5
ACCEPTABLE LEVEL
190TW8
5
Tips
Poor reception
The proximity of mountains or high buildings may be responsible for ghost
pictures, echoing or shadows. In this case, try manually adjusting your picture:
see Finetune (p.9) or modify the orientation of the outside aerial. If you are
using an indoor aerial, reception may be difficult in certain conditions. You can
improve reception by rotating the aerial. If the reception remains poor, you
will need to use an external aerial
No picture
Have you connected the aerial socket properly ? Have you chosen the right
system? (p.10). Poorly connected euroconnector cables or aerial sockets are
often the cause of picture or sound problems (sometimes the connectors can
become half disconnected if the TV Monitor set is moved or turned). Check all
connections.
No sound
If on certain channels you receive a picture but no sound, this means that you
do not have the correct TV Monitor system. Modify the System setting (p.10).
The am plifier connected to the TV Monitor does not deliver any sound?
Check that you have not confused the audio output with the audio input.
PC mode
don’t work ?
Check that you have configured the computer on a compatible display
resolution (see p.8).
Remote control The TV Monitor set does not react to the remote control; the indicator on the
set no longer flashes when you use the remote control? Replace the battery.
Standby
If the set receives no signal for 30 mins, it automatically goes into standby
mode. To save power, your set is fitted with components that give it a very
low power consumption when in standby mode (less than 1 W).
Cleaning the
set
Only use a clean, soft and lint-free cloth to clean the screen and the casing of
your set. Do not use alcohol-based or solvent-based products.
Still no results?
Disconnect the mains plug of the TV Monitor for 30 seconds then reconnect it.
If your TV Monitor set breaks down, never attempt to repair it yourself: contact ’s
your dealer after-sales service.
Glossary
VGA (Video Graphics Array): a common standard graphics display system for PCs.
RGB signals : These are the three video signals,
Red Green Blue, which make up the picture.
Using these signals improves picture quality.
S-VHS Signals: These are 2 separate Y/C video
signals from the S-VHS and Hi-8 recording standards.The luminance signals Y (black andwhite)
and chrominance signals C (colour) are recorded
separately on the tape.This provides better
picture quality than with standard video(VHS and
8 mm) where the Y/C signals are combined to
provide only one video signal.
NICAM sound: Process by which digital sound can
be transmitted.
System: Television pictures are not broadcast in
the same way in all countries. There are different
standards: BG, DK, I, and L L’. The System setting
(p.10) is used to select these different standards. This
is not to be confused with PAL or SECAM colour
coding. Pal is used in most countries in Europe,
Secam in France, Russia and most African countries.
The United States and Japan use a different system
called NTSC. The input EXT is used to read NTSC
coded recordings.
16:10: Refers to the ration between the length and
height of the screen. Wide screen televisions have
a ration of 16/10, conventional screen TV Monitor
sets have aration of 4/3.
17
PC Input Signal Reference Chart
Resolution
Horizontal Frequency
(kHz)
Vertical Frequency
(Hz)
Standard
1
640 x 350
31.5
70
VGA
2
720 x 400
31.47
70
VGA
3
640 x 480
31.47
60
VGA
4
640 x 480
35
66.7
MAC
5
640 x 480
37.861
72
VESA
6
640 x 480
37.5
75
VESA
7
640 x 480
43.3
85
VESA
8
800 x 600
35.156
56
VESA
9
800 x 600
37.879
60
VESA
10
800 x 600
48.077
72
VESA
11
800 x 600
46.875
75
VESA
12
800 x 600
53.674
85
VESA
13
832 x 624
49.72
74.5
MAC
14
1024 x 768
48.36
60
VESA
15
1024 x 768
56.48
70
VESA
16
1024 x 768
60.02
75
VESA
17
1280 x 720
44.772
59.855
VESA
16:10
18
1280 x 720
56.456
74.777
VESA
16:10
19
1360 x 768
47.72
59.799
VESA
16:10
20
1360 x 768
60.288
74.891
VESA
16:10
21
1440 x 900
55.935
59.887
VESA
16:10
22
1440 x 900
70.635
74.984
VESA
16:10
* The PC input does not support Sync on Green or Composite Sync.
* The PC input does not support interlaced signals.
18
Format
Product specifications
Model
Panel spec
Resolution (pixels)
Brightness (typical)
Contrast Ratio (tpe.)
Display colour
Viewing angle (tpe.)
Response (tpe.)
Power supply
Input
Max. power consumption
Power saving
Mechanical
Dimensions (W x H x D mm)
Weight (Kg)
Weight (lbs)
Gross weight (Kg)
Gross weight (lbs)
Wall Mounting
Analog TV system
TV Colour system
Sound system
Stereo system
TV Tuner System
Subtitles
Analog TV-tuner quantity
Terminal
Analog Tuner In
SCART
AV-S-Video
AV-CVBS
HDMI
SPDIF-out
PC D-sub in
PC audio-in
Headphone
Audio system
Speaker
190TW8
1440 x 900
300 cd/m2
1000:1
16.7 M
H: 170 o ; V:160 o
5 ms
90 V ~ 264 V - AC. (47~63 Hz)
<58 W
<1 W
490.4 x 412.5 x 138.9
4.6
10.1
6.8
15
100mm x 100mm
PAL, SECAM
B/G/D/K/I/L
NICAM / A2
PLL, 45.25 Mhz - 862.25 Mhz
Teletext 1.5
1
Yes
CVBS (In/Out), RGB (In), Audio R/L
S-Video, Audio R/Lshare with CVBS
CVBS, Audio R/L share with S-Video
Yes
Yes
Yes
Yes
Yes
5W+5W
19