1
Quick Start Guide
Wi-Fi Phone for Skype™
Executive Travel Set
Model No.
This product is designed
for use in the following
countries:
UK, Germany, France (indoor
use), USA, Canada, Japan
KX-WP1050E
Contents
1. Packing the accessories ..........2
2. Installing the base unit .............2
3. Setting up the base unit ...........6
4. Setting up the handset .............8
5. Menus .................................... 11
6. Managing contacts .................13
7. Making / answering calls ........15
8. Troubleshooting ......................15
Thank you for purchasing a Panasonic Wi-Fi Phone for Skype
Executive Travel Set.
Please read this Quick Start Guide before using the unit and save for future
reference.
For further details, please read the Operating Instructions included in the
CD-ROM.
The Operating Instructions are in PDF format. Please note that Adobe®
Reader® (6.0 or later) or Acrobat® Reader (5.0 or later) is required to view
the Operating Instructions.
No emergency calls: Skype is not a replacement for your ordinary
telephone and cannot be used for emergency calling.
We recommend keeping a record of the following information for
future reference.
Date of purchase
Serial No.
(found on the bottom of the base unit)
MAC address
(found on the bottom of the base unit)
Name and address of dealer
Note:
LIn the event of problems, you should contact your equipment supplier in
the first instance.
Sales Department:
Panasonic Business Systems U.K.
Panasonic House, Willoughby Road, Bracknell, Berkshire, RG12 8FP
Panasonic Communications Co., Ltd.
1-62, 4-chome, Minoshima, Hakata-ku, Fukuoka 812-8531, Japan
Copyright:
This material is copyrighted by Panasonic Communications Co., Ltd.,
and may be reproduced for internal use only. All other reproduction, in
whole or in part, is prohibited without the written consent of Panasonic
Communications Co., Ltd.
© 2007 Panasonic Communications Co., Ltd. All Rights Reserved.
PQQW15844ZA SJ0207SM0
1
Packing the accessories
1
Included accessories
2
No.
1
2
3
4
5
6
7
8
9
j
k
l
4
3
5
6
7
8
j
k
9
Trademarks:
LMicrosoft, Windows and Internet Explorer are either registered
trademarks or trademarks of Microsoft Corporation in the United States
and/or other countries.
LSkype, SkypeIn, SkypeOut and the S logo are trademarks of Skype
Limited.
LWi-Fi is a trademark of the Wi-Fi Alliance.
2
Quantity
1
1
1
1
1
1
1
1
1
1
1
1
*1 The included AC mains lead is compatible with a power source up to 250 V AC.
You might need a separate AC mains lead when you use this product in other
countries.
For USA, Canada and Japan: Part No. PQJA10188Z
For Germany and France: Part No. PFJA02A006Z
*2 Your base unit’s default network name (SSID) and network key for wireless
connection are printed. As this information is important for the base unit
settings, save this sticker in a safe place.
l
Note:
LDo not include the CD-ROM when packing the
accessories in the carrying case.
LCharge the battery for 6 hours before initial use.
Accessory item
Ethernet cable (approx. 0.5 m)
Charge cable (approx. 0.5 m)
AC mains lead*1 (approx. 1.8 m)
AC adaptor for base unit (approx. 1.9 m)
Base unit (Wireless travel router)
Handset stand
Battery
Handset
Carrying case
Quick Start Guide
CD-ROM (Operating Instructions are included.)
Wireless LAN sticker*2
LAdobe, Acrobat and Reader are either registered trademarks or
trademarks of Adobe Systems Incorporated in the United States and/or
other countries.
LMozilla and Firefox are registered trademarks of the Mozilla Foundation.
LAll other trademarks identified herein are the property of their respective
owners.
ł
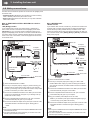
Installing the base unit
Select the appropriate installation procedure according to where you want
to use the unit.
– In a hotel room: Follow the instructions 2-A on this page.
– At home: Follow the instructions 2-B on page 4.
Note:
LYou need to connect a computer to the base unit in order to set up the
base unit.
2-A While you are in a hotel room
You can use the handset while you are travelling by accessing the Internet
from a hotel room.
The hotel you are staying in may give you specific instructions as to what
Internet connection mode you should select. In that case, follow their
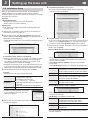
Mode selector
1
Computer
(if necessary)
Base unit
AC mains lead
To AC outlet
instructions. Otherwise, you are suggested to use [Default Profile] when
you set the connection mode in Initialization Setup (3-A on page 6).
3
4
Ethernet cable
(not included)
AC adaptor
Note:
LUse only the included Panasonic AC adaptor
PQWEWP1050 and AC mains lead PSJA1106Y.
LYou need a separate AC mains lead when
you use this unit in USA, Canada, Japan,
Germany and France.
2
2
Internet
Ethernet port
(RJ45 socket)
1 Switch the Mode selector to “HOTEL”.
2 Connect the included Ethernet cable to the “WAN”
port on the base unit and the Ethernet port (RJ45
socket) in the hotel room.
LIf you cannot find the Ethernet port (RJ45 socket)
in the hotel room, ask the hotel front desk. In
some hotels, the wireless Internet connection
service may be available by using a wireless
Ethernet bridge prepared by the hotel.
3 Connect a separate Ethernet cable to the “LAN”
port on the base unit and the Ethernet (LAN) port
on your computer.
4 Connect the included AC adaptor to the power port
Ethernet cable (included)
OR
and an AC outlet.
LThe WAN indicator on the base unit lights in
steady green or amber.
Wireless Ethernet bridge
3
ł
2. Installing the base unit
2-B While you are at home
The base unit has 2 modes of operation for use at home: AP (Bridge) mode
and Router mode.
– AP (Bridge) mode is designed for the case when you have an existing
router or modem (cable or DSL) with a built-in router.
– Router mode is designed for the case when you only have a standard
cable or DSL modem.
With an EXISTING ROUTER or MODEM with a built-in
ROUTER
<AP (Bridge) mode>
If you install the base unit with your existing router or modem with a
built-in router, the base unit should be set to AP (Bridge) mode. Select
[AP (Bridge)] for your connection mode in Initialization Setup (3-A on
page 6). In AP (Bridge) mode, the base unit connects wireless devices to
one another and to the LAN, and allows wireless devices to use a DHCP
server on the LAN. In most cases, routers are equipped with the function
as the DHCP server.
With a MODEM ONLY
<Router mode>
If you install the base unit with a modem only, the base unit should be set
to Router mode. In Router mode, the base unit assigns IP addresses to
network devices (including wireless devices) as a DHCP server. It also
protects the network devices from being directly exposed to the WAN. For
your connection mode, select [DHCP], [Static] or [PPPoE] in Initialization
Setup (3-A on page 6).
Mode selector
1
Mode selector
Base unit
1
Computer
(if necessary)
Base unit
Computer
(if necessary)
2
4
Ethernet cable (not included)
Ethernet cable (not included)
3
Existing router
2
4
3
2,5
Cable or DSL modem
Cable or
DSL modem
Ethernet cable (included)
Ethernet cable
(included)
Internet
6
5
AC mains lead
To AC outlet
AC adaptor
1 Switch the Mode selector to “HOME”.
2 Turn off your computer properly. Unplug any cable connecting your
existing router (or modem with a built-in router) to your computer.
However, your existing router (or modem with a built-in router) needs
to remain connected to your cable or DSL modem.
3 Connect the included Ethernet cable to the “WAN” port on the base
unit and an unused Ethernet (LAN) port on your existing router (or
modem with a built-in router).
4 Connect a separate Ethernet cable to the “LAN” port on the base
unit and the Ethernet (LAN) port on your computer.
5 Connect the included AC adaptor to the power port and an AC outlet.
LThe WAN indicator on the base unit lights in steady green or
amber.
Internet
AC mains lead
To AC outlet
AC adaptor
1 Switch the Mode selector to “HOME”.
2 Turn off your computer properly and unplug your cable or DSL
modem’s Mains lead. Unplug any cable connecting the modem to
your computer. However, the modem needs to remain connected to
the Internet.
3 Connect the included Ethernet cable to the “WAN” port on the base
unit and the Ethernet (LAN) port on the modem.
4 Connect a separate Ethernet cable to the “LAN” port on the base
unit and Ethernet (LAN) port on your computer.
5 Plug your modem’s power adaptor into an AC outlet.
LWait for your modem’s power light to stop flashing before you go
to the next step. (It may take a few minutes.)
6 Connect the included AC adaptor to the power port and an AC outlet.
LThe WAN indicator on the base unit lights in steady green or
amber.
Note:
LUse only the included Panasonic AC adaptor PQWEWP1050 and AC
mains lead PSJA1106Y.
LYou need a separate AC mains lead when you use this unit in USA,
Canada, Japan, Germany and France.
Note:
LUse only the included Panasonic AC adaptor PQWEWP1050 and AC
mains lead PSJA1106Y.
LYou need a separate AC mains lead when you use this unit in USA,
Canada, Japan, Germany and France.
4
5
3
Setting up the base unit
3-A Initialization Setup
When you log in the base unit for the first time, you must register the
network settings you use for HOME or HOTEL mode as a profile in
Initialization Setup using the Web browser on the computer you connected
to the base unit’s “LAN” port.
5 Click [Network Connection] on the Top Menu.
ł
LThe current Internet connection settings and information of the
wireless connection are displayed.
Important:
LRequired Web browser:
– Microsoft® Internet Explorer® 6.0 or later for Windows®
– Mozilla® Firefox® 1.5 or later for Windows
Operating tips:
[ ]: The words in the brackets indicate button names displayed on the
computer screen.
1 After the base unit installation (pages 2-5), turn on the computer you
connected to the base unit’s “LAN” port.
2 Open the Web browser. Enter http://192.168.102.1/ (the base unit’s
default IP address) or http://kxwpa.webpage in the address field of the
browser and press the ENTER key.
LInitialization Setup starts. The Login User Name and Password page is
displayed.
6 Click [New Profile] under the New Profile heading.
LIf you have no specific instructions for the Internet connection from the
hotel, you can use [Default Profile] for an easy setup. Ask the hotel
front desk for details. Select [Default Profile] then skip to step 10.
7 Select the desired connection mode used in the current mode (HOME or
HOTEL), then click [Next>].
When the Mode selector is set to “HOME”:
LIf you have already set your user name and password, skip to step 4.
If “Initialization Setup” window is not displayed:
LCheck the network setting on your computer. It is necessary to obtain
an IP address of your computer automatically from a DHCP server.
See “Obtain an IP address automatically on your computer” in the
Operating Instructions included in the CD-ROM.
LSometimes it is necessary to set up your Web browser’s proxy server
to access the base unit. See “Changing the proxy server settings on
Web browser” in the Operating Instructions included in the CD-ROM.
3 Enter the desired user name and password, then click [Save].
Important:
LPlease keep your user name and password secure.
[User Name]
[Password]
LThe user name and password can contain 6 to
15 alphanumeric characters.
LThe following cannot be used:
[ ” ], [ ’ ], [&], [<], [>], [ : ], [(space)]
LUser name and password must be different from
each other.
LUser name and password are case-sensitive.
LInternet connection modes vary according to the Internet service
provider. Select a connection mode referring to the Internet service
provider’s setup information.
LSelect [DHCP], [Static] or [PPPoE] if the base unit is installed in
Router mode.
Select [AP (Bridge)] if the base unit is installed in AP (Bridge) mode.
[DHCP]
LAllows the base unit to receive an IP address
automatically from a DHCP server. This connection
mode is usually required for use with cable modems.
[Static]
LAllows the base unit to assign a specific IP address.
[PPPoE]
LAllows the base unit to receive an IP address from
a PPPoE server. This connection mode is usually
required for use with DSL modems.
[AP (Bridge)]
LAllows the base unit to work as an access point when
you have a router at home.
When the Mode selector is set to “HOTEL”:
[Retype Password] LEnter the password again to verify.
LThe base unit begins restarting and a prompt
screen with fields for your user name and
password is displayed.
LSelect the conection mode as specific instructions for the Internet
connection from the hotel.
L[AP (Bridge)] is not available in HOTEL mode.
[DHCP]
LAllows the base unit to receive an IP address
automatically from a DHCP server. DHCP
configuration is often used in hotel rooms.
[Static]
LAllows the base unit to assign a specific IP address.
[PPPoE]
LAllows the base unit to receive an IP address from a
PPPoE server.
4 Enter the user name and password set in step 3. Then click [OK].
LTop Menu is displayed.
LA screen with fields for configuring the connection mode you select in
this step is displayed.
6
7
ł
3. Setting up the base unit
10 Click [Restart].
Example: When you select [DHCP]
LThe base unit restarts with the Internet connection profile you have just
saved. When the WAN indicator lights in steady green, the Initialization
Setup is complete.
LIn AP (Bridge) mode, you need to restart your computer.
11 Try to access a website in order to confirm the Internet connection
8 Configure the settings referring to the Internet service provider’s setup
information (or instructions provided by the hotel), then click [Next>].
LIf your Internet service provider or the hotel you are staying in does not
specify any of the settings, leave the data fields blank except for MTU
entry.
LThe Save Settings page is displayed.
setting. Enter http://www.panasonic.co.uk in the address field of the
browser and press the ENTER key.
LIf the Panasonic website is displayed, you have successfully
connected to the Internet.
LIf you are in a hotel room, an authorisation for the Internet access may
be required. Ask the hotel front desk and follow their instructions.
3-B Mode selector
Once you have registered the profiles for HOME and HOTEL modes in
Initialization Setup, you can easily select the mode by switching the Mode
selector to “HOME” or “HOTEL” before turning on the base unit.
Mode selector
9 Confirm the settings you are about to save, then click [Save].
LThe setting that you have just configured are saved as profile No. 1
(HOME mode) or No. 2 (HOTEL mode) according to the position of
the Mode selector. The profile is automatically named “Automatic
generation” and saved.
3-C Using your computer on a wireless LAN
The 15 character device-specific network name (SSID) and 13
alphanumeric character 128 bit encryption network key (WEP) are set to
factory defaults. These factory default setting values are shown on the
included Wireless LAN sticker. If you use your computer on a wireless
LAN, use the values on the sticker to set the wireless LAN configuration
on your computer. To set your computer to be used on a wireless LAN, see
the manual for the computer you use.
Note:
LTo use your computer on a wireless LAN, a wireless LAN card needs to
be installed on your computer.
4
ł
Setting up the handset
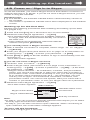
Battery charge
4-A Battery installation
1 Press the notch of the handset cover firmly, and
slide it in the direction of the arrow.
2 Insert the battery (A), and press it down until
it snaps into position (B). Then close the
handset cover (C, D).
Charge indicator
C
B
A
Connect the included charge cable to the CHARGE port of the handset.
Connect the other end to the CHARGE port of the base unit that is
connected to the power supply.
Charge the battery for 6 hours before initial use.
LWhile charging, the charge indicator on the handset lights in red. When
the battery is fully charged, the indicator goes out.
D
Important:
LUse only the rechargeable Panasonic battery.
CHARGE ports
To AC outlet
Charge cable
Handset stand
8
9
ł
4. Setting up the handset
ł
4-B Power on / Sign in to Skype
To use the handset, you need a Skype account and need to connect to a
network and sign in to Skype. If you do not have a Skype account, you can
create it using the handset.
Operating tips:
{ }: The words in the brackets indicate button names/soft key names on
the handset.
“ ”: The words in quotations indicate menu items displayed on the handset
screen.
Starting up for the first time
Perform the following procedures after installing and setting up the base
unit (pages 2-9).
1 Press and hold {}} for 2 seconds to turn on the handset.
2 Read the entire Skype agreement. i {Yes}
LThe handset starts searching for available networks
in range, then the handset automatically connects to
the base unit.
LIf the network list is displayed, select the desired
network and press {Connect}.
If you already have a Skype account:
3 After a network connection is complete, select “Sign
in to Skype”.
i {Select}
4 Enter your Skype name (see section 6-C on page 14 for information on
entering text). i {OK} i Enter your password. i {OK}
5 Press {Yes} or {No} to decide whether to sign in automatically from the
next time on.
LThe Idle screen appears.
If you do not have a Skype account:
3 “Create new account” i {Select}
4 Enter a Skype name (see section 6-C on page 14 for information on
entering text). i {OK} i Enter a password. i {OK} i Re-enter
the password. i {OK}
LSkype names can be 6 – 32 characters, numbers, and punctuation
marks. You cannot use spaces or start your name with a number or
punctuation mark. If the name is already in use, you will be prompted
to try another name. Password can be 4 – 20 characters. You can
use any mix of upper- and lowercase characters, numbers, and
punctuation marks. You cannot use spaces, start your name with a
number or punctuation mark, or use your Skype name as a password.
5 Read the entire Skype agreement. i {Yes}
LThe Idle screen appears.
<Idle screen>
Handset status icons
Skype online status
Current time
Skype credit balance
Soft key functions
Note:
LIn step 2, you can connect to specific networks that require you to select
security type and enter the network key.
LIn step 2, you can also connect to open networks. When connecting to
open networks, the confirmation message appears.
To turn off the handset:
Press and hold {}} for 2 seconds.
10
ł
4. Setting up the handset
Starting up for the second time
1 Press and hold {}} for 2 seconds to turn on the handset.
LThe handset starts searching for available networks. If any networks
you normally use are already in your preferred networks list, the
handset automatically connects to one of the networks in the list.
1 {Menu} (middle soft key)
2 “Settings” i {Select}
3 “Time and Date” i {Select}
4 Select the desired setting.
2 After a network connection is complete, select “Sign
in to Skype”.
i {Select}
LIf the handset is set to “Auto sign in” and you did not sign out
the previous time, the Idle screen appears instead of the “Sign in”
screen and steps 3 and 4 are skipped.
Select the desired item. i {Select}
Time zone
Summer time Select “Standard” or “Summer time”. i {Select}
Enter the current hour and minute (24-hour clock/
12-hour clock format) by selecting 2 digits for each.
For 12-hour clock, press {*} to select “AM” or “PM”.
i {OK}
Time
3 Enter your Skype name. i {OK} i Enter your password. i {OK}
4 Press {Yes} or {No} to decide whether to sign in automatically from the
next time on.
LThe Idle screen appears.
Time format Select “24 hour clock” or “12 hour clock”. i
{Select}
The default is set to “24 hour clock”.
4-C Setting the time and date
Date
Set the correct time and date before you start using the handset.
LChanging “Time zone” and “Summer time” sets the displayed time
forward or backward. When you set the time and date for the first time,
set the time after all the other time and date settings.
5
Enter the current day, month and year by selecting
2 digits for day and month, and 4 digits for year. i
{OK}
Date format Select the desired format. i {Select}
Note:
LIf you make a mistake when entering the time and date, press {<} or {>}
to move the cursor, then make the correction.
Menus
5-A Main menu
Skype’s Main menu provides 7 menus as shown below.
1 {Menu} (middle soft key)
2 Select the desired menu. i {Select}
Contacts*1
View a list of Skype and SkypeOut™ contacts with their
current Skype status.
History*1
View history of missed calls, incoming calls, outgoing
calls, Voicemails and authorization requests.
Status*1
Define your personal Skype settings.
LChange status: Change your Skype online status.
LMy profile: Change your profile details.
LSign out: Sign out of Skype.
Configure handset settings.
LNetwork: Search for networks, manage preferred
networks list, and set auto-connection to open networks.
LGeneral: Change your password*1, set auto sign-in*1,
update software, and reset handset settings.
LCall divert*1: Set call forwarding, Voicemail and
welcome message.
LPrivacy*1: Restrict incoming calls to those you specify.
LTones: Set the ringer type, tone, volume, notification
tone, Keypad tone and out of service tone.
LTime and Date: Set the time zone, summer time,
time, time format, date and date format.
LBlocked users*1: View blocked users list and
unblock users you desire.
LPhone settings: Register the handset to the base
unit and adjust the brightness of the handset display.
LInformation: View handset information such as product
ID, software/firmware versions and MAC address.
LAdvanced: Set the notification for software update and
set network proxy.
Settings
Add contact*1 Add Skype and SkypeOut contacts to your contact list.
Search*1
Search for Skype contacts over the Internet.
Services*1
View Skype credit, SkypeIn™ and Voicemail information.
*1 Available only when you are signed in to Skype.
5-B Idle mode option screen
1 {Options}
2 Select the desired menu. i {Select}
LFunctions available in the menu depend on whether
you are signed in to Skype.
Silent*1
Set the silent mode to on.
Sounds on*1
Set the silent mode to off.
11
Change status*2 *3
Change your Skype online status.
My profile*2
Change your Skype profile details.
Sign out*
2
Sign out of Skype.
View networks
View a list of networks found within range.
Network details
View network connection information.
*1 Either is displayed according to the current silent mode setting.
*2 Available only when you are signed in to Skype.
*3 You can also access to the “Change status” menu by pressing {^}
while in the Idle screen.
12
6
Managing contacts
3 Enter the name (Skype name or full name) or E-mail address to search
6-A Adding contacts
You can add up to 500 contacts to your contact list. If you have an existing
Skype account, your contact list is automatically downloaded when you
sign in. If you are new to Skype and have just created an account, your
contact list will be empty. You will need to add contacts to your list.
Adding Skype contacts
1 {Menu} (middle soft key)
2 “Add contact” i {Select}
3 “Skype” i {OK}
4 Enter the Skype name (max. 32 characters; see
section 6-C on page 14 for information on entering
text). i {OK}
5 Press {Yes} to add the contact to your list and to authorize the contact
to see when you are online.
LPress {No} to add the contact without the authorization.
LIf you previously sent an authorization request to the same user and
the user accepted your request, skip steps 6 and 7, then press {OK}.
for (max. 50 characters; see section 6-C on this page for information on
entering text). i {OK}
LYou can also search for a contact by entering a part of the name.
LThe contacts containing the entered characters are listed.
4 Select the desired Skype contact.
LTo view the contact’s profile, press {View}.
LTo call the contact, press {{} or {s}.
LTo access options, press {Options} and select the desired option. i
{Select}
More results
View the next 20 results.
Previous results
View the previous 20 results.
Search again
Search again with another keyword.
Add to contacts
Add the contact to your contact list.
View profile
View the contact’s profile.
6-C Text entry
6 Press {OK} to send an authorization request to the added contact.
7 Enter text to send with the request (max. 200 characters). i {OK}
The dial keys are used to enter characters and numbers. Each dial key
has multiple characters assigned to it. Use the following character table for
reference when you enter characters or numbers.
Note:
LYou can also search and add Skype contacts from the “Search” menu
(6-B on this page).
Character table
Key
Adding SkypeOut numbers
You can add non-Skype (SkypeOut) numbers to your contact list. SkypeOut
numbers are listed with “
” icon in your contact list.
1 {Menu} (middle soft key)
2 “Add contact” i {Select}
3 “SkypeOut number” i {OK}
4 “Contact’s name” i {Select}
5 Enter the name if you desire (max. 50 characters; see section 6-C on
page 14 for information on entering text). i {OK}
6 “Phone number” i {Select}
7 Enter the phone number (max. 20 digits) in the following way (even for
{1}
Lowercase
Uppercase
(abc)
(ABC)
1 . , ? ! - _ @ *1
{2}
a b c 2
{3}
{4}
{5}
A B C 2
2
2 a b c
2
d e f 3
D E F 3
3
3 d e f
3
g h i 4
G H I 4
4
4
4
j k l 5
J K L 5
5
5
5
{6} m n o 6
M N O 6
6
6
6
{7}
p q r s 7 P Q R S 7
7
7
7
{8}
t u v 8
8
8
8
8 {Save}
6-B Searching for Skype contacts
You can search the Skype directory for your desired Skype contacts over
the Internet so that you can call, add to your contact list, or view the profiles
of the contacts.
1 {Menu} (middle soft key)
2 “Search” i {Select}
13
T U V 8
{9} w x y z 9 W X Y Z 9
Space*1 0
{0} Space*1 0
local calls):
“country code” + “area code” + “local phone number” i {OK}
Example (using the country code “1” for calling USA): + 1 555 321 5555
L“+” (international prefix) is automatically added.
LFor some countries, you may need to exclude “0” at the beginning of
the area code.
LTo correct a digit, press {CLEAR}.
Phone No.
entry screen
Numeric Hexadecimal Numeric
(123)
(HEX)
(123)
1
1
1
Text entry screen
{*}
9
9
0
0
+ (Press
and hold)*1
Change character entry mode
{#}
9
0
+ (Press
and hold)
*
#
Line feed*1
*1 Valid depending on the text entry screen.
Basic operation
LTo move the cursor, press {<} or {>}.
LTo enter another character located on the same dial key, leave for a
second after pressing the dial key, so that the cursor automatically moves
to the right.
LTo change the character entry mode, press {*} repeatedly to shift
through Lowercase (abc), Uppercase (ABC), Numeric (123) and
Hexadecimal (HEX) modes. (Changing the character entry mode is
invalid when you enter phone numbers.)
LPress {*} to switch between uppercase and lowercase just after entering
a character.
LTo enter symbols while in the text entry screen, press {Symbol} and
select the desired symbol, then press {Insert}.
(The available symbols differ depending on the text entry screen.)
LTo edit/correct a mistake, press {<} or {>} to move the cursor to the
character or number you want to erase, then press {CLEAR}. Enter the
appropriate character or number.
14
7
Making / answering calls
7-A Making Skype calls
Using the contact list
1 {CONTACTS}
2 Select the desired Skype contact. i {{}
LYou can search for a contact by entering a part of the display name.
Press the dial keys to enter the name, then press {^} or {V} to select
the desired contact from the candidates.
3 When you are finished talking, press {}}.
Note:
LIn step 1, you can also press {Menu} (middle soft key). i “Contacts”
i {Select}
Using History
Example (using the country code “1” for calling USA):
+ 1 555 321 5555
L“+” (international prefix) is automatically added.
LFor some countries, you may need to exclude “0” at the beginning of
the area code.
LTo correct a digit, press {CLEAR}.
2 {{}
3 When you are finished talking, press {}}.
7-C Answering calls
1 Press {{} or {s}.
2 When you are finished talking, press {}}.
The following events are logged in the “History” menu: 50 missed calls,
20 incoming calls, 20 outgoing calls, 100 Voicemails and 20 authorization
requests.
To reject the call:
1 {Menu} (middle soft key)
2 “History” i {Select}
3 Select the desired list. i {Select}
4 Select the desired log. i {{}
While the handset is ringing, press {Silent}.
While the handset is ringing, press {}}.
Temporary ringer off:
7-D Useful features during a call
LIf you select a Voicemail log, press {Options}.
i “Call” i {Select}
5 When you are finished talking, press {}}.
Note:
LIn step 1, you can also press {{} to access the outgoing calls list. i
Press {<} or {>} to switch between the outgoing calls, incoming calls
and missed calls lists, then skip to step 4.
7-B Making regular phone calls (SkypeOut)
Feature
Operation
Using the
speakerphone
Press {s} during a call.
LTo switch to the receiver, press {s} or {{}.
Reciver/Speaker
volume
Press {^} or {V} repeatedly during a call.
Hold
1 Press {Hold} during a call.
2 To release hold, press {Resume} or {{}.
1 Press {MUTE} during a call.
2 To return to the conversation, press {MUTE} or {{}.
1 Press {Answer} to answer the 2nd call after the call
Mute
Call waiting
waiting tone.
SkypeOut is a way to make calls from Skype to persons who use landlines
or mobile phones. You must have Skype credit to make SkypeOut calls.
For more information, please visit http://www.skype.com/
2 To switch between calls, press {Switch}.
3 To resume conversation, press {Resume}.
1 Enter the phone number in the following way (even for local calls):
“country code” + “area code” + “local phone number”
8
Troubleshooting
For other troubleshooting, please see the Operating Instructions included
in the CD-ROM. You can also get up-to-date support information from our
website: http://www.panasonic.co.uk
Problem
Cause/solution
The unit does not work. • Make sure the battery is installed correctly and
fully charged (pages 8-9).
• Check the connections (pages 2-5).
• Unplug the base unit’s AC adaptor to reset the
unit. Reconnect the adaptor and try again.
• The handset has not been registered to the
base unit. Register the handset (refer to the
Operating Instructions included in the CDROM).
The Top menu of
the base unit is not
displayed.
• Confirm the new IP address by using the
handset. Select “Network details” in the
Idle mode option screen (5-B on page 11).
Enter the displayed IP address in the address
field of the browser after http://.
15
Problem
I cannot make a call.
Cause/solution
• Confirm the Ethernet cable is properly
connected (pages 2-5).
• If you cannot access Internet Web pages using
your computer, check to see if your Internet
service provider is having connection problems
in your area.
• Double-check your device connections against
the installation instructions (pages 2-5). The
order in which you turn on the devices is very
important.
• Many installation issues can be resolved by
resetting all the equipment. First, power down
your modem, base unit, router (if you have
one), and computer. Then, turn the devices
back on one at a time in this order: modem,
router, base unit, computer. If you use the
PPPoE connection, it may take a few minutes
or more to reset the PPPoE connection.
16


![議事録[PDF:299KB]](http://vs1.manualzilla.com/store/data/006615021_2-ca7646eafef05d2c88ccbd96aa1a3bbf-150x150.png)