1
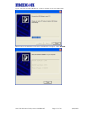
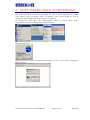
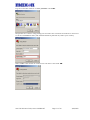
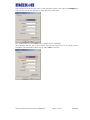
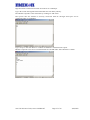
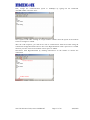
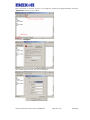
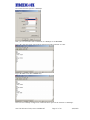
Maxon Electronics Australia Pty Ltd
MM-5100
CDMA 800MHz 1xRTT
Voice/Data/SMS Modem
Windows Setup
Manual
Version: 1.an
Date: August 9th, 2003
FCC RF EXPOSURE COMPLIANCE
In August 1996 the Federal Communications Commission (FCC) of the United States with
its action in Report and Order FCC 96-326 adopted an updated safety standard for
human exposure to radio frequency (RF) electromagnetic energy emitted by FCC
regulated transmitters. Those guidelines are consistent with the safety standard
previously set by both U.S. and international standards bodies. The design of this device
complies with the FCC guidelines and these international standards.
Use only the supplied or an approved antenna. Unauthorized antennas, modifications, or
attachments could impair call quality, damage the phone, or result in violation of FCC
regulations.
The use of this device in any other type of host configuration may not comply with FCC
RF exposure requirements and should be avoided. During operation, a 20cm separation
distance should be maintained between the antenna, whether extended or retracted, and
the user’s/bystander’s body (excluding hands, wrists, feet, and ankles) to ensure FCC RF
exposure compliance.
CAUTION
Change or modification without the express consent of Maxon Electronics Australia Pty.
Ltd. voids the user’s authority to use the equipment. This equipment has been tested and
found to comply with the limits pursuant to Part 15 of the FCC rules. These limits are
designed to provide reasonable protection against harmful interference in an appropriate
installation. This equipment generates, uses, and can radiate radio frequency energy and,
if not used in accordance with instructions, can cause harmful radiation to radio
communication. However, there is no guarantee that interference will not occur in a
particular installation. If the equipment does cause harmful interference in radio and
television reception, which can be determined by turning the equipment on and off, the
user is encouraged to try to correct the interference by one or more of the following
measures:
z
Re-orient or relocate the receiving radio or TV antenna
z
Increase the separation distance between the equipment and the receiver
z
Contact RT Wireless Ltd. Technical Support for assistance.
MM-5100 Windows Setup Manual 090803 NZ
Page 2 of 44
4/09/2003
MM-5100 WINDOWS SETUP MANUAL
All data and information contained in or disclosed by this document are proprietary
information of Maxon Australia, and all rights therein are expressly reserved. By accepting
this material, the recipient agrees that this material and the information contained therein
are held in trust and will not be used, copied, reproduced in whole or in part, nor its
contents used in any manner without the express written permission of Maxon Australia.
This information provided in this document is provided on an “as is” basis, is preliminary
and subjected to change without notice.
In no event will Maxon Australia be liable for any damages arising directly or indirectly from
any use of information contained in this document.
It is recommended that this manual be read in conjunction with other supporting
documentation from Maxon Electronics Australia Pty. Ltd.
NOTES:
The user is cautioned that changes or modifications not expressly approved by Maxon
Electronics Australia Pty Ltd could void the warrantee.
POTENTIALLY UNSAFE AREAS
Posted facilities: Turn off this device in any facility or area when posted notices require
you to do so.
Blasting areas: Turn off your phone where blasting is in progress. Observe restrictions
and follow any regulations or rules.
Potentially explosive atmospheres: Turn off your phone when you are in any area with
a potentially explosive atmosphere. Obey all signs and instructions. Sparks in such areas
could cause an explosion or fire, resulting in bodily injury or death.
Areas with a potentially explosive atmosphere are often but not always clearly marked.
They include:
z
fuelling areas such as gas or petrol stations
z
below deck on boats
z
transfer or storage facilities for fuel or chemicals
z
vehicles using liquefied petroleum gas, such as propane or butane
z
areas when the air contains chemicals or particles such as grain, dust or metal
powders
z
any other area where you would normally be advised to turn off your engine
MM-5100 Windows Setup Manual 090803 NZ
Page 3 of 44
4/09/2003
1. REVISION HISTORY
Level
Date
History
0.1a
August 7th, 2003
Commercial Release Version - Australia
0.1an
August 19th, 2003
Commercial Release Version - New Zealand
MM-5100 Windows Setup Manual 090803 NZ
Page 4 of 44
4/09/2003
2. CONTACT INFORMATION
Depending on the nature of your inquiry, please feel free to contact the following senior
personnel:
New Zealand Sales, Marketing & Technical:
Lester Radford – Director RT Wireless Limited
Phone
Email
[email protected]
Email:
[email protected]
Email:
[email protected]
+64 4 562 8226 or +64 27 292 3084
Australia Sales, Marketing & Corporate:
Ray Sanders – Managing Director
Phone:
+61 2 9707 2000
Dana Baggetto – General Manager
Phone:
+61 2 9707 2000
Andrew Arnold – Cellular Business Development Manager
Phone:
+61 418 977 778
Email:
[email protected]
Email:
[email protected]
Australia Technical:
Ashween Prasad – Technical Engineer
Phone:
+61 2 9707 2000
MM-5100 Windows Setup Manual 090803 NZ
Page 5 of 44
4/09/2003
3. TABLE OF CONTENTS
MM-5100 WINDOWS SETUP MANUAL ........................................................................................ 3
1.
REVISION HISTORY ........................................................................................................ 4
2.
CONTACT INFORMATION ................................................................................................ 5
3.
TABLE OF CONTENTS ..................................................................................................... 5
4.
OVERVIEW ...................................................................................................................... 7
5.
LED FUNCTIONS ............................................................................................................. 8
6.
LOADING THE PHONE SOFTWARE & DRIVERS................................................................ 9
7.
SETUP MODEM USING HYPERTERMINAL .......................................................................15
8.
MODEM SETUP UNDER WINDOWS OS.............................................................................23
8.1.
Setup Standard 19200 Modem .........................................................................................23
8.2.
Setup Maxon USB Modem Driver......................................................................................26
8.3.
Setup Maxon Serial Modem Driver....................................................................................27
8.4.
USB or Serial Modem Properties .......................................................................................27
8.4.1.
9.
Change MM-5100 Modem Properties ............................................................................28
SETTING UP WINFAX PRO WITH WINDOWS 98 AND 2000...............................................29
9.1.1.
Introduction .................................................................................................................29
9.1.2.
Setting up WinFax® General Properties when using RS232 port. ...................................30
9.1.3.
Fax Properties - when using Serial................................................................................31
9.1.4.
Start Using...................................................................................................................32
9.1.5.
Setting up WinFax® General Properties when using USB connection.............................33
9.1.6.
FAX Properties – when using USB ................................................................................34
9.1.7.
Start Using...................................................................................................................35
10.
CHANGE FROM WINFAX TO 1X DATA SESSION..............................................................36
11.
SETTING UP QNC (QUICK NET CONNECT) WINDOWS 98 & 2000 .....................................40
MM-5100 Windows Setup Manual 090803 NZ
Page 6 of 44
4/09/2003
4. OVERVIEW
This manual is specifically provided as a guide to the set-up and operation of the Maxon
MM-5100 modem with WindowsTM for operation of the MM-5100 in Data or Fax mode when
connected to a PC.
Details on loading the Drivers are covered in the initial section where we describe use of the
installation CD.
The MM-5100 modem is a rugged, full duplex 1xRTT CDMA Voice/Data/Fax/SMS modem
designed to operate on CDMA 800MHz networks. CDMA is an efficient and secure cellular
wireless technology that compliments fixed or mobile applications.
Two main data services are available on CDMA networks: 1xRTT, a packet switched
connection; and IS-95A, a circuit switched connection. IS-95A over-air data rates are limited
to 14.4 kbps. The 1x service is capable of data rates as high as 153.6 kbps [network
dependant].
The MM-5100 modem has been specifically designed to be compatible with 1xRTT networks
to take full advantage of the exceptional data speeds and always-on connection, and is
backwards compatible with IS95A circuit switched networks.
When using the MM-5100 for 1x connections, access is achieved via a PPP (TCP/IP)
connection to the CDMA network. The CDMA carrier provides the Internet connectivity,
becoming the ISP for that session.
Applications such as web browsing, email, FTP, LAN access, etc function as normal.
MM-5100 Windows Setup Manual 090803 NZ
Page 7 of 44
4/09/2003
5. LED FUNCTIONS
This section describes the labelling and functions of the LED on the MM-5100.
The RSSI LED will be OFF when RSSI is less than -105dBm, flashing when in-between the 95dBm and -105dBm, and ON when greater than or equal to -95dBm.
NOTE: the higher the negative number i.e. the further away from ZERO, the weaker the received signal.
The smaller the number i.e. the closer to ZERO, the stronger the received signal.
A flashing RSSI LED indicates potential need for an alternative antenna, relocating the
antenna to a site more suited to signal acquisition, or elevation of the antenna to improve
signal acquisition, or a combination of all the above.
A consistent RSSI reading of -95dBm or better [number closer to ‘0’] is advisable.
LED Label
Description
pwr
Lit continuously when power is applied to modem
dtr
To indicate MODEM is live on Host device
sms
Blinks if there is unread SMS message
ri/rx
Blinks on incoming voice call, lights continuously on incoming data call,
blinks on data from PC to MODEM
tx
Blinks on data from MODEM to PC
Lights continuously in RSSI range > -95dBm (This is the preferred range)
rssi
Blinks in RSSI range -95dBm > -105dBm, (Signal is marginal)
Turn-off at RSSI < -105dBm (No signal available)
roam
ON when inside a preferred roaming carrier network but outside Telstra’s
network, FLASHES when inside a non-preferred roaming carrier network but
outside Telstra’s network, OFF when inside Telstra network
crt
To indicate connection in Circuit Switched mode
pkt
To indicate active connection in Packet Switched mode (OFF when in dormant
mode)
1x cell
To indicate that local cell supports Packet Switched data (OFF indicates cell
supports only IS95A)
Note 1: In ALL-LED-OFF state, when you connect ear piece to the MM-5100, the LED’s are enabled for a
value set by AT command AT$$EXT_LED=<1~255sec>. If LED always ON is required, change the
AT command parameter to ‘0’.
Note 2: If the LED’s have been disabled by AT command prior to power cycle, all LED’s will remain in
OFF state until ear-piece is connected.
MM-5100 Windows Setup Manual 090803 NZ
Page 8 of 44
4/09/2003
6. LOADING THE PHONE SOFTWARE
& DRIVERS
As you will be required to connect your MM-5100 to your computer and a power source you
must attach an antenna to MM-5100 NOW. This must be done before ANY power is
connected to the modem.
NOTE: The MM-5100 can be powered solely through the USB connection to your PC, however the
maximum power draw available on USB is 500mA. Therefore USB power would only be suitable
where the RSSI signal strength LED on the modem is ON solid. If the RSSI LED is flashing we
recommend you use alternative power source such as the optional 240vAC to 12vDC plug pack.
During the following steps you will:
Load UI software from CD supplied
Supply power to MM-5100
Connect MM-5100 to PC via the supplied Serial or USB cable
Load appropriate drivers from CD supplied
Step 1: Load the CD
Insert the supplied CD into your CD drive. It should auto-run without intervention. If not,
locate the CD drive on your computer, then double click on Setup.exe.
Double click
setup.exe to start
the installation
This will start the installation.
MM-5100 Windows Setup Manual 090803 NZ
Page 9 of 44
4/09/2003
When the software starts the screen will look similar to this:
If you are NOT intending to use the Maxon Phone UI software and only want to load the
drivers then you may install the drivers only.
If USB is not present on your PC leave ‘Install USB Driver’ un-ticked.
If a Serial port is not present on your PC leave ‘Install Serial Driver’ un-ticked.
If you ticked ‘Install USB Driver’ observe the following alert, then click “OK”.
MM-5100 Windows Setup Manual 090803 NZ
Page 10 of 44
4/09/2003
Tick features you want to load then click “Next” to continue.
Software & Drivers you selected will be installed in C:\MAXON folder or rename to suit your
preference.
MM-5100 Windows Setup Manual 090803 NZ
Page 11 of 44
4/09/2003
If you selected to ‘Install Serial Driver’ select the Serial com port to which it is connected
and the communication speed of the modem. The default comm. speed setting is 115200.
The software now installs the Serial Driver.
MM-5100 Windows Setup Manual 090803 NZ
Page 12 of 44
4/09/2003
If you selected ‘Install USB Driver’ connect modem to PC via USB cable.
Maxon Phone UI Software and Driver installation complete. Click ‘Finish’.
MM-5100 Windows Setup Manual 090803 NZ
Page 13 of 44
4/09/2003
To confirm loading of Drivers please go to ‘Control Panel>Phone and Modem
Options>Modems tab’.
MM-5100 Windows Setup Manual 090803 NZ
Page 14 of 44
4/09/2003
7. SETUP MODEM USING HYPERTERMINAL
This section forward is for advanced users who may wish to control integration of the MM5100 without using the Maxon Phone UI Software. This section should be read in
conjunction with the MM-5100 AT Commands User Manual.
To change the baud rate, start HyperTerminal which
Programs>Accessories>Communications>HyperTerminal’
is
located
under
‘Start>
HyperTerminal starts
HyperTerminal asks you for a Connection Description so enter a name of your choosing for
this connection.
MM-5100 Windows Setup Manual 090803 NZ
Page 15 of 44
4/09/2003
E.g. the connection name is “115200_MODEM”. Click ‘OK’.
Drop down the “connect using” dialog box and select the Com Port the modem is connected
to via the serial RS232 cable. (The modem should be powered on). Select your country.
Select COM1 if the modem is connected to Com Port 1 then click ‘OK’.
MM-5100 Windows Setup Manual 090803 NZ
Page 16 of 44
4/09/2003
Select Properties from the File menu or the Properties button, then click on ‘Configure’ for
this com port and in this dialog box, select Bits per second (bps).
The default baud rate of the MM5100 is 115200. Select 115200bps.
After selecting the bits per second confirm that the Data bits is set to “8”, Parity “none”,
Stop Bits “1”and “Hardware” flow control. Click “OK” to continue. .
MM-5100 Windows Setup Manual 090803 NZ
Page 17 of 44
4/09/2003
HyperTerminal communicates with the modem at 115200bps.
Type “AT” inside the HyperTerminal window then the Enter/CR key.
The Modem responds to AT command by sending an “OK” back.
This proves that the modem is correctly connected with PC through serial port and is
communicating at 115200bps.
Type “at+ipr?” and then Enter to confirm the Modems communication speed.
Modem responds to the above command with the set IPR value. This should be 115200.
MM-5100 Windows Setup Manual 090803 NZ
Page 18 of 44
4/09/2003
Now, change the communication speed to 19200bps by typing the AT Command
“AT+IPR=19200” and then enter.
The response “OK” after sending of “at+ipr=19200” confirms that the speed of the modem
has been changed to 19200.
After the “OK” response, you will not be able to communicate with the modem using AT
Commands in HyperTerminal. This is due to the HyperTerminal comm. speed set at 115200
whereas you have now set the modem comm. speed to 19200.
Disconnect from HyperTerminal by clicking “Disconnect” in the toolbar to release the
connection.
MM-5100 Windows Setup Manual 090803 NZ
Page 19 of 44
4/09/2003
Now connection is released, and you can change the properties of HyperTerminal. Click the
“Properties” button on the toolbar.
Properties “Configure”.
The communication speed was set to115200bps.
MM-5100 Windows Setup Manual 090803 NZ
Page 20 of 44
4/09/2003
Set communication speed to 19200bps.
Now, you can send the “AT” Commands at 19200bps to the MODEM.
Type “AT” and then enter. The modem should respond back with an “OK”.
Type “AT+IPR?” and then “ENTER” key.
You have successfully changed the communication speed of the modem to 19200bps.
MM-5100 Windows Setup Manual 090803 NZ
Page 21 of 44
4/09/2003
You must now shut down the HyperTerminal program. Click the “Yes” button.
Save HyperTerminal so that you do not have to set the properties again.
MM-5100 Windows Setup Manual 090803 NZ
Page 22 of 44
4/09/2003
8. MODEM SETUP UNDER WINDOWS OS
8.1. Setup Standard 19200 Modem
The same procedure applies to set up in Windows 2000 and Windows 98.
Open Control Panel
After you have changed the communication speed of Modem to 19200bps, select modem
under “Control Panel” then “Phone and Modem Options”
Select Modem tab and click on ADD to setup a new modem.
MM-5100 Windows Setup Manual 090803 NZ
Page 23 of 44
4/09/2003
In the ‘Add/Remove Hardware Wizard’ select the box beside “Don’t detect my modem; I will
select it from a list”. Click “Next >”to continue with the installation.
Select Standard Modem Types under the manufacturers list.
Select Standard 19200bps Modem under Models.
MM-5100 Windows Setup Manual 090803 NZ
Page 24 of 44
4/09/2003
Select the Com Port that will be used by this modem.
Installation is now complete. Click “Finish” button to finish installing the New Modem.
Verify Installation of Standard 19200bps Modem by checking under listed modems in
Control Panel. Click on the “Properties” button.
MM-5100 Windows Setup Manual 090803 NZ
Page 25 of 44
4/09/2003
This page should show the COM Port this modem will use and the Maximum Port speed.
8.2. Setup Maxon USB Modem Driver
A USB connection between the PC and the MM-5100 allows full use of the 1x networks high
speed data transfer rates. Serial Cable connections between the PC and any connected
device have a baud limit of 115kbps.
Install the USB driver as previously described using Maxon Phone UI Software and selecting
installation of Maxon USB Driver. When finished the Maxon USB modem should now be
listed under ‘Modems’ in the Device Manager.
MM-5100 Windows Setup Manual 090803 NZ
Page 26 of 44
4/09/2003
8.3. Setup Maxon Serial Modem Driver
The Serial Driver is required for utilising data rates greater than 19,200bps (up to 115kbps)
for example when using the 1x network.
Install the Serial driver as previously described using Maxon Phone UI Software and
selecting installation of Maxon Serial Driver. When finished the Maxon Serial modem should
now be listed under ‘Modems’ in the Device Manager.
8.4. USB or Serial Modem Properties
Under ‘Control Panel>Phone And Modem Options’ you can see that the MM-5100 Modem
Drivers you have loaded are now listed. To check the installed Modem click “Properties”
button or double click the listed modem.
MM-5100 Windows Setup Manual 090803 NZ
Page 27 of 44
4/09/2003
8.4.1.
Change MM-5100 Modem Properties
This section is applicable to both the Serial and USB modems. It deals with the different
settings required for QNC or 1x Packet Connection (for Fax settings please refer to next
chapter):
For QNC Connection, type “AT+CRM=131”.
For 1x Packet Connection, type “AT+CRM=150”.
Then Click ‘OK’ Button.
MM-5100 Windows Setup Manual 090803 NZ
Page 28 of 44
4/09/2003
9. SETTING UP WINFAX PRO WITH
WINDOWS 98 AND 2000.
9.1.1.
Introduction
Installation of WinFax Pro 10.* and above.
To install WinFax®, please see WinFax® setup guide provided by Symantec®.
Note: WinFax® supports only 19200bps. If you use the MM-5100 at 115200bps baud rate, but want to
send or receive Fax by WinFax® you must change the baud rate from 115200bps to 19200 bps
The modem speed should be set to 19200bps. Please use AT+IPR command to change the
communication speed of the MM-5100.
Execute WinFax®
MM-5100 Windows Setup Manual 090803 NZ
Page 29 of 44
4/09/2003
9.1.2. Setting up WinFax® General Properties
when using RS232 port.
1:
You can define program and user setup by selecting this.
2:
Setup Dialog Box
2-1: Option tab
2-2: Modem setup
3:
Modems and Comms Devices Properties Dialog Box
3-1: Leave it as “Default”
3-2: You must select Standard 19200bps Modem.
3-3: Select the Modem “Properties…” button
4:
Properties for MM-5100 General tab
4-1: Modem connects with COM 1
4-2: You must select “19200” bps
4-3: WinFax® detects Class 2.0 automatically
NOTE: Under item 3-1 there may be 4 options as below:
1. Cellular (Analog/AMPS)
2. Cellular (PCS/GSM-Digital)
3. Default
4. Dial as entered
Any of these options can be selected and work well. But if possible select “default”.
MM-5100 Windows Setup Manual 090803 NZ
Page 30 of 44
4/09/2003
9.1.3.
5:
Fax Properties - when using Serial
Properties for MM 5100 Fax tab
5.1: For reliable transmission we recommend you select the Maximum Transmission speed
as “9600bps” and the Minimum Transmission speed at “9600bps” or “Send at any rate”.
Maximum Transmission can be set at “14400bps” but if faxing proves unreliable, set back to
“9600”.
5-2: Do NOT select this.
5-3: You must type the strings:
“AT+CRM=0” in Field 1;
“AT$QCVAD=2” in Field 2;
“AT+FCLASS=2.0” in Flow control field;
“Use hardware flow control” MUST be ticked;
ATZ in Reset field;
After typing that string, click the “OK” button.
If your WinFax® has the combo box in item number 5 as below:
1. Cellular (Analog/AMPS)
2. Cellular (PCS/GSM-Digital)
Either of these can be selected and work well.
MM-5100 Windows Setup Manual 090803 NZ
Page 31 of 44
4/09/2003
9.1.4.
Start Using
After setting up, click on File and select “Send New”
Send Fax by clicking the “Send” button.
MM-5100 Windows Setup Manual 090803 NZ
Page 32 of 44
4/09/2003
9.1.5. Setting up WinFax® General Properties
when using USB connection
1:
You can define program and user setup
2:
Setup Dialog Box
2-1: Option tab
2-2: Setup Maxon (Qualcomm) USB Modem here
3:
Modems and Communications Devices Properties Dialog Box
3-1: Leave it as “Default”
3-2: Select installed Maxon USB Modem.
3-3: Select the Modem then click the “Properties…” button
4:
Properties for Maxon USB Modem’s General tab
4-1: It connects with COM5 or whichever comm USB modem uses.
4-2: You must select “19200” bps
4-3: WinFax® detects Class 2.0 automatically
NOTE: Under item 3-1 there may be 4 options as below:
1. Cellular (Analog/AMPS)
2. Cellular (PCS/GSM-Digital)
3. Default
4. Dial as entered
Any of these options can be selected and work well. But if possible select “default”.
MM-5100 Windows Setup Manual 090803 NZ
Page 33 of 44
4/09/2003
9.1.6.
5:
FAX Properties – when using USB
Properties for Maxon USB Modem’s Fax tab
5-1: You must select the Maximum Transmission speed as “9600bps” and the
Minimum Transmission speed as the item of “9600bps” or “Send at any rate”
5-2: Do NOT select this.
5.1: For reliable transmission we recommend you select the Maximum Transmission speed
as “9600bps” and the Minimum Transmission speed at “9600bps” or “Send at any rate”.
Maximum Transmission can be set at “14400bps” but if faxing proves unreliable, set back to
“9600”.
5-2: Do NOT select this.
5-3: You must type the strings:
“AT+CRM=0” in Field 1;
“AT$QCVAD=2” in Field 2;
“AT+FCLASS=2.0” in Flow control field;
“Use hardware flow control” MUST be ticked;
ATZ in Reset field;
After typing that string, click the “OK” button.
If WinFax® has the combo box in item number 5 as below either of these can be selected and
work well. - 1. Cellular (Analog/AMPS)
2. Cellular (PCS/GSM-Digital)
MM-5100 Windows Setup Manual 090803 NZ
Page 34 of 44
4/09/2003
9.1.7.
Start Using
After setting up, click on File and select “Send New”
Send Fax by clicking the “Send” button.
MM-5100 Windows Setup Manual 090803 NZ
Page 35 of 44
4/09/2003
10. CHANGE FROM WINFAX TO 1X DATA
SESSION
To go from a WinFax or Asynchronous data call the modem must be reset to accept 1x
communications by changing the baud back from 19200bps to 115200bps.
Open saved HyperTerminal session.
If you had saved HyperTerminal connection when changing the speed from 115200 to
19200, open that connection.
Starts HyperTerminal
The HyperTerminal speed should be set to 19200.
MM-5100 Windows Setup Manual 090803 NZ
Page 36 of 44
4/09/2003
Type “at+ipr?” followed by ‘enter’ to confirm the modem’s communication speed.
The modem should respond with +IPR: 19200 and OK.
Now, change the communication speed to 115200bps by typing the following AT Command
“at+ipr=115200” followed by enter.
The response “OK” after sending of “at+ipr=115200” confirms that the speed of the modem
has changed to115200.
After that “OK” response, you can’t type any other AT Command in HyperTerminal. The
Hyper Terminal speed has to be changed to 115200.
MM-5100 Windows Setup Manual 090803 NZ
Page 37 of 44
4/09/2003
Click “Disconnect” in the toolbar and release the connection.
After the connection has been released, change the properties of HyperTerminal. Click on
the “Properties” button in the toolbar.
In the Properties dialog box. Select the Com Port to which the modem is connected to. Click
the “Configure…” button
MM-5100 Windows Setup Manual 090803 NZ
Page 38 of 44
4/09/2003
Under Port Settings, the communication ‘Bits per second:’ speed is currently 19200bps.
Select 115200 and click ‘OK’
The communication speed has now been changed to 115200bps.
Now check the MM-5100 communication speed. Type “at+ipr?” and enter.
An OK response confirms the comms speed of the modem has been changed to 115200.
MM-5100 Windows Setup Manual 090803 NZ
Page 39 of 44
4/09/2003
11. SETTING UP QNC (QUICK NET
CONNECT) WINDOWS 98 & 2000
Before setting up QNC you should install the modem. This is explained in this manual
under “Modem Setup Under Windows”. Particularly refer to the section “Change MM-5100
Modem Properties”
NOTE: for details on the Accelerator service that can significantly boost your web page and internet
access and which is supplied at no charge for both 1x and QNC, please review the information
on the Telstra web site at: http://www.telstra.com.au/mobilenet/services/mobilint.htm
This section deals with the different settings required for QNC or 1x Packet Connection:
Start Dialup Networking as shown below.
Open Control Panel folder and double click on the icon “Network and Dial-up Connections”.
MM-5100 Windows Setup Manual 090803 NZ
Page 40 of 44
4/09/2003
Double Click on the icon “Make New Connections”.
This will start a new connection wizard, click “Next >” to continue.
Select connection type of “Dial-up to private network” and then click the “Next >” button
MM-5100 Windows Setup Manual 090803 NZ
Page 41 of 44
4/09/2003
Type the phone number for QNC or 1x connection which is #777 and click “Next >”.
Select your preference and click the button “Next >”.
Type the name you want to use for this connection, and click “Finish”.
MM-5100 Windows Setup Manual 090803 NZ
Page 42 of 44
4/09/2003
After successful setup of Network Connection Wizard, you can start the Dial-up connection
by double clicking on this new connection icon in the ‘Network and Dialup Connections’
box.
Type User name, Password then click “Dial”.
Then click “Properties”.
1) QNC Connection
or
2) 1x Packet Connection
User name:
qncuser
User name:
mobile@jamamobile
Password:
ssqnc
Password:
telecom
For either option select “Save Password”
MM-5100 Windows Setup Manual 090803 NZ
Page 43 of 44
4/09/2003
If you wish you can check or set the Properties of this Connection.
You have now completed the MM-5100 modem setup and Windows functionality.
If you have any questions relating to this setup procedure please contact your dealer or RT
Wireless Ltd. on +64 4 562 8226 or visit their web site at [email protected] .
MM-5100 Windows Setup Manual 090803 NZ
Page 44 of 44
4/09/2003