1
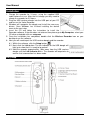
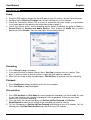
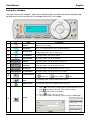
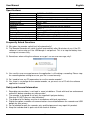
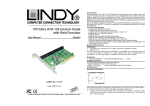
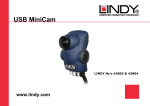
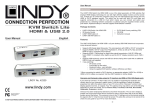
Wireless Voice Recorder
User Manual
English
LINDY No. 32494
www.lindy.com
© LINDY ELECTRONICS LIMITED & LINDY-ELEKTRONIK GMBH - FIRST EDITION (JANUARY 2008)
User Manual
English
Introduction
Thank you for purchasing the LINDY Wireless Voice Recorder! Never again will you run out of
recording space, with this Wireless Voice Recorder you can record directly to your computer’s
hard disk, from a range of up to 30 metres.
Features
•
•
•
•
•
•
Record Remotely
Thanks to integrated 2.4GHz RF technology you can control all functions of the recorder
remotely, giving you the ultimate in flexibility
Organise and Playback your Recordings
Using the Section function you can easily create chapters as you record, with the touch
of a button. Once you have finished your recording you can then playback the chapters in
order, or skip between them, either on your PC or using the remote and its integrated
speaker.
Virtually unlimited Recording disk space
All recordings are stored directly to the hard disk of your PC, meaning that you have
almost limitless recording disk space.
Built-in high sensitivity microphone
Ensuring the clearest recordings, so you never miss a word!
Range up to 30 metres indoors
From one side of the office to another, even through walls
Rechargeable
Simply connect the Wireless Audio Recorder to a PC via the supplied USB cable. The
internal battery will be fully recharged in 2.5 hours, providing up to 12 hours of recording
time.
System Requirements
•
•
A PC running Windows 2000, XP or Vista
One available USB port
Package Contents
•
•
•
•
•
Wireless Voice Recorder with battery
USB receiver dongle
USB charging cable
Installation CD
User Manual
-2-
User Manual
English
Installation
1. Charge the recorder for 3 hours, using the supplied USB
cable, before first use. After the first charge you only need to
charge the recorder for 2.5 hours.
2. Plug the USB receiver dongle into the USB port of your PC
and turn on the Voice Recorder.
3. Windows will recognise the dongle and install the necessary
drivers. Once Windows has finished installing the device
move to the next step.
4. Insert the CD and follow the instructions to install the
Recorder software. If the disk does not autorun then please go to My Computer, select your
CD drive and double click on setup.exe
5. Once the installation has completed, double click the Wireless Recorder icon on your
desktop to run the software.
6. Next you will need to pair the USB receiver dongle and the recorder:
6.1. Within the software, click the Setup button
6.2. Next, click the Link button. The link indicator on the USB dongle will
light up to show that it is ready to be paired.
6.3. Hold the recorder approximately 10cm away from the USB receiver
dongle until the Link Indicator blinks. The recorder will beep twice to
confirm that a connection has been made.
Key Map
-3-
User Manual
English
Key Map (continued)
Icons
Keys
Function description
Power
Press and hold this key for 3 seconds to turn the
recorder on/off.
2
Record
Click to start recording.
3
Section/Stop
4
File Up / Save
5
Section Up /
Fast Forward
In playing mode, scroll up to go to the previous section.
In playing mode, scroll up and hold for 0.5 seconds to
activate the Fast Forward function.
6
Play/Pause
Press to start playing files. Press again to pause.
7
Section Down /
Fast Rewind
8
File Down
9
USB connector
10
Speaker
1
11
Mode indicator
12
Microphone
13
Charging status
LED
14
Connection status
LED
In recording mode, click to start a new section.
In playing mode, click to stop playing.
In recording mode, click to end and save the file.
In playing mode, click to go to the previous file.
In playing mode, scroll down to go to the next section.
In playing mode, scroll down and hold for 0.5 seconds to
activate the Fast Rewind function.
In playing mode, click this button to go to the next file.
Connect USB charging cable.
Speaker
1 Red: Recording mode.
2 Green: Playing mode.
3 Orange: Insufficient disk space.
(When the available disk space is less than 50MB.)
Microphone
1 Red LED on: Low battery alarm.
2 Red LED blinks: Charging.
1 Green LED on: Connected.
(NOTE: If the recorder is out of range or disconnected, the
recorder will beep as a warning)
2 Green LED blinks fast: Standby mode
(When not used for 10 seconds, the recorder will turn to
standby mode)
-4-
User Manual
English
Instructions
Setup
1. Plug the USB receiver dongle into the USB port of your PC and turn on the Voice Recorder.
2. Double click the Wireless Recorder icon on your desktop to run the software.
3. Check the Connection Status LED to ensure a connection has been made. (if a connection
is not made please refer back to the Installation guide on page 3)
4. Check the volume of the sound recording device, before recording, by going to Start >>
Control Panel >> Sounds and Audio Devices. Then choose the Audio tab as shown
below and select Volume. You can now adjust the recording volume.
Recording
1. Press Record to begin recording
2. If you want to create a chapter/section, press Sec/Stop to create your first section. Then
press it again to create a second section (if required) and repeat as required.
3. When you are ready to stop recording press File Up/Save to end and save the recording.
Playback
1. Press Play/Pause to begin playback of the last file recorded.
2. Press Sec/Stop to stop the playback.
File selection
1. Press File Up/Save and File Down to scroll through the recordings you have made. As soon
as you stop scrolling, the selected recording will start to playback so that you can check
whether it is the correct recording.
2. Once you have the correct recording, use Section Up/Fast Forward and Section
Down/Rewind to move to the section of the recording you want to listen to.
3. To Fast Forward press Section Up/Fast Forward and hold for at least 0.5 seconds. To Fast
Rewind press Section Down/Rewind and hold for at least 0.5 seconds.
-5-
User Manual
English
Using the software
You can also use the software, which you installed earlier, to control the remote recorder and
perform many of the functions of the recorder from the PC or Laptop.
Icon
Key
Function
1
Record
Click to start recording
2
Play/Pause
Press to start playing files. Press it again to pause.
3
Section/Stop
1 In recording mode, click to mark a section.
2. In playing mode, click to stop playing.
4
Fast Rewind
In playing mode, click to fast rewind.
5
Fast Forward
In playing mode, click to fast forward.
6
File Up
In playing mode, click to go to the previous file.
7
File Down
In playing mode, click to go to the next file.
8
Section Up
In playing mode, click to go to the previous section.
9
Section Down
In playing mode, click to go to the next section.
10
Volume Control
11
File End and
Save
In recording mode, click to end and save the file.
12
Battery Level
The bar goes lower as the battery charge runs low.
:Volume up
1. Click
:Volume down
:Mute
to change the recording format and FF/Rewind speed.
2. Click
to change the file path. (The default file path is
C:\Program File\ Wireless Recorder)
3. Click
to leave and save changes.
4. To pair the recorder and dongle, you can click the Link button.
13
Setup
-6-
User Manual
English
Specifications
Frequency
Channel number
Data rate
Wireless range
Sampling rate
Recording format
Speaker
Interface
Battery Type
Recharge time
Battery life(full charged)
Dimensions
Weight (battery included)
2400MHz~2483MHz
36
250Kbps
Outdoors up to 100m; Indoors up to 30m
8KHz; 16bit
WAV
13mm diameter dynamic internal speaker
USB 1.1
Rechargeable Lithium-polymer battery
Approx. 2.5 hours
Up to 12 hours recording; 6 hours playback
42 x 20.5 x 130mm (WxDxH)
82.4g
Frequently Asked Questions
Q. Why does the recorder switch itself off automatically?
A. The Remote Recorder will switch itself off automatically after 10 minutes of use, if the PC
software is not running, or if the USB dongle is not present. This is to stop the battery from
running out unnecessarily.
Q. Sometimes when exiting the software on my pc I see an error message, why?
A. You see this error message because the application is still making a recording. Please stop
the recording before exiting to ensure your file is saved correctly.
Q. Do I need to have my PC powered on to use the remote recorder?
A. Yes, there is no storage on the remote recorder, so you must use a PC with the software
application installed.
Safety and General Information
1. Recording conversations is not legal in some jurisdictions. Check with local law enforcement
authorities before recording any conversation.
2. The recorder is designed to use only the supplied Li-polymer battery.
Warning: DO NOT press or stab the battery.
3. The disposal of the battery must be in accordance with local regulations.
4. Digital encryption scrambles all communications transmitted between the recorder and USB
dongle for your privacy.
5. Do not attempt to open the recorder, only qualified personnel may repair this product.
6. Keep the recorder and its parts out of the reach of children.
-7-
CE/FCC & WEEE Information
CE Certification
This equipment complies with the requirements relating to electromagnetic compatibility, EN 55024 and EN55022
class A for ITE, EN61000-3-2/-3 the essential protection requirement of Council Directive 89/336/EEC on the
approximation of the laws of the Member States relating to electromagnetic compatibility.
FCC Warning
This equipment has been tested and found to comply with the limits for a Class B digital device, pursuant to part 15
of the FCC Rules. These limits are designed to provide reasonable protection against harmful interference in a
residential installation.
This equipment generates, uses, and can radiate radio frequency energy and, if not installed and used in
accordance with the instructions, may cause harmful interference to radio communications. However, there is no
guarantee that interference will not occur in a particular installation. If this equipment does cause harmful
interference to radio or television reception, which can be determined by turning the equipment off and on, the user
is encouraged to try to correct the interference by one or more of the following measures:
Reorient or relocate the receiving antenna
Increase the separation between the equipment and receiver
Connect the equipment into an outlet on a circuit different from that to which the receiver is connected
Consult the dealer or an experienced technician for help
You are cautioned that changes or modification not expressly approved by the party responsible for compliance
could void your authority to operate the equipment.
This device complies with part 15 of the FCC Rules.
Operation is subject to the following two conditions:
1. This device may not cause harmful interference, and
2. This device must accept any interference received, including interference that may cause undesired operation.
WEEE (Waste of Electrical and Electronic Equipment), Recycling of Electronic Products
United Kingdom
In 2006 the European Union introduced regulations (WEEE) for the collection and recycling of all waste
electrical and electronic equipment. It is no longer allowable to simply throw away electrical and electronic
equipment. Instead, these products must enter the recycling process.
Each individual EU member state has implemented the WEEE regulations into national law in slightly different
ways. Please follow your national law when you want to dispose of any electrical or electronic products. More
details can be obtained from your national WEEE recycling agency.
Germany / Deutschland
Die Europäische Union hat mit der WEEE Direktive umfassende Regelungen für die Verschrottung und das
Recycling von Elektro- und Elektronikprodukten geschaffen. Diese wurden von der Bundesregierung im Elektround Elektronikgerätegesetz – ElektroG in deutsches Recht umgesetzt. Dieses Gesetz verbietet vom 24.März 2006
an das Entsorgen von entsprechenden, auch alten, Elektro- und Elektronikgeräten über die Hausmülltonne! Diese
Geräte müssen den lokalen Sammelsystemen bzw. örtlichen Sammelstellen zugeführt werden! Dort werden sie
kostenlos entgegen genommen. Die Kosten für den weiteren Recyclingprozess übernimmt die Gesamtheit der
Gerätehersteller.
France
En 2006, l'union Européenne a introduit la nouvelle réglementation (DEEE) pour le recyclage de tout équipement
électrique et électronique.
Chaque Etat membre de l’ Union Européenne a mis en application la nouvelle réglementation DEEE de manières
légèrement différentes. Veuillez suivre le décret d’application correspondant à l’élimination des déchets électriques
ou électroniques de votre pays.
Italy
Nel 2006 l’unione europea ha introdotto regolamentazioni (WEEE) per la raccolta e il riciclo di apparecchi elettrici
ed elettronici. Non è più consentito semplicemente gettare queste apparecchiature, devono essere riciclate. Ogni
stato membro dell’ EU ha tramutato le direttive WEEE in leggi statali in varie misure. Fare riferimento alle leggi del
proprio Stato quando si dispone di un apparecchio elettrico o elettronico.
Per ulteriori dettagli fare riferimento alla direttiva WEEE sul riciclaggio del proprio Stato.
LINDY No. 32494
1st Edition January 2008
www.lindy.com