1
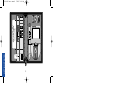
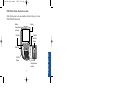
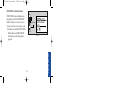
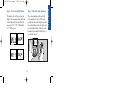
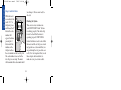
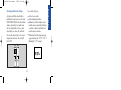
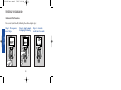
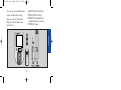
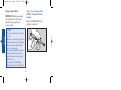
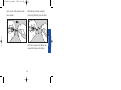
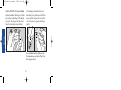
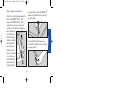
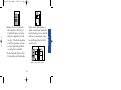
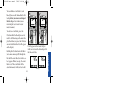
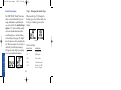
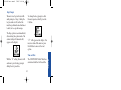
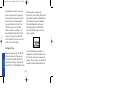
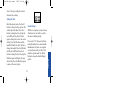
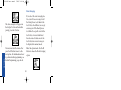
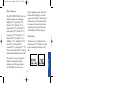
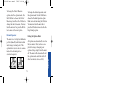
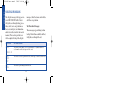
LSC-96-003 own. manual
7/26/97 1:45 AM
Page 1
BLOOD GLUCOSE MONITORING/INSULIN TRACKING SYSTEM
SYSTÈME DE
CONTRÔLE DE LA
GLYCÉMIE/REGISTRE
D’INSULINE
M
Manuel du propriétaire
C
Owner’s Booklet
a
company
LSC-96-003 own. manual
7/26/97 1:45 AM
Page 3
The ONE TOUCH® Profile® System is intended for use outside the body
(in vitro diagnostic use). It should be used only for blood glucose testing
purposes and only with whole blood (not plasma or serum). It should not
be used for the diagnosis of diabetes.
LSC-96-003 own. manual
7/26/97 1:45 AM
Page 4
CAUTION: Before using any product to test your blood sugar (blood glucose), read all instructions and practice the test. Do all quality control checks as directed and consult with a diabetes healthcare professional.
These recommendations apply to all Blood Glucose Monitoring Systems and are supported by the Diabetes
Educator Section of the Canadian Diabetes Association.
This system contains many small parts. Keep away from young children.
Important phone numbers:
LifeScan Customer Care Line (Monday–Friday 9 AM–8 PM Eastern Time):
1 800 663-5521
Write your meter serial number:
Diabetes healthcare professional
Pharmacist
Other
LSC-96-003 own. manual
7/26/97 1:45 AM
Page 5
TABLE OF CONTENTS:
INTRODUCTION
1
Why Blood Glucose Testing Is Important
PRECAUTIONS AND LIMITATIONS
1
3
GETTING STARTED
5
The Complete ONE TOUCH Profile System
5
ONE TOUCH Profile Blood Glucose Meter
7
ONE TOUCH Test Strips
9
®
®
®
ONE TOUCH Control Solution
®
BEFORE TESTING
11
12
Coding the ONE TOUCH Profile Meter
12
Checking the System
– Checking with the Check Strip
– Checking with Control Solution
14
15
19
LSC-96-003 own. manual
7/26/97 1:45 AM
Page 6
TESTING YOUR BLOOD
26
Abbreviated Test Procedure
26
Getting a Drop of Blood
28
How to Test Your Blood
34
Special Messages
38
Checking the Amount of Blood on the Test Strip
40
IMMEDIATELY AFTER TESTING
42
Event Labeling
42
Insulin Programming
44
Carbohydrate Counting
46
UNDERSTANDING YOUR RESULTS
48
Recent Diabetes Findings
48
What This Means for You
48
Frequency of Testing
48
Comparing Meter and Laboratory Results
49
Expected Test Results (Target Range)
50
LSC-96-003 own. manual
7/26/97 1:45 AM
Page 7
Testing Tips to Ensure Accuracy
51
Health Conditions Causing Out-of-Range Results
54
Recommendations for Better Diabetes Control
55
USING THE METER MEMORY
57
Entering the Memory Mode
57
Event Averages
59
Recalling Test Results
60
Event Labels
61
Changing an Insulin Record
61
Deleting an Insulin Record
62
SETTING METER OPTIONS
63
Entering and Using the Options Mode
63
Beep Prompts
65
Time and Date
65
Insulin Prompt
67
Event Averaging
68
LSC-96-003 own. manual
7/26/97 1:45 AM
Page 8
Insulin Programming
69
Display Language
71
Time Format
71
Date Format
72
Unit of Measure
72
Decimal Separator
73
Exiting the Options Mode
73
SOLVING PROBLEMS
74
Test Procedure Messages
74
Error Messages
78
TAKING CARE OF YOUR METER
84
Doing a Daily Check
85
Cleaning the Meter
85
Replacing the Batteries
89
SPECIFICATIONS
92
Guarantee and Warranty
94
LSC-96-003 own. manual
7/26/97 1:45 AM
Page 1
The ONE TOUCH® Profile® System
takes ONE TOUCH technology a step
further with a simple testing procedure
and easy record-keeping features. The
ONE TOUCH Profile System is for
people with diabetes who need to
check (monitor) the level of sugar (glucose) in their blood. This system is
widely available and can be purchased
without a prescription.
levels of people without diabetes, you
can reduce the risk of complications
involving the eyes, kidneys, and nervous system by up to 60%. Keeping
tight control of your blood glucose
requires frequent testing to know how
well you are doing with the factors that
affect your diabetes—medication, diet,
exercise, and stress management.
Why Blood Glucose Testing
Is Important
The Diabetes Control and Complications
Trial (DCCT), a 10-year study of people
with Type I diabetes, found that by
keeping your blood glucose close to the
1
LifeScan developed the ONE TOUCH
Profile System to help you maintain
good control. In addition to providing
you with a simple, fast, and accurate
means of blood glucose testing, the
system includes features that allow
you to record and review important
information regarding your test results,
INTRODUCTION
INTRODUCTION
INTRODUCTION
LSC-96-003 own. manual
7/26/97 1:45 AM
Page 2
insulin dosages, meals, and other significant events in your treatment plan.
for choosing the ONE TOUCH®
Profile® System from LifeScan, a
Johnson & Johnson company.
To perform a blood glucose test, a
ONE TOUCH® Test Strip is inserted
into the meter and a small sample of
blood is applied to the test strip. The
meter measures the blood glucose
level and displays the result in just
45 seconds.
In addition to this owner’s booklet,
complete instructions for use are
included in the “ONE TOUCH Profile
Video Procedure Guide.” For a free
copy, call the LifeScan Customer Care
Line at 1 800 663-5521.
Please read this owner’s booklet carefully. It is your guide to receiving all
of the benefits that this advanced
system has to offer.
If you have any questions, please
call LifeScan’s Customer Care Line at
1 800 663-5521, 9 AM–8 PM Eastern
Time Monday to Friday. Thank you
2
LSC-96-003 own. manual
7/26/97 1:45 AM
Page 3
PRECAUTIONS AND LIMITATIONS
The following information may be useful to you and your healthcare professional when using the ONE TOUCH®
Profile® System to monitor your blood
glucose level.
If the message hi danger appears on
the meter display, this indicates severe
high blood sugar (hyperglycemia);
contact your doctor immediately.
Hematocrit: Extremes in whole blood
hematocrits, very high (above 60%), or
very low hematocrits (below 25%) can
cause false low results.1
Never make significant changes to
your medication program or ignore
physical symptoms without consulting
your healthcare professional.
Reducing substances, such as Vitamin
C (ascorbic acid), have little effect on
blood glucose results when occurring
3
PRECAUTIONS
IMPORTANT: The ONE TOUCH Profile
Meter is not intended for monitoring
blood from newborn infants 0–4 weeks
old (neonatal blood samples).
If you experience symptoms that are
not consistent with your blood glucose results, and you have carefully
followed the procedure described in
the owner’s booklet, contact your
healthcare professional immediately.
LSC-96-003 own. manual
7/26/97 1:45 AM
Page 4
PRECAUTIONS
in normal blood concentrations.
However, abnormally high concentrations of reducing substances in
blood will cause false low blood
glucose results.2
Do not use blood samples with preservatives that contain fluoride (gray top
test tubes). You will get false low
results.
4
LSC-96-003 own. manual
7/26/97 1:45 AM
Page 5
GETTING STARTED
The ONE TOUCH® Profile® System
consists of three main products: the
ONE TOUCH Profile Blood Glucose
Meter, ONE TOUCH® Test Strips, and
ONE TOUCH® Control Solution. These
products have been designed, tested,
and proven to work together as a system to produce accurate blood glucose
test results. Only LifeScan manufactures ONE TOUCH Profile System
products. Attempting to substitute
other products may affect the accuracy of your test results and limit
LifeScan’s ability to help you solve
problems that may arise.
The Complete ONE TOUCH Profile
System
Your ONE TOUCH Profile System
includes:
■
■
■
■
■
■
■
■
5
GETTING STARTED
■
ONE TOUCH Profile Meter
ONE TOUCH Test Strips
ONE TOUCH Control Solution
Owner’s Booklet and Reference
Guide
Check Strip
PENLET® II Automatic Blood
Sampler
Lancets
Carry Case
Logbook
✔
GETTING STARTED
a
company
in whole
blood.
For use w
TOUCH
Blood Bl ith ONEeters.
ucose M
Instructi
package oi ns: Readfore
nsert be
LSC-96-003 own. manual
7/26/97 1:45 AM
Page 6
M
6
C
LSC-96-003 own. manual
7/26/97 1:45 AM
Page 7
ONE TOUCH® Profile® Blood Glucose Meter
Study this diagram to become familiar with all of the parts of your
ONE TOUCH Profile Meter.
Display
Battery
Compartment
(on back)
M Button
C Button
Test Strip
Holder
M
C
Data Port
Test Area
with protective
coating
7
GETTING STARTED
On/Off
Button
LSC-96-003 own. manual
7/26/97 1:45 AM
Page 8
On/Off Button. This button turns the
meter on and off.
Test Strip Holder. The test strip holder holds a ONE TOUCH® Test Strip in
place when you perform a blood glucose or control solution test. It must
be removed to clean the meter.
Display. This is where you read the
simple messages that guide you
through testing, setting options, and
using the memory. Your test results
will be displayed here.
Test Area. The test area is located
under the test strip holder. There is a
clear, protective coating over the test
area that must be kept clean and
undamaged for accurate test results.
GETTING STARTED
M Button. The ONE TOUCH® Profile®
Meter automatically stores your test
results. Use the M button to recall the
information stored in your meter’s
memory and to review your meter’s
option settings.
Battery Compartment. Holds two
AAA batteries. The batteries are
already installed in your meter.
Data Port. Allows you to transfer
the information stored in the meter’s
memory to a computer to view,
analyze, and print. Please contact the
C Button. Use the C button to set the
code on the ONE TOUCH Profile
Meter and to change the meter’s
option settings.
8
LSC-96-003 own. manual
7/26/97 1:45 AM
Page 9
LifeScan Customer Care Line at
1 800 663-5521 for more information.
reads the color to determine the
blood glucose level.
ONE TOUCH® Test Strips
The ONE TOUCH® Profile® System
measures the amount of sugar (glucose) in whole blood. When blood is
applied to a ONE TOUCH Test Strip,
compounds on the test strip react
with the blood to form a blue color.
The ONE TOUCH Profile Meter
Test Spot
GETTING STARTED
9
LSC-96-003 own. manual
7/26/97 1:45 AM
Page 10
IMPORTANT TEST STRIP INFORMATION
■
■
■
■
■
GETTING STARTED
■
■
■
■
ONE TOUCH® Test Strips can be damaged by heat and light. Keep them sealed in
the original vial and store in a cool, dry place below 30˚C (86˚F). Do not refrigerate. Do not place in direct heat or sunlight.
ONE TOUCH Test Strips are intended for use with fresh whole blood or
ONE TOUCH® Control Solution. Do not use them with plasma or serum samples.
Results will not be accurate.
Do not use test strips beyond the expiration date on the vial.
When you open a new vial of test strips, record the discard date on the vial.
Discard unused test strips four months after first opening the vial.
Do not use test strips that are bent, torn, cut, or changed in any way.
Use each test strip immediately after removing it from the vial; replace
the vial cap and close it tightly.
Never transfer test strips to a new vial or any other container. Do not carry
unwrapped test strips in your meter case.
Do not use bleach (or products containing bleach) near the test strips.
For reliable results, use only test strips made by LifeScan.
10
LSC-96-003 own. manual
7/26/97 1:45 AM
Page 11
ONE TOUCH® Control Solution
Normal Control Solution
R
ONE TOUCH Control Solution is an
important part of the ONE TOUCH®
Profile® System. Use it in two ways:
1) to practice the test procedure, and
2) to make sure that the ONE TOUCH
Profile Meter and ONE TOUCH®
Test Strips are working together
properly.
Sha
For
Nor
Expiration Date
Dis
Un
Lot
LIF
AW
(Example)
GETTING STARTED
11
BEFORE TESTING
LSC-96-003 own. manual
7/26/97 1:45 AM
Page 12
BEFORE TESTING
Note: The ONE TOUCH® Profile®
Meter has a number of settings you
can change, including the language,
time and date, display formats, and the
unit of measure. A description of all
these options and how to set them is
found in SETTING METER OPTIONS,
pages 63–73.
you change to another vial of
ONE TOUCH® Test Strips.
Coding the ONE TOUCH Profile Meter
Code the ONE TOUCH Profile Meter
in these three easy steps:
CAUTION: If the code number
on the meter display does not
match the code number on the
vial of ONE TOUCH Test Strips,
test results may be false.
Code numbers are used to ensure
consistent measurements by the
meter. For this reason, it is important
that the code is set correctly. You
must code the meter before using it
for the first time and then every time
12
LSC-96-003 own. manual
7/26/97 1:45 AM
Page 13
Step 2: Match the Code Numbers.
The meter code will appear on the
display for a moment along with the
current time and date and then the
message insert code 9 (Example)
strip will appear.
The code numbers on the test strip
vials range from 1 to 16. If the code
number on the meter display matches
the code number on the test strip vial,
you can begin testing. If the two code
numbers do not match, follow Step 3
to code the meter.
st
C
25
Te
M
Str
ips
(Example)
Do
T e n ot s
o ut st Striptore
sid e s
t h e vi
al
Co de
10
Te
me st for
in asure the qu
an
w
m
Fo hole ent of titative
Blor use blood. glucose
w
o
In d Blu ith ONE
cose
T
pa struc
M OU C H
usi ckagetions: R eters.
n
ea
in
g th ser
d
Fo
is p t befor
Sto r in v
e
rodu
at re in itro di
ct.
t
(30 empe a cool agnostic
,
r
˚
Vi C). D atures dry pla use only.
moal Ca o not r under 8ce
p
6
e
r
Pr e tha : cont frigerate ˚F
U. otecte n 3g s ains not .
an S. Pat d und ilica gel
d o ent er t
the s 4, he fo
r pa 935,3 llowin
g
4
tent
s pe 6, 5,049,487
n din g
,
.
13
BEFORE TESTING
Step 1: Press the On/Off Button.
BEFORE TESTING
LSC-96-003 own. manual
7/26/97 1:45 AM
Page 14
Step 3: Code the Meter.
you change it. You are now ready to
do a test.
While the meter
is on and after the
word insert is
displayed, press
and release the C
button; the code
number will
appear. Continue
pressing the C
button until the
number on the
display matches
the code number on the test strip vial.
The code number is now set for the
test strips you are using. The meter
will remember this code number until
M
Checking the System
There are two ways to make sure
your ONE TOUCH® Profile® System
is working properly. The check strip
is used to check that the meter is
operating properly. ONE TOUCH®
Control Solution is used to check that
the meter and the test strips are working together as a system and that you
are performing the test procedure correctly. It is very important that you do
these simple checks routinely to
make sure you get accurate results.
C
14
LSC-96-003 own. manual
7/26/97 1:45 AM
Page 15
Do a check strip test:
A purple and white check strip is
included in your meter case for your
ONE TOUCH® Profile® System. Before
doing a check strip test, make sure
the test strip holder, test area, and
check strip are clean, dry, and lintfree. Do the check strip test at room
temperature between 18˚ and 26˚C
(64˚–79˚F).
■
Front
Back
1
2
✔
✔
■
■
■
15
At least once a day
After cleaning the meter
Whenever your blood glucose test
results are not consistent with how
you feel, or when you think your
results are not accurate
Whenever the following message
appears before the insert code 10
(Example) strip prompt:
BEFORE TESTING
Checking with the Check Strip
BEFORE TESTING
LSC-96-003 own. manual
7/26/97 1:45 AM
Page 16
How to do a Check Strip Test:
Step 1: Press the On/Off Button.
Insert Side 1 of the Check Strip.
Step 2: When apply sample
Appears, Remove the Check Strip
from the Test Strip Holder.
The code number will appear on the
display. When insert code 10
(Example) strip appears, slide the
notched end of the check strip into
the test strip
holder with
Side 1 (purple
side) facing up.
wait please
appears for a
1
moment.
M
Note: This is the only time you
should remove a test strip during a
test.
M
C
C
1
16
LSC-96-003 own. manual
7/26/97 1:45 AM
Page 17
(Example)
It should go in notched end first, Side
2 (white side) facing up. The meter
counts down from four to zero and
then gives you a check strip result.
M
The display will show A ok if your
result falls within the correct check
strip range printed on the back of
your meter. If the reading is not within the recommended range, the meter
display will show A notok redo A.
C
2
17
BEFORE TESTING
Step 3: When insert side 2
A strip Appears, Turn the Check
Strip Over and Slide it Back into
the Test Strip Holder.
BEFORE TESTING
LSC-96-003 own. manual
7/26/97 1:45 AM
Page 18
CAUTION: If your check strip test
result is out of range, your meter may
not be working properly. Do not use
the meter to test your blood until you
get a check strip reading that is within the correct range. For assistance,
call the LifeScan Customer Care Line
at 1 800 663-5521.
(Example)
If these messages appear, repeat the
check strip test. If these messages
appear again, clean your meter and
repeat the test. If you do not obtain an
acceptable check strip reading, redoA
will appear each time you turn on your
meter, indicating that your last check
strip test was outside of the check strip
range. This message will continue to
appear until you perform a check strip
test and get a reading that falls within
the correct check strip range.
To clean and maintain the check
strip:
■
18
Make sure both sides of the check
strip are clean. If necessary, wipe
the check strip with a soft cloth or
tissue dampened with water. Dry it
completely.
LSC-96-003 own. manual
■
■
■
Page 19
Do not get blood, alcohol, control
solution, or any other fluid (except
water) on the check strip.
Do not scratch the check strip.
Do not leave the check strip in sunlight.
If you lose or damage the check
strip, call the LifeScan Customer
Care Line at 1 800 663-5521 for
a free replacement.
make sure your meter and test strips
are working properly.
Before you use the ONE TOUCH®
Profile® Meter to test your blood
glucose for the first time, practice
the procedure using control solution.
When you can do three tests in a row
that are within the expected range, you
are ready to test your blood.
Checking with Control Solution
Normal Control Solution
R
ONE TOUCH® Control Solution contains a known amount of glucose that
reacts with ONE TOUCH® Test Strips.
Control solution should be used to
practice the test procedure and to
Sha
For
Nor
Dis
Un
Lot
LIF
AW
19
BEFORE TESTING
■
7/26/97 1:45 AM
BEFORE TESTING
LSC-96-003 own. manual
7/26/97 1:45 AM
Page 20
Do a control solution test:
that you use ONE TOUCH® Control
Solution instead of blood.
For practice, before testing your
blood with the ONE TOUCH®
Profile® Meter for the first time,
■ When you begin using a new vial
of test strips,
■ At least once a week,
■ Whenever you suspect that the
meter or test strips are not working
properly,
■ When your blood glucose test
results are not consistent with how
you feel, or when you think your
results are not accurate, or
■ If you drop the meter.
The control solution test procedure is
just like blood glucose testing, except
■
Control solution test tips
■
■
■
■
20
Shake the control solution vial
thoroughly before using.
If there are any bubbles on the top
of the vial, wipe them off with a
clean tissue.
Apply a full drop of control solution to the center of the test spot
and cover it completely. Do not
dab, wipe, or smear control solution on the test spot.
Avoid contaminating the control
solution. Do not touch the test
spot with the tip of the vial.
LSC-96-003 own. manual
7/26/97 1:45 AM
Page 21
■
■
■
■
■
■
Use only ONE TOUCH® Control Solution.
Check the expiration date of the control solution. Do not use if expired.
Record the discard date on the control solution vial. Discard the vial
three months after first opening.
The control solution range printed on the test strip vial is for
ONE TOUCH Control Solution only. It is not a recommended range for
your blood glucose level.
Store the control solution at room temperature below 30˚C (86˚F). Do not
refrigerate.
Control solution should not be used as a cleaning solution for the meter.
Warning
For external use only. Do not swallow or inject control solution or put
control solution drops into your eyes.
21
BEFORE TESTING
IMPORTANT CONTROL SOLUTION TEST INFORMATION
BEFORE TESTING
LSC-96-003 own. manual
7/26/97 1:45 AM
Page 22
How to do a control solution test:
Step 1: Press On/Off Button.
Insert Test Strip.
strip holder, notched end first with
the test spot facing up. Make sure you
push the test strip in all the way until
it stops. wait please appears for a
moment, then apply sample appears
for five minutes or until you apply a
drop of control solution to the test spot
on the test strip.
The code number, time, and date will
appear. The code number should
match the code number on the test
strip vial. When insert code 10
(Example) strip appears, slide a
ONE TOUCH® Test Strip into the test
M
M
C
(Example)
22
C
LSC-96-003 own. manual
7/26/97 1:45 AM
Page 23
Step 3: Control Solution Result
Appears in 45 Seconds.
Shake the control solution vial well
before using. Remove the cap and
apply a drop of control solution to the
middle of the test spot, covering it
completely.
M
R
CC
ol
ntr
Co
se
co
Glu
al
rm on
No oluti
S
M
Compare the control solution test
result with the control solution range
printed on the test strip vial. When
you get a control solution test result
within the control range, you are
ready to test your blood.
23
C
BEFORE TESTING
Step 2: Apply Control Solution.
BEFORE TESTING
LSC-96-003 own. manual
7/26/97 1:45 AM
Page 24
Note: The control solution range
is shown in two different units of
measure—mg/dL (used in the United
States) and mmol/L (used in Canada
and some parts of Europe).
Control solution results
If test results fall outside the range
printed on the test strip vial, repeat
the test. Results that fall outside the
expected range may indicate:
■
s
D o no
t use after expiration date. u
lac
4 m o nt
hs after first opening. rep
i mme
d i a t ely.
D a te v
L ot N
ial first opened __________
o.
E x p. D
ONE T
■
4 0 6 8 1 4A
a te
07 - 96
n
OUCH Normal Control Ra
8 6 - 122
MG/DL
4.8-6.8
MMOL/L
■
a
35
Milpitas, California 950
©LIFESCAN INC. 1993 AW
(Example)
■
Control solution test results are automatically stored in the meter memory
with the time and date of the test. If
you use a logbook, indicate control
solution tests by writing “C” after the
result.
■
■
■
■
24
Procedural error
Control solution that has not been
shaken enough
Expired or contaminated control
solution
Improper coding of the meter
Dirt on the test strip holder or on
the test area beneath the test strip
holder
Test strip deterioration
Meter malfunction
Extremes in testing temperatures
LSC-96-003 own. manual
7/26/97 1:45 AM
Page 25
BEFORE TESTING
CAUTION: If your control solution test result falls outside the
expected range, the system may
not be working properly. Do not
use the system to test your blood
until you get a test result that falls
within the expected range. If you
are unable to resolve the problem,
call the LifeScan Customer Care
Line at 1 800 663-5521.
25
LSC-96-003 own. manual
7/26/97 1:45 AM
Page 26
TESTING YOUR BLOOD
Abbreviated Test Procedure
You can test your blood by following these three simple steps:
Step 2: Apply sample.
No wiping. No timing.
Step 3: Accurate
results in 45 seconds.
TESTING
Step 1: Press power,
insert strip.
M
C
M
C
M
C
(Example)
26
LSC-96-003 own. manual
7/26/97 1:45 AM
Page 27
Note: Be sure to read the following
section carefully before testing.
■
■
■
Choose a clean, dry work surface.
Make sure you have all the items
needed to test:
■
ONE TOUCH® Profile® Meter
ONE TOUCH® Test Strips
PENLET® II Automatic Blood
Sampler (with choice of caps)
LIFESCAN® Lancet
TESTING
C
25 Test Strips
M
D o n o t sto re
T e s t S tri p s
o u t s i d e t h e vial
Code
10
Test for t
he quantitative
measurem
lucose
in whole ent of g
blood.
For use w
T O UC H
Blood Bl ith ONE ters.
ucose Me
Instructi
package ons: Readore
using thiinsert beft.
s produc
For in v
nly.
Store initro diagnostic use o
at temp a cool, dry place
er
F
(30˚C). atures under 86˚
Do not refrigerate.
Vial Ca
more thp: contains not
an 3g silica gel
Protecte
ng
U.S. Pa d under the followi 9,487,
and othtents 4,935,346, 5,04
er patents pending.
27
LSC-96-003 own. manual
7/26/97 1:45 AM
Page 28
Getting a Drop of Blood
Step 1: Insert a Lancet in the
PENLET® II Automatic Blood
Sampler.
Remove the PENLET II Cap by
pulling it straight off.
TESTING
IMPORTANT: Getting an adequate
drop of blood is one of the most
important steps in getting an
accurate result.
CAUTION:
■ Use a new, sterile lancet every time
you test.
■ Do not use a lancet if the protective
disk has been removed or damaged.
■ Never use a lancet that has been
used by someone else.
■ If you share a PENLET® II Sampler,
each person should always use a
new lancet and a new or properly
disinfected cap.
■ For assistance, call the LifeScan
Customer Care Line at 1 800 663-5521.
28
LSC-96-003 own. manual
7/26/97 1:45 AM
Page 29
Insert a new, sterile lancet into the
lancet holder.
Hold the lancet firmly, and gently
twist and pull off the protective disk.
29
TESTING
Note: Save the protective disk for safe
removal of the lancet after testing.
LSC-96-003 own. manual
7/26/97 1:45 AM
Page 30
Choose either the regular or deep
penetration PENLET® II Cap and slide
it back onto the PENLET II Sampler.
Step 2: Cock the PENLET ® II
Sampler.
Holding the lower portion of the
PENLET II Sampler, pull out the
dark gray sliding barrel until it clicks.
If it does not click, the PENLET II
Sampler may have been cocked when
the lancet was inserted.
TESTING
Regular
Deep Penetration
30
LSC-96-003 own. manual
7/26/97 1:45 AM
Page 31
Step 3: Get a Drop of Blood.
Wash your hands with soap and
warm water and dry them thoroughly. Warm water stimulates blood flow
to the fingers. Hang your arm down
for 10–15 seconds before you stick
your finger. If you use alcohol to
clean your finger, make sure you let
it dry.
To avoid soreness, choose a site on
the side of your fingertips. To avoid
calluses, choose a different spot each
time you test.
TESTING
31
LSC-96-003 own. manual
7/26/97 1:45 AM
Page 32
Hold the PENLET® II Sampler firmly
against the side of the finger, with the
cap resting on the finger. (The harder
you press, the deeper the puncture.)
Press the dark gray release button.
TESTING
By holding your hand down and
kneading your palm, blood will flow
more quickly and easily to your finger. If necessary, squeeze the finger
gently.
Proceed with your blood glucose test.
For instructions, see How to Test Your
Blood, pages 34 –38.
32
LSC-96-003 own. manual
7/26/97 1:45 AM
Page 33
Step 4: Remove the Lancet.
on a hard surface. Take the PENLET® II
Sampler and stick the lancet into the
protective disk.
Now carefully pull the lancet out.
Discard the used lancet in a container
for sharp objects.
33
TESTING
Always be careful when removing the
lancet and PENLET® II Cap. First,
remove the PENLET II Cap. Then
grasp the two gray prongs located
near the release button, pointing the
lancet down and
away from you.
Pull back on the
dark gray sliding
barrel until the
lancet drops out.
Another way to
remove the lancet
is to put the protective disk back
on the lancet by
placing the disk
LSC-96-003 own. manual
7/26/97 1:45 AM
Page 34
How to Test Your Blood
Step 1: Press On/Off Button.
Insert Test Strip.
TESTING
Turn your meter on.
M
(Example)
Make sure the code number on the
meter display matches the code
number on the vial of ONE TOUCH®
Test Strips you are using. If the code
numbers do not match, code the
meter. (See Coding the ONE TOUCH®
Profile® Meter, pages 12–14.)
C
(Example)
will appear on the display for several
seconds, followed by
34
LSC-96-003 own. manual
7/26/97 1:45 AM
Page 35
Remove a test strip from the vial.
Replace the vial cap immediately.
Do not touch the test spot on the
test strip.
With the meter display showing
ip
tr
S
t
es
T
25
10
or
re the
le me qua
e blo nt o ntit
ru Bl with od. f glu ative
cos
ct uc O
e
g ion ose NE
th e in s: R Me TOU
t
s
itr is p er ead ers. CH
ro t be
a od
du for
ra coo iagn
c t. e
o ture l, dr ost
n s y ic
U nd
a
r e pe
Fo tor tem ). D
S t ˚C a a
a 30 C h
( ial e t te
V or tec at er
m ro . P th
P .S o
p:
c ot u p u
n on re nd lac se on
ly.
d 3g tai fri er e
en un sil ns n gera 86˚F
ts de ic
o te.
pa 4,9 r th a ge t
te 35 e f l
nt ,3 ol
s p 46 low
en , 5, ing
din 049
g. ,487
,
The test spot should be white or ivorycolored, with no tears or wrinkles.
Test Spot
35
TESTING
f
st su
Te mea who s
in or u od
F lo t
B ns ka
I pac ing
v
us in in
slide the test strip into the test strip
holder, notched end first, test spot
facing up. Make sure you push the
test strip in all the way until it stops.
ou
s
(Example)
D
T e o no
s
t
tsi t Str store
Co
d e ip s
de
th e
via l
LSC-96-003 own. manual
M
7/26/97 1:45 AM
Page 36
Obtain a drop of blood from your finger using the PENLET® II Automatic
Blood Sampler. (See Getting a Drop of
Blood, pages 28–32.)
C
Step 2: Apply Blood Sample.
TESTING
With the test strip in the meter and
appears for a moment. Then
on the display, apply a drop of blood
to the test spot.
appears for five minutes or until you
apply blood to the test spot.
36
LSC-96-003 own. manual
7/26/97 1:45 AM
Page 37
Be sure that you:
strip moves, push it back into its
original position.
■ Do not remove the test strip from
the meter to apply blood.
If the beep option is set to “on,” the
meter will beep when the blood is
applied to the test spot.
M
■
■
C
TESTING
Touch only the
tip of the drop
of blood to the
test spot.
■ Apply enough
blood to form
a round, shiny
drop that covers
the test spot
completely and stays wet during
the entire test.
Do not smear blood on the test
spot or apply a second drop after
the test begins.
Do not move the test strip as you
are applying blood. If the test
■
Step 3:
Accurate Results
in 45 Seconds.
The meter then
counts down from
45 to 0 seconds,
beeps, and displays your result.
(Example)
37
M
C
TESTING
LSC-96-003 own. manual
7/26/97 1:45 AM
Page 38
Blood glucose test results are automatically stored in your meter’s memory
with the time and date they were performed. In addition, you may wish to
enter an event label and insulin information. For information on event
labeling and insulin programming
features, see Event Labeling, Insulin
Programming, pages 42–47.
(Example)
The message is warning you of potential low blood sugar (hypoglycemia)
and reminding you that a meal or
snack may be necessary.
If your blood glucose test result is
13.3 mmol/L or greater, but less than
33.3 mmol/L, your meter will beep in a
high tone and display a special message:
Special Messages
The meter displays results between 0
and 33.3 mmol/L. If your blood glucose
test result is 3.3 mmol/L or below, your
meter will beep in a low tone and
display a special message:
(Example)
38
LSC-96-003 own. manual
7/26/97 1:45 AM
Page 39
If you take insulin, you may be
producing ketones. Testing your
urine with a ketone test strip may
be necessary.
Blood glucose results greater than
33.3 mmol/L are displayed as hi and
your meter will beep in a high tone.
(Example)
These messages indicate very high
blood sugar (severe hyperglycemia).
You should call your doctor immediately.
39
TESTING
Test results below 3.3 mmol/L
(60 mg/dL)3 mean low blood glucose
(hypoglycemia). Test results greater
than 13.3 mmol/L (240 mg/dL)4 mean
high blood glucose (hyperglycemia). If
you get results below 3.3 mmol/L or
above 13.3 mmol/L, and do not have
symptoms, first repeat the test. If you
have symptoms and continue to get
results that fall below 3.3 mmol/L or
above 13.3 mmol/L, follow the treatment
advice of your healthcare professional.
IMPORTANT: If you get a hi danger
test result or a result below 3.3 mmol/L
and your test result does not reflect
how you feel, follow the guidelines on
pages 52–53 to ensure testing accuracy.
LSC-96-003 own. manual
7/26/97 1:45 AM
Page 40
Checking the Amount of Blood
on the Test Strip
appears on the display, your drop of
blood was too small, or smeared, or
the test strip was not pushed all the
way into the test strip holder. Repeat
the test with a new test strip and
enough blood to cover the entire test
spot.
TESTING
Although the ONE TOUCH® Profile®
System requires only a small drop
of blood, it is very important that
the drop be large enough to cover the
test spot completely.
In many cases, the meter can detect
if the drop of blood was too small
to give an accurate reading. If
The meter cannot always tell if a sample is too small, so it is important that
you also look at the test strip to make
sure that you applied enough blood.
Note: If you are using event labeling,
remove and check the test strip after
you have linked the event label to
your test result. See Event Labeling,
Insulin Programming, pages 42–47.
40
LSC-96-003 own. manual
7/26/97 1:45 AM
Front
■
Side
Back
If there are any white patches or
streaks, you may have smeared the
blood or the drop was too small. In
either case, you may have a false
low result. Repeat the test with a
new test strip.
Remove the test strip from the
meter and look at the test spot.
It should still have a wet, shiny
drop that completely covers the
test spot. If the blood sample has
a dull, dry appearance, you may
not have applied enough blood,
or you may have smeared it.
Look at the back of the test strip.
You should see a full, dark circle.
(Example — Not enough blood applied)
41
TESTING
■
Page 41
LSC-96-003 own. manual
7/26/97 1:45 AM
Page 42
AFTER TESTING
IMMEDIATELY AFTER TESTING
The ONE TOUCH® Profile® Meter
allows you to enter and store information linked to each test result. You
can save information on diet, exercise, and insulin dosages in memory
and link this information with each
blood glucose test you perform. These
features are called event labeling and
insulin programming, and they give
you a more complete picture of your
diabetes treatment plan. Using these
features routinely will aid you and
your healthcare professional in making important treatment decisions
based on how you are responding to
your medications, diet, and exercise.
Event Labeling
You may want to mark your glucose
readings with event labels to help you
and your healthcare professional analyze the trends in your blood glucose
levels more easily. Your meter has 15
event labels:
fasting
bedtime
pre breakfast
during night
after breakfast pre exercise
pre noon meal
after exercise
after noon mealillness
pre dinner
hypoglycemia
after dinner
other
different food
42
LSC-96-003 own. manual
7/26/97 1:45 AM
Page 43
You can link an event label to your
blood glucose result immediately after
testing before you remove and inspect
the test strip or later when you are
reviewing the tests stored in your
meter’s memory.
M
To select an event label, press the
C button while the blood glucose test
result is still showing on the meter display. Each time you press the C button,
an event label from the list will appear
on the display.
C
M
C
It will appear on the meter display
with your test result, alternating with
the time and date.
(Example)
43
AFTER TESTING
Holding the C button down will allow
you to move more rapidly through the
list until the event label you wish to select appears. When you stop, the event
label is set. This event label will be
stored in memory with your test result.
AFTER TESTING
LSC-96-003 own. manual
7/26/97 1:45 AM
Page 44
Insulin Programming
Step 1: Changing the Insulin Type.
The ONE TOUCH® Profile® Meter also
allows you to link insulin type and
dosage information to each blood glucose test result. Set the Insulin Prompt
option to “on,” and you will be prompted to enter insulin information after
each blood glucose, control solution,
or check strip test (see page 67). Simply
leave the meter on after completing the
test. When you remove the test strip or
check strip, the following messages
will appear on the display, prompting
you to enter insulin information.
When insulin type reg (Example) is
flashing, press the C button until your
first type of insulin appears on the
display.
(Example)
The list includes:
(Example)
44
INSULIN TYPE
DESCRIPTION
reg
Regular insulin
nph
NPH insulin
lente
Lente insulin
ulente
Ultralente insulin
70/30
Mixture 70% NPH
and 30% Regular
LSC-96-003 own. manual
7/26/97 1:45 AM
INSULIN TYPE
DESCRIPTION
50/50
Mixture 50% NPH and
50% Regular
mix
Mixture other than
mixtures identified
other
Other insulin types
not specified
bolus
Insulin pump setting
insulin taken over
baseline amount
carb*
Carbohydrate intake
80/20
Mixture 80% NPH and
20% Regular
60/40
Mixture 60% NPH and
40% Regular
Page 45
After you have selected the insulin
type, press the M button to move on
and set the units.
Step 2: Changing the Insulin
Units.
When the units area is flashing 00,
press the C button until your insulin
dose appears on the display.
(Example)
45
AFTER TESTING
*In addition to insulin, you may record carbohydrate intake as well.
LSC-96-003 own. manual
7/26/97 1:45 AM
Page 46
The units selection will advance on
the display as follows:
same steps to enter insulin type and
units.
BOLUS
0.0 – 20 (in steps of 0.1)
Carbohydrate Counting
CARB
0 – 150 (in steps of 1)
All others
0 – 99 (in steps of 1)
Your healthcare professional may
recommend that you count the grams
of carbohydrate in your diet. This
information may be used to help
adjust Regular insulin requirements.
If you count grams of carbohydrate,
you can use the insulin programming
feature to record this number in your
ONE TOUCH® Profile® Meter. Follow
the steps for insulin programming,
selecting carb instead of an insulin
type. Enter the number of carbohydrates, 1–150.
Note: Holding down the C button
will allow the units to advance more
quickly.
AFTER TESTING
(Example)
Press the M button and enter your
second type of insulin, following the
46
LSC-96-003 own. manual
7/26/97 1:45 AM
Page 47
Note: When carb is selected instead
of insulin type, the word UNITS will
not be displayed with the number.
AFTER TESTING
47
RESULTS
LSC-96-003 own. manual
7/26/97 1:45 AM
Page 48
UNDERSTANDING YOUR RESULTS
well you are doing with the factors that
affect your diabetes — medication, diet,
exercise, and stress management. Blood
glucose test results can also tell you
whether your diabetes is changing in
ways that might require an adjustment to your treatment plan. Always
consult your healthcare professional
before making any adjustments to your
treatment plan.
Recent Diabetes Findings
In 1993, the National Institute of
Health concluded an extensive 10-year
study of people with Type I diabetes.
This study, called the Diabetes Control
and Complications Trial (DCCT),
found that by keeping your blood
glucose close to the levels of people
without diabetes, you can reduce the
risk of complications involving the
eyes, kidneys, and nervous system
by up to 60%.5
Frequency of Testing
How often you may need to test your
blood glucose will vary according to
your age, the type of diabetes you
have, the medications you are taking,
What This Means for You
Frequent blood glucose testing is the
best means for keeping track of how
48
LSC-96-003 own. manual
7/26/97 1:45 AM
Page 49
and your physical and emotional
health. Your own motivation is a key
factor in the number of tests you do
each day. Your healthcare professional
will guide you. After you decide when
and how often you should test, it is
important that you make testing part of
your daily routine.
results, follow the guidelines below:
■
■
■
Comparing Meter and Laboratory
Results
■
The blood glucose test result you
obtain from your meter may be different from your laboratory result due to
normal variation; however, the two
results should be within 20% of each
other.6 To make an accurate comparison between meter and laboratory
Make sure your meter is clean.
Perform check strip and control
solution tests to make sure the
meter is working properly.
Comparisons will be best if you
are fasting or have not eaten for at
least four hours.
Take your meter with you to the lab.
While at the lab:
■
■
49
Make sure that both tests are done
within 15 minutes of each other.
Wash your hands before obtaining
a blood sample.
RESULTS
Before you go to the lab:
LSC-96-003 own. manual
RESULTS
■
7/26/97 1:45 AM
Page 50
Never use your meter with blood
that has been placed in a gray top
test tube.
the blood (a high or low hematocrit)
or the loss of body fluid (severe dehydration) may also give a meter result
different from a laboratory result. For
more detail, see Health Conditions
Causing Out-of-Range Results, pages
54–55.
A variation between meter and lab
results can occur because blood glucose levels can change significantly
over short periods, especially if you
have recently eaten, exercised, taken
medication, or experienced stress.7 In
addition, if you have eaten recently,
the blood glucose level from a fingerstick can be up to 3.9 mmol/L higher
than blood drawn from a vein (venous
sample) used for a lab test.8 It is therefore best to fast for eight hours before
doing comparison tests. Factors such
as the amount of red blood cells in
Expected Test Results (Target Range)
Your test results will vary somewhat
from test to test because blood glucose
levels change throughout the day. The
types and amounts of food you eat,
your activity and stress levels, and the
insulin or other medication you take
affect your blood glucose levels. If you
are controlling your diabetes well,
50
LSC-96-003 own. manual
7/26/97 1:45 AM
Page 51
your test results should fall within the
target range recommended by your
healthcare professional. Once you
have established your target range, you
will be able to recognize when your
results are high or low and know
when to take action based on the
advice of your healthcare professional.
Testing Tips to Ensure Accuracy
GLUCOSE RANGES IN
PEOPLE WITHOUT
DIABETES, mmol/L9
Before breakfast
3.9– 5.8
Before lunch or dinner
3.9– 6.1
1 hour after meals
Less than 8.9
2 hours after meals
Less than 6.7
Between 2 and 4 a.m.
Greater than 3.9
51
YOUR TARGET
RANGES, mmol/L
RESULTS
If you have a test result that falls
outside of your target range and
you cannot link it to changes in your
diet, exercise, medication, or stress
level, you may want to review these
testing tips, then repeat the test.
RESULTS
LSC-96-003 own. manual
7/26/97 1:45 AM
Page 52
Before testing:
■
Wash your hands before testing.
■
Use a new, sterile lancet.
■
Make sure you are using
ONE TOUCH® Test Strips.
■
Check the expiration date on the
test strip vial. If it has passed, discard the unused test strips and
open a new vial. Discard any
remaining test strips four months
after first opening.
52
■
Make sure the test spot is white
or ivory-colored with no tears or
wrinkles.
■
Make sure the code on the meter
matches the code on the test strip
vial.
■
Make sure the meter’s test area
and test strip holder are clean.
■
Do a test with ONE TOUCH®
Control Solution to verify that the
test strip and meter are working
properly.
LSC-96-003 own. manual
■
7/26/97 1:45 AM
Page 53
IMPORTANT: If you have
followed these tips to ensure
accuracy and your blood glucose
results are still out of range, call
your healthcare professional.
After testing:
■
Make sure you have applied
enough blood to the test strip.
Do not smear the blood or touch
the test spot.
■
Do not move the test strip during
the countdown process.
53
RESULTS
Clean the test area and test strip
holder following the instructions
on pages 85–89.
RESULTS
LSC-96-003 own. manual
7/26/97 1:45 AM
Page 54
Health Conditions Causing
Out-of-Range Results
■
If you are getting results outside
your range of expected blood glucose
levels, and you are certain that the
ONE TOUCH® Profile® Meter and
ONE TOUCH® Test Strips are working
together properly, ask yourself the
following questions:
■
■
■
■
■
“How do I feel?”
“Do I have symptoms of low blood
glucose (hypoglycemia): slurred
speech, headache, tingling of lips,
cool sweating, rapid heartbeat,
disorientation, weakness, fainting,
dizziness, hunger, nervousness,
irritability, or tremors?”
■
“Do I have symptoms of high blood
glucose (hyperglycemia): fatigue, dry
mouth and skin, increased thirst or
hunger, blurry vision, increased
urination, rapid deep breathing,
or a fruity smell to the breath?”
“What have I eaten?”
“How much have I exercised?”
“Am I ill (common cold, flu, etc.)?”
“Have I been under stress lately?”
In addition to these factors, there are
other abnormal conditions that can
affect your results.
1. Extremes in hematocrit (the
amount of red blood cells in the
blood) can affect test results. High
54
LSC-96-003 own. manual
7/26/97 1:45 AM
Page 55
If you believe you are suffering from
severe dehydration, consult a healthcare professional immediately.
Recommendations for Better
Diabetes Control
Here are some recommendations to
help you control your diabetes:
■
■
■
55
Follow the advice of your healthcare professional.
Follow the exercise and meal
plans recommended by your
healthcare professional.
Take insulin or diabetes medication at your scheduled times.
RESULTS
hematocrits (above 60%) and very
low hematocrits (below 25%) can
cause false low results.
2. Excessive water loss (severe
dehydration) may cause false low
results.10,11 Severe dehydration,
which may lead to many serious
medical complications, can be
caused by:
■ Vomiting and diarrhea
■ Prescription drugs (such as diuretics)
■ Inability to recognize or respond to
“thirst” sensations
■ Uncontrolled diabetes
■ Shock12
LSC-96-003 own. manual
RESULTS
■
■
■
7/26/97 1:45 AM
Page 56
Keep in touch with your emotional
and physical condition. Stress or
illness can affect diabetes.
Watch for signs and symptoms of
low blood glucose (hypoglycemia)
and high blood glucose (hyperglycemia).
Review your test results with your
healthcare professional regularly.
1. LifeScan data on file.
2. LifeScan data on file.
3. Kahn, R., and Weir, G.: Joslin’s Diabetes Mellitus. Philadelphia:
Lea and Febiger (1994), 489.
4. Krall, L. P., and Beaser, R. S.: Joslin Diabetes Manual.
Philadelphia: Lea and Febiger (1989), 261–263.
5. American Diabetes Association position statement on the
Diabetes Control and Complications Trial (1993).
6. Clarke, W. L., et al.: Diabetes Care, Vol. 10, No. 5 (1987),
622–628.
7. Surwit, R. S., and Feinglos, M. N.: Diabetes Forecast (1988),
April, 49–51.
8. Sacks, D. B.: “Carbohydrates.” Burtis, C. A. and Ashwood,
E. R. (ed.), Tietz Textbook of Clinical Chemistry. Philadelphia:
W. B. Saunders Company (1994), 959.
9. Krall, L. P.: and Beaser, R. S.: Joslin Diabetes Manual.
Philadelphia: Lea and Febiger (1989), 138.
10. Wickham, N. W. R., et al.: Practical Diabetes, Vol. 3, No. 2
(1986), 100.
11. Cohen, F. E., et al.: Diabetes Care, Vol. 9, No. 3 (1986),
320–322.
12. Atkin, S. H., et al.: “Fingerstick glucose determination in
shock.” Annals of Internal Medicine, Vol. 114 (1991),
1020–1024.
56
LSC-96-003 own. manual
7/26/97 1:45 AM
Page 57
USING THE METER MEMORY
Your ONE TOUCH® Profile® Meter
automatically stores up to 250 test
records. It stores blood glucose, check
strip, and control solution test results
with time and date. Event labels, when
linked to blood glucose results, will
alternate with the time and date.
Insulin records including insulin type,
units, time, and date are also stored.
When you have stored more than 250
records, the oldest record is dropped
from the memory as a new record is
added.
Entering the Memory Mode
Turn the meter on by pressing the
on/off button. You can access the
meter’s memory and recall test results
at any time before or after performing
a test by pressing the M button.
MEMORY
M
57
C
M
C
MEMORY
LSC-96-003 own. manual
7/26/97 1:45 AM
Page 58
The word memory with the memory
symbol will appear briefly.
However, if you have used the meter
at least once in the past 14 days, the
first value that will appear on the
display will be the 14-day average —
the average of your blood glucose test
results for the past 14 days.
If you are using the meter for the very
first time and have not used it for
testing, or if you have used a software
program to clear the meter’s memory,
this message will appear, indicating
that there are no results stored in the
memory.
Check strip and control solution tests
are not included in the average.
(Example)
While the 14-day average result is on
the display, press and hold the C button to see how many tests are included in the average. The number of tests
will remain on the display as long as
58
LSC-96-003 own. manual
7/26/97 1:45 AM
Page 59
you hold the C button. Results
above 33.3 mmol/L will be displayed
as hi and will be calculated into the
average as 33.3 mmol/L.
Event Averages
If you have chosen to use the event
averaging feature (that is, you selected “on avg” in the options mode),
you may review averages for each
event, as well as a 30-day test average. In order for an event average to
appear, at least one blood glucose
result must have been linked to the
event label in the last 14 days. Press
the M button to move through and
review these averages:
59
MEMORY
30-day average
avg fasting
avg pre breakfast
avg after breakfast
avg pre noon meal
avg after noon meal
avg pre dinner
avg after dinner
avg different food
avg bedtime
avg during night
avg pre exercise
avg after exercise
avg illness
avg hypoglycemia
avg other
LSC-96-003 own. manual
7/26/97 1:45 AM
Page 60
The average for each event label will
appear as follows:
Press the M button to continue
reviewing test averages for each
event label.
Recalling Test Results
After reviewing the averages, you can
move on to review the individual
records. Pressing the M button allows
you to see each blood glucose, check
strip, control solution, and insulin
record. The records will appear in
order from the most recent to the oldest, up to the full 250-record capacity of
the memory. Test results will appear
on the meter display as follows:
MEMORY
(Example)
To see how many tests are included
in the average for each event label,
press and hold the C button. The
number of tests will be displayed as
long as the C button is depressed.
(Example)
60
(Example)
LSC-96-003 own. manual
7/26/97 1:45 AM
Page 61
Event Labels
Changing an Insulin Record
If you added an event label to a blood
glucose test after it was performed, it
will alternate with the time and date
when you recall the test.
If you have entered insulin information, those records will appear as
You can change the insulin type or
units of an insulin record in memory
by pressing the C button while the
insulin record is on the display. The
insulin type will flash. Use the C
button to change the insulin type.
Use the M button to move from the
insulin type to the units. Press the C
button to change the units.
(Example)
An event label may also be changed
or added to a blood glucose result in
memory while the result is on the
display. Follow the procedure for
selecting event labels (see Event
Labeling, pages 42–43). You can exit
the memory mode at any time by
turning the meter off.
61
MEMORY
(Example)
LSC-96-003 own. manual
7/26/97 1:45 AM
Page 62
Deleting an Insulin Record
MEMORY
To delete an insulin record, select 00
for the units. You can now turn off
your meter or press the M button to
move to the next record. Your
changes will be saved automatically.
Note: Blood glucose, control solution,
and check strip test values cannot be
changed or deleted.
62
LSC-96-003 own. manual
7/26/97 1:45 AM
Page 63
SETTING METER OPTIONS
You can customize your ONE TOUCH®
Profile® Meter by changing various
option settings to meet your needs.
The options mode allows you to view
or change numerous meter features.
In all, you can change, or in some
cases turn off, 11 features of the
ONE TOUCH Profile Meter, including:
■
■
■
■
■
■
■
■
Decimal Separator
Entering and Using the Options Mode
To enter the options mode, start with
your meter turned off. Press and hold
the on/off button for about three seconds until all segments of the display
appear and begin to flash. Release the
on/off button. The following screens
will appear:
Beep Prompts (“beeps”)
Time
Date
Insulin Prompt
Event Averaging
Insulin Programming
Display Language
Time Format
OPTIONS
■
■
Date Format
Unit of Measure
■
63
LSC-96-003 own. manual
7/26/97 1:45 AM
Page 64
The meter will then automatically
present the first option screen. The
options map to the right will help
guide you through the option screens.
■
OPTIONS
■
Use the M button to scroll through
the options or move within an
option.
If you want to change an option
setting, use the C button.
Note: You can exit the options mode
at any time by turning off the meter. If
after two minutes you have not made
a selection, the meter will turn itself off
automatically. All option settings are
saved as they are made.
* We do not recommend entering insulin records in the
options mode.
64
LSC-96-003 own. manual
7/26/97 1:45 AM
Page 65
Beep Prompts
The meter is set to provide you with
audio prompts, or “beep,” during the
test procedure to tell you that the
meter has performed some function or
to alert you to a special message.
To change the beep prompts so that
the meter operates silently, press the
C button.
The Beep option is seen immediately
after entering the options mode. The
current setting will automatically
appear on the display.
“off” will appear on the display. You
may now turn off the meter or press
the M button to move to the next
option.
Time and Date
65
OPTIONS
The ONE TOUCH® Profile® Meter has
an internal clock that will record the
With the “on” setting, the meter will
continue to provide beep prompts
during the test procedure.
LSC-96-003 own. manual
7/26/97 1:45 AM
Page 66
time and date of each test you perform. You may need to change the
time setting in your meter in order
to have the correct time and date
appear with your test result. You
will also need to reset the time
whenever there is a change to or
from Daylight Savings Time. (The
accuracy of your test results will
not be affected if you do not set the
clock to the correct time.)
C button again to advance the
hour to the correct setting. Press the M
button and the minutes will flash. Use
the C button to change the minutes.
Press the M button to see the new
time setting (the colon will flash).
Press the M button again to move to
the next option.
OPTIONS
Setting the Time
Note: When the time and date are
changed, the calculated values for 14day, 30-day, and event averages may
change. These averages are calculated
from the results obtained during the
Enter the options mode. Use the M
button to choose the Time option.
The current time will show. Press
the C button to change the time; the
hour and am or pm will flash. Press the
66
LSC-96-003 own. manual
7/26/97 1:45 AM
Page 67
14 or 30 days preceding the current
time and date settings.
Setting the Date
Enter the options mode. Use the M
button to choose the Date option. The
current date will show. Press the C
button to change the date setting; the
year will flash. Press the C button
again to change the year to the correct
setting. Press the M button and the
month will flash. Use the C button to
change the month. Press the M button
and the day will flash. Press the C
button to change the day. Pressing the
M button again will display the new
date setting. Press the M button again
to move to the next option.
Insulin Prompt
With the next option, you may choose
whether or not you wish to activate
the meter’s insulin prompt.
67
OPTIONS
If you select “on,” the meter will automatically remind you to enter insulin
information every time you complete
a test and remove the test strip. First,
enter the options mode. Use the M
button to choose the Insulin Prompt
option.
LSC-96-003 own. manual
7/26/97 1:45 AM
Page 68
Event Averaging
If you select the event averaging feature, you will see an average for all
the blood glucose tests taken in the
last 30 days. In addition, you can get
an average of all the blood glucose
tests linked to a specific event in the
last 14 days. An event label must
have been used at least once in the
last 14 days for an event average to
be displayed in memory mode.
OPTIONS
The above example will appear on
the display. To turn on the insulin
prompt, press the C button.
You may now turn the meter off or
press the M button to move to the
next option. For information on how
to perform insulin programming, see
Insulin Programming, pages 44–46.
Enter the options mode. Use the M
button to choose the Event Averaging
option.
68
LSC-96-003 own. manual
7/26/97 1:45 AM
Page 69
The previous example will appear on
the display. Press the C button to turn
on the Event Averaging option.
Insulin Programming
We recommend that you use the
Insulin Prompt option and enter your
insulin dosage information after completing a test (see Insulin Prompt page
67 and pages 44–46).
You may want to use this insulin
programming option if:
You may now turn off the meter or
press the M button to move to the
next option.
■
■
When this option is used, you must
also enter the hour, minute, day,
month, and year, in addition to the
69
OPTIONS
Note: Your meter automatically gives
you an average of all the blood
glucose tests taken in the last 14
days. This average will appear as the
first item in the memory whether or
not the event averaging feature is on.
You want to enter several insulin
records.
You forgot to enter your insulin
information after a test.
LSC-96-003 own. manual
7/26/97 1:45 AM
Page 70
OPTIONS
insulin type and units. The records
entered in this option may appear out
of order in the meter memory. This
feature allows you to enter several
insulin records one after another. For
example, you could enter all your
insulin doses for the day.
ing the M button will allow you to
move to the hour, minutes, year,
month, and day to complete your
insulin record. Use the C button to
change the information in each area.
After you have moved through each
area, the complete record will be
displayed for two seconds, followed
by another insulin programming
screen. At this time you may press
the C button to enter another insulin
record, turn the meter off, or press
the M button to move to the next
option.
To begin entering insulin information,
enter the options mode. Use the
M button to choose the Insulin
Programming option. Press the C
button; the insulin type will flash.
Continue pressing the C button until
your insulin type is displayed. Press
the M button to move to the units
area. Use the C button to enter your
insulin units. In the same way, press70
LSC-96-003 own. manual
7/26/97 1:45 AM
Page 71
Display Language
Display Language option. Press the C
button until the language you want
appears on the display. You may now
turn the meter off or press the M button to move to the next option. Once
a language is selected, all messages
will be displayed in that language.
The ONE TOUCH® Profile® Meter can
display messages in 18 languages:
English [engl.], Spanish [espan.],
French [franc.], Italian [italia],
Hungarian [magyar], Dutch [neder.],
Norwegian [norsk], Polish [polski],
Portuguese [port.], Russian [pycck.],
Finnish [suomi], Swedish [svens.],
Turkish [turkce], Symbolic [oxooxo],
Czech [cesky], Danish [dansk],
German [deuts.], and Greek [e^^/ka].
There is also a British [brit] setting to
address insulin differences in the U.K.
Time Format
The meter is set to display the time
in the 12-hour am/pm format. An alternative 24-hour time format is available.
OPTIONS
The meter is set to give prompts in
English. To change the display
language, enter the options mode.
Use the M button to choose the
71
LSC-96-003 own. manual
7/26/97 1:45 AM
Page 72
To change the time format, enter the
options mode. Use the M button to
choose the Time Format option. Press
the C button to change the time
format. You may turn the meter off
or press the M button to move to the
next option.
To change the date format, enter the
options mode. Use the M button to
choose the Date Format option. Press
the C button to change the date format. You may turn the meter off or
press the M button to move to the
next option.
Date Format
Unit of Measure
The meter is set to display the date
as month-day-year (for example:
June 1, 1995 reads as 6-01-95). You
can set the meter to display daymonth-year, as is common in Europe.
OPTIONS
The meter is set to display test results
in millimoles per litre (mmol/L). You
have the option to change to milligrams per decilitre (mg/dL), commonly used in the United States.
72
LSC-96-003 own. manual
7/26/97 1:45 AM
Page 73
To change the Unit of Measure
option, enter the options mode. Use
the M button to choose the Unit of
Measure option. Press the C button to
change the unit of measure. You may
turn the meter off or press the M button to move to the next option.
To change the decimal separator, enter
the options mode. Use the M button to
choose the Decimal Separator option.
Make your selection using the C button.
You may now turn the meter off or
press the M button to move back to the
Beep Prompts option.
Decimal Separator
Exiting the Options Mode
The meter is set to display millimoles
per liter (mmol/L) and bolus insulin
units using a decimal point. This
option allows you to select a comma
instead of a decimal point as
a decimal separator.
73
OPTIONS
All options are automatically saved as
they are made. After you have completed viewing or changing your
option settings, simply turn the meter
off. The meter will automatically exit
the options mode and turn itself off
after two minutes of no activity.
MESSAGES
LSC-96-003 own. manual
7/26/97 1:45 AM
Page 74
SOLVING PROBLEMS
The display messages that appear on
your ONE TOUCH® Profile® Meter
will guide you through testing procedures, alert you to any problems as
they occur, and give you information
about test results stored in the meter’s
memory. This section provides you
with a complete listing of the display
messages, what they mean, and what to
do if there is a problem.
Test Procedure Messages
These messages appear during routine
testing. Follow them carefully and they
will guide you through the test.
MESSAGE
APPEARS WHEN
code10
The meter is first turned on. The code number (1– 16) must match the
code number on the test strip vial or be reset.
7:26am 6-01-95
insert
code 10
strip
The meter is ready to perform a blood, check strip, or control solution test.
wait
please
The meter is performing internal checks.
74
LSC-96-003 own. manual
7/26/97 1:45 AM
Page 75
APPEARS WHEN
The meter is ready to receive a blood or control solution sample. If
performing a check strip test, this is your signal to remove the check strip
from the meter.
45. . . . . . . 0
The meter is counting down from 45 seconds to 0.
106 mg/dl
A blood test has been completed. This indicates a blood glucose result
when the meter is set for mg/dL, the unit of measure used in the
United States.
(Example)
8:01am 6-01-95
5.9 mmol/l
(Example)
8:01am 6-01-95
5.6 mmol/l
A blood test has been completed. This indicates a blood glucose result
when the meter is set for mmol/L, the unit of measure used in Canada
and parts of Europe.
contrl
7:52am 6-01-95
A control solution test has been completed. (If you have just performed
a blood glucose test, this means that the blood sample was too small and
the meter read it as control solution. Repeat the test with a new test strip and
larger drop of blood.)
insert
side 2
You are performing a check strip test. Turn the check strip over and insert
Side 2.
(Example)
75
MESSAGES
MESSAGE
apply
sample
MESSAGES
LSC-96-003 own. manual
7/26/97 1:45 AM
Page 76
MESSAGE
APPEARS WHEN
4.4
The check strip test result falls into the acceptable range.
The check strip range is printed on the back of your meter.
(Example)
√ok
7:40am 6-01-95
3.3 mmol/l
(Example)
Your blood glucose test result is low, 3.3 mmol/L or below, possibly
indicating hypoglycemia.
8:01am 6-01-95
alternating with
3.3 mmol/l
(Example)
do you
need a snack
You may need food immediately.
13.3 mmol/l
Your blood glucose test result is 13.3 mmol/L or above and less than
33.3 mmol/L.
(Example)
8:01am 6-01-95
alternating with
13.3 mmol/l
check ketones
You may need to check your urine for ketones.
76
LSC-96-003 own. manual
7/26/97 1:45 AM
Page 77
APPEARS WHEN
Your blood glucose test result is 33.3 mmol/L (600 mg/dL) or above. This
level is severe hyperglycemia.
alternating with
hi mmol/l
call dr.
check ketones
Contact your doctor immediately.
Appears briefly when the meter is turned on. You can see that all of
the display segments are working properly.
77
MESSAGES
MESSAGE
hi mmol/l
danger
8:01am 6-01-95
MESSAGES
LSC-96-003 own. manual
7/26/97 1:45 AM
Page 78
Error Messages
ing a test. In most cases, problems are
easy to fix. If you have trouble, help is
available from the LifeScan Customer
Care Line at 1 800 663-5521.
When any of these messages
appear, there is a problem with
your ONE TOUCH® Profile® Meter
or the way in which you are performMESSAGE
PROBLEM
When this symbol appears
and stays on the screen, it
means the batteries are
getting low. This symbol
will remain on the display
while the meter is on until
the batteries are replaced.
WHAT TO DO
Test results will still be
accurate, but replace
the batteries as soon as
possible.
When this symbol is flashing,
the batteries are too low.
Replace the batteries
immediately. The meter
will not operate.
battry
replace now
78
LSC-96-003 own. manual
7/26/97 1:45 AM
Page 79
PROBLEM
WHAT TO DO
clean
test
area
1. There is dirt, blood, or
lint on the test area.
1. Clean the test area
according to instructions.
2. Your hand or an object
covered the test area while
turning on the meter.
2. Repeat the test. Keep test
area clear.
remove
strip
The test strip was inserted
before the word insert
appeared on the display.
Remove the strip. Wait for the
word insert before inserting
test strip.
5.6 mmol/l (Example)
contrl
8:01am 6-01-95
If the word contrl appears
after a blood test, your
blood sample was too small,
smeared, or another drop was
added after the test began.
Repeat the test with a new test
strip and apply a larger drop
of blood.
error 1
retest
The sample was applied
before the words apply
sample appeared.
Repeat the test with a new
test strip.
79
MESSAGES
MESSAGE
MESSAGES
LSC-96-003 own. manual
MESSAGE
error2
retest
7/26/97 1:45 AM
Page 80
PROBLEM
1. The test strip moved
during the test.
WHAT TO DO
1. Repeat the test with a new
test strip.
2. The test strip was not
inserted correctly.
2. Repeat the test with a new
test strip.
3. The test strip was
removed before the test
was completed.
3. Repeat the test with a new
test strip.
4. There was not enough
blood on the test strip.
4. Repeat the test with a new
test strip.
5. The meter was used in
very bright light.
5. Move the meter away from
the light source. Repeat the
test with a new test strip.
6. The check strip procedure was incorrect.
6. Repeat the check strip test.
7. The meter may not be
operating correctly.
7. Call the LifeScan
Customer Care Line
at 1 800 663-5521.
80
LSC-96-003 own. manual
not
enough
blood
retest
not ok
Page 81
PROBLEM
1. The blood or control
solution sample was too
small or smeared.
WHAT TO DO
1. Repeat the test with a
new test strip and a large,
shiny drop of blood or
control solution.
2. The test strip was not
inserted far enough into
the test strip holder.
2. Repeat the test, pushing
the test strip all the way
into the test strip holder.
1. If appearing when you
turn your meter on, your
meter may have an electronic problem.
1. Call the LifeScan
Customer Care Line
at 1 800 663-5521.
2. If appearing at the end
of a test, your strip may
have been moved while
applying blood or during
the test process.
2. Repeat the test; try not
to move the strip.
81
MESSAGES
MESSAGE
7/26/97 1:45 AM
MESSAGES
LSC-96-003 own. manual
MESSAGE
7/26/97 1:45 AM
Page 82
PROBLEM
3. If appearing during the
test, the strip has been
removed during the
wait please screen.
WHAT TO DO
3. Repeat the test with a
new test strip.
The check strip test result
is outside the acceptable
range.
Clean the meter and check
strip if necessary. Repeat the
check strip test.
redo√
The last check strip test
was outside the acceptable
range and an acceptable
repeat test was not performed.
Repeat the check strip test.
retest
The last test failed after
the countdown started.
Repeat the test.
not ok
3.2 mmol/l
(Example)
√not ok
7:40am 6-01-95
82
LSC-96-003 own. manual
reset
Page 83
PROBLEM
The meter has lost some
important information,
including the code number.
WHAT TO DO
Use the C button to reset
the meter code to match
the test strip vial code.
You should also check all
of your meter option settings
to be sure they are correct.
(If this continues to happen,
there may be a problem with
your meter. Call the LifeScan
Customer Care Line at
1 800 663-5521.)
Some parts of the display
are not working. The messages
will be incomplete.
Call the LifeScan
Customer Care Line at
1 800 663-5521.
83
MESSAGES
MESSAGE
7/26/97 1:45 AM
LSC-96-003 own. manual
7/26/97 1:45 AM
Page 84
TAKING CARE OF YOUR METER
Your ONE TOUCH® Profile® Blood
Glucose Meter is easy to maintain.
These tips will help you keep it in
good operating condition:
■
METER CARE
CAUTION:
■
■
■
■
Do not get water inside the
meter.
Never immerse the meter or hold
it under running water.
■
Keep the test strip holder and test
area clean.
Keep your meter dry and avoid
exposing it to extremes in temperature or humidity. For example, do
not leave it in your car.
■
84
Do not drop the meter, as this
could damage the electronics. If
you drop the meter accidentally,
make sure the test strip holder is
still securely in place. Check the
meter by doing check strip and
control solution tests to be sure
your meter is working properly.
Do not take the meter apart. Sensitive parts could be damaged, causing false results. Taking the meter
apart will void the warranty.
Do not clean the meter with alcohol.
Alcohol will damage the meter.
LSC-96-003 own. manual
7/26/97 1:45 AM
Page 85
Doing a Daily Check
Cleaning the Meter
Look through the small hole in the
test strip holder to make sure there is
no lint, dirt, or blood blocking it.
Clean the meter and test strip holder:
■
■
If there is anything blocking the hole,
or if the test area has dirt, lint, or
blood on it, remove the test strip
holder and clean the test area by following the instructions in the next
section. Then do a check strip test.
■
At least once each week
Whenever the test area looks dirty
Whenever
clean
area
appears on the display
How to clean your meter:
Step 1: Remove the Test Strip
Holder from the Meter.
Hold the meter and place your
thumbs on the two raised dots on the
test strip holder. Press down on the
85
METER CARE
test
LSC-96-003 own. manual
7/26/97 1:45 AM
Page 86
raised dots and slide the test strip
holder toward you.
METER CARE
M
Step 2: Clean the Test Strip
Holder.
C
Wash the test strip holder with soap
and water.
Remove the test strip holder to expose
the test area.
M
Clean the underside of the test strip
holder. Using a cotton swab, clean the
small hole to remove any dirt, blood,
or lint. Rinse well.
C
Dry completely with a soft cloth or
tissue.
86
LSC-96-003 own. manual
7/26/97 1:45 AM
Page 87
Step 3: Clean the Test Area.
CAUTION: Do not get water inside
the meter.
The following cleaning agents will
damage the meter.
Do not use:
• Alcohol
• Cleansers with ammonia or phenol
• Windex® or other glass cleaners
• Abrasive cleaners
M
C
(Windex is a registered trademark of the Drackett Products
Company.)
Check the clear, protective coating
over the test area to make sure it is
not scratched or damaged.
Dry the test area with a soft, dry tissue
or cloth. Remove any lint.
87
METER CARE
Rub the test area with a cotton swab or
soft cloth dampened with water to
remove all blood, dirt, or lint from the
test area. If necessary, a mild liquid
dishwashing detergent mixed with
water may also be used. Do not apply
full-strength detergent to the test area.
Be careful not to scratch the test area.
LSC-96-003 own. manual
7/26/97 1:45 AM
Page 88
Step 4: Replace the Test Strip
Holder.
Hook the bottom of the test strip
holder onto the square notch on the
meter.
Press down on the raised dots of the
test strip holder until it snaps firmly
into place.
METER CARE
M
C
M
88
C
LSC-96-003 own. manual
7/26/97 1:45 AM
Page 89
Press forward on the base of the test
strip holder to be sure it is properly
in place.
M
installed. When the batteries need to
be replaced, use two AAA, 1.5 volt,
alkaline batteries.
C
You are now ready to do a check strip
test. If the check strip will not slide
into the test strip holder, repeat Step 4.
Replacing the Batteries
The ONE TOUCH® Profile® Meter
comes with batteries already
89
METER CARE
The batteries should last about one
year when testing up to four times
a day. When the battery symbol
appears on the meter display, the
batteries are getting low. The meter
will still provide accurate test results
with low batteries, but you should
replace them as soon as possible.
LSC-96-003 own. manual
7/26/97 1:45 AM
Page 90
When
Turn the meter over so that the front of
the meter is resting in the palm of your
hand. With your thumb, press upward
on the opening tab of the battery compartment door and lift upward until it
releases from the clasp.
METER CARE
battry
replace now
appears flashing on the display, the
meter will no longer give results and
you must replace the batteries before
you can perform another test.
Dead batteries or battery removal will
not affect the information stored in
the meter memory. The time and date
will be saved in the meter for approximately an hour without the batteries.
1. Turn the meter
over and locate the
battery compartment door.
To replace the batteries:
Make sure the meter is turned off
before you remove the batteries.
90
2. Remove the battery compartment
door.
LSC-96-003 own. manual
7/26/97 1:45 AM
Page 91
To replace the battery compartment
door, insert the tab on the top of the
door into the slot in the top of the
battery compartment.
Press the opening tab upward toward
the top of the meter.
3. Remove the old
batteries by gently
slapping the meter
against the palm of
your hand. Never
tap the meter
against a hard
surface.
4. Insert the new
AAA batteries into
the battery compartment, being sure to
align the plus (+)
and minus (–) signs
correctly.
Check to see that your meter is
working. If the meter fails to turn on,
the batteries may have been inserted
incorrectly. Remove the batteries and
reinsert them as illustrated.
91
METER CARE
Lower the battery compartment door
until it snaps shut.
LSC-96-003 own. manual
7/26/97 1:45 AM
Page 92
SPECIFICATIONS
SPECIFICATIONS
Power Supply:
Two AAA alkaline batteries
Battery Life:
Approximately one year when testing up to four times
a day.
Result Range:
0 – 33.3 mmol/L (0 – 600 mg/dL). Values of 33.3 mmol/L
(600 mg/dL) and above displayed as hi.
Display Type:
Liquid crystal
Blood Source:
Whole blood (capillary or venous). Do not use samples
that contain fluoride (gray top tubes).
Hematocrit Range:
25 – 60%
Dimensions:
Length, 10.9 cm; width, 6.6 cm; height, 2.5 cm
Weight:
127.5 grams with batteries
Operating Temperatures:
15˚–35˚C (59˚–95˚F)
Operating Humidity Range: 0–90% relative humidity (non-condensing)
92
LSC-96-003 own. manual
7/26/97 1:45 AM
Page 93
Memory:
Up to 250 records with time and date
Data Port:
RS-232 serial communications with special
LifeScan cable for interface with LifeScan’s
Diabetes Management System software
Complies with Canadian ICES-001
SPECIFICATIONS
93
WARRANTY
LSC-96-003 own. manual
7/26/97 1:45 AM
Page 94
Guarantee and Warranty
Five-Year Warranty
30-Day Money-Back Guarantee
If, at any time during the first five
years after purchase, the meter does
not work for any reason (except for
obvious abuse), LifeScan will replace
it with a new meter or equivalent
product free of charge.
If you are not fully satisfied with the
ONE TOUCH® Profile® System, a full
refund may be obtained by calling a
LifeScan Customer Service Representative at our toll-free number,
1 800 663-5521, within 30 days of
purchase. You must return the
ONE TOUCH Profile® Meter and a
copy of your receipt to receive a
refund.
The warranty policy applies only to
the original purchaser of this meter
and does not include the batteries
supplied with the meter.
94
LSC-96-003 own. manual
7/26/97 1:45 AM
Page 95
Please complete the warranty service
card and mail it to LifeScan.
The ONE TOUCH® Profile® Meter has
a full five-year warranty from the
original date of purchase. Write your
date of purchase here:
This warranty is in lieu of all other
warranties, express or implied,
including any implied warranty of
merchantability or fitness for a particular purpose.
95
WARRANTY
The warranty policy does not
apply to the performance of the
ONE TOUCH Profile Meter when
used with any test strip other than
genuine ONE TOUCH® Test Strips
made by LifeScan, or when the
ONE TOUCH Profile Meter or
ONE TOUCH Test Strips are changed
or modified in any way.
Before you return your meter, or any
product, call the LifeScan Customer
Care Line at 1 800 663-5521.
LSC-96-003 French
7/26/97 2:02 AM
Page 96
LifeScan Customer Care Line/Ligne InfoSoins:
1 800 663-5521
Canada
une filiale de
Burnaby, B.C. V5C 6C6
AW *05178602A*
© LIFESCAN, Inc. 1996
Printed in U.S.A.
Imprimé aux É.-U.