1
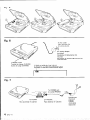
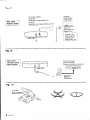
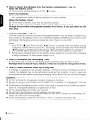
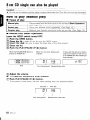
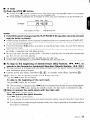
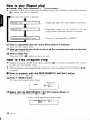
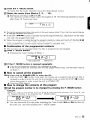
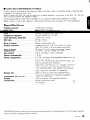
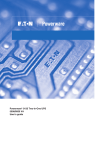
t
77
m
7
0
u
DPC-41
PORTABLE
COMPACT
DISC PLAYER
INSTRUCTION
MANUAL
(PAGE6-15)
LECTEUR
CD PORTABLE
MODE D’EMPLOI
(PAGE16-25)
REPRODUCTOR
DE DISCOS COMPACTOS
PORTATIL
MANUAL DE INSTRUCCIONES
(PAGINA26-35)
KENWOOD
CORPORATION
Keep this manual
handy
for future
reference.
For your records
Record the serial number, found on the bottom of the unit, in the
spaces designated on the warranty card, and in the space provided
below. Refer to the model and serial numbers whenever
vou call
upon your dealer for information
or service on this product.
Model
DPC-41
Serial number
@PRINTED
IN JAPAN B60-0261-OS(K,P,M,Y)(TJ
91112 11 1096 7 6 5 4 3 2 1 9002 11 10 9 6 76
Precautions
for use
To maintain
the high performance
in the following
Prkcautions
and reliability
avoid
using
or storing
it
zi I’emploi
Pour preserver
les hautes
ou de I’entreposer
dans
performances
et la fiabilite
les endroits
Precauciones
al usaria
Para conservar
el alto rendimiento
guardarla
of this unit,
conditions.
en las condiciones
de cet appareil,
eviter
de I’utiliser
suivants:
y la confiabilidad
de esta unidad,
evite
usarla
o
siguientes.
Dusty
places.
In high
humidity
Emplacements
areas
such
as the bathroom
poussiereux.
Dans une piece tres humide,
Sitios
Salle de bain.
polvorosos.
EN sitios
l Near
telle qu’une
de mucha
heat sources
humedad,
such
tal coma
as stoves,
etc.
l Pres de sources
de chaleur
l Cerca de fuentes
de calor coma por ejemplo
Places exposed
to direct
comme
sunlight,
el bar70
un radiateur,
estufas,
especially
etc.
etc.
in a closed
car.
Endroits
dans
exposes
Lugares
l Extremely
Endroits
l Lugares
a 10s rayos
en el interior
cold
au soleil,
en particulier
fermee.
expuestos
pecialmente
l
directement
une voiture
directos
de automoviles
del
sol,
es-
cerrados.
places.
extremement
extremadamente
froids.
frios
DPC-41
2
Fig. 2
Fig. 3
6.
Fig. 4
5.
4.
To AC outlet
Vers une prise CA
A la toma de CA
Rear panel
Panneau
Panel
arri&re
trasero
Adaptateur
d’alimentation
CA
Aduptador de energia ektrica
buministrada)
de CA
DPC-41
3
Fig. 5
Fig. 6
To AC outlet
Vers une prise CA
A la toma de CA
Ql
Q
AC power adaptor
(provided1
Adaptateur d’alimentation CA
(fourniel
Aduptador de energia &ctrica
(suministrada)
CHARGE button
Touche de charge (CHARGE1
Both
de carge (CHARGE)
It blinks at relatively long interval.
II clignote B un intervalle relativement long.
Parpadea a lntervalos relativamente largos.
(am
Fig. 7
To PHONES jack
To increase
Pour augmenter le son
Par.3 aumentar el v&men
4
DPC-41
To decrease
Pour reduire le son
Para disminuir el volumen
Headphones
(Optionall
casque
(Option1
Auriculares
(Opcionall
de CA
Fig. 8
Panel
trasero
AC power adaptor
(attached1
Adaptateur d’alimentation
CA
(fournie)
Aduptador de energia ektrica
(suministrada)
Amplifier
Amplificateur
Ampllficador
de CA
I
M;gn&opho”e
recorder,
etc.
cas*ette etc.
Radiocasete, etc.
Fig. 9
Car audio system
Chaine autoradio
Sistema de audlo de autom6vil
(Optional)
Fig. 10
Poire souffklnte
a3
Ll3lS
Lentille
Lente
5
DPC-41
Unpacking
Unpack the unit carefully
and make sure that all accessories
and cables are put aside so they
will not be lost.
Examine the unrt for any possibility of shipprng damage. If your unit is.damaged
or fails to operate, notify your dealer immediately.
If your unit was shipped to you directly, notify the shrpprng
company
without
delay. Only the consignee
(the person or company
receiving the unit) can file
a claim against the carrier for shipping damage.
We recommend that you retain the original carton and packing materials for use should you transport
or ship the unit in the future.
Before applying power of AC adaptor
important!
USA and Canada
Unit shipped to the above are not equipped
with an AC voltage selector switch and the
drscussion
of such a switch that follows
should be disregarded
All other countries
AC adaptor shipped to countries other than
the above are equipped with an AC voltage
selector switch on the top cover. Refer to
the followrng paragraph for the proper setting of this switch.
AC voltage
selection
AC adaptor operates on 1 IO- 120 volts or
220-240
volts AC. Before connecting
the
power cord to your AC outlet, make sure that
the setting position of this switch matches your
line voltage. If not, it must be set to your voltage
In accordance
with
the following
direction.
Note:
Our warranty
by excessive
does not cover damage caused
line voltage due to improper setting of the AC voltage selector switch.
WARNING:
TO
PREVENT
SHOCK,
APPLIANCE
6
DPC-41
DO
FIRE
NOT
TO RAIN
OR
ELECTRIC
EXPOSE
THIS
OR MOISTURE.
b-1
llOV-12ov
zzov-24ov
Move switch lever to match your line voltage
with a small screwdriver or other pointed
tool.
AC voltage
selector
switch
Fig. 1
Before plugging
in
that the position
Selector
conforms
voltage.
If not, it
Fig. 1.
WARNING
this unit, make sure
of the AC Voltage
to your line (mains)
must be reset. See
NOTICE:
IN MOST CASES IT IS AN INFRINGEMENT
OF COPYRIGHT
TO MAKE COPIES OF
TAPES OR DISCS WITHOUT
THE PERMISSION OFTHE COPYRIGHT OWNERS.
ANYONE WISHING TO COPY COMMERCIALLY AVAILABLE
TAPES OR DISCS
SHOULD CONTACT THE MECHANICAL
COPYRIGHT
PROTECTION
SOCIETY
LIMITED OR THE PERFORMING RIGHTS
SOCIETY LIMITED.
Controls, connectors and indicators
@
@
@
@
@
@
@
@
[I44 w]
SKIP/SEARCH buttons
[ml STOP button (POWER OFF)
[~/III PLAY/PAUSE button
(POWER ON)
Lid
OPEN button
PHONES jack
VOLUME control knob
Display description
1.
<Fig.
<Fig.
2>
LAST MEMO. (Last memory) switch
HOLD switch
REP. (Repeat) button
P. MODE (Program modoj button
CHARGE button
Display
LINE OUT jack
DC IN jack (6-9
Vj
3>
It blinks when the batteries are running out. It also blinks at relatively long interval during
recharging.
It is indicated when “P.MODE (Program mode)” is set.
It is indicated when Repeat Play is set.
It indicates total-recording time and elapsing time of a CD.
It indicates total number of musics and the order of musics in the disk which is being played
and programmed.
6. It is indicated when “HOLD” switch is set.
2.
3.
4.
5.
Power source
n Use in the following
method:
Rechargeable Battery
(Provided)
Charge with the provided AC adaptor before use.
Alkali Battery
Use size AA alkali manganese dry batteries which are available in
the general market.
Household AC Power
Source
Use the provided AC adaptor.
Car Battery
Use the optional car-battery adaptor DC-C7 (exclusive for 12-V car).
n How to use the main unit with the provided
l
0
AC adaptor
<Fig. 4>
When this provided AC adaptor is used, the power source can be supplied from household
outlets. Insert the plug of the AC adaptor into the power-source terminal on the reverse side
of the main unit, then connect the AC power adaptor to a household outlet.
Pull out the AC adaptor from the outlet when it is not in use. Conduct insertion into or pulling
out from the power source terminal after pressing the STOP [ n I button twice in order to
turn the main-unit into “POWER OFF” condition.
n How to use the unit with the provided
manganese
rechargeable
batteries
or alkali
dry batteries
The usable batteries are only the provided rechargeable batteries (KN-3lJ).
Generally marketed rechargeable batteries and manganese dry batteries cannot
be used.
DPC-41
7
l How
to Insert
the batteries
Open the battery cover.
@ Lift the cover while pressing
insert the batteries.
@ insert the four provided
I
tery
compartment
surely
into the battery
the STOP
rechargeable
by paying
[
batteries or alkali manganese
attention
for correct polarity.
into the specified
Be sure to fit it into the specified
position until
Charge the provided
first time.
l How
to Recharge
rechargeable
<Fig.
6>
n 1 button
Close the battery cover.
@ Fit the hook of battery cover
@
compartment
batteries
batteries
into the bat-
position.
it clicks and gets locked.
for 6 hours,
if you use them for the
<Fig. 6>
Turn the Power off and insert provided rechargeable
batteries into the battery compartment,
then connect an AC adaptor to the main unit before pressing CHARGE button in order to start
recharging.
(Recharging
cannot be conducted
when Power is turned ON)
Recharging is canceled automatically
by the built-in and 6-hour timer when recharging is completed.
1. If the STOP 1W 1 and PLAY/PAUSE
[ bill 1 button is pressed while recharging is being
conducted,
POWER will be turned OFF. Recharging
will be canceled when PLAY/PAUSE
[ WI 1 button is pressed during recharging. Other operations cannot be conducted.
2. The CHARGE button functions
even though when the HOLD switch is turned ON.
3. Recharging
is canceled when the AC-adaptor
plug is pulled out an outlet while recharging
is being conducted,
or when power supply is cut.
0
How
to Recognize
In the normal
use,
the Recharging
5 hours
of recharging
Time
allows
continuous
play for about
2 hours.
Recharge them for about 6 hours, however, if they are not used for a long period of time.
l How
to make
batteries
stand
up to long use
If recharge is repeated for the provided batteries,
whereas the power of batteries is still remained, the batteries may not be recharged
enough as their property.
In such a case, use
up the power of them before conducting
recharging, which allows them for normal recharging.
Cautions:
Do not recharge the manganese
and alkali manganese
batteries.
Be sure to use only the provided and AC adaptor for recharging.
It is dangerous
if you use
other kind of AC adaptor.
Avoid adverse recharging
and short circuit. They result in causing of such troubles as deterioration of rechargeable
batteries and generation
of heat.
Do not disassemble
and modify it by yourself.
Do not touch the CD player and AC adaptor with wet hands
Should the liquid contained
in the battery attach on your skin or clothes due to breakage, etc.
rinse it off with much running water.
Avoid overcharging
a battery for 24 hours or more. It shortens the battery life.
8
DPC-41
Listening through headphones
l
l
<Fig.
7>
Connect the headphone
(optional) plug with the “PHONES”
jack fuse 43.5
Conduct the pull-in/out
operation
of the jack during Power is OFF_.
Adjust the volume with the VOLUME control.
stereo
mini plug).
Notes:
l
0
0
Keep the plug of headphone
clean all the time.
Non-clean
plug may cause noise.
Avoid using the headphone
when you drive a car and so on for traffic
Be careful not to fall asleep with the headphone
on.
As a Compact Disc contains very little noise, a sudden
if the VOLUME
control is adjusted too higP
safety
loud sound could be output
8 cm CD single can also be played
This unit can play 8 cm CD srngles
directly
without
using
an adaptor.
Caution:
l
Do not use an adaptor
sold for other
models
(otherwise
the CD or this unit may be damaged).
How to play (Manual play)
n Types
of play
Manual play
Plays musics from the first track to the last track (Basic Operation).
(See Page IO.)
Repeat play
Plays your
Program play
Reserve
favorite
your
music
favorite
repeatedly.
musics
by order
(See Page 12.)
as you like. (See Page 12.)
n Manual
Play (Basic Operation)
Leave the HOLD switch turned OFF.
Q
Q
Push the OPEN button.
Open the lid: Lightly lift the lid near the OPEN button.
a
Insert
@
Close
QPush
the disk:
Be sure to keep the label side of the disk upward.
the lid.
the PLAY/PAUSE
The unrt starts
playing
When PLAY/PAUSE [t/II
pressed to POWER ON.
[b/l11
automatically
button:
after
scanning
Track No. 1
/E---j
Adjust
Min: Sec.
d:SC
Track being played
press
stop
temporary
Push PLAY/PAUSE
If you
Elapsed playing time
it once
[~/Ill
more,
(pause)
button:
the unit starts
playing
Track No. 1
from
the paused
Min: Sec.
:+/El
/
Track being played
10
DPC-41
event that data is not read or
is not inserted. (It will turn out
POWER OFF after elapsing of
minutes.)
the volume.
n To operate
a
In the
a disc
to be
three
(1
Blink
a
the data of the drsk.
When the unit starts playing automatically.
1 button is
I
Playback time blinks here.
position
1
n To stop
(ZJ Push the STOP [ml button:
l
l
If the STOP [ n 1 button is pressed once, the unit is put in the standby mode. If it is pressed
once again, the unit is turned out to be POWER OFF.
If the standby mode lasts for 3 minutes or more, the unit is turned out to be POWER OFF.
Track
Min.
:q
r6:3B
STANDBY
: Set
/
Total
number
/
of tracks
Total
playing
Notes:
If the HOLD switch is being turned ON, PLAY/PAUSE
even the button is pressed.
time
[V/Ii] operation cannot be activated
If OPEN button is pressed, all the contents is erased and the unit is turned out to be POWER OFF.
If the lid is open, all the functions
do not work. Closing the lid does not simply allow the unit
to turn out to be POWER ON.
If the PLAY/PAUSE
[WI11 button is pressed during the standby mode, the unit starts playing
from the first track.
When the music is played until the final track and the player has naturally entered the Standby Mode, it indicates the total playing time.
Be sure not insert the disk up side down. If the disk is inserted into the unit with reverse side
up, the unit can not start playing.
Do not insert anything
other than the disk into the disk tray.
A disk may be damaged
if it is inserted diagonally
into the disk tray.
To skip to the beginning of desired track (Skip feature,
M,
search in the forward or backward direction (Search feature,
WI,
to
M,
Hf 1
The skip function
is activated
with one press of button and the search function
is activated
with continuous
press of button.
Operate during play (Basic Operations
Q,
@I, or standby mode (Basic Operation
a).
@jTo
skip to the beginning of the track being played:
Tap the
I+r
button
for an instant.
To skip to the beginning of the next track:
(iiJ
Tap the H
button
0 When you wish
0 The first music is
l If you press H4
for an
to skip
caused
button
How to operate
the quick
Push Irr
button
How to operate
Push w
0
0
button
instant.
back to the previous music, press the w
button once more.
to play if w
button is pressed while the last music is being played.
during the standby mode, the last music is activated
to play.
return
with
the main
unit:
continuously.
the quick
traverse:
continuously.
If you release the quick return and quick traverse buttons, the unit plays the music from
that position.
If an operation
is made during the pause mode, the music is paused at the position where
the button is released.
DPC-41
11
How to play (Repeat play)
Repeatplay (Basic operations Q - a
n
are omitted.)
0 If the REP. button
on the main unit is pressed
play will be activated.
@3,, repeat
Every time
the button
during
play or standby
(basic-operation
is pressed
REPEAT-one
.Repeatedly
REPEAT-all
.Repeatedly
programmed
Cancellation
mode
of REPEAT
.It turns
play
plays the music
plays all
(reserved)
off the rndrcation
played
or selected
the musics
or all
musics in the disk.
the
of REPEAT
1
Q
@j
How
to repeatedly
being
played
or selected:
once.
How to repeatedly
play all the music or all the programmed
Push REP. button
@
play the music
Push the REP. button
How
to Stop
musics
in the disc:
twice.
Play
Press the STOP
[ W 1 button
on the main
unit.
How to Play (Program Play)
l
0
l
H
@
Operate during the standby mode (Basic operation
@J. It cannot be operated if the mode is
in other than the standby mode.
15 favorite musics can be programmed
(reserved)
in the order you like to listen to.
After completion
of the programming
(reservation),
play is activated if “PLAY/PAUSE
[WI
1”
is pressed.
How to program
with
(Basic Operations m
- @j are omitted.)
Push P. MODE
l
Enters
the SKIP/SEARCH
input
mode.
No
I
I
Select
l
with
The same
the SKIP/SEARCH
operatron
as in m
[
W
FH I button
(Music
and @I.
It means that the second music has been chosen
12
DPC-41
button
button:
the program
Memory
Q
WI
[I44
1):
@ Push the P. MODE button.
(It means
li7J
that
the music
has been set as the firstly
played
music.)
Select the music (from Musics 2, 3, . . . 15):
l
l
Repeat the operation
in Q and (@.
The maximum number of input musics for program
after those 15 musics are input.
is 15. The following
indication
is shown
During the programmed
play, the unit is in the auto space mode. Then, the four-second
pause
is Inserted between the musics.
If the SKIP [I+4
WI
button IS pressed durrng the programmed
play, skip search can be made
only wrth the programmed
track.
When the program is called during the program stand-by mode and the PLAY/PAUSE
F/Ill
button IS pressed with LAST MEMO. OFF (See Page 14), the player WIII play from the first
music programmed,
not the music whose number is indicated
now.
n Confirmation
l
This function
of the programmed
can be operated
when
contents
the disc
is programmed
and stopped
(iiJ Push P. MODE button:
l
lndrcates
the music
number
of Music
1
I
Track programmed
@
Memory
No.
If the P. MODE button is pressed repeatedly:
l
l
Then the programmed
contents
If the music orders are indicated
to Music 1.
are indicated
in order.
untrl the last programmed
music,
the indication
returns
H How to cancel
all the programs
@J Put the unit to POWER OFF or open the lid:
l
l
Push the STOP [ W ] button once when the musics are is programmed
and the disc is
stopped in order to enter the unit into the standby mode, or press the STOP [ W 1 button
twice during play in order to put the unit to POWER OFF.
Push the OPEN button.
n How to change
the contents of the program
Q Call the program number to be changed by pressing the P. MODE button:
Example:
When you wish to change the music in Track 6 of the Program
the Program Number 2 by pressing the P. MODE button.
l
You can also revise the track after indicating
the Track
the main unit, and then pressing the P. MODE button.
8 with
Number
Irr
2 to Track
and H1
8, call
buttons
on
DPC-41
13
Convenient functions
H Prevention of misoperation
shockl/Last
*
memory
[HOLDl/Reduction
of
sound
skip
[Anti
function
This unit has the HOLD function
to prevent misoperation,
the anti-shock
function
to reduce
the sound skipping and the LAST MEMO. function
to memorize the musics until the power
is turned off. When the unit is used in the car or elsewhere
where there is big vibrations,
the
sound skipping is reduced.
Turn on the HOLD switch:
0 If the “HOLD” is turned on in
ON mode
even thougS3 Tr -0.
the POWER OFF mode,
the unit will not be turned
to the POWER
W Care and maintenance
If dirt or dust
available CD
When wiping
use a record
Avoid leaving
When a disc
of discs
is attached to the playing surface of a disc, clean it carefully using a commerciallycleaning cloth, etc.
the disc, be sure to wipe it in a radial direction,
as shown in the Fig. 10. (Do not
cleaner for ordinary disks.)
discs under direct sunlight or in a place where the temperature
is high.
is not to be used for a long period of time, do not leave it in the CD player.
Specifications
Tracking system
........................
Laser type
................................
D/A converter
...........................
Filter .......................................
Frequency
response
...................
Total harmonic distortion
...........
S/N ratio ...................................
Channel separation
....................
Wow & flutter ...........................
Output terminals
........................
Input terminal ...........................
Output level ..............................
Line output
...............................
Power consumption
..................
Power requirement
.....................
Battery
life
...............................
Dimensions
(W x H x D) ..............
Weight
....................................
Accessories
.............................
Three-beam
tracking
Semiconductor
laser
16 bit, linear
Double oversampling
digital filter
20 to 20,000
Hz, ? 1 dB
0.04%
tat 1 kHz)
87 dB, 1 kHz
80 dB, 1 kHz
Below measurable
limit
Headphone
jack: 3.5 mm stereo mini-jack
LINE OUT jack: 3.5 mm stereo mini-jack
DC IN 6 V to 9 V (external
power supply)
12 mW+12
mW (16 s2, at 1 kHz)
0.8 V (47 k!I at 1 kHz, Variable)
1.5 w
6 V DC: provided rechargeable
batteries or external DC IN jack
120 V AC, 60 Hz (USA and Canada type, using the provided AC adaptor)
220-240
V AC 50 Hz (U.K., Europe, and Australia, using the provided AC adaptor) or
1 1 O-l 201220-240
V AC, 50160 Hz (All other
type, usrng the provrded AC adaptor)
About 2 hours (continuous
Repeat Play)
(may vary depend on charging
condition)
137x41
xl57
mm
445 g (without
rechargeable
battery)
Audio connection
cord
xl
AC adaptor
xl
Rechargeable
battery (AA)
x4
KENWOOD follows a policy of continuous
cation may be changed without
notice.
advancements
in development.
For this reason
specifi-
DPC-41
15