1
IMPORTANT
MANUAL
DoNot
ThrowAway
Him .
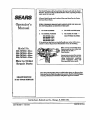
Operator's
Manual
,
Model
No.
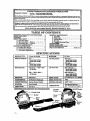
358.797922-32cc
358.797950-22cc
358.797961-22cc
358.797982-32cc
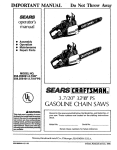
Always
Wear Eye Protection
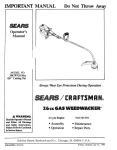
8___/A/,q._iC
RI:IFTSMl:lN_
GAS POWER
BLOWER
A WARNING:
Read the Operator's
F_o__am.,AILW_
_t_¢ti__
Manual
and
Safety
TOvo so
Ca_ Result in Serous Injury.
2 Cycle E_gine
Fuel
• Assembly
• Maintenance
• Operation
• Repair Parts
J,
illl illl
,,
,L,
Sold by Sdi_,_Ro_b_Lck-a.ffd:__.o.2Ohicagd,_IL
60684 USA
153o
............................
Mix I
|_
_]
[_ For the W_ey
_,| _
warranty
:
_,
- Mc4els 358.7979t_0 & 358.797961
Two ears - Modal_ 358.79%922 & 368.797982
Pe_gd sp_Ie_
_ove from the date of purchase, when this Power Blo_zr
excludes blower t_e_,
spark plug, a_d air deane_; _ich
_xe expendable
is maintatued_ _ubric_ted, and tUaed u_
parts and become worn dufingnvrmai
use.
_| If this Power Blower m used for commet_dal or rental pur_se_. _
werran_" applies for 90 days.
•_| WAF.I_ "TI' SERVIC_ IS AVAILABL_ BYRETUI_LNG
THE U2qlT TO THE _AREST
SEARS SERVICE _NT_RDEP._RT[i{ MEriT 1N THE UNITED STATES,
This wm'fan_- applie_ only wh_e this product is in use in the United States.
_|
Thi_ warranty
gives _u
._eific
legal rights, and yo_ may al_e have o_her tights whiCh _r
from s_ate to _-'_le,
TABLE OF CONTENTS
WAI_NINOS AND SAFETY INSTRUCTIONS
KNOW YOUR UNIT
"
ASSEMBLY ................................
USING YOUR UNIT .........................
•
..
_
B.
C.
D.
3
4
5
6
Operator
Safety
.. .........
:-..........
6
Operating
Tips_
- Blower
.... :....
......
Operating
Til_s--Vacuum
..,_ ........
7
Pre-operation
Checks
. .............
_. 7 7
ENGINE INFORMATION ....................
8
A. FuelingYour Engine
... _ _.............
8
B. Starting
Instructions
..................
8
C. Carburetor Adjustments
.........
_....
9
GENERAL M.a_ITEN._ICE
.................
I0
A. Air Filter ..............
. .............
10
B. Fue! Tank ............................
10
C. Starter Rope ... :_.....................
10
Do Storage ..............................
12
. E. T!_b-leShootingChart.
.............
_ 12
ACCEqSORIES .............
.................
.1_
REPAIR PARTS LIST ........................
!3
QUICK'REFERENCE PAGE ..................
16
PARTS AND SERVICE ..............
Back Co_,er
SPECIFICATIONS
ENGINE TYPE:
2 Cycle
DISPLACEMENT:
_22cc- -
Air Coded
Model
358.797950
Model 358.797961
32ceModel
35&797922
Model 358.797982
ENGINE RPM:
Operatin" gAll Models
-7000-7600.
Idle- -3800-4600All Models
-
f,,,
!So d.s t ..........
,,
H,
,
,
....................
Positive Rocker
P LUG:
MoD z
Auto Rewind
'i !8,6 ft. oz. .............
LUBRICATION:
Thr e
Rear
Muffler
Plug
Blower
Rope
-Z-
_
_
"
"
III
iiiiiiiii
|l
IIIIIIIIIII *11
I
III
r
;'me_
="
'
-
IIIIIIIIII1_
IJ
ill
WARNINGS
.................................
AND SAFETYINSTRUCT!0NS
Failu)_.to
A.KNOW
follow
all Safety
Rules
and Prdeardions
YOUR UNIT
1. Read your Operator's Manual carefully ur_tfl
you completely understand and can follow all warningsand safety instructions
before operating
unit.
Z. Restrict
your unit to users who understand and
follow all warnings and safety, instructions in .
_thls manual.
B. PLAN
..
AHEAD
l"..:_[ways wear eyeproteetion
to prevent rocks or
..debris from being blown or ricocheting into eyes and
face which can result in blindness andlor other serious mjuryo
2. Always wear a respirator
or facemask
when
working with the unit in di_sty environments.
3. Always wear heav_ long pants, boots, and
gloves.
Do not go barefoot or wear short pants,
sandals,
jewelry,
looseclothing,
or clothingwith
loosely hanging straps, ties, tassels, etc_;they canbe
•caught in moving _.
Secure;_]_ir so it is above
shoulderlength.Beingfullycov6Fedwillhelpprotectyou from piecesof_ic
pla_ts suchas poison
ivy"
thrown by theblade,
which couldbe more ofa
hazardthantouchingtheplantitse]£
4, Do not operate the unit when you are fired, ill,
upset, or ffyou are trader the influence of alcohol,
drugs, ormedication.
5. Keep children,
bystanders,
andanimals
away
from.the work area a mirdmum of 3Ofeet wher_ starting or operating the unit.
.
6. Inspect the areahefore
starting
the unit. Remove all debris and hard objects such as rocks,
glass, wire, etc. that can ricochet, be thrown, or oth..
exw]secause injury or damage during operation,
C, HANDLE
FUEL WITH
CAUTION
L Elimizmte all sources of sparks or flame (in, " clud_g smoking,open flames,or work that can
causesparks)
inareaswhere ft_el
ismixed,poured,
or stored.
2. _
and pour fuel in an outdoor area; stor_
E.
fuel in a c0ol, dry, well-ventilated
place;, use an ap......
proved, marked container for_._d_nrposes ....
;,%_'I_ m:ct _a_ke
while h_ndiii_:_ih'_or
w_i|e
"" :"_q_erating the unit.
.
.
•
'.'" '
• 4,..Do not fill fud tmuk w_ile en_e
Is running.
5._ Stop the engine before removmgthe
fuel cap,_
"Allow the engine to cool before refueling.
6. Wipe up allZuel spills/_J_orestsrtingengine;
7. Move at least 10 feet away from fuel and fuel.
ing site before starting the engine.
D. OPERATE
YOUR
UNIT
SAFELY
:
z
li Stop the engine before opening the vaenum
inIet door or attempting to insert or remove the
" -vacu,,um,t,_b_"_T._--_e_glne_-_'-_
ppe-dandthe
""
_mpeaer
maae_u_ger"tm_ng_.:Tavom
seno_
injuryfrom the rotatlngblades.
2. Inspect the entire unit before each use for wo r_
loose,
missing,
or damaged parts.Do notuseuntil
theu_dtisinproperworkingorder,
3, Keep the outside surfaces free ofoil and fuel.
4. Never start or run unit inside a closed room
...
....
from staticelectrictt_
do not
wear rubber or anyother insulated glov.es..,whileLo._._:::
erating the unit.
_
can result in serious
injury.
6. Never use for apreadin_
chemicals,
fertiliz,
ers, or any other material w_ich may contain toxic
substance_
7. Do not set the unit on any surface except a
clean, hard area to start the engine or while
the engine is running.
Debrissuchas gravel.
sand, dust, grass, etc. could be picked up by the air
intake and thrown out through the discharge opening,damagingthe unit, property, or causing serious
injury to bystanders or the operator.
8, Avoid dangerous environments.
Do not use in
unventilated areas or where explosive vaporsor
carbon monoxide build up could be present.
9. Avoid situations whmh could se_ the collection bag on fwe, Do not vacuum discarded cigars
or cigarettes or ash,from fireplaces, barbecue pits.
brush piles, etc. To avoid spreading fire, do not use
blower nearleaforbrushfires,
Rreplaces,
barbecue
pits, ashtrays, etch.
IO.Do not overreach or use from unstable sur.
faces such. as ladders, troe_ steepsl_pe_ rooftops,
etc_ Use extra care when'cleaningon stairways.
Keep firm footing and balance at all times.
ll.Never
place objects inside the blower tubes;
alwaysdirect
the blowingdebrisaway from people,
animals,
glass,
andsolid
objects
such_strees,
auto.mobiles,
Walls,
etc.The forceofaircancausereeks,
dirt_,
orsticks
tobethrovator toricochet
whichcan
hurtpeopleoran/raMs,
breakglass,
orcauseother
damage. Do not allow the unit to be used as a toy.
I2,Nevex place any object in the air intake opening as th_ couldrestrict proper air flow and cause
damage to the unit.
13.Never run unit-wlthout
the proper_equil _me_t attached. W_en used as._blower, aIways install
ablowertube.When usedasavacuum,always
install vacu_ tubes and collecUon hag assemb}y.
,I4.Use only for jobs explained_n
this m_uaL
MPAINTAIN
YOUR UNIT
PROPERLY
L Have all maintenanca other than the rec0mmended
p_
descn_oedin
_heOperator's
Manual per. formedby yo_trSearsSer'.-ice Center.
2, Disvonneet
spark
plug before performing
maintenance
except"for carburetor a&_tmtment.
3. Use only genuine replacement
l_arts as recbm.
mended by Sears to avoid creating
a hazard and/or
voiding your warr_ty.
4. Cheek air zutake openings, blower tubes, elbow tube, and vacuum tuhes frequentl_
aL
wayswiththeen_mestopped.
Keepventsandtubes
free o£ debris Which can accumulate and restrict
proper air flow.
:
_. Before storing t[_ unit,use up fad leftinthe__:'
carburetor
and furllines by starting
theeng."eand=..
lettingit run until it stops. See _Storpge section.
6. Do not use any accessory
or attachmentother
thanthoserecommendedby Searsforusewithyour
unit.
7. D6 not store the unit or fuel in a closed area
fromhotwaterheaters,
e]ectricmotors
orsv_tches,
..... furnace s_ etc, ,
' . - _ .
_g;" Store _:_dry
area out ofreae_
ofbhildren,
If sltuations
occur which are not covered m th_s manual, ase care arzd goodj_dgeme_
Contact your Sears Service Center/DepOt
if you need assistance,
.
_ 3-
i
I mII
iiii
.......................
i I
....
"u!!"!.' " .............................
'
!ll!!LLL,_
i
•KNOW YOUR D CIT
il
n
ii
i
ii i
mm,i
I
• in
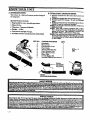
A. INTRODUCTION
:
i
i
vim
B. UNPACKING
Your blower is a high performance product designed
,lil
for to_job_
Special:
8. Examine parts for damage.
arts.
2. Checkparts _
include:
• Top handle for one-handed
operation.
Handle.
e Convenlent
upright storage.
• Available Gutter Attachment
ii
if you have not
the Carton Contents
Do not use damaged
.dlatety if apart _ missing or danuiged.
It is normal to hear the fuel filter rattle in an
_ empty fuel tauk_
Your unit is factory equipped with a _4brati0n-damlDened handle which causes the hence to
appe_arto_
loose. This condition is normal. See
the Safety Notice at the b6ttom of this page.
Your unit'has been factory tested and the carburetor prec_ ely adjusted. Therefore, it ispossible
to smell _oline
otto find a drov of oil/fuel re_idtm
on the muffler.
• Direct Driv_
• Vibration-Dampened
• WeightI2 lbs.
i
INSTRUCTIONS
•1. Remove contents from thecazton
done so.
,
Features
i
Kit #358.79992
Powerhead
.... i
Blower Tube
!
Concentrator Nozzle"
1
Flare Nozzle
1
Vacuum Collection Bag
1
Upper Vacuum Tube
1
Lewer ,Velum
Tube
I
Elbow Tube
1
2-cycleEngine
011
1
Operator's Manual (not shown) 1
•
Models
7_
_8
Models
_ E_q_ sm'e to vibrstions _prolopgeduse
-4-
_
4
of psoK_
_
.
p?_
:
358.797961
-2
358.7979_0
3
:
toolseould
cau._bbodv_
or_
_
l
'
I
_ ' ........
,....
....................
._
_
.
I
.
L
I!ul ...........
In
roll....
I,,,,,,
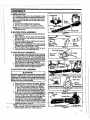
ASSEMBLY
A.PREPARAT ON
Your Operator's Manual has been developed to help
you assemble the unit and to understand its safe opera_;fion._ It is importer that you read your mauual completely to become familiar with the unit befvre you be_
' gin assemb_.
Locking _
Blower
L READ YOUR OPE_ATOR'S MANUAL
2. The only tool required is a standard screwdriver.
To ease assembly, lubricate locking tabs before
assembling tubes.
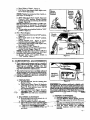
Bo BLOWER
TUBE
ASSEMBLY
L Locate the two lockingtabs on the side ofthe bIower
tube. Figure 1.
2. Align thegrooveson thefiozzle
withthe locking
tabson the blower tube and push the nozzle onto
the blower tube.
3. Turn the noz_e dock-wise untiI the parts snap into
• .phce and arefirmlytightened.
,
.
4. _Mign Grooves on ttIe Blower Tube with I.ec_g
mower
1,met)
• e BlowerTube into the Blower Outlet.
5. Turn the Blower Tube clockwise until the parts
snap into placeand arefirmlytightened.
dp
h
•C.VACUUM
BAG ASSEMBLY
1...
Open'thezipperon thelarge'end
ofthevacuum bag.
2. InserttheElbowTube, groovedend first,
through
•
the zipper openiag in the va__um beg _
2).
Then, push the grooved _
of the Elbow Tube
through the bagtube openingin theother end ofthe
bag.Figures2 &3. Makesurethebegtubeopening
• _sflushagain_thetubeflauge.
Figure&
"3..Closethe zipper on theb_t_ Make sure the zipper is
.!:,:_dosedcompletely and the zipper seam is tucked to.:.'wa.'_l.theinside of the beg. Figure 4 (inset).
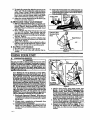
D.VACWJUM TUBE ASSFAdBLY
t
"
i Stop.the
'Aw,crnm
engine before
opening
............... I
thevaeuum
inlet !
| debt or _em_ =_g _ _er_ _ _
the vacu-i
l 'ramtubes. The engine must be st_pped and the Im-I
| p e!!@r,blades
no longer
•'I _-a.ry fromthe _ta_t_
" .
tur-aing to avoid serious]
bhde_ ............
I
1. Remove the blowertubefrom the engine. Figure 4,
2. Settheunit_
Mower outlet
up,on aflat
surface (Figura 5).Open thevacuum iv-let
coverasfollows:
• _u Insertascrewdrivei"int_latcharea._gu:re5.
=b..Gently twist the tip ofthe screwdriver and open
l;he _m_um inlet cover with your other hand.
_; -Holdopenvacuum inlet
.cover
andalignthe _es
• on, the upper vacuum tu_e with the I_:_f_:,_'_m
s_de the vacuum inlet, Figure 6. Insert the upper
rac:m_minto the vacuum inlet; twLst the upper vacuum tube clockwise until parts snap together.
4, Assemble the vacuum tubes by aligning the danted
end of the lower vacuum tube with the blower outlet
as shown in Figure 6. Push the two tubes together
,'°..._igure 5
'_ower'vacuum:tube
is
•
::_ cu.t:at an angle. Make sure slanted end of vacuum
'__
•'_:.__:'_.b_e
_se_igned
wlth bloweroutlet.
Figure 6.
-5,t,
5- To attzch the vacuum b_, _ign the grooves on the "
elbow tube with the locking t_s inside the blower
qutlet_ Figure 7 ('.reset). Be sure to align the dot on
the .elbow
tubew_ththe doton the blowerhousing.
mser_ e_ow tube intobloweroutlet;
twistelbow
tube counterclockwise
untilpartssnap together.
6. Adjustthevacuum collection
bagat theelbowtube
tO remove anytwist_Figure 8,
E.SHOUI_ER
soctior_
STRAP ADJUSTMENT
1. ,_r_ y_dr le_ hand hold the unit in an upright po_i.
•, _tion, supporting me Lower Vacuum .Tube on the
.._vundiFigureS.
Make suvethe Blower Outlet and
. Collection Bag are pasitioned on your rlght-hand
side.Figure8:
2."Placecollection
bag strap around,y?ur back and
overyour left
shoulder.
Snap collection
bag hook
' onto the strap retainer in the top handte. FigureS.
3. _ndyour
right arm toward the rear of the collection bag. Figure8.
•
4. Adjusttheshoulderstrapuntil
the collection
bag/
• shoulder strap seam lies _between your thumb and
index finger.
Figure 8.
• 5. Ma_ suretheshoulderstrapisadjusted
to allowa
:f_Ylbwofairfromtheelbowtube_Figure& Ifthe
_:-Bag iskiuked_theunitwillnotoperateproperly.
E BLOWER
/3. Secure thevacutuninlet
cover.Makersurethatthe
latchon thevacuuminietcoverissecurd_y
festened.
4. gelast_
the blowertubesasshownin_e "Blower
Collection Bag/
Shoulder Strap
Seam
CO_RSION
1. Stop the engine. Allow the eng_e to cool.
2. Remove the vacuum tubes and collection bag assemb!_
l
IUll
l
usING
_HI
l!l.
ml
l
Figure 8
I
, ,,,,,,
!ll
Illl I
I
I _
I!!
.............
I
YOUR UNIT
II Illll' I
I
II
I
I
I
OPERATOR
SAFETY
A WARNING
Do not assemble or disassemble the.vaenum
tube
W]itle the engine is framing.
Ius_mg
OZ"
removing the va._cmtm t_ube while the engine is running
can result_
serious _
Always stop the en,.f_e and diseo.nnect the sp_k plug.l_ore
une_oggsng the .u_nt or performmgany
maintenance
on _e eonee_'on ba_. ........
I
,Eye
"
As a blower, the unit is _
to sweep debris,
_',_.
__l_jn___..smalltwig_ or light snow. It can
•o__g
als wh_
_emic_, fe._"e_ orkuyomermaren•
may _ntatn t_xic substanc_ A_. a vacu-
ran, the unit is demgned to pickup dry materL_ such as
leaves, grass, sm_ twigs, andbits of paper. Do not atany omer aeons wmc_ may cause damage _o menn_._
let. Do rot attempt to vacuwn water or any other l_.
Vasuum_" watey,or other H_ids will cansedama_. to the engine. Avoid situations that couldcatch the
coltecfion bag on-fire.Do not operatenear an open
_'D_
notvalutadiscarded
tigers
or_
"4,r _Ways
gloves.
_anda_ jewelry,loo_ elo__'g
or
-6-
boots_ and
pan._,
with
looselylmuging_t]es_
tas_ls, etc. Secu_hair
soit is ab0_e shoulderlength.Beingfully covered
help protect you tYom pieces of toxic plants such
as poison ivy thrown by the blade, which co_d be
more of a hazard than touching the plan..titsott
5. Cheek the unit before each operahon.
Look
forworn,loose, missing, or damaged l_arts.
Do not
a_'_rom firepisr_, barbecue pits,brush pries, etc.
1, Read your Operator's
Manual, Make sure you
completely
un_d
and canfollowallwarnings
and safety instructions inthe manual b_fore operatingthe unit.
2. AIweys wear a respirator or facemask when
working in dusty environments.
_ys
we_ eye protection to prevent rabks or
anuTacewiden caU_r_t
ousinj_.
Wear heav_
long pants,
Do not go fba_.e_._,t or _._
m blb_dness
orother seri•
debris and object__,
wire_large sticks, etc., that can caUSe damage dm-ing op_
eration.
_l.Never place objects inside blower tubes; a!ways diredt blowing debris a'way from people , animals, glass, and solid 01_jectssuch as tx_s,-automobiles,
walls,etc_ The force ofair e_n causerocks,
dirt,
orsticks to be thrownortorice_.het whichmay
hurt people ora_imal_breakglass, et_
12.Never run the unit without the proper equip.
merit attached. When usingyour unit as a blower,
always install blower tubea When using your unit
asa vacuum, alwaysinstall
vacuum _ubesand collection
bag assembly. Make sure collection bag assembly is completely zipped as shown in Figure 4.
13.When using the unit as a va_um_ a_ways use
theshoulder strap to avoid loss
ofcontrol.
7. Keep children, bystanders,
and animals safely away. __furestarting
theenb'_ and dw-lngoperase, r_a_ cer_in c_ildr_ people, _
w_imais
area _in'_r_.
of 30 feet away _
the work area.
8. Check mr retake opening, blower tubes, vacu mn tubes, and elbow tube fi_uentl_
always
with engine s_ped
and s.l_rk_plug discormecte_,
_eep ven_s an_ alSC!W.rgertmes tree oIaeDrm wRlCl_
a_mulate
and re_
_OPERATING
TIPS
proper air flow.
9. use the eonrect ol_rating
posi_on.
Figure 9.
Do not oVeXreaeh or use from unstable surfaces
such as ladders, trees,'_teep dope_ rooftops, et_
Keep _
footing and balance at all times_
10.To avoid shock from static e_h-lei_j_
do not
wear rubberglovasor any otherinsulated
gloves
while operat'mg the unit.
B.
-'7 BLOWER
[
[ ......................
A WAlinG
• ......
.
[Do not use the unit as a btower wRhout the blow
[ear tubes properly attaehed
to avmd flying debris
[and/or impeller contact which _
cause serious
TIPS
--- VACUUM
WARNING
.[_
Do not use the unit as a vacuum without the vaeu I
um tube .and collection
bag properly attached to |
avoid flying debris .mrd/or impeller contact which [
can ea.use sermus _
Always make sure the [
eoHe_ionbagis
completely
zlpped before the en-[
_e_s,started.
• -
.._
"
|
I. When using your _as a VaCUUm, l_stresults
are achieved when the unit is operated at full
throttIe. Engage the Throttle Lock beforebeginningvacuumingproeedures.'
2. Move the unit slowlyback and forth over debristo be vacuumed, Avoid forcing
thevacuum
-'.
",'tube
into a pile of debris as th_ _
clog the unit.
& The _uum
ten pick up objects that are too
big to pass through the impeller.
This type of
object will fall out of the vacuum tubes when the en-.
_,_r_e
is slopped.
D_ PRE-OPERATION
I
|debr_
blown or ricocheting
into the[
IAlways from
wear being
eye protection
to prevent rocks
or[
[ eyes and face which can Tesult in blindness or se- |
[_Ons injury.
[
1. Always work going away from solid objects
such as waiis, trees, autom6bfles,
and fences.
2. Clean comers by starting in corners and moving outward to straight areas to prevent an accumulation of debriswhich could flyintoface.
,'_3.
_Be_eareful.when
working near plants.
The
force of the air could damage .ten_er plants.
4_ Direct air flow by directing the nozzle down or
to One side.
5. Vary the air flow by adjusting your grip on the
• throttle trigge_
C. ,OPERATING
A WAR_._ING
CHECKS
Before operating your unit, always:
I. _CHECK
OVER WARNINGS AND SAFETY
STRUC ONS
loweachone.
_-._
if 'di_
fo _e!bp erating the ,unit.
For location, see the _AirFilter section.
6. Use me assist handle [ocatc_ton thehacko_.
the
unitwhen working'_e
the waistor when a
two-handed grip is de_d-.
7. _ses For Your Blower.
Sweeping debris or grass clipp'mgs from driveways, sidewalks, patios, park_,parking lots,
barns, stadiums, etc.
h. Blowing grassClippings,
straw,or Ieaves into
ties.
_
d_ag,wet
outdoor
areas
su_ asa_atio.
d. Removing debr_ fromcorners,
ardundjoints,
and betweenbricks.
e. Blowing_ight
snow f_omdriveways,
sidewalks,
or_
patio_
+ 4_ If the unit becomes Clogged:
Stop the engine and disconnect the spark plug
wire. Do not attemp_ to remove obstructions w_h
the engine rurmi_g.
b. Wa_t untilthe impeller has completely stopped
training, then remove the vacuum tube_
c. Careftdly reach into the vacuum opening end
dear out_eb_
........
:_.
=._
o. _e eolIectibn
Dagl_l_
pr?peHy emptied
_"and maintained to avoid deterioration end ohstruction of air flow Which W_ reduce the performance
ofthe vacuun_
a_ Empty the bag _
each u_.
b: Remove the beg/elbewfl_mtheunit by turning
it in a d_
direction. Do not storebag containing leaves, grass, et_
c. Wash the bag once _year as follows:
1) Turn the bag inside oat
2) Hang it up.
3. _CHECK
THE UNIT FOR LOOSE BOLTS,
NUTS, OR FITTINGS.
T_ter_ repair, or replace parts as necessary. You
will need a Fnillip_ screwdriver and a _'Is_ hex
•
taeem_
recommended by _ears.
4. _GHEGK
THE FY_!I_LTANIL
.._
......
Fill
'with_ dean, f_h fnel mi£_ur_g_
the instructions in the "Fuel Mixture _ section.
-7-
I IIIIIIII
II I
I II
IIII
[
III
I IIII
IIIII
III
ENG ,LNE INFORMATION
A. FUELING
YOUR ENGINE
1, FUEL SAFETY
a. Use only recommeudedfuel
mixtures.
b;,Mix and pour fuel outdoors and where
there are no .sparksor flames.
e. Use a-continuer
approved for fuel
& Do not smoke or allow smoking near fuel
or:_e unit or while using the uniL
e. Wipe up all fuel spills before starting the
elide.
f.
Move at least I0 feet away from [heling
_te Detore starting engine.
i g- Stop engme before removingfuel
cap. Allow the engine to cool before refueling.
•h. Before storing the unit, use up fuel left in
fuel lines and carburetOr by starting engine
and letting engine run until it stops,
i. Store unit and fuel in an area Where fuel
:
vapors
cannot
reach sparks or open
•
flames from water heaters, electric motors or
3. USE THE FO!J,OW]_G
O__
WEED EA'I"i_R40:1, 2- cycle engine oil is strong.
,ouL .or
POULIULAN
PRO brand 40:1 2-cycle engine offis
acceptable if mixed according to the instructions
:on the container. •
I PART OIL TO 40PARTS GASOLINE=
3.2 ft. oz. oil to 1 g_on gasol_e
8.0 ft. oz. oil to 2,5 gallon gasoline
Not all air cooled 2-cycle engine oils "have the
same qualities. IfWEZD EATER, PARAMOUNT,
PO_,
or POULAN PRO brand 2-cycle engine oil is not available, usea
good qualit_
2-cycle engine oil receded
for air-cooled
engine_ Mix at a ratio of 40:1 (3.2 oz. oil to 1 gallon gasoline). A 40:1 fuel mixture with these oils
will assure adequate lubrication for your engine.
4. DO NOT USE:
e NMlVL_ Oil--NattonalMartueManufuc.
Does _ot have prover _lifi_es
_!_
for_-_.]e_
mr
engines andcan,_ca_e ._gine _
-_- AUTOMOTIVE OILDoes not have proper _idditives for 2- cyc.le, air
cooledenginesand can cause engine damage.
B. STARTING
.......................
INSTRUCTIONS
_ WARNING
_rea:_tho
ntiag. Debt" Such as grav_
_a_,
Your unit is powered by a Z-cycle engine
which requires a fuel mixture of regular
unleaded gasoline and a high quality en*
oil spec_)aily made for 2-cycle,
air
cooled engines. The "mtem_ design of the
2-cycle engine requires lubrication ofraoving
parts. _on
is provided when recommended mixture of gasoline and oil is used.
• Gasoline must be clean and fresh. After a
short period of time, gasoline will chemically
break down and form-compounds that cause
hard starting and damage in2-cycle engines.
• The correct measure of gasoline to oil is
very nnportant. Too much oil in the mixture
will foul the spar_plug.
Too little oil w£11causetheengineto over
heat and seize,
•
A CAUTION
Experience
indicates
that alcohol blended fuels
(called gasohol or using ethanol or methanoD
van
attract mo_
which leads to separation
and
format]on.ofacads
duringstorag_
Acidic gas can
tlamage
the fttel sy_em ofan engine while in storage,, TO avoid engine problems, do not leave fuel
in the unit when s_g
for 30 days or longer.
Start the engine and let it run until the fuel lines
and carburetor are empty. Use fresh_elnext
sea.
son. See the "Storage" section for additiona! mformati0n_ Never use engine or earbm-etc_- eleaner products
in the fuel tanko or permanent
damage
S.HOWT0
MIXFUF, LAND FH, LTANK
a. Pourthepropermeasureofengineoffintoan gppr_
marked container.
Then, fill
thecon.
tainer with _gular u_leaded gasoline.
NOT_. If furl is alr_y
in the container, add the
proper measure of en_ue o_ Then, close the
_o not m_vgaso/ine
_o//atre_y+m
t_e
b. Using a spoutorfimuel,fill
thefueltank with
fue!mix.
r. Reinstall
thefuel
capssecurely.
the vacuum end is directed away frompeople,
.......
Wight starting engine, hold the unit as shown
FiLq_e 10. Do not set the _t
on any surface ex
eept a _e_ _
2. FUEL_m"_R_
engine is run.
dust, gias_ etc.
could be picked up bY the air intake mid thrown
out .throu-gh the d_selmrge opening, d_.
gthe
um_pr'property
or causmg serious injury to bystsmders or operator.
I. Before Starting the Engine:
a. Fuel the engine. Move at least 10 feet away
'h'om thefueh_ s_-"te.'
.....
i...... :
b. Holdtheunitin_he:_position
aS:_hpwn
m Figure 10. When using the unit as a'blb_,_
make sure the blower end is directed away
frompeople,animals,gIass, and solidobjects.
When usingtheunitasa vacuum, make sure
an_a_, _,.and
2. For a Cold
Engine
_lld objects.
.
or a Warm EngmeAfter
Running Out of Fuel.
a. Move Ignition Switch to the "ON" position
•Figure11.
.
_'
."_"
b;"':Move Choke to.._EUL_. Figure!1.: .
c. Engage the Throttle Lock as follows:
1) Funy squeeze and hold the throttle trigge_
2) Pressand hold the thro_tIe lockbutt_m
Figure II (inset).
3) Release"
the throttletrigger. I_ve
the
throttle lock engaged thru step "g."
d--Pu_ Starter Rope sharply unt_ engine attempts to rtm, but no mere than 8 pulls on full
cho_ The engme_'attemptsto
rm_." ma_
be hard to hear. The operator must listen
carefully.
After 8 pulls, proceed to step"e _
even if the engine has not attempted to run.
eo Move Choke to "_".
Figure 1L
£ PullStar_erRope sharplyuntilengineruns,
but no more than 5 pulls.
_Q__Ir_
e has not started after 5 pulls, repeat steps a through =f."
Blower
S_mrting
Position
g. Allow engine to run for 5 seconds, then move
-'
Choke to _OFF" posRion. Release Throttle
Lock by squeezing and releasing the Throttle
_Ifengine
dies with Choke at "OFF _ posi,tion, repe_tsteps"e" through"g," If engine does
not operate proper_ refer to "Carburetor Adjust_tents."
h. To stop engine, move ignition Switch to"OFF"
position. Figure 1!.
3. For a Warm Engine:
a. Move the Ignition Switch to the_ON" position.
Figure 11.
b. Move Choke Lever to the "HALF" position.
Figure Ii.
c. Engage ThrottleLock. Figure U ._set).
/_-ove throttle lockengagedthinstep d."
d, PulI Stair,Rope
sharplyuntil engine runs,
but no m_6_ _han _ pRlls.
..e. Mo-¢e Choke to "OFF". Figure !L
f, Release Throttle Lockby squeezing and re]easingthe Throttle Trigger. Figure 11.
If engine does not run a!_er 5 pulls, it is
•.",':_: probably flooded. Wait a few minutes and repeat
....._.; procedure with Choke at "OFF" position.
g. To stop engine, move Ignition Switch to
• _OFF" position.
Figure11.
Figexe 10
Throttle
ignition Switch
Figure 11
i
C..CARBURETOR
-
.
i
__
ADJUSTMENTS
'-" Poor engine performauce
_
be a result of
.other causes such as dirty mr filter_ carbon
build-up
on muller
outlets,
etc.
See
w_couble
Shooting
Chart _ befoi-e proceed'lag with carburetor adjustments.
Filt_ Cover
.,-
•e The carburetor has been carefully adjusted
at the faetor_ Due to changes in altitude and op...ex_tin_ condi_'9_ your carbttr_tor
may. require
'- _;: tow thepreeedurdbelow.
1. PREPARATION
a. Use fresh fuel roll See the _TueIing Your
Engine" sec_on.
b. Turn MixtureScrew (Figure 12) clockwise
[CAIYrION: l The _
setting is a hlgbIy criti.
untilfullyclosed; but do notoverLighten;
ca[ adjustment. If set .memu_et_,
permanent damFigure 12_Turn mixture screw one full
age will occur to the engine. Dp._ot operate engine
turncounterdockwi_.
•at full throttle for proldnge_l pe_ods While roaring
c_ Turn Idle Speed Screw (Figure12)dockthe _
a_ent_
The final mixture screw
_t
stops.Do NOT overtlghten. setting s h_uld
j
be in,thePange of314,._-1/4
Turn:_three ful! turnscounterclock- open.
,_
....... _.
_'_. =_ "
wise.
2. IDLE SPEED ADJUSTMENT
a. Starttheengineandruntheunltfor
10-15
minutestowarm up engine.
b. Allow the engine to return to idle speed.
3. ItlEk'TURB ADJUSTME_.
_. Accelerate engine to full throttle.
b. Turn the MiXture Screw slowly clockwise
un/_ the engine speed _sreduced, Note position_
_jusHd___unUi
_ e_pe
c. Tam thescrewslowlycounterclockwise.
Stop
idlesasslowlyaspossible
without stalling.._
when theenginejustbegins
torun.ro_.ly
r
_
•
-- Tam screwclock__ne_a_s:..' ':_
<_ _: "_ d. Tam the screw slowly the minim_
amount
clockwise until the engine r_fi_
_e
de._n.
smoothly.
'
.
-9-
.........
lllllllllllIl IIIII
IIIIII
III I III
GENERAL MAINTENANCE.
II Ill I I
.
A_ Air Filter
A dirty- air filter decreases engine performance
and
increases reel _ansumption.
Clean the Air FiIte_.
• Frequently;
• Always clean after 5 tanks of fuel or 5 hours
of operation,
whichever is less.
Follow _ese steps:
_
L Move the choke lever to Full. Figurell.
_. _emove the air filter cover on top 0fthe unit (un: der the handle). Figure 13.
3." Remove the air filte_ Figure t3.
.... 4_ :Wash the air filter witli soap and water. "
To avoid ereattng fire hazard, do not
clean'filter
in gasoline or other flammahie solvent.
5. Squeeze the mr rater
6..Add 4 or 5 drops of off to the the air irdter.
NOTE: Avoid soaking the air filter.with oiL
t
m In H,I
B. FUEL
i
HI
I
¸Cover
A_r1_ter
Figure13
7. Squeeze the air filter to dlstr_ute oil.
8. Reassemble the air filter onto the cover.
! CAUTION; J The holesm the an- filter must be fitted over the posts on the air filter'eove_
When installing the air filter/cover
_semb]_
be sure that
the filter does not hang on the choke lever screw.
9. Reassemble air filter/cover assembly to uniL Rechoke lever to the '_ff_ position.
Figure1!.
,m ;i
TANK
L Never
use gasoline
that is more than 2
m?nt_
old in_ fuel_mixtur._. Gasollne b_
i _to_fe'ak <town m_er a_hort perlod oftime and _
form compounds tl_t cause hard starting and
damage in 2-eycle ev_e_.
.
2. Insl?eCt the unit for fuel leaks each time zt is
use_. Repair or rep|acepart_ as nece_
3. Using a fuel mix or g_soline over 2 months.
old _ill eai_se the engir_to I_edifficult or im.
possible to start. "
.
_" " " "
4. -Empty the fuel tank before storing the unit.
Use up fuel ]eft in the carburetor by s_
the
engine and letting it run until it stop_
,,,,,,,
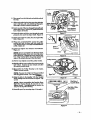
C. STARTER
Replace t]_e starter rope if the rope 'breaks or is
badly worn.
"
When replacing an unbroRen rope_ cut the
rope and allow the rope to rewind onto the pulley.
........... ,=
'J
,,,
, ,
,
,
i,
,,
,,,,,,,,,, ,,,,,,,,,,,,,
ROPE
i........
ImpeDer
Nut
DO not remove the Pulley when replacing
the
starter ro_e.:.Always
wear eye protection
_when
servicing
the starter rope. The recoil sprin_ loeared beneath the pulley; is undex tension.
If the
spring
pops out, serious
injury i,,llll
can "l result. ,,, J,i
,,i ,,i
,
,
i
To Fepair or replace:
L ]_scennect sperk plug wire from the sperk P!Ug,_]
,Ure I_ Ol_m i_e vamuminIet coyer _ _:
, _ :/.v_a't a s_wdrivexlnto
._; .ure 14(inset).
theIatch opening._ Fig-.
b. Gently twist the scr_..driver while open_g the
vacuum inlet cover ruth your other hand.
3. Remove the impeller nut and washers whiIe holding the _el_d-.
z4.
4.. Remoye.t]_e 4 "_m_i
.pe_eershZ_¢ud
screws. Figure I,.
"_The_ remove the 2 engine shroud screws located
, bythe sp_kplug.
Figure 15. Remove the _mpel-
• letshro_zd_mtheengine_
• ._._,_.._._-.,,,.
then remove the lmlley housing and pulley from
the engine. Figure _6.
6. Remove the rope r_talner screw fr0m pulley; then,
remove the broken piece of rope, if an_. Figure !7.
7. Grasp the pulley ratchet and wind the pulley
ddclrwise
untilthepulleyStOps. Ther_ slowlyunwind thepulleycoun_terdock_fse
unt_ thepu_ey
_z_h-I_h_wim
me ptuiey _ousmg notch.
Figure 17. Insert the hex wrench _ntothe 'hole
formed by thealigned
notches.Figure:17_ .....
- 10 -
Shroud
Figt_e 15.
,
,
,
,,,,,,[_
•PulleyRatchet
8. Move away from the i_el tank and melt the ends of
the rope.
9. Allow each melted end to drip once; then while the
rgpe is still hot, pull each melted end through a
dean rag to obtain a smooth, pointed end.
'Hole
Pulle_
t0. Insert one end of the rope through the handle and
secure with a knot. Leave 3/lb _ pigtailbehind the
knot. _gure 18 (Inset).
11.insert the other end of the rope through the meta!
grommet, then under the Rope Guide, l_igure 18.
.|
lie ! I
Rope Retainer
lOt_
H0using
NotchScrew/Washer
------_--
17
....
12,Guide He inside the pulley, then through Pulley
Hole. Figure 17.
13,Wrap rope counterciock_se
around the pulley
• ra_het and tuck the loose end bac__ und_,t_e
rope,
leaving
abouta Iinchtail
next_
Retainer-P_b.Figure19.
14.Install and tighten
Figure17.
•_
Rope
Grommet
the Retainer Screw/Washer.
.
Screw
Do not overtighte_ the Retainer Screw.
Over tightening the s_.ew can cause the screw
post-to_strip ouL Tightdn the screw untilthe bgttom of the washer either (1) is snug againstthe
rope or (2) contacts the top of the screw pest,
w
Figure18
IS,Ptfll the rope tightly around the FRlley ratchet.
!6_Sllghfiyp _uI[the rope to relieve the premsuroon the
hex wr#'hch.Remove thehex wr_ch and allow.
the rope_torewi_ slowly.
,Rope
Retainer
17,t_assemb_
the _lley
Housing to the engine,
Tighten screwssecurely.
_eBe
sure tl_e
rubber O-Ring._
_ey
ls._JJgntheh_i.
h_talled
housing.
See__,,
the._pener_
the_p_er
When _l_
the Impeller Housing to the Engine Sl_. u_ be sure not to over-
tighten screws. Overtigh_
strip out the Impet_r Housing.
19,Assemble
parts by reversing
the screws can
steps 1. through 4.
- II -
D. STORAGE
z..Cle.aythe_
before_g.
Pa_part_
ALWAYS FOLLOW INSTRUCTIONS ON THE
/ STABILIZERCONTAINER. THEN, RUN THE
ENGINE AT LEAST i0_ES
AFTER STA-
_t-
Fn_iq_m themr."intske area, keepingit free ofdevri_ .U_se a mild detergent and slmnge to clean the
plast_ _
BILtZER IS ADDED TO ALLOW MIXTURE TO
REACH CARBURETOR.
STORE UNIT IN A
SAFE PLACE. SEE STEP 2 (this
section).,
,
2. Do not store the umt or fuel in a closed areawhere
fuel vapors can reach sparks or an open flame
from liot water heaters,
electric motors or
switches, furnaces, et_
3. Store in a dry area out of the reach of ch_dre_
It is important
to prevent
gum deposits from
formingin essen_al fuel system parts such as the
carburetor., fuel fllte_ _fuel hose or fuel tank during storage_
Experience
indicates
that alcehol
blended fuels (called Gasohol or using ethanol or
methanol)
can attract moisture wIflch leads to
[s_aratton
and formation of acids during Storage,
Acidic gas can damage the fuel system of an erie
[gthe while in storage.
• .......
Ifyou do net want to remove thegasoline
from yourunit, SEARS CRAFTSMAN Fuel Stabitiger (_71-33500)
maybe added to ge_oline left in
the tank to minimize gum deposits and acids. If
thetankisalmostempty,mix stabilizer
with fresh
g_bline in a separatecontainerand add to the
tanl_
A_
m
E. TROUBLE
•r
lu
ull
.ml at t i
SHOOTING
,,,,,
It
..........
Engine
,
,
WIH nOt idle properly.
3. Mixture screw requires adSustment.
4. Crankshai_ seals worq.
5. Compressionlow.
I. Carburetorrequires
adjustment.
or dies under
1. See "CarburetorAdjnstments."
2.. Clean or replace air filter.
3. Clean or reph_e spark plug and
regap.
4. Contact your Service _mter.
3. Spark plugfouled.
4. Carbon bu_d-up.
5- Compression low.
__ok_
tt t
5_,,,,,,Contact
your _-rlce Center.
A_ f_ter
dirty.
a
i f
2_.F;_%ank with corr_ fuel mixture.
3. _
iiew spark plug.
4. Chec_ for dirty fuel filter, clean.
Check for kinked or split fuel line;
repalr or replace.•
5. See _Startmg Instructions. _
6. Contact your .Service. Cente_
1."Adjust idle speed screw clockwlse to in_tse
speed.
2. Adjustidle speedsc_ew counterelockwise to reduce
3: See _Carbivretor Adjustments."
4. Contactyour Service Center.
2. Idle speed set too
lacks powe_
load.
,t H't
Z,,
M_. Zgrd'_o._
switch
to.
_0_" "
. _
5. Engine flooded.
6. Compression Iow.
_
1. Idle speed set too low.
,
__
,,u,i
L zg_itions_vit_o_
,,,
t
,,,,,,,,, ,,
CAtmE
2. Fuel tank empty.
3. Spark plug not fir_g.
4: Fuel not reaching carburetor
•.
,,
CHART
i
TROUBLE
.........
Engine will not start.
,,,,,,,,
.. u.
e_ivel_
2.._
fllterdlrty,:.
=..
"2'_
Or:rephce air _ter.-y.
_....
3. Mixturescrewzequires'adjustment_
4. Fuelmixtumincorrect.
4. EmpW fuel tank and refm _dth
correct fuel mixture.
r
, .L,
Engine runs hot.
I.
2.
3.
4.
i,
,
,
,i,,,,
Fuel mixture incorrect.
Spark plugincorrect,
Carbon build-up.
)_re
screw set to01ow
L
2.
• •'J :3,.
4.
=.
.....................
-i
i
_-IH"
See "Fueling Your Unit."
Replace with _orrect spark plug.
Contact your Service Cente_
See "CarburetorAdjustmentsY
IIIII
.......
Jllll
Illl!ll..I
_
_*
_.=r_._
I
Illllllll
II
I
II
Ill
Illllll]_l]lll
Illll
II
[
ACCESSORIES
i
......
The following accessories are available through Sears Retail Stores, Catalog Outlet% or Serv_
Saf_ Goggles............................................................................
i
i
iii
iii
_nters.
STOCKNO.
71-8,5707
2-_cle
_gine On .......................................................................
7!-36551
Spar-kPlug ..-.
............................................................................
71-85853
_
Attachment Kit ............................................................................
71-79992---Vacuum AttachmentKit .........
.o..........
f..........................
_....................
71-79_9.4
Spark Arrestor.,
_..._;_._
...................................
-.r
..........
d_ ....>_. ..........
."_30_,:0_848",
.,
Operator's
Manu_ ...........................
;........
,.....
,...........
.,
.......--;
:_
........
. o30 068243
* Avaihblethr0ughyourSEARS Service CenterlCatalogue_
- 12-
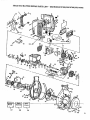
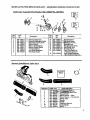
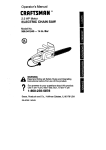
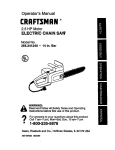
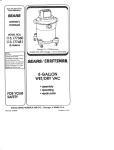
SEARS GAS BLOWER REPAIR PARTS LIST - MODELS358.797922,358.797960,358.797982
16
114
112
27 _
20
28
48
50
55
78
93
.87
88 89
9O
107
,108
104
91
92
98
102
I3
SEARS GAS BLOWER
REPAIR
PARTS LIST -_ MODELS358,797922,358.797960,358.797982
....
_e_
14
,
,,, ,,
No.
Handle
Front I_lator
530-029067
53O_-O296O9
_hroud- P_ht (Mo&r3_.TSTS60)
57
+58
59
60
Screw
Throttle Lock Button
Sprm_
Shroud-Left;
Shroud-Left;
358.797982)
(Model 358.797960)
(Model 358.797922 &
S1_oud-_gbt
3_8.797982)
Key
Piston
Model No. 358.797960
Mode[ Nm. _5B.79792:,?,
k
358.79798S
Spacer
Inn= Bearing
Switch
-_oIator
_sol_tor
(Model 358.797922
"
&
,
61
62
63
64
65
:66
67
68
7O
7I
?2
73
74
75
76
7'/
75
530-015788
530-032_03
530-015787
530-019158
530-032102
530-015789
' 530-014016
630-039136
_,90-34"/987
530-0._$17
530-02917_
53.0-:014156
530-015_P3
530_015496
530-027,523
" _P_)=069486
_9-0_395
530_-069563
79
81
8_
83
84
85
86
87
88
89
90
91
:92
530-627569
530-015769
530-032108,
53_0-0_1X0
S_0-01_05
_-0t9167
"530-029182"
53O-015805
580-02752_
5_30-029119
"530-09471O
630-029173
. _--01_157..
RL_
Crazd_af¢_aI Outer _ad.g
RetainingRing
Crs=kcase
Flywheel
Wsshex
Sp_g
Spacer
Crffiak_ase/Cra_baftAs_
Screw
Screw
Ptarter
talner
..
P.II_ GncL 73)
•S_u'_er Spring
Fan Hou_
Kit
(L.d. Starte_ Pulley)
8t_t, er Handle
F_d _p (I_cL0'R_r_
Foe£Pick-up A._'y.
Ha=dle Cover Ass'_ _
9,10 & 12)
COver
Air Filter
..%_slstHandle (Model 358.797982 Only)
Muffler
530-012244
530-012235
35
• Cranksha_: Ass'_
Trigger
630-010729
530-010897
530-014160
.530-029071
.530-029L 12
530-_ 094740
530-U69293
630-029116
530-030073
530-0!52_9
Model No. 358.797960
Modet No. 358//97922
358.797982
530-029145
530-039137
530-015776
530-015816
530-019178
530-015241
530-014033
_0_015126
530-014005
530-010960
2_-& 10S) •
32
33
3_
Description
NO.
.,
53O-O94712
530-026994
,530-029111.
530-015635
530-029130
5_9-015813
5_0-0L_072
630-027597
530-O15702
530-029117
5,"0-015840
_3{)- 0247T2
530-029068
530-029610
1,.5
'530:-'0L9168 "
16
_ 530-069292
17 I 530-029LT9
18 _"' .: 530-029089- _
19
"530-015814
20
530-014121
:_1
22
23
24
25
26
27
28
g9
30
31
.,
Part
Description
Part
No.
I
1
2
3
4
5
6
7
8
9
10
11
12
13
-,,
/,,,,,
*
&
Lead _'_e
Ignition Module
Swew
M6del 358,79?960
Model 358,7979P_ & 358,797982
Gasket
_.lt_g
94_
95
96
97
530-015816
530-015441
530-015472
530-094711
98
_-0L5-367
•9_
sao-o_
Bear_g
sp_
Screw
;
Eyel_
•Itol[ P_
Blower Hou._g
Bazzl
•
_)
,._er
Hub
Washer
Washer
"Nut
B_ower Hous_g (Low,r)
_t.
Sg- ze3)
I}+o_
100 _ o,5S0'-01,5667"
I01
, _5_'_":.0156_7
"37
530-0_2T4
530-069349
38
39
530-015162
530-015306
M_el No.3SS/191s60
z_
No_. 358._22
Z,_.T97982
Retain=
G_mnd_
43
44
•AS
46
47
48
49
50
51
52
63
54
! 55
56
.
, ,,
14
530-015849
,5_0-029144
539-015_+54
530-0275P,8
530-_911_
530-016T'/1
;530-O29146
530-_9115
530-035263
530-019164
530-019165
530-015775
530- 029113
,_0-0P+,9070
530-019166
530-0TI593
530-027594
H,,,
•Cl_ke 8hu_t_
&
103
104
10S I
106
102
108
109
110
111
112
113
:ii_
Carburetor
Gasket
Se_t
Scr_
Ground
_Ttre
R_ Block
B_ _e
R_ St_
,5,_-_15672
5_-0S93_
,_,_-069232
53q-0692,17
530-068243
53O-O69294
5,._-0_t04
530-015811
530-027525
,530-069303
530-029460
530-036274
115
530-029179
530-015843
W_h_
Spe_= _5a797960
MuflZer Gua_
Only
De--on
Modet No. 358.797922 &
358R97982
Model No- 358,797960
Screw
Not Sho+m
530-061350
530-061189
530-061347
Caxton (btodet 358.797922)
:/=_rton
(Modal 358.7_796_)
_-a.',tontModet 358+797982)
SF_RS
GAS BLOWER REPAIR PARTS LIST - MO_ELS358.797922,358.797960,358.797982
' Carburet0r
Assembly
Part
Number
,2
530-035262_WA-207/20,TA
5-_a / 6.
Pep air
I_t
\
17
zo
18
16
K_y
Par_
No,
Description
N_oy
".
Description
"'Part
No.
,,,.L
1
6
7
8
9
53O-O35014
530-035151
580-035016
530-035268
530-035214
53O-O35217
530-0352/8
530-035166
530-035164
10
11
12
13
14
15
16
17
*+ Metering Diaphragm
*_ Metering Diaphragm Gasket
Metering Lever Pin Screw
1WaxtureNeedZe
Mixvare Needle Spring
Needle Washer
"0" Ring Mixture
Fuel Pump Diaphragm
Fuel Pump Gasket
530-035203
689-035208
530-035028
530-035031
530-035188
530-035106
530-035178
530-03526,0
,18
.
Vacuum
_TnbefBlower
jllllll iI
,Tube
IIIIIIIIIIIII
iI
III
II
•,
•+z_ spe_ spr_
• +M_
Lever Ph
Metering Le.w_
Metering Lever Spring
• IMet Needle Valve
• Fuel ]_/et; Screen
Carb. Kwik Repair Kit
-(*Indicates Contents)
Carb. Gasket/Diaphragm
Kit (+Indicazes Conteu_s)
53O.-035219
II
,
Idle SpeedScrew
i
Ass'y._
8
4
,°
6
•
KEY NOo
PART NO.
z,
58o-o69_
2
3
4
5
6
7
_89
10
11
530 -0947_
530-069270
530-094662
530-351455
530-094664
530-010850
--530--094230-530-067306
530-094740
530-015814
V .SC ON
co._
W!Strap
Vacuum Tube
Blower Nozzle--Flare
Blower Nozzle--Concentrator
Blower Tube
Handle
Operator's Manual
AssisttL_ndle
Screw .....
15
f
IIIIIIIIIIIII
IIIlllI Iflf
IIIIIIIHIIIII
I
III
II IIII
I
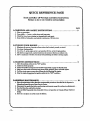
QUICK REFERENCE
Read
IIIII II
"_
PAGE
and follow all Warnings and Safety Instfmctions.
Failure to do so can result in serious injury.
PAGE
_A.WARNINGS
L
2.
3.
4.
AND
SAFETY
INSTRUCTIONS
B. FT._LING YOUR ENGINE
L
23.
4.
5.
..............................
3
Wear eye protec_on.
Dress safely -- boots or safety shoes and longpants.
Check for worn, loose, inissing, or damaged parts and repai_
Keep ch_dren, bystanders, and animals aminimum of 30 feet away.
8
.
EHnfinate all sources of sparks or flame where fueI is mixed, poured, or store_
Use clean, flesh gaso'flne_*
Use 3.2 oz. 2-cycle engine oil to 1 gal.
gasoline OR 8 oz. oil to 2.5 gal. gasoline.
Mix fuel in an appro_ed, marked container; mix and pour fuel in an outdoor area.
Move a minimum of 10 feet _way from fuel and fueling site before starting engine.
C. STARTING
INSTRUCTIONS
-
8
_. Move the ignition switsh to the _ON_po_itio_
2.
3..
4.
_.
Adjust the choke properly:
Grasp the handle and squeeze the throttle trigger _
engage the throttle lock.
Make sure the nozzle is _
away fi-ompeople, animals, glass, and solid object.
PU]! the starter rope no more than 8 times to avoid flooding the engine.
•6. Stop the engine_
the ign_on s_'t_htothe _OFF_ position.
D GENERAL ',rrENA CE
'
1. Have all msln_enance other than the recommended procedures descrilz_d in the Opere_r's
M_ual_ed
byyour Sears Se_ce Center.
2. Disconnect the spark plug before performing maintenance _except _or carburetor adjustments..
3- Run fuel from the unit before storing.
4. Clean air filter f_equentIy, but alwsys after 5 hours of operation or _ tanks of fuel, whicheve_
5. Store in a dry place out of the reach ofchi_L-en.
IIIIII I
- 16_'.
IIIIII
2
J
......
."!_"%'i_'_' .............
i_'ii
.
"i'
'
,,,,,,
J
,,
,
.
............
,
,,
The Model Num_
will be found below the top handle with the Serhd
Nu_be_ _ways me_tlon the Model Number when requesting servi_ or
repair parts for your unit.
All parts, listed herein may be ordered from any Sears Service Center
and most Sears Stores.
Operator's
Manual
WHEN OPcDERINGREPAIRPARTSALWAYSGIVE THE FOLLOW.
[NO INFORMATIONAS SHOWN1N THIS LIS_.
L
The PART NT_ER
3. The PARTDESCRIPTION
2.
The MODEL NUMBER
4.
The NAME OF ITEM --
358.q97925-32cc
GAS POWdeR BLOWER
358.797950-22c¢
3_8.797961-22cc
."
358.797982-32cc
Ifthepartsyou needarenotstocked_
your brderwillbetr_smitt_ltoa SearsRepairParts Distribution
Canterforhandlin_
When you buy merchandisefrom
Seam you _etan e_travaluethat
nobodyelsecanoffer--
Model No.
358.797922-32cc
358.797950-22cc
358.797961-22cc
358.797982--32cc
Sears
Serd_.
A_mss town or acrossthe country,
Sears Servi_e'is always near, proriding trustworthy,competent
service_
using only
Searsspecifi_l
factory
parts.
HOW to Order
•
Revair
Parts
L
=
•
i
,,,,,,
SERVICE
• . ,i
iiii iii
,,
i
iiii
ii
.m
:= ............................
Sold by Sears, Roebuck
.................
530-081829
,,,,,,
,,,
,
- 1- 0@/17/93
,m,
,u
Your Sears Merchandise takes oe added value when you discove_ that
Sears has Service U_its t_.u._out
the cotm_. Each is st,_ett _
trained, professional technicmus using Sears approved methed_:
SF RS-'SF WCE
IS AT YOUR
_
,
........:
and Co., Chicago,
.....................................
IL 60684 USA