1
contents
Adapter Plugs
Appliance Registration
19
2
Auto Defrost
Auto Roast
I
I
12, 13
10,11
3
20
Program Cooking
Repair Service
6
21
Auto Simmer
Care & Cleaning
11
18
Safety Instructions
Temperature Cook
3,4
9
Control Panel
Conversion Guide
6
12
Temperature Probe
Time Cook
5,6,9-11, 18
8
Cook ‘N Watch
Cooking Complete Reminder
8
5
14
Time Defrost
To Removefrom CabinetMount 15
Delayed Cooking
Double Duty Shelf
7
4,5, 16-18
I
Extension Cords
Features
19
5
‘
Grounding Instructions
Hold Tim;
19
7
Light Bulb Rcplacemcnt
MicrowavingTips
18
2
7
2
I
Precautions
Problem Solver
Minute/Second Timer
Model and Serial Numbers
Warranty
Back Cover
use
andcare
of
I_I’M
The electric output
oftbis microwave oven
is 600 Watts.
-=====-—-..-==
—.-....—
,—.:-_
-=_
.-=—-—
-J.—.
s=====
—-.—
..
. .. .
.———
.——
.—
—— —.
...—
....
WUIDirectme ‘mchimera! Ekctric
-.,“
J
/
......
.
........ .....,.,..=.=.
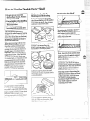
using
your
ovens
read thi$book Camfuuy
It is intendedto help you operate
and maintainyour new microwave
ovenproperly.
Keep it handy for answersto your
questions.
If you don’tunderstand something
or need more help, write (include
your phone number):
Consumer Affairs
General Electric Company
AppliancePark
Louisville,KY40225
down the model
and said
You’llfind them on a label inside
the oven.
These numbers are also on the
Consumer Product Ownership
RegistrationCard that came with
your microwaveoven. Before
sending in this card, please write
these numbers here:
ModelNumber
Serial Number
Use these numbers in any
correspondence or service calls
concerning your microwaveoven.
Please check with your supplierto
be sure he has done so; also send in
yourConsumerProductOwnership
RegistrationCard. If you move,or
if you are not the originalpurchaser
please write to us, statingmodel
and serial numbers.This appliance
must be registered.Pleasebe certain
that it is.
Writeto:
General Electric Company
RangeProduct Service
Appliance Park
Louisville,KY40225
If you.1received a
oven. ee
Immediatelycontact the dealer (or
builder) that sold you the oven.
save the
and money.
Before you request service...
checkthe ProblemSolveron page20.
It lists causes of minor operating
problemsthatyoucancorrectyourself.
Accessories
Availableat extra cost from your
General Electric supplier.
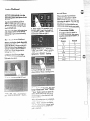
e Make sure all cookwareused in
your microwaveovenis suitablefor
microwaving.Most glasscasseroles,
cookingdishes, measuringcups,
custard cups, pottery or china
dinnerwarewhich does not have
metallictrim or glazewith a metallic
sheen can be used. Somecookware
is labeled“suitableformicrowaving’
If you are unsure, use this dish test:
Measure 1 cup water in a glass cup.
Place in ovenon or beside dish.
Micmve 1-1%minutesat HIGH. If
waterbecomeshot, dishis microwave
safe. If dish heats, it should not be
used for microwaving.
~ Paper towels, wax paper, and
plastic wrap can be used to cover
dishes in order to retain moisture
and prevent spattering.
@Some microwavedfoods require
stirring, rotating, or rearranging.
Check your cookbook.
@Steam builds up pressure in foods
which are tightly coveredby a skin
or membrane. Pierce potatoes, egg
yolks and chicken livers to prevent
bursting.
.
JX8G Installation Kit converts
this oven to a built-in wall oven.
WM8G Installation Kit allows
this oven to be mounted on a wall.
It is important that wc know the
location of your microwaveovcil
should a need occur for adjustinerits.
%missupplier is responsible for
i“egistcringyou as the owner.
when
your
microwave oven.. you should find
an installationpackagethat contains
installation iilstructions, a template,
and installation hardware for
under-the-cabinet mounting. If
missing, con~actyoui-supplier.
9
,-
...—.
.———
0
m
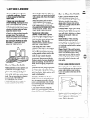
Whenusingelectricalappliances
shouldbe
basicsai%typrecautions
followed,includingthefollowing:
reduce
(a)Do NW
to operatethis
oven with the door open since
open door operation can result in
harmful exposure fo microwave
energy.It is important not to
defeatortarnper with the safety
interlocks.
[t))Do Not ~hcc? 1311yobject
between the ovenfront face and
the door or allow soil or cleaner
residue @accumulateon seaiing
~urfa~e~+
(c) Do PM
the oven
if it is damaged. R is particularly
important that the oven door close
properly and that there is no
damage to the:
(1) door (bent)
(2) hinges arid bitches (broken or
loosened)
theriskofbums,electricshock,
fire,injurytopersonsorexposure
toexcessivemicrowave
energy:
* ~~e this ~pplianee Onlyfor its
intended use as described in this
manual.
e ~~d and follow the specific
“FRECAUTKN’4S
‘IOAVOID
PCN!MBLE
EXPOSURE30
MK3WWAVE
EXCESSIVE
ENERGY”at left.
* Thisappliance
nmstbegm~ded.
C.onnectonly
toproperlygrounded
outlet.See“CRCNJMXNG
HWTIWC130NS”
onpage19.
~Forbestoperation,plugthis
applianceintoitsownelectrical
outlet,topreventflickeringof
lights,blowingoffineor tripping
ofcircuitbreaker.
@~nstallor locate this appliance
only in accordance with the
provided installation instructions.
..
.imnerse
powercordor
@Donot
plugillwater.
e D() flc)tQpwitethis!appliirw
ifithasa damagedpowercordor
plug,ifit isnotworkingproperly,
or ifit hasbeendamagedor
dropped.
%Seedoorsurfacecleaning
instructionsortpage184
~Thisappliance ShOUldk
servicedonlybyqualifiedservice
personnel.Contactnearest
authorizedservicefiicilityfor
examination,
repairoradjustment.
~A withanyappliance,CIOSe
supervisionisnecessarywhen
usedbychildren.
@~~Nduct!tlwriskoffire in
theovenCm’ity:
–Do notovercookfood.GrdbUy
attendapplianceifpaper.’,
plastic,
orothercombustible
materialsare
placedinsidetheoventofacilitate
cooking.
–Removewiretwist4iesfrom
paperorplasticbagsbefore
placingbaginoven.
–Do notuseyourmicrowave
oventodrynewspapers.
–Pq.MX
and
wax
Recycledpaper
productscancontainmetalflecks
whichmaycausearcingor ignite.
Paperproducts
nylon
or nylon.filamentsshouldbe
avoided,astheymayalsoignite.
–-KMnot operatethe ‘Wonwhile
to avoid
‘b$1162
4YWK!4
$mdthe
W&% H
byaccidenttheovenshouldrun
emptya.minuteor two,noharm
isdone.However,try toavoid
operatingtheovenemptyat ail
times—-it
savesenergyand
proh’lgsthelifeof~~~~~~~.
—J’’..%
,
I
.. .. .
...-—.--.—
.“
—
. .
.
----
—————
--
.
.
.
.
.-
,!
o
.
:..J,~.,,
+-.L,,3:,..,.z
,~->-.,k%-<.m-
..+-.
———
-...—.——-———-—
—..,
. .
(~~ntin~ed)
—m
notpop lpqx!om h your
microwave
own unlessina special
microwave popcorn accessory or
unless you use popcorn labeled for
use in microwave ovens.
–Do m OWm)dk
potatoes.
Theycoulddehydrateandcatch
fire,causingdamage toyouroven.
–If materials inside oven should
ignite, keep oven door closed,
turn oven off, and disconnect
power cord, or shutoff power at
fuse or circuit breaker panel.
@f$~lnf?
suchas Whoie
eggsand sealedcontainers-for
example,closedglassjars—may
explodeandshould not be heated
in this oven.
s ~vf-j~~
baby
foodin
glassjars, evenwithout their lids;
especially meat and egg mixtures.
@~Qn$~
fiwzwi
innarrowneckedbottles(especially
carbonated beverages). Even if’the
container is opened, pressure
can build up. This can cause the
container to burst, resulting in
injury.
---
inky.ids(such
@FOO(jf$
cooked
aspasta)maytendtoboilover
morerapidlythanfoodscontaining
lessmoisture.Shouldthisoccur,
refixtopage18forinstructions
on
howtocleantheinsideoftheoven.
*
~~e~~~~~~~—~o
not
.
usea thermometerinfoodyou
aremicrowaving
unlessthe
thermometerisdesignedor
recommended
foruseinthe
microwave
oven.
youleavetheprobeinsidetheoven
withoutinsertingitinf~ orliquid,
andturnonmicrowave
energy,it
cancreateelectricalarcinginthe
ovenanddamageovenwalls.
~Plasticutend.s-i%sticutensils
designedformicrowave
cooking
areveryusefid,butshouldbe
usedcarefully.Evenmicrowave
plasticmaynotbeastolerantof
overcooking
conditions
asareglass
or ceramicmaterialsandmay
softenor charif subjectedto short
periodsofovercooking.
In longer
exposurestoovercooking,
thefood
andutensilscouldignite.For
thesereasons:1)Usemicrowave
plasticsonlyandusetheminstrict
compliancewiththeutensil
manufacturer’s
recommendations.
2) DOnotsubjectemptyutensilsto
microwaving.
3)Donotpermit
childrentouseplasticutensils
wi(houtwmpletesupervision.
—.—
.. .,
@~f*~
%kin99
such aspotatoes,sausages,
tomatoes,apples,chickenlivers
andothergiblets,a~deggyolks
(seepreviouscaution)shouldbe
piercedtoallowsteamtoescape
duringcooking.
@~~~~~~~~&
cookingpouches
andtight!ycihxxlpkastk
bags
IBRemove
thetemperature
p~
Ii-mthemm whennotinuse. If
.. .——.
$2~(p~fj~~~~~
-..
shouldbeslit,piercedorvented
asdirectedincookbook.Ifthey
arenot,plasticcouldburstduring
orimmediately
aftercooking,
possiblyresultingininjury.Also,
plasticstoragecontainers
shouldbe
atleastpartiallyuncovered
because
theyforma tightseaLWhen
cookingwithcontainerstightly
coveredwithplasticwrap,remove
coveringcarefullyanddirectsteam
awayfromhandsandface.
b@ing—Under
*
certain special circumstances,
liquids may start to boil during or
shortly afier removal from the
rnicmwave oven. To prevent burns
from splashi~g liquid, siir the
liquid briefly before removing the
containerfromthemicrowave
ovem
@EJseofthe
DKJ~~Thl
–Removetheshelffromoven
whennotinuse.
–Ilo notstoreor cookwithshelf
onfloc~ofoven.Productdamage
mayresult.
–Use potho~derswhenhandling
theshelfandutensds.Theymay
behot.
–Do notusemicrowave
browning
dishonshelf.Thsshelfcould
overheat.
–Be surethattheshelfis
positionedpropmlyinsidethe
oventopreventproductdamage
(seepage16).
_—..—.
..
..-——.
-.’
.
.—
.————.—
.
. .
. .
.
.-—
.
—.
—
.ai%?a?.
~cooking complete Reminder
QdesexCe~tc0de6°
MJm
~ (E-orallA
I.)EFROST,COOK ‘NWATCH,TIME COOK
and TIME DEFROST cycles)
Tbremindyouthatyou havefoodin the
oven,the ovenwillbeep oncea minuteuntil
~’oueither openthe ovendoor or touchthe
CLEARIOFF pad.
Um~~~~c
5–
“
:-------
=
:,-----...
“--.->
S
*.. .
“-:::.-<
:.-. -....5
:..... .-,..
..:..:+
::..
!!5EE4-B
*
>
m
Ils~
I
l!
Y
I
I
I
b..
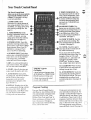
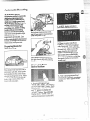
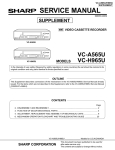
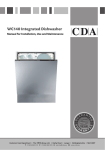
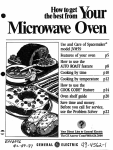
5. Oven Interior Light turns on
when the door is opened or when
(he oven is operating.
6. IwIcRorrHE~~~~~~~~~~T3’
Tempe@u~”e Probe. Usc with
AUTO ROAST 01-TEMP
COOK/~-~O~Df’unctiOnonly.
cmtro~
Paneland
Display. See next page for
instructions.
8. Touch
9. Door Latch Rekase. Press latch
release bar at indent to open door.
Door must be securelYlatched fo~”
oven to operate.
10. Auto Roast and Auto
Defrost (hides. Contain cooking
information for the Automatic
Roasting function (see page 10)
defrosting information for the
Automatic Defrosting function (see
page 12).
....
and
E?” “ :
-=\&1“
-’!?!”-- ~
:,- 5+ ,;
l.~
->S: ,
Lg:(
;={
‘,
1:
I~ ‘
\
I
~
o
I
!
——
...
——.
-
..-.
..——-—--. .,—
-r .- ——
—--
-.
.-—
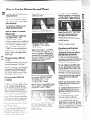
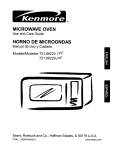
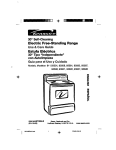
.}
9. TEMP ICOOWHOLD. Use
the temperatureprobe to cook by
usinga preset temperature. Once
ovenreaches preset temperature,
it switchesto HOLD setting and
maintainsthat temperatureuntil
you touch the CLEAIUOFF pad.
(See page 9.)
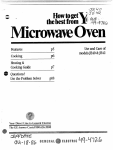
The Touch Control Panel
allowsyou to set the ovencontrols
ekctronically with the touch of
a finger. It’sdesignedto be easy
to use and understand.
L TIME COOK 1 & 11.
Microwavefor a preset amount of
time usingautomaticPowerLevel
10(HIGH), (or changepowerlevel
after entering cookingtime. See
page 8.)
10.MIN/SEC TIMER This
feature uses no microwaveenergy.
It functionsas a kitchentimer, as a
holdingperiod after Time Defrost
or as a delaytimer beforeTime
Cook I & 11,TempCook/Hold or
Auto Roast. (See page7.)
2. TIME DEFROST. Gentle
thawingat automaticPowerLevel
3 (LOW). (If desired, you may
changepower levelafter entering
defrostingtime. See page 14.)
IL COOK ‘INWATCH. Use this
pad for short-term cooking. The
ovenautomaticallyturns off after
3 minutes. (See page 8.)
3. IXN’VERLEVEL. Touchthis
pad beforeentering another power
levelnumber if you want to change
from automatic PowerLevel 10
(HIGH) for cooking or Power
Level 3 (LOW) for defrosting.
K2.CLOCK. Touchthis pad to
enter time of day or check time of
day while microwaving.
To set clock, first touch CLOCK
pad and then enter time of day.For
example, if time is 1:30,touch
number pads 1, 3, and Oand 1:30
will appear in display.Touch
STARTpad. To reset or change
time, simply repeat aboveprocess.
4.
PADS. Touchthese
padstoentercooking/defrostingtime,
power level, time of day, finished
food temperature, Auto Roast
codes and Auto Defrost weights.
5. MIN. Use with number pads to
enter whoje minutes. For example,
for 4 m:nutes touch 4 and MIN.
6. START. After all selections are
made, touch this pad to start oven.
7. AU”I’0ROAST. insert probe,
touch this pad, and desired number
pad for C(MJC to slow-cook or
[cmj~craturccook meat with
;m[omtiticpreset program. (See
pii~<CS 10 iiIld
“PROBE” ~~~C?~13
On Display:
~ Probe has been forgottenwhen
AU’10ROASTor TEMP CClOK/
HOLD function is being used.
~ Probe is not securely seated
in oven wall receptacle.
13.CLIQ?J1/OFF. When touched,
it shuts off the oven and erases all
settings (excepttime of day).
14. AUTO DIU?ROST. Touch this
pad and then the number pads for
the desired food weight. The oven
automatically sets power levels
and defrosting time. (See pages 12
and 13.)
11.)
3. J!)
ISPLAY’.Dispkiys time
ofday,
[in]ccounting down during cooki12g
fu[[ctions,power Icvcl, internal
fix}dtcmpcraturc, Auto ~oast codes
;~ndAuto ikfrost food weights,
~xltlkiIIgnltxlc nnd instructions.
Pmgmm
Use yoLlrTouch Control Panel to
ALltoRoast or Auto Defrost with the
oven automatically setting the times
and power levels for you, Time
Defrost, Time Cook and Cook ‘N
Watch with choice of Power Levels
from 1 (Iowcst) to 10(highest),
tii~wkitchen tasks with the Min/Sec
Timer. Gndset the clock.
Create your own programs to suit
your individual cooking style. For
example: use the Min/Sec Timer to
delay the start of Auto Roast, Temp
Cook/Hold or Time Cook I & H or
program a hold time between Time
Defrost and Time Cook I Ik 11.(See
page 7.) Set ‘TimeCook I &11 for a ;Z”’”
two-stage program using different
~-...times and PowerLevels. (See page 8.)
6
..——
.-
. . ---—
---- . - ———-——-.
. .—
----
, ..———..... .,...-———.—.
-.
0
... .- —
HOW
tOthe the
“NwNIM’WSEC
TIMER has three
timing functions:
@N operates as a minute timer.
~ It can be set to delay cooking.
@Mcan be used as a hold setting
after defrosting.
The MIN/SEC TIMER operates
withoutmicrowaveenergy.
Step L Takecasserolefrom freezer
and place in oven.
How to m-ma3-Minute
Phone cdl
Step2: TouchTIME DEFROSTpad.
L TouchMIN/SEC TIMER pad.
The displayshows : Oand
“ENTER TIME” flashes.
2. Touchnumber pad 3 and MIN (for
3 minutes and no seconds). Display
shows3:00 and “TIME” flashes.
3. Touch START.Displayshows
“TIME” and time countingdown.
4. When time is up, ovensignals,
flashes “EndJ’and display shows
time of day.
‘---
‘-
TJHWIE
Step 7: Touch2,5 and MIN for
twenty-fiveminutesof cookingtime.
“COOK TIME” flashesand 25:00 _–
--and “POWER10”appearon display. -
il?2%5—
—.
_–
-
The displayshows : Oand
“POWER 3:’ “ENTER DEF
TIME” flashes.
Step 3: Touch pads 1,5 and MIN
for 15minutesdefrostingtime. 15:00
appears on display.(Defrosting is
automaticallyset on power level 3
but can be changed by touchingthe
POWER LEVEL pad and the
desired power level.)
The h4inute/SecondTimer can also
bc used to program “hold time”
between microwavecooking
functions. The time can range from
onc scconcito 99 minutes and 99
seconds. A HOLD, or “standing”
time may bc found in some of your
own recipes or ccmkbook.
Step 4: Set standing or hold time
by touching NHN/SEC TIMER.
The display shows : Oand
“ENTER TIME” flashes.
Step 5: Tbuch 1,0 and MIN to hold
for ten minutes. 10:00appears on
display and “TIME” flashes.
Step$: TouchST~. “DEF TIME”
and 15:00countingdown show
on display.As each fi.mctionis
automaticallyperformed oven
displayshowsinstructionsentered
and the fimction.
Step 9: When time is up, the oven
signals and flashes “EndV
and
Q. What will happen Ml
accidentally reverse my defrost9
McI and cook instructions’?
A. The oven will automatically
rearrange your program. Defrosting
will alwayscome first, then hold,
and then the cooking function.
Q. Can 1 defrost and hold.only’?
A. Yes. Sometimes you may only
want to defrost a food, hold it, and
cook it later. All you need to do is
program in Defrost and amount of
time. Then program Hold and the
amount of time. Be sure to put the
thawed dish in the refrigerator
promptly.
NOTE: Let foods remain at room
temperature only as long as safe.
Times will vary.
‘Q.1
my oven for a
specific defIwsting time but it
defrosted. klnger than necessary.
what
A. When instructions conflict,
the oven carries out the last
instruction. Youmay have set the
oven to Defrost for 4 minutes,
I-Iold/Timefor 2 minutes, and then i
Defrost for 6 minutes. In this case, [
the own would Defrostfor 6 minutes
and Hold/Time for 2 minutes.
7
-.
—-.—.
. —.
.. .......——.—---..-...,,
,—— --
---———-.
~,——-—-
.
---
TIME COOK I &II allowsyou
to microwave for a preset amount
of time using automatic power
level10 (1-HG~9
or c~wx Power
levelau~omatically.
Powerlevel 10(HIGH) k
recommendedfor most cooking,
but you may change this for more
flexibility.See your cookbook.
To become better acquaintedwith
timu coofir~g,make a CUPOfCOffee
by followingthe steps below.
To
Step 4: TouchSTART.“COOK
TIME;’ “POWER 10~’and time
countingdown showon display.
Step 5: When time is up, the oven
signalsand flashes “End~’Oven,
light and fan shut off.
Step 6: Open the door.
using the me cook n
Feature
Step 1: Fill a cup 2/3 full of
water and add 1 teaspoon of instant
coffee and stir to dissolve. Use a
cup that has no metal decoration
and is microwavesafe (refer to
MicrowavingTips on page 2).
Place cup in oven and close door.
Step 2: Touch TIME COOK I & H
p~~(],
I>isiiayShOWS: O and “POWER
TIME” fladles.
lo:” “ENTER (XXX
With the Time Cook II feature, you
can set two time cooking functions
within one program. This would
be ideal if you desired to change
power levelsduring your cooking
operations.
The followingis an example of how
to change power levels using Time
Cook II.
Step 1: Repeat Steps 1,2 and 3.
Step2: Touch TIME COOK I & H.
Step 3: Set your time.
Step 4: To change the power level,
touch POWER LEVEL pad and
desirednumber for new powerlevel.
Step 5: Touch START.
Step6:“POWER 10” is displayed
and “COOK TIME I“ countsdown.
Step 7: At the end of “COOK
TIME 1“ the next selected power
level is displayed and “COOK
TIME II” is shown counting down.
Step 8: When time is up, the oven
signals and flashes “End~’The
oven, light and fan shut off.
Step 9: Open the door.
Use Cook ‘NWatch
Step 1: TouchCOOK ‘NWA~H.
“COOK ‘NWATCH”and
“POWER 10”are displayedand
“START”flashes.
Step 2: TouchSTART.“COOK ‘N
WA~H” and time countingup to
3 minutesare displayed.Power
level 10is automaticallyset in
ovenbut another powerlevelcan
be selected.
Step 3: Open the door or touch the
CLEAR/OFF pad to stop cooking.
The ovenwill automaticallysignal,
flash “End” and shut off at the end
of 3 minutes.
‘QI.lestiom andAIB$we~~
Q. 1 set my oven for the time
called for in the recip% but at the
end of the time allowed, my food
wasn’t done. What happened?
A. Since house power varies due
to time or location many Time
Cook recipes give you a time range
to preventovercooking.Set the
oven for minimum time, test the
food for doneness, and cook your
food a little longer, if necessary.
Q. I touched the number pads
and selected my power level.When
I touched START, lwveve~, my
oven didn’t come on. Why not’?
A. The TIME COOK I & 11pad
must be touched before setting the
number pads or else your oven wiH
not begin cooking.
Q. I want to cook on a power
level otherthanHIGH. Vvhatdo
Ixledi
todo?
A. To change the power level,
touch the POWER LEVEL pad.
“ENTER POWER” flashes on the
display panel. Enter new number.
Q, Can 1 interrupt my Time
Ckmkfunction tocheckthefood?
A. Yes. To resume cooking,
simply close the door and press
the STARTpad. The timer must be
reset for cooking to resume unless
time is remaining on timer.
.= ...
.-.
.-—
Internal temperature is the best
test of doneness for many foods.
Use TEMP C.00K/HOLD to
cook a variety of foods to the
desired finished food ten-qxmture.
The TIME COOK I &11 setting
is recommended for batters,
doughs, frozen foods and foods
which are difficult to cook
precisely with the probe.
“TEMP COOK/HOLD” takesthe
guessworkout of cooking because
the oven automaticallysignalswith
four beeps when the food reaches
(he preset temperature. The Hold
featurewilfmaintainthistemperature
for up to twelvehours or until you
touch the CLEAR/OFF pad.
~otc: Oven automatically switches
to “Hold” when preset food
temperature is reached.
The
Probe
HANDLE
CABLE
SENSOR
The temperature probe is a
food thermometer that gauges the
internal teinperature of the food; it
must bc used when using “TEMP
COOK/HOL13°or “AU’II)ROAST:’
‘[i)Lfscthe probe pl”oper]y,fol]ow
d irwtions on page 10.
BeefRib Roast toMedium
Step 1: Insert temperatureprobe
into roast and attach probe securely
in ovenwall. Close the door.
Step2: TouchTEMPCOOK/HOLD.
“F” and “POWER 10”are displayed
and “ENTER TEMP” flashes.
Step 3: Touch 1,2,5 for 125”F.
“TEMP~’ “POWER 10”and
“125F” are displayed.
Step 4: Touch POWER LEVEL
pad. “ENTER POWER” flashes.
Touch5 for medium power.
“TEMP,” “POWER 5“ and
“125F” show on display.
Step 5: Touch START.If internal
temperature of the roast is less than
80°F., display will show “COOL”
and “FOOD TEMP.” If temperature
is 80°F.or above, display shows
temperature counting up.
Step 6: When 125”F.is reached,
the oven will sound and display
“HOLD:’ The oven will then hold
the temperature.
Step 7: Touch the CLEAR/OFF
pad to stop the cycle.
Step8: Remove probe and food
from the oven.
cooking
‘llps
Q Use a lower power level; it will
heat more evenly even though
requiring more time.
@Be sure frozen food has been
completelydefrostedbeforeinserting
probe. Probe may break off if used
in frozen ioods.
~ COVCr
foods
loosely for moistul”e
control and quick, even heating.
Questions and Answers
Q. I inserted the temperature
probe, closed the door, touched
TEIW?COOIUHOD and entered
my desired food temperature but
the temperature didn’t appear on
the display.
A. Youmay haveentered an
incorrect temperature. Any food
temperaturefrom 80° to 199°F.
may be entered for TEMP COOK/
HOLD. TouchCLEAR/QFF and
begin again.
RE%%!-%3&am.—
-p%awl—
Q. Are there any foods I can’t
Ternp Cook?
A. Yes.Delicate butter icings, ice
cream, frozen whipped toppings,
etc. softenrapidly at warm
temperatures. Batters, doughs and
frozen foods are also difficultto
cook precisely with the probe. It’s
best to Time Cook these foods.
Q. Why did 6TROBE” flash on
the display after I touched the
START pad?
A. “PROBE” will flash if you
don’tseat the cable end of the probe
securely into the receptacle in the
oven wall or if you touch the TEMP
COOK/HOLD pad and forgetto
use the probe.
Q. Can I leave my probe in the
oven if it%not inserted in food?
A. No, if it touches the oven wall,
you may damage the oven.
Q. can I Temp cook different
portions of food at different
temperatures?
A. Yes. The temperature probe
gives you the freedom to cook
different portions of food at
different temperatures to suit
individual eating styles. Simply
place probe in food and change
temperature setting as needed.
.
...”--”””
AU~ ROAST usesthe
ternperatu~~
probe to cook to the
desired serving temperature.
iJnlikeTE~~~~~/~~~D,
which uses a single power level,
AUNI ROAST uses up to 3 power
settings which automatically
switch during roasting, thus
providing even, tender cooking
results without overcooking.
Justas in conventionalroasting,
only tender roastsshouldbe Auto
Roasteduntil specifiedinternal
temperaturesare reached. Less
tender roasts shouldbe microwaved
bytime, accordingto the cookbook
whichcomes with your oven.
-
‘-
2. At 80°F.,displayswitchesto
showmeat’sinternaltempera~re.
Pork or ham roastsneed no trivet.
Add 1/2cup waterto roastdish and
coverwith plasticwrap.
Roas@ for
Auto
Place meat in ovenwith probe to
the right. Insert cable end ofprobe
firmly into receptacle on ovenwall.
3. When you selectAutoRoast
Codes 1,2,3 or4, the ovensignals
with 4 beeps and “Turn” flashing
on the displaywhen it’stime to turn
the roast over. After youturn the
roast, close the door and touch
START.The remainingcooking
time countsdownon the display.
(Note: Oven continuesto cook after
the signalwhether or not roast is
turned over.)
How to Auto Roast
Beef to
Place tender beef roast on trivet in
microwave-s~~fe
dish. Insert probe
horizontally intothe center meaty
W-cilnot touchingbone or fat. Make
sure the handle does not touchthe
foodor top or sides ofthc oven.
Cover with wax paper.
4. After aprepl”ogrammedfood
temperature is reached, ovenbeeps
4 times and “End” appears on the
display.
1. TouchAU~ ROASTpad.
“AUIU” and “TElVIP”are displayed
and “ENTER CODE” flashes.Touch
number pad 2. “TEMP;’ “CODE”
and “2” appeflrOndisPlaYand
“START” flashes.
Touchand
START.
,,c~~L,,
“2,,
Display shows
untilfoodtemperaturereaches80°E
.g!sss$
. ........
simmer
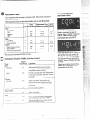
Auto Roast Guide
(Auto Roast ~Od~ 6)
~ Use containersand coveringsas directed at left. Place probe correctly in
roast beforecooking.
@Recommendedcodes are also showninsideovenon Auto Roastguide.
ApproximateTime Hold”
Final
Code Temperature (minutesper pound) Minutes
Food
Beef
TenderRoast
Rare
Medium
Well
Pork
LoinRoast
PrecookedHam
Poultry
WholeChicken(3 lbs.)
1
2
3
115°
125°
150°
12-14
14-16
16-18
5-1o
10
10
4
1
175°
115°
17-19
13-15
10
5-1o
5
5
180°
180°
12-14
15-18
5-1o
20
Turkey Breast
(Insc; probe horizontally
into meatiest area. )
. .
.. .- . . 1--r--- -,..-.,:=”
*Rcc~mmended stanUlng time CX51UI
c WI v IIIg-.
w-
=7-
Ch.lide
(AutoRoast~Q~4
Approx.
Bed’
PotRwst
5-7
Addenoughliquidtojust covermeat.
If addingvegetablesmakesuretheyare
completely covered by liquid.
Chili
ElrtJilci/Fry~r
——.-.—.—---’i iaul (11Pork
Roast
—_,-—
Sl)lii I’C:l
———..
-.
5-8
Precookmeatanddrainwell.Placeprobe
1inchfromtop surface.Stirafter3 hours,
if possible.
4-6
3-4
Add4 cupsliquid.Insertprobeinto
meatiestareaof innerthighfrombelow
endml parallelto leg.Turnoverafter
1/2oftime.
Sameprocedureas above.
4-6
Add4 cupsliquid.
5-7
A(k!enoughliquidto coverpeasat least
‘7inchc~.stir-;lftCI1]1OUI’S.
——.-——-———————
Set Auto Simmer like Auto
Roastas explainedon page 10.
Display shows “COOL” until food
is 80”F., then switchesto show
food temperature until 180”F.
Oven will hold at 180°F.,until you
turn off the oven and removethe
food. If stirring is recommended,
you can reset oven by retouching
START.Touch CLEAR/OFF after
cooking.
Totaltime includes time to bring
food to 180”F.and hold at that
temperature until done.
With the Auto Defrost feature,
the oven automatically sets the
defrosting times and power IeveBs
for ycm.
Use the Auto Defrostguide on
page 13.Enter the Food Weightin
pounds and tenthsof a pound (see
ConversionGuide at right). Then
touch STARTpad.
The ovencalculatesdefrostingtime
and changespower levelsduring
defrostingto give even defrosting
results.
When using the AutoDefrost
feature, it is necessaryto allow
meat to stand in order to finish
defrostingthe interior.Youmaytake
the meat out of the ovenif youwish.
Stand’timerecommendationsare
givenin the guide on the nextpage.
3. Enterweight.For example,touch
Number Pads 1 and 2 for weightof
1.2pounds (1pound, 3 ounces. See
ConversionGuide at right.)
How’tosetAuto Defrost
Before you begin, check the guide
located at bottom of ovenwhen you
open the door. It showsminimum
and maximum Food Weightsfor a
variety of foods. Youwill need to
knowyour Food Weightbefore
setting Auto Defrost.
L Removefood from package,
place in oven on microwave-safe
dish and close door.
--
Stand Time
Display shows “1.2;’ “WEIGHT:’
“LBS” and “DEF~’After4 seconds,
“DEF” is displayedand “1.2” is
replaced by “START” flashing.
4. Touch STARTpad. Display
showsDefrost Time countingdown.
2. TbUCh AUTO DEFROST pad.
Twiceduringdefrosting the oven
beeps 4 timesand “mod’ fhs~=
“Turn” flashes until you open the
door. attend your food (see guide
on next page), close the door and
GN’mrskmGuide
If weightof food is stated in
pounds and ounces, the ounces
must be convertedto tenths (.1)
of a pound.
Ounces
1-2
3
4-5
6-7
8
9-10
11
12-13
14-!5
I
Pounds
.1
.2
.3
.4
.5
.6
.7
.8
.9
*
L
‘
,
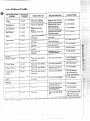
RECOMIWEmE~
FOODS
Meat
Chops
Frankfurters,
Sausage
Ground Meat
MIN.-MAX.
WEIGHT
0.1-2.0
0.1-2.0
0.1-3.0
Beef Patties
0.1-3.0
Roast
0.1-5.0
Lamb Roast
0.1-5.0
Ribs
0.1-3.0
Steak
0.1-2.0
stew
0.1-3.0
Poultry
Whole Chicken
0.1-5.0
Turkey Breast
0.1-5.0
Chicken Pieces
0.1-5.0
Cornish Hens
(Wllolc)
0.1-3.0
(DornishHcr\s
(split)
SQ:!f’ood
Fish Fillets
Shrimp, scallops
,.—
— -—
Whole Fish
xF~~ST SI~NA~
SECOND SIGNAL
‘llrn over,separate,
shieldwhere necessary.
Turn over.Separate.
Separateand turn over.
Shieldwhere necessary.
Separateand remove
defrostedpieces.
Removedefrosted
areas and break apart.
Separateand remove
defrostedpatties.
Turn over and shield if
necessary.
Turn over. Shield
where necessary.
Turn over and remove
defrosted pieces.
Turn over. Shield.
Removedefrosted
areas.
Separate.Turn over.
Turn overand shield if
necessary.
Turn overand shieldif
necessary.
Turn overand
separate.
Turn over and
separate.
Turn over and
separate.
STANDTIME
5 to 10minutes
5 to 10minutes
5 to 10minutes
.—————
5 to 10minutes
60 to 90 minutes
60 to 90 minutes
5 to 10minutes
5 to 10minutes
Separate and remove
defrosted pieces.
5 to 10minutes
Turn over and shieldif
necessary.
Turn over and shield.
Turn over and shieldif
necessary.
Turn over and shield if
necessary.
Turn over and shield if
necessary. ‘
Turn over and shield.
10to 15minutes;
run cold water in
cavity,if necessary.
60 to 90 minutes
0.1-3.0
Turn over and shieldif
necessary.
Turn over and shield.
(il-2.o
Turnover.
Separate and remove
defrosted pieces.
Separate and remove
defrosted pieces.
Turn over and shield
tail.
0.1-2.0
separate.
0,1-2.0
Turn over.
Separate and remove
defrosted pieces.
Turn over and shield.
--
5 to 15minutes
lo to 15minutes;
run cold water in
cavity,if necessary.
5 to 10minutes
.— —-. —
.-—-.
..—
.———
-&:+::--~.
=—=~ –-. -* “-–
-.:
--L””
T
-–
_.z ~
x
-—w:-—
.- --–
=——:- ~.-. –- -WG;.~+:—
1:- !s%%?kz:R“w–<?.
.
WA-en—.
ti~?
–—–=
...”...L..%
E.T+:—
4---,=--=--:
b;+>w~
––.:
$-?–.&*#@=- -—
—
b;c=y.
–‘-<:—KZ.“
k%-.-4n..
8.—*.l
~q~--?._-~~~k::
,: :.-.-- - ‘.
: ‘:” i-;;:;:-- ;-a..,.=-.. !V~.,
:L=
..--
5 to 10minutes
5 t. 10mi*utes
5 to 10minutes; hold
under co]d rurming
water, if necessary.
-“-3‘ .=:,>:..,.
““,,- ,:’:”
:.’
- ......—---------After first or second s@aL shield warm areas
vilucs or thin m-cmof nut will defrost more rapidly than other areas.
.-.,
I
.
by
The Time Defrost setting is
designed for speedy thawing of
frozen food and is one of the great
advantages of a microwave oven.
Use the Time Defrost setting to
quickly thaw foods such as bread,
rolls, vegetables, fruits and frozen
dinners. The Auto Defrost setting
is preferred for meat and poultry
because the ovensets the defrosting
time and power levelsfor you.
~ Power level3 is automaticallyset
for defrosting,but you may change
this for more flexibility.
~ See your cookbook for
defrostinghelp.
To become better acquainted with
the defrostfimction,defrosta 1O-OZ.
package of frozen strawberries by
followingthe steps below.
IQ.When I press START,1 hear a
dull, thumping noise. What is it?
A. This sound is normal. It is
lettingyou knowthe ovenis using a
powerlevellower than 10(HIGH).
f%ep4: TouchST~. “DEF TIME”
showsand time countsdown on
display.When cycleis completed,
the oven signals and flashes “End~’
then automaticallyshuts off.
Step 5: Turn packageover, close
door and repeat Steps2 and 3 to set
remaining half of defrostingtime
and touch START.
Step 6: When oven signals and
flashes End, open door, remove
package and separate strawberries
to finish defrosting.
Step 1: Place package of frozen
strawberries in the oven and close
door. Be sure package contains
no metal.
Tips
-.
<*p
./ .
“i,~~>
, ././
e Foods frozen in paper or plastic
can be defrosted in the package.
Step 2: TOUChTIME mimosrr.
Display shows : Oand “POWER 3:’
“ENTER DEF TIME” flashes.
Q. Can I defrost small items in
a hurry?
A. Yes,but they will need more
frequent attentionthan usual. Raise
the power level after entering the
time by touchingthe desired power
levelpad. Power level7 cuts the
total defrostingtime about in 1/2;
Powerlevel 10cuts the total
defrostingtime to approximately
1/3.During either, rotate or stir
food frequently.
Q. Why don’t the defrosting
times in the cookbook seem right
for my food?
A. Cookbook times are averages.
Defrostingtime can vary according
to the temperature in your freezer.
Set your oven for the time indicated
in your cookbook. If your food is
still not completely thawed at the
end of that time, reset your oven
and adjust the time accordingly.
Q. Should aUlfoods be completely
thawed before cooking?
A. Some foods should not be
completely thawed before cooking.
For example, fish cooks so quickly
it is better to begin cooking while it
is still slightly frozen.
~ Family-size, pre-packaged
frozen dinners can be defrosted
and microwaved. If the food is in a
foil container, transfer it to a
microwave-safedish.
o For mm defrosting, some foods
nwd to bc broken up or separated
part of the way througb the
(idi’r(v+t
ins ti[llc.
..
..... .
... —.. . —
Q. Can 1 open the door during
defrosting to cheek on the
progress of my food?
A. Yes. Youmay open the door at
any time during microwaving. To
resume defrosting, close the door
and press START.The oven begins
operating if time is left cmtimer.
If not, reset timer.
- -——
...
.-.
To
the
A#%?al
...-
Step 1: Replacethe rubber feet.
--—-
Step 2: Fully support the
microwavewith somethingsturdy.
For exampleuse telephonebooks
or encyclopedias,stackedevenly
and close enough to balancethe
weightof the oven.
.-–
-—
.—
-–
_–.. .
E?as.
Step 3: Open your cabinet and with
your screwdriver, begin to remove
the screws holding the microwave
oven in place by turning them
countercloc~wise(Alternate between screws so that
oven is loosened as evenly as
possible.)
m
-*
~Ot~s Before final removal of the
screws. check to be sure that the
microwave oven is being suitably
supported to prevent it from falling
ors] id ing.
..>
i
(
,>,
I
I
—.-
-.. .....—
—.---- . .- —
——..
-. —
0
“
A4?if&.—.—.—
.
shelfon floor ofovem Product
damage may result.
e use potholders when handling
metal shelf and cookware.
They may be hot.
~Do not store microwave
browning dish on metal shelf.
Beforeplacingfoodin thedishes,
checkto seethattheywillfittogether
on or under the shelf. Also, be sure
cookwareis microwavesafe.
The wire shelf is specifically
designedfor added capacityheating
and reheatingin your microwave
oven. Nowmore than one foodmay
be heated or reheated and readyto
serve at the same time.
When microwavingwith the oven
shelf, sometechniqueswill differ
from the cookbookwhich came
with youroven. It is importantto
arrange foodsproperly (shownon
the nextpage). Cookwaresizeis
important; select from amongthe
suggestionsbelow.Also, foodsize
should be considered; foodsover
3 ~ incheshigh, or 3 pounds are riOt
recommended for shelfcooking.
Battersand dough foodsand also
uncooked foodswhich need to be
prepared from scratch shouldbe
cooked without the ovenshelf,
fcdlowingcookbook directions.
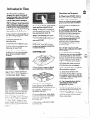
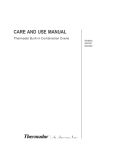
Topositionthe DOUBLE DUTY’M
shelf, tip the back slightlyand fit the
shelf support guidesonto the
support guideslocated on each side
ofthe ovenin the rear.
I
n
Cookwarefor heatingor reheating
include 1cup measuringcup,
8x4x3-inchloaf dishes, 9x5x3-inch
loaf dishesor 9-inch pie plates.
-
Leftoversmaybe placed in small
individualceramic or plasticbowls
or divided plates.
1
I
p’--
‘-
the shelf
cookware forshelf
Heating and Reheating
e DO~0~storeor cook With
$
LJSCwax ppcr
ins!ewt of lids
Next, lowerthe front untilthe shelf
support guides fit onto the support
guides located at each sideof the
ovenin the front.
When the shelf is properly
positioned, YOUshouldbe able to
read the plastictab that saysFRONT
THIS SIDE UP. The shelf should fit
snugly in place, be leveland not
touch the back wall of the oven.
Ifareing occurs when using the
shelf to cook more ‘thanone food
at the same time9 turn the oven
off. Make sure the shelf is
positioned right-side-up on all
four shelf supports and not
touching oven walk
or pkist
ic wrap
on casscrcics. Lids
! ()
1
I
.-
-—...—
..———-—..
—.——.—
o
.. .-
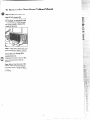
How toHeat or Reheat Simibrl’jqxs W?ood
II
TWOplates of’leftoversmaybe
reheatedtogether.Arrange thick
or dense foodsto outsideedgesof
plate and coverwith plastic wrap.
Microwaveat HIGH (10)for2 to 3
minutes.Reversepositionof plates
(top to bottom)and rotate 1/2turn.
Continuemicrowavingat HIGH
(10)for2 to 3 minutes. Continue
heating, if necessary, until hot.
How to
several
Reheating two casseroles (height
shouldbe lessthan 3%inches)is
possible. Coverwith plasticwrap.
Use staggeredarrangementsof
food, placingfoodon rightsideof
shelfand left side of floor.Referto
Heating or ReheatingGuidein
cookbookfor suggestedmicrowave
time per casseroleand add the times
together.Microwaveat HIGH (10)
reversingpositionof foods(topto
bottom)afier half oftime. Several
smaHbowlsofkflovers maybe
heated in the same way,stirring
and reversingpositionsafter half
of time.
Two frozen individual entrees
(5 to 702. each) or two TV dinners
(Into 120z. each) are both ready to
serveatthe sametime.Removetrays
offbodfromtheirboxesandturnback
onecomeroftheplasticcovertovent.
If there are foilcovers,removethem
and return the traysoffoodto their
boxes. (Batterfoodsshouldbe
removedfrom the traysand cooked
conventionally.)Place in ovenwith
one TV dinner on rightshelf and the
seconddinner on left floor.
Microwaveat HIGH (10)for 8
minutes. Reversepositions(top to
bottom)and rotatefoods 1/2turn.
Continuemicrowavingat HIGH
(10)for 8 minutes. Check dinners
for heating. If one dinner seems less
donethan desired, return it to the
boxand continueheatingon floor
1to 2 more minutes.
Types OfFoods Together
Heat or reheat different types of
foodat HIGH (10).Todetermine
heating [imes, add times for all
foocistogether. (See heatingguide
in cookbook.) After half of time,
S(ir (wrearrange foods(do not
reversepositions). C%cckfoods
(cspcciiillythose on ,>vcniloor)
after 3/4 oflot:il time and rcmove
a]lywhich arc done. Continue
cookin: others.
miceon floor, kwge or (klmse
foods which need the most heating,
such as leftoverfried chicken,
casseroles of canned or leftover
vegetables, rice or pasta. Place on
oven shelf those foodswhich need
only bc warmed, such as bakery
pies, rolls, muffins or breads.
!
. ...—
.———..
.. ,0
“
Your new Mkr-owaveoven is
a valuable appliance. Protect
it from misuse by following
these rules:
@Keep your oven clean and
sweet-smelling. Opening the oven
door a few minutes after cooking
helps air-out the interior. An
occasionalthorough wiping with a
solution of baking soda and water
keeps the interior fresh.
@Don’t use sharp-edged utensils
on your oven. The inside and
outsideovenwallscan be scratched.
The control panel can be damaged.
BE CERTAII$4IWWER IS OFF
BEFOJRECLEAIWNG ANY
PAJK!i7
OI?THIS OVEN.
B
“
3How
to(%3mthe Imide
Walls and floor. Some spatters can
be removed with a paper towel,
others may require a damp cloth.
Removegreasy spatters with a
sudsy cloth, then rinse with a damp
cloth. Do not use abrasive chxmers
on oven wails. NEVER USE
A COMMERCIAL OVEN
(’1.KiAN~~Il
ON ANY PARTOF
YOUR MICROWAVEOVEN.
Door (inside). Window:Wipe up
spattersdaily and wash when soiled
with a damp cloth.Rinsethoroughly
and dry.
Metal and plasticparts on door:
Wipe frequentlywith a damp
cloth to removealI soil. DO NOT
USE ABRASIVES, SUCH AS
CLEANINGPOWDERSORSTEEL
AND PLASTIC PADS.THEY
WILL MAR THE SURFACE.
Special note when using
Brown ‘NSear Dish: If grease
is present, high heat generated on
bottom of a Brown ‘N Sear dish
may cause the grease to bum onto
the ovenfloor. This may be
removed with a cleanser such as
Bon Ami@brand cleanser.
After using Bon Ami” brand
cleanser, rinse and dry thoroughly,
followinginstructions on can. Do
not use Bon Ami@brand cleanser
on the painted surfaces such as the
walls. It may scratch the paint.
Automatic Temperature Probe.
Probe is sturdy, but care should be
taken in handling. Do not twist or
bend; avoiddropping temperature
probe.
Clean as soonafter usingas possible.
To clean, wipe with sudsy cloth,
then rub 1ightlywith plasticscouring
ball if necessary. Rinse and dry. (Or
wash in dishwasher.)
How toChm the
Case, Clean the outsideof your
ovenwith soap and damp cloth,
rinse with damp cloth and then dry.
Wipethe windowclean with a
damp cloth. Chrome trim is best
wiped with a damp cloth and then
with a dry towel.
Control Pad. Wipewith a damp
cloth. Dry thoroughly.Do not use
cleaning sprays,large amountsof
soap and water, abrasives, or sharp
objectson the panel—theycan
damage it.
Door Surface. When cleaning
surfaces of door and oven that
come together on closing the door,
use only mild, nonabrasivesoaps
or detergentsappliedwith a sponge
or softcloth.
Power Cord. If the cord becomes
soiled, unplug and wash with damp
cloth. For stubborn spots, sudsy
water may be used, but be certain
to rinse with damp cloth and dry
thorough~ybeforepluggingcord
into outlet.
.- -.
‘oven Lamp
First unplug the oven. Then remove
lampcompartmentcoverbyremoving
screw which holds cover in place.
Cover is located on the back of the
outer case.
DOUBLE DIY1’YT”
shelf. Your
shelf accessory is designed for use
in a microwaveoven only; do not
use in a conventional oven. Do not
use a browning dish with the shelf.
Arcing could occur.
CIcan shelf’with mild soap and
water or in the dishwasher. Do not
clean shelf in a
oven.
Replacewith 20-wattappliancebulb.
(It is availablein drug and hardware
stores.) Replace compartment
cover. Plug in the oven.
~;.:
—
-—
.
—. . —...
.——.—.
..
—. .
..
~-=---w
.—=~-=’=”j
J&-. -.-i
— 3,
r
v--
..,,-.-..-,,----- .. .1----
.
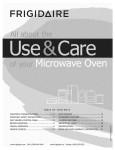
This appliancemust be grounded.
In the eventof an electrical short
circuit, groundingreduces the risk
of electric shock by providingan
escape wire for the electric current.
This applianceis equipped with a
powercordhavinga grounding
wire with a groundingplug. The
plug must be pluggedinto an outlet
that is properly installedand
grounded. (Fig. 1)
use ofthegroundingplug ian result
in a risk of electric shock.
r
(
use
usage
..L-.
whel’%’
apphmds powermrd VW
be
usage
Becauseof potentialsafetyhazards
under certain conditions,we
strongly recommend against the
use of an adapter plug. However,
if you still elect to use an adapter,
where local codes permit, a
TEMIWRARY CONNE~ION
maybe made to a properlygrounded
two-prongwall receptacleby the use
of a ~L l~stedadapter (Fig.‘2)
which is availableat most local
hardwarestores.
Do notuse an adapter plug in these
{ADAPTER
PLUGSNOT
Consult a qualified electrician or
service technician if the grounding
instructions are not completely
understood, or if doubt exists as to
whether the appliance is properly
grounded.
Where a standard two-prong wall
nxcptaclc is encountered, it is
>WJIpersonal responsibility and
obligation (Ohave it replaced with
itproperly groundul three-prong
W’:IIJ
I“cceptxk.
~){)~~[)g#Jg~gj~~”
any
L’HiOrViYnovethe third
p“oilg fi-onl ihc power ‘fxMdo
-.
,-..,..
.-,.=-..—
.. .
-=3:
.. . . . . . .
.
.>%.5. .- .-.+.
Plugs
-
—
101
The larger slot in the adapter must
be aligned with the larger slot in the
wall receptacle to provide proper
polarity in the connection of the
power cord.
CmJtion: Attaching the adapter
ground terminal to the wall
receptacle cover screw does not
ground the appliance unless the
cover screw is metal, and not
insulated, and the wall receptacle
is grounded through the house
wiring. YOLJ
should have the circuit
checked by a qualified electrician
to malw sure the receptacle is
properly grounded.
E%m=.
— --.
~.
_–
,—.
m?mr
—.
situationsbecause disconnectingof
the power cord places undue strain
on the adapter and leads to eventual
fiiilureoftheadaptergroundterminal.
Youshould havethe two-prongwall
receptacle replaced with a threeprong (grounding)receptacle by a
qualified electrician before using
the appliance.
use
1
R
‘where
pm’ver ‘cm’d
will
be
TEMPORARYMETHOD
-.
w’
..——
----—..!-
c@r&
Because of potentialsafety hazards
undercertainconditions,we strongly
recommend againstthe use of an
extensioncord. However,if it is
necessary to use an extensioncord,
use only a 3-wire extension cord
that has a 3-blade grounding plug,
and a 3-slot receptacle that will
accept the plug on the appliance.
The marked rating of the extension
cord shall be equal to or greater
than the electrical rating of the
appliance (15amperes).
Such extension cords are obtainable
through General Electric service.
If you do use an extension ‘cord
with your mkn-owaveoven$the
interior light may fliclcerand the
blower sound may vary when oven
is in use. Cook times may be longer
as well.
~
When disconnecting the power
cord [mm the adapter+alwayshold
lhc adaptcF. with orw hm)d. If this
is n(x done, the adapter ground
[crminai is wry liktiy to break with
K’pcwcd use . ~hou]d this happen,
]>() ~.:();’ ~]~~~, the appliance until
~.tltl
~c][l:l:;a:a in bcei~
:Lpr(lpcr ~~~
~~j:~[:[
i~[~~d.
.-...,. ...—-—.-..
.- ------..——.-—-—-
. . . .. . . .
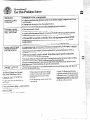
-=.=.
CAUSEAN~~~~~
P’ROBLEM
POSSIBLE
0V13NlVILLN~
COMBO??
@Afise inyourhomemaybeblownorthecircuitbreakertripped.‘R@ace‘fiM@
orre@
circuitbreaker.
~Unplugyourmicrowaveoven,then
plug
it
back
in.
*~&e ~ure3-prongplugonovenisfullyinsertedintoW* laeP@cIe~
CONTROLP~~
LIGHTED, YET OVEN
WILL NOT START
Door not securelyclosed.
*STARTmustbe touchedafterenteringcookingselection.
e
I
I
nottouchedtOcan~e~~t~
e AnotherselectionenteredalreadyinovenandCL134-R/OFF
%MakesureyouhaveenteredcookingtimeaftertouchingTME CO~K~~ ~.
~ cLEAR/OFF wastouchedaccidentally.Resetcookingprogr~andt~uch STA~.
s MakesureyouhaveenteredadesiredfinishedtemperamreaftertouchingT~M~
CoOK/HOLD.
~Makesureyouhaveentereda codenumberaftertouctingALT~ROAST.
Fcmx AREmmm
ovw?coo~~~~
wwmlumo~~
~cooking times mayvarybecauseofstartingfoodtemperamre,fooddensityor amount
offoodsinoven.TouchTIMECOOKI &II andadditionalcookingtimeforcompletion.
~kcorrect power levelentered. Check cookbookfor reco~endedpower kvel~or
changinglevelsduring cookingif necessw.
s Dish was not robted, turned or stirred. Some dishesrequire specificinstructions”
Check cookbookor recipe for instructions.
~ TOO many dishes inovenatsametime.Cookingtimemustbeincreasedwhencooki*g
morethanonefooditem.Checkcookbooktimerecommendations.
*Probenotinsertedproperlyintomeator dishwhenusingTempCoWHo~dOrAuto
Roastfunctions. Check cookbook for specific instructions.
‘WKMMi”APPEARS
ONDEM’’LAY
e Probe has been forgottenor not seatedproperly in ovenwallwhen using Auto Roastor
TernpCook/Hold Ii.mctions.
AAThese Things Are Norma!
with your Microwave Oven:
Q,Stcamor vapor escuping from
around the door.
QLight rcllcction around door or
(w{crcase.
0 Dimming ovenlight and change
in blower sound may occur while
operating at power levelsother
than high.
QDull thumping sound while oven
is ol]eratin~.
“
1
~ Some TV-Radiointerference
mightbe noticed while using your
microwaveoven. It’ssimilar to the
interference caused by other small
appliancesand does not indicatea
problem with your oven.
i
.------,
‘1’
(~\.)
+.,.-J
II
,
Toobtainservice,seeyourwarranty
on the back .pageof this book.
We’reproud of our service and
wantyou to be pleased. If for some
reason you are not happywith the
serviceyou receive, here are three
stepsto followfor further help.
FIRST, contactthe people who
serviced your appliance. Explain
whyyou are not pleased. In most
cases, this will solvethe problem.
NEXT, if you are still not pleased,
write all the details—including
your phone number—to:
Manager, Consumer Relations
General Electric
Appliance Park
Louisville, Kentucky40225
FINALLY. if your problem is still
not resolved. write:
Major Appliance
Consumer Action Panel
20 North WackerDrive
Chicago, Illinois 60606
=.——.
_—
wdR?l:–
—.
nw#.
EmdFm—.
w#35&5mmB–
PEaaEzF=ms&—
_—
waE&—.
-
1
---t,
j
r
.
.——-..
.....——.
--———
--- -—- .—
---—
-—.
-.-
..—.
I
I
,,
.
“
1
Saveproof of original purchase date such as your sales slip or cancelled check to establish warranty period.
is
FULLTHREE-YIEARWARRANTY
Forthree yearsfrom date of original
purchase,we will provide,free of
charge, parts and service labor
in your home to repair or replace
anypart of the microwaveoven
that failsbecauseof a manufacturing
defect.
ILIMITEDADDITIONAL
TWO-YEARWARRANTY
Forthe fourth and fifth year from
date of original purchase,we
will provide, free of charge, a
replacement magnetron tube if
the magnetron tube fails because
of a manufacturing defect. Youpay
for the service trip to your home
and service labor charges.
1S
~ Service trips to your home to
teach you how to use the product.
,4
\
This warranty is extendedto
the original purchaser and any
succeeding owner for products
purchasedfor ordinary home use
in the 48 mainland states, Hawaii
and Washington, D.C.In Alaskathe
warrantyis the same exceptthat it is
LIMITEDbecause you must pay to
ship the product to the service shop
or for the service technician’s travel
costs to your home.
All warranty service will be provided
by our FactoryService Centers or
by our authorized Customer Care@
servicersduring normal working
hours.
Look in the White or Yellow Pages
of your telephone directory for
GENERAL ELECTRICCOMPANY,
GENERAL ELECTRICFACTORY
SERVICE,GENERAL ELECTRICHOTPOINTFACTORYSERVICEor
GENERAL ELECTRICCUSTOMER
CARf=” SERVICE.
~ Replacement of house fuses or
resetting of circuit breakers.
Read your LJseand Cake material. ~ Failure of the product if it is used
If you then have any questions
about operating the product,
please contact your dealer or our
Consumer Affairs office at the
address below, or call, toil free:
The GE Answer Cente@
800.626.2000
consumer information service
. ....
-.—.——.....—.————
——.-—
for other than its intended purpose
or used commercially.
QDamage to product caused
by accident, fire, floods or acts
of God.
WARRANTORIS NOTRESPONSIBLE
FOR CONSEQUENTIAL DAMAGES.
~ improper installation.
If you have an installation problem,
contact your dealer or installer.
Youare responsible for providing
adequate electrical, exhausting
and other connecting facilities.
.-.-——... .---—
So[i~t? states do not allow the exclusion or limitation of incidental or consequential damages, so the above limitation or exclusion
may not apply to you. This warranty gives you specific legal rights, and you may also have other rights which vary from state to state.
To know what your Icgal rights are in }’our state, consult your local or state consumer affairs office or your state’s AttorneyGeneral.
W%tmmic.m GWwa!
m?ctrk
-..,
‘)
...