1
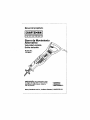
Owner's Manual
ICRAFTSMRNI
IPR
Q
FEa
I
I0
N
AL
Reciprocating
Saw
Vafriable Speed
Double Insulated
Model No.
172.26672
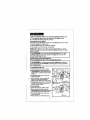
CAUTION:
Read, understand and follow
all Safety Rules and Operating Instructions
inthis manual before using this product,
Sears, Roebuck
and Co., Hoffman
,,SAFETY
• OPERATION
• MAINTENANCE
• ESPAI;IOL
Estates, IL 60179 U.S.A.
Warranty.::.: ...........................................................
Page
2
Safety Instructions ..............................................
Pages 3-7
Safety Symbols ...............................................
Page
7
Description ............................................................
Page 8
Operation ..........................................................
Pages 8-11
Maintenance ..........................................................
Pages t2-13
Accessories .........................................................
:.Page 13
Parts List ................................... :........................... Page 14-15
Service Numbers ................................................... Back Cover
ONE FULLYEARWARRANTY
ON CRAFTSMAN
TOOL
If this Craftsman Tool fails to give complete satisfaction within one year horn
the date of purchase, RETURN IT TO THE NEAREST SEARS STORE OR
SEARS PARTS &REPAIR CENTER tNTHE UNTIED STATES, and Sears
will replace it, free of charge.
If this Craftsman Tool is used for commercial or rental purposes, this warranty
applies far only 90 days from the date of purchase.
This warranty gives you specific legal rights, and you may also have other
rights which vary from state to state.
Sears, Roebuck and Co., Dept. 817 WA, Hoffman Estates, IL 60179
SAVE THESE INSTRUCTIONS!
READ ALL INSTRUCTIONSI
FaiFurs to follow all instructions Fisted below may result in electric
BE SUREpersonal
to read injury.
and understand all instructions.
serious
I shock,
/_ WARNING:
fire and/or
WORK AREA SAFETY
1. ALWAYS keep your work area clean and well IlL Cluttered benches and
dark areas invite accidents.
2. DO NOT operate power tools in explosive atmospheres, such as in the
presence of flammable liquids, gases, or dust. Power tools create sparks
which may ignite the dust or fumes•
3. ALWAYS keep bystanders, ehUdran, and visitors away while operating
power tool. Distractions can cause you to lose control.
ELECTRICAL
a
SAFETY
1. Doubts insulated tools are equipped with a polarized plug (one blade is
wider than the other.) This plug wilFf'd in a polarized outlet only one way.
if the plug does not fit fully In the outlet, reverse the plug. if it still does
not fit, contact a qualified electrician to install a polarized outlet.
Do not change the plug in any way.
2. Double insulation [] eliminates the need for the three wire grounded power
cord and grounded power supply system. Applicable only to Class II
(doubre insulated) tools.
3. Before plugging in the tool, BE SURE that the outlet voltage supplied is
within the voltage marked on the tool's data plate, DO NOT use "AC only"
rated tools with a DC power supply.
i
i
J
4. ALWAYS avoid body contact with grounded surfaces, such as pipes,
radiators, ranges and refrigerators. There is an increased risk of electric
shock if your body is grounded.
/
5. If operating the power tool In damp locations Is unavoidable,
ALWAYS use a Ground Fault Circuit Interrupter to supply power to
your tool. ALWAYS wear electrician's rubber gloves and footwear
in damp conditions,
6, DO NOT expose power tools to rain or wet conditions. Water entering
a power tool will increase the risk of electric shock.
7. DO NOT abuse the cord. NEVER use the cord to carry the tools or pull
the plug from the outlet. Keep cord away from heat, off, sharp edges or
moving parts. Replace damaged cords immediately. Damaged cords
increase the risk of electric shock.
3
ELECTRICAL
SAFETY
cont.
8.When
operating a power tool outside, ALWAYS
use an outdoor extension
cord marked '_JV-A"or 'W." These cords are rated for outdoor use and
reduce the risk of electhc shock.
NOTE: The extension cord must have adequate wire size AWG (American Wire
Gauge) for safe, efficient use. Smaller gauge wires, have greater capacity
(16 gauge wire has more capacity than 18 gauge wire).
PERSONAL
SAFETY
1. ALWAYS stay alert, watch what you are doing and use common sense
when operating a power tool. DO NOT use tool while tired or under the
influence of drugs, alcohol, or medication. A moment of inattention while
operating power tools may result in serious personal injury.
2. ALWAYS dress properly. DO Nor wear loose clothing or Jowelry. Pull
back long hair. Keep your hair, clothing, and gloves away from moving
parts. Loose clothes, jewelry, or long hair can be caught in moving parts.
3. ALWAYS avoid accidental starting. BE SURE switch is in the "Off"
posttion before plugging in. DO NOT carry tools with your finger on the
switch. Carrying tools w_thyour finger on the switch or plugging in tools that
have the switch in the "On" posif_on invites accidents.
4. ALWAYS remove adjusting keys or wrenches before turning the toot on.
A wrench or a key that is left attached to a rotating part of the tool may result
in personal injury.
5. DO NOT overreach. ALWAYS keep proper footing and balance at all
times. Proper footing and balance enables better control of the tool in
unexpected situations.
6, ALWAYS use safety equipment. Always wear eye protection,
Dust mask, non-skid safety shoes, hard hat, or hearing protection must be
used for appropriate conditions
TOOL
USE
ANDCARE
SAFETY
1.ALWAYS
useclamps
orother practical
ways to secure and support the
workptace to a stable platform. Holding the work by hand or against your
body is unstable and may lead to loss of control.
2. DO NOT force tool. Use the correct tool and blade for your application.
The correct tool and blade wilt do the job better and safer at the rate for
which it is designed.
3. DO NOT use tool If switch does not turn it"On" or"Off". Any tool that
cannot be controlled with the switch is dangerous and must be repaired.
4. ALWAYS disconnect the plug from the power source before making any
adjustments, changing accessories,or storing the tool. Such preventive
safety measures reduce the risk of starting the tool accidentally.
5, ALWAYS store Idle tools out of reach of children and other untrained
persons.Tools are dangerous in the hands of untrained users.
6. ALWAYS maintain tools with care. Keep cutting tools sharp and clean.
Properly maintained tools with sharp cutting edges are less likely to bind
and are easier to control.
7. ALWAYS check for mlsalignment or binding of moving par_s, breakage
of parts, and any other condition that may affect the tool's operation.
If damaged, have the tool serviced before using. Many accidents are
caused by poorly maintained too;s,
RECOMMENDED
FOR USE WITH THIS TOOL MAY CREATE
[ AAk
WARNING:CONDITION.
USEOFACCESSORIES
THATARENOT
HAZARDOUS
8. ALWAYS use only accessories that are recommended for this tool.
Accessories that may be suitable for one tool can become hazardous
when used on another tool.
5
SERV1CE SAFETY
1. If any part of this saw Is missing or should break, bend, or fail in any
way; or should any electrical component fail to perform properly:
ALWAYS shut off the power switch and remove the saw plug from the power
source and have the missing, damaged or fei(ed parts replaced BEFORE
resuming operation.
2.Toot service must be performed only at a Sears Service Center. Service
or maintenance performed by unqualified pemonnel could result in a risk
of injuP!.
ADDITIONAL
SPECIFIC SAFETY RULES
t. Know your power tool. Read operator's manual carefully. Learn the
applications and limitations, as wed as the specific potential hazards
related to this tool. Fo_owing this rule 'Nil[ reduce the r_skof electric shock,
fire or sedous i_ury.
2. ALWAYS hold tool by insulated gdpp|ng surfaces when pet_corming an
operation where the cutting tool may contact hidden wiring or Its own
cord, Contact with a 'live _ wire wilt make the exposed metal parts of the tool
"_ive"end shock the operator.
3. ALWAYS keep your hands away from cutting at_)a. DO NOT reach under
the matedal being cut because the nesmess of the blade to your hand is
hidden from your sight.
4. DO NOT use dull or damaged bisdes. Bent blades can break easily,
or cause kickback,
5, ALWAYS wear safety glasses or eye shields when using this saw.
ALWAYS wear a dust mask or respirator for applications which
generate duel
g. ALWAYS protect your lungs.Wear a face mask or dust mask if the
operation is dusty. Following this rule will reduce the dsk of serious
personal injury.
7. ALWAYS protect your hearing,wear hearing protection during extended
periods of operation. Following this rule will reduce the risk ofsadous
personal injury.
8. ALWAYS inspect and remove all nails from lumber before sawing.
Following this rule will reduce the risk of serious personal injury.
g. SAVE THESE INSTRUCTIONS. Rofer to them frequently and use them to
instruct others who may use this tool. If someone borrows this tool,
make sure they have these InntrucUons also.
ti
ADDITIONAL
SPECIFIC
SAFETY RULES ¢onL
Z_ WARNING: Some dust particles crusted by power sanding,
sawing, grinding, drilling and other ¢anetructlon Jobs contain
chemicals known to cause cancer, birth defects or other reproductive
harm. Soma examples of theee chemfcals am:
• Lead from lead,-based paints.
• Crystalline silica from bricks and cement and other masonry products.
- Arsenic and chromium from chemically-treated lumber,
Your risk from these exposures varies, depending upon how often you do this
type of work. To reduce your exposure to these chemicals:
• Work in a wel{-ventifatad area.
• Work with approved safety equipment, such as those dust
masks that are specially designed to filter out microscopic
particles.
/_ WARNING: The operallan of any saw can
result in foreign objects being thrown iota your eyes,
which can reeolt in severe eye damage. Before
beginning power tool ope_'ation,ALWAYS wear
safety goggles or safety glasses with side shield
and a fall face shield when needed.We recommend
a Wide Vision Safety Mask for use o,_er eyegk_sses
or standard safety glasses with side shield, both available
at Sears Retail Stores.
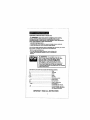
The label on your tool may Include the foltowtng symbols.
V...........................................................................
Volts
A ...........................................................................
Hz .........................................................................
• W. .........................................................................
_' rain .......................................................................
_'_ ........................................................................
....
•..................................................................
no ........................................................................
[] ........................................................................
.,./rata ...................................................................
z_ ......................................................................
IMPORTANT!
Amperes
Hertz
Watts
Miseries
Alternating current
Direct curt'ant
No-load speed
Class If construction
Revolutions or
reciprocation per minute
Indicates danger, warning
caution, it means attention!!!
Your safety is Involved.
READ ALL INSTRUCTIONS
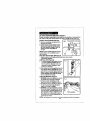
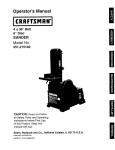
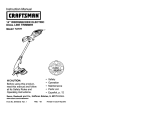
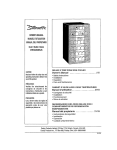
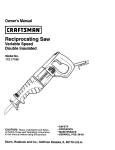
Your 12.0-amp redprocabngsaw has many built-inc_enience features for fast, efficient
cutting.These features includea variablespssd triggerswitchthat allowsyou to change
the speeds for cuttinga vadety of rrmteriais,A/1adjustal_e/pivotingshoe/or maximum
conlm_in a varfatyof cutsand an easy-tc-griprubberboot. The tool-lessblade cJamphas
easy leveraction far extrafast blade changes.
Fig. 1
_r_
Tool-_essBlade Clamp
/
Variable Speed
Trigger Switch
Btade
Rubber
Handle
Gdp
•
='="==_llJir,=w_--=-_
_
_.;,_-=:- :'-:=.1
_,
Input
Blade Stroke
12.0 Amps
BladeType
Rating
No-feadSpeeds
1/2 in. Universal Shank
120 volts, 60 Hz AC
11/4 in.
0 to 2700 SPM
Beforeattemptingto use any tool,be sure to familiarize yourselfwith all
the operatingfeatures andsafety instructfe_s.
z_ WARNING:
%FANY PARTS ARE MISSING, 00 NOT OPERATE
THIS SAW UNTIL THE MISSING PARTS ARE REPLACED. FAILURE TO
DO SO COULD RESULT IN POSSIBLE SERIOUS PERSONAL INJURY.
i
A_ CAUTION;
DO NOT let familiarity with your saw make you
careless. Remember that a careless fraction of a second is sufficient to
cause severe injury,
Z_
CAUTION:
powertool.
USING THE TRIGGER
ALWAYS wear eye protacttonwhile operat(ngthis ,.....
SVVITCH TO CONTROL VARIABLE
I
I
J
SPEED
This saw is equipped with a vadatde speed trigger switch. The saw can be
turned ON or OFF by squeezing or releasing the trigger switch.
The speed of the blade can be adjusted by the pressure you apply to the
trigger switch.
s
!
USINGTHETRIGGER
SWITCH TO CONTROLVARIABLE
SPEED cont.
1. To increase the speed, apply more pressure to the trigger switch.
2. To decrease the speed, apply less pressure,
Choosing the Correct Speed
The speed you use will depend on the type of materials that you are cutting:
1. Use high speeds for cutting wood.
2. Medium speed is best for non-ferrous materials.
3. Low speed is recommended for curing metal,
NOTE:Material thickness and blade selection will also affect your speed
selection. As a general rule, as the material thickness increases, the speed
should be slower.
L
increase speed once the cut is started. Preloaged use at a very slow
Z_ CAUTION:
a veryslowspeed
when beginning
a cut. Then
speed
may damage use
your
saw.
BLADE INSTALLATION
AND REMOVAL
This sow is designed to use all 1/2-in. universal shank blades.
I
plug from power source BEFORE assembling parts, making adjustments
WARNING:
or_changing
blades. To prevent personal injury, ALWAYS disconnect the
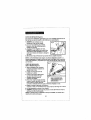
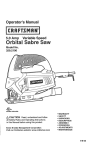
To Install Blade (Figure 2)
1. Disconnect saw from power soume.
2. When installing the blade, extend the
adjustable/pivoting shoe away from the
blade clamp or just remove it for easier
access.
Fig.2 {}ladeC_npLe_er_._
/
3. Push blade clamp lever up with your
thumb and hold it.
• 4. insert the blade into the saw's blade
f"
clamp and make sure that blade
attaches to 1he blade nub inside damp,
5. Release blade clamp lever to lock blade
in place. Pull on blade to be sure it is
securely locked in place.
_pme_
sh_l
To Remove Blade
1. Disconnect saw from power source.
2, When removingthe blade, extendthe
adjustable/pivotingshoeaway from the blade
damp or just remove it for easier access.
3, Push blade clamp lever up with your
thumb and hold it.
4. Pull the blade out of the blade clamp.
BIw,6
e Cl_'_mp
0 m
==
0
•
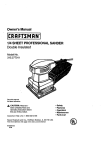
THE SLIDING I pIVOTING SHOE (Figure 3)
The shoe slides in or out to adjust the
depth of cut to material being cut for
maximum control and longer blade life.
Fig. 3
Adjusting the Depth of the Shoe
1. Push down and hold the shoe
adjustment button.
2, Slide shoe in or out to the depth of cut
that you desire and then release the
shoe ad ustment buttor_to lock the
shoe in p ace.
NOTE: The shoe also pivots to provide
maximum control against the surface
being cut.
To Pivot Shoe: (See Fig. 3)
1. Firmly hbid saw and then pivot
FLUSH CUTTING (Figure 4)
1. Use the blade installed teeth up.
The compact design of the motor
housing and the adjustabie/pivottog
shoe on this saw allows you to make
extremely ctose cuts in floors, corners
and other extremely tight areas.
2. To obtain the maximum flush cubing
capability of this saw, make sure that
shoe
to desired
the shoe
is in its position.
cJceestposition to the
saw housing. And the teeth of'the blade
ere facing as close as possible to the
work surface.
I
I F ], 4
WOOD CUTTING (Figure 5)
t. ALWAYS clamp the workpieco
down to prevent it from s))pping.
2. Place the adjuetobie shoe and
the blade lightly against the
surface to be cut,
3. Turn on saw and allow it to come
to full speed before applying pressure
to the workplace,
4, ALWAYS hold the saw firmly with=beth
hands while cutting. Whenever powdble,
hotd the adjustable shoe flrmty ag_net
the matodal to be cuL This will preempt
the saw from jumping or vibretfng and
help minimize blade breakage.
NOTE: Wear gloves if cutting for long periods.
10
Moves
in or out
METAL CUTTING (Figure 6)
Thissaw has differentmete)cut_ngcapacitiesdependinguponthe
type of blade being used and metal being cut.
1. ALWAYS clamp the work down to
prevent it from slipping.
2. Use a finer blade for ferrous metals and a
coarse blade for non-ferrous metals.
3. When cutlJng thin gauge sheet metals,
ALWAYS clamp wood on both sides of the
sheet, This will give you a clean cut without
excess vibration or teadng of the metal.
4. DO NOT force the cutting blade. Forcing
the blade wil_ reduce blade life and cause
the blade to break.
NOTE: We recommend that you spread a thin fitm of oil or other coolant along
the line of cut ahead of the saw. This will allow easier operation and help extend
blade life. When cutting aluminum, use keresene.
POCKET CUTTING: Wood Only
(Figure7)
1. Measure the surface area to be
cut and mark it dearly using a pen,
pencil or chalk.
2. Install a pocket cutting blade
into saw.
3. Tip the saw backwards until the back
edge of the adjustable shoe is resting
on the work surface.
4. To avoid breaking the blade, start
the saw and use the slowest speed
to begin the cut. Then graduatiy
increase the speed as you start to cut.
5. Hold the saw handle firmly end begin
to make a slow, deliberate upward swing
with the handle of the saw.
6. The blade will begin to feed into the rnatedsL
7. ALWAYS be sure that the blade is completely through the matedal before
continuing with the pocket cut.
NOTE: In areas where blade visibility is limited, use the edge of the saw
guard as a guide,
11
SERVICE
personnel may result in misplacing of internal wires and components
Z_ WARNING
maintenance performed by unauthorized
which
could cause Preventive
a serious hazard
I
I
t. Tool service MUST BE performed only by a Sears Service Center.
Service or maintenance performed by unqualified personnel could result
in a dsk of injury.
IMPORTANT NOTE: All service that requires opening the saw should onJybe
performed at a Sears Service Center.
2. When servicing a tool, ALWAYS use only identicaJreplacement parts. Follow
instructions in the Maintenance Section of this manual. Usd of unauthorized
parts or failure to follow Maintenance Instructions may cn_ate a risk of etectric
shock or injury.
TOOL LUBRICATION
Your CRAFTSMAN Reciprocating Saw has been properly lubricated and ready
to use. No further lubrication is needed under normal operating conditions.
All bearings in the saw are lubricated with sufficient amount of high quality
lubricant for the life of the tool.
WHEN SERVICING
i
I
USE ONLY IDENTICAL REPLACEMENT
PARTS
ii
tool from the power source BE]FORE cleaning or performing any
_
WARN
'N
G ." To
ew_id
_don_,
ALWAYS
dl.conn.ct
th.
malntsnance.
12
I
CLEANING
i
,
from
/_ WARNING:
the power source
To avoid
BEFORE
accidents,
cleaning
AUNAYS
or pe<fecming
disconnect
any the
maintenance.
tool
n
to the plastic parts. These include gasoline, carbon tetrachledde,
chlorinated deablng solvents, ammonia and household detergents
/_ CAUTION: Certain cleaning agents and solvents cause damage
that contain ammonia.
t. Use a clean cloth to remove dirt, carbon dust, etc.
2. Electric tools are subject to accelerated wear and possible premature failure
when they ere used to work on fiber glass boats, sports cam, etc. The fiber
glass chips and grindings are highly abrasive to electrical tool parts, such as
bearings, brushes, commutators, etc. Consequently, _t is not recommended
that this tool be used for extended work on fiber glass. During any use on
fiber glass, it is extremely important that the too_is cleaned frequently with
compressed air.
J Jwith
Z_ WARNING:
compmssed
air.
ALWAYS wear safety g°ggles when cleanthg t°°ls
IMPORTANT:
To assure product SAFETY and RELIABILITY, repairs, maintenance and
adjustment MUST be performed by a Sears Service Center.
The following recommended accessories are currerd]y available at
• your local Sears Store.
BLADES
Sears has a la_e selection of recipmcafing saw blades in a variety of lengths
and teeth per inch that are ideal for a wide variety of cutting needs. Choose
blades for cutting wood only, blades for metal cult+rigonly and general-purpose
blades that cut wood or metal.
EXTENSION
CORDS
Sears offers a large selection of extension cords that help extend your
working range.
i
be dangerous.
I recommended
Z_ WARNING: mightThe
use of attachments or accessories that are not
13
I
f
RECIPROCATINSSAW- MODEL NUMBER 172.26672
TheModelNumberwitlbe found on Me Nameplate.Alwaysmention the ModelNumberin ancorrespondence
regarding yourtool
Part No.
I
SEE BACK PAGE FOR PARTS ORDERING INSTRUCTIONS
NOTES
16
Manual del propietario
I CRFIFTSHFINi
iF
R
0
F
[
$
I
0
N
A
L i
Sierra de Movimiento
Alternativo
Velocidad variable
Doble aislaci6n
Modelo N0_
172.26672
PRECAUCI(_N: Lea, comprenda y siga
las reglas de seguridad e instrucciones
operativas de este manual, antes de
usar el producto.
Seam, Roebuck
• SEGURIDAD
• OPERACI6N
• MANTENIMIENTO
and Co., Hoffman Estates, IL 60179 EE.UU.
Garantia..............................................................
Instruccionesde Seguridad................................
Simbolos de Seguridad.......................................
Descripcibn.........................................................
Funcionamiento...................................................
Mantenimiento....................................................
Accesodos..........................................................
Piezas ................................... _.............................
N_meros de Servicio...........................................
Pagina 18
Paginas 19-23
P_gJna 23
Pdgina 24
Pdginas 24-27
Pdginas 28-29
Pdgina 29
P;_ginas 30-31
Contraportada
GARANTiA COMPLETA DE UN Al_O DE LA HERRAMIENTA
CRAFTSMAN
Siesta herramienta Craftsman no es de su total s_f_s_ccibn durante el
primer aflo a partir de la focha de compra, DEVUELVALA A I,A TIENDA
SEARS O AL CENTRO DE'SERVIClO Y PIEZAS SEARS MAS
CERCANOS EN ESTADOS UNIDOS y Sears la reempiaza_ sin costo
a_Jurlo.
Siesta hermmienta Craftsman es usa para fines comercisies o de arriend(
esta garantfa es v_llda 0rdcamente dumnte Ice;90 dlas siguientes a la
fecha de compra.
Esta garantla le otorga dereches legales especificos. Usted puede tener
otres detechos que ,/arian de un estado a obo.
Sears, Roebuck and Co., Dept. 817 WA, Hoffman Estates, IL 60179
iCONSERVE
ILEA TODAS
ESTA$ INSTRUCCIONES!
LAS INSTRUCCIONES!
18
i
tas InstruccJones. El incumpgmlento
de todas tas Inetruoclones
sigulentae podria producif un cheque el6ctrico, Incendio y/o lesiones
]Z_
ADVERTENCIA: ASEGURESE de leery comprender todas
personales
SEGURIDAD
graves.
]
DEL AREA DE TRABAJO
I. SIEMPRE mantenga el lugar de trabajo limpio y bien iluminado. Los
bancos de trabajo desordenados y real iltJminados Pavorecen foe acoideRtes.
2. NO utilice las herramientas el6ctricae on una atmc_sfera expiosiva, tal
coma en presencla de llquidos inflamabies,
gases o polyo. Las
herramientas er_ctricas crean chispas qua pueden inflamar el poIve
o los vapores.
3. SIEMPRE mantenga a los espectadoree, niSos o visitantee a usa
distancla prudente cuando eat6 utlllzando una herramienta el8ctrica.
Las distracoiones pueden hacerle perder el control.
SEGURIDAD
ELECTRICA
1. Lae herramlentas con aJslamiento dobta est_n equlpadas con un
enchufe po|aHzado (una hoja de contacto es m_s ancha que la otra.)
Eats enGhufe puede poeorse en an tomacorriente poiarizado on urta
s6ta dlreecl6n. SI el enehufe no calza bien an el tomacorrtante, invlerta
el enchufe. Si todavla no calza, contacts aun atactricista
calificado
pars qua ins(ale un tomacorriente adecuado. NO modifique el enchufe
de ninguna manera.
2, El aislamiento doble I_ elimin_ la necesidad det cordbn el_ctdco triflrar puesto
a tierra y del sistema de alimentacibn de energia puesto a tierra. Esto se
aplica sb[o alas herramientas de Class II (de doble aislarniento)
3. Antes de enchufar la herramienta, ASEGURESE qua el interrupter de
voltaje corresponds al indicado en la placa de Informacibn de la herramienta,
NO USE "CA selamente" en herramientas qua dicen CC.
•
_"
4. SIEMPRE evite el ¢ontacto del ©uerpo con tas superficies
puestas a
tierra tales coma tuberias, radladores, cocinas y refrigeradores
Exists mayor riesgo de sufrir cheque el_ctrico si su cuerpo est_ a tierra.
5. Si no puede evitar usar su herramienta en lugaree h,_medos, 81EMPRE
use un Interrupter de CJrcuito do Falls aTierra para proporcionar
energia a su heframienta. Erl ambientee h,tmedos use siempre guantes
do electrlcieta y calzado.
6. NO exporlga las herramlentas el6ctricas a la IJuvla nl a ambientea
h'_mados. Cuando antra agua a una herramienta er_ctrica, se aumenta el
riesgo de sufrir ue cheque eldctnco.
7. NO abuse del cord6n ekk:trico. NUNCA tranaporte la herramienta par
el corddn nl tire del €ord6n part desenchufarla. Mantenga el ©ord6n
aleJado del taler, del aceite, hordes afilados o plazas mbviles.
Reemplace inmedtatamente
los cordones sl6©trlcoe dafiados.
Los cordones dat_ados aumentan el desgo de sufrir un cheque eJ_ctrico.
19
SEGI.IRIiIlll)
ELECTRICA
cont.
8. Cuandoutillosuna perramlenta el6ctrica al aim libra, SlEMFRE use un
cord6nde extensl6n marcadoWV-A"o'W', Estoscordonesestdnapr0bados
para use at aire libre y reducenel riesgode chequeel_ctrico,
NOTA: El cord6n de extensi6n debe tenet el tamafio de alambre adecuado
AWG (American Wire Gauge) pare use eflciente y seguro. Los alambres de
calibre md_spequeflo tienen mayor capactdad (el alambre de calibre 16 tiena
m_ts ospecidad qua ei atambre de 18),
SEGURIDAD
I
PERSONAL
1: SIEMPRE Manl_ngase alerta, observe Io qua ust_ hacienda y use sentld0
carotin cuando usbt usando una hen'amienta. NO USE la herrarnienta
cuendo esUt cansado o bale |a influerlcla de drogas, alcohol o
medlcamentos. Un memento de c_is_6n
cuando ost_ trabajando con lea
harrarnientas el0ctriP.aa,puede ocasionar una lesi6n personal grave.
2. SIEMPRE vistasa adecuedamante. NO use ropas sueltas o joyas,
Amirrusa el cabello largo. Mantenga su cabelto, ropes y guantes
alejadoe lie lea plazas m6vllus. Las ropes sueltas, las joyos o el cabello
largo pueden quedar atrapados en (as plazas mbviles.
3, SIENIPRE ev|te |a pueata art marcha Ilccldantal. ASEGURESE de qua el
Interrupter est=t an puslcl6e "Off" (Apag_do) antes de anchufarla. NO
tl'ansper telas henamientas con su dedo en el Interrupter. Si trensporta las
helrarfflentas con su dedo en el intea'uptor o si enchufll los herremientas que
tengan el intarruptDr en la posick_l "Oil" (Encendido) se favorecan los
accidentes,
4. SIEMPRE eaque las Ilaves de aJaste o Iliiilm Inglosas antes de poner en
mamha la herramlenta, Si se deja una _
inglesa o una ,ave (kl ajusts an
una plaza m6vil de la herramienta, se puade pmduc{r ur_ !esi6n personal.
5. NO use la herramienta a una dlslanr.la demaslado alajade. Mantenga
SIEMPRE un buen equilibria y una II<_lcl6n flrme. El buen equilibria
y la posici6rt firme permiten un meier central de la herramienta en
situacionea imprevistas.
6, SIEMPRE use equlpo de segurtdad. Use SIEMPRE lantes protactores.
Se debe user m&scaras centre el pone, zapatos de seguridad antirresbaladizos,
caeca da seguridad o protec_tbn audltJw de acuerdo con las clrcunstancias.
2O
USOY
CUiDADO
DELASHERRAMIENTAS
DESEGURIDAD
1.SIEMPRE
usemordazas
uotromdtodo
pr_ctlco
parsasegurar
y
apoyar
lapieza
detrabajo
enunaplatafornla
estabie.
Sisujeta
eltrabajo
conlamano
ocontra
su cuerpo queda inestable y puede conducir a la
p_fdida de control
2. NO fuerce la hen'amtenta. Use la herramlenta aproplada pars el trabajo.
La herramienta corrects har_ el trabajo major y de manera robs segura, a la
vetocidad para la cual fun dise;_ada.
3, NO use la herramienta st el tnterruptor no funcLona debldamente. Es
_oeiigroso si la herramienta no puede ser controlada con el interfuptar y par
tanto debe set reparada.
4. SlEMPRE desenchufe la herramlenta antes de hacer alg_n ajuste,
©amblar accesodos o guardarla. Eatas medidas pmventJvas de seguridad
reducen el desgo de qua ta herram(enta se pangs an marcha acc(dentaimente.
_;.._IEMPRE gua_le las hel'ramlsntas |ejos dnt alcan©m de los hi,as y de
otras personas inexpertas. Las herramientas son pe{igrosas en manos de
personas inexpertas.
5. SIEMPRE
cortantes
manttene,
atascarse
mantenga bian culdadas Iss herramlentas. Las herramlentas
dnben mantBnerse afiladas y limpias. Las heframientas quese
bien culdadas y bie_ atiladas tjenen menoa probabilidad de
y se pueden controlar m_s fScilmente.
7. SIEMPRE vedflque si hay plazas desa((neadas o atascadas, si hay
ptezas quebradas o s| exists cuatqulet" otra situad_m qua pueda afectar
el funcionamiento de ta herramienta. Si la herramien_ est_ da(_ada, debe
repararse antes de usaria nuevamente. Muchos accidentes son causados
debido al mal estado de las herramientas.
PARA SER USADOS CON ESTA HERRAMIENTA PUEDEN CREAR UNA
I SITUACION
/_ ADVERTENCIA:
PELIGROSA EL usa DE ACCESOR{OS NO RECOMENDADOS
J
8. SIEMPRE use solamente tos accesorios recomen_lado_ par et fabricante
pars su modeto. Los _ccesori(_; adecuados pare una herramienta, pueden
set peligrosos si se utilizan an otra hsrramienta,
21
SERVICIOTECNICO
SEGUI_O
1. Si falta o os rompe, so dobla 0 |alia aJguna plaza de seta sierra o sJ
alguno do los componentes ek_atcos no funcfona an forma deb|da,
SIEMPRE apague el interrupter, desonchufi) la siena de la fuente de
a(imentack_n y _a
reemplazarlapiezas taitantes,
de._das o defe_osas
ANTES de voivera ponerlaon fundonamiento.
2. La reparaci6n de la herram|enta debeser efectuada so|emerita en un
Centre de Sarvlcio Sears. La reparac_(>n
o mantenimiento efi_ctuado per
persona) no espe_alizado pueda causer una lesibn.
REGLAS DE SEGURIDAD
ADIGIONALES
ESPECtFICAS
1. Conozca su herramianta. Lea r.uldadosamante e| manual de| usuarta,
Aprenda aus apllosclones y Ifmltacionse as; come tambi6n los rfsegos
potenclalse especificos rela_ionados con osta harramienta. Si so cump}a
esta reglase reduc_r_
elt'ie_go
do un choqna ek_-trico, incendio o )esibn grove.
2. SIEMPRE sostenga ta herramtanta per ta superflcie de suJacibn alsiada
cuando la herramienta de carte pueda teosr contacto con a|ambrado
ascend|do
o con su propio _rd6n.
Si la herramienta tiene conta(do con un
alambm bajo "tensibn" las plazas de metal expueelas de la herramienta
tambidn quedar_n bajo "t_"
y e/operador puede suffir un cheque e_,cb'ico.
3, SIEMPRE mantenga sue numos etajadas do| =trse deride est_ €ortando.
No tmte do s_canzar el mar'ariel cortado porqna re|entree m_s se acerca su
mane ala hoja, se aleja de su vista.
4. NO use hoJas an malse condtalonos,
romperse o dave/verse con tacilidad.
Las he, as dobladas pueden
S. Use SIEMPRE/antes
pro|at|ores o pantallos do seguridad cuando usa
esta sierra. SIEMPRE use une mascarilla
pare el polvo o respirador
pare/as apl|oseiones que producen polvo.
6. SIEMPRE proteJa sue pu|monea. Utlllos una m_scara centre el poh/o
ai ta operar;16n de corte ,ca a desped|r mucho polvo. El cumplirniente de
esta reg(a reducer8 el rtesgo de su_Lruna tasi6n personal grave.
7. SIEMPRE proteja eu audlcKTm. Utllice protecei6n pare los ofdos durante
periodos prolongados de funeJonamiento. E) cumplimiento de esta regla
reducirb el rJesgo de sufrir una lesi_l personal grave.
8. SIEMPRE inspecclone y seque |odes los c|avos de la madera antes de
user ta sierra. El cumplimianto de esta regla reducir_ el desgo de sufrlr una
tesibn personal grave.
9. CONSERVE ESTAS INSTRUCCIONES. Cons01telso con frecusncia
_ ,',sales pare ayudar a otroe qua puedan user esta herramienta.
iusted presta esta herram|enla a otra persona, entregue |arabian
las instruccionse.
22
REGLAS DE SEGURIDAD
ADICIONALES
ESPECIFICAS
cent,
ADVERTENCIA: Algunes particulas de polvo creadas al fijar con
une herramienta, meier, taladrer y hater otms trebajos de construccion
€onUenen quimlcos que se sabe pueden producir c_ncer, defectos af
nacer u otro_ da_os reproductivos. Algunos ejemplos de estos
quimlcoe son:
• Plomo de las pinturas a base de pfomo.
• Sliios cristalino e partir de ladrillos y cemento y otros productos de alba_ileria.
• Ars6nico y creme a partir de maderas tratadas con quimicos
Su riesgo e estas exposiciones varfe, dependiendo de la ;'recuencia con que
hace este ripe de babajo. Pare reducir su exposicibn a estos quimicos:
• Trabeje en un &tea bien ventilada.
• Trabaje con equipo de seguridad aprobedo, co;no per ejernplo mascaras pare
polvo dise_adas especfficamente pare filtrar les perticules micro_scbpicas.
.,_ ADVERTENCIAk La utflizacibn de cuelquier
sierra puede causar la proyecoidn de objetos extrafios a
sue ojos, lo coal puede ocasione,' da_os oculares severos.
Antes de comenzar a user le herrarnienta mecdnica,
SF'MPRE use sus lentes protectores o pantallas de
seguddad con proteccibn lateral y una mdscara complete
cuando sea necesario. Reoomendamos una M_scara de
Visi6n Amplia pare user sob_ sus lentes protecteres o
lentes de seguridad est_ndar, con protecoi6n lateral,
disponible en los Afmacenes Seam.
La etiqueta an su herramlenta puede incluir los sigulentes
V...........................................................................
Vortios
A ...........................................................................
Hz .........................................................................
W ..........................................................................
I" rain .......................................................................
...................... '..................................................
---'----= ...................................................................
no ........................................................................
[] ........................................................................
..Jmln ...................................................................
OPM ......................................................................
._
......................................................................
ilMPORTANTE!
simbolos.
Amperios
Hertz
Watts
Minutes
Corriente Alterne
CorrJente Continua
Veloodad sin carga
Construcc_bn Clase ti
Revoluciones o
G_pes per Minute
Orbitas per Minute
Indica peligro, advertenda o
atencibn. Puede usarse
con'untamente con otros
similes o pictogmrnas.
iLEA TODAS LAS INSTRUCCIONES?
23
Susierra
altemativa
de12amp. cuenta con
touches caracterlsticas incorporadas
pare res_izarcortes r_pida y eficientemente, Entre estas caresteristices se
encuentran un gentle de velocidad vadable qua te permite r.ambiar la velcoided
de la heja peru una variedad de msteriales. Tambi6n cuenta con una base
ajustable/con pk,ote pare un m_ximo contro_ en una variedad de cortes y con un
mango de gems f_tcil de agarrar. Et fi ador manual (no requiem herramientas) de la
hoja of_ce una arc bn de pe ancs senci ta pare camb os de he a t_p dos.
Fig 1
Abrazadera de la heja sin herramienta
Interrdptor
v_naNe
Mangode
Botbn;e a.luste
de ta base
dMeango°ma
g a
_
_
goma
Ill
ili
I|
Alimentacibn
12 Amps,
Largo de la carters
1114 pul.q.
Tipo de hoia
Potencia nominal
112 pui.q, v&sta_lo un)_rsal
Velocidad sin cama
.
I
IIIII
120 voltJos, 60 Hz CA
0 to 2700 CPM
Antes de tratar de user cualquier herramienta, familiarlcese con todas ias
caractedsticas de funoionamiento y con las instrucoionea de seguddad.
HAGA FUNCIONAR ESTA SIERRA HASTA QUE LAS PIEZAS FALTANTES
NO HAYAN S_DO REEMPLAZADAS. DE LO CONTRARIO _E PUEDE
CAUSAR UNA PO_IBLE LESION PERSONAL GRAVE.
i
i
I Z_ ATENCION:
NO permita qua su familiaridlxl _
la sierra inteiff]era I
| con su etend6n y prudenrJa, ReGuerde que un de_¢uido de una ftacc{6n de
I segundo
I
puede
P.;aLlsBr
urta
{esi(_n
grave,
I
cu, =Aooo:
.'E.P.E
ooo,ro,oco'+n.
oJo..'o,o.+ I
use DEL INTERRUPTER DE GATILLO PAPA CONTRQLAR LA
VELOClDAD VARIABLE
Este sierra viene equipada con un Interrupter de g_tillo de vetocidad variable,
La sierra se puede ENCENDER y APAGAR epretando o tiberendo el interrupter
de gatil[o.
La veloddad de Is hoja se puede ajustar de acoerdo con [a presibn qua aplique
sobre el interrupter de 9atillo.
24
useDELINTERRUPTER
DEGATILLO
PAPA
CONTROLAR
LA
VELOCIDAD
VARIABLE
cont.
1.Pare
auroenLar la velocided, apiique roayor presi6n sobre el interrupter
de gatille.
2.Para reducirlavelocidad,
apIiqueroenotpresibn.
Selecclonar lavelocidad eorrecta
La ve)ocidad useda depender& de_ripe de materiales qua est_ usando:
1. Use vetocidades sites pare cortar roadera.
2, El use de vetocidad media para roateriales no ferrosos es [a m_s adecuada.
3. La vefocidad baja se recomienda pare cortar metal.
NOTA: EI grosor deI material y la selecci6n de la hoja afectar_n la seteCCi6n de
la velocidad. Come regis general, si eI grosor del material auroenta, ta velocidad
debe disroinuir / o ear mas baia.
Despu_s auroente _avelocidaci una wz qua inicie et corte. FI use prok)n_db
Z_ CUIDADO:
Use la vetocidad rods baja cuande empiece un corte.
I
a tma veIocidad muy baja puede ,dafter su siena.
SACADO E INSTALACION DE LA HOJA
Esta sierra est_ disehada pare uearse con todas las hojae U-Shank de pulgada.
I
I desenchufe
z_ ADVERTENCIA:
ANTES de roontar
Pare repuestos,
ptevenir lesionea
hacer
ajustas
personelea,
o carobiar
SIEMPRE
hojas,
Pare |nstalar la hoja (Figure 2)
F" 2
Pa_mca
de_a .
1. Oesenchufe lasierra.
2. Cuando instaie la hoja, ex{Jandela base
_ustab)e/con pi,,ote hacla afuera del
fijadorde la hoja o simplemente retiroIo
pare Iacilitar su aeceso.
3. Optima la palaeca de] fljador de la hoja
hacia afrib_
con su dedo pulgsry
sost_ngala en su Iugar.
4. Inserte la hoja en la abrazadero y
/
aseggrese de qua queda instalada en el
soportede la hoja dentro de la abtazadera.
S. Libetela paLancadel fijadorde la heja
pare fijar la hoja en su lugar.Tire de [a
hoja pare asegurarse de qua est_
asegurada en su lugar.
Pare retirar la hoja
1. Deseechufe la sierra.
2. Cuando retire la hoja, e_tier_a la base
_us_blelconpivote haciaafuero del
deeh_e
ador de la hojs o simpfemente rot h'efo
pare tac'd'dar
su accoso.
3. Optima la palanca del fijadorde la hoja
hacia arriba con au d_o pulgar y sost_ngala ee su lugar.
4. Tire de la tl_a pare sacada
fuera de Iaabrazadero.
25
i_ll
_[_J_
f;1LV_ll_
_mi_
mini
DEL PATIN GIRATORIO DPLIZANTE
(Figure 3)
El patin se desliza hacia afuem o hacia edentro pare ajusterse ala profundidad
det corte a fin de cortar con el m_ximo de control y elargar la vide de la hoja.
Ajuete de la profundidad
de in base
Fig.3
Mue_ hadadeemo hadaf_era
1, Opdma y mantenga opdmido el botbn
de ajuste de ra base.
2. Deslice la base hacla adentro o hacia
afuera haste alcanzar la profundidad
de corte deseada y iibere el botbe de
ajuste de la base pare fijada en
su lugar.
NOTA: Et patin tambi_n gira pare proveer
control m_ximo en la superrK:ie que se
est_ cortando.
Paten
Pare Hacer Girar el Patln: (Vet figure 3)
1. Sujete la sierra con firmeza pare despu_s hacor girar el patin
ala posieibn deseada.
I
CORTE AL RAS (Figure 4)
1.. El dise_o compacto de la caja del motor [ F__.4
y el patin ajustablelptvotente de esta
i
sierra le permiten ejecuter cortes muy
corcanos en pisos, esquinas y otras
dreas muy estrechas.
2. Pare obtener la m_lxima capacidad de torte I
al ras de esta sierra, asegOrese de que el
I
patin este en su posic_bnrods cemana a [a
caja de la sierra y que los dientes de la hoja I
queden didgidos tento como sea posible
|
hacia Is superficie de babajo.
|
I
CORTE DE MADERA (Figura 5)
1. SIEMPRE ponga una mordaza en la pieza
de trabajo pare evitar que se resbale.
2. Coloque el pat[n ajusteble y la hoja
levemente coetra la superflcie a cortaL
3. Encienda la sierra y perrn[ta que alcance
la mdxima velocidad antes de aplicar
presi6n a _apieza de trabajo.
4. SIEMPRE sostenga firrnemente la sierra
con ambas manos mientra¢ corte, Siempre
que sea posible, sostenga flrmemente el
patin ajustabIe contra el rnatedal a cortar.
Esto evitar_ que la sierra salte o vibre y
se reducir_ a un mInimo la posibilidad de
que la hoja se rompa.
NOTA: Use guantes siva a corter con la sierra durante periodos prolongados.
26
I=II _[SlIll] _P_Ikrd
11_il[(.li_.j 11.
CARTE DE ME/ALES
(Figure 6)
Esta sierra tiene diferentes capacidades pare carter metales dependiendo del
tlpo de hoja que se est_ usando y del metal qua se est,, cortando.
1. SlEMPRE use mordazas con su
trabajo par eviler qua se resbale,
2. Use una hoja mas fina pare metales
ferrosos y una hoja m_s gruesa pare
metales no ferrosos.
3. AI carter laminas deigadas de metal
SlEMPRE ponga madera en ambos tados
de las lamina, esta resuLtar_,en un buen
carte sin el exceso de viPracibn o dasgarre
del metal.
4. NO fuerco la hoja, Si fuerza ta hoja durara menos y puede romperse.
NOTA: Le recomendamos qua ap[Lclueuna pelicula delgada de aceite o un
liquido refrigerante a Io largo de la _nea de carte de la sierra. Estote permitira
usarla m_s f_cilmente y le ayuda_ qua le dare mas la hoJa,AI cortar atuminio
use
kerosene.
CARTE DE BOLSILLOS:
$61o an Madera (Ftgura 7)
..
t. Mida ia superficie a set cortada y
marquela ctaramente ufilizando un
lapicero, Idpiz o tiza.
2. LnstaLeuna hoja pare carte de
bolsiltos en la sierra,
3. Lnclinela sierra hacia atras haste
qua el borde trasero del patin
/ ,Hacef unmovk'niento
heda
,;_. ajustabLedescanse sabre la
supe_cta de trabaJo_
;_n_a,en lapos_v.)nnormal,
4. Pa_'aeviler romper la hoja, encienda
cuar_x)la hojaha pas,_doa
b_av_s
del nuateria_
ta sierra y use la valocidad mas baja
pare empezar a carter. Despu_s
aumente ta velocidad an forma gradual mien&as empieza a caftan
5. Sujete el mango de la sierra con flrmeza y
empiece ahacer un movimiento lento, hacia arriba con el mango de la sierra.
6. La hoja empezar_ a avanzar en el material.
7, SIEMPRE asegt_rese qua ta hoja ha pasado a lravGs del material antes de
conttnuar con el carte de bo_sillo.
NOTA: En areas donde la vlsibilidad de la hoja ea limitada, use el lado de ta
cubierta de la sierra coma guia,
27
iltYillli I illlll_llillll_
8ERVIClO
I
personal no autod, zado puaelb resultar en qua alambres Internes y
componentu seen puastol In fofma equlvoeada, ocasionsndo una
_ ADVERTENClA: Elmm=nimtentowe_ntivo realizadoper
sltuackSn de pellgro,
1. La reparaci0n de las hermmientas DEBE SER efectuada solamente per el
Centre de Servicio Sears u otto personal calificado. La reparaclGn o
mantenimtento efectuado per personal no especializado puede causar
una lesibn personal .
NOTA IMPORTANTE: Todo servicio que requiere abrir la sierra debe set
realizado en un Centre cle Servldo T6cnico Sears.
2. Cuando efect,',e reparscione1| a una herramienta, use SIEMPRE sblo
repuestos legltimos. Siga las instrucdones indicadas en la seccibn
Mantenimiento de este manual. El use de piezas no autorizadas o el
incumplimiento de las insVu¢ciones de mantenimiento, puede crsar un
riesgo de cheque el6ctdco o lesiones.
LUBRICACION
DE LA HERRAMIENTA
Su Siena Alternative CRAFTSMAN ha side lubdcada en forms adecuada y
esta lists pars ser usada. Lubdcantes adicionales no se mquieren bajo
condiciones de funcionamiento normates. Todos los cojinetes en ia sierra se
lubrican P-_n sufldente cantidad de lubricante de alta calidad pars la vide de
la herrsmienta.
CUANDO REALICE
REPARAClONES
USE SOLO PIEZAS LEGITIMAS.
I |aA_he_rsmienta
ADVERTENCIA:
SIEMPREdesen(:hufeI
ANTES deParsevitaraccidentes,
Ilmplarla o hacerte mantardmlento.
28
LIMPIEZA
/_ ADVERTENClA: Pare evltar accldentes, SlEMPRE desenchufe
la herramlenta ANTES de limptarla o hacerle rnantenimtanto.
/_ PRECAUCION: Clertos agentes de limpieza y solvente$ pueden
daiSar las plazas pl_,sticas. Estos incluyen gasolina, tetracJonJro de
car'obn, sotventas de timpieza a base de cloro, amoniaco y detergenta
domesUco con amoniaco+
I
I
1. Use pafies limpioe para sacar la suciedad, pelvo de carbbn, etc,
2. Las herramientas ei_ctricas se desgastan mbs r&pidamente y pueden failer
prematuramente si se usan en embarcaciones de fibra de vidrio y canos
deportivo, etc. Lae astilias de la fibre de vidrio y residuos son attamente
abrasivos pare las piezas de las herrarnientas el_ctTicas, como con cojinetes,
cepitlos y conmutadores, etc. For Io tanto, no se recomienda usar esta
herramienta durante largo tiempo en trabajos con fibre de vklrio. Durante el
uso con fibre de vidrio, es muy importante qua la herramienta se flmpia
frecuentamente con aire compdraido.
I soguddad
Z_ ADVERTENCIA:
cuaedo limpie SIEMPRE
|as harramlentas
use lentes
conpr°teet°res
airs compdmldo.
de
I
IMPORTANTE:
Pare asegurar la segundad y conflabilidad del producto, reparaciones,
mantenimtanto y ajustes deben set realizados en el Centro de Servicio
Tecnico de Seam.
Los siguientes accesorios recomendados est_n disponibles actualmente en
;'su Alraac_n Sears.
HOJA
Sears tiene una gran selecci6n de hojas de sierras alternativas en una
variedad de largos y dientes pot pulgada que son ideales pare un sinndrnero
de necesidades de cortes. Hojas pare cortar madera sotamente, hojas pare
cortar metal colamente y hojas pare usos generates qua cortan madera o metal.
CORDONES
DE EXTENSION
Sears ofrece una gran selecck_rt de cordones de extensibn que ayuden a
prolengar el alcance t_til.
I no
]_ recomendadas
ADVERTENC'A:
puede cor
El uso
peligroso+
de accesor+os o piezas qua Se acoplan,
29
I
SIERRA DE MOVIMIENTO ALTERNATIVO-
MODELO NUMERO 172.26672
ElN_merode Modef_fo enconh'_r_
en la platade fabflca_te.$iemF_emencioneel N_merode Modelocuandohaga unaconsuttasobresu herramienta.
Description
Pteza No,
Description
cruceta
O_
O
rasor_
ST12.17,01-00
VF-.A
EN LA ULTRA HOJALAS INSTRUCCIONESPARA
PEDtDOSDE-PIF.ZAS,
®
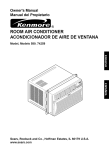
Your Home
For repair in your homo of a|l major brand appliances,
lawn and garden equipment, or heating and cooling system,
no matter who made it, no matter who sold it|
For the replacement pads, accesso#es and
owner's manual_ that you need _.odo-it-yourself.
For Sears prolessiot'_l installation of home applia.,_es
and the ilems like garage door openers and water heaters.
1.8_004-MY-HOME
_
Anyf_,
(I -8OO-46g-4S63|
day or ni_t
{U.S.A. and Car_tJa)
Our Home
For repair of carry-in products like vacuums, lawn equipment,
and electronic, call or go on4ine for the nearest
._lmra Parts and Repair Center.
1-a00_488-1222
Atl_me,<_yorni_J_((U.SmA.)
WWW_K.P.J3FII
To purchasea protec_onagreement (U.S.A.) or main_nar_e
a_
(Car_da) on a productse_P..odby Se_rs:
1-8008274655
._£&A.)
Parep_r serv_o _e _
a dorr_[o, y para mden_-pie_s:
1.888-$U4-1OGAR_
1-800-361-6G65
(Canal)
AuCanada pa_ se_ce _ francis:
1.800.LL=.FOYER,€
_
!_
_I