1
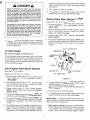
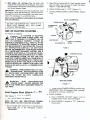
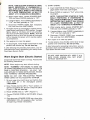
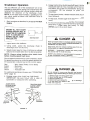
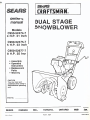
SEARS
owner's
manual
Models
C950-52474-7
4 H.P. 21 Inch
CRAFTSMAN®
DUAL STAGE
SNOWBLOWER
C950-52475-7
5 H.P. 23 Inch
C950-52677-7
8 H.P. 25 Inch
• Assembly
• Operating
Instructions
• Replacement
Parts
• Warranty
CAUTION:
You must read and
understand this owner's
manual before operating
unito
Serial No.
SEARS
litho in Canada
_
CANADA
INC.,
TORONTO,
Part No. 7524
ONTARIO
M5B
288
Issue 5/87A
.
engine to warm up for a few minutes as the engine
will not develop full power until it reaches operating
temperature.
AOANGERA
Gasoline is flammable and caution must be used when
handling or storing il. Do not fili fuel tank while snowblower is running, hot, or when snowblower Is in an enclosed area. Keep away from open flame, electrical spark,
and DO NOT SMOKE while filling the fuel tank. Never fili
fuel tank completely; but fili the tank to within 1/4-1/2 inch
from top to provide space for expansion of fuel. Always
fili fuel tank outdoors and use a funnel or spout to prevent spilling. Make sure to wipe up any spilled fuel before
starting the engine.
7. Aun engine at or near top speed.
8. To stop engine, move throttle control lever to stop
position and remove key. Do not turn key.
Warm Engine Start (Recoil Starter)
(Engine stili warm from recent running.)
1. Be sure auger drive clutch lever and traction drive
clutch lever are in the disengaged
position,
"RELEASED"
Store gasoline in a clean, approved container, and keep
the cap in piace on the container. Keep gasoline in a cool
well ventilated piace; never in the house. Never buy more
tllan a 30 day supply of gasoline to assure volatility. Gasoline is intended to be used as a fuel for internai combustlon engines; therefore, do not use gasoline for any other
purpose. Since many chlldren like the smell 01 gasoline,
keep it out of their reach because the fumes are dangerous to inhale, as well as being explosive.
2. Move throttle control (UP) to "FAST" position. Insert
key into ignition slot. Be sure it snaps into piace.
(Figure 10). Do not turn key.
3. Aotate choke knob lo "OFF"
primer button.
posilion. Do not use
4. Pull starter handle (Figure 10) rapidly. NOTE: Do
not allow handle lo snap back, but allow il to rewind
slowly while keeping a firm hold on the starter
handle.
5. Check to make sure that spark plug is tightened
securely into engine and spark plug wire is attached
to spark plug. Il torque wrench is available, torque
plug to 18-23 ft-Ibs.
OIL FILL CAP/DIPSTlCK
To Start Engine
Be sure that engine has sufficient
oil.
CARBURETOR
COVER
The snowblower engine is equipped with a recoil startero The speed of this engine is controlled by the throttle controllever (Figure 10). Before starting engine, be
certain that you have read and followed ali instructions
on the preceding pages.
.
Cold Engine Start (Recoil Starter)
(See figure 10 on page 7).
OIL ORAIN PLUG
(Engine has not been run recently.)
1. Be sure auger drive clutch lever and traction drive
clutch lever are in the disengaged
position,
"RELEASED"
FIGURE 10
5. If engine fails to start after a reasonable number of
starting attempts rotate choke knob to "FULL" position and repeat instruction number 4.
When engine starts, rotate choke knob gradually to
"OFF" position.
2. Move throttle control (UP) to "FAST" position. Insert
key into ignition slot. Be sure it snaps into piace
(Figure 10). Do not turn key.
3. Aotate choke knob lo "FULL"
choke position.
NOTE: Do noi choke a warm engine. (See Warm
Engine Start.)
6. Run engine at or near top speed.
4. Push primer button(Figure 10) 2 times. NOTE: Do
not prime a warm engine. (See warm Engine Start.)
7. To stop engine, move throttle control lever to stop
position and remove key. Do not turn key.
5. PiJII starter handle (Figure 10) rapidly. NOTE: Do
not allow handle to snap back, but allow it to rewind
slowly while keeping a firm hold on the starter
handle.
IMPORTANT: To help prevent possible freeze-up of
rewind starter and engine controls, proceed as follows
after each snow removal job.
6. As engine warms up and begins to operate evenly,
rotate choke knob slowly to OFF position. If engine
falters, return to 1/2 choke until it runs smoothly.
then move to OFF choke position.NOTE: Allow the
1. With engine running, pull starter rope hard with a
continuous full arrn stroke three or four times. Pulling of starter rope will produce a loud clattering
sound. This is not harmful to the engine or starter.
7
2. With
engine not running
wipe ali snow and
moisture fram carburetor cover (Figure 10) in area
of contrai levers. Also move controllevers backward
and forward several times.
2. Move Throttle Control (UP) to "Fast" position. Insert
key into ignition slot. Be sure it snaps into piace.
(Figure 11). Do not turn key.
3. Rotate CHOKE knob to "OFF"
IMPORTANT: After each use of the snowblower, stop
the engine, remove the ignition key, remove ali accumulated snow tram the snowblower and wipe clean.
Store the snowblower in a protected area.
Never cover snowblower while engine and exhaust
area are stili warm.
(Figure 11).
4. Connect POWER CORO to SWITCHBOX.
11A)
(Figure
OIL FIL CAP/DIPSTICK
DO NOT LOSE IGNITION KEY. KEEP IT IN A
SAFE PLACE. ENGINE WILL NOT START
WITHOUT IGNITION KEY.
USE OF ELECTRIC ST ARTER
.........5TARTER
HANDLE
On models so equipped
A WARNING: THIS STARTER IS EQUIPPEO
..
WITH A THREE-WIRE POWER CORO ANO
PLUG ANO IS DESIGNEO TO OPERATE ON 120
VOL T AC HOUSEHOLO CURRENT. IT MUST BE
PROPERL Y GROUNOEO AT ALL TIMES TO AVOlO
THE POSSIBILlTY OF ELECTRIC SHOCK WHICH
MAY BE INJURIOUS TO THE OPERATOR. FOLLOW
ALL INSTRUCTIONS CARE FULL Y AS SET FORTH
BELOW. OETERMINE THAT YOUR HOUSE WIRING
IS A THREE·WIRE GROUNOEO SYSTEM. ASK A
LlCENSEO ElECTRICIAN IF YOU ARE NOl SURE.
IF YOUR HOUSE WIRING SYSTEM IS NOT A THREEWIRIi GROUNOED SYSTEM, DO NOT USE THIS
ElECTRIC ST ARTER UNOER ANY CONOITION. IF
YOUR SYSTEM IS GROUNOED ANO A THREE-HOlE
RECEPT AClE IS NOT AVAILABLE AT THE POINT
YOUR ST ARlER WllL NORMALL Y BE USEO, ONE
SHOULO BE INST AllEO
BY A LICENSEO ElECTRICIAN.
IGNITION
KEV
OIL DRAIN PLUG
THAOTTLE
LEVER
CONTROL
FIGURE 11
A WARNING: WHEN CONNECTING 120 VOlT
..
"POWER CORO", ALWAYS CONNECT CORO
TO "SWITCH BOX" ON ENGINE FIRSl, ANO THEN
PlUG
THE OTHER END INTO THREE-HOLE
GROUNDEO RECEPT ACLE.
ELECTRIC
A
WARNING:
WHEN
OISCONNECTING
..
"POWER CORO", AlWAYS
UNPLUG lHE
END IN THE THREE-HOLE GROUNOED RECEPT ACLE FIRST.
5T ARTER
FIGURE 11A
5. Plug other end of POWER CORO into a three hole,
GROUNDED 120V, AC receptacte. (See "warning"
at beginning of these instructions).
çold Engine Start (Electric Starter)
6. START ENGINE:
(See figures 11 and 11A on page 8)
(Engine has not been run recently.)
A. Push STARTER BUTTON (Figure 11A) to
engage starter motor and crank engine.
NOTE: DO NOT USE PRE-SlARTING
PRIMER
WHEN USING 120 VOL l ELECTRIC ST ARTER.
B. Move CHOKE on engine to "Full"
king engine.
1. Be sure auger drive clutch lever and traction drive
clutch lever are in the disengaged
position,
" RELEASEO".
8
while cran-
NOTE: THIS ELECTRIC ST ARTER IS THERMALLV PROTECTEO. IF OVERHEATED IT
WILL STOP AUTOMATICALL V, ANO CAN BE
REST ARTEO ONL V WHEN IT HAS COOLEO
TO A SAFE TEMPERATURE.
(A WAIT OF
ABOUT 5 TO 10 MINUTES IS REQUIREO:j
6. START ENGINE:
A. Push ST ARTER BUTTON (Figure 11A) to engage starter rnotor and crank engine.
B. Move CHOKE on engine to "Full"
ing engine.
NOTE: THIS ELECTRIC ST ARTER IS THERMALL V PROTECTEO. IF OVERHEATEO IT
WILL STOP AUTOMA TICALL Y, ANO CAN BE
REST ARTEO ONL V WHEN IT HAS COOLEO
TO A SAFE TEMPERATURE.
(A WAIT OF
ABOUT 5 TO 10 MINUTES IS REQUIREO.)
C. When engine starts, release ST ARTER BUTTON and move CHOKE gradually to "Off".
D. If engine falters, move CHOKE immediately
"Full" and then gradually to "Off".
to
E. Disconnect POWER CORO trom receptacle,
first, and then trom SWITCHBOX.
C. When engine starts, release STARTER BUTTON and move CHOKE gradually to "Off".
7. As engine warms up and begins to operate evenly,
rotate choke knob slowly to OFF position. It engine
talters, return to 1/2 choke until it runs smoothly,
then move to OFF choke position. NOTE: Allow the
engine to warm up tor a tew minutes as the engine
will not develop tull power until it reaches operating temperature.
D. If engine falters, move CHOKE immediately to
"Full" and then gradually to "Oft".
E. Disconnect POWER CORO trom receptacle,
first, and then from SWITCHBOX.
7. Run engine at or near top speed.
8. Run engine at or near top speed.
8. To stop engine, move throttle control lever to stop
position and remove key. Do not turn key.
9. To stop engine, move throttle control lever to stop
position and remove key. Do not turn key.
If, after tollowing the preceding instructions, your engine tails to start, have it checked by your nearby Authorized Sears Service Outlet.
It, after following the preceding instructions, your engine tails to start, have it checked by your nearby Authorized Sears Service Outlet.
DO NOT LOSE IGNITION KEY. KEEP IT IN A
SAFE PLACE. ENGINE WILL NOT START
WITHOUT IGNITION KEY.
Warm Engine Start (Electric Starter)
(Engine stili warm from recent running). Proceed with
the following instructions.
NOTE:
Warm engine may start without choking.
NOTE: "WARNING"
PERTAINING TO SAFE USE
OF 3-WIRE GROUNDED ELECTRICAL SYSTEM, ON
PAGE 8. ELECTRIC STARTER - 120 VOLT "AC"
ALSO APPLIES TO THESE INSTRUCTIONS. REVIEW
THIS "WARNING"
BEFORE PROCEEDING.
NOTE: DO NOT USE PRE-STARTING
PRIMER
WHEN USING 120 VOLT ELECTRIC STARTER.
1. Be sure auger drive clutch lever and traction drive
clutch lever are in the disengaged
position,
"RELEASED" .
2. Move Throttle Control (UP) to "Fast" position. Insert key into ignition slot. Be sure it snaps into piace.
(Figure 11) Do not turn key.
3. Rotate CHOKE knob to "OFF"
(Figure 11).
4. Connect POWER CORO to SWITCHBOX.
11A)
while crank-
(Figure
5. Plug other end of POWER CORO into a three hole,
GROUNDED 120V, AC receptacle. (See "warning"
at beginning of these instructions).
9
ìì
Snowblower Operation
6. Engage traction drive clutch lever (Ieft hand). As the
snowblower starts to move, maintain a firm hold on
the handles and guide the snowblower along the
cutting
path. Do not attempt
to push the
snowblower.
The most effective use of the snowblower will be established by experience, taking into consideration the
terrain, wind conditions and building location which will
determine the diraction of the discharge chute.
NOTE: Do not blow snow towards a building as hidden objects could be blown with sufficient force to
cause damage.
7. To stop forward motion, release traction drive clutch
lever (Ieft han d).
8. To stop auger, release auger drive clutch lever (right
hand).
1 . Start the engine as described in paragraph To Start
Engine.
ENGINE WILL NOT ST ART
UNLESS IGNITION KEY IS
INSERTED INTO IGNITION
SLOT IN CARBURETOR
COVER. DO NOT TURN
IGNITION KEY.
9. To move the snowblower backwards, move speed
select lever into first or second reverse and engage
traction drive clutch lever (Ieft hand). To stop,
release traction drive clutch lever.
A
IGNITION KEY
DANGER
A
Never run engine Indoors or in enclosed, poorly ventilated
areas. Engine exhausl contains CARBON MONOXIDE, an
ODORLESS and DEAOL Y GAS.
2. Adjust snow chute deflector.
3. Using crank, position the discharge
discharge snow with the wind.
chute
lo
Keep hands, leet, hair and loose clothing away trom any
moving parts on engine and snowblower.
4. Select proper speed for snow conditions as outlined
below and set speed select lever to desired position.
WARNING - Temperature of muffler and nearby
mayexceed
150°F. Avoid these areas.
NOTE: Always release traction drive clutch
before moving speed select lever.
DO NOT allo w children or young teenagers
be near snowblower while it is operating.
lever
areas
to operate or
Ground speed is determined by snow conditions. Select
Ihe speed you desire by moving the speed selector into
the appropriate coloured area on the control pane!.
Red
Amber
White
Green
-
Wel, Heavy, Slushy, Extra Deep
Moderate
Very Light
Transport Only
ADANGERA
Do not attempt to remove any item that may become
lodged in auger without taking the following precautions:
For additional operating instructions see "OPERATING
TIPS" page 18.
1. Release auger and drive clutch levers.
2. Move throttle lever lo STOP position.
3. Remove ignition key.
4. Disconnect spark plug wire.
5. Do not piace your hands in the auger or discharge
chute. Use a pry bar.
5. Engage auger drive clutch lever (right hand).
IMPORTANT: Be sure front of unit is clear of
bystanders or obstacles before operating.
AUGER DRIVE
CLUTCH LEVER
DISENGAGED
TRACTION DRIVE
CLUTCH LEVER
DISENGAGED
FIGURE 12
10