1
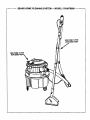
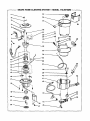
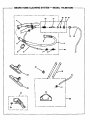
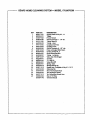
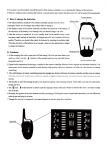
SEARS
OWNERS
MANUAL
HOME
CLEANING
SYSTEM
i
MODEL NO.
175.8670290
CAUTION:
Read Instructions
and Rules for
Safe Operation
Carefully
Kenmore
HOME CLEANING. SYSTEM
For Household
Use Only
Save this
Manual for
Future Reference
SEARS,
661654-146
ROEBUCK
(06SO)
Rev.
,
•
•
•
•
INTRODUCTION
ASSEMBLY
OPERATION
MAINTENANCE
REPAIR PARTS
AND CO., Dept. D/731 CR-W, Sears Tower,
10Ooo)
Chicago, IL 60684
_]NTED
IN U.S.A,
IMPORTANT SAFETY INSTRUCTIONS
--Readallinstructions
before using thiscleaner.
When using any electri_l appliance, basic precautions should always be followed, including the following:
WARNING
1.
2.
3.
-To
reduce
the risk of fire, electric
shock,
or injury:
Do not leave cleaner when plugged into electrical outlet. Unplug from outlet when not in use and before servicing.
WARNING" TO AVOID ELECTRIC SHOCK, DO NOT EXPOSE TO RAIN -- STORE INDOORS.
WARNING: DO NOT REMOVE GROUNDING PRONG FROM POWER CORD PLUG. Connect to a properfy
grounded outlet ONLY. See Grounding Instructions.
GROUNDING iNSTRUCTIONS:
outlet(sse
Thisvacuumcleanermustbegrounded.Ifit should
rnal[uncf_0n
or raryadaptershouldbeusedonlyuntilaproperlygrounded
figure A) can be installedby a qualifiedelectrician.The tab for
break down,groundingprovidesa path of lea,stresistance
for
electxical
currentton_:luce
theriskof electricshock.Thisvacuum gmundlngscrew(seefigureB)extendingfromthe adaptermustbe
outlet
cleaneris equipl:_lwitha cordhavingan equipment-groundingconnectedtoapermanentgroundsuchasa pmperiygrounded
boxcover.Whenever
t
headap_risin
use,it
mustbeheldin
place
conductorand groundingi_ug.The plug mustbe pluggedintoan
bya
metalscrew(see
Rgurea),
appropdare
outletthat ispmberlyinstalled
andgroundedinaccordancewi_ all localocdes andordinances.
ADAPTER
WARNING:improper
connectionoftheequiprrent<jmuntling
conductorcanresultin a riskofelecl_icshock.Checkwitha quaJified
electddanorservicepersonif youare in doubtas to whaler the
0utietispmperlygrounded.
DONOTmodifytheplugprovided
with
thevacuumcleaner-- ifitwillnotlittheoutlet,havea properou_et
installedbya qualifiedalectridan+
ThisVACUUm
cleanerisforu_=ona nominal120-v01tcircuit,
And
hasagroundedplug(seeIigureA).Atemporary
adapter
(seetigure
B) may be usedtoconnecthis plug to a 2-polereceptacle
(see
figure13)if a probedygroundedoutletisnotavailable,Thetempo4.
5,
6.
7.
8.
9.
10,
11.
12.
13.
14.
15.
16.
17.
18.
!9.
20.
21.
22.
I sca
GROUNDED
PLUG
GROUNOED TABFOR
2-POLE
OUTLET GROUNDING
SCREW
RECEPTACLE
Fiqure A
Figure B
D_S_NNE_T
P_WER C_RD FR_M ELECTR_AL _UTLET bef_re the recov_ry t_nk is emptied_ the s_uti_n tank
is refilled, or the cleaner is serviced in any way,
DO NOT store this cleaner in an area which may reach freezing temperatures. Should this occur, DO NOT operate
this cleaner until it has been at room temperature for at least two (2) hours.
DO NOT use any cleaning solution or chemicals other than those discussed in this manual.
For maximum efficiency, empty container frequently and keep inside of hose, wands, nozzle and container clean.
DO NOT overwet carpet or upholstery. If three or more cleaning strokes are required, let the carpet or upholstery
material dry and then repeat cleaning process.
D_n_ta___wchi_drent__peretec_eaner_n_rsh_uidtheyp_aywithc_eaneresat_y_C__seattenti_nisneceasarywhen
used around or near children.
Use this cleaner ONLY for its intended use as described in this manual. Use only the attachments recommended in
this manual.
Always turn cleaner OFF when connecting or disconnecting the Spraymate motorized nozzle.
Do not use with damaged cord or plug. If cleaner is not working properly, has been dropped, damaged, left outdoors,
or dropped into water, return it to a Sears Service Center.
Do not pull or carry by cord, nor use cord as a handle, nor close a door on cord, nor pull cord around sharp edges or
comers. Do not run cleaner over cord. Keep away from heated surfaces.
Do not unplug from electrical outlet by pulling on the cord. To unplug, grasp the plug, not the cord. and pull.
Do not handle plug or cleaner with wet hands.
Do not put any objects in ventilation openings. Do not use with any opening blocked; keep openings free of dust, lint,
hair, and anything that may reduce air flow.
Keep hair, loose clothing, fingers, and all parts of the body away from openings and moving parts.
NEVER vacuum materials such as hot coals, cigareffe butts, matches, etc.
When "dry" vacuuming do not us_ without filter in p_aca.
Turn off all controls before unphl_.;ing.
Use extra care when using on stairs.
Do not use to pick up flammable or combustible liquids such as gasoline or use in areas where such liquids may be
present_
-- SAV E.THESE iNSTRUCTIONS
--
TABLE OF CONTENTS
Safety Instructions .....................................................
page 2 Additional Uses I Optional Accea,.,_ories.................. page 8-g
Warranty ....................................................................
page 3
Trouble Shooting Chart ...........................................
page 10
introduction ................................................................
page 3
,_xploded Views and Parts Lists ........................ page 11-15
Assembly ...................................................................
page 4
Ordering Parts .........................................................
page 16
Operation................................................................
page 5-8
FULL ONE YEAR_WA IRANTY
When used for private household purposes, if within one year from the date of purchase, this vacuum cleaner fails due to a
' defect in matehaJ or workmanship, RETURN IT TO THE NEAREST SEARS SERVICE CENTER/DEPARTMENT
IN THE
UNITED STATES, and Sears wig repair it, free of charge.
If this vacuum cleaner is used for commercial or rental purposes, the above warranty coverage applies for only 90 days from
the date of purchase.
This warranty gives you specific legal rights, and you may also have other rights, which vary from state to state.
SEARS, ROEBUCK AND CO., D/731CR-W, SEARS TOWER, CHICAGO, IL 60684
•
_
::
i
H
INTRODUCTION
Your new Kenmore Home Cleaning System is a deluxe high performance cleaner, designed for today's cleaning rsq uirements.
With proper care and maintenance, it should provide you with years of service. It is important that you read this rl_nual to
fully under6-1andthe cleaner's capabilities as well as providing you with the essentials regarding maintenance and safety. A
complete list of operating parts and features is shown in figure 1 below,
ANGLED WAND
POWER SWITCH
RECOVERY TANK
POWER HEAD
WANDS
RECOVERYTANK
VACUUM HOSE
SOLUTION TANK
SOLUTION TUBING
FLOOR
NO._-_LE
_[g,I
ASSEMBLY
ASSEMBLY OF RECOVERY TANK
AND SOLUTION
POWER
EAD
TANK
See Figure 2
1. Place Recovery Tank into Solution Tank (align the
word "VACUUM" on Recovery Tank with =VACUUM"
on Solution Tank) and secure with Metal Latch.
2, Insert the plug onthe Short Cord from the Solution Tank
into the Recovery Tank Power Head.
ASSEMBLY OF HOSE, WANDS,
NOZZLE
AND SOLUTION
TUBING
PLUG
SHORT
CORDIN
HERE
RECOVERY
TANK
METAL
LATCH
SHORT
CORD
See Figure I
1. Assemble the two Straight Wands.
2. Assemblethe upper Straight Wand tothe Angled Wand
of the Hose.
3. Assemble the Floor Nozzle to the lower Straight Wand,
NOTE: Be sure locking button engages properly when
assembling straight wands, angled wand, and floor
nozzle.
4, Push the Solution Tube Quick-Disconne= Nut onto
Tdgger Valve. Twist clockwise to lock. See DETAIL ",4"
-Fig. 3.
5. Snap Solution Tubing into Retaining Clips on the
Angled Wand and Straight Wands. Connect other end
of Tubing to Carpet Tool,
6. Attach the Vacuum Hose to Recovery Tank inlet
(Vacuum Inlet).
7. Insert the Plastic Insert of the Solution Tubing into the
Coupling of the Solution Tank. See DETAIL "B"o Fig. 3.
NOTE: To remove the Plastic Insert depress the Tab
and gently pull on the Plastic Insert. Be careful to pull
on the Plastic Insert and not the Tubing as damage may
TANK
Fig. 2
RETAINING
CLIP
occur.
INLET
PLASTIC INSERT
VACUUM
HOSE
COUPLING
TAB
DETAIL "B"
Fig, 3
OPERATION
CARPET
PREPARATION
For best results prepare carpet for cleaning as follows:
1. Vacuum carpet 11oremove loose dirt before using Cleaner.
2. To remove stains and ground in dirt present in heavy traffic
areas of the carpet, spray or rub Sears Heavy Traffic ProTreatment (82833) into carpet before u_ing Cleaner. Follow
directions on the bottle.
FILLER
OPENING
FILLING CLEANER WITH WATER AND
CLEANING SOLUTION
See Figure 4
1, Open I'_1ofthe Filler Opening,
2. Add Seam AH In One Carpet Cleaner (82813) solution or
Sears Upholstery Cleaner (82843) solution to Solution Tank
(depending on type of cleaning to be performed). Follow
directions on label of bottle.
SOLUTION
TANK
i
Fig. 4
3. Pour clean, hot water (from tap) into Filler Opening in the
Solution Tank -- use two (2) gallons of water.
4. Close Filler Opening.
NOTE: This unit may become damaged if boiling water is used.
POWER
CORO
AND
SWITCH
SeeFigure5
1. Plug Power Cord into electrical outlet.
2. Turn Power Switch to "ON* position.
SWITCH
POWER CORD
Fig. 5
Continued-
OPERATION
TEST FOR SOLUTION
SPRAY
See FTgure 6
1. Hold Floor Nozzle above floor level.
2. Pull Solution Release Trigger on Angled Wand.
3. Observe Floor Nozzle to make sure oleaning solution
is being sprayed evenly. (see DETAIL _A")
SOLUTION
RELEASE
TRIGGER
NOTE: If solution is not being sprayed evenly, refer to
Trouble Shooting Chad.
FLOOR
sPRAYS OF
SOLUTION
CLEANING
THE CARPET
See F_gures 7 & 8
Solution Dispensing Stroke:
1, Sfad at a comer (recommended).
2. Place Roor Nozzle so Suction Inlets are flush with
carpet.
3. While exerting light pressure down on Floor Nozzle,
depress Solution Release trigger and slowly pull
Roor Nozzle towards you,
NOTE: Do not overwet. Ifthree or more cleaning strokes
are required, let dry and then repeat cleaning process.
Solution Recovery Stroke:
1. Release Solution Release Trigger.
2. Lift Floor Nozzle off carpet.
3, Return Floor Nozzle to point where you dispensed
cleaning solution and pull across carpet, recovering
dirty solution.
SUCTION
INLETS
Rg. 7
LIFT.
SET FORWARD,
PULL BACK ACROSS CARPET
|
I
I
Fig. 8
OPERATION
WHEN TO EMPTY RECOVERY
TANK
See Figure 9
During normal operation, your cleaner may stop recovering
solution from your carpet. When this occurs there are three
check points to alert you:
1. An increase in motor noise.
2. No solution visibly being recovered by the floor nozzle.
3. No air coming from the exhaust port of your cleaner.
EXHAUST
PORT
RECOVERY
TANK
W_en this occurs:
1, The Recovery Tank is full and the Float Valve in the
Recovery Tank has been activated. The Recovery Tank
should be emptied,
--
or
--
2. The Recovery Tank has foam in the Tank and the Float
Valve has been activated.
NOTE: If cleaner is accidently turned over while in operation,
the float may activate and shut off the suction. If this occurs,
set the cleaner upright. Turn Power Switch "OFF" and let
motor come to a complete stop. Then turn switch back on and
continue cleaning.
LOCK BUTTON
VACUUM
HOSE
SOLUTION
TUBING
TO EMPTY RECOVERY
Sea Figure
TANK
DETAIL "A"
10
1. Turn Power Switch "OFF" and Dis¢onnect Power Cord
from Electrical Outlet,
2. Disconnect Shod Cord located between Solution Tank and
Recovery Tank.
3. Disconnect Vacuum Hose by depressing the Lock Button
and remove.
4. Push Tab inward on Plastic Coupling and remove Plastic
Insert and Tubing. (See DETAIL "A")
5, Lift Latches on Power Head.
6. Lift power Head. by Handle, and remove from Recovery
Tank.
7. Rotate Metal Latch on the Solution Tank and lift Recovery
Tank fi'om the Solution Tank.
8. Empty Recovery Tank.
9. Reassemble cleaner and resume cleaning, NOTE: Power
Head is designed to go on in only one position_Make sure
the word "VACUUM" on the Power Head islined up dire_ly
over the Hose Inlet on Recovery Tank a_ shown in Fig, 10
or Power Head will not sea] to unit preperly.
POWER
HEAD
LE
RE
TANK
SHORT
CORD
LATCH
OPERATION
TO EMPTY THE SOLUTIONTANK
METHOD 1
See Figure 11
When (:leaning is completed, both the Recovery Tank and the
Solution Tank should be emptied prior to storage. Empty the
Recovery Tank as described earlier. There are three methods
of emptying the Solution Tank.
Method 1 :
1. Disconnect Pump Cord from Recovery Tank,
2. Remove Recovery Tank from Solution Tank and pour
solution out of the Filler Opening.
Method 2:
1. Place Floor No_le
in bath tub or container.
2. Depress Solution Release Trigger and spray until empty,
Method 3:
1. Remove Floor Nozzle and insed Wand into Solution Tank
METHOD 2
through the Filler Opening.
2. Vacuum solution out,
METHOD 3
Fi_. 11
:3. All solution is now in Recovery Tank. Empty Recovery
Tank as described eadier.
ADDITIONAL USES
DRY VACUUMING
See Figure 12
Your Cleaner COmes with a disposable paper dust bag to trap and collect dirt when used for dry pick up. it is very important
that the disposable paper dust bag remain clean to allow air to pass through it while trapping did. If the dust bag is over filled
or its pores become dogged from fins powders, no air can pass through. This greatly reduces the efficiency of your cleaner
and could Pause the dust bag to burst. To maintain your cleaner's peak efficiency, check the disposable paper dust bag often
and replace when clogged or approximately one half full.
TO INSTALL DUST BAG
1. TURN POWER SWITCH OFF AND DISCONNECT
POWER CORD FROM ELECTRICAL OUTLET.
2, Lift Latches and remove Power Head from Unit.
3. Grasp Cardboard Collar of Dust Bag and push Collar as
far as possible onto Bag Adapter Tube. NOTE: For
greater ease in assembly, slide bottom of Cardboard
Collar onto Adapter Tuba first, then pull top of Collar over
Adapter Tube.
4. Position Dust Bag around sides of tank to allow motor
assembly to fit back into unit.
5, Bend top flap of Cardboard Collar inward,
6. Replace Power Head on unit, aligning the word
"VACUUM" with Hose Inlet on Recovery Tank _s shown
in F_g. 10. NOTE: Be careful not to crush Dust Bag or to
deform flexible splash plate on Power Head when
assembling,
7, Unplug Short Power Cord from Recovery Tank Power
Head. (See FTgure 2, page 4)
CARDBOARD
COLLAR
DUST
BAG
BAG ADAPTER
TUBE
_g. 12
c;IUTIoN:
PAPER DUST BAG IS FOR DRY PICK UP
ONLY. DO NOT USE WHEN VACUUMING UP WATER OR
OTHER LIQUIDS!
ATTACHMENTS
UPHOLSTERY
NOZZLE
See Figure 13
The Carpet Cleaner Upholstery Nozzle is an attachment for
furniture upholstery cleaning, The upholstery nozzle may also
be used to clean auto upholstery or carpeting. In addition, the
nozzle may also be used to clean carpeted stairs and other
areas difficu# to clean with the normal floor nozzle.
FLOOR TOOLS
See Figure 14
The Bare Floor/Carpet Brush (1) may be used on floors
without aarpet for DRY cleaning with Paper Dust Beg
Installed.
The Squeegee Attachment (2) is useful for WET pick up.
CAUTION: DO NOT run the Pump Motor when using these
attachments, To prevent Pump Motor from operating, make
sure Pump Motor is in "OFF' position, or unplug the shod
Power Cord from the Solution Tank to the Recovery Tank.
• Fig. 14
OPTIONAL CLEANING ACCESSORIES
Optional cleaning accessories
A complete set of instructions
KENMORE
SPRAYMATE
may be purchased or ordered through your nearest Sears store.
comes with each attachment set.
A'I-rACHMENT
Modal No. ;_832S2
See Figure 15
Cleanmore Spmymate is an optional attachment for ,'_rpet
cleaning, The Cleanmore Spraymate has a motorized beater
brush which is especially good for difficult to clean areas of
heavy traffic.
Fig. 15
TROUBLE
SHOOTING
CHART
PROBLEM
POSSIBLE
SOLUTIONS*
1. Neither vacuum motor nor pump
motor runs.
1. Be sure power switch is in "ON" position_
2. Be sure power cord is plugged in securely.
3. Check wall electrical outlet (by plugging in a known
working electrical appliance).
2. Vacuum motor runs, but there is no
spray at the nozzle.
1. Be sure Electrical Cord from Power Head to Solution
Tank is securely plugged into receptacle on the Power
Head.
2. Check that Solution Tank is full.
3. Be sure Pump Switch is in the "HI" or "LO" position.
4. Nozzle Ports may be clogged. See illustration below to
unclog.
3. Spray from the floor nozzle comes
out of one side of the nozzle only.
1. Unclog the Nozzle Pod. See illustration below.
4. Motor runs but cleaner does not pick
up ,=',lutionfrom carpet (no exhaust
from top of cleaner).
1. Recovery Tank isfull of dirty water and must be emptied.
2/Check for clogged hose or nozzle. Clogs could result from
picking up material such as carpet strings, shoe laces,
etc.
i
.
,
.j,i
J,
5. Spray connections leak.
1. Disassemble nut at leaking connection. Be sure washer
is properly seated. Reassemble and tighten securely.
"If the "Possible Solutions" to "Problem,s"listedin the chart do not correctthe problem, take your cleaner to a Sears
Sen/ice Center for professional service, Repairs not listed in this chart require professional and specific
knowledge of this model cleaner and could result In safety hazards and pemonal injury' if not made by a
qualified Sea_ Service Technician.
TO UNCLOG
NOZZLE
.,,,
PORT
,, L ....
i
CAUTION: Do not let needle
or pin touch this surface.
See FTgure 16
1. Insert the point of a needle or pin into
Spray Port to unclog.
NOTE: Do not let the point of needle or pin
touch any part of the Spray Pad surface or
Spray Pad will not spray solution properly.
SPRAY PORT
NEEDLE OR
PIN
Fig. 16
SEARS HOME CLEANING SYSTEM -- MODEL 175.8670290
SEE PAGE 13 FOR
F.XPLODED NEW
SEE PAGE 12 FOR
EXPLODED
VIEW_
SEARS
HOME CLEANING
SYSTEM
--- MODEL 175,8670290
33
11
_2
13
19
20
21
44
'_
SEARS
HOME CLEANING
KEY
1
2
3
4
5
6
7
6
9
10
11
12
13
14
SYSTEM -- MODEL 175.8670290
PART NO,
642315-012
64,L125-OO7
642600-039
641768-004
641838-001
643741-002
643509-001
642149-004
641843-010
642367-006
644548-001
642367-004
643909-902
642367-004
DESCRIPTION
Switch Cap
Handle Plme Label
Handle Shroud w/Label
Motor Housing Screw
Switch Screws (2)
Female Pigtail
Switch
Wiring Nut (4)
Power Cord
Motor Seal
Motor Cover
Motor Seal
Carbon BmehAsm. (2)
Motor Seal
15
16
17
18
19
20
21
22
642406-016
641857-012
641866-039
640145-005
643584-000
642405-001
643579-002
642313-000
Motor Asm. Complete b--_._
_ _''_
Latch (2)
Cover Asm. w/#19, 20, 21, 22
Cover ScreWs (4)
Foam Rher
Valve Asm. w/_1,22
Valve ScreWs (2)
Sensor Guard
23
24
25
26
27
28
29
662252-001
642046-016
968702-007
641798-002
fl42627-001
642470-006
' 640218-006
30
31
32
33
34
36
36
37
38
39
40
41
42
43
44
45
46
47
48
46
60
51
706362-319
644773-008
642603-061
643565-016
643561-000
644802-001
642392-003
643562-003
643535-001
643438-002
843536-000
643566-015
643531-(_05
643533-002
886493-_04
643686-001
989829-c02
660081-002
840940-001
643431-010
643454-003
643583-000
Washer (2)
Coupling Body
Separator Plate w/#7, 9, 27
Upper Container w/Rller Door
Retaining Ring
Ground Lead Screw
Lead w/terminal
Tubing Asm. w/#31, 34, 39
Valve Seat Screws (2)
Valve Seat
Gasket
Lower Container
Pigtail
Lower Container Screws (3)
Strain Relief
Motor Screws (2)
Latch Screw
Latch
Spacer
Filler Door
Washers (3)
Foam Filter
52
53
54
55
56
67
58
643685-001
6,434,98-0c30
644089-o _,4
643171-G_3
66236%0ol
968702-007
20-5086
661664-146
Motor Screws (4)
Casters (3)
Pump Motor
"0" Ring
Splash Plate
Screws (2)
Paper Dust Bag
Owner's MasuaJ
Adapter
Dirt Container w/#23, 25
Baffle Screws (2)
Separator Plats Screw
Gasket R3t
Rivet
Wave Washer
SEARS
HOME CLEANING
SYSTEM -- MODEL 175.8670290
I
18
16
1,5 14
17
1
(
l..................
J
12
lO
J
21
F
24
I
I
12
I
I
I
I
i
L
----2O
13
SEARS
HOME CLEANING
KEY
1
2
3
4
5
6
7
8
9
10
11
12
13
14
15
16
17
18
19
20
21
22
23
,_4
25
PART NO.
662257-001
862262-001
644037_002
644848-006
643731-005
644038-003
644773-005
644773-007
643502-009
643570-09.3
661404*0O3
663324-001
644038-001
643572-007
662266-001
662266-002
662264-001
662263-001
643186_18
643571-013
644159-003
643076-009
642458-005
643737--013
663324-002
661654-146
SYSTEM---
MODEL t75.8670290
DESCRIPTION
Angled Wand w/Key # 2, 14
Trigger
Ferrule NUt (2)
Swivel Connector 1 - 1/4" dia_
Tubing Strap (2)
Tubing - Hose
Coupling Insert Nut
Coupling Insert
Swivel Connector 2 - 1/2 "dia.
Hose and Angled Wand Asm.
8' Hose w/Key #4, 9
Quick Disconnect Nut
Tubing - to Nozzle
Valve Arm. Kit w/trigger
•0" Ring
;O" Ring (2)
Valve Shut Off
Spring, Valve
Straight Wands (2)
Nozzle Asm. Complete w/Key # 3, 12,13
Retaining Clip
Barn RoorlCarpet Brash
Wet Squeegee Nozzle
Wet Upholstery Nozzle Asm.
Nut w/"O" Ring
Owner's Manual
-
Kenmore
SEARS
OWNERS
MANUAL
SERVICE
MODEL NO.
175.8670290
HOW TO ORDER
REPAIR PARTS
HOME CLEANING SYSTEM
_Now that you have purchased your Kenmore Home
Cleaning System, should a need ever exist for repair parts
or service, simply contact any Sears Service Center. Be
sure to provide all pertinent facts when you call or visit.
The model number of your Power Spray Cleaner will be
located on the Po_,er Head of the cleaner.
WHEN ORDERING
REPAIR PARTS,
THE FOLLOWING INFORMATION:
ALWAYS
GIVE
• PARTNUMBER
• PART DESCRIPTION
• MODEL NUMBER
175.8670290
• NAME OF ITEM
Kenmore
Home Cleaning System
All parts listed may be ordered from any Sears Service
Center.
If the parts you need are not stocked locally, your order
will be electronically transmitted to a Sears Repair Parts
Distribution Center for handling.
SEARS,
ROEBUCK
AND CO., Dept. D/731 CR-W, Sears Tower, Chicago,
IL 60684