1
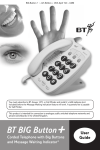
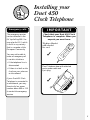
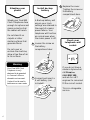
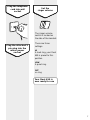
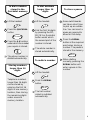
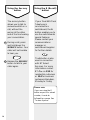
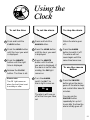
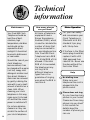
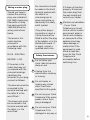
Duet 450 Clock Telephone
Userfriendly
Guide
At a glance
Lift flap
Contents
At a glance
2
Introduction
4
Installing your Duet 450
5
Clock Telephone
Using the Telephone
8
Using the clock
11
Technical information
12
Index
14
Hints and tips
boxes
In this user guide, we’ve
included helpful tips and
useful notes.
3
Introduction
Your Duet 450 Clock Telephone is
designed for ease of use and made to
the high standards set by BT
We thank you for
making the right
choice and expect
that your machine
will give you many
years of quality
service.
Please read
the instructions
carefully before
use, and keep this
User Guide for
future reference.
For your records
Date of purchase:
Place of purchase:
Serial number:
(on base of answering
machine)
Purchase price:
(for warranty purposes,
proof of purchase is
required, so please keep
your receipt)
4
Installing your
Duet 450
Clock Telephone
Emergency calls
I M P O R TA N T
The emergency services
can be contacted in the
UK by dialling 999. You
may also dial 112, which
is valid in any country
that is a member of the
European Community.
Check that your Duet 450 Clock
Telephone is complete. When you
unpack you must have:
You may not be able to
make an emergency call
in certain situations:
• If the telephone line is
disconnected.
• If there is a fault on the
line from your phone or
on the network.
If your Duet 450 Clock
Telephone is connected to
a switchboard, you may
have to dial an access
number before 999 or 112
to contact the emergency
services.
Telephone Handset
with attached
line cord.
✓
Clock Telephone base with attached
mains power cable and
3-pin plug
✓
5
3 Replace the cover.
Situating your
phone
Situate your Duet 450
Clock Telephone close
enough to a phone and
mains socket so that
the cables will reach.
Do not stand it on
carpets or other
similar surfaces that
generate fibres.
Do not cover or
enclose the machine;
allow a free flow of air
to its surfaces.
Install backup
battery
A Backup battery will
ensure your clock
settings are retained in
the event of a mains
power failure. Your
telephone will function
as normal even when
the mains power is off.
1 Loosen the screw on
the battery
compartment door.
Tighten the screw on
the battery
compartment door.
Check your
telephone wall
socket
Warning
Your Duet 450 Clock
Telephone is only
designed to be operated
in a normal office or
domestic environment.
It should not be used in
bathrooms or near water.
2 Connect and insert a
9 volt battery (not
included).
If you do not have a
modern style socket,
call Freefone
0800 800 150
and ask for a BT
engineer to come and
fit the correct socket.
This is a chargeable
service.
6
Plug the telephone
cord into wall
socket
Set the
ringer volume
OFF
LO
HI
The ringer volume
switch is located on
the side of the handset.
Plug the attached 3
pin plug into the
mains power
socket
There are three
settings:
HI
A loud ring; your Duet
450 is preset to this
position.
LOW
A quiet ring.
OFF
no ring
Your Duet 450 is
now ready for use
7
Using the
Telephone
4 Press the STORE button.
Storing and dialling
numbers
STORE
To store phone
numbers in the
Quickdial memory
5 Press the memory
Your Duet 450 Clock
Telephone has three
one-touch memory
buttons M1, M2 or M3.
You can store a further
10 telephone numbers
in the two-touch
Quickdial memory.
Each stored number
can be up to 16 digits
long.
To store a phone
number in the onetouch memory
2 Press the STORE button.
STORE
3 Dial the number you
want to store using the
keypad.
8
1 Lift the handset.
M1
Replace the handset.
The number is stored.
2 Press the STORE button.
STORE
To dial a number
stored in the onetouch memory
3 Dial the number you
want to store using the
keypad.
4 Press the STORE button.
1 Lift the handset.
STORE
5 Press the keypad
2 Press the one-touch
memory button
(M1, M2 or M3) you
want to dial.
M1
The number is dialled
automatically.
One touch memory label
Use the label by the M1, M2
and M3 button to keep a
record of the stored numbers.
button (0-9) under
which you want to
store the number.
JK
L
1 Lift the handset.
button (M1, M2 or M3)
under which you want
to store the number.
5
Replace the handset.
The number is stored.
To dial a number
stored in the
Quickdial memory
1 Lift the handset.
2 Press the QUICKDIAL
button.
QUICKDIAL
3 Press the 0 - 9 location
under which the number
you require is stored.
JK
L
5
The phone number is
dialled automatically.
Storing numbers
longer than 16
digits
Telephone numbers
longer than 16 digits
can be stored by
entering the first 16
digits in one memory
location, then storing
the remaining digits
under a second
memory location.
To dial numbers
longer than 16
digits
1 Lift the handset.
2 Dial the first 16 digits
by pressing the M1,
M2, M3 or Quickdial
button under which
the second part of the
number is stored.
The whole number is
stored automatically.
To store a pause
1 Some switchboards
can take a short time
to pick up an outside
line. You can insert a
pause as required to
allow for this delay.
2 Press the REDIAL
button at the required
point when storing a
number. The pause is
stored in the memory.
REDIAL
To redial a number
When dialling
normally, pressing the
REDIAL button will
enter a pause in the
number
1 Lift the handset.
2 Press the REDIAL
button.
REDIAL
The last number
called is redialled
automatically.
9
Using the Secrecy
button
Using the R (Recall)
button
The secrecy button
allows you to talk to
someone whilst on a
call, without the
person at the other
end of the line hearing
your conversation.
If your Duet 450 Clock
Telephone is
connected to a
switchboard, the R
button enables you to
use the switchboards
special features.
Please contact your
communications
manager or
switchboard supplier
for further details.
1 During a call, press
and hold down the
SECRECY button. Your
caller will not be able
to hear you.
SECRECY
2 Release the SECRECY
button to talk to your
caller again.
R
The R button is also
used in connection
with BT Select
Services. For more
information contact
BT Free on 152 for
residential customers
or 154 for business
customers 8am-6pm,
Monday to Friday.
Please note:
If you are using the R
button as part of a stored
number, it must be
followed by a pause. See
‘To store a pause’
10
Using the
Clock
To set the time
To set the alarm
1 Press and hold the
CLOCK button.
1 Press and hold the
ALARM button.
2 Press the HOUR button
2 Press the HOUR button
until the hour you want
is displayed.
until the hour you want
is displayed.
3 Press the MINUTE
button until the right
time is displayed.
4 Release the CLOCK
button. The time is set.
Please note:
The PM light comes on
when the clock time is set
to midday or after.
3 Press the MINUTE
button until the time
you want is displayed. If
the alarm is set for after
midday, the PM light
comes on.
4 Turn the ALARM
switch to ON. The
Alarm light comes on.
AL
The alarm will now go
off at the time you have
set.
To stop the alarm
When the alarm goes
off::
1 Press the ALARM
button to switch it off.
The alarm will not
sound again until the
same time tomorrow.
To use the snooze
button
1 Press the SNOOZE
button when the alarm
goes off. the alarm stops
and re-start after about 9
minutes.
You can use the
SNOOZE button
repeatedly for up to 2
hours after the time the
alarm initially goes off.
11
Technical
information
Maintenance
Your Duet 450 Clock
Telephone should be
kept free of dust,
moisture, high
temperature, vibration
and should not be
exposed to direct
sunlight. It should not
be used in bathrooms
or near water.
Should the case of your
clock telephone
become soiled, it can
be cleaned with a warm
(not hot) soapy mild
detergent solution and
then dried. Stubborn
stains can be removed
by gently rubbing the
area with a very small
amount of alcohol on a
clean cloth. When
cleaning your clock
telephone in this way,
make sure it is turned
off and that the mains
power is switched off.
Do not use abrasive
cleaners as they can
scratch the surface of
your clock telephone.
12
How many phones
can you have?
All items of telephone
equipment have a
Ringer Equivalence
Number (REN), which
is used to calculate the
number of items that
may be connected to
any one telephone line.
Your Duet 450 Clock
Telephone has a REN
of 1. A total REN of 4 is
allowed. If the total
REN of 4 is exceeded,
the telephones may
not ring. With
different telephone
types there is no
guarantee of ringing,
even when the REN is
less than 4.
Mains Operation
For your own safety
and convenience your
Clock Telephone is
fitted with a UK BSI
standard 3 pin plug
with 3 Amp fuse.
If the fuse in the fitted
mains plug should fail,
replace it with a BS
1362 approved fuse
rated at 3 A. Never use
the plug without the
fuse cover fitted.
Help
No dialling tone
Make sure your
telephone line cord is
plugged into the
phone socket
Phone does not ring
Do you have too many
phones in your home?
Please see ‘How many
phones can you have?’
in this section for
details about the
number of phones you
can use
Wiring a mains plug
Should you have to
replace the existing
plug, use a standard
(BS 1362) mains plug
fitted with a 3 Amp
fuse approved to BS
1362 and follow the
wiring instructions
below.
The wires in this
mains lead are
coloured in
accordance with the
following code:
BLUE - NEUTRAL
BROWN - LIVE
If the wires in the
mains lead may not
correspond with the
coloured markings
identifying the
terminals in your plug,
connect as follows:
The blue wire must be
connected to the
terminal marked with
the letter N or the
word ‘Black’.
The brown wire must
be connected to the
terminal marked with
the letter L or the
word ‘Red’.
No connection should
be made to the Earth
terminal marked with
the letter E or
coloured green or
green and yellow, or
marked by the safety
earth symbol.
If any other plug or
connection is used, a
3 Amp fuse must be
fitted to either the plug
of the adaptor or in the
distribution board. If
in doubt, contact a
qualified electrician.
Safety Precautions
1 Do not allow your
clock radio to become
damp or wet.
if it does not function
properly. Disconnect
the mains plug from
the wall socket and
consult your dealer.
6 Moisture condensation
- If your Clock
Telephone is moved
from a cold to a warm
enviroment, water in
the air will condense
on some parts of the
appliance and may
cause damage or
malfunction if the
equipment is used.
Allow at least two
hours for the Clock
Telephone to
acclimatise before
switching it on.
2 Unplug from the
mains before cleaning
or moving.
3 Do not loosen or
remove any screws
other than those
specified in this guide.
4 Do not use your Clock
Telephone if the mains
power cord or 3-pin
plug is damaged.
5 Do not use your Clock
Telephone if it is
damaged in any way or
13
Guarantee
If you own your
Duet 450 Clock
Telephone - under
BT’s guarantee.
BT guarantees the
product for one year
provided that:
The goods have only
been used for their
intended purpose, and
have not been
subjected to misuse,
or been wilfully or
accidentally damaged.
The goods have not
been tampered with or
repaired by anyone
other than BT, its staff
or agents. If a fault
does occur in this
product, and you
bought the unit
yourself, provided that
you return it to the
place of purchase and
produce your receipt,
it will either be
repaired or replaced
free of charge. The
terms and conditions
of this guarantee do
not affect your
statutory rights.
14
If you own your
Duet 450 Clock
Telephone - outside
guarantee.
If your Duet 450
needs repair after the
guarantee period
has ended, it must
be repaired so as to
remain compliant
with the approval
requirements for
connection to the
telephone network.
We recommend that
you call BT on
Freefone 0800 800
150, or visit your
nearest BT shop, and
you will be informed
of our recommended
repair agents.
Index
BT phone socket
7
Dialling numbers
stored in the
one-touch memory
8
Dialling numbers
stored in the
Quickdial memory
9
Emergency calls
5
Guarantee
14
Installing
5
Mains power
7
Recall
10
Secrecy
10
Redialling the last
number
9
Ringer volume
7
Storing numbers in
the one-touch memory 8
Storing numbers in
the Quickdial memory
8
Storing a pause in
the memory
9
Using the Clock
Set the Time
11
Set the Alarm
11
Snooze button
11
Stop the Alarm
11
Offices in Europe, North America,
Japan and Asia Pacific.
The Telecommunications services described in this publication
are subject to availability and may be modified from time to time.
Services and equipment are provided subject to British
Telecommunications plc’s respective standard conditions of contract.
Nothing in this publication forms any part of any contract.
Touchtone™ is a registered trade mark of
British Telecommunications plc in the UK.
© British Telecommunications plc 1998.
Registered Office: 81 Newgate Street, London EC1A 7AJ.
Registered in England No. 1800000.
Printed in Hong Kong. Duet 450 Issue No.1 (09/98).
Designed by The Art & Design Partnership Limited.
CE compliant to 89/336/EEC
(EMC Directive) & 73/23/EEC
(Low Voltage Directive)
APPROVED for connection to
telecommunication systems specified
in the instructions for use subject to
the conditions set out in them


![Converse 220 user guide [ROLL]](http://vs1.manualzilla.com/store/data/006893753_1-a5f5b41a1871906539e8cdcfce1420ae-150x150.png)