1
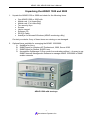
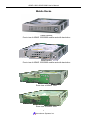
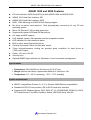
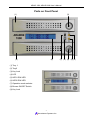
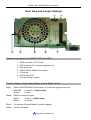
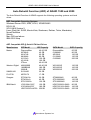
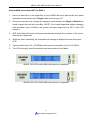
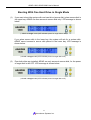
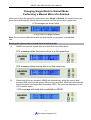
ARAID 1500, ARAID 2000 User’s Manual
ARAID® Models 1500 and 2000
User’s Manual – V1.0 Revision A
Table of Contents
Thank you for your purchase of ARAID 1500, 2000 ......................................................................................... 2
Unpacking the ARAID 1500 and 2000 ................................................................................................................ 3
Mobile Racks........................................................................................................................................................ 4
ARAID 1500 and 2000 Features.......................................................................................................................... 5
Specifications .................................................................................................................................................... 5
System requirements ........................................................................................................................................ 5
ARAID 1500 and 2000 Operations Overview..................................................................................................... 6
ARAID 1500 General <IMPORTANT> ........................................................................................................... 6
ARAID 1500 and ARAID 2000 General ............................................................................................................ 6
Parts on Front Panel............................................................................................................................................ 7
Rear View and Jumper Settings......................................................................................................................... 8
ARAID 1500 or 2000 Operational Tests ............................................................................................................. 9
RAID 1 - Auto Rebuild Function Test ............................................................................................................ 9
Auto Rebuild Function (ARF) of ARAID 1500 and 2000................................................................................. 10
ARF Compatible Operating Systems .............................................................................................................. 10
ARF Compatible IDE @ Serial ATA Hard Drives............................................................................................. 10
Auto Rebuild Instruction (ARF) for RAID 1 ......................................................................................................11
Booting With One Hard Drive in Single Mode ................................................................................................ 12
Changing Single Mode to Default Mode.......................................................................................................... 13
Performing a Manual Mirror-On-Demand........................................................................................................ 13
Cooling Fan and Temperature.......................................................................................................................... 15
Hard Drive Failure and Troubleshooting Guide.............................................................................................. 17
ARAID Questions & Answers ........................................................................................................................... 18
PC BIOS setup ................................................................................................................................................ 18
Power failure while disk rebuild is in progress ................................................................................................ 18
Preventing and recovering from an unexpected virus attack.......................................................................... 18
Replacing and Upgrading Hard Drives ........................................................................................................... 19
Appendix A......................................................................................................................................................... 20
_________________________________________________________________________
Accordance and ARAID are registered trade marks of Accordance Systems Inc.
All international copyrights reserved
1
Accordance Systems Inc.
ARAID 1500, ARAID 2000 User’s Manual
Thank you for your purchase of ARAID 1500, 2000
Important Notice
Please read the following before using the ARAID Disk Array
•
ARAID 1500 and 2000 complies with standard RAID 1 (disk mirroring) and RAID 0 (disk
striping) definitions.
•
We recommend that two identical (exact same brand and model) hard drives be used in all
RAID implementations for RAID system performance and maintenance.
•
Recommended UDMA 133/100/66 hard drives:
¾ Seagate
¾ Maxtor
¾ Western Digital
¾ Hitachi(IBM)
¾ Fujitsu
•
Use 40 GB or greater disk capacity.
•
Keep a spare hard drive or an inventory of spare hard drives used in your RAID system in
case of disk failure. If identical models are unavailable, stock drives with larger capacity
and higher drive speed from the same manufacturer. See Q&A for details on hard drive
replacement.
•
ARAID 1500/2000 features an Auto-Mirror function (default mode) for easy hard disk
duplication. The Auto-Mirror allows you to duplicate a hard disk without requiring FDISK
and FORMAT partitioning and formatting functions.
2
Accordance Systems Inc.
ARAID 1500, ARAID 2000 User’s Manual
Unpacking the ARAID 1500 and 2000
1.
Unpack the ARAID 1500 or 2000 and check for the following items:
•
•
•
•
•
•
•
•
•
One ARAID 1500 or 2000 with
Mobile rack 1 (in Upper Bay)
Mobile rack 2 (in Lower Bay)
Two security keys
Screws
User’s manual
Software CD
RS-232 Cable
AraidEye for Microsoft Windows (ARAID monitoring utility)
Contact your dealer if any of these items are missing or are damaged.
2.
Optional items available for managing the ARAID 1500/2000:
A. AraidEye for Linux
B. SNMP Agent for Windows XP Professional, 2000, Server 2003
C. SNMP Agent for Redhat, SUSE Linux
D. Accordance OpManager 5 (One month free evaluation edition) – An easy to use
SNMP Network Management Software to manage ARAID 1500/2000 in SNMP
enable networks
ARAID 1500 with two trays
3
Accordance Systems Inc.
ARAID 1500, ARAID 2000 User’s Manual
Mobile Racks
Plastic handler
Front view of ARAID 1500/2000 mobile rack with hard drive
Metal handler
Front view of ARAID 1500/2000 mobile rack with hard drive
Rear view of ARAID 1500
Rear view of ARAID 2000
4
Accordance Systems Inc.
ARAID 1500, ARAID 2000 User’s Manual
ARAID 1500 and 2000 Features
z
z
z
z
z
PC host Interface: SATA (Serial ATA) for both ARAID 1500 and ARAID 2000
ARAID 1500 Hard Disk Interface: IDE
ARAID 2000 Hard Disk Interface: SATA
RAID 1 Disk Mirroring and RAID 0 Disk Striping support
No driver or add-on card required. Real plug-and-play connectivity for any PC and
operating system
Mirror-On-Demand™ off-line disk duplication
Supports all popular SATA and IDE hard drives
Hot swap and ARF support
LCD displays system, disk operation and fan temperature status
LED indicators for disk read/write status
Built-in alarm alerts disk and fan failure
Practical front panel “Mirror-On-Demand” switch
70mm high-performance cooling fan provides good ventilation for hard drives at
7,200 rmp or higher
Power: +5V and +12V DC
Security keys
Optional SNMP Agent software for Windows or Linux for network management
z
z
z
z
z
z
z
z
z
z
z
Specifications
•
•
•
Dimensions: 236x146x86 mm (fits into one 2U 5.25” bay)
Weight (without hard drive): approximate Metal: 4 lb, Aluminum :3lb
Temperature: 0°C - 55°C (operating); -20°C - 70°C (standby)
System requirements
•
•
•
IBM PC compatibles (Pentium IV, III, II or Pentium MMX/Pentium compatibles)
Standard SATA PC host interface, IDE or SATA hard drive interface
Supported OS: Windows Server 2003, 2000, NT 4.0, XP/ME/98/95; DOS6.22; LINUX;
SCO OpenServer; Free BSD; NetWare; Solaris, IBM OS/2 Warp, Mac OS
5
Accordance Systems Inc.
ARAID 1500, ARAID 2000 User’s Manual
ARAID 1500 and 2000 Operations Overview
ARAID 1500 General <IMPORTANT>
IDE Drives:
Set both IDE hard disks in upper and lower trays to “Master” or “Single
Drive” mode allowing the ARAID to detect and recognize the hard disks in
the trays.
NOTE: “Cable Select” is the default jumper setting for most new IDE hard disks. You must change
the jumper to “Master” mode, or otherwise ARAID won’t detect it.
ARAID 1500 and ARAID 2000 General
Default Mode:
ARAID 1500/2000 default operation is UDMA. If it cannot work with the
host SATA on your PC in this mode, it will automatically switch to PIO
mode 4 or a lower drive speed.
Cooling:
ARAID 1500/2000 is equipped with a 70mm cooling fan providing
adequate ventilation for hard disk operation at 10,000 rpm. Please check
and remove any obstructions in the computer system that may be
blocking air to and from the ARAID disk array.
Drive Selection:
ARAID works with all drives. We recommend using two new matching
drives but two identical drives will work. ARAID is designed with a strict
EIDE command set and accurate to work on any operating system without
the need of a device driver or RAID I/O controller board.
ARAID 1500 and 2000 RAID 1 Users
Default mode: When ARAID is set at RAID 1 mode, its front panel operation mode switch
is set to Default position for ordinary disk mirroring operation.
One Drive Operation: ARAID can operate with only one drive in the upper bay. When the front
panel operation mode switch is set to Single, ARAID will only access to
Mobile Rack1 (Upper Bay) disk, and the mirror function is disabled.
Changing Modes from Single to Default: ARAID will automatically mirror contents from the
Upper tray to Lower tray when you switch from Single to Default mode
(Performing a manual Mirror-On-Demand).
ARAID 1500 and ARAID 2000 RAID 0 Users
Mode Selection: When ARAID works at RAID 0 mode, the front panel operation mode
switch must be always set to Default.
Additional Notes for RAID 0 Users
z
When ARAID is set at RAID 0 mode, it requires two disks to operate with. ARAID will not
work with one single disk installed at RAID 0 mode.
z
Always place the switch in the “Default” position for RAID 0 operation.
z
Never place the switch in the “Single” position or switch it from “Single” to “Default”, or you
will risk losing all RAID 0 data.
6
Accordance Systems Inc.
ARAID 1500, ARAID 2000 User’s Manual
Parts on Front Panel
(1)
(3)
(2)
(4)
(1) Tray 1
(2) Tray2
(3) Key Lock
(4) LCD
(5) HDD1 R/W LED
(6) HDD2 R/W LED
(7) Operation mode selector
(8) Buzzer ON/OFF Switch
(9) Key Lock
7
Accordance Systems Inc.
(7) (8) (9) (6) (5)
ARAID 1500, ARAID 2000 User’s Manual
Rear View and Jumper Settings
(1)
(3)
(4)
(5)
(6)
(2)
(7)
Parts on rear panel of an ARAID 1500 and 2000
1.
2.
3.
4.
5.
6.
7.
SATA connector (To PC Host)
IDE connector (For firmware upgrade only)
FAN connector
ARAID 1500 & 2000 power socket
70mm fan
RS232 connector
Function Setup Jumpers
Function Setup Jumper descriptions (Lower Right corner)
Pin 1:
Device MASTER/SLAVE mode setup. (For firmware upgrade use only)
MASTER
SLAVE
Pin 2:
(1 closed) – Default setup
(1 open)
RAID Level setup jumper.
RAID 1
RAID 0
(2 open) – Default setup
(2 closed)
Pin 3:
For optional Enforced Mode Firmware Upgrade
Pin 4:
Factory Reserved
8
Accordance Systems Inc.
ARAID 1500, ARAID 2000 User’s Manual
ARAID 1500 or 2000 Operational Tests
ARAID is designed with strict compliance to the SATA and EIDE (Parallel ATA) command set
and timings. ARAID is a self-contained RAID storage subsystem that connects to any
operating system and motherboard without requiring a device driver or I/O board. Please refer
to the BIOS Setup in the Q&A section for complete details on how to optimize ARAID for your
PC. You can also contact your Accordance dealer or contact Accordance at
www.accordancesystems.com or email [email protected] for technical support.
RAID 1 Basic Operation Test – Mirroring
1.
2.
3.
4.
5.
6.
7.
Prepare your PC or motherboard, two identical hard drives and operating system image.
Load the operating system to one S-ATA or IDE hard drive (source disk).
Attach the source disk (SATA or IDE) with the OS to the upper bay of the ARAID device.
Attach the ARAID device to the SATA port on the target PC.
Run ARAID as a single disk to the PC making sure that front panel operation mode switch
is set to Single.
Once the source disk operation is confirmed, then set the operation mode from Single to
Default and install a target disk into the lower tray. You can do this while the system is
powered since ARAID supports hot-swapping. ARAID will then automatically detect the
presence of the second disk and start disk mirroring functionality with Auto Rebuild.
You have passed the basic compatibility test are now executing RAID1 maintaining
concurrent data on both drives.
RAID 1 - Auto Rebuild Function Test
1.
2.
The ARAID Auto Rebuild Function feature provides automated disk copying of Source
disks to Target disks. Rebuilds can be done while the computer is in use or on off-line.
Refer to the Auto Rebuild Test (ARF) section for complete instructions and hardware
compatibility.
RAID 0 Basic Operation Test - Striping
1.
2.
Prepare your PC or motherboard, two identical hard drives and operating system image.
Set the front panel operation mode switch to Default.
3.
4.
Install two identical hard disks into the upper bay and lower bay.
ARAID RAID 0 will perform striping allowing the PC to read and write to the two drives as
one disk.
5. Disk capacity is doubled and disk read/write performance will be improved 35% or
greater.
9
Accordance Systems Inc.
ARAID 1500, ARAID 2000 User’s Manual
Auto Rebuild Function (ARF) of ARAID 1500 and 2000
The Auto Rebuild Function of ARAID supports the following operating systems and hard
drives.
ARF Compatible Operating Systems
Windows Server 2003, 2000, NT4.0, XP/ME/98/95
DOS 6.22
SCO UNIX System V
Linux (Red Hat, SUSE, Monta Vista, Slackware, Debian, Turbo, Mandrake,)
Novell NetWare
Solaris
Mac OS9 and above
IBM OS/2 Warp
ARF Compatible IDE @ Serial ATA Hard Drives
Manufacturer
IDE Model
IDE Capacity
SATA Model
Maxtor
DiamondMax
92799U6
96147H8
98196A8
6Y120L0
4G160J8
5T0xxx
40-60 GB
40 GB
60 GB
80 GB
120 GB
160 GB
40-60 GB
DiamondMax
6Y080M0
4R120L0
6Y120M0
6Y250M0
60 GB
80 GB
120 GB
120 GB
250 GB
Western Digital
400/800BB
1800BB/JB
2000JB
40-80 GB
180 GB
200 GB
WD1200JD
WD1600JD
WD2500JD
120 GB
160 GB
250 GB
SAMSUNG
SV2044D
20 GB
FUJITSU
MPE3170
17 GB
Seagate
ST320410A
ST34001xA
ST2130023A
20 GB
40 GB
120 GB
ST380026AS
ST3120026AS
ST3160026AS
80 GB
120 GB
160 GB
IBM/Hitachi
IC35120AVV207
IC35180AVV207
HDS722525VLAT80
120 GB
180 GB
250GB
HDS722580VLSA80
HDS722516VLSA80
HDS722525VLSA80
80 GB
160 GB
250 GB
10
Accordance Systems Inc.
SATA Capacity
ARAID 1500, ARAID 2000 User’s Manual
Auto Rebuild Instruction (ARF) for RAID 1
1.
Have one hard drive in the Upper Bay of your ARAID disk array and set the front panel
operational mode switch set to Single mode and boot your PC.
2.
Once the computer is up, change the operation mode switch from Single to Default and
install a target disk into the Lower Bay. (NOTE: If you install target disk without changing
disk operation mode to Default, the system will report target disk as OFF in the LCD
window.)
3.
ARF (Auto Rebuild Function) will start automatically and copy the contents of the source
disk onto the target disk.
4.
While the disk is rebuilding, the completion percentage is displayed on the front panel
LCD.
5.
Typical rebuild rate is 30 ~ 80 GB/hour with maximum transfers of up to 120 GB/Hr.
6.
The LCD will signify rebuild completion and show status of both disks.
ARAID 1500 LCD screen after auto rebuild is completed.
ARAID 2000 LCD screen after auto rebuild is completed.
11
Accordance Systems Inc.
ARAID 1500, ARAID 2000 User’s Manual
Booting With One Hard Drive in Single Mode
(1)
If you want to boot the system with one hard drive (source disk), place source disk in
the upper bay. ARAID can then access to source disk only. LCD message is shown
below.
◎ ARAID in Single mode (OFF indicates power for target disk is OFF)
If you place source disk in the lower bay, the system will ask for a system disk.
ARAID cannot access to source disk placed in the lower bay. LCD message is
shown below.
◎ARAID in Single mode (OFF indicates power for target disk is off)
(2)
Even both disks are installed, ARAID can only access to source disk, for the power
of target disk is still OFF. LCD message is shown below.
◎ARAID in Single mode (OFF indicates power for target disk is off)
12
Accordance Systems Inc.
ARAID 1500, ARAID 2000 User’s Manual
Changing Single Mode to Default Mode
Performing a Manual Mirror-On-Demand
When you change the operation mode switch from Single to Default, the target (lower bay)
drive will be automatically rebuilt with the contents from the source drive (upper bay).
LCD messages are shown below.
◎Change mode from Single to Default
Note: Do not remove either drive while the disk rebuild is in progress, to avoid data
loss.
Booting the system with one hard drive in default mode
(1)
ARAID can boot the system with one hard drive from either drive.
LCD message when the source drive is in the upper bay:
LCD message when source disk is on the lower bay:
(2)
When both drives are installed, ARAID will automatically detect the source disk
(primary HDD) and boot the system. When source disk fails, ARAID will automatically
boot the system from target disk (secondary HDD). The message displayed on the
LCD is shown below.
LCD message with both disks installed on ARAID
13
Accordance Systems Inc.
ARAID 1500, ARAID 2000 User’s Manual
LCD message with the source disk only at system boot:
LCD message with target disk is installed after system boot:
LCD message with target disk only at system boot:
LCD message after installing a new source disk when system has
booted with target disk:
LCD message and LED indication after disk rebuilding is completed:
Warning: Do not change mode from Default to Single mode while both drives are operating.
Disk power will be disconnected immediately and the real-time backup (mirroring) function will
be terminated. ARAID can then access only the source disk (upper bay). Unexpected data
loss or disk failure may occur.
14
Accordance Systems Inc.
ARAID 1500, ARAID 2000 User’s Manual
Cooling Fan and Temperature
Front Panel Messages
When the cooling fan of the ARAID unit stops or rotates very slowly, the LCD will show a
highlighted F as illustrated in the diagram shown below:
If the temperature is higher than the default setting (a preset number, typically 50°C or 122°F)
the LCD will show a highlighted T as illustrated in the diagram shown below:
RAID System Management
Monitoring via AraidEye
AraidEye allows users to see information about the hard disk, fan speed and temperature
status of your ARAID unit via an RS-232 connection in Microsoft Windows or Linux’
X-Windows.
AraidEye for Windows is bundled with the ARAID. AraidEye for Linux is an optional purchase.
15
Accordance Systems Inc.
ARAID 1500, ARAID 2000 User’s Manual
Network Management via SNMP
Accordance provides an SNMP Agent (Simple Network Management Protocol) for the ARAID
models 1000L/1010/1500/2000. It is compatible with Windows 2000 Professional and Server,
2003 Advanced Server, Windows XP Professional, and Red Hat/SUSE Linux. The agent and
user interface simplifies the management and monitoring of multiple ARAID unites in a mid to
large size network. Information provided includes disk health status, fan speed and
temperature. It is compatible with Accordance’s OpManager, HP’s OpenView, and IBM’s
NetView.
The Accordance SNMP Agent provides enterprise proprietary MIB and MIB II support as well
as ARAID event traps.
Accordance’s OpManager NMS
Accordance’s OpManager is an easy to learn, powerful Network Management System (NMS).
All Accordance ARAID MIB support and traps are recognized by OpManager and is
particularly useful for managing multiple ARAID devices.
A no-cost 30 day evaluation edition is available at www.accordancesystems.com or
www.accordance.com.tw.
16
Accordance Systems Inc.
ARAID 1500, ARAID 2000 User’s Manual
Hard Drive Failure and Troubleshooting Guide
1. LCD message when both disks are operating correctly.
2. LCD message when the source disk is OK and target disk fails.
ARAID will maintain read/write function on the source disk, but the RAID function is
terminated. Replace the failed hard drive to resume the disk mirroring function.
3. LED message when source disk fails and target disk is OK.
ARAID will maintain read/write function on target disk, but the RAID function is terminated.
Replace the failed drive to resume the disk mirroring function.
4. LED message when both disks failed.
No disk read/write function is available. Replace disks immediately and restore from your
latest backup to resume operation.
Note: Always replace new disks with an identical model or a model in same series with larger
capacity from the same manufacturer.
17
Accordance Systems Inc.
ARAID 1500, ARAID 2000 User’s Manual
ARAID Questions & Answers
PC BIOS setup
Q: What type of hard drive should be selected in the PC BIOS setup?
A: If you are using two identical hard drives (same manufacturer and model) in your ARAID,
select HDD TYPE of AUTO.
If you replace a failed hard drive with a new disk with the same brand, and the same model
series, but with a larger capacity, select HDD TYPE: AUTO, as well.
If the replacement drive is larger than the surviving drive, it is imperative that you place the
smaller (surviving) drive in the upper bay, then boot the computer. When the operating system
is booted, insert the new larger capacity disk in lower bay and launch auto rebuild.
Power failure while disk rebuild is in progress
Q: What should I do if the power fails while auto-rebuild is in progress?
A: Just turn on the PC again, the disk rebuild will restart and continue, regardless of whether
you are rebuilding from primary to secondary (upper bay to lower bay) or rebuilding from
secondary. To primary (lower bay to upper bay).
The PC will boot from the source disk, whether it is primary or secondary, then it will
automatically resume the disk rebuild sequence without further user intervention.
Preventing and recovering from an unexpected virus attack
Q: How can I prevent or recover from a virus attack by utilizing Mirror-On-Demand function
provided by ARAID? (for RAID 1 users only).
A: Prevention is the most important factor in preventing a virus attack. Accordance
recommends the use of commercial grade anti-virus software and a hardware firewall.
Remember to check with the AV and firewall manufacturer’s website frequently for the latest
updates to their products.
If you find that you are infected, run the AV software first to clean or quarantine the virus.
Here are some other recommendations you can optionally use.
Method 1: Generate a grandfather/father/son, multi-generation backup Use the ARAID
on-the-fly disk rebuild and disk hot swap function to duplicate a clone
periodically as you require. Keep the archive of your generated backup disks
in safe place. If both disks in an ARAID array are affected by a virus, remove
them and replace with the latest unaffected archive disk and rebuild a clean
disk array in just minutes.
Method 2: Use Accordance the mirror-on-demand function on the front panel operation
mode switch to initiate a disk duplication whenever you need. While the
system is clean and virus-free, make sure to generate clone disks and keep
them in safe place.
18
Accordance Systems Inc.
ARAID 1500, ARAID 2000 User’s Manual
Replacing and Upgrading Hard Drives
Q: What should I do if I need to replace a defective hard drive?
A:
1. To minimize the risk of losing mission critical data, make it a practice to keep a spare
hard drive of the same make and model for the next two years. Always restock your
spare inventory with new hard drive(s) of the same model whenever a defective hard
drive is replaced. These drives can be easily added to the ARAID disk array and rebuilt
by running the Auto Rebuild facility.
2. If your replacement drives are the same manufacturer as the original drives but are a
larger capacity, place the surviving drive in the upper bay where it will be designated as
the source drive. Boot the PC from the upper bay source drive. When the operating
system is ready to serve, insert the replacement drive into lower bay. The disk auto
rebuild sequence will now start. If it fails to start, switch the front panel operation mode
switch from “Single” to “Default” The BIOS HDD type can set to Auto in this case.
For normal operation, always put the smaller capacity drive in upper bay and larger
capacity drive in lower bay. Never place the larger capacity drive in the upper bay.
Tip: Label each tray with the disk capacity, brand, and model for future reference.
3. The BIOS of some older computers may only be able to access hard drives of 8GB or
less. In these instances, you must set the HDD TYPE in the BIOS to USER mode and
then key in the Head/Cylinder/Sector data which is printed on the drive label or
available from the manufacturer’s website.
4. CASE STUDY:
z
Company ABC uses two Western Digital WD800BBRTL (80GB) hard drives on one
ARAID disk array.
z Company ABC should keep an inventory of spare WD800BBRTL hard drives.
z Company ABC experiences a disk crash and has no more WD800BBRTL to replace.
Instead a new WD1200BBRTL (120GB) is available for replacement. For daily
operation, the smaller drive, the WD800BBRTL, needs to be put in Upper Bay and the
larger drive, the WD1200BBRTL, must be put in the Lower Bay as a mirrored couple.
In this scenario the mirror couple of WD80GB + WD120GB, its effective capacity is 80GB.
RAID 1 disk array capacity is always defined by the capacity of the smaller drive.
z For Windows User ONLY:
If at some later point the WD800BBRTL malfunctions and the WD1200BBRTL is
the surviving drive, you can enlarge the WD1200BBRTL’s partition size from 80GB to
120GB by using a third party’s program, such as Symantec's Ghost. Then mirror it to
another WD1200BBRTL and realize a 120GB disk capacity.
19
Accordance Systems Inc.
ARAID 1500, ARAID 2000 User’s Manual
Appendix A
Product Discrepancy Report
ARAID Series
No. yymmdd:
Company Name:
Date: yy/mm/dd:
Your name:
Accordance Product Name & Model
Firmware Revision
Manufactured Date or Purchase Date
Equipment & Environment
PC or Motherboard Brand & Model (**)
BIOS (**) Phoenix or Award or AMI
Chipset (**)
HDD 1(**) Brand/Model/Series number
HDD 2(**) Brand/Model/Series number
IDE operation Mode (*)
CPU
RAM
Version of Windows, Linux, other
Benchmark / Application if available
(**) Mandatory
(*) Optional, but it helps to identify problem.
Test Procedure & Error Messages
1
2
3
…
Symptom
1
2
3
…
20
Accordance Systems Inc.