1
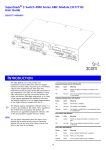
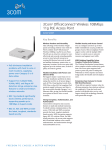
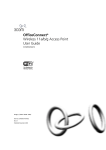
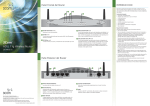
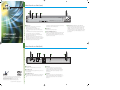
11abg AccessPoint Poster.qxd
17/11/03
11:00 am
Page 1
About Your Access Point (front)
Installation Guide
1
2
3
4
WLAN
Alert
Power
3CRWE454A72
LAN Status
11g 11a
OfficeConnect Wireless 11a / b / g Access Point
1 Alert LED orange
Off – The Access Point is operating normally.
Indicates that the Access Point is powered on.
– the Access Point has just been started up and is running a self-test
routine
3 Wireless LAN (WLAN) Status LED green
– the administrator has invoked the Reset to Factory Defaults command
OfficeConnect
Wireless 11a/b/g Access Point
(3CRWE454A72)
If the LED is on, the link between the port and the next piece of network
equipment is OK. If the LED is flashing, the link is OK and data is being
transmitted or received. If the LED is off, nothing is connected, or the
connected device is switched off, or there is a problem with the connection
(refer to the User Guide). The port will automatically adjust to the correct
speed and duplex.
2 Power LED green
Flashing quickly – Indicates one of the following conditions:
®
4 LAN Status LED green (100Mbps link) / yellow (10Mbps link)
Continuously on – A fault has been detected with your Access Point during
the start-up process. Refer to the main User Guide.
Indicates a number of different conditions, as described below.
If the LEDs are on it indicates that wireless networking is enabled. If the LED
is flashing, the link is OK and data is being transmitted or received. If the
LED is off, the Wireless LAN has been disabled in the Access Point, or there
is a problem (refer to the User Guide).
– the system software is in the process of being upgraded
In each of these cases, wait until the Access Point has completed the
current operation and the alert LED is Off.
Flashing slowly – The Access Point has completed the Reset to Factory
Defaults process, and is waiting for you to reset the unit. To do this, release
the reset button and allow the unit to restart. The Access Point will then
enter the start-up sequence and resume normal operation.
About Your Access Point (back)
6
7
5
8
9
OK
Ethernet
5 Wireless Antennae
The antennae on the product should be placed in a ‘V’ position.
6 Power Adapter socket
Only use the power adapter that is supplied with this Access Point. Do not
use any other adapter.
7 Power Adapter OK LED green
3Com Corporation, Corporate Headquarters, 350 Campus Drive, Marlborough, MA 01752-3064
Copyright © 2003 3Com Corporation. All rights reserved. 3Com, the 3Com logo, and OfficeConnect
are registered trademarks of 3Com Corporation.
Microsoft, MS-DOS and Windows are registered trademarks of Micorsoft Corporation.
All other company and product names may be trademarks of their respective companies.
Part number: DIA0045-4AAA01 Published: December 2003
Indicates that the power adapter is supplying power to the Gateway. If the
LED is off, there may be a problem with the power adapter or adapter
cable.
RESET
8 Ethernet port
Using suitable RJ45 cable, you can connect your Access Point to a
computer, or to any other piece of equipment that has an Ethernet
connection (for example, a hub or a switch). This port has an automatic
MDI/MDIX feature, which means either straight-through or a crossover
cable can be used.
9 Reset Button
If you want to reset your Access Point to factory default settings, and
cannot access the web management interface (for example, due to a lost
password), then you may use this button. Refer to the User Guide for
further details.
5
11abg AccessPoint Poster.qxd
17/11/03
11:00 am
Page 2
step
Introduction
This Guide takes you through the basic steps necessary to install and configure
your OfficeConnect Wireless 11a/b/g Access Point, and establish a connection
from your wireless LAN to your wired LAN. Throughout this guide the
OfficeConnect Wireless 11a/b/g Access Point is simply referred to as the Access
Point.
Note: 3Com recommends that the Access Point is configured from a wired
Ethernet computer during the initial set-up.
1
Positioning and Installing your
Access Point
Safety Information
WARNING: Please read the ‘Important Safety Information’ section in the
Support and Safety Information sheet before you start.
VORSICHT: Bitte lesen Sie den Abschnitt ‘Wichtige Sicherheitsinformationen’
sorgfältig durch, bevor Sie das Gerät einschalten.
When positioning your Access Point, ensure:
• One OfficeConnect Wireless 11a/b/g Access Point
• The unit is centrally located to the wireless computers that will connect to
the Access Point. A suitable location might be on top of a high shelf or
similar furniture to optimise wireless connections to computers in both
horizontal and vertical directions, allowing coverage throughout.
• Four rubber feet
• One Ethernet cable
• One CD-ROM containing the Access Point Discovery program and the User
Guide
• This Installation Guide
• One Support and Safety Information Sheet
• One Warranty Flyer
System Requirements
Before starting, you must ensure the following:
• You have a computer that has an Ethernet connection available and is
already correctly configured for communication with the network. Your
computer must have a Web browser installed.
Wall Mounting
Use the four self-adhesive rubber feet to prevent your Access Point from
moving around on your desk or when stacking with other flat top
OfficeConnect units. Only stick the feet to the marked areas at each corner of
the underside of your Access Point.
There are two slots on the underside of the OfficeConnect Access Point which
can be used for wall mounting.
When wall mounting your Access Point, ensure that it is within reach of
the power outlet.
AVERTISSEMENT: Veuillez lire attentivement la section "Consignes
importantes de sécurité" avant de mettre en route.
Your package contains:
• One power adapter for use with the Access Point
Using the Rubber Feet
• It is out of direct sunlight and away from sources of heat.
Connecting Your Access Point
1. Connect the power adapter to the Access Point and wait for the Alert LED
to stop flashing.
Computer
2. Ensure that your computer is switched on.
3. Connect your computer to the 10/100 LAN port on the Access Point.
Check that the LAN Port Status LED lights.
Power Adapter
Connecting to a Hub or Switch
Hub / Switch
• Cabling is away from power lines, fluorescent lighting fixtures, and sources
of electrical noise such as radios, transmitters and broadband amplifiers.
To connect your wireless network to your wired network you will need an
additional Hub or Switch, this should be connected to the Ethernet port.
3Com
Wireless 11a/b/g
Access Point
• In order to meet FCC radiation exposure regulations the Access Point should
be located in a position that maintains a minimum distance of 20 cm (8
inches) from any personnel (refer to the User Guide for details).
• Water or moisture cannot enter the case of the unit.
Wireless User
• Air flow around the unit and through the vents in the side of the case is not
restricted. We recommend you provide a minimum of 25 mm (1 in.)
clearance.
Wireless User
• You have a computer with a wireless 802.11a, 802.11b or 802.11g adapter
card installed.
If one or more of these conditions are not met, refer to the comprehensive
Access Point User Guide provided on the accompanying CD-ROM for further
guidance.
step
2
Using the OfficeConnect
Discovery Application
As part of the installation process, you need to launch the OfficeConnect
Discovery Application provided on the CD-ROM. This application configures your
Access Point to work within the network by allocating an IP address to it. The
Discovery Application must be run from a PC that is connected to the network. If
your network has a DHCP server in it, the Access Point will obtain an IP address
automatically. However, if the Access Point is unable to detect a DHCP server
then it will automatically choose a free IP address within the same range that the
Windows 98/Me/2000/XP AutoIP function uses (in the 169.254.x.x subnet). For
more information about IP addressing, see the IP Addressing section in the Access
Point User Guide.
step
3
step
Running the Setup Wizard
1. Login using the default password admin. The Wizard will attempt to launch
automatically, but if it fails, select the Wizard option from the main menu.
2. The Wizard will ask for SSID, channels for 11a and 11g, and IP address.
Most of these should be provided to you by your network administrator.
3. By default, 3Com recommends that you set the IP allocation mode for the
Access Point as "Static". You should make a note of the new address :
Access Point's LAN IP Address
The default wireless settings for the Access Point are:
Windows Installation
Service Area Name / SSID is 3Com
(95/98/2000/Me/NT)
Channel 11
1. Insert the Access Point CD-ROM in the CD-ROM drive on your computer. A
menu will appear; select Discovery. Discovery will find the Access Point even if
it is unconfigured or misconfigured.
2. When the Welcome screen is displayed click on Next and wait until the
application discovers the Access Points connected to your LAN.
3. Figure 3 shows an example Discovered Devices screen. Highlight
the Wireless Access Point by clicking on it, and press Next.
4. Click on Finish to launch a web browser and display the login page
for the Access Point.
_______._______._______._______
WEP Encryption is off
If you do not have a Wireless LAN you can use the Access Point’s default
settings. Ensure that your wireless clients have the default SSID, channel
and WEP as detailed above.
If you have an existing Wireless LAN, configure the Access Point to use the
same SSID and WEP/WPA settings to be compatible with your existing
wireless network.
Service Area Name/SSID
______________________________
Channel Number
______________________________
Connecting to the Wireless LAN
When the Wizard has completed, follow the steps in section 4 to connect your
wireless computer to the Access Point.
Refer to the User Guide if you cannot make contact with the Access Point.
4
Connecting to the Wireless LAN
1. Now you have configured the Access Point via the wired computer, you
can connect to the Access Point via a wireless computer.
To connect via wireless all the wireless clients must have the same SSID
and WEP settings as the Access Point. All wireless clients must use
Infrastructure mode.
2. If your computer has both a wired and wireless NIC installed, you must
ensure that only one NIC is used to communicate with the LAN. To use the
wireless NIC, unplug the Ethernet cable and reboot your computer.
3. Launch your web browser and attempt to browse the IP address of the
Access Point. If you can successfully access this site, then your wireless
computer and Access Point have been successfully configured.
4. 3Com strongly recommends that you enable WEP/WPA encryption to
improve the security of your wireless network and you change the SSID to
something other than the default. Consult the on line help or the User
Guide for details.
5. For more trouble shooting see
http://knowledgebase.3com.com/3CRWE454A72.asp