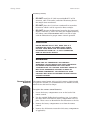
1
Owner’s Manual
Nº 320S
Preamplifier
Important Safety Instructions
Read all instructions and precautions carefully and completely before attempting to operate this component.
1.
NEVER clean or make/break connections to this component unless it and all associated
components are powered off and disconnected from electrical outlets.
2.
ALWAYS terminate this connection with a three-conductor AC power cord that includes an earth-ground
connection. To prevent shock hazard, all three connections must be used.
3.
AC power extension cords are NOT recommended for use with this product.
4.
NEVER use flammable or combustible chemicals to clean audio components.
5.
NEVER operate this component with any covers removed.
6.
NEVER wet the inside of this component with any liquids.
7.
NEVER pour or spill any liquids directly onto this component.
8.
NEVER block air flow through ventilation openings or heat sinks.
9.
NEVER bypass any fuse.
10. NEVER replace any fuse with a value or type that is not specified by the manufacturer.
11. NEVER attempt to repair this component. Refer all servicing to qualified service personnel.
12. NEVER expose this component to extremely high or low temperatures.
13. NEVER operate this component in an explosive atmosphere.
14. ALWAYS keep electrical components out of the reach of children.
15. ALWAYS unplug electrical components during lightning storms.
WARNING
TO REDUCE THE RISK OF FIRE OR ELECTRIC SHOCK, DO NOT EXPOSE THIS COMPONENT TO
RAIN OR MOISTURE.
This triangle, which appears on your component,
alerts you to the presence of uninsulated,
dangerous voltage inside the enclosure voltage that may be sufficient to
constitute a risk of shock.
CAUTION
RISK OF ELECTRIC SHOCK
DO NOT OPEN
This triangle, which appears on your component,
alerts you to important operating and
maintenance instructions in this
accompanying literature.
Notice
This component has been tested and found to comply with the limits for a Class B digital device, pursuant to
Part 15 of FCC rules. These limits are designed to provide reasonable protection against harmful interference
in residential installations. This component generates, uses, and radiates radio frequency energy and, if not
installed and used in accordance with the manufacturer’s instructions, may cause harmful interference to
radio or television reception, which can be determined by powering the component on and off. The user is
encouraged to try to correct the interference by one or more of the following measures:
•
Reorient or relocate the receiving antenna.
•
Increase the separation between the component and the receiver.
•
Connect the component to an electrical outlet on a circuit different from that to which the receiver is
connected.
•
Consult an authorized Mark Levinson dealer or an experienced radio/television technician for assistance.
CAUTION
•
DO NOT ATTEMPT TO REPAIR THIS PRODUCT. CONTACT AN AUTHORIZED MARK LEVINSON
DEALER OR MARK LEVINSON CUSTOMER SUPPORT AT 781-280-0300 OR www.marklevinson.
com FOR ASSISTANCE.
•
CHANGES OR MODIFICATIONS MADE TO THIS COMPONENT THAT ARE NOT EXPRESSLY
APPROVED BY MARK LEVINSON MIGHT DAMAGE THE COMPONENT AND VOID THE
MANUFACTURER’S WARRANTY AND/OR STANDARD REPAIR POLICIES.
3 Oak Park
Bedford, MA 01730-1413 USA
Telephone:
781-280-0300
Fax:
781-280-0490
www.marklevinson.com
Customer Support
Telephone:
781-280-0300
Sales Fax:
781-280-0495
Service Fax: 781-280-0499
Product Shipments
16 Progress Road
Billerica, MA 01821-5730 USA
Part No. 070-630493 | Rev 0 | 02/04
“Mark Levinson” and the Mark Levinson logo are registered
trademarks of Harman International Industries. U.S. patent
numbers and other worldwide patents issued and pending.
“Madrigal Audio Laboratories” and the Madrigal Audio
Laboratories logo are registered trademarks of Harman
International Industries. U.S. patent numbers and other
worldwide patents issued and pending.
©2004 Harman Specialty Group. All rights reserved.
This document should not be construed as a commitment on
the part of Harman Specialty Group. The information it
contains is subject to change without notice. Harman Specialty
Group assumes no responsibility for errors that may appear
within this document.
Introduction
Mark Levinson
Table of Contents
Documentation Conventions . . . . . . . . . . . . . . . . .iv
Section 1: Getting Started
Special Design Features
. . . . . . . . . . . . . . . . . . . . . . . .1-1
Highlights • Product Registration
Installation Considerations . . . . . . . . . . . . . . . . . . . . . .1-4
Unpacking • Placement • Remote Control Batteries
Power Requirements . . . . . . . . . . . . . . . . . . . . . . . . . . .1-7
Warm-Up & Break-In Period • Continuous Operation
Quick Start Guide . . . . . . . . . . . . . . . . . . . . . . . . . . . . .1-8
Section 2: Basic Operation
ii
Front Panel Overview . . . . . . . . . . . . . . . . . . . . . . . . . .2-1
Rear Panel Overview . . . . . . . . . . . . . . . . . . . . . . . . . . .2-5
Linking . . . . . . . . . . . . . . . . . . . . . . . . . . . . . . . . . . . .2-9
Making Link Connections • Constructing Link
Communication Cables • Creating a Slave Chain • Link
Controls
Remote Control Overview . . . . . . . . . . . . . . . . . . . . . .2-15
Operation Considerations • Command Overview
Section 3: Setup Menu
Navigating the Setup Menu . . . . . . . . . . . . . . . . . . . . . .3-1
setup button • enter button • select knob & ± buttons •
volume knob & ± buttons
Set Inputs Menu . . . . . . . . . . . . . . . . . . . . . . . . . . . . . .3-3
Set Inputs Menu Shortcut • Name • Gain • Offset •
Rec.Out
Teach IR Menu . . . . . . . . . . . . . . . . . . . . . . . . . . . . . . .3-8
Setup Menu Parameters . . . . . . . . . . . . . . . . . . . . . . .3-11
Mute • MaxVol • Trig. • Sw
Nº 320S
Introduction
Section 4: Controls & Modes
Standby . . . . . . . . . . . . . . . . . . . . . . . . . . . . . . . . . . . .4-1
SLEEP
Display Intensity . . . . . . . . . . . . . . . . . . . . . . . . . . . . . .4-2
Polarity . . . . . . . . . . . . . . . . . . . . . . . . . . . . . . . . . . . .4-3
Balance . . . . . . . . . . . . . . . . . . . . . . . . . . . . . . . . . . . .4-3
Mono Playback . . . . . . . . . . . . . . . . . . . . . . . . . . . . . . .4-5
MODE • L + R Balance Control Tip • L – R Phono
Alignment Tip
SSP (Surround Sound Processor) Mode . . . . . . . . . . . . . .4-8
Section 5: Troubleshooting & Maintenance
Troubleshooting . . . . . . . . . . . . . . . . . . . . . . . . . . . . . .5-1
No Power • No Remote Control Operation • No IR
Learning • No Main Output • No Record Output • Audible
Hum • “Missing” Input • No Link Controls • Erratic
Behavior • If All Else Fails…
Restoring Factory-Default Settings . . . . . . . . . . . . . . . . .5-4
Care & Maintenance . . . . . . . . . . . . . . . . . . . . . . . . . . .5-5
Appendix
Specifications . . . . . . . . . . . . . . . . . . . . . . . . . . . . . . . .A-1
Dimensions
Installation Worksheet . . . . . . . . . . . . . . . . . . . . . . . . .A-4
Index
iii
Introduction
Mark Levinson
Documentation
Conventions
This document contains general safety, installation, and operation
instructions for the Nº 320S Preamplifier. It is important to read
this document before attempting to use this product. Pay particular
attention to safety instructions.
Appears on the component to indicate the
presence of uninsulated, dangerous voltages
inside the enclosure – voltages that may be
sufficient to constitute a risk of shock.
Appears on the component to indicate
important operation and maintenance
instructions included in the accompanying
documentation.
Appears on the component to indicate
compliance of with the EMC (Electromagnetic
Compatibility) and LVD (Low-voltage
Directive) standards of the European
Community.
iv
WARNING
Calls attention to a procedure, practice,
condition, or the like that, if not correctly
performed or adhered to, could result in
personal injuries or death.
CAUTION
Calls attention to a procedure, practice,
condition, or the like that, if not correctly
performed or adhered to, could result in
damage or destruction to part or all of the
component.
Note
Calls attention to information that is
essential to highlight.
1
Getting Started
Special Design Features
Thank you for purchasing the Nº 320S Preamplifier. A direct
descendant of the Nº 32 Reference Preamplifier, the Nº 320S
features audio circuits, controls, architecture, and optional phono
modules based on the critically acclaimed Nº32. In fact, some
audio circuits, such as the proprietary discrete volume attenuators,
are identical to those found in the Nº 32.
With a single-chassis design, the Nº 320S achieves separation of audio
circuit, control circuit, and power supply sections similar to that of
the dual-chassis Nº 32. The internal structure of the Nº 320S separates
these sections, while a steel shield box protects the power supply
and other circuits against electrostatic and magnetic interference.
Filtered AC power is routed outside audio circuit sections, providing
audio circuits with the quiet, shielded environment essential for
superior sound.
Like most high-performance audio components, the Nº 320S relies
on clean, noise-free AC power to deliver maximum performance.
Unfortunately, most AC power does not meet these standards.
Common household appliances such as refrigerators, TVs, and
computers often contaminate AC power lines with line noise,
spikes, and other irregularities that make it difficult for audio
circuits to perform up to their full potential.
To compensate for this, the Nº 320S offers a series of highly effective
noise suppression and isolation techniques that begin filtering AC
power for noise as soon as it enters the chassis. Audio and control
circuit sections use independent power supplies, each with its own
low-noise toroidal transformer. The audio circuit power transformer
includes a Faraday shield between the AC power line and lowvoltage secondaries for improved isolation.
In addition, the Nº 320S uses two active voltage regulation stages
for audio circuit sections. A high-power stage absorbs line-voltage
and temperature variations, while a second high-performance
stage provides local, high-speed, low-noise power for audio
circuits.
(continued)
1-1
Getting Started
Mark Levinson
Special Design Features (continued)
An advanced dual-mono design allows the Nº 320S to achieve
exceptional channel separation. Both audio channels use
independent power supplies, communication circuits, and audio
circuits. In fact, each channel’s audio circuits are located in a
separate area of the chassis. This innovative approach isolates
each channel, allowing the Nº 320S to produce vividly detailed,
three-dimensional sonic images.
To maximize channel separation, all left-channel connectors are
located on one side of the rear panel and all right-channel
connectors are located on the other side of the rear panel. The
connector complement includes three balanced (female XLR) and
four single-ended (Mark Levinson-designed RCA) stereo input
connectors as well as separate stereo main and record output
connectors. Two Link communication ports make it possible to
link the Nº 320S to compatible Mark Levinson components, while
a trigger output connector, ir input connector, and RS-232 port
offer even more control possibilities.
1-2
For even greater isolation, the Nº 320S deactivates unused inputs
to prevent interference from other components. When an input is
deactivated, the Nº 320S disconnects the input signal and ground
connection, eliminating ground loop noise between the Nº 320S
and the associated component. As a result, input signals pass
through the Nº 320S with remarkable freedom from interference.
The Nº 320S offers seven configurable inputs, each of which is
assigned to one of its balanced (XLR) or single-ended (RCA) input
connectors. Single-ended input signals are converted to balanced
signals upon entering the chassis, and processed as balanced signals
thereafter. During this rigorous conversion process, meticulously
balanced circuits preserve all input signal information, passing it
to the associated power amplifier without the limitations of
asymmetrical single-ended designs.
A large front panel select knob provides convenient selection of
the desired input. When an input is selected, just press and hold
the front panel or remote control setup button to open the
corresponding Set Inputs menu, which can be used to change
input names, optimize input gain levels, offset input volume
levels, and assign record output connectors.
Two Mark Levinson-designed discrete volume attenuators control
master volume level with unparalleled accuracy and sonic neutrality.
Constructed from Arlon® 25N circuit boards with local power
supply regulation and bypass capacitors, the volume attenuators
generate optimal power and isolation for even the most sensitive
adjustments. Precision surface-mounted resistors accommodate
Nº 320S
Getting Started
adjustments in 1.0dB increments up to 23.0dB and in 0.1dB
increments above 23.0dB.
Unlike most stereo preamplifiers, the Nº 320S is designed to
integrate with multi-channel surround sound processors without
the complications associated with competing stereo and multichannel master volume controls. SSP (surround sound processor)
mode allows the Nº 320S to deactivate its master volume control
to send line-level input signals to the associated processor. With
no interference from the Nº 320S, the processor controls the
relative volume level of all channels, allowing it to maintain its
carefully calibrated levels.
Following the Mark Levinson tradition, the Nº 320S exceeds all
reasonable expectations for a stereo preamplifier. Its flexible
design – including seven configurable inputs, separate main and
record output connectors, and complete surround sound processor
integration – allow it to accommodate a wide range of demands.
Even more, a series of advanced techniques shield audio circuits,
resulting in an incomparable sound befitting sophisticated music
reproduction systems.
Highlights
1-3
•
7 configurable inputs
•
Maximum channel separation
•
Advanced dual-mono design
•
Multi-channel surround sound processor integration
•
3 balanced (female XLR) and 4 single-ended (Mark Levinsondesigned RCA) input connectors
•
Separate main and record output connectors
•
Independent power supplies, communication circuits, and
audio circuits for each channel
•
Effective noise suppression and isolation techniques
•
AC power filtering
•
2 active voltage regulation stages for audio circuit sections
•
Independent power supplies for audio circuit and control circuit
sections, each with its own low-noise toroidal transformer
•
Faraday shield between AC power line and low-voltage
secondaries
•
2 proprietary discrete volume attenuators
•
Deactivation of unused inputs to eliminate ground-loop noise
(continued)
Getting Started
Mark Levinson
Highlights (continued)
Product Registration
1-4
•
Balanced conversion for single-ended input signals
•
Mono or stereo playback
•
Selectable output signal polarity
•
Balance control
•
Intuitive Set Inputs menu
•
Sleep timer (standby)
•
Large front panel display
•
Selectable display intensity
•
2 Mark Levinson Link communication ports
•
Configurable trigger output connector (12 or 5V)
•
ir input connector
•
RS-232 port
•
Optional phono modules
Please register the Nº 320S within 15 days of purchase. To do so,
register online at www.marklevinson.com or complete and return
the included product registration card. Product registration serves
no warranty purposes. Retain the original, dated sales receipt as
proof of warranty coverage.
Installation Considerations
The Nº 320S requires special care during installation to ensure
optimal performance. Pay particular attention to the bulleted
items that appear in this section and to other precautions that
appear throughout this user guide.
Unpacking
•
DO save all packing materials for possible future shipping
needs.
•
DO inspect the Nº 320S for signs of damage during shipment.
If damage is discovered, contact an authorized Mark Levinson
dealer for assistance making appropriate claims.
•
DO locate and remove the accessory box from the carton.
Make sure it contains all of the items listed in the table at the
top of the next page. If not, contact an authorized Mark
Levinson dealer.
Nº 320S
Getting Started
Item
Quantity
Detachable AC power cord
1
Link communication cable
1
1/8-inch hex key
1
Phillips-head screwdriver (size 1)
1
Nº 320S remote control
*
White gloves (pair)**
1
Warranty & Product Registration Card
1
*
1
The remote control comes with two AAA batteries, which
should be replaced as needed.
** The white gloves are provided to assist with the initial unpacking
and installation of the Nº 320S.
Placement
•
DO install the Nº 320S on a solid, flat, level surface such as a
shelf or table.
•
DO install the Nº 320S close to associated components to
keep interconnect cabling as short as possible.
1-5
Note
In some cases, it is better to use longer interconnect cabling
between the preamplifier and the power amplifier to allow
for shorter loudspeaker wires.
•
DO select a dry, well-ventilated location out of direct sunlight.
•
DO allow at least a 4-inch clearance above the Nº 320S for
proper heat dissipation. It is strongly recommended to install
the Nº 320S on its own shelf for proper ventilation.
•
DO refer to Dimensions (page A-3) for assistance with custom
installations.
•
DO NOT place the Nº 320S on a thick rug or carpet or cover
the Nº 320S with a cloth, as this might prevent proper cooling.
•
DO NOT expose the Nº 320S to high temperatures, humidity,
steam, smoke, dampness, or excessive dust. Avoid installing
the Nº 320S near radiators and other heat-producing appliances.
(continued)
Getting Started
Mark Levinson
Placement (continued)
•
DO NOT install the Nº 320S near unshielded TV or FM
antennas, cable TV decoders, and other RF-emitting devices
that might cause interference.
•
DO NOT place the Nº 320S on a windowsill or in another
location in which it will be exposed to direct sunlight.
•
DO NOT obstruct the IR receiver located in the front panel
display. When the Nº 320S is not using the ir input connector,
the remote control IR transmitter must be in line-of-sight
with the IR receiver for proper remote control operation.
CAUTION
BEFORE MOVING THE Nº 320S, MAKE SURE IT IS
POWERED OFF WITH THE FRONT PANEL POWER
BUTTON. THEN, MAKE SURE THE POWER CORD IS
DISCONNECTED FROM THE ~ac mains CONNECTOR
AND THE ELECTRICAL OUTLET.
WARNING
1-6
MAKE SURE ALL COMPONENTS ARE PROPERLY
GROUNDED. DO NOT DEFEAT THE SAFETY PURPOSE OF
POLARIZED OR GROUNDING-TYPE PLUGS WITH
“GROUND-LIFTER” OR “CHEATER” ADAPTORS. DOING SO
MAY CAUSE DANGEROUS VOLTAGES TO BUILD UP
BETWEEN COMPONENTS. THE PRESENCE OF THESE
VOLTAGES MAY RESULT IN PERSONAL INJURIES AND/OR
PRODUCT DAMAGE.
Remote Control
Batteries
The remote control comes with two AAA batteries, which should
be replaced as needed. It is recommended to use Alkaline batteries,
which do not leak and last longer.
To replace the remote control batteries:
Screws
1. Locate the battery compartment cover on the back of the
remote control.
2. Use the supplied Phillips-head screwdriver (size 1) to remove
the three screws that hold the battery compartment cover in
place. These screws are identified in the illustration to the left.
3. Remove the battery compartment cover from the remote
control.
4. Remove the old batteries inserted in the battery compartment
(if applicable).
Nº 320S
Getting Started
5. Insert two AAA batteries as shown in the illustration to the
left. Make sure the batteries are correctly inserted observing the
proper polarity.
6. Align the battery compartment cover with the guide on the
back of the remote control.
7. Replace the three screws that were removed in step 2.
8. Properly dispose of the old batteries (if applicable).
Power Requirements
The Nº 320S can be powered with a standard 15amp AC power
line. If other components are also connected to the AC power
line, the combined power requirements of all components should
be considered.
When shipped, the Nº 320S is configured for 100, 120, 220, or
230VAC power operation at 50 or 60Hz. In compliance with CE
regulations, the Nº 320S is configured for 230VAC power operation
at 50Hz in European Union countries. Before operating the Nº 320S,
make sure the ~ac mains connector label indicates the correct
operating voltage for the current location.
CAUTION
Warm-Up & Break-In
Period
•
DO NOT ATTEMPT TO ADJUST THE OPERATING
VOLTAGE. CONSULT AN AUTHORIZED MARK LEVINSON
DEALER IF THE OPERATING VOLTAGE IS INCORRECT
OR IF THE OPERATING VOLTAGE MUST BE CHANGED
FOR RELOCATION PURPOSES.
•
BE ADVISED THAT DIFFERENT OPERATING VOLTAGES
MAY REQUIRE THE USE OF DIFFERENT POWER CORDS
AND/OR ATTACHMENT PLUGS. CONTACT AN
AUTHORIZED MARK LEVINSON DEALER FOR
ADDITIONAL ASSISTANCE.
Although the Nº 320S delivers superior performance from the first
time it is powered on, this performance will continue to improve
as the Nº 320S reaches its normal operating temperature and
various components “break in.” The greatest performance
improvements will occur within the first 25 to 50 hours of use.
Sound quality will continue to improve for about 300 hours.
(continued)
1-7
Getting Started
Mark Levinson
Warm-Up & Break-In Period (continued)
After this initial period, performance will remain consistent unless
power is disconnected from the ~ac mains connector. Power is
disconnected from the ~ac mains connector when the Nº 320S is
powered off with the front panel power button; the power cord is
disconnected from the ~ac mains connector or the electrical outlet;
or an extended power failure or power outage occurs. Power is not
disconnected from the ~ac mains connector when the Nº 320S is
in standby.
When power returns, the Nº 320S will require a brief warm-up
and break-in period (not the full 300 hours). It is recommended to
allow the Nº 320S and other audio components to stabilize for
about 2 minutes.
Note
1-8
Continuous Operation
•
When powered on with the front panel power button,
the Nº 320S automatically enters standby after completing
the initialization sequence.
•
The main output connectors are muted while the Nº
320S performs the initialization sequence.
The Nº 320S should be unplugged during lightning storms and
extended periods of non-use. Otherwise, it is designed for
continuous operation. For best performance, make sure power is
connected to the ~ac mains connector at all times. During
normal operation, do not use the power button to power off the
Nº 320S. Instead, use the front panel or remote control standby
button to place the Nº 320S into standby, which allows the Nº
320S to remain warmed-up to deliver optimal performance at all
times.
Quick Start Guide
These instructions are intended to accommodate immediate use of
the Nº 320S. However, it is important to read this owner’s manual
before attempting more extensive use. This owner’s manual contains
information about features that enhance operation and performance,
as well as important safety, installation, and operation instructions
designed to prevent personal injuries as well as product damage.
Nº 320S
Getting Started
CAUTION
NEVER MAKE OR BREAK CONNECTIONS TO THE Nº 320S
UNLESS IT AND ALL ASSOCIATED COMPONENTS ARE
POWERED OFF AND DISCONNECTED FROM ELECTRICAL
OUTLETS.
To begin using the Nº 320S:
1. Make sure the Nº 320S and all associated components are
powered off and disconnected from electrical outlets.
Note
The Nº 320S offers balanced (XLR) and single-ended (RCA)
stereo connections. For best performance, use balanced
(XLR) connections whenever possible. A balanced connection
between the Nº 320S and the associated power amplifier will
offer the highest possible performance with the best
protection against RF interference and other common mode
noise.
1-9
2. Connect the desired Nº 320S stereo input connectors to the
source component (e.g., CD player) output connectors.
•
Use the Nº 320S balanced (XLR) stereo input connectors
labeled 1, 2, or 3 if the source component offers balanced
(XLR) output connectors.
•
Use the Nº 320S single-ended (RCA) stereo input connectors
labeled 4, 5, 6, or 7 if the source component does not offer
balanced (XLR) output connectors.
3. Connect the desired Nº 320S stereo main output connectors
to the associated power amplifier.
•
Use the Nº 320S balanced (XLR) stereo main output
connectors if the associated power amplifier offers balanced
(XLR) input connectors.
•
Use the Nº 320S single-ended (RCA) stereo main output
connectors if the associated power amplifier does not offer
balanced (XLR) input connectors.
(continued))
Getting Started
Mark Levinson
Quick Start Guide (continued)
4. Reconnect the Nº 320S and all associated components to
electrical outlets. Then, power on the Nº 320S and all associated
components. It is recommended to power all power amplifiers
on last.
5. Rotate the Nº 320S front panel select knob or press the remote
control select ± buttons to select the Nº 320S input that
corresponds to the Nº 320S stereo input connectors selected
in step 2.
1-10
•
The Nº 320S front panel display indicates the name and
volume level of the selected input.
•
Factory-default input names correspond to their assigned
stereo input connectors. For instance, Input 1 is assigned
to the stereo input connectors labeled 1, Input 2 is assigned
to the stereo input connectors labeled 2, and so on.
2
Basic Operation
3
5
4
7
6
IR Receiver
polarity
mono
volume
select
PREAMPLIFIER
Nº 320S
power
setup
enter
display intensity
balance
mute
standby
1
8
9
10
11
12
2
The numbers in the Nº 320S front panel illustration shown above correspond to the numbered items in the Front Panel Overview
section that begins below.
Front Panel Overview
2-1
Unless otherwise specified, the numbered items in this section
indicate the commands the front panel performs during normal
operating mode. Refer to Section 3: Setup Menu and Section 4:
Controls & Modes for information about other commands the front
panel performs.
1. power button
Powers the Nº 320S on and off when the supplied power cord
is connected to the ~ac mains connector and an electrical
outlet. When the Nº 320S is powered off, pressing the power
button connects power to the ~ac mains connector and
powers on the Nº 320S. When powered on, the Nº 320S
automatically enters standby after completing the initialization
sequence. When the Nº 320S is powered on, pressing the power
button disconnects power from the ~ac mains connector and
powers off the Nº 320S.
Note
Before operating the Nº 320S, make sure the ~ac mains
connector label indicates the correct operating voltage (page
1-7) for the current location.
(continued)
Basic Operation
Mark Levinson
Front Panel Overview (continued)
2. standby button & LED
Places the Nº 320S into standby and takes the Nº 320S out of
standby, which allows the Nº 320S to remain warmed-up to
deliver optimal performance at all times. The front panel
standby LED blinks red to indicate that the Nº 320S is in standby
and lights red to indicate that the Nº 320S is not standby.
Note
Power is still connected to the ~ac mains connector when
the Nº 320S is in standby.
3. select knob
Selects the desired input. Rotating the select knob scrolls
through all activated inputs. The front panel display indicates
the name and volume level of the selected input. Select knob
scrolling does not include deactivated inputs – inputs for
which the Name parameter has been set to unused.
2-2
4. front panel display
Includes 12 alphanumeric characters that provide one-line
viewing of information. During normal operating mode, the
front panel display indicates the name and volume level of
the selected input.
The right side of the front panel display includes an IR receiver
that receives infrared commands from the remote control IR
transmitter when the Nº 320S is not using the rear panel ir
input connector. Refer to Operation Considerations (page 2-15)
for additional information.
5. polarity LED
Lights red to indicate that main output signal polarity has
been inverted with the remote control polarity button. Refer
to Polarity (page 4-3) for additional information.
6. mono LED
Lights red to indicate that mono playback has been activated
with the remote control mono button. Refer to Mono Playback
(page 4-5) for additional information.
Nº 320S
Basic Operation
7. volume knob
Adjusts master volume level. Rotating the volume knob
increases (clockwise) and decreases (counterclockwise) master
volume level in 1.0dB increments up to 23.0dB and in 0.1dB
increments above 23.0dB. The minimum master volume level
setting is OFF. The MaxVol parameter can be used to determine
the maximum master volume level setting in 0.1dB increments
between 40.0 and 80.0dB. The factory-default maximum
master volume level is 80.0dB.
The Offset parameter can be used to determine individual
input volume level offsets in 0.1dB increments between –20.0
and +20.0dB. The factory-default input volume level offset is
0.0dB. Whenever an input is selected, the Nº 320S automatically
applies the Offset parameter setting to master volume level.
Note the following about using the volume knob:
•
Rotating the volume knob quickly accelerates the rate of
change to accommodate large adjustments. Rotating the
volume knob too quickly decelerates the rate of change to
prevent accidental adjustments that could send dangerous
signal levels to the loudspeakers.
•
Rotating the volume knob slowly decelerates the rate of
change to accommodate fine, precise adjustments.
Note
•
The master volume control does not affect record output
levels.
•
All Nº 320S volume controls, including master volume
and balance, are deactivated when SSP mode (page 4-8)
is activated.
8. setup button & LED
Opens and closes the setup menu, which can be used to
configure the Nº 320S to suit individual preferences and
listening spaces. The front panel setup LED lights red to
indicate that the setup menu is open.
9. enter button
Selects and deselects menu items when the setup menu is
open. The enter button performs no function during normal
operating mode.
(continued)
2-3
Basic Operation
Mark Levinson
Front Panel Overview (continued)
10. display intensity button
Controls the illumination level of front panel display characters
and the front panel standby LED. Refer to Display Intensity
(page 4-2) for additional information.
11. balance button & LED
Opens and closes the balance control, which can be used to
control the left-to-right channel balance of the main output
connectors. The front panel balance LED lights red to indicate
that the balance control is open. Refer to Balance (page 4-3)
for additional information.
Note
When the balance control is closed, the front panel balance
LED remains lit if the left-to-right channel balance of the
main output connectors is offset.
2-4
12. mute button & LED
Activates and deactivates mute. Pressing and releasing the mute
button once activates mute and attenuates master volume by
the selected mute level. The front panel mute LED lights red
to indicate that mute is activated. Pressing and releasing the
mute button again restores master volume to its original
level.
The Mute parameter can be used to determine the amount of
master volume level attenuation that occurs when mute is
activated. The mute level can be set in 0.1dB increments
between –10.0 and –80.0dB. The factory-default mute level is
–20.0dB.
Note
Rotating the front panel volume knob deactivates mute,
adjusting master volume from the muted volume level.
Nº 320S
Basic Operation
4
5
record outputs
communication
10
MARK LEVINSON
PREAMPLIFIER Nº 320S
S/N
RIGHT CHANNEL
7
4
8 9
RS-232
1
record outputs
trigger ir
output input
Made in the U.S.A.
~ac mains
LEFT CHANNEL
inputs
main outputs
main outputs
inputs
1
2
slave in
1
2
5
4
phono
ground
1
3
2
3
4
5
6
7
7
6
6
2
3
2
1
1
2
2
3
The numbers in the Nº 320S rear panel illustration shown above correspond to the numbered items in the Rear Panel Overview section
that begins below. For maximum channel separation, all left-channel connectors are located on one side of the rear panel and all rightchannel connectors are located on the opposite side of the rear panel.
Rear Panel Overview
CAUTION
NEVER MAKE OR BREAK CONNECTIONS TO THE Nº 320S
UNLESS IT AND ALL ASSOCIATED COMPONENTS ARE
POWERED OFF AND DISCONNECTED FROM ELECTRICAL
OUTLETS.
1. ~ac mains connector
Provides power to the Nº 320S through the supplied power
cord when the supplied power cord is connected to the ~ac
mains connector and the electrical outlet. One IEC-standard
AC mains receptacle labeled ~ac mains is available.
Note
Before operating the Nº 320S, make sure the ~ac mains
connector label indicates the correct operating voltage (page
1-7) for the current location.
(continued)
2-5
Basic Operation
Mark Levinson
Rear Panel Overview (continued)
2. stereo input connectors
Push
Pin 2
Pin 1
Pin 3
Balanced (female XLR)
Input Connector
Pin Assignments
• Pin 1: Signal Ground
• Pin 2: Signal + (Non-Inverting)
• Pin 3: Signal – (Inverting)
• Connector Ground Lug: Chassis Ground
Pin 1
Pin 2
Pin 3
Provide left and right-channel analog audio input. Three
balanced (female XLR) connectors labeled 1-3 are available to
accept line-level balanced input signals from associated
components that offer balanced (male XLR) output connectors.
Four single-ended (RCA) connectors labeled 4-7 are available
to accept line-level single-ended input signals from other
associated components.
For best performance, use balanced connections whenever
possible. Refer to the illustration to the left and to the associated
component documentation to ensure that Nº 320S balanced
input connector pin assignments correspond to the associated
component balanced output connector pin assignments. If
not, wire the cable so that the appropriate input pin connects
to the appropriate output pin.
Balanced (male XLR)
Main Output Connector
Note
•
The single-ended (RCA) input connector labeled 7
becomes the phono input connector when the Nº 320S
phono modules are installed.
•
A balanced connection between the Nº 320S and the
associated power amplifier will offer the highest possible
performance with the best protection against RF
Interference and other common mode noise.
2-6
3. stereo main output connectors
Provide left and right-channel analog audio output. One
balanced (male XLR) connector labeled 1 is available to output
balanced signals to an associated power amplifier that offers
balanced (female XLR) input connectors. One single-ended
(RCA) connector labeled 2 is available to output single-ended
signals to other associated components, including power
amplifiers that do not offer balanced (female XLR) input
connectors.
For best performance, use balanced connections whenever
possible. Refer to the illustration in the top-left corner of this
page and to the associated power amplifier documentation to
ensure that Nº 320S balanced output connector pin assignments
correspond to the associated power amplifier balanced input
connector pin assignments. If not, wire the cable so that the
appropriate input pin connects to the appropriate output pin.
Nº 320S
Basic Operation
4. stereo record output connectors
Provide left and right-channel analog audio output at fixed
levels. Two single-ended (RCA) connectors labeled 1 and 2 are
available to output single-ended signals to recording components
such as CD-Rs and tape decks.
The Rec.Out parameter can be used to assign the record output
connectors to the desired input(s). It is recommended to use
the Name parameter to associate inputs with the correct
recording components to prevent possible record feedback
loops.
Note
Nº 320S volume controls, including master volume and
balance, do not affect record output levels.
5.
& slave in communication ports
Provide “links” to compatible Mark Levinson components,
allowing the Nº 320S and other linked components to share
controls such as display intensity, input naming, standby,
playback, input selection, and record. Two 8-pin modular
RJ-45 jacks labeled
and slave in are available.
The
communication port can be connected to a Mark
Levinson power amplifier that offers Link communication
ports. The slave in communication port can be connected to
a compatible Mark Levinson digital audio processor or digital
transport that offers Link communication ports.
Note
Refer to Linking (page 2-9) BEFORE linking the Nº 320S to
other Mark Levinson components.
(continued)
2-7
Basic Operation
Mark Levinson
Rear Panel Overview (continued)
6. phono ground connector
Provides an earth-reference ground connection for a phono
cartridge. One binding post labeled phono ground is available
for a phono grounding wire. Connecting the phono grounding
wire to the phono ground connector grounds the phono
cartridge to the Nº 320S chassis, which sometimes reduces audible
hum and other noise that results from multiple grounding
paths. Otherwise, the ground connection between the Nº 320S
and the associated phono cartridge is isolated.
Note
Listen to the associated phono cartridge both with and
without the phono ground connection. Then, select the
connection that results in the best performance.
7. trigger output connector
Provides 12 or 5V DC output to control connected components.
One 3.5mm mini-jack labeled trigger output is available for a
mono plug (Tip/Sleeve) connection. The Trig. parameter can
be used to configure the trigger output connector to provide
12 or 5V DC output.
2-8
8. ir input connector
3 to 15V @ <100mA
Provides input of 5V infrared signals with no more than
100mA of current from standard infrared distribution equipment
such as IR repeaters. One 3.5mm mini-jack labeled ir input is
available for a mono plug (Tip/Sleeve) connection. The tip of
the mono-plug must have positive polarity as shown in the
illustration to the left.
9. RS-232 port
Provides serial control, performing flash memory software
upgrades and facilitating external control in AMX™ and
Crestron™ systems. One 6-pin modular RJ-11 port labeled
RS-232 is available.
10. serial number label
Indicates the Nº 320S serial number, which is required for
product registration and warranty service.
Nº 320S
Basic Operation
Linking
Linking is available for all Mark Levinson components that offer
Link communication ports, including master, slave in, slave out,
and
communication ports. These communication ports can
be used to “link” compatible Mark Levinson components in a slave
chain, allowing them to share controls such as display intensity,
standby, playback, input selection, and record.
The Nº 320S offers two Link communication ports labeled slave
in and
. The slave in communication port can be connected
to a compatible Mark Levinson digital audio processor or digital
transport. The
communication port can be connected to a
compatible Mark Levinson power amplifier.
The Nº 320S is compatible with:
•
All power amplifiers that offer Link or
ports.
communication
•
Nº 30, Nº 30.5, and Nº 30.6 Reference Digital Audio Processors
•
Nº 31 and Nº 31.5 Reference CD Transports
•
Nº 36, Nº 36S, Nº 360, and Nº 360S Digital Audio Processors
•
Nº 39 and Nº 390S CD Processors (can be used as either digital
audio processors or digital transports in a slave chain)
•
Nº37 CD Transport
•
Refer to the appropriate documentation for Link compatibility
information about other Mark Levinson components.
Note
Linking is not available for Mark Levinson digital transports
unless a Mark Levinson digital audio processor is included in
the slave chain. Certain digital transport and digital audio
processor combinations are not Link compatible. Refer to the
appropriate owner’s manual for additional information.
Making Link
Connections
•
DO use Link communication ports, such as master, slave in,
slave out, and
communication ports. DO NOT use
RS-232 ports or other rear panel connectors.
•
DO use supplied Link communication cables, which are
provided in the Nº 320S accessory carton. Additional Link
communication cables are available at authorized Mark
Levinson dealers.
(continued)
2-9
Basic Operation
Mark Levinson
Making Link Connections (continued)
•
DO use constructed Link communication cables (if desired).
Refer to Constructing Link Communication Cables (next page) for
additional information.
CAUTION
LINK CONNECTIONS MUST BE MADE USING LINK
COMMUNICATION PORTS AND SUPPLIED OR
CONSTRUCTED LINK COMMUNICATION CABLES.
CONNECTIONS MADE USING OTHER CONNECTORS OR
CABLES MAY DAMAGE THE Nº 320S AND OTHER LINKED
COMPONENTS, POSSIBLY VOIDING THE MANUFACTURER’S
WARRANTY AND/OR STANDARD REPAIR POLICIES.
Constructing Link
Communication Cables
Link communication cables can be constructed using an 8-conductor
modular telephone cable with the appropriate plug crimped on
each end.
•
Use an 8-pin RJ-45 plug to connect to a digital audio processor,
digital transport, or Nº 320S. RJ-45 plugs provide an 8-pin
connection.
•
Use a 6-pin RJ-11 plug to connect to a power amplifier. RJ-11
plugs provide a 6-pin connection in which connector pins 7
and 8 are not used.
2-10
When linking components with constructed Link communication
cables, twist the cable 180˚ as shown in the illustration below for
a straight-through (pin 1-to-pin 1) connection.
Nº320S
Preamplifier
Mark Levinson Digital Audio
Processor or Transport
8-Pin RJ-45 Plug (Pin 1)
8-Pin RJ-45 Plug (Pin 1)
Locking Tab
180˚ Twist
Locking Tab
Mark Levinson
Power Amplifier
Nº320S
Preamplifier
6-Pin RJ-11 Plug (Pin 1)*
8-Pin RJ-45 Plug (Pin 1)
Locking Tab
180˚ Twist
Locking Tab
*Pins 7 and 8 are not used
Creating a Slave Chain
Making Link connections creates a slave chain that facilitates
communication among linked components, allowing them to
share certain controls. The table on the next page indicates slave
chain requirements for each component.
Nº 320S
Basic Operation
All slave chains:
•
Must include compatible Mark Levinson components. The
Nº 320S is compatible with the components listed on page 2-9.
Refer to the appropriate documentation for Link compatibility
information about other Mark Levinson components.
•
Must connect components in a certain order to prevent
communication from terminating. In general, components
must be linked as follows: digital audio processor, to digital
transport, to Nº 320S, to power amplifier.
Note
Link communication port names differ among Mark Levinson
components. The Link communication port names used in
the table below correspond with the component listed in the
Component column.
Component
Requirements & Connections
Digital Audio
Processor*
• Serves as the master component in the slave chain.
(e.g., Nº 360S)
• Connect the master communication port on the digital audio processor to the slave in communication
port on the first digital transport. If no digital transports are included in the slave chain, connect
the master communication port on the digital audio processor to the slave in communication port
on the Nº 320S.
• Maximum of one per slave chain.
Digital
Transport*
• No maximum number per slave chain.
(e.g., Nº 37)
• Connect the slave in communication port on the first digital transport to the master communication
port on the digital audio processor. Digital transports CANNOT be included in a slave chain that
does not include a compatible Mark Levinson digital audio processor.
• Must be positioned after the digital audio processor and before the Nº 320S and power amplifier(s).
• Connect multiple digital transports in a “daisy chain” using slave out-to-slave in communication
port connections. Connect the slave out communication port on the last digital transport to the
slave in communication port on the Nº 320S.
Preamplifier
(e.g., Nº 320S)
• No maximum number per slave chain.
• Connect the slave in communication port on the Nº 320S to the slave out communication port on
the last digital transport. If no digital transports are included in the slave chain, connect slave in
communication port on the Nº 320S to the master communication port on the digital audio
processor.
• Connect the
communication port on the Nº 320S to the
the first power amplifier.
Power
Amplifier
(e.g., Nº 432)
input communication port on
• Maximum of six per slave chain.
• Connect the
input communication port on the first power amplifier to the
port on the Nº 320S.
communication
• Connect up to six power amplifiers in a “daisy chain” using
input-tocontrol
communication port connections. The
control communication port on the last power
amplifier is not connected.
* The Nº 39 and Nº 390S CD Processors can serve as either a digital audio processor or a digital transport in a slave chain.
(continued)
2-11
Basic Operation
Mark Levinson
Creating a Slave Chain (continued)
To create a slave chain that includes the Nº 320S:
1. Load a disc in a digital transport that will be included in the
slave chain (if applicable).
2. Make sure the Nº 320S and all associated components are
powered off.
3. Refer to the table on the previous page and the illustration on
the next page to make Link connections. In general, components
must be linked as follows: digital audio processor, to digital
transport, to Nº 320S, to power amplifier.
4. When Link connections have been made, power on linked
components ONE AT A TIME in the order specified below.
Allow each component to complete the initialization sequence
before proceeding to the next component.
A. Digital Transport(s)
B. Digital Audio Processor
2-12
C. Nº 320S
D. Power Amplifier(s)
At this point, the front panel standby LEDs on all linked
components should be blinking in unison.
Note
Linked components must be powered on ONE AT A TIME in
the specific order listed in step 4 (above) to ensure proper
functioning of Link controls. Do not use a power strip switch
to power on several components at once. When power is
supplied to a power strip, connected components that do not
include a power button will automatically power on.
5. Play the input source on the digital transport selected in step 1
(if applicable).
•
All linked components should automatically come out of
standby.
•
The linked digital audio processor and Nº 320S should
automatically select the appropriate input.
Nº 320S
slave in master/
slave out
Basic Operation
Nº390S*
Nº360S
CD Processor
Digital Audio Processor
master
communication
port
Step A:
Connect the digital audio processor master
communication port to the Nº320S slave in
communication port.
Nº320S
CD Processor
slave in master/
slave out
Step B:
Connect the Nº320S
communication
port to the first power amplifier
input
communication port.
input
input
control
control
Connect the digital audio processor master
communication port to the first digital transport
slave in communication port.
Nº390S*
Preamplifier
slave in
Step A:
Nº432
slave in slave out
The slave chain at the far left links one
digital audio processor (Nº 390S); one
preamplifier (Nº 320S); and two power
amplifiers (Nº 432 and Nº 431).
Step B:
Connect the first digital transport slave out
communication port to the Nº320S slave in
communication port.
Nº37
Power Amplifier
Digital Transport
Step Ca:
Step C:
Connect the first power amplifier
control communication port to the second
power amplifier
input communication
port. Repeat this step to include up to six
power amplifiers.
Connect the second digital transport slave out
communication port to the Nº320S slave in
communication port.
Nº431
Nº320S
Power Amplifier
The slave chains shown here are made
according to the requirements listed in the
table on page 2-11.
The slave chain shown to the immediate
left links one digital audio processor
(Nº 360S); two digital transports (Nº 390S
and Nº 37); one preamplifier (Nº 320S);
and one power amplifier (Nº 432).
Preamplifier
The last power amplifier
control
communication port is not connected.
slave in
Step D:
Connect the Nº320S
communication
port to the power amplifier
input
communication port.
input
control
Nº432
Power Amplifier
The last power amplifier
control
communication port is not connected.
* The Nº390S can serve as either a digital audio processor or a
digital transport in a slave chain.
2-13
Link Controls
Linking Mark Levinson components allows them to share controls
such as display intensity, standby, playback, input selection, and
record.
Note the following:
•
Linked components must be powered on ONE AT A TIME in
the specific order listed in step 4 (page 2-12) to ensure proper
functioning of Link controls.
•
Link controls must be enabled on the linked digital transport(s)
linking menu, which allows activation and deactivation of
individual Link controls. Refer to the appropriate digital
transport owner’s manual for additional information.
•
Some Mark Levinson digital transports accommodate a maximum
of four front panel display characters. In these cases, certain
input names appear abbreviated on the front panel display.
For example, an input named No320S will appear as No32 on
the digital transport front panel display even though the
input is associated with the Nº 320S.
•
The linked Nº 320S and power amplifier(s) must be in the
same standby-state to allow the linked power amplifier(s) to
enter standby after a power failure.
(continued)
Basic Operation
Mark Levinson
Link Controls (continued)
The table below provides a general description of controls the
Nº 320S shares with other linked components. Some controls may
not be available for certain component combinations. Other Mark
Levinson components may share additional controls. Refer to the
appropriate documentation for additional information.
Component
Link
Controls
2-14
Digital Audio
Processor
Digital
Transport
Preamplifier
(Nº 320S)
Power
Amplifier
Display
Intensity
Link
Maintains consistent front panel display character illumination among all linked components.
Adjusting display intensity for one linked component simultaneously adjusts display intensity for all
other linked components.
Standby
Link
Placing the linked
digital audio processor
into standby also places
all linked digital
transports into standby.
Taking the linked
digital audio processor
out of standby also
takes the linked Nº
320S out of standby.
Playback
Link
Pressing the play button on a linked digital transport automatically takes the linked digital audio
processor, Nº 320S, and power amplifier(s) out of standby and selects the associated input on the
linked digital audio processor and Nº 320S.
Input
Selection
Link
Pressing and holding the digital transport remote control select button toggles
between selecting digital transports on the linked digital audio processor
and selecting analog inputs on the linked Nº 320S. Pressing and releasing the
digital transport remote control select button scrolls through all available
digital or analog inputs (depending on whether the digital audio processor
or Nº 320S is selected). The digital transport front panel display indicates the
name and volume level of the selected input.
N/A
Placing the linked Nº 320S into standby will not place the linked Nº 30,
Nº 30.5, Nº 30.6, Nº 31, or Nº 31.5 into standby:
N/A
Record
Link
Taking the linked
digital transport(s) out
of standby also takes
the linked Nº 320S and
power amplifier(s) out
of standby.
Placing the linked
Nº 320S into standby
also places all other
linked components
into standby. Taking
the linked Nº 320S out
of standby also takes
the linked power
amplifier(s) out of
standby.
Placing a linked power
amplifier into standby
also places all other
linked power amplifiers
into standby. Likewise,
taking a linked power
amplifier out of
standby also takes all
other linked power
amplifiers out of
standby.
• if the linked digital audio processor is in Record Mode
• if the linked digital transport is in Record Link Mode
A warning message will appear on the linked digital audio processor and
digital transport to indicate that these components are involved in a recording
session.
HDCD™
Link
Configuring the linked
digital audio processor
for an HDCD recording
session automatically
attenuates the linked
Nº 320S master volume
level the required –6dB.
N/A
Configuring the linked
digital audio processor
for an HDCD recording
session automatically
attenuates the linked
Nº 320S master volume
level the required –6dB.
N/A
Nº 320S
Basic Operation
Note
The Nº 31, Nº 31.5, Nº 37, and Nº 39 remote controls can be
used to control Nº 320S master volume level. This command
is available over IR (not Link connections). Before using one
of these remote controls to adjust Nº320S master volume
level, make sure the digital transport setup menu volume
control parameter is set to fixed.
Remote Control Overview
The Nº 320S remote control provides full operation of the Nº 320S.
Unless otherwise specified, the numbered items in the Command
Overview section (next page) indicate the commands the remote
control performs during normal operating mode. Refer to Section
3: Setup Menu and Section 4: Controls & Modes for information
about other commands the remote control performs.
Operation
Considerations
The remote control requires special consideration during operation
to ensure optimal performance. Pay particular attention to the
bulleted items below and to other precautions that appear
throughout this user guide. The bulleted items that begin below
are not applicable when the Nº 320S is using the rear panel ir
input connector.
•
DO eliminate obstructions between the remote control IR
transmitter and the front panel display IR receiver.
•
DO position the remote control within ±45˚ of a line that is
perpendicular to the front panel display IR receiver. At more
severe angles, attempt to “bounce” the remote control signal
off a wall or another surface so the signal is received at the IR
receiver at a reasonable angle.
•
DO position the remote control within 17 feet (5m) of the
front panel display IR receiver. If the Nº 320S is placed inside a
glass cabinet, tinted glass will reduce the remote control range.
•
DO replace the remote control batteries as needed. Refer to
Remote Control Batteries (page 1-6) for additional information.
•
DO NOT obstruct the front panel display IR receiver.
•
DO NOT expose the front panel display IR receiver to
strong sunlight, halogen light, or fluorescent light. This can
cause IR reception to become unreliable.
(continued)
2-15
Basic Operation
Mark Levinson
Operation Considerations (continued)
•
DO NOT use remote controls for different components at
the same time. Remote controls for different components can
interfere with one another.
Command Overview
Unless otherwise specified, the numbered items in this section
indicate the commands the remote control performs during normal
operating mode. Refer to Section 3: Setup Menu and Section 4:
Controls & Modes for information about other commands the
remote control performs.
1. IR transmitter
Sends infrared signals to the front panel display IR receiver
when the Nº 320S is not using the rear panel ir input connector.
Refer to Operation Considerations (previous page) for additional
information.
2. standby button
1
Places the Nº 320S into standby and
takes the Nº 320S out of standby,
which allows the Nº 320S to remain
warmed-up to deliver optimal
performance at all times. The front
panel standby LED blinks red to
indicate that the Nº 320S is in standby
and lights red to indicate that the
Nº 320S is not in standby.
2-16
standby
2
enter
setup
3
4
select
volume
Note
+
6
5
–
polarity balance display mono
7
Power is still connected to the ~ac
mains connector when the Nº 320S
is in standby.
10
mute
11
8
9
PREAMPLIFIER
Nº 320S
The numbers in the Nº 320S remote control illustration shown
above correspond to the numbered items in the Command
Overview section that begins on this page.
3. setup button
Opens and closes the setup menu,
which can be used to configure the
Nº 320S to suit individual preferences
and listening spaces. The front panel
setup LED lights red to indicate that
the setup menu is open.
Nº 320S
Basic Operation
4. enter button
Selects and deselects menu items when the setup menu is
open. The enter button performs no function during normal
operation.
5. volume ± buttons
Adjust master volume level. Pressing the volume ± buttons
increases (+) and decreases (–) master volume level in 1.0dB
increments up to 23.0dB and in 0.1dB increments above
23.0dB. The minimum master volume level setting is OFF. The
MaxVol parameter can be used to determine the maximum
master volume level setting in 0.1dB increments between 40.0
and 80.0dB. The factory-default maximum master volume
level is 80.0dB.
The Offset parameter can be used to determine individual
input volume level offsets in 0.1dB increments between –20.0
and +20.0dB. The factory-default input volume level offset is
0.0dB. Whenever an input is selected, the Nº 320S automatically
applies the Offset parameter setting to master volume level.
Note the following about using the volume ± buttons:
•
Pressing and releasing the volume ± buttons accommodates
fine, precise adjustments.
•
Pressing and holding the volume ± buttons for longer than
1.5 seconds accelerates the rate of change to accommodate
large adjustments.
Note
•
The master volume control does not affect record output
levels.
•
All Nº 320S volume controls, including master volume
and balance, are deactivated when SSP mode (page 4-8)
is activated.
6. select ± buttons
Select the desired input. Pressing the select ± buttons scrolls
through all activated inputs. The front panel display indicates
the name and volume level of the selected input. Select ±
button scrolling does not include deactivated inputs – inputs
for which the Name parameter has been set to unused.
(continued)
2-17
Basic Operation
Mark Levinson
Command Overview (continued)
7. polarity button
Controls the polarity of the main output signal. Pressing and
releasing the polarity button toggles between inverting and
restoring main output signal polarity. The front panel polarity
LED lights red to indicate that main output signal polarity is
inverted. The polarity button has no affect on record output
signal polarity. Refer to Polarity (page 4-3) for additional
information.
8. balance button
Opens and closes the balance control, which can be used to
control the left-to-right channel balance of the main output
connectors. The front panel balance LED lights red to indicate
that the balance control is open. Refer to Balance (page 4-3)
for additional information.
Note
2-18
When the balance control is closed, the front panel balance
LED remains lit if the left-to-right channel balance of the
main output connectors is offset.
9. display button
Controls the illumination level of front panel display characters
and the front panel standby LED. Refer to Display Intensity
(page 4-2) for additional information.
10. mono button
Activates and deactivates the selected mode of mono playback.
The front panel mono LED lights red to indicate that the
mono playback is activated. Refer to Mono Playback (page 4-5)
for additional information.
11. mute button
Activates and deactivates mute. Pressing and releasing the
mute button once activates mute and attenuates master volume
by the selected mute level. The front panel mute LED lights
red to indicate that mute is activated. Pressing and releasing
the mute button again restores master volume to its original
level.
Nº 320S
Basic Operation
The Mute parameter can be used to determine the amount of
master volume level attenuation that occurs when mute is
activated. The mute level can be set in 0.1dB increments
between –10.0 and –80.0dB. The factory-default mute level is
–20.0dB.
Note
Pressing the volume ± buttons deactivates mute, adjusting
master volume from the muted volume level.
2-19
(continued)
3
Setup Menu
Navigating the Setup Menu
The front panel and remote control setup buttons provide
convenient access to the setup menu structure shown below,
which can be used to configure the Nº 320S to suit individual
preferences and listening spaces.
No320S Setup
Set Inputs
Teach IR
Mute = -20.0
MaxVol= 80.0
Trig.= 12v,L
Sw 1.00
VOLUME UP
VOLUME DOWN
SELECT NEXT
SELECT PREV
INTENSITY
MUTE KEY
MONO KEY
POLARITY KEY
STANDBY KEY
ENTER KEY
SETUP KEY
BALANCE KEY
EXIT STANDBY
GO STANDBY
GO INPUT 1
GO INPUT 2
GO INPUT 3
GO INPUT 4
GO INPUT 5
GO INPUT 6
GO INPUT 7
GO MUTE
GO UNMUTE
GO BALANCE
EXIT BALANCE
DISPLAY OFF
DISPLAY DIM
DISPLAY HALF
DISPLAY FULL
-80.0 to -10.0
Name=INPUT 1
Gain= +6 dB
Offset= 0.0
Rec.Out=NONE
40.0 to 80.0
Name=INPUT 2
Gain= +6 dB
Offset= 0.0
Rec.Out=NONE
12v,L
5v,P
Name=INPUT 3
Gain= +6 dB
Offset= 0.0
Rec.Out=NONE
Set
Set
Set
Set
Set
Set
Set
Input
Input
Input
Input
Input
Input
Input
1
2
3
4
5
6
7
Name=INPUT 4
Gain= +12 dB
Offset= 0.0
Rec.Out=NONE
Name=INPUT 5
Gain= +12 dB
Offset= 0.0
Rec.Out=NONE
Name=INPUT 6
Gain= +12 dB
Offset= 0.0
Rec.Out=NONE
Name=INPUT 7
Gain= +12 dB
Offset= 0.0
Rec.Out=NONE
+0 dB
+6 dB
+12dB
+18dB
-20.0 to +20.0
NONE
#1
#2
BOTH
The front panel display provides one-line viewing of the setup menu shown here, indicating the current menu item.
(continued)
3-1
Setup Menu
Mark Levinson
Navigating the Setup Menu (continued)
To open the setup menu:
Press and release the front panel or remote control setup button.
No320S Setup
•
When the setup menu is closed, pressing and releasing the
setup button opens the setup menu on the front panel
display as shown to the left. The front panel setup LED lights
red to indicate that the setup menu is open.
Both the front panel and remote control can be used to navigate
the setup menu structure shown in the illustration on the previous
page. The bulleted items that begin below indicate the commands
the front panel and remote control perform when the setup
menu is open.
setup button
RESTORING
•
Returns to the previous menu, eventually closing the setup
menu.
•
Deselects the selected parameter without saving setting
adjustments that have not been previously stored. The
RESTORING message will appear on the front panel display as
shown to the left to indicate that new adjustments are not
being stored.
•
Advances to the next menu.
•
Selects the current parameter. When a parameter is selected,
the equal sign (=) between the parameter label and the parameter
setting will blink to indicate that setting adjustments can be
made with the volume knob or volume ± buttons.
•
Deselects the selected parameter, saving setting adjustments
that have not been previously stored. The SAVING DATA
message will appear on the front panel display as shown to
the left to indicate that new adjustments are being stored.
3-2
enter button
SAVING DATA
Note
NO CHANGE
When a parameter is deselected, the NO CHANGE message
will appear on the front panel display as shown to the left if
no changes have been made to the parameter’s last stored
setting.
Nº 320S
Setup Menu
select knob &
± buttons
Scroll through menu items. Rotating the select knob or pressing the
select ± buttons scrolls upward (clockwise/+) and downward
(counterclockwise/–) through all menu items available on the
open menu. The front panel display indicates the current menu
item.
volume knob &
± buttons
Adjusts the selected parameter setting. Rotating the volume knob
or pressing the volume ± buttons increases (clockwise/+) and
decreases (counterclockwise/–) the selected parameter setting in
the designated increment. The front panel display indicates the
current setting. (If the current parameter has not been selected
with the enter button, rotating the volume knob or pressing the
volume ± buttons automatically selects the current parameter before
making adjustments.)
Set Inputs Menu
Selecting Set Inputs prompts the selection of the desired input
(e.g., Input 1). Selecting an input opens the corresponding Set
Inputs menu as shown below, which can be used to change input
names, optimize input gain levels, offset input volume levels, and
assign record output connectors.
No320S Setup
Set Inputs
Inputs
Set
Teach IR
Mute = -20.0
MaxVol= 80.0
Trig.= 12v,L
Sw 1.00 B.18
enter
Set
Set
Set
Set
Set
Set
Set
Set
Input
Input
Input
Input
Input
Input
Input
Input
11
2
3
4
5
6
7
enter
Name=INPUT 1
Gain= +6 dB
Offset= 0.0
Rec.Out=NONE
Input 1 is used here as an example and will continue to be used as an
example throughout this section.
Parameter
Default
Setting
Possible
Settings
Name
INPUT
Factory-Default, Custom
Gain
+6 or +12dB*
+0dB, +6dB, +12dB, +18dB
Offset
0.0dB
–20.0 to +20.0dB
Rec.Out
NONE
NONE, #1, #2, BOTH
* The factory-default Gain parameter setting is +0dB for Inputs 1-3 and +6dB for
Inputs 4-7.
(continued)
3-3
Setup Menu
Mark Levinson
Set Inputs Menu
Shortcut
(continued)
The Set Inputs
menu shortcut provides convenient access to the
Set Inputs menu for the selected input. When this shortcut is
used, the four Set Inputs menu parameters for the selected input –
Name, Gain, Offset, and Rec.Out – are available. No other setup
menu items are available.
To “shortcut” to the Set Inputs menu for the selected input:
1. Rotate the front panel select knob or press the remote control
select ± buttons to select the desired input. The front panel
display indicates the name and volume level of the selected
input.
Name=INPUT 1
2. Press and hold the front panel or remote control setup button
until the Name parameter for the selected input appears on
the front panel display as shown to the left.
•
Name
Factory-Default, Custom
3-4
The front panel setup LED lights red to indicate that the
setup menu is open.
Determines the name of the selected input. Factory-default input
names correspond to their assigned stereo input connectors. For
instance, Input 1 is assigned to the stereo input connectors
labeled 1, Input 2 is assigned to the stereo input connectors
labeled 2, and so on. Custom input names should be based on the
component with which the input is associated. For instance, DVD
is an appropriate custom name for an input associated with a
DVD player. Two methods are available for customizing input
names: the custom names list and the character list.
Note
Linked Mark Levinson components must have recognizable
custom input names to share Link controls. For instance, an
input associated with a Nº 360S Digital Audio Processor
should be named No360S. In some cases, linked components
will assign correct input names for other linked, associated
components. Otherwise, use the custom names list to enter
the correct input name.
Custom Names List
The custom names list shown in the top-left corner of the next
page provides convenient access to 28 custom input names that
can be used for the most common associated components, including
other Mark Levinson components. It also includes custom input
names that can be used to deactivate unused inputs or to activate
SSP mode. The table on the next page indicates the intended use
of all custom input names available on the custom names list.
Nº 320S
Custom
Names List
Setup Menu
INPUT 1-7
unused
SSP
SACD
DAT
VCR
CASS
RtoR
MD
CD-R
SAT
LD
CD
TUNER
AUX
DAC
TAPE
DVD
No30
No30.5
No30.6
No35
No36
No36S
No360
No360S
No39
No390S
Custom Name
Description
INPUT 1-7
Identifies the factory-default input name. This name can be
customized one character at a time using the character list
(next page).
unused
Removes the selected input from select knob and select ±
button scrolling.
SSP
Activates SSP (surround sound processor) mode, which
configures the selected input for complete integration with
a multi-channel surround sound processor.
CAUTION
BEFORE ACTIVATING SSP MODE, SET THE
ASSOCIATED SURROUND SOUND PROCESSOR
VOLUME CONTROL TO A REASONABLE
LEVEL TO PREVENT SENDING DANGEROUS
SIGNAL LEVELS TO THE LOUDSPEAKERS.
SACD
Identifies an input associated with a super audio compact
disc player or a digital versatile disc player capable of super
audio compact disc playback.
DAT
Identifies an input associated with a digital audio tape
transport.
VCR
Identifies an input associated with a video cassette recorder.
CASS
Identifies an input associated with a cassette deck.
RtoR
Identifies an input associated with a reel-to-reel player.
MD
Identifies an input associated with a mini-disc player.
CD-R
Identifies an input associated with a compact disc recorder.
SAT
Identifies an input associated with a satellite receiver.
LD
Identifies an input associated with a laser disc player.
CD
Identifies an input associated with a compact disc player.
TUNER
Identifies an input associated with a tuner.
AUX
Identifies an input associated with an auxiliary component.
DAC
Identifies an input associated with a digital-to-analog
converter.
TAPE
Identifies an input associated with a tape deck.
DVD
Identifies an input associated with a digital versatile disc
player.
No30, No30.5,
No30.6, No35,
No36, No36S,
No360, No360S,
No39, No390S
Identifies an input associated with the corresponding Mark
Levinson component. Linked Mark Levinson components
must have recognizable custom input names to share Link
controls. For instance, an input associated with a Nº 360S
Digital Audio Processor should be named Nº 360S. In some
cases, linked components will assign correct input names
for other linked, associated components. Otherwise, use the
custom names list to enter the correct input name.
(continued)
3-5
Setup Menu
Mark Levinson
Character List
(continued)
The character
A
D
G
J
M
P
S
V
Y
1
7
+
(
To customize the name of the selected input:
a
d
g
j
m
p
s
v
y
2
8
–
)
B
E
H
K
N
Q
T
W
Z
3
9
.
,
b
e
h
k
n
q
t
w
z
4
&
/
_
C
F
I
L
O
R
U
X
_
5
‘
:
c
f
i
l
o
r
u
x
0
6
*
?
list shown to the left provides access to 76 characters
that can be used to enter custom input names one character at a
time. Custom input names can consist of up to 7 characters,
including letters, numbers, punctuation marks, and blank spaces.
A custom input name entered with the character list replaces the
factory-default INPUT 1 name on the custom names list.
1. Rotate the front panel select knob or press the remote control
select ± buttons to select the desired input.
•
The front panel display indicates the name and volume
level of the selected input.
2. Press and hold the front panel or remote control setup button
until the Name parameter for the selected input appears on
the front panel display.
•
The front panel setup LED lights red to indicate that the
setup menu is open.
3. Select one of the following options:
Name=_______
•
Press the front panel or remote control enter button once
to select the Name parameter and access the custom
names list shown in the top-left corner of the previous
page. The current input name blinks as shown to the left
to indicate that a new input name can be selected from
the custom names list.
Name=_NPUT 1
•
Press the front panel or remote control enter button twice
in succession to select the Name parameter and access the
character list shown in the top-left corner of this page.
The first character in the current input name blinks as
shown to the left to indicate that a new character can be
selected from the character list.
3-6
4. Rotate the front panel volume knob or press the remote
control volume ± buttons to scroll through all custom input
names included on the custom names list or all characters
included on the character list.
5. When the desired custom input name or character is selected,
press the enter button to:
•
Select this custom input name (if the custom names list
option was selected in step 3). The SAVING DATA message
will appear on the front panel display to indicate that the
new input name is being saved.
Nº 320S
Setup Menu
•
Select this character (if the character list option was
selected in step 3). The blinking cursor will advance to the
next character space. Repeat steps 4 and 5 until all desired
characters have been entered. When the seventh character
is selected, the SAVING DATA message will appear on the
front panel display to indicate that the new input name is
being saved.
Note
The factory-default input name must be restored one
character at a time using the character list (unless factorydefault settings are restored).
Gain
+0dB, +6dB, +12dB, +18dB
Optimizes gain levels for the input using the stereo input connector
for which the selected input is assigned. Increasing the Gain
parameter setting increases gain levels for the selected input,
which sometimes prevents input sources with low gain levels from
producing low signal-to-noise ratios. Decreasing the Gain
parameter setting decreases gain levels for the selected input,
which sometimes prevents input sources with high gain levels
from producing distortion.
Note
The Gain parameter should be set before the Offset parameter.
Offset
–20.0 to +20.0dB
Determines individual input volume level offsets in 0.1dB increments
between –20.0 and +20.0dB. The factory-default input volume
level offset is 0.0dB. Whenever an input is selected, the Nº 320S
automatically applies the Offset parameter setting to master
volume level.
In some cases, this causes some input sources to sound softer or
louder than others. If this occurs, select the Offset parameter
setting that compensates for the volume level difference, allowing
all associated components to output at a comparable volume
level.
(continued)
3-7
Setup Menu
Mark Levinson
Rec.Out
NONE, #1, #2, BOTH
(continued)
Assigns record
output connectors to the selected input. The rear
panel offers two single-ended (RCA) stereo record output
connectors that pass audio at fixed volume levels. When an input
is assigned for the record output connectors, the input signal is
sent to both the assigned main and record output connectors.
The master volume, balance, and polarity controls do not affect
record output levels.
Select the NONE setting to assign no record output connectors to
the selected input. Select the #1 setting to assign the stereo record
output connector labeled 1 to the selected input. Select the #2 setting
to assign the stereo record output connector labeled 2 to the
selected input. Select the BOTH setting to assign both record output
connectors to the selected input.
CAUTION
3-8
IF THE ASSOCIATED COMPONENT OFFERS BOTH RECORD
INPUT AND OUTPUT CONNECTORS, IT IS RECOMMENDED
TO SET THE REC.OUT PARAMETER TO NONE TO PREVENT
RECORD FEEDBACK LOOPS IN WHICH THE ASSOCIATED
COMPONENT ATTEMPTS TO RECORD ITS OWN OUTPUT
SIGNALS. THESE FEEDBACK LOOPS PRODUCE HIGH-LEVEL
NOISE THAT MAY DAMAGE THE LOUDSPEAKERS AND/
OR OTHER ASSOCIATED COMPONENTS.
Note
If the associated component connected to the record output
connectors is also connected to a separate ground (such as a
VCR with a cable TV connection), it is recommended to set
the Rec.Out parameter for all activated inputs to NONE
unless a recording session is in progress. This helps prevent
low-level electrical noise from degrading performance.
Teach IR Menu
Selecting Teach IR opens the menu shown in the top-left corner
of the next page, which prompts the selection of the desired IR
command. Selecting an IR command sends the associated infrared
signal from the left side of the front panel display to a learning
remote control, allowing Nº 320S IR commands to be sent from a
learning remote control even if the Nº 320S remote control is not
present.
Nº 320S
No320S Setup
Set Inputs
Teach IR
IR
Teach
Mute = -20.0
MaxVol= 80.0
Trig.= 12v,L
Sw 1.00 B.18
Command
Setup Menu
enter
VOLUME UP
VOLUME DOWN
SELECT NEXT
SELECT PREV
INTENSITY
MUTE KEY
MONO KEY
POLARITY KEY
STANDBY KEY
ENTER KEY
SETUP KEY
BALANCE KEY
EXIT STANDBY
GO STANDBY
GO INPUT 1
GO INPUT 2
GO INPUT 3
GO INPUT 4
GO INPUT 5
GO INPUT 6
GO INPUT 7
GO MUTE
GO UNMUTE
GO BALANCE
EXIT BALANCE
DISPLAY OFF
DISPLAY DIM
DISPLAY HALF
DISPLAY FULL
The Nº 320S sends infrared signals at 40kHz, the most
common carrier frequency used in learning remote controls.
However, if the learning remote control seems unable to
learn IR commands:
•
Eliminate obstructions between the learning remote
control and the left side of the front panel display.
•
Adjust the distance between the learning remote control
and the left side of the front panel display.
•
Make sure the learning remote control and the left
side of the front panel display are not exposed to
strong sunlight, halogen light, or fluorescent light.
This can cause IR reception to become unreliable.
•
Replace the learning remote control batteries.
•
If problems persist, contact an authorized Mark
Levinson dealer.
The table below indicates all available IR commands. For
toggle commands, the Nº 320S provides one IR command
for the toggle command as well as separate IR commands
for the positive and negative forms of the toggle command.
For instance, the MUTE KEY IR command teaches the
learning remote control to perform mute button commands,
while the GO MUTE IR command teaches the learning
remote control to activate mute and the GO UNMUTE IR
command teaches the learning remote control to deactivate
mute.
Description
Command
Description
VOLUME UP
Performs volume + button commands.
EXIT STANDBY
Takes the Nº 320S out of standby.
VOLUME DOWN
Performs volume – button commands.
GO STANDBY
Places the Nº 320S into standby.
SELECT NEXT
Performs select + button commands.
GO INPUT 1-7
SELECT PREV
Performs select – button commands.
Selects the input assigned for the
corresponding stereo input connector
(1-7).
INTENSITY KEY
Performs display button commands.
GO MUTE
Activates mute.
MUTE KEY
Performs mute button commands.
GO UNMUTE
Deactivates mute.
MONO KEY
Performs mono button commands.
GO BALANCE
Opens the balance control.
POLARITY KEY
Performs polarity button commands.
EXIT BALANCE
Closes the balance control
STANDBY KEY
Performs standby button commands.
DISPLAY OFF
Sets display intensity to 0%.
ENTER KEY
Performs enter button commands.
DISPLAY DIM
Sets display intensity to 25%.
SETUP KEY
Performs setup button commands.
DISPLAY HALF
Sets display intensity to 50%.
BALANCE KEY
Performs balance button commands.
DISPLAY FULL
Sets display intensity to 100%.
(continued)
3-9
Setup Menu
Mark Levinson
Teach IR Menu (continued)
To teach Nº 320S IR commands to a learning remote control:
1. Prepare the learning remote control to receive IR commands.
2. Follow the instructions on page 3-2 to open the setup menu.
3. Rotate the front panel select knob or press the remote control
select ± buttons until Teach IR is selected.
4. Press the front panel or remote control enter button to open
the Teach IR menu.
•
The VOLUME UP IR command will appear on the front
panel display.
5. Rotate the front panel volume knob or press the remote control
volume ± buttons to scroll through all available IR commands.
6. When the desired IR command is selected, press the enter
button to teach this command to the learning remote control.
3-10
•
SENDING -->
The SENDING --> message will appear on the front panel
display as shown to the left to indicate that the associated
infrared signal is being sent to the learning remote control.
7. Repeat steps 5 and 6 until all desired IR commands have been
sent.
Note
The Nº 31, Nº 31.5, Nº 37, Nº 39, and Nº390S remote
controls can be used to control Nº 320S master volume level.
This command is available over IR (not Link connections).
Before using one of these remote controls to adjust Nº320S
master volume level, make sure the digital transport setup
menu volume control parameter is set to fixed.
Nº 320S
Setup Menu
Setup Menu Parameters
Mute
–10.0 to –80.0dB
MaxVol
40.0 to 80.0dB
Trig.
12v,L; 5v,P
Sw
Non-adjustable
Parameter
Default
Setting
Possible
Settings
Mute
-20.0dB
-10.0 to -80.0dB
MaxVol
80.0dB
40.0 to 80.0dB
Trig.
12v,L
12v,L; 5v,P
Sw
N/A
N/A
Determines the amount of master volume level attenuation that
occurs when mute is activated with the front panel or remote
control mute button. The mute level can be set in 0.1dB increments
between –10.0 and –80.0dB. The factory-default mute level is
–20.0dB.
Determines the maximum master volume level setting in 0.1dB
increments between 40.0 and 80.0dB. The factory-default maximum
master volume level is 80.0dB.
Configures the trigger output signal. Selecting the 12v,L setting
configures the trigger output connector to send a 12V, level
(constant) signal to the connected component whenever the
Nº 320S is taken out of standby. This signal is not present when
the Nº 320S is placed into standby. Selecting the 5v,P signal
configures the trigger output connector to send a 5V pulse signal,
similar to that of a momentary contact switch, to the
connected component whenever the standby button is pressed.
This signal is only present when the standby button is pressed.
Indicates the current software version operating in the Nº 320S,
allowing for quick comparison between the current software
version and most current software version available. Software
upgrades can be performed with the RS-232 port, allowing software
to be upgraded without disassembling the Nº 320S or disconnecting
it from other components.
(continued)
3-11
4
Controls & Modes
Standby
Allows the Nº 320S to remain warmed-up to deliver optimal
performance at all times. The Nº 320S cannot be placed into
standby unless it is powered on with the front panel power
button. Refer to Continuous Operation (page 1-8) for additional
information.
To place the Nº 320S into or take the Nº 320S out of standby:
1. Make sure the Nº 320S is powered on with the front panel
power button.
2. Press and release the front panel or remote control standby
button.
•
•
When the Nº 320S is not in standby, pressing and releasing
the standby button places the Nº 320S into standby. The
front panel standby LED blinks red to indicate that the
Nº 320S is in standby.
When the Nº 320S is in standby, pressing and releasing
the standby button takes the Nº 320S out of standby. The
front panel standby LED lights red to indicate that the
Nº 320S is not in standby.
Note
When powered on with the front panel power button, the
Nº 320S automatically enters standby after completing the
initialization sequence.
SLEEP
-OFF-, 0h 30m to 4h 0m
Controls the sleep timer, which configures the Nº 320S to
automatically enter standby after a designated amount of time has
passed. The SLEEP parameter can be set to –OFF– or in 30-minute
increments between 30 minutes and 4 hours. The factory-default
SLEEP parameter setting is –OFF–.
(continued)
4-1
Controls & Modes
Mark Levinson
SLEEP (continued)
When the –OFF– setting is selected, the Nº 320S does not
automatically enter standby. When a time increment setting is
selected, the Nº 320S automatically enters standby after the
designated amount of time has passed. For example, if the 2h
30m setting is selected, the Nº 320S automatically enters standby
after 2 hours and 30 minutes have passed.
To set the sleep timer:
1. Follow the instructions on the previous page to take the
Nº 320S out of standby.
SLEEP –OFF–
2. Press and hold the front panel or remote control standby
button until the SLEEP parameter opens on the front panel
display as shown to the left.
3. Press and release the standby button to cycle through all
available SLEEP parameter settings.
4-2
4. When the desired setting is selected, press the front panel or
remote control enter button to close the SLEEP parameter.
•
Otherwise, the SLEEP parameter automatically closes a
few seconds after the last command is received. If this
occurs, the selected setting is automatically applied.
Note
The SLEEP parameter is set to –OFF– whenever the Nº 320S
is placed into standby.
Display Intensity
Controls the illumination of front panel display characters and
the front panel standby LED. Four illumination levels are available,
including FULL (100%), HALF (50%), DIM (25%), and OFF (0%).
The factory-default illumination level is FULL (100%).
When the OFF (0%) illumination level is selected:
•
The front panel display automatically activates whenever a
change in status is detected.
•
The front panel standby LED lights at the FULL (100%)
illumination level.
Nº 320S
Controls & Modes
To adjust display intensity:
Press and release the front panel display intensity button or the
remote control display button to cycle through the four available
illumination levels.
•
Front panel display characters and the front panel standby
LED automatically adjust to the selected illumination level.
Polarity
Controls the polarity of the main output signal, whether that
signal is using the balanced (XLR) or single-ended (RCA) main
output connectors. The polarity control has no affect on the
record output signal.
To adjust main output signal polarity:
Press and release the remote control polarity button.
•
When main output signal polarity is non-inverted, pressing
and releasing the polarity button inverts main output signal
polarity. The front panel polarity LED lights red to indicate
that main output signal polarity is inverted.
•
When main output signal polarity is inverted, pressing and
releasing the polarity button restores main output signal
polarity to its non-inverted state.
Note
Experiment with main output signal polarity to determine
the best sound for individual recordings. The sound difference
between an inverted and non-inverted output signal ranges
from subtle to inaudible, depending on microphone technique
and other recording factors. In some cases, individual
recordings will just sound better one way than the other.
Balance
Controls the left-to-right channel balance of the main output
connectors, including the balanced (XLR) and single-ended (RCA)
main output connectors. The balance control has no affect on
the record output connectors.
(continued)
4-3
Controls & Modes
Mark Levinson
Balance (continued)
The balance control facilitates precise adjustments in 0.1dB
increments between 0.1 and 20.0dB. When the balance offset
exceeds 20.0dB, the Nº 320S mutes the channel outputting the
lower signal level.
To adjust the left-to-right channel balance of the main output
connectors:
<-- 0.0 -->
1. Press and release the front panel or remote control balance
button to open the balance control on the front panel display
as shown to the left.
•
The front panel balance LED lights red to indicate that
the balance control is open.
2. Rotate the front panel volume knob or press the remote
control volume ± buttons to make the desired adjustments.
4-4
<-- 0.1 -->
•
Rotate the volume knob clockwise or press the volume +
button to decrease the output level of the left channel.
The balance control appears as shown to the left to indicate
that balance is offset in favor of the right channel.
<-- 0.1 -->
•
Rotate the volume knob counterclockwise or press the
volume – button to decrease the output level of the right
channel. The balance control appears as shown to the left
to indicate that balance is offset in favor of the left
channel.
<-- 0.0 -->
•
Select the 0.0 setting to balance the output levels of the
left and right channels, allowing both channels to output
at the same level. The balance control appears as shown
to the left to indicate that balance is centered between the
left and right channels.
3. When the desired adjustments have been made, press and
release the balance button to close the balance control.
•
Otherwise, the balance control automatically closes a few
seconds after the last command is received. If this occurs,
the selected setting is automatically applied.
•
The front panel balance LED remains lit if the left-to-right
channel balance of the main output connectors is offset.
Note
All Nº 320S volume controls, including master volume and
balance, are deactivated when SSP mode (page 4-8) is
activated.
Nº 320S
Controls & Modes
Mono Playback
Sends mono (rather than stereo) signals to the main output
connectors, whether those signals are using the balanced (XLR) or
single-ended (RCA) main output connectors. The mono playback
control has no affect on the record output connectors.
To toggle between mono and stereo playback:
Press and release the remote control mono button.
MODE
L + R, L ONLY, R ONLY, L – R
•
During stereo playback, pressing and releasing the mono
button activates the selected mode of mono playback. The
front panel mono LED lights red to indicate that mono
playback is activated.
•
During mono playback, pressing and releasing the mono
button deactivates mono playback and activates to stereo
playback.
Determines the mode of mono playback that is activated when
the remote control mono button is pressed. The factory-default
MODE parameter setting is L + R.
•
Selecting the L + R mono mode sends an equal combination
of left and right-channel input signals to the left and rightchannel main output connectors. Refer to L + R Balance
Control Tip (next page) for additional information.
•
Selecting the L ONLY mono mode sends the left-channel input
signal to the left and right-channel main output connectors.
The right-channel input signal is ignored.
•
Selecting the R ONLY mono mode sends the right-channel input
signal to the left and right-channel main output connectors.
The left-channel input signal is ignored.
•
Selecting the L – R mono mode sends the difference between
the left and right-channel input signals to the left and rightchannel main output connectors. Refer to L – R Phono
Alignment Tip (page 4-7) for additional information.
To select the desired mono mode:
MODE: L + R
1. Press and hold the remote control mono button until the
MODE parameter opens on the front panel display as shown
to the left.
2. Press and release the mono button to cycle through all
available MODE parameter settings.
(continued)
4-5
Controls & Modes
Mark Levinson
MODE (continued)
3. When the desired setting is selected, press and release the
front panel or remote control enter button to close the
MODE parameter.
•
L + R Balance Control
Tip
Otherwise, the MODE parameter automatically closes a
few seconds after the last command is received. If this
occurs, the selected mono mode remains selected.
Precise left-to-right channel balance is critical to achieving an
accurate soundstage. When L + R mono playback is activated, the
balance control can be used to compensate for output level
imbalances that occur after the Nº 320S in the signal chain,
including those that result from asymmetrical loudspeaker
placement and slight mismatches in loudspeaker sensitivity.
To use the L + R balance control:
MODE: L + R
4-6
1. Press and hold the remote control mono button until the
MODE parameter opens on the front panel display as shown
to the left.
2. Press and release the mono button to cycle through all
available MODE parameter settings until the L + R mono
mode is selected as shown to the left of step 1 (above).
3. Press and release the front panel or remote control enter
button to close the MODE parameter.
•
Otherwise, the MODE parameter automatically closes a
few seconds after the last command is received. If this
occurs, the selected mono mode remains selected.
4. When the MODE parameter is closed, press and release the
remote control mono button to activate L + R mono playback.
5. Begin playback of the desired recording.
<-- 0.0 -->
6. Press and release the front panel or remote control balance
button to open the balance control on the front panel display
as shown to the left.
•
The front panel balance LED lights red to indicate that
the balance control is open.
7. Rotate the front panel volume knob or press the remote
control volume ± buttons to center the image between the
front left and right loudspeakers.
Nº 320S
Controls & Modes
8. When the desired adjustments have been made, press and
release the balance button to close the balance control.
•
Otherwise, the balance control automatically closes a few
seconds after the last command is received. If this occurs,
the selected setting is automatically applied.
9. Press and release the mono button to cancel L + R mono
playback and return to stereo playback.
L – R Phono Alignment
Tip
L – R mono playback simplifies the process of aligning phono
cartridge azimuth.
To use L – R mono playback to align phono cartridge azimuth:
MODE: L + R
1. Press and hold the remote control mono button until the
MODE parameter opens on the front panel display as shown
to the left.
MODE: L – R
2. Press and release the mono button to cycle through all
available MODE parameter settings until the L – R mono
mode is selected as shown to the left.
4-7
3. Press and release the front panel or remote control enter
button to close the MODE parameter.
•
Otherwise, the MODE parameter automatically closes a
few seconds after the last command is received. If this
occurs, the selected setting remains selected.
4. When the MODE parameter is closed, press and release the
remote control mono button to activate L – R mono playback.
5.
Begin playback of the desired mono recording.
6. Using the L – R output signal, adjust the associated phono
cartridge azimuth to achieve minimal output signal.
•
Playing a mono recording when L – R mono playback is
activated should result in silence (no output signal).
Because phono cartridges differ, it is recommended to
adjust azimuth to achieve minimal output signal.
7. Press and release the mono button to cancel L – R mono
playback and return to stereo playback.
Controls & Modes
Mark Levinson
SSP (Surround Sound
Processor) Mode
•
Allows for complete integration between the Nº 320S and a
multi-channel surround sound processor.
In the past, the difference between the number of channels in
each component made integration difficult.
•
Sending multi-channel processor output signals to a stereo
preamplifier distorts calibrated processor output levels. Multichannel processor volume controls adjust the relative volume
level of all channels in unison. However, stereo preamplifier
volume controls adjust the relative volume level of just the
front left and right channels, leaving the center, surround,
and subwoofer channels unaffected.
Different techniques have been used to compensate for this,
including marking a calibrated point on the preamplifier volume
control or using Dolby Pro Logic for volume level adjustments.
But these techniques are crude, time consuming, and imprecise,
resulting in an inconsistent performance at best.
4-8
•
Sending stereo preamplifier output signals to a multi-channel
processor interferes with some Dolby noise reduction processing.
Processors that feature Dolby Pro Logic decoding sometimes
also feature a form of Dolby noise reduction similar to the
Dolby B noise reduction found in cassette decks. Designed to
respond to input sources based on their strength, Dolby noise
reduction requires input sources to be calibrated to Dolby
standards. Variable preamplifier output signals cause Dolby
noise reduction to mis-track and, in extreme cases, Dolby
circuits to overload.
To avoid these problems, SSP mode allows input sources to
pass through the Nº 320S without interference. When SSP
mode is activated:
SSP
LINE
•
The front panel display appears as shown to the left, indicating
that the Nº 320S is sending line-level input signals to the
associated processor.
•
The Gain parameter for the selected input is set to a fixed
level of +0dB for inputs using balanced (XLR) connectors and
+6dB for inputs using single-ended (RCA) connectors.
•
All Nº 320S volume controls – including master volume,
balance, and volume-related parameters – are deactivated to
prevent the Nº 320s from distorting channel balance. As a
result, the processor controls the relative volume level of all
channels while maintaining its calibrated output levels.
Nº 320S
Controls & Modes
To activate and use SSP mode:
1. Make sure the Nº 320S and all associated components are
powered off and disconnected from electrical outlets.
2. Connect the output connectors on the surround sound source
component to the input connectors on the surround sound
processor.
•
For example, if this source component is a DVD player,
connect the output connectors on the DVD player to the
input connectors on the processor.
3. Connect the center, surround, and subwoofer output connectors
on the processor to the appropriate input connectors on the
power amplifier(s).
4. Connect the front left and right output connectors on the
processor to the desired stereo input connectors on the
Nº 320S.
•
For best performance, use balanced (XLR) connections
whenever possible.
5. Connect the main output connectors on the Nº 320S to the
appropriate input connectors on the power amplifier(s).
•
A balanced (XLR) connection between the Nº 320S and
the associated power amplifier will offer the highest possible
performance with the best protection against RF
interference and other common mode noise.
CAUTION
BEFORE ACTIVATING SSP MODE, SET THE ASSOCIATED
SURROUND SOUND PROCESSOR VOLUME CONTROL TO
A REASONABLE LEVEL TO PREVENT SENDING
DANGEROUS SIGNAL LEVELS TO THE LOUDSPEAKERS.
6. Using the Nº 320S, rotate the front panel select knob or press
the remote control select ± buttons to select the input for
which the stereo input connector selected in step 3 is
assigned.
•
The front panel display indicates the name and volume
level of the selected input.
(continued)
4-9
Controls & Modes
Mark Levinson
SSP (Surround Sound Processor) Mode (continued)
Name=INPUT 1
Input 1 is used
here as an example
and may be substituted for whichever
input was selected
in step 3 (page 4-9).
Name=_______
7. Press and hold the front panel or remote control setup button
until the Name parameter for the selected input opens on the
front panel display as shown to the left.
•
8. Press the front panel or remote control enter button once to
select the Name parameter and access the custom names list.
•
4-10
The front panel setup LED lights red to indicate that the
setup menu is open.
The current input name will blink on the front panel
display as shown to the left to indicate that a new input
name can be selected from the custom names list.
Name=SSP
9. Rotate the front panel volume knob or press the remote
control volume ± buttons to scroll through all custom input
names until the SSP name appears on the front panel display
as shown to the left.
SAVING DATA
10. Press the enter button to select the SSP name, which activates
SSP mode.
•
The SAVING DATA message will appear on the front panel
display as shown to the left to indicate that the SSP name
is being saved.
5
Troubleshooting & Maintenance
Troubleshooting
Incorrect operation is sometimes mistaken for malfunction. If
problems occur, refer to this section for troubleshooting information.
If problems persist, contact Mark Levinson Customer Support at
781-280-0300 or www.marklevinson.com.
No Power
1. Examine the power cord to ensure that it is connected to both
the ~ac mains connector and a wall outlet.
2. Make sure the Nº 320S is powered on with the front panel
power button.
3. Make sure the Nº 320S is not in standby. The front panel
standby LED blinks red to indicate that the Nº 320S is in
standby and lights red to indicate that the Nº 320S is not in
standby.
4. Make sure display intensity has not been set to OFF (0%),
deactivating the front panel display.
5. Examine the electrical circuit breaker to ensure that power is
supplied to the wall outlet to which the Nº 320S is connected.
No Remote Control
Operation
1. Eliminate obstructions between the remote control IR
transmitter and the front panel display IR receiver.
2. Make sure the rear panel ir input connector is not being used.
3. Make sure the remote control is positioned within 17 feet
(5m) of the front panel display IR receiver. If the Nº 320S is
placed inside a glass cabinet, tinted glass will reduce the
remote control range.
4. Make sure the remote control signal is being received at the
front panel display IR receiver at a reasonable angle.
5. Make sure the front panel display IR receiver is not exposed
to strong sunlight, halogen light, or fluorescent light. This can
cause IR reception to become unreliable.
6. Replace the remote control batteries.
5-1
Troubleshooting & Maintenance
No IR Learning
Mark Levinson
1. Eliminate obstructions between the learning remote control
and the left side of the front panel display.
2. Adjust the distance between the learning remote control and
the left side of the front panel display.
3. Make sure the learning remote control and the left side of the
front panel display are not exposed to strong sunlight, halogen
light, or fluorescent light. This can cause IR reception to
become unreliable.
4. Make sure the learning remote control is configured to learn
commands.
5. Replace the learning remote control batteries.
No Main Output
1. Examine audio cables to ensure a solid connection between the
Nº 320S and associated components.
2. Make sure master volume is set to an audible level.
3. Make sure mute is deactivated.
4. Make sure the Offset parameter for the selected input is not
reducing master volume to an inaudible level.
5. Make sure the Nº 320S main output connectors are connected
to an operational power amplifier, and that the associated
power amplifier is connected to operational loudspeakers.
5-2
6. Make sure all associated components are powered on and
connected to electrical outlets.
7. Make sure the associated component connected to the selected
input is producing an input signal.
No Record Output
1. Make sure the Rec.Out parameter for the selected input has
been used to assign the selected input for a record output
connector.
2. Make sure the associated component connected to the selected
input is producing an input signal.
Audible Hum
1. If a cable TV connection is present, disconnect the cable from
the wall outlet. If this eliminates the humming sound, a ground
loop isolation device is required. Contact an authorized Mark
Levinson dealer for assistance.
2. Disconnect components one at a time to isolate the problem.
Once the problem is identified, make sure the problematic
component is properly grounded and connected to the same
electrical circuit as the Nº 320S.
Nº 320S
Troubleshooting & Maintenance
“Missing” Input
No Link Controls
1. Make sure the Name parameter for the selected input
has not been set to unused.
1. Make sure the slave chain includes Mark Levinson components
that are compatible with the Nº 320S.
2. Examine Link connections to ensure a solid connection
between linked components.
3. Make sure Link connections have been made using Link
communication ports and supplied or constructed Link
communication cables.
4. Make sure constructed Link communication cables have been
twisted 180˚ as shown in the illustration at the bottom of page
2-10 for a straight-through (pin 1-to-pin 1) connection.
5. Examine the slave chain to ensure that connections meet all
of the requirements listed in the table on page 2-11.
6. Make sure Link controls have been enabled on the linked digital
transport(s) linking menu, which allows activation and
deactivation of individual Link controls. Refer to the appropriate
digital transport owner’s manual for additional information.
7. Make sure linked components have been powered on in the
order specified in step 4 (page 2-12). Linked components must
be powered on ONE AT A TIME in this order to ensure proper
functioning of Link controls.
Erratic Behavior
1. Power cycle the Nº 320S, waiting at least 10 seconds between
powering the Nº 320S off and on.
2. Restore factory-default settings.
If All Else Fails...
1. Power cycle the Nº 320S, waiting at least 10 seconds between
powering the Nº 320S off and on.
2. Restore factory-default settings.
3. Contact an authorized Mark Levinson dealer.
4. Contact Mark Levinson Customer Support at 781-280-0300 or
www.marklevinson.com.
(continued)
5-3
Troubleshooting & Maintenance
Mark Levinson
(continued)
Restoring Factory-Default
Settings
Performing this procedure restores all parameters and user-defined
controls to their factory-default settings. Before performing this
procedure, it is recommended to record all custom settings on the
Installation Worksheet (page A-4).
To restore factory-default settings:
1. Press and release the front panel power button to power off
the Nº 320S. It is also recommended to power off all associated
components.
2. Press and hold the front panel setup and display intensity
buttons.
3. Still holding the setup and display intensity buttons, press
and release the power button to power on the Nº 320S.
CLEAR SETUP?
•
The CLEAR SETUP? message will appear on the front
panel display as shown to the left.
5-4
4. Choose one of the following:
•
To restore factory-default settings, continue holding the
setup and display intensity buttons for about 10 seconds.
The FACTORY SETTINGS RESTORED message will blink
on the front panel display as shown below when factorydefault settings have been restored.
FACTORY
•
SETTINGS
RESTORED
To cancel restoration of factory-default settings, release the
setup and display intensity buttons. The CLEAR and
CANCELLED messages will blink on the front panel
display as shown below to indicate that restoration of
factory default settings has been cancelled.
CLEAR
CANCELLED
5. Power on all associated components that were powered off in
step 1.
Nº 320S
Troubleshooting & Maintenance
Care & Maintenance
The Nº 320S requires routine care and maintenance to ensure
optimal performance. The bulleted items below indicate
maintenance procedures that should be performed on a regular
basis.
Note
Failure to perform the maintenance procedures included in
this section may void the manufacturer’s warranty and/or
standard repair policies.
•
Use a feather duster or a low-pressure blower to remove dust
from the Nº 320S exterior surface.
•
Use a soft, lint-free cloth to remove dirt and fingerprints from
the Nº 320S exterior surface. Do not use a cloth made with
steel wool or metal polish. If needed, this cloth can be
dampened with isopropyl alcohol. Do not dampen the cloth
with Benzene, acetone-based cleaners, and other commercial
cleaners. Wipe the Nº 320S exterior surface in the same
direction as the grain of the brushed aluminum.
CAUTION
DO NOT APPLY LIQUID DIRECTLY TO THE Nº 320S
EXTERIOR SURFACE. DOING SO MAY DAMAGE
ELECTRICAL COMPONENTS.
•
Replace the remote control batteries as needed. Refer to
Remote Control Batteries (1-6) for additional information.
•
Refer to Installation Considerations (page 1-4) for information
about preventative maintenance.
(continued)
5-5
A
Appendix
Specifications
Unless otherwise specified, these specifications indicate nominal
values measured over a 20Hz to 20kHz bandwidth through balanced
(XLR) connections.
Power Consumption
Operating Voltage
Connector Complement
• 50W maximum
• 100, 120, 220, or 230V AC power at 50 or 60Hz (preset)
• 3 balanced (female XLR) stereo inputs
• 4 single-ended (Mark Levinson-RCA) stereo inputs
• 1 balanced (male XLR) stereo main output
• 1 single-ended (Mark Levinson-RCA) stereo main output
• 2 single-ended (Mark Levinson-RCA) stereo record outputs
• 2 8-pin RJ-45 connectors for Link communication
• 1 6-pin modular RJ-11 connector for RS-232 communication
• 1 3.5mm mini-jack for trigger output
• 1 3.5mm mini-jack for ir input
• 1 phono ground terminal
• 1 IEC-standard ~ac mains connector
Gain
Volume Control Range
Gain Resolution
• 0, 6, 12, or 18dB (line-level stage)
• 80.0dB (maximum)
• 1.0dB increments up to 23.0dB on front panel display (-57dB)
• 0.1dB increments above 23.0dB on front panel display (-57dB)
Specifications are subject to change without notice.
(continued)
A-1
Appendix
Mark Levinson
Specifications (continued)
Input Overload
XLR
Connectors
RCA
Connectors
+18dB
1.6V
0.8V
+12dB
3.3V
1.6V
+6dB
6.6V
3.3V
0dB
13.2V
6.6V
Input Impedance
• 100k
Output Impedance
• <50Ω
THD + N
• <0.001%
Crosstalk
• <90dB (any input to any output, input terminated)
Residual Noise
A-2
Gain
Setting
Frequency Response
Weight
• 20Hz to 20kHz (input terminated < -94dBV)
• 10 to 40kHz, ±0.2 dB
• 30 pounds (14kg)
Specifications are subject to change without notice.
Nº 320S
Appendix
Dimensions
Front View
17.75” (450.85mm)
polarity
2.92”
(74.04mm)
mono
2.66”
(67.56mm)
volume
select
PREAMPLIFIER
Nº 320
power
setup
enter
display intensity
balance
mute
standby
0.26” (6.48mm)
13.62” (345.95mm)
2.07” (52.45mm)
2.07” (52.45mm)
Top View
17.50” (444.50mm)
0.47” (11.89mm)
A-3
13.58”
(344.91mm)
12.00” (304.8mm)
0.43” (10.80mm)
0.50” (12.70mm)
1.58” (40.11mm)
Specifications are subject to change without notice.
(continued)
Appendix
Mark Levinson
(continued)
Installation Worksheet
Set Inputs
Name
Gain
Offset
Rec.Out
Input 1
Input 2
Input 3
Input 4
Input 5
Input 6
Input 7
Setup Menu Parameters
Control/Mode Settings
Mute
Polarity
MaxVol
Intensity
Trig.
Balance
Sw
Mono Playback
A-4
Set Inputs
Name
Gain
Offset
Input 1
Input 2
Input 3
Input 4
Input 5
Input 6
Input 7
Setup Menu Parameters
Control/Mode Settings
Mute
Polarity
MaxVol
Intensity
Trig.
Balance
Sw
Mono Playback
Rec.Out
-10,
I
Index
SYMBOLS
C
, iv, IFC
CANCELLED message, 5-4
, iv, IFC
care & maintenance, 5-5
CAUTION, iv, 1-6, 1-7, 1-9, 2-5,
2-10, 3-5, 3-8, 4-9, 5-5, IFC
, iv
Note, iv, 1-5, 1-8, 1-9, 2-1, 2-2,
2-3, 2-4, 2-5, 2-6, 2-7, 2-8, 2-9,
2-11, 2-12, 2-15, 2-16, 2-17,
2-18, 2-19, 3-2, 3-4, 3-7, 3-8,
3-10, 4-1, 4-2, 4-3, 4-4, 5-5
WARNING, iv, 1-6, IFC
CASS input name, 3-5
cassette decks, 3-5, 4-8
CAUTION, iv, 1-6, 1-7, 1-9, 2-5,
2-10, 3-5, 3-8, 4-9, 5-5, IFC
CD input name, 3-5
CD players, 1-9, 3-5
CD processors, 2-9, 2-11
CD recorders, 2-7, 3-5
CD transports, 2-9
CD-R input name, 3-5
A
~ac mains connector, 1-6, 1-7, 1-8,
2-1, 2-2, 2-5, 2-16, 5-1, A-1
adjusting parameter settings, 3-3
, iv
auxiliary components, 3-5
CLEAR SETUP? message, 5-4
azimuth alignment, phono
cartridges, 4-7
communication circuits, 1-2, 1-3
compatibility, linking, 2-9, 2-11
connectors
~ac mains, 1-6, 1-7, 1-8, 2-1, 2-2,
2-5, 2-16, 5-1, A-1
balanced, 1-2, 1-3, 1-9, 2-6, 4-3,
4-5, 4-8, 4-9, A-1
crosstalk, A-2
balance button, 2-4, 2-18, 3-9, 4-4,
4-6, 4-7
input, 1-2, 1-3, 1-9, 1-10, 2-6,
3-4, 3-7, 3-9, 4-9, A-1
BALANCE KEY IR command, 3-9
ir input, 1-2, 1-4, 1-6, 2-2, 2-8
(ill.), 2-15, 2-16, 5-1, A-1
balanced connectors, 1-2, 1-3, 19, 2-6, 4-3, 4-5, 4-8, 4-9, A-1
balanced conversion, input
signals, 1-2, 1-4
batteries, remote control, 1-6 to
1-7 (ill.), 2-15, 5-1, 5-5
record output, 1-2, 1-3, 2-3, 2-7,
2-17, 2-18, 3-3, 3-8, 4-3, 4-5,
5-2, A-1
RJ-11, 2-8, 2-10, A-1
RJ-45, 2-7, 2-10, A-1
RS-232, 1-2, 1-4, 2-8, 3-11, A-1
slave in, 1-2, 1-4, 2-7, 2-9, 2-11,
3-10, A-1
single-ended, 1-2, 1-3, 1-4, 1-9,
2-6, 2-7, 4-3, 4-5, 4-8, A-1
specifications, A-1
XLR, 1-2, 1-3, 1-9, 2-6 (ill.), 4-3,
4-5, 4-8, 4-9, A-1, A-2
CLEAR message, 5-4
balanced circuits, 1-2
RCA, 1-2, 1-3, 1-9, 2-6, 2-7, 4-3,
4-5, 4-8, A-1, A-2
channel separation, 1-2, 1-3, 2-5
AUX input name, 3-5
balance LED, 2-4, 2-18, 4-4, 4-6
connectors
trigger output, 1-2, 1-4, 2-8,
3-11, A-1
character list, 3-4, 3-5, 3-6 (ill.),
3-7
balance, 1-4, 2-3, 2-4, 2-7, 2-17,
2-18, 3-8, 3-9, 4-3 to 4-4, 4-6,
4-7, 4-8, A-4
(continued)
channel balance, 2-4, 2-18, 4-3,
4-4, 4-6
audio circuits, 1-1, 1-2, 1-3
B
C
constructing Link communication
cables, 2-10 (ill.)
continuous operation, Nº320S,
1-8, 4-1
control circuits, 1-1, 1-3
creating a slave chain, 2-9, 2-10
to 2-13 (ill.)
crosstalk, A-2
custom input names, 3-4, 3-5, 3-6
4-10
custom names list, 3-4 to 3-5
(ill.), 3-6, 4-10
D
, 1-2, 1-4, 2-7, 2-9, 2-11,
3-10, A-1
D/A converters, 3-5
main output, 1-2, 1-3, 1-8, 1-9,
2-2, 2-4, 2-6, 2-18, 3-8, 4-3,
4-4, 4-5, 4-9, 5-2, A-1
DAT input name, 3-5
mini-jack, 2-8, A-1
phono ground, 2-8, A-1
phono input, 2-6
DAC input name, 3-5
digital audio processors, 2-7, 2-9,
2-10, 2-11, 2-12, 2-13, 2-14, 3-5
digital transports, 2-7, 2-9, 2-10,
2-11, 2-12, 2-13, 2-14, 2-15, 3-5,
3-10, 5-3
(continued)
I-1
Index
Mark Levinson
Index (continued)
D
G
(continued)
I
(continued)
digital-to-analog converters, see
D/A converters
gain levels, input, 1-2, 3-3, 3-7, 48
dimensions, Nº320S, A-3
display button, 2-18, 3-9, 4-3
Gain parameter, 3-3, 3-4, 3-7, 4-8,
A-2, A-4
character list, 3-4, 3-5, 3-6
(ill.), 3-7
DISPLAY DIM IR command, 3-9
gain resolution, A-1
custom, 3-4, 3-5, 3-6 4-10
DISPLAY FULL IR command, 3-9
gain specification, A-1
DISPLAY HALF IR command, 3-9
GO BALANCE IR command, 3-9
custom names list, 2-14, 3-4
to 3-5 (ill.), 3-6, 4-10
display intensity, 1-4, 2-4, 2-7, 2-9,
2-13, 2-14, 2-18, 3-9, 4-2 to 4-3,
5-1, A-4
GO INPUT 1-7 IR commands, 3-9
GO STANDBY IR command, 3-9
scrolling, 2-2, 2-14, 2-17, 3-5
display intensity button, 2-4, 4-3,
5-4
GO UNMUTE IR command, 3-9
selected, the, 1-2, 1-10, 2-2, 2-3,
2-14, 2-17, 3-4, 3-5, 3-6, 3-7, 3-8,
4-8, 4-9, 4-10, 5-2, 5-3
GO MUTE IR command, 3-9
display intensity link, 2-7, 2-9,
2-13, 2-14
H
DISPLAY OFF IR command, 3-9
documentation conventions, iv
Dolby circuits, 4-8
DVD input name, 3-4, 3-5
names
factory-default, 1-7, 1-10, 3-4,
3-5, 3-6, 3-7
selecting, 1-2, 1-10, 2-2, 2-7, 2-9,
2-12, 2-13, 2-14, 2-17, 3-3, 3-4,
3-6, 3-9, 4-9
HDCD link, 2-14
specifications, A-1
highlights, Nº320S, 1-3 to 1-4
volume levels, 1-2, 1-10, 2-2, 2-3,
2-14, 2-17, 3-3, 3-4, 3-6, 3-7, 4-9
DVD players, 3-4, 3-5, 4-9
I
I-2
inputs
installation considerations,
Nº320S, 1-4 to 1-7
installation worksheet, A-4
impedance, A-2
INTENSITY KEY IR command, 3-9
infrared signals, 2-8, 2-16, 3-8,
3-9, 3-10
ir input connector, 1-2, 1-4, 1-6,
2-2, 2-8 (ill.), 2-15, 2-16, 5-1, A-1
initialization sequence, 1-8, 2-1,
2-12, 4-1
IR learning
ENTER KEY IR command, 3-9
EXIT BALANCE IR command, 3-9
INPUT 1-7 input names, 3-5, 3-6
connections, 2-15, 3-10
EXIT STANDBY IR command, 3-9
input connectors, 1-2, 1-3, 1-9,
1-10, 2-6, 3-4, 3-7, 3-9, 4-9, A-1
learning remote controls, 3-8,
3-9, 3-10, 5-2
input impedance, A-2
reception, 2-15, 3-9, 5-1, 5-2
input selection link, 2-7, 2-9, 213, 2-14
troubleshooting, 5-2
E
enter button, 2-3, 2-17, 3-2, 3-3,
3-6, 3-9, 3-10, 4-2, 4-6, 4-7, 4-10
F
factory-default settings, restoring, 3-7, 5-3, 5-4
inputs
activated, 2-2, 2-17, 3-8
FACTORY SETTINGS RESTORED
message, 5-4
assigning components, 2-13,
2-14, 3-4, 3-5
FCC notice, i
assigning record outputs, 1-2,
2-7, 3-3, 3-8, 5-2
frequency response, A-2
front panel display, 1-4, 1-6, 2-2,
2-4, 2-14, 2-15, 2-16, 2-18, 3-1,
3-8, 3-9, 4-2, 4-3, 5-1, 5-2
deactivated, 1-2, 1-3, 2-2, 2-17,
3-4
front panel overview, 2-1 (ill.) to
2-4
“missing”, 5-3
gain levels, 1-2, 3-3, 3-7, 4-8
commands, 3-8, 3-9, 3-10
IR receiver, 1-6, 2-2, 2-15, 2-16, 5-1
IR transmitter, 1-6, 2-2, 2-15, 2-16,
5-1
L
L + R mono mode, 4-5, 4-6, 4-7
L – R mono mode, 4-5, 4-7
L ONLY mono mode, 4-5
laser disc players, 3-5
LD input name, 3-5
Nº320S
Index
L
M
(continued)
learning remote controls, 3-8, 3-9,
3-10, 5-2
LEDs, front panel
main output connectors, 1-2, 1-3,
1-8, 1-9, 2-2, 2-4, 2-6, 2-18, 3-8,
4-3, 4-4, 4-5, 4-9, 5-2, A-1
balance, 2-4, 2-18, 4-4, 4-6
maintenance, Nº320S, 5-5
mono, 2-2, 2-18, 4-5
making connections, 1-9, 2-5, 2-9,
2-10, 2-12
mute, 2-4, 2-18
polarity, 2-2, 2-18, 4-3
setup, 2-3, 2-16, 3-2, 3-4, 3-6,
4-10
standby, 2-2, 2-4, 2-12, 2-16,
2-18, 4-1, 4-2, 4-3, 5-1
Link
communication cables, 1-5, 2-9,
2-10 (constructing), 5-3
communication ports
, 2-7, 2-9, 2-11, 3-10, A-1
control, 2-11
input, 2-11
master, 2-9, 2-11
names, 2-11
Nº320S, 1-2, 1-4, 2-7, 2-9,
2-10, 2-11, 3-10, A-1
slave in, 2-7, 2-9, 2-11
slave out, 2-9, 2-11
compatibility, 2-9, 2-11
connections, 2-9 to 2-10
(making), 2-11, 2-12, 2-15,
3-10, 5-3
Nº 31.5, 2-9, 2-15, 2-14, 3-10
Nº32, 1-1
Nº 320S
care & maintenance, 5-5
dimensions, A-3
highlights, 1-3 to 1-4
MaxVol parameter, 2-3, 2-17,
3-11, A-4
obtaining service, IBC
installation considerations, 1-4
to 1-7
MD input name, 3-5
operating voltage, 1-7, 2-1, 2-5,
A-1
mini-disc players, 3-5
phono modules, 1-1, 1-4, 2-6
mini-jack connectors, 2-8, A-1
power requirements, 1-7 to 1-8
“missing” inputs, 5-3
product registration, 1-4, 1-5, 2-8
MODE parameter, 4-5, 4-6, 4-7
return authorization, IBC
modes
serial number, 2-8, IBC
mono modes, 2-18, 4-5, 4-6, 4-7
shipping, 1-4, IBC
normal operating mode, 2-1, 2-2,
2-3, 2-15, 2-16
special design features, 1-1 to 1-4
SSP mode, 1-3, 2-3, 2-17, 3-4,
3-5, 4-4, 4-8 to 4-10
see also surround sound
processors
mono button, 2-2, 2-18, 3-9, 4-5,
4-6, 4-7
MONO KEY IR command, 3-9
mono LED, 2-2, 2-18, 4-5
mono modes, 2-18, 4-5, 4-6, 4-7
mono playback, 1-4, 2-2, 2-18, 45 to 4-7, A-4
slave chains, 2-9, 2-10 to 2-13
(ill.)
mute button, 2-4, 2-18 to 2-19,
3-9, 3-11
troubleshooting, 5-3
MUTE KEY IR command, 3-9
communication port, 2-7,
2-9, 2-11, 3-10, A-1
mute level, 2-4, 2-18, 2-19, 3-11
mute LED, 2-4, 2-18
Mute parameter, 2-4, 2-19, 3-11,
A-4
linking, 2-9 to 2-15
loudspeakers, 1-5, 2-3, 3-5, 3-8,
4-6, 4-9, 5-2
(continued)
master volume, 1-2, 1-3, 2-3, 2-4,
2-7, 2-14, 2-15, 2-17, 2-18, 2-19,
3-7, 3-8, 3-10, 3-11, 4-4, 4-8, 5-2
controls, 2-7, 2-9, 2-13 to 2-14,
3-4, 3-5, 5-3
linked components, 2-7, 2-10,
2-11, 2-12, 2-13, 2-14, 3-4, 3-5,
5-3
N
N
Name parameter, 2-2, 2-7, 2-17, 33, 3-4 to 3-7, 4-10, 5-3, A-4
unpacking, 1-4 to 1-5
warranty, 1-4, 1-5, 5-5, IBC
weight, A-2
Nº 35, 3-5
I-3
Nº 36, 2-9, 3-5
Nº 360, 2-9, 3-5
Nº 360S, 2-9, 2-11, 2-13, 3-4, 3-5
Nº 36S, 2-9, 3-5
Nº 37, 2-9, 2-11, 2-13, 2-14, 2-15,
3-10
Nº 39, 2-9, 2-11, 2-15, 3-5, 3-10
Nº 390S, 2-9, 2-11, 2-13, 2-15, 3-5,
3-10
Nº 431, 2-13
Nº 432, 2-11, 2-13
NO CHANGE message, 3-2
normal operating mode, 2-1, 2-2,
2-3, 2-15, 2-16
Note, iv, 1-5, 1-8, 1-9, 2-1, 2-2,
2-3, 2-4, 2-5, 2-6, 2-7, 2-8, 2-9,
2-11, 2-12, 2-15, 2-16, 2-17,
2-18, 2-19, 3-2, 3-4, 3-7, 3-8,
3-10, 4-1, 4-2, 4-3, 4-4, 5-5
navigating the setup menu, 3-1
to 3-3 (ill.)
Nº 30, 2-9, 2-14, 3-5
Nº 30.5, 2-9, 2-14, 3-5
Nº 30.6, 2-9, 2-14, 3-5
Nº 31, 2-9, 2-15, 2-14, 3-10
(continued)
Index
Mark Levinson
Index (continued)
O
obtaining service, IBC
Offset parameter, 2-3, 2-17, 3-3, 34, 3-7, 5-2, A-4
Q
quick start guide, Nº320S, 1-8 to
1-10
output impedance, A-2
output level imbalances, 4-6
overload, input, A-2
scrolling inputs, 2-2, 2-14, 2-17,
3-5
R
select knob, 1-2, 1-10, 2-2, 3-3, 34, 3-5, 3-6, 3-10, 4-9
R ONLY mono mode, 4-5, 4-7
SELECT NEXT IR command, 3-9
RCA connectors, 1-2, 1-3, 1-9,
2-6, 2-7, 4-3, 4-5, 4-8, A-1, A-2
SELECT PREV IR command, 3-9
rear panel overview, 2-5 to 2-8
(ill.)
selecting inputs, 1-2, 1-10, 2-2,
2-7, 2-9, 2-12, 2-13, 2-14, 2-17,
3-3, 3-4, 3-6, 3-9, 4-9
Rec.Out parameter, 2-7, 3-3, 3-4,
3-8, 5-2, A-4
SENDING --> message, 3-10
recording, 2-7, 2-14, 3-8, 4-3
service, obtaining, IBC
parameters, adjusting, 3-3
record link, 2-7, 2-9, 2-13, 2-14
phono cartridges, 2-8, 4-7
record output connectors, 1-2,
1-3, 2-3, 2-7, 2-17, 2-18, 3-3, 3-8,
4-3, 4-5, 5-2, A-1
Set Inputs menu, 1-2, 1-4, 3-3 to
3-8 (ill.), 3-4 (shortcut) A-4
P
azimuth alignment, 4-7
I-4
(continued)
select ± buttons, 1-10, 2-17, 3-3,
3-4, 3-5, 3-6, 3-9, 3-10, 4-9
operating voltage, 1-7, 2-1, 2-5,
A-1
operation considerations, remote
control, 1-6, 2-15 to 2-16
S
serial number, 2-8, IBC
setup button, 1-2, 2-3, 2-16, 3-1,
3-2, 3-4, 3-6, 3-9, 4-10, 5-4
phono ground connector, 2-8, A-1
reel-to-reel players, 3-5
SETUP KEY IR command, 3-9
phono input connector, 2-6
remote control
setup LED, 2-3, 2-16, 3-2, 3-4, 3-6,
4-10
phono modules, Nº320S, 1-1, 1-4,
2-6
batteries, 1-6 to 1-7 (ill.), 2-15,
5-1, 5-5
placement, Nº320S, 1-5 to 1-6
command overview, 2-16 to 2-19
(ill.)
playback
Setup menu, 2-3, 2-16, 2-17, 3-1
to 3-3 (navigating the), 3-2, 3-4,
3-6, 3-10, 3-11, 4-10, A-4
mono, 1-4, 2-2, 2-18, 4-5 to 4-7,
A-4
operation considerations, 1-6,
2-15 to 2-16
shipping the Nº320S, 1-4, IBC
stereo, 1-4, 4-5, 4-7
overview, 2-15 to 2-19 (ill.)
single-ended connectors, 1-2, 1-3,
1-4, 1-9, 2-6, 2-7, 4-3, 4-5, 4-8,
A-1
playback link, 2-7, 2-9, 2-13, 2-14
troubleshooting, 5-1
polarity, 1-4, 2-2, 2-18, 3-8, A-4
residual noise, A-2
polarity button, 2-2, 2-18, 3-9, 4-3
RESTORING message, 3-2
POLARITY KEY IR command, 3-9
return authorization, IBC
polarity LED, 2-2, 2-18, 4-3
RF interference, 1-6, 1-9, 2-6, 2-8,
4-9
ports, see connectors
power amplifiers, 1-2, 1-5, 1-9,
1-10, 2-6, 2-7, 2-9, 2-10, 2-11,
2-12, 2-13, 2-14, 4-9, 5-2
power button, 1-6, 1-8, 2-1, 4-1,
5-1, 5-4
power failures, 1-8, 2-13, 5-1
power requirements, Nº320S, 1-7
to 1-8
power supplies, 1-1, 1-2, 1-3
power transformers, 1-1
product registration, 1-4, 1-5, 2-8
slave in communication port,
2-7, 2-9, 2-11, 3-10, A-1
slave chains, 2-9, 2-10 to 2-13
(ill.)
SLEEP parameter, 4-1 to 4-2
RJ-11 connectors, 2-8, 2-10, A-1
sleep timer, 1-4, 4-1 to 4-2
RJ-45 connectors, 2-7, 2-10, A-1
special design features, Nº320S, ,
1-1 to 1-4
RS-232 communication port, 1-2,
1-4, 2-8, 3-11, A-1
RtoR input name, 3-5
power consumption, Nº320S, A-1
power cord, 1-5, 1-6, 1-7, 1-8, 2-1,
2-5, 5-1
shortcut, Set Inputs menu, 3-4
S
SACD input name, 3-5
SACD players, 3-5
safety instructions, IFC
SAT input name, 3-5
satellite receivers, 3-5
SAVING DATA message, 3-2, 3-6,
3-7, 4-10
specifications, A-1 to A-3
SSP input name, 3-5, 4-10
see also surround sound processors
SSP mode, 1-3, 2-3, 2-17, 3-4, 3-5,
4-4, 4-8 to 4-10
see also surround sound processors
standby, 1-4, 1-8, 2-1, 2-2, 2-7, 2-9,
2-12, 2-13, 2-14, 2-16, 3-9, 3-11,
4-1 to 4-2, 5-1
standby button, 1-8, 2-2, 2-16, 39, 3-11, 4-1, 4-2
standby LED, 2-2, 2-4, 2-12, 2-16,
2-18, 4-1, 4-2, 4-3, 5-1
standby link, 2-7, 2-9, 2-13, 2-14
Nº320S
Index
S (continued)
STANDBY KEY IR command, 3-9
stereo playback, 1-4, 4-5, 4-7
W
warm-up & break-in period,
Nº320S, 1-7 to 1-8
surround sound processors, 1-3,
4-8 to 4-10
see also SSP mode
WARNING, iv, 1-6, IFC
Sw parameter, 3-11, A-4
weight, Nº320S, A-2
T
table of contents, ii
tape decks, 2-7, 3-5
warranty, Nº320S, i, 1-4, 1-5, 2-8,
2-10, 5-5, IBC
X
XLR connectors, 1-2, 1-3, 1-9, 2-6
(ill.), 4-3, 4-5, 4-8, 4-9, A-1, A-2
TAPE input name, 3-5
Teach IR menu, 3-8 to 3-10 (ill.)
THD + Noise, A-2
Trig. parameter, 2-8, 3-11, A-4
trigger output connector, 1-2, 1-4,
2-8, 3-11, A-1
troubleshooting, 5-1 to 5-3
TUNER input name, 3-5
tuners, 3-5
I-5
U
unpacking, Nº320S, 1-4 to 1-5
unused input name, 1-2, 1-3, 2-2,
2-17, 3-5, 5-3
V
VCR input name, 3-5
VCRs, 3-5, 3-8
volume ± buttons, 2-17, 2-19, 3-2,
3-3, 3-6, 3-9, 3-10, 4-4, 4-6, 4-10
volume attenuators, 1-1, 1-2, 1-3
volume control range, A-1
VOLUME DOWN IR command, 3-9
volume knob, 2-3, 2-4, 3-2, 3-3,
3-6, 3-10, 4-4, 4-6, 4-10
VOLUME UP IR command, 3-9, 310
(continued)
Obtaining Service
We take great pride in selling Mark Levinson products through a
network of well-trained dealers who are dedicated to customer
satisfaction. These professionals are ideally suited to design,
install, and, if the need arises, facilitate the service of highperformance electronic home entertainment systems.
Customer Support assists authorized Mark Levinson dealers in
solving problems effectively. When purchasing Mark Levinson
products, customers make a substantial investment in audio/video
equipment of exceptional quality. In the event that service is
needed, Customer Support intends to provide assistance that
matches that investment.
If this Mark Levinson product requires service, contact an
authorized Mark Levinson dealer for assistance. The dealer will
contact Customer Support to determine the best way to rectify the
situation and, if needed, to obtain return authorization in the
event that the product must be returned to the factory for repair.
Alternatively, customers may contact Customer Support directly to
obtain return authorization. However, return authorization must
be obtained before any product is shipped to the factory. Products
returned without prior authorization will be refused.
When obtaining return authorization, please be prepared to
provide the model, serial number, and a complete, explicit
description of the problem. A copy of the original, dated Bill of
Sale must be included to confirm warranty status.
Please always retain the original packing materials. This product
should be properly packaged (in its original packing materials
whenever possible) and the proper return authorization must be
on the outer carton for easy identification. Improper packaging
may lead to unnecessary freight damage that is not covered by
either the freight carrier or the warranty.
3 Oak Park, Bedford, MA, 01730-1413 USA | Telephone: 781-280-0300 | Fax: 781-280-0490 | www.marklevinson.com
Customer Support: Telephone: 781-280-0300 | Sales Fax: 781-280-0495 | Service Fax: 781-280-0499
Product Shipments: 16 Progress Road, Billerica, MA 01821-5730 USA
Part No. 070-630493 | Rev 0 | 02/04