1
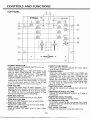
Vrrrcstalx
Vestax Mixing Controller
取 扱 説 明 書
U
P.2∼
OWNER■ S MANUAL
P.9∼
浩
混棚 禦1lselagttatbい ヽ002 JaFn
4‐
Phone 03‐ 3412・ 701l Fax 03‐ 3412・ 7013
Web:www Vestax.●
柵
〒 154‐ 0023
奮
弓
捨│マ
誘
汀
店
躍
藝卍
ト6フ
Web:www.Vestax.com
ス∞3綱 2川 3
ク
ァ
ッ
棚
棚
om
1鵬 J陽此測わnhm"‖ にGUt tL m¨ 耐川K
phone゛ )1420‐ 83000 Fax
“1011420・ 80040
Web:www,Vestax.oo.uk
L濾 "“
舅
‖
譜
品
1躙ソ覧
CONGInTULAT10NS!
Thank you for purchasing the Vestax VMC-0O2XLu Mixing Controller. We suggest
that you read through this owner's manual thoroughly so that you may enjoy the full
use of this product safety and in the knowledge of all its special features and
su itably applications.
CONTENttS
C A U丁
10N
IMPORTANttSAFEGUARDS
FEATURES
CONTROLS AND FUNCT10NS
TOP PANEL
F R O Ntt PANEL
REAR PANEL
HOWTOCHANGEttHE FADER UNIT
CONNECT10N DIAGRAM
SPECIFICA丁 10NS
△
CAUT10N:TO REDUCE ttHE RISK OF ttLECTRIC SHOCK
DO NOT REMOVE COVER(OR BACK)
NO USttR‐ SERV!CEABLE PARttS iNS!DE
REFER SERVICiNG TO QUALIF:匡 D SERViCE PERSONNEL
The lightning flash with arrowhead symbol, within an equilateral triangle, is
intended to alert the user to the presence of uninsulated "dangerous voltage"
within the product's enclosure that may be of sufficient magnitude to consitute
risk of electric shock to persons.
a
The exclamation point within an equilateral triangle is intended to alert the user
to the presence of important operating and maintenance (servicing) instructions
in the literature accompanying the appliance.
TO REDUCE THE RISK OF FIRE OR ELECttRIC SHOCK, DO NOT
‐
巨XPOS巨 丁HIS APPLIANCE TO RAIN OR MOISTUR巨
-9-
:MPORttANtt SAFEGUARDS
READ BEFORE OPERATING EQUIPMENT
This product was designed and manufactured to rneet strict quality and safety
standards. There are, however, some insta‖ ation and operatiOn precautions
which you should be particularly aware of.
1.Read instructions-All the safety and operating
instructions should be read before the
appliance is operated.
2.Retain instructions-The safety and operating
instructions should be retained for future
9.This product should never be placed near or
over a radiator or heat register. This product
should not be placed in a built-in installation
such as a bookcase or rack unless proper
ventilation is provided or the manufacturer's
instructions have been adhered to.
reference.
3.Heed Warnings-Allwarnings on the appliance
and in the operating instructions should be
adhered to.
4.Follow Instructions-All operating and use
10.Power sources-This product should be
operated only from the type of power source
indicated on the marking label. lf you are not
sure of the type of power supply to your
home, consult your appliance dealer or local
power company.
instructions should be followed.
5.Cleaning-Do not use liquid cleaners or
aerosol cleaners. Use a damp cloth for
cleaning.
6.Attachments-Do not use attachments not
recommended by the product manufacturer
as they may cause hazards.
T.Water and Moisture-Do not use this product
near water-for example, near a bath tub,
wash bowl, kitchen sink, or laundry tub, in a
wet basement, or near a swimming pool, and
the like.
S.Accessories-Do not place this product on an
unstable cart, stand, tripod, or table. The
product may fall, causing serious injury to a
child or adult, and serious damage to the
appliance. Use only with a cart,. stand,
tripod, bracket, or table recommended by the
manufacturer, or sold with product. Any
mounting of the appliance should follow the
manufacturer's instructions, and should use a
mounting accessory recommended by the
manufacturer.
-10-
l l.Lightning-For added protection
of
this
product during a lightning storm, or when it is
left unattended and unused for long periods
of time, unplug it from the wall outlet. This will
prevent damage to the product due to
lightning and power-line surges.
l2.Overloading-Do not overload wall outlets
and extension cords as this can result in a
risk of fire or electric shock.
13.Object and Liquid Entry-Never push objects
of any kind into this product through
openings as they may touch dangerous
voltage points or short-out parts that could
result in a fire or electric shock. Never soill
liquid of any kind on the product.
l4.Servicing-Do not attempt to service product
yourself as opening or removing covers may
expose you to dangerous voltage or other
hazards. Refer all servicing to qualified
personnel.
15.Damage Requiring Service-Unplug this
product from the wall outlet and refer
servicing to qualified service personnel under
the following conditions:
a.When the power-supply cord or plug is
l6.Replacement Parts-When replacement
parts are required, be sure the service
technician has used replacement parts
specified by the manufacturer or have the
same characteristics as the original parts.
Unauthorized substitutions may result in fire,
electric shock or other hazards.
damaged.
b.lf liquid has been spilled or objects have
fallen into the oroduct.
c.lf the product has been exposed to rain or
water.
d.lf the product dose not operate normally by
following the operating instructions. Adjust
only those controls that are coverd by the
operating instructions as an improper
adjustment of other, controls may result in
damage and will often require extensive
work by a qualified technician to restore the
product to its normal operation.
e.lf the product has been dropped or cabinet
has been damaged.
f. When the product exhibits a distinct change
in performance this indicates need for
17.Safety Check-Upon completion of any
service or repairs to product, ask the service
technician to perform safety checks to
determine that the product is in proper
operating condition.
18.Carts and Stands-The appliance should be
used only with
a cart stand that is
recommended by manufacturer.
19.An appliance and cart combination should
be moved with care. Quick stops, excessive
force, and uneven surfaces may cause the
appliance and cart combination to overturn.
service.
FEATURES
OVMC-OO2XLu is equipped with 3-band isolator
on each channel, allowing DJs to mix in the
most creative way.
OThe EQ curve has been refined by our
manufacturing team to offer the sweetest
sounding, and most striking EQ available
among mixers in this price zone.
ODigital connection with computers and USB
devices is enabled by installing TUB-1(USB
Board / Sold Separately)to the OPTION
Otne cross fader of the VMC-0O2XLu is the
ultra smooth CF-R US, which is the best
quality fader available in this class.
OTo give young DJs all over the world a mixer
that can grow with their career, the crossfader in the VMC-OO2XLu can be upgraded to
the most double Vestax PROJader, CF-PCV
to realize pro-level pedormance.
BOARD slot.
-1 1-
CONttROLS AND FUNC丁 10NS
TOP PANEL
Vvestax出
δ 101日
m
¨0
0
o
け
o ¨
① POWERINDiCATOR
日ghts up whenthe
POWER SWITCH
C)INPUT SELECTOR
G)INPUT LEVEL METER
⑬ is on.
&肝 :晰 B品 』,た
⑨ CROSS FADER
醜
町襴
set, PGMl will be heard wnh the
crossfader set to the left side.
※When 2 individualinputs are connected to LINE 2 and
and if the input select switch of PGM 2 is set to LiNE
2/USB,both signals vvi‖ be mixed in to the channel.
VOLUME
⑩ MASTER
LEVEL VOLUME
he dgnJね vd outptts iom ttNE OUT
① MASTER
⑤
肥 寵
PGM iSOLATOR Hl
BALANCE VOLUME
)指
⑫ MONITOR
AdiustS the Hifrequency level of each PGM.
SbnJ bJance d he Lわ R Jde d
LEVEL VOLUME
AdiustS the headphone monitorlevel.
PGM iSOLATOR MID
⑬ CF
AdiustS the M!D frequency level of each PGM.
⑥ PGM:SOLATOR
PGM2 will be
hλ
冊Ъ
lYよ :瞑 緊
嵩
:rT:Lf驚 棉
』 l麗 1:私
aCement耐 h"c「 RUデ
鼎計Riξ 需記u『 口
嶽 ぢ
④
he htt dgnJ
When the input level of PGMl and PGM2 are
prope‖ y
USB(Optional, please read REAR PANEL on page13)
③ TR:M
誡e
lt「
MONITOR VOLUME
Crossfader signal to be monitored from each
LOW
program when the MON!TOR SELECT SW:TCH
AdiustS the LOVV frequency level of each PGM.
is selected 'icue:=.
C):NPUT LEVEL VOLUME
鳳 よattust the input ttvel of each PGM
-12-
⑭ MIC LEVEL VOLUME
Adjusts the inpu‖ evel ofthe MIc INPUT().
FRONtt PANEL
⑮ C.E
d
品
デ
認
151t』 Ъ
ttЬ 嶋
眺ご
ち
i島 乱
MASTER・ ・・lt allows you to hear the signal of
CURVE SWiTCH
雷鶴」
粽ξ
喘 1県 緩盤常
響朧
Jde br a gette curve sunaЫ e br bng
P:ξ
:∫
:せ
峰事
mlxes.
⑩ MONITOR
SELECT SWITCH
鵬 t認 詳。
論 淵ny
fぶ
L!NE OU丁
.
OPHONE JACK
Connectthe headphones with the impedance of
8ohm to 600ohm.
Sded he way d
REAR PANEL
⑬ POWER SWiTCH
Use to turn power on.
④ LINE OUT JACK
Connectto the input of power amplifier
⑩ POWER
② REC
JACK
Connectthe Vestax DC-15A,AC adaptor.
⑩ LiNEINPUT
JACK
f:『
肥認 嘉 」で キ
∬ 留鷺
Phono inputis selected.
換蠅.海 甜詔絣榊TN鳥
t∬
`ど宙膜,1駆
Sb品
・
舗 需b‖ 腎 ded
b鷺 Ⅷ 鳳 譜:
ぶ熙淵鼎常に
Connect turntables equipped with MM(Moving
竃
T∬
F剛 :CtP3澗 サ
P珈
計鼎
藷 Ъ l::
OUT JACK
④ LINE
OuTPUT JACK
馳1曇 棚鼻:メ ¥誌 譜酬 朧
.
④ MiC INPUT JACK
lnputiack fOr Mlc.
00PT:ON BOARDINSERT
⑫ GROuNDTERMiNAL
Connect this terminal to the ground lead of the
turntables.
-13‐
HOW ttO CHANGE THE FADER UN:T
■ HOWTO REMOVETHETOP PANEL.
■ HOW TO CHANGETHE FADER UN!T
α
DRemove the screws on the fader panel.
(DRemove a‖ fader knobs and the 4screws.
(See fig.B)
(See ig.A)
② Remove the fader unl from the mixer.
③ Carefully remove the muni― cable connector from
② Remove the top panel.
fader unit.
(See lg.C)
CDAttach multi― cab:e connectorto new fader unit.
延)Position
the fader unit carefu‖ y and secure with
screws.
fig.A
轟
轍
i螂
鸞
喩
PCV'' unit is installed,set the swlch to
mode.
鸞
“PCV''
You can replace the CF unit with 'CF-RUS',
"CF-R'or "CF-PCV".
fig.C
CAUtt10N
舶撃r盤 鴇 畷牝眼
iぽ
hCd'do na bosen
Remove four scews.
│││││││││││
()iCF‐ RUS orCF― R
O:CF‐ PCV
-14-
CONNEC丁10N DIAGMM Iexamplel
TAPE RECORDER,CD,MD etC
Connectto OUTPUTjack
CD,MD p:ayer,TAPE DECK etc
L:NE input,ack
CDptAVER〔 ex VESTAX CDX‐ 161
Fh‰
日
│
MAS ER oo
:│
∵
AMPL:FIER
Connectto OUTPUT,ack
SPECIFICAT10NS
lNPUT
SECT:ON
NOMiNALINPUT
lMPEDANCE
PHON0 1,2(RCA P:N JACK)
-45dBv
49KΩ
LINE l,2
-4dBv
7K Ω
MIC
OUTPUT
(RCA PiN JACK)
(1/4‖ PHONE JACK)
L:NE OuT
(RCA JACK)
SECT:ON
HEADPHONE(1/4‖
PHONE」 ACK)
-52dBv
3.3KΩ
NOMINAL OUTPUT
lMPEDANCE
OdBv
220Ω
MAXIMUM OUTPUT
:MPEDANCE
100mW147Ω bad)
>8Ω
20Hz-20KHz±
FREQUENCY RESPONSE
CROSS TALK
65dB over
S/N RAT:0
70dB over
3dB
DC15V 500mA
POWER SUPPLY
264× 105× 260(mm)
D:MENS10NS(W× H× D)
4.Okg
WE:GH丁
-15-
Vestax Corporation
」∪N200フ ∨MC-002XLu①
P/N:4301‐ 7314■0
VVestax
mixing controller
yMCo002XL“ TCJB
JヽCo004XLu TCJB
こ
ヽ Cr004FXu πUB
Vestax Corporalon
l・ 18・ 6 Wakabayas‖ ,Setagaya‐ ku,Tokyo 154‐ 0023 Japan
phone 03・ 3412・ 701l Fax03・ 3412・ 7013
Web:www,vestax.com
Vestax EuFOpe Technical Support
Rhelnst.213D‐
Supplemental Instruction Sheet
53332 8omheim Cermany
Phone 49(0)2222・
95・ 23・ 2
Fax4910〉 ″ 2‐95‐ 23‐ 74
Please be sure to completely read this supplementalinstruction sheet along with the userls
manual ofthe following products.(PrOducts:abe:ed“ TUB")
● VMC-002XLu_TUB
● VMC‐ 004XLu ttUB
● VMC‐ 004FXu_TUB
O
HOWTO USE USB
Connect the mixers USB input/output port to a computers USB port with a USB cable.
Sound InpuVOutput will be enabled simply by connecting via USB, using the OS internal driver.
XUSB board features
. USB1.1(US82.0 compatible) compliant
. USB BUS power operated
The USB POWER LED will light up after the mixer is identified by the computer and the power
has been supplied.
◇
USB PORT CHANNEL ASS:GN
(1)VMC¨ 002XLu ttUB
⇒ Please refer to(27),page 13 ofthe VMC¨
Assigned to:
002XLu users manual.
INPUT:L:NE2/USB ofPGM2
0UTPUT:MASTER OUTPUT
(2)VMC-004XLu_TUB
⇒ Please refer to(20),page 13 ofthe VMC‐ 004XLu users manua:.
Assigned to:
lNPUT:LINE4/USB ofPCM4
0UTPUT:MASttER OUTPU丁
(3)VMC¨ 004FXu_丁 UB
⇒ Please refer to(29),page 18 ofthe VMC… 004FXu users manual.
Assigned to:
INPUT:LiNE5/USB ofPGM3
0UTPUT:MASTER OUttPU丁
υsB′ rvPυ T/OυTPυ T
PORT
SYSTEM REQUIREMENTS
◇
Minimum System requirement
じSB
POWER LED
OOS(Operating System )
Windows:
Windows9S/98SE/Me, 2000/XP
(Windows XP will require the latest USB audio driver available from Windows update website)
Macintosh:
. Mac OS X 9.1 and later versions
. Mac OS X 10.0 English Edition and later versions
. Mac OS X 10.1 Japanese Edition and later versions
(Mac OS X 10.0 Japanese Edition is NOT SUPPORTED)
Allversions before OS X 9.1 is NOT SUPPORTED
X
NOTE
' The minimum system requirements
'
'
above are for the mixer. lf the minimum system requirement
of the software is higher than the mixers requirement, please prepare an advanced operating
system qualified.
Macintosh CPU accelerator cards are not supported. The computer must have USB connection.
YAMAHA AC-XG Audio Device does not work with this mixer.
"Above are minimum requirements and does not guarantee performance for all computers and
devices.
O
USB connection confirmation
The USB POWER LED (red) will light up when the mixer is connected to a computer via USB and
indicate that USB input/output is operating.
Please follow the instructions below to confirm if the computer has identified the mixer via USB
connection.
Windows XP:
To check connection status in Windows XP, view [control panel] > [system] > [hardware] > [device
managerl > inside [sound, video and game controller] find [USB Audio device] .
lf both are displayed and the status is "This device is installed correctly", the mixer and computer
is connected correctlv.
Macintosh:
To check the connection status in Macintosh, view [Applications] > [Utilities] > [Audio MlDl setting] >
[MlDl device] and find "Vestax PC-CONTROLER". The property shall show,
* Device:Vestax PC CONTROLLER
x Manufacturer: Vestax
* Model: Vestax PC-CONTROLLER
The computer and the mixer are connected correctly if the information above is shown.
AUG 2007_VMC‐ TUB EO
P′ N:4301-7320+0