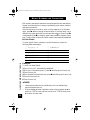
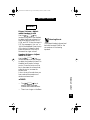
1
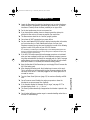
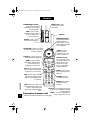
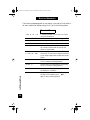
Mæstro 900 DSS
T ABLE
OF
C ONTENTS
Congratulations...
on your purchase of the Mæstro 900 DSS telephone.
Reading the following easy to understand guide will let you take full
advantage of all your 900 DSS features.
Enjoy!
Table of Contents
Introduction . . . . . . . . . . . . . . . . . . . . . . . . . . . . . . 2
Important Tips . . . . . . . . . . . . . . . . . . . . . . . . . . . . 3
Handset . . . . . . . . . . . . . . . . . . . . . . . . . . . . . . . . . . 4
Base . . . . . . . . . . . . . . . . . . . . . . . . . . . . . . . . . . . . . 5
Installation . . . . . . . . . . . . . . . . . . . . . . . . . . . . . . . . 6
Charging the Battery . . . . . . . . . . . . . . . . . . . . . . . . 9
Options . . . . . . . . . . . . . . . . . . . . . . . . . . . . . . . . . 10
Making & Answering Calls . . . . . . . . . . . . . . . . . . 13
Redial . . . . . . . . . . . . . . . . . . . . . . . . . . . . . . . . . . . 14
Call Waiting ID . . . . . . . . . . . . . . . . . . . . . . . . . . . 15
Call Waiting ID Calls . . . . . . . . . . . . . . . . . . . . . . 16
Callers List . . . . . . . . . . . . . . . . . . . . . . . . . . . . . . 17
Directory . . . . . . . . . . . . . . . . . . . . . . . . . . . . . . . 19
Services List . . . . . . . . . . . . . . . . . . . . . . . . . . . . . 21
Special Features . . . . . . . . . . . . . . . . . . . . . . . . . . 23
Names, Numbers and Characters . . . . . . . . . . . . 24
Volume Control . . . . . . . . . . . . . . . . . . . . . . . . . . 25
Display Messages . . . . . . . . . . . . . . . . . . . . . . . . . . 26
Icons & Lights . . . . . . . . . . . . . . . . . . . . . . . . . . . . 28
Troubleshooting . . . . . . . . . . . . . . . . . . . . . . . . . . 29
Glossary . . . . . . . . . . . . . . . . . . . . . . . . . . . . . . . . 31
Specifications . . . . . . . . . . . . . . . . . . . . . . . . . . . . . 33
Warranty . . . . . . . . . . . . . . . . . . . . . . . . . . . . . . . . 34
Index . . . . . . . . . . . . . . . . . . . . . . . . . . . . . . . . . . . 35
1
P0876162 02 E D900.UG Page 0 Wednesday, March 25, 1998 4:43 PM
P0876162 02 E D900.UG Page 1 Wednesday, March 25, 1998 4:43 PM
T ABLE
OF
C ONTENTS
Congratulations...
on your purchase of the Mæstro 900 DSS telephone.
Reading the following easy to understand guide will let you take full
advantage of all your 900 DSS features.
Enjoy!
Table of Contents
Introduction . . . . . . . . . . . . . . . . . . . . . . . . . . . . . . 2
Important Tips . . . . . . . . . . . . . . . . . . . . . . . . . . . . 3
Handset . . . . . . . . . . . . . . . . . . . . . . . . . . . . . . . . . . 4
Base . . . . . . . . . . . . . . . . . . . . . . . . . . . . . . . . . . . . . 5
Installation . . . . . . . . . . . . . . . . . . . . . . . . . . . . . . . . 6
Charging the Battery . . . . . . . . . . . . . . . . . . . . . . . . 9
Options . . . . . . . . . . . . . . . . . . . . . . . . . . . . . . . . . 10
Making & Answering Calls . . . . . . . . . . . . . . . . . . 13
Redial . . . . . . . . . . . . . . . . . . . . . . . . . . . . . . . . . . . 14
Call Waiting ID . . . . . . . . . . . . . . . . . . . . . . . . . . . 15
Call Waiting ID Calls . . . . . . . . . . . . . . . . . . . . . . 16
Callers List . . . . . . . . . . . . . . . . . . . . . . . . . . . . . . 17
Directory . . . . . . . . . . . . . . . . . . . . . . . . . . . . . . . 19
Services List . . . . . . . . . . . . . . . . . . . . . . . . . . . . . 21
Special Features . . . . . . . . . . . . . . . . . . . . . . . . . . 23
Names, Numbers and Characters . . . . . . . . . . . . 24
Volume Control . . . . . . . . . . . . . . . . . . . . . . . . . . 25
Display Messages . . . . . . . . . . . . . . . . . . . . . . . . . . 26
Icons & Lights . . . . . . . . . . . . . . . . . . . . . . . . . . . . 28
Troubleshooting . . . . . . . . . . . . . . . . . . . . . . . . . . 29
Glossary . . . . . . . . . . . . . . . . . . . . . . . . . . . . . . . . 31
Specifications . . . . . . . . . . . . . . . . . . . . . . . . . . . . . 33
Warranty . . . . . . . . . . . . . . . . . . . . . . . . . . . . . . . . 34
Index . . . . . . . . . . . . . . . . . . . . . . . . . . . . . . . . . . . 35
1
P0876162 02 E D900.UG Page 2 Wednesday, March 25, 1998 4:43 PM
I NTRODUCTION
Welcome...
to the world of 900 MHz Digital Spread Spectrum (DSS). Based on
technology originally developed for military applications, DSS provides a
level of performance for range, security, clarity over the range, and
immunity to interference that is unparalleled by any other cordless
telephone technology currently on the market.
Your Mæstro 900 DSS allows you to originate and receive calls anywhere
in your home, yard or even many blocks away from the Base. 900 MHz DSS
is the most sophisticated telephone technology available today. It provides
the ultimate in security because the voice signal is digitized and then
encoded by means of a random code that changes over time and that only
your Base and your Handset recognize. Anyone listening on a scanner hears
no intelligible signal. In addition, to increase immunity to interference, the
resulting DSS signal is not transmitted over one single frequency but instead
is transmitted over a 1.3 MHz band of frequencies.
These characteristics are what make the 900 DSS different from 900 MHz
Digital, 900 MHz Analog and 25 Channel 43/49 Mhz Analog cordless
telephones.
Introduction
2
Technology
Explanation
Performance
900 MHz DSS
Digitized Voice, encoded with Random
Noise, transmitted over a range of
frequencies
BEST
900 MHz Digital
Digitized Voice, transmitted over
discrete frequencies, typically via FM
signalling
900 MHz Analog
Transmits Analog voice, typically via FM
signalling
25 Channel (43/49
MHz Analog)
Transmits Analog voice, typically via FM
signalling
GOOD
P0876162 02 E D900.UG Page 3 Wednesday, March 25, 1998 4:43 PM
I MPORTANT T IPS
➤
➤
➤
➤
➤
➤
Locate the Base away from electrical equipment such as other telephones,
radios, computers, refrigerators, fluorescent lights, stereos, etc., to prevent
interference. Centrally locate the Base, preferably on an upper floor.
For the best performance, do not use a power bar.
If you have another cordless phone or answering machine, attempt to
position the Base units as far away as possible from each other.
The Base antenna should be in a vertical (upright) position.
Your phone will NOT operate during a power failure.
For your new Mæstro 900 DSS phone to display incoming caller information,
you must subscribe to a Caller Identification service from your local
telephone company.You may also need to subscribe to some of the following
services in order to fully utilize all your 900 DSS features:
✍ Call Waiting or Call Waiting ID, Message Waiting or Visual Message Waiting,Voice Mail
Services or Visual Voice Mail Services and 3 Way Calling.Your local telephone company may
use different names for these services.
➤
➤
➤
➤
➤
➤
➤
Important Tips
➤
If the 900 DSS multipurpose light and message prompt are not activated
when you have messages, contact your local telephone company to ensure
they have activated both the feature for messages and the “visual” message
waiting feature to turn on the multipurpose light.The light will only activate
when the Handset is in the Base (this conserves battery power).
Keep the Handset off the Base unless you are charging.This will increase the
life of the battery pack.
After charging the battery pack, the Handset may be warm to the touch.
This is normal, do not be concerned. Note that the power adapter will also
feel warm to the touch if it has been plugged in for a while; again, there is
no need for concern.
Turn the Power Saver Option on (page 11) for maximum Standby and Talk
time.
You will consume more Standby time when you operate or leave the
Handset at an extreme range from the Base.
If the Handset displays the message “Out of range”, see page 29 "The
Handset display shows Out of range ."
The Security code automatically changes when the Handset is placed in the
Base.
Your Handset will have a greater range in a wooden dwelling rather than a
concrete or metal dwelling.
3
P0876162 02 E D900.UG Page 4 Wednesday, March 25, 1998 4:43 PM
H ANDSET
Battery cover - Slide
cover down to replace
battery pack.
Handset/Ringer Volume Press bottom for lower
volume; press top for higher
volume (page 25).
Mute
Antenna
Options
Mute - Press so callers
cannot hear you; press again
when you wish them to
hear you (page 13).
Multipurpose Light When the Handset is in
the Base, flashes at
various speeds or lights
solid to indicate the status
of a call (page 28).
Options - Press to access
the Options list (page 10).
Call Waiting* - While on a call and
the Call Waiting tone sounds, press
to answer (page 15).
Callers* - Press to
display the names/
numbers stored in the
Callers List (page 17).
Directory - Press to view saved
names and numbers (page 19).
Delete - Press to remove
entries when displayed in the
Callers List, Directory,
Redial List or Services List.
Save - Press to confirm changes
and store names and numbers in
the Directory or Services List.
Call Waiting
Directory
Save
Handset
4
Delete
Talk
Redial
Goodbye
2 ABC
3 DEF
5
JKL
6 MNO
7 PQRS
8 TUV
9 WXYZ
*Hold
0
1
Talk - Press to answer calls and
dial numbers appearing on the
display or when display is blank
for dial tone.
Callers
4
GHI
Redial - Press to access
list of outgoing numbers
(page 14).
Goodbye - Press to
end calls and exit lists.
#
Services
Flash
Hold - Press once to place a call
on Hold; press again to take a call
off Hold. Also used to add a
pause when entering Directory
items.
Direction arrows Press Up/Down arrows
to scroll through lists. Use
the left arrow to edit
entries and the right
arrow to view further
display information.
Dial pad - Enter names,
numbers and special
characters.
Services* - When Handset is idle, press
to access a list of telephone company
services (page 21).
Press any key to answer a call! Flash - Used with Call Waiting* and
3 Way Calling* while on a call.
*Telephone company subscription or cost may apply.
P0876162 02 E D900.UG Page 5 Wednesday, March 25, 1998 4:43 PM
B ASE
Handset cradle - Place the
Handset, with the display
facing you, in the Base to
charge.
Handset key - (not labeled) Use
to locate the Handset (page 23).
Charging contacts Place the Handset into
the Base so that both
the Handset and Base
contacts touch.
Stand - Use to stand the telephone
upright on a desk.
Remove for wall mounting.
Base
5
P0876162 02 E D900.UG Page 6 Wednesday, March 25, 1998 4:43 PM
I NSTALLATION
1
1 Route line cord through
the small hole on the back
of the stand.
2 Plug the end of
the line cord
into the back of
the Base.
3 Attach the
stand to Base
by inserting
the stand clips
into Base
holes.
2
1 Slide the stand forward
to lock into position.
2 Route the line cord
through the top clip and
right channel on the
back of the stand.
4 Place power
cord
through
left clip
and top left
channel.
Installation
6
3 Insert
the small end of the
power adapter into the
Base through the stand. Turn
the power cord counter clockwise to lock into position.
P0876162 02 E D900.UG Page 7 Wednesday, March 25, 1998 4:43 PM
3
1 Connect the battery pack to the
Handset and insert the battery
pack into the Handset.
2 Place the cover over the
battery
compartment.
Press down and
slide the cover
forward to close.
4
1 Plug the other end of
the line cord into a
wall jack.
2 Plug the large end of the
power adapter into a
nearby electrical outlet.
The display may remain blank for up to
10 minutes when charging a dead battery.
Installation
3 Place the Handset into the Base and charge
for at least 10 hours.
7
P0876162 02 E D900.UG Page 8 Wednesday, March 25, 1998 4:43 PM
5
WALL MOUNTING
1 Insert a short line cord, 9 in/23 cm or
less (not supplied) into back of Base.
4 Line up the
mounting lug
positions on
the back of
the Base with
those on the
wall mount
plate. Plug
the line cord
into the wall jack.
Slip the Base onto
the lugs and slide
down to lock.
6
Installation
8
1 Remove wall
mount
tab.
2 Ensure that the
line cord is tightly
and neatly coiled in
the back compartment of the Base
before hanging.
3 Insert
small end
of power cord into back of
Base and plug power adapter
into a nearby electrical outlet.
2 Rotate tab
180 degrees.
3 Reinsert tab. The
Handset can now
hang from this
tab.
P0876162 02 E D900.UG Page 9 Wednesday, March 25, 1998 4:43 PM
C HARGING
CHARGING
The First Time...
When you first setup your Mæstro
900 DSS, you must charge your
Handset for at least 10 hours. Place
the Handset into the Base, with the
display facing up, to charge.
Every Time After...
When your battery is low and you
are on a call, a prompt will appear
and a tone will sound, letting you
know you should end your call and
recharge immediately.
Place the Handset into the Base,
with the display facing you —
ensure that the Handset and Base
contacts touch. The message
C h a r g i n g will appear on the
Handset’s display (the
messages N e w C a l l e r s or
M e s s a g e W a i t i n g will override
the charging message). It’s best
to leave the Handset in the Base for
at least 10 hours to charge.
— The display may remain blank
for approximately 10 minutes,
every time you charge a dead
battery.
— Your Handset will be warm to
the touch after charging—this
is normal.
B ATTERY
STANDBY TIME
You may receive up to 7 days of
standby battery time* when the
battery pack is fully charged and the
Power Saver option is ON (see
“PowerSaver ON/OFF” on
page 11).
➠ Battery hints:
— Always charge the Handset
for at least 10 hours.
— Place the Handset in the Base,
with the display facing you.
— For the best performance, let
the battery pack run down
until the Low battery
message appears before
recharging. This will maximize
the life of the battery pack.
— When the Handset is in the
Base and the red multipurpose
light is lit solid, charging time
will be longer.
* Standby time will be reduced by talking on the
Handset or Handset ringer activation from incoming calls. Standby and Talk time will be shorter if
the Handset is used at long range from the Base
owing to the higher transmit power levels required.
Charging the Battery
➠ hint:
THE
9
P0876162 02 E D900.UG Page 10 Wednesday, March 25, 1998 4:43 PM
O PTIONS
— On the side of the Handset press the O key to access the
Options List. Press g to exit the list.
— Use ] or [ to move through the list or enter the number of the
Option you wish to customize to go directly to it (e.g., 01, 02...).
— Press • to change an item.
— A flashing will appear beside items currently set.
— Follow the instructions on the display to change any of the Options.
01
LANGUAGE
Choose to view the display in
English or Spanish.
02
CLEAR MESSAGE
WAITING
(when subscribing to Voice Mail Services
from your local telephone company)
Choose Clear if the display shows
Message Waiting and there are
no more messages in your voice
mail box.
03
CALL LOG*
Choose to log all incoming calls,
only unanswered calls or no calls at
all in the Callers List.
Options
10
04
COMPRESS* ON/OFF
Combine calls from the same
number into one Callers List entry.
When this option is ON, the
Callers List shows 1x, indicating
that that number has called you
once. Each time that particular
number calls again, the count will
increase by one (up to 9x). The
time is also updated and the call is
moved to the end of the list. When
this option is OFF, each incoming
call, whether from the same
number or not, will appear
separately in the Callers List.
05
CALL LIGHT ON/OFF
Turn this Option ON to have the
Handset light flash to indicate when
you have new calls. The light will
only flash when the Handset is in
the Base.
*
You may be required to subscribe to
specific telephone company services.
Contact your local telephone
company for more information.
P0876162 02 E D900.UG Page 11 Wednesday, March 25, 1998 4:43 PM
06 POWERSAVER ON/OFF
When this option is ON, your
Handset’s dial pad and display will
stay lit for less time, thereby saving
battery life.
07
EXTENSION IN USE
Turn this option OFF only if the
message Extension in use
appears when no extension
telephone is off-hook.
08
TIME/DATE
11
LONG DISTANCE
A long distance prefix (usually the
number 1) may be entered in order
to make long distance calls from
the Callers List. Once a number has
been entered in this option, simply
press < when in the Callers List to
insert the long distance prefix in
front of the telephone number
displayed (prior to dialing). See
"Saving from the Callers List to the
Directory" on page 18.
*
You may be required to subscribe to
specific telephone company services.
Contact your local telephone
company for more information.
Options
Enter the current time and date
(using the 12 or 24 hour system). If
you subscribe to Caller ID or Call
Waiting ID, the time and date will
automatically be set when you
receive a call.
AREA CODES
Area codes are shown for incoming
calls and in the Callers List. The
Mæstro 900 DSS lets you block the
display of up to three local area
codes. This is useful in locations
where area codes are not
necessary in order to dial a long
distance number or where an area
code cannot be used when dialing
local numbers.
You may enter one, two, three or
no codes (up to 7 digits each).
CALL WAITING*
Set this Option as follows. If you
subscribe to Call Waiting, set
Call WtgID to off. If you
subscribe to Call Waiting ID, set
CallWtgID to on. Your local
telephone company may use
different names for Call Waiting
and Call Waiting ID.
If you do not subscribe to any Call
Waiting service set CallWtgID to
off.
09
10
11
P0876162 02 E D900.UG Page 12 Wednesday, March 25, 1998 4:43 PM
OPTIONS DISPLAY
Flashing check
mark indicates that
this Option (English)
is currently selected
Option number (01 through 11)
Option title
Option choice
01 Language
In English?
]=Next *=Change
]=Next *=Choose
Press to move
to the next
Option in the
list
Options
12
Press to move to
Spanish
Press to see how this
Option is currently set
or to change that setting
Press to select
the displayed language
P0876162 02 E D900.UG Page 13 Wednesday, March 25, 1998 4:43 PM
M AKING & A NSWERING C ALLS
MAKING CALLS
Your Mæstro 900 DSS lets you
view a number before you dial,
helping to prevent dialing errors.
1 Enter the number using the dial
pad. If you make a mistake, use
< or > and nd to
remove numbers before entering again.
2 Press t to dial the
displayed number.
ANSWERING CALLS
To answer a call, press any key on
the front of the Handset. If a caller's
name/number is available, it will be
displayed after the first ring*.
➠hint:
*
You may be required to subscribe to
specific telephone company services.
Contact your local telephone
company for more information.
➠hint:
— The match is made starting
from the end of the Directory
entry, so a long distance prefix
and/or an area code will not
affect the matching process.
Making & Answering Calls
— To log a call (including Call
Waiting calls), Option 03 must
be appropriately set.
— If a call comes in while the
Handset is in the Base, picking
up the Handset will
automatically answer the call;
returning the Handset to the
Base will disconnect the call.
— Press g to end a call.
Muting Incoming or
Outgoing Calls
While on a call, press the
m key on the side of the
Handset so that callers cannot hear
you. When you wish for the caller
to hear you, simply press
m again.
Holding calls
You can place a call on hold by
simply pressing the ˙ key.
Retrieve a held call by pressing
˙ again or picking up
another extension in your home.
You must retrieve your held call
within 15 minutes or the call will
automatically be disconnected.
You can also disconnect a held call
by placing the Handset into the
Base.
Preferred Name Match*
With Preferred Name Match, your
Mæstro 900 DSS displays incoming
names as you've entered them in
the Directory and not as the
telephone company transmits
them.
13
P0876162 02 E D900.UG Page 14 Wednesday, March 25, 1998 4:43 PM
R EDIAL
REDIAL
The Mæstro 900 DSS Redial List
remembers the last 5 numbers you
dialed. The last number you dialed
will always be the first number
displayed in the list. When 5
numbers are in the list, the oldest
number will be removed when
another number is dialed.
Making a call using Redial
1 Press r.
2 Press [ or ] to move to the
number you wish to dial.
3 Press t.
Note: Press r or
g to exit from the
Redial List when not on a
call.
Deleting a Redial List Item
1 Press r.
2 Press [ or ] to move to the
number you wish to delete.
3 Press d twice to remove the call from the list.
Note: It is not possible to delete
the entire Redial List at
once.
Redial
14
Saving from the Redial List
to the Directory
You can save a previously dialed
number to your Directory.
1 Press r.
2 Use [ or ] to move to the number you wish to save to the Directory.
3 Press s.
If a name is already entered, the
Saved: Directory prompt
will be displayed and you are
done.
If a name is required, the Enter
Name> prompt will be displayed.
Enter the name using the dial pad
(see “Names, Numbers and
Characters” on page 24).
4 Press s again to
confirm.
P0876162 02 E D900.UG Page 15 Wednesday, March 25, 1998 4:43 PM
C ALL W AITING ID
CALL WAITING ID*
Call Waiting ID allows you to view
the name/number of a second
incoming call. Switch between the
two callers by pressing C
when you hear the unique tone.
The display will indicate which
caller you’re speaking to by
showing the name/number of that
caller—no matter how many times
you switch between the callers!
Option 08, CallWtgID must be
set to on (see “Call Waiting*” on
page 11).
Answering a Call
Waiting ID Call
While on a call and the Call Waiting
tone sounds:
*
You may be required to subscribe to
specific telephone company services.
Contact your local telephone
company for more information.
— Pressing the f key
will also allow you to switch
between callers.
— You may switch between
callers as often as you like.
— The name and number of a
Call Waiting caller will not be
displayed when an extension
phone is in use.
Call Waiting ID
1 Look at the display to determine
if you wish to answer the call.
2 Press C to speak with
the other caller. The first caller is
placed on hold.
3 Press C again to return
to the first caller. The second
caller is placed on hold.
4 To end a call, one of the callers
must hang up.
Note: You may switch between
callers as often as you like.
➠hint:
15
P0876162 02 E D900.UG Page 16 Wednesday, March 25, 1998 4:43 PM
C ALL W AITING ID C ALLS
1
1 When your phone rings, the
incoming caller’s name and
number (if available) are
shown on the Handset’s
display.
RING
Call Waiting
Callers
CALLER ON
555-1112 E
Directory
Handset
Save
Redial
Delete
Goodbye
Talk
2 ABC
3 DEF
4 GHI
5 JKL
6 MNO
7PQRS
8 TUV
9 WXYZ
1
*Hold
#
0
Services
Flash
2
BEEP
CALLER TW
555-2221 O
Call Waiting
Callers
Directory
Save
1 The Call Waiting tone
sounds and Caller Two’s
name and number are
displayed (for 20 seconds).
Redial
Delete
Goodbye
Talk
2 ABC
1
JKL
4 GHI
5
7PQRS
8
*Hold
TUV
0
3 DEF
6 MNO
9 WXYZ
#
Services
Flash
1 Press C to speak
with Caller Two.
2 Press C again to
switch back to Caller One.
3
CALLER TW
555-2221 O
Call Waiting
Callers
Directory
Save
Delete
Redial
Goodbye
Talk
Call Waiting ID Calls
16
1
2 ABC
3 DEF
4 GHI
5 JKL
6 MNO
7PQRS
8 TUV
9 WXYZ
*Hold
0
CALLER ON
555-1112 E
#
Services
Flash
➠hint:
— You may switch between callers as often as you like by pressing
C or f.
— You must subscribe to the appropriate service from your telephone
company and Option 08, CallWtgID must be on.
P0876162 02 E D900.UG Page 17 Wednesday, March 25, 1998 4:43 PM
C ALLERS L IST
Press the c key on the Handset to access the Callers List. Up to
30 incoming calls may be stored in the list. This valuable feature helps you
organize your calls by monitoring their status. Easy to understand messages
and icons keep you informed about who called, when they called, how
often they tried to reach you, and even if you returned the call!
USING THE CALLERS LIST*
— Erase individual callers from
the list by pressing d
twice when the name/number
is on the display.
— Erase all callers by pressing
d twice when
Callers list=XX is
displayed.
— Use g or c
to exit the list when not on a
call.
Dialing from the
Callers List
1 Press c.
2 Press [ or ] to find and display
the caller's name/number.
3 Press t.
*
You may be required to subscribe to
specific telephone company services.
Contact your local telephone
company for more information.
Callers List
Although the display will guide you
through all functions, the following
will assist you in using the Callers
List.
— You must subscribe to a
service from your telephone
company in order for a name
and number to be displayed.
— Press [ or ] to move through
the Callers List. If ... appears
on the Handset’s display, press
> to view further information
on that call.
— XX New Callers appears
when the Handset is idle,
indicating the number of new
or unviewed calls.
— Dial a call automatically by
pressing t on the
Handset when the name/
number is on the display.
— When the list is full, the oldest
call is deleted to make room
for the newest call. The
number of calls removed is
shown on the display: Calls
bumped=XX.
— Use s to quickly add
a Callers List number to your
Directory.
17
P0876162 02 E D900.UG Page 18 Wednesday, March 25, 1998 4:43 PM
Saving from the Callers List
to the Directory
You can save a name and number
from the Callers List and store it in
your Directory. Directory entries
are not bumped when the list is full.
You can add a long distance prefix
and/or an area code prior to saving.
See the next section for more
information.
When a Callers List name/number
is displayed:
1 Press s.
2 Use the dial pad to enter a name
if one does not already exist (see
“Names, Numbers and
Characters” on page 24) and
press s.
Dialing Long Distance
numbers from the Callers
List
When a long distance prefix (LDP)
is entered in Option 11 (page 11)
and an area code(s) in Option 10
(page 11), you need only press <
once, to automatically add both the
long distance prefix and area code
in front of the Callers List number
on the display.
If you only require the long distance
prefix, press < and then ] to add
just the long distance prefix in front
of the Callers List number.
Press < then ] and then ] again to
display just the Callers List number.
Press t to dial out the
number once it is displayed as you
wish.
.
CALLERS LIST DISPLAY*
Callers List
Indicates you returned this call Name of caller , Unknown
Indicates you answered this call name or Private name may
be displayed
when it first came in
Number of caller ,
Placement of call
Unknown num.
in the list
or Private num.
XXX XXXXXX
may be displayed
555-1234
02
Number of times
Jan 1 12:53 AM
Status of call
this number has
in the log
called you
New Call Waiting call
(Option 04 ON)
Answered Call Waiting call
Indicates that the call was
Unviewed call
from a long distance
Unviewed Call Waiting call
number. (This service may
not be available everywhere.)
Date and time of incoming call
Note: See page 26 and page 28 for more information on messages and icons.
18
P0876162 02 E D900.UG Page 19 Wednesday, March 25, 1998 4:43 PM
D IRECTORY
Pressing the D key on the Handset allows you to access the
Directory. The Directory lets you store any 30 names and numbers you
choose. Read the following instructions or press D and follow the
display prompts to view, save, change, enter or delete items.
USING THE DIRECTORY
— Erase entries by pressing
d twice when the
name/number is on the display.
— Erase all items by pressing
d twice when
XX items in the
Directory is displayed.
— Press g or D
to cancel a delete operation
before deletion is confirmed.
— Use g or D
to exit the Directory when not
on a call.
— Enter a 1 second pause (useful
when preprogramming voice
mail access) by pressing
h, at the appropriate
spot, when entering items. You
may enter more then one
pause by repeatedly pressing
h.
Directory
— Press [ or ] to move through
the Directory. If ... appears
on the Handset’s display, press
> to view further information
on that item.
— Once in the Directory, use the
keypad to move to the
Directory section which begins
with that letter (see "Names,
Numbers and Characters" on
page 24 for instructions on
using the keypad’s alpha and
numeric features).
— Telephone numbers may be 24
digits long.
— Names may be letters,
numbers or a combination of
both.
— Names may be 16 characters
long and are stored
alphabetically by the first letter
entered.
— A number can be stored by
itself, but a name without a
number cannot.
— Directory entries are sorted
by the first character only.
19
P0876162 02 E D900.UG Page 20 Wednesday, March 25, 1998 4:43 PM
Directory
20
Adding an entry to the
Directory
1 Press D.
2 Press s.
3 When the display shows: Enter
Number>, use the dial pad to enter the number.
4 Press s to confirm.
5 When the display shows: Enter
Name>, use the dial pad to enter
the name (see “Names, Numbers and Characters” on
page 24).
6 Press s to confirm the
entry.
Dialing from the Directory
1 Press D.
2 Use [ or ] to find and display
the number you wish to dial.
3 Press t.
Dialing from the Directory
while on a Call
You can dial a number stored in
your Directory (for example,
banking card access) while on a call.
While on a call:
1 Press D.
2 Use [ or ] to find and display
the number you wish to dial.
3 Press t when the number is displayed.
Editing a Directory entry
1 Press D.
2 Use [ or ] to find and display
the name/number you wish to
edit.
3 Press < to enter edit mode.
The display shows:
]=Next *=Change
4 If you wish to edit the name
press *. If you wish to edit the
number, press ] and then *.
- Use < or > to move over the
name or number
- use d to remove letters or numbers
5 Press s when you have
finished editing the name and/or
the number.
➠hint:
— Press g at any time to
exit from the Directory
without making any changes.
— Once in the Directory, you
may also use the keypad to
move to the Directory section
which begins with that letter.
P0876162 02 E D900.UG Page 21 Wednesday, March 25, 1998 4:43 PM
S ERVICES L IST
USING THE SERVICES LIST*
The Services List is accessible using
the shared Services/Flash key on
the Handset. Various telephone
company feature codes may be
preprogrammed in this key for
your convenience.
The Services List may only be used
when the Handset is idle (the Flash
key is active during calls).
In order to activate a Services List
feature, it must be dialed as an
outgoing call.
Accessing the Services List
When the Handset is idle:
1 Press the shared Services/Flash
key to access the list.
2 Use [ or ] to move to the
desired feature.
3 Press t to dial the
feature.
Saving a Feature Code to
the Services List
When your Handset is idle:
1 Press the shared Services/Flash
key.
2 Use [ or ] to move to where
you want to add the service in
the list.
3 Press s.
4 When the display shows: Enter
Number>, use the dial pad to enter the desired feature code.
5 Press s to confirm.
6 When the display shows: Enter
Name>, use the dial pad to enter
the name of the feature (see
“Names, Numbers and Characters” on page 24).
7 Press s to confirm the
entry.
➠hint:
— Press g at anytime to
end a Services List call.
— Press the shared Services/Flash
key and then use the dialpad to
enter the number of the
feature (1 to 6) to
automatically dial it.
— The available services are often
explained at the front of your
local telephone book.
— A Services List code can be up
to 24 digits long.
— Each Services List item retains
its unique position in the list—
no matter how often you
rename it or even if you delete
other items in the list.
— If Call Forwarding is
programmed as a service, it
cannot be cancelled until you
execute the Cancel Call
Forwarding service.
*
Contact your telephone company
regarding any charges for feature use.
Services List
➠hint:
21
P0876162 02 E D900.UG Page 22 Wednesday, March 25, 1998 4:43 PM
Editing the Services List
When your Handset is idle:
1 Press the shared Services/Flash
key.
2 Use [ or ] to find and display
the Feature you wish to edit.
3 Press < to enter edit mode.
The display will show:
]=Next *=Change
4 If you wish to edit the feature
name, press *. If you wish to edit
the service code, press ] and *.
- Use < or > to move over the
code or name
- use d to remove letters or numbers
5 Press s when you have
finished editing the name and/or
the number.
Services List
22
Voice Mail Service
— Some service providers may
preprogram your Services list
with an entry for Messages or
Voicemail.The entry will have a
name but not a number
programmed. In this case, you
need only edit the entry to add
your voicemail number and
password.
If a voicemail feature is not
preprogrammed, you can easily
add this feature as a new entry,
with whatever name and
telephone number you choose.
P0876162 02 E D900.UG Page 23 Wednesday, March 25, 1998 4:43 PM
S PECIAL F EATURES
HANDSET LOCATOR
TIMING CALLS
To locate your Handset, simply
press the Handset key on the Base.
Your Handset will ring. Follow the
sound to locate the Handset.
You must press g or
t on the Handset to end
the locating sound.
The duration of an incoming call is
displayed while the call is in
progress. The elapsed time of an
incoming call is not retained.
The Callers List will retain the time
and date that you received a call. If
the compress option is on (page
10), the latest call’s time and date
will be displayed.
➠hint:
— The Handset key is not labeled
on the Base (see "Base" on
page 5).
Special Features
23
P0876162 02 E D900.UG Page 24 Wednesday, March 25, 1998 4:43 PM
N AMES , N UMBERS
AND
C HARACTERS
Both numeric and alpha characters are programmed into each dial pad key.
Review the following hints to help you successfully enter names, numbers,
and special characters.
If the second letter you wish to enter is on the same key or is the same
letter, press > before entering the second letter. If the next letter is on a
different key, simply press that key the required number of times. Press >
to add a space. Press [ to change to upper case; press ] to change to lower
case. The first letter of each word after a space is automatically capitalized.
LETTER CHART
To enter specific letters, numbers or special characters, review the
following table and example.
⁄
‹
fi
‡
·
•
Names, Numbers and Characters
24
& ‘ ( space ) , - . 1
DEFéè3
JKL5
PQRS7
WXYZ9
*
¤
›
fl
°
‚
£
ABCáàç2
GHIíì4
MNOóòñ6
TUVúù8
0
#
Example:
To enter the name Debbie:
1
2
3
4
5
6
Press 3 once (=D - automatically capitalized)
Since e is on the same key as D, press > and then press 3 twice (=e)
Press 2 twice (=b)
Since b needs to be entered twice, press > and then press 2 twice (=b)
Press 4 three times (=i)
Press 3 twice (=e)
➠hint:
— Letters and numbers are printed directly onto the Handset keys;
special characters are not.
— If letters display as lower case letters when entering names, use [ to
switch to CAPITAL letters. When entries are in CAPITAL letters, use
] to switch to lower case.
P0876162 02 E D900.UG Page 25 Wednesday, March 25, 1998 4:43 PM
V OLUME C ONTROL
HANDSET
➠hint:
— The
key is
used for both the Ringer
Volume and Handset Volume.
— There is no ringer on the Base.
Hearing Boost
The highest Handset volume level
has been boosted 12 dB for the
convenience of the hearing
impaired.
Volume Control
Ringer Volume—Adjust
when Handset is Idle
Use the
key,
located on the side of the Handset,
to adjust the Ringer volume. You
have three distinct levels: HIGH,
LOW, and OFF. When the ringer is
OFF, the message HS Ringer is
OFF will be displayed. Press the top
of the key to increase the level;
press the bottom of the key to
decrease the ringer volume.
Handset Volume—Adjust
while on Calls
Use the
key,
located on the side of the Handset,
to adjust the Handset Volume.The
Handset has 8 levels of volume
control. Press the bottom of the
key to decrease the volume level;
press the top to increase the
volume level.
A short tone will sound when you
have reached the maximum or
minimum volume level.
25
P0876162 02 E D900.UG Page 26 Wednesday, March 25, 1998 4:43 PM
D ISPLAY M ESSAGES
The following messages appear on the display. If you want to know what to
do about a particular display prompt, look it up in the following table.
PROMPTS TABLE
Display Messages
26
Check phone Cord
A possible problem with the line cord. Check
line cord connections.
HS Ringer is OFF
You have turned your telephone ringer OFF.
Extension in use
Another phone in your home is off-hook.
Call is on hold
You have placed your call on Hold.
Battery is low
You must recharge the Handset. If you are on a
call, a beep will sound and this prompt will
appear on the Handset.
Directory full
No changes made
You are trying to add an item to the Directory
and it is full. You will have to delete an item that
you no longer require before a new item can be
added.
Message waiting
Check for new messages at your Voice Mail
Center (telephone company feature).
Saved: CCF
Appears when you have saved to the Services
List (CCF=Custom Calling Features).
Charging
Appears on the Handset’s display ONLY when
the Handset is in the Base.
Microphone muted
Appears when you have used the Mute key on
the side of the Handset. Press m
again to stop the muting feature.
P0876162 02 E D900.UG Page 27 Wednesday, March 25, 1998 4:43 PM
You have 30 seconds to move closer to the
Base before you lose the call. If you were making changes in the Directory or Callers List
when you went out of range, those changes are
lost after 30 seconds. The message may also appear if your Base has lost power or has lost contact with the Handset.
Oct 12 2:54 pm 2x
This is the time and date that the call was received. The 2X appears in the Callers List indicating that the caller called twice.
Private
name/number
The incoming caller has requested that their
name (or number) not be shown.
Redial list is
empty
There is no number stored in the Redial List.
Dial using the dial pad, Callers List, or Directory
instead.
Unknown
name/number
The telephone company is unable to provide
the name (or number) of this caller.
Calls bumped=XX
A number of caller entries were bumped (removed) from the Callers List to make room for
new callers.
XX New Callers
A number of new calls have been added to the
Callers List since you last checked it.
Use ] for X New
Prompt for viewing new calls in the Callers List.
Display Messages
Out of Range
(tone sounds)
27
P0876162 02 E D900.UG Page 28 Wednesday, March 25, 1998 4:43 PM
I CONS & L IGHTS
DISPLAY ICONS
Always appears in the Callers
List indicating an unanswered
Call Waiting call.
Always appears in the Callers
List and indicates a new, unviewed call.
Always appears in the Callers
List and indicates an answered Call Waiting call.
Appears in the Callers List
and indicates the number of
times that number tried to
reach you.
Appears in the Callers List
and indicates a call is from a
long distance number.*
Appears in the Callers List
and indicates you have called
this number back.
Appears in the Options List
(flashing) and indicates that
item is currently selected.
*
Icons & Lights
28
This service may not be available
from your local telephone company.
HANDSET LIGHTS
Handset in the Base
Flash
You have placed the
once
Handset into the Base.
Flash
You have a status prompt
slowly saying there is a message
or new calls.
Solid
Extension in use or
Check phone cord
message is displayed.
Handset in or out of Base
Flash
You have an incoming
quickly call.
POWERSAVER & LIGHTS
Option 06 ON
-display and keypad stay lit for only
3 seconds after last key press
Option 06 OFF
-display and keypad stay lit for 10
seconds after last key press
P0876162 02 E D900.UG Page 29 Wednesday, March 25, 1998 4:43 PM
T ROUBLESHOOTING
Callers are not identified on
the display.
You must subscribe to Caller ID or
Call Waiting ID from your
telephone company and your
service must be turned on. Also,
your telephone cannot display
incoming information until after the
first ring.
No dial tone. C h e c k p h o n e
C o r d may appear on the
display.
The line cord may not be properly
attached. Check all your cord
connections.
The Handset doesn’t work.
Make sure the battery is installed in
the Handset properly. Ensure that
the battery is charged. The Base
must be plugged into a working
electrical outlet as well as a
telephone jack.
The Handset display shows
Out of range.
The Base has lost power. Check
that the power adaptor is plugged
in. If it's a power failure, you will
lose your call. Ensure the Base is
away from fluorescent lights and
any electronic equipment such as
other cordless phones.
The Handset continues to
display O u t o f r a n g e .
Disconnect the Handset battery
pack and the Base power adapter
for a couple of seconds. Reconnect
the power adapter, reconnect the
battery pack and then place the
Handset into the Base. If
unsuccessful, you should repeat the
process.
The Handset’s display is
blank.
The display may remain blank for
up to 10 minutes when charging a
dead battery. In addition, the Base
may not be plugged in or the power
may be off. Also ensure that the
Handset’s battery pack is charged
and properly installed.
Troubleshooting
Not sure if the Handset is
charging.
When the Handset is placed in the
Base, the message Charging
appears on the display.
When charging a dead battery, the
display may remain blank for up to
10 minutes. Also ensure that the
Base and Handset contacts are
clean.
When to purchase a new
battery pack.
The battery pack can be recharged
and reused many times. If the
battery fails, even after charging for
10 hours, replace it with a new
battery pack (Ni-Cd battery, 3.6V,
700 mAh, type W connector).
29
P0876162 02 E D900.UG Page 30 Wednesday, March 25, 1998 4:43 PM
The display indicates you
have a message when there
isn’t one.
Clear the display by choosing
Clear in Option 02 (page 10).
There is a clicking sound on
the Handset.
You may hear this noise when you
are operating the Handset at an
extreme range from the Base and
moving around. The Mæstro 900
DSS is automatically changing
channels to ensure the best
reception. Once you stop moving,
the clicking sound will be reduced.
The Message Waiting Light
does not work.
You must subscribe to Visual
Message Waiting Indication from
your local service provider before
the multipurpose light will flash
when you have messages. As well,
the Handset must be in the Base for
the multipurpose light to flash.
Troubleshooting
30
The Handset and power
adapter are warm to the
touch.
It is normal for the Handset to be
warm after sitting in the Base to
charge. This should not cause
concern. The power adapter will
also feel warm—this is normal.
I hear a re-occurring pulse
sound while on my phone or
using my answering
machine.
You may be experiencing a form of
interference sometimes seen with
900 MHz phones. Move your
Mæstro 900 DSS Base away from
all other telephones in your home
and away from your answering
machine. You should also avoid
placing the Base near a radio or
television.
P0876162 02 E D900.UG Page 31 Wednesday, March 25, 1998 4:43 PM
G LOSSARY
Base
The device and stand in which the
Handset rests to charge.
Directory
A list where any names and
telephone numbers you choose
may be permanently stored.
Digital Spread
Spectrum (DSS)
A method of encoding and
transmitting voice signals.
Handset
The device used to make and
receive calls or access lists.
Long Distance Prefix (LDP)
Traditionally the number 1, and is
used to make long distance calls.
Overseas calls would use a series of
numbers for the LDP.
Message Waiting
A service provided by your local
telephone company in which a
signal is sent to your phone
indicating that you have a message.
A subscription fee is usually
required.
Options
A list of functions, preprogrammed
into your phone, which you may
change to control how your phone
works.
Glossary
Caller ID
A service provided by your
telephone company which displays
the incoming callers name and/or
telephone number (when
available). A subscription fee is
usually required. May also be
known as Call Identification, Call
Display or Calling Line
Identification (CLID).
Callers List
A list where an incoming caller’s
name and number (when available
from your telephone company) is
stored. When the list is full, the
oldest name/telephone number is
removed. You are generally
required to subscribe to a
telephone company service such as
Caller ID or Call Waiting ID.
Call Waiting
A service provided by your
telephone company which alerts
you to a second, incoming call while
on a call. A subscription fee is
usually required.
Call Waiting ID
A service provided by your
telephone company which displays
the Call Waiting caller’s name and/
or telephone number. A
subscription fee is usually required.
May also be known as Caller ID on
Call Waiting, Visual Call Waiting or
Call Waiting Deluxe.
31
P0876162 02 E D900.UG Page 32 Wednesday, March 25, 1998 4:43 PM
Glossary
32
Range
The amount of distance that you
may have between your Handset
and your Base while still
maintaining contact.
Services
Your telephone company provides
many useful services for which you
are usually charged on a per use
basis. Some common services are,
Voice Mail, Call Forwarding, Call
Return and Call Trace. The front
section of your local telephone
book generally provides
information on any services
available in your area.
Services code
The two- or three-digit code which
your local telephone company
assigns to activate a particular
service.
Security code
One of 16 million codes, known
only to the Base and Handset,
which ensures privacy.
Standby time
The amount of time that your
Handset may remain out of the
Base, not being used.
Talk time
The amount of time available to
make and receive calls or view and
modify lists before recharging.
P0876162 02 E D900.UG Page 33 Wednesday, March 25, 1998 4:43 PM
S PECIFICATIONS
HANDSET & BASE
POWER REQUIREMENTS
• Base Power Adaptor:
9 Vdc/350 mA, 60 Hz, 10W
• Handset Battery Pack:
Ni-cd, 3.6V, 700 mAh, type W
connector
• Handset Charge Time:
10 hours
• Handset Standby Time:
7 days*
• Handset Talk Time:
4 hours*
• Operating Frequency:
20 Channels, autoscanning,
902-928 MHz
* Standby and Talk Time will be reduced by talking
on the Handset or Handset ringer activation from
incoming calls.
MEMORY
• Handset: 18.5 x 5.8 x 4 cm
6 1/4 x 2 3/8 x 1 5/8 inch
• Base:
22.3 x 17 x 4.8 cm
8 3/4 x 6 5/8 x 2 inch
• Packaged: 8 x 15 x 38 cm
3 1/8 x 9 3/4 x 13 inch
WEIGHT
• Handset with battery: 260 g, 9.1 oz
• Base with stand:
312 g, 11 oz
• Packaged:
1100 g, 37.3 oz
CLEANING & CARE
DON’T USE...
✖
✖
✖
✖
✖
✖
✖
solvents
alcohol
acetone
bleach
ammonia
any harsh chemicals
any other liquids or spray
cleaners directly on phone
DO USE...
✔
a damp cloth to wipe plastic
parts
✔
a clean dry cloth to wipe the
Base and Handset charge
contacts
Specifications
• Callers List:
30 incoming calls
• Directory:
30 programmable entries
• Redial List:
5 outgoing calls
• Services List:
6 entries, some may be
preprogrammed
SIZE
33
W ARRANTY
LIMITED WARRANTY
WARRANTY REPAIR SERVICES
Aastra Telecom warrants this product against
defects and malfunctions during a one (1) year
period from the date of original purchase. If there
is a defect or malfunction, Aastra Telecom shall, at
its option, and as the exclusive remedy, either
repair or replace the telephone set at no charge, if
returned within the warranty period.
If replacement parts are used in making repairs,
these parts may be refurbished, or may contain
refurbished materials. If it is necessary to replace
the telephone set, it may be replaced with a refurbished telephone of the same design and color. If it
should become necessary to repair or replace a
defective or malfunctioning telephone set under
this warranty, the provisions of this warranty shall
apply to the repaired or replaced telephone set
until the expiration of ninety (90) days from the
date of pick up, or the date of shipment to you, of
the repaired or replacement set, or until the end of
the original warranty period, whichever is later.
Proof of the original purchase date is to be provided with all telephone sets returned for warranty
repairs.
Should the set fail during the warranty period;
In North America, please call 1-800-5741611 for further information. Outside North
America, contact your sales representative for
return instructions.
You will be responsible for shipping charges, if any.
When you return this telephone for warranty service, you must present proof of purchase.
EXCLUSIONS
Warranty
34
Aastra Telecom does not warrant its telephone
sets to be compatible with the equipment of any
particular telephone company. This warranty does
not extend to damage to products resulting from
improper installation or operation, alteration, accident, neglect, abuse, misuse, fire or natural causes
such as storms or floods, after the telephone is in
your possession.
Aastra Telecom shall not be liable for any incidental or consequential damages, including, but not
limited to, loss, damage or expense directly or indirectly arising from the customers use of or inability
to use this telephone, either separately or in combination with other equipment. This paragraph,
however, shall not apply to consequential damages for injury to the person in the case of telephones used or bought for use primarily for
personal, family or household purposes.
This warranty sets forth the entire liability and obligations of Aastra Telecom with respect to breach
of warranty, and the warranties set forth or limited
herein are the sole warranties and are in lieu of all
other warranties, expressed or implied, including
warranties or fitness for particular purpose and
merchantability.
AFTER WARRANTY SERVICE
Aastra Telecom offers ongoing repair and support
for this product. This service provides repair or
replacement of your Aastra Telecom product, at
Aastra Telecom's option, for a fixed charge. You are
responsible for all shipping charges. For further
information and shipping instructions;
In North America, contact our service information number:
1-800-574-1611. Outside North America,
contact your sales representative.
Note: Repairs to this product may be made only
by the manufacturer and its authorized agents, or
by others who are legally authorized. This restriction applies during and after the warranty period.
Unauthorized repair will void the warranty.
RECYCLING NICKEL-CADMIUM BATTERIES
NICKEL-CADMIUM
BATTERY
MUST BE DISPOSED OF
PROPERLY.
Nickel-Cadmium batteries are recyclable. You can
help preserve our environment by returning your
unwanted batteries to your nearest recycling center for recycling or proper disposal.
Note: In some areas the disposal of nickel-cadmium batteries in household or business trash may
be prohibited.
Caution: Do not handle damaged or leaking batteries.
P0876162 02 E D900.UG Page 35 Wednesday, March 25, 1998 4:43 PM
I NDEX
A
Answering
calls 13
Answering machine 30
Area Codes option 11
Assistance 34
B
Base
description 5, 31
installation 6
specifications 33
Battery is low message 26
Battery pack
charging 7, 9
cover 4
installing 7
replacing 29
C
29
Cleaning and care 33
Clear Message Waiting option 10
Compress Callers List option 10
Cord routing 6
Current options 10
Index
Call Forwarding Service 32
Call is on hold message 26
Call Light option 10
Call Waiting 31
Options 16
switching callers 15
Call Waiting ID 15, 16, 31
Caller ID 31
Callers List
area codes 11
bumped calls 17
compressing 10
deleting 17
dialing from 17
display 18
icons 28
logging calls 10
long distance 18
saving to Directory 18
timing calls 23
Calls
answering 13
Call Waiting 15, 16, 31
Call Waiting ID 15, 16, 31
display not working 29
ending 13
logging 10, 13
long distance 11
making 13
Redial List 14
switching callers 15
timing 23
Calls bumped message 17, 27
Capital letters 24
CCF list full message 26
Change Callers option 10
Characters, entering 24
Charging 7
battery 9
contacts 5
time 33
Charging message 26
Check Phone Cord message 26,
35
P0876162 02 E D900.UG Page 36 Wednesday, March 25, 1998 4:43 PM
Index
36
D
E
Date option 11
Deleting
Callers List items 17
Directory items 19
Redial List items 14
Services List items 21
Dial tone not working 29
Dialing
calls 13
from the Callers List 17
from the Directory 20
from the Redial List 14
from the Services List 21
long distance calls 18
Digital Spread Spectrum 31
Direction arrows 4
Directory
adding pause 19
deleting entries 19
dialing from 20
dialing while on a call 20
editing 20
entering names 24
name match 13
saving from Callers List 18
saving from Redial List 14
special characters 24
Directory full message 26
Disconnecting calls 13
Display
for Callers List 18
icons 28
messages 26
not working 29
DSS 31
Editing
Directory entries 20
Services List items 22
Ending calls 13
English 10
Enter Name> prompt 21
Enter Number> prompt 20, 21
Entering
a pause 19
names and numbers 24
special characters 24
Erasing the Callers List 17
Extension in use message 26
Extension in use option 11
F
Feature codes
saving 21
Services List 21
Features 23
Finding the handset 23
First charge 9
H
Handset
description 4, 31
display not working 29
lights 28
locating 13, 23
messages 26
not working 29
reception 29, 30
specifications 33
static 30
warm 3, 9, 30
P0876162 02 E D900.UG Page 37 Wednesday, March 25, 1998 4:43 PM
Hearing aid compatibility 25
Hold 4, 13, 15, 26
HS Ringer OFF message 26
I
Icons 28
Important tips 3
Installation 6, 8, 9
battery 7
cord routing 6
desk mount 6
handset 7
Interference 30
items in the Directory message 19
L
Language option 10
Letter chart 24
Lights 4, 28
not working 30
Locating Handset 13, 23
Logging
Callers List 17
calls 10, 13
Long distance 11
calls 18
icon 28
prefix 11
Long Distance Prefix (LDP) 13, 18
Lower case letters 24
Making calls 13
Memory specifications 33
Message waiting 10, 30, 31
light not working 30
26
Messages 26
Multipurpose light 4
N
Names
displaying 13
entering 24
upper/lower case 24
New Callers message 17, 27
Numbers, entering 24
O
Options 31
list 10, 12, 13
long distance 11
Out of range message 27, 29
P
Pause, entering 19
Phone cord, installing 6
Power
adapter warm 3, 30
adaptor 7
cord, installing 6
requirements 33
Saver option 11
standby 9
Preferred Name Match 13
Private name/number message
27
Problem solving 29, 30
Prompts table 26
Index
M
Message waiting message 10,
37
P0876162 02 E D900.UG Page 38 Wednesday, March 25, 1998 4:43 PM
R
T
Range 32
Redial List 14
deleting items 14
saving to Directory 14
Redial list is empty message
Talk time 32
Technical assistance 34
Time option 11
Timing calls 23
Troubleshooting 29, 30
pulse sound 30
27
Repair 34
Returns 34
S
Index
38
Saved Directory message 14
Saving
battery power 10
Directory 20
Security 2
code 32
Services List
charges 21
code 32
editing 22
explanation 32
saving 21
Setting options 10
Setup 6, 8, 9
Solving problems 29, 30
Spanish 10
Special characters, entering 24
Special Features 23
Stand 5
Standby time 3, 9, 32, 33
Static 30
Subscribed services 3
Switching callers 15
U
Unknown name/number message
27
Uppercase letters 24
V
Voice Mail
preprogramming 19
Services 10, 32
Volume 25
W
Warranty 34
P0876162 02 E D900.UG Page 39 Wednesday, March 25, 1998 4:43 PM
P0876162 02 E D900.UG Page 40 Wednesday, March 25, 1998 4:43 PM
P0876162 02 E D900.UG Page 41 Wednesday, March 25, 1998 4:43 PM
If you’ve read this owner’s manual and consulted the Troubleshooting section and still have
problems, please call 1-800 574-1611 for technical assistance.
P0876162 Issue 02
™Mæstro 900 DSS is a trademark of Aastra Telecom
©Copyright 1998