1
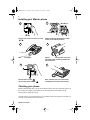
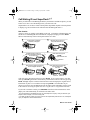
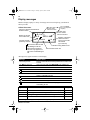
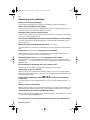
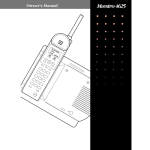
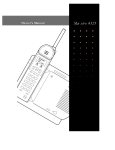
Mæstr o
P0834568 01 E UG 3500 US Page -3 Tuesday, April 25, 2000 3:48 PM
Mæstro 3500CW
User Guide
P0834568 01 E UG 3500 US Page -2 Tuesday, April 25, 2000 3:48 PM
P0834568 01 E UG 3500 US Page -1 Tuesday, April 25, 2000 3:48 PM
TABLE of CONTENTS
Call Waiting Display
1
Installing your Mæstro phone
Checking your phone
2
2
Call Waiting ID and SuperFlash™
How it works
3
3
Hold - Continuing a call on
another phone
4
Using Speaker/Mute
4
Placing a call with Speaker/Mute
4
Answering a call with Speaker/Mute 4
Receiver volume
4
Ringer volume
4
Custom Calling Features
5
Using the ,Reviewo Key
Using the Callers List
Saving from the Callers List
Long distance calls
5
5
5
6
Saving frequently called numbers
in memory
Saving a number in memory
Letter chart
To erase the contents of a
memory key
7
To protect the contents of your
memory keys
Password protected keys
Locking the memory keys
Unlocking the memory keys
7
7
7
7
Personalizing your phone
Options
8
8
Key reference
9
6
6
7
Display messages
10
Ensuring privacy
11
Example of saving ON and
OFF keys
To save a Call Forwarding
ON key
To save a Call Forwarding
OFF key
Answering your questions
11
11
11
12
P0834568 01 E UG 3500 US Page 0 Tuesday, April 25, 2000 3:48 PM
P0834568 01 E UG 3500 US Page 1 Tuesday, April 25, 2000 3:48 PM
1
CALL WAITING DISPLAY
Finally, a telephone that lets you see who is calling – even
when you’re on another call!
•
Intelligent Viewing System™
- With your Mæstro phone and Call Waiting ID, you will always be able to view
incoming Caller ID as well as Call Waiting information. This added flexibility lets
you decide which calls are important because you’ll know who is on Call Waiting
before you answer their call.*
- SuperFlash™ is an exclusive feature which permits at least two SuperFlash
capable products to display, log, and switch between Caller ID and Call Waiting
ID callers.*
•
Display - Your Mæstro will always display the name/number of the person to whom
you are speaking, whether it is the original or Call Waiting ID caller.
•
Call Logging - A record of the last 30 calls you received is stored in your Maestro.
Easy to read icons tell you if the call was from a long distance number, how many
times someone tried to reach you, and even if you returned the call.
•
Menu Driven - Maestro’s display provides messages that guide you step by step
through any function. The larger display area allows you to see all your calling
information at one time. As an added bonus, Maestro is backlit, making the display
visible even in the dark.
•
Memory Keys - Maestro’s memory keys allow you to save names/numbers or
features for easy one button functionality. You can program new names/numbers or
save names/numbers directly from the Callers List.
•
Preferred Name Match - Now you can decide how a name will appear on the display.
When you receive a call, Maestro compares the incoming number to those you have
programmed into the memory keys. If a match is made, the name and number is
displayed as you entered it into memory.
•
Custom Calling Features - Mæstro has preprogrammed keys to access Custom
Calling Features. The enclosed Quick Reference Card describes some of these
services and how to use them with your new Mæstro telephone.
•
Speakerphone - The built in speaker and microphone lets you hear and speak
without using the receiver. Maestro 3500CW allows your whole family to join in
conversations with relatives and friends and lets you continue with tasks while on a
call.
* You must subscribe to Call Waiting ID from your local telephone company. If Call Waiting ID is not yet
available in your area, your Mæstro 3500CW can be used as an advanced Caller ID telephone.
Maestro User Guide
P0834568 01 E UG 3500 US Page 2 Tuesday, April 25, 2000 3:48 PM
2
Installing your Mæstro phone
2
1
Wall Mount
Desk Mount
Connect the receiver and receiver cord.
Attach the wedge-shaped base in desk
mount or wall mount position†.
4
3
Attach the faceplate.
Attach the receiver card and lens (shinyside down) after recording numbers for
quick reference.
5
6
!
Connect the line cord.
Connect the power adapter.
!
Save numbers (see user instructions)
and attach the memory card and lens.
Checking your phone
Mæstro automatically runs a test to ensure that the phone cords are connected properly. If
the test fails, the display will prompt you to check the phone cords. Make sure all
connections are fastened securely.
†For wall mounting, we recommend that you use a telephone wall mounting plate (not included). The
short line cord should be used for wall mounting.
Maestro User Guide
P0834568 01 E UG 3500 US Page 3 Tuesday, April 25, 2000 3:48 PM
3
Call Waiting ID and SuperFlash™†
When you subscribe to Call Waiting ID and use your Mæstro 3500CW telephone, you will
be able to see who is on Call Waiting before you answer the call.
SuperFlash™ is an exclusive feature which permits SuperFlash capable extension phones
to display, log, and switch between Caller ID and Call Waiting ID callers.*
How it works
Answer a call as you usually would. While on the call, you hear the Call Waiting ID tone
and the new Call Waiting ID caller information is displayed. Simply press the FLASH
button to automatically switch to and speak with the new caller.
2
1
G
RIN
Extension phone picks up and
also speaks with Caller One.
Incoming caller's information
(Caller One) is displayed
CALLER ON
555-1112 E
CALLER ON
555-1112 E
Kitchen
Extension
4
3
EP
BE
Call Waiting ID tone sounds and
Caller Two's information is displayed
on both extensions
CALLER TW
555-1234 O
Kitchen
Extension
EP
FLASH
to speak with Caller Two
Kitchen or Bedroom
Extension
Bedroom
Extension
Both extensions speak with Caller Two
and see displayed information
Kitchen
Extension
Bedroom
Extension
Either extension may press
BE
CALLER TW
555-1234 O
5
CALLER TW
555-1234 O
Kitchen
Extension
CALLER TW
555-1234 O
Bedroom
Extension
6
Either extension may press FLASH
again to switch back to
Caller One.
CALLER ON
555-1112 E
Kitchen
Extension
Bedroom
Extension
Calls will not be disconnected when you press FLASH. If you wish to return to your first
caller press FLASH again. Either extension may switch between the two callers by pressing
FLASH, although only the extension which first answered will display the original caller’s
information. A pause of 3 seconds between pressing FLASH is recommended. If you
choose not to answer the Call Waiting ID call, the caller’s name and number will be stored
in the Callers List as long as Option 8 is set to “log all calls” or “log unanswered calls.”
If you wish to terminate a caller, press GOODBYE when their caller information is on the
display. You will automatically be switched to the other caller.
†You
must subscribe to Call Waiting ID from your local telephone company. Until you subscribe, your
telephone will not display or record incoming calls.
* The ability to take the waiting call, when more than two SuperFlash products are in use, will depend
upon your telephone network characteristics.
Maestro User Guide
P0834568 01 E UG 3500 US Page 4 Tuesday, April 25, 2000 3:48 PM
4
Hold - Continuing a call on another phone
If you want to continue your conversation at another extension, press HOLD and hang up
the receiver. The hold feature keeps the caller on the line until you pick up the extension
telephone.
Note: If you receive a Call Waiting ID call while a call is on hold, Call Waiting ID information will not be displayed.
Using Speaker/Mute
The Mæstro 3500CW’s built in speaker and microphone allow you talk and hear without
holding the receiver to your ear. If you wish to answer a Call Waiting ID call while using
Speaker/Mute, simply press FLASH , as usual, to connect the second call.
Placing a call with Speaker/Mute:
Answering a call with Speaker/Mute:
1.
Press SPAKER/MUTE and wait for the
dial tone. Light goes on.
1.
When the phone rings, press SPEAKER/
MUTE. Light goes on.
2.
Enter the number you wish to call and
speak as usual.
2.
Speak as usual.
3.
Press GOODBYE to disconnect your
call.
3.
Press GOODBYE to disconnect your
call.
Note: You may turn off the audio so that your caller cannot hear you at anytime when
using Speaker/Mute. Simply press SPEAKER/MUTE during your call. The small light
beside the key will begin to flash when Mute is active. Press SPEAKER/MUTE again
to turn sound back on.
Receiver volume
While you are on the phone, you can press the left or right side of the volume bar
— for soft or loud receiver volume.
Ringer volume
Press the left or right side of the volume bar — for soft or loud ringer volume. If
you don’t want to be disturbed you can turn the ringer OFF by pressing the left side of the
volume bar — without lifting the receiver. Ringer is OFF may appear on the
display unless other messages have priority. You can adjust ringer volume and tone in the
OPTIONS list, as long as the ringer has not been turned OFF. When you want to turn the
ringer ON, press the right side of the volume bar — without lifting the receiver.
Maestro User Guide
P0834568 01 E UG 3500 US Page 5 Tuesday, April 25, 2000 3:48 PM
5
Custom Calling Features
All the Custom Calling Features available from your local telephone company work with
your Mæstro 3500CW. The enclosed Quick Reference Card describes some of these
services and how to use them with your new Mæstro telephone.
Using the ,Reviewo Key†
The ,Reviewo key lets you enter the Callers List. Mæstro remembers up to 30 incoming
calls which are stored in the Callers List. This valuable feature helps you organize your
calls by monitoring their status. Easy to understand messages and symbols keep you
informed about who called, when they called, how often they tried to reach you, and even
if you returned the call.
Using the Callers List:
•
Press ,Review or Reviewo to enter the Callers List.
•
Press either ,Review or Reviewo to move down and up the Callers List.
•
Edit numbers from the dial pad by pressing k or l.
•
Return to where you were in the Callers List after exiting the Callers List by pressing
,Review or Reviewo and then pressing *.
•
Return a call automatically by pressing DIAL while the caller’s number is on the display.
•
If you have 30 calls in the Callers List and the 31st call is received, the oldest call in
the List is automatically deleted. Callers bumped=XX will appear on the display, indicating the number of calls removed from the list.
•
Erase individual callers from the list by pressing DELETE twice when the name/number is on the display. You may also erase all callers by pressing DELETE twice when
Callers List=XX is displayed.
Saving from the Callers List
While in the Callers List, you can save the number on the display directly into a memory
key.
To save a caller from the Callers List:
When a name/number is displayed while in the Callers List.
1. Press SAVE.
2.
Press the memory key where you want to save the number or SHIFT and then the
memory key.
3.
Write the name in the space provided on the memory card or receiver card
(in pencil).
†You must subscribe to Call Waiting ID from your local telephone company. Until you subscribe, your
telephone will not display or record incoming calls.
Maestro User Guide
P0834568 01 E UG 3500 US Page 6 Tuesday, April 25, 2000 3:48 PM
6
Long distance calls
Dialing a long distance number from the Callers List:
When a name/number is displayed in the Callers List.
1. Enter 1 and the appropriate area code (if required).
2.
Press DIAL.
The number on the display will be automatically dialed.
Note:
If you make an error while entering either the 1 or area code, press l or k to
correct.
Saving frequently called numbers in memory
After you have set up your phone, save the names and phone numbers of your family and
friends or important emergency numbers in any of Mæstro’s memory keys.
Press SAVE and follow the instructions shown on the display or read through the following
example on how to save a name and number to memory.
Saving a number in memory:
For example, to save Len’s number (555-1440)
1.
Press SAVE.
2.
Press the memory key where you want to store the number
OR press SHIFT and then the memory key where you want to store the
number*.
3.
Press 5 5 5 1 4 4 0 on the dial pad.
4.
Press SAVE.
5.
Press SAVE again to quit
OR enter Len’s name by pressing the following keys:
5 three times then l
3 twice then l
6 twice.
Note: The Letter Chart lists the keys for specific letters and numbers “Letter chart:” on
page 7.
6.
Press SAVE to store the name.
7.
Write the name on the memory card or receiver card (in pencil).
Note: Press l to move to the next letter in a name. To erase a letter, simply press k .
Use either ,Review or Reviewo to switch between upper and lower case. Press l
twice to add a space.
*Use SHIFT, combined with any of the memory keys, to save a second number and name
or feature to a memory key. Press the memory key and then SHIFT to view the contents of
a memory key. Repeatedly pres SHIFT to switch between the two items contained on the
key. The display will indicate (in bottom right corner) 1 or 2; 1 being a memory key alone,
2 a memory key and shift key combination. Note that any number saved to Mæstro’s
unshifted memory keys will continue to function, even in the event of a power failure. This
handy feature is particularly helpful for emergency numbers.
Maestro User Guide
P0834568 01 E UG 3500 US Page 7 Tuesday, April 25, 2000 3:48 PM
7
If you program a long distance number into a memory key, you must also include 1 and
the area code.
Note: Press HOLD when entering numbers to place a pause into a memory key (if
required). This is useful if you wish to preprogram access to a remote system, such
as Voice Mail, because a pause is often required before entering a system password.
A flash may also be programmed into a memory key if required.
Letter chart:
1=& 11=’
111=(
2=A 22=B
222=C 2222=2
1111=)
3=D
11111=, 111111=- 1111111=. 11111111=1
33=E
333=F
3333=3
4=G 44=H
444=I
4444=4
5=J
55=K
555=L
5555=5
6=M 66=N
666=O 6666=6
7=P
77=Q
777=R
7777=S
77777=7
8=T 88=U
888=V 8888=8
9=W
99=X
999=Y
9999=Z
99999=9
To erase the contents of a memory key:
1.
Press the memory key or SHIFT and then the memory key to see its contents.
2.
Press DELETE twice.
To protect the contents of your memory keys
For security reasons or child-proofing you can protect the contents of your memory keys
by locking them. You will still be able to use your memory keys to place calls or use
features, but you will not be able to erase or save a new name, number or feature while
they are locked.
Locking the memory keys:
Unlocking the memory keys:
1.
Don’t pick up the receiver or press
SPEAKER/MUTE.
1.
Don’t pick up the receiver or press
SPEAKER/MUTE.
2.
Press OPTIONS key under the panel.
2.
Press OPTIONS key under the panel.
3.
Press HOLD.
3.
Press HOLD.
4.
Press *.
4.
Press *.
Note: All memory keys will be locked.
Password protected keys
The bottom four of Mæstro’s shifted memory keys are designed to let you enter special
passwords or codes (such as those required for Voice Mail). Once the shifted memory key
has been dialed, all other digits then entered will not be displayed on the screen or stored
in the Redial list.
Maestro User Guide
P0834568 01 E UG 3500 US Page 8 Tuesday, April 25, 2000 3:48 PM
8
Personalizing your phone
Below the display is a sliding panel. Move the panel to the right and press the OPTIONS
key to see each of the nine choices. You can change any of the nine options by following
the change procedure below.
To change any of the nine options:
1.
Don’t pick up the receiver or press SPEAKER/MUTE.
2.
Slide the panel located below the display to the right and press the OPTIONS key.
3.
4.
Press either ,Review or Reviewo to move through the list of options or press the
desired option number on the dial pad. (For example, when 9 items in list appears on
the display, press 2 to set the time and date.)
Press the selected option number again (1 through 9) and follow the instructions on
the display to make a change.
Note: To exit at any time press GOODBYE.
Options
1.
Change the Language
You have a choice of display messages in one of two languages.
2.
Set the Time and Date
When you subscribe to Caller ID or Call Waiting ID, the time and date are automatically set for you when the first call comes in. You can also set the time and date yourself if you do not want the time and date automatically updated. If there is a power
failure you may have to reset the time and date or wait for an incoming call.
3.
Set the Ring Tone
You can choose one of three different ring tones. Use SAVE to end only when you are
satisfied with your chosen ring tone. If an incoming call is private (i.e., caller has
blocked their name and number from appearing on your display), the call will ring
with a fourth distinctive tone.
4.
Timer ON/OFF
The Mæstro comes with an autotimer option to track the length of your calls. The
display will show you, in minutes and seconds, the elapsed time of an individual call.
5.
Set Contrast
Choose from 8 contrast levels to suit your needs. Once you’ve chosen set contrast in
the OPTIONS list, simply press , or o until you are satisfied with the display.
6.
Clear Message Waiting (when subscribing to Voice Mail services only)
If Message Waiting appears on the display when there are no more voice messages,
you can turn the display message off using this option.
Maestro User Guide
P0834568 01 E UG 3500 US Page 9 Tuesday, April 25, 2000 3:48 PM
9
7.
Enter Your Area Code
With Caller ID or Call Waiting ID, area codes are displayed for incoming calls and in
the Callers List. With this option, you may block the display of up to three local area
codes. This is useful in locations where area codes are not necessary in order to dial a
long distance number or where an area code can not be used when dialing local numbers.
8.
Change Callers List
You can log all the calls that you receive, only those calls you or your answering
machine did not answer, or no calls.
9.
Call Wait ID
This option is turned ON at the factory. You would only turn this option OFF if persistent clicking or tones interrupt your calls. When this option is turned OFF, your
Mæstro will act as a Caller ID telephone only.
Key reference
o Review, - Access to Callers List.
Also allows you to move
forward or backward
in the Callers List.
k l - Advance to the next
letter or delete letters/numbers
when entering a name or number
into memory.
Goodbye - Disconnects calls and
exits from Callers List & OPTIONS.
OPTIONS - Slide panel
to right. Allows you to
personalize your phone
by changing its options.
Delete - Erases contents of
Callers List and memory keys.
Save - Saves memory key
data & OPTIONS changes.
Custom Calling Features Shift - Used in combination
See Quick Reference
Card for details.
with a memory key. Lets you
save another name & number
or feature on the key.
Flash - Press to connect
your Call Waiting ID calls.
Memory Keys -
Redial - Use , or o
Program frequently
called numbers
& names.
to scroll through the
last 3 outgoing calls.
Press DIAL when the
number appears on
the display.
Speaker/Mute - Speak & hear
without holding the receiver.
Mute lets you turn mic off
so that your caller cannot
hear you.
Volume - Adjustable
ringer and receiver
volume.
Hold - Lets you keep
a caller on the line
while you move to an
extension. Also lets
you program a pause
into memory.
Dial - One key
dialing of the
number appearing
on the display.
Lights when Speaker is in
use. Flashes when Mute is
engaged.
Password protected - shifted memory keys.
Maestro User Guide
P0834568 01 E UG 3500 US Page 10 Tuesday, April 25, 2000 3:48 PM
10
Display messages
Mæstro’s display employs a variety of messages and icons to help keep you informed
about your calls.
Private name
Unknown name
If present, call was forwarded from
another location.
Number of this call
in the Callers List.
Call has not been
previously viewed.
Info not available
from your telephone
company.
May also read:
Callers list screen
May also read:
Private number
Unknown number
L.E. Smith
# 01 N
555-1440
Jan 1 12:45 PM
Call has been returned OR
Call Waiting ID call OR
Call has been answered.
This icon only appears if a
call is NOT a Call Waiting ID
call.
Number of times this
caller has tried to
reach you since list
last viewed.
(up to 9 times)
3X
Indicates a long distance call.
Time and date of this call.
Messages may appear elsewhere on the display.
Message
Calls bumped=XX
Use ,, o for XX New
XX New Callers
What it means
Number of old calls automatically deleted when Callers was
List full.
View your new calls using ,Reviewo in the Callers List.
Number of new calls stored in Callers List.
Flash has been dialed.
Pause has been dialed.
Indicates further information. Use l to view.
more l
Call is a Call Waiting ID call.
Call was returned.
Call was from a long distance number.
Call was answered. This icon only appears if a call is NOT a
Call Waiting ID call.
Lights
What it means
Priority
Solid
Extension in use or Check phone cord appears on display
Highest
Fast Flash
Visual ring indicator for incoming calls
High
Slow Flash
Message waiting (with voice mail services only)
Low
Flash
New call has been received (and not returned).
Lowest
Note: The light and display will always indicate the highest priority condition.
Maestro User Guide
P0834568 01 E UG 3500 US Page 11 Tuesday, April 25, 2000 3:48 PM
11
Ensuring privacy
Mæstro’s red display light comes ON and Extension in use appears on the display when
another person in your home picks up an extension. The light remains ON until the other
person hangs up.
Example of saving ON and OFF keys
The following examples show you how to save an ON and an OFF key and activate
Mæstro’s light for a telephone company feature.
To save a Call Forwarding ON key:
To save a Call Forwarding OFF key:
1.
Press SAVE.
1.
Press SAVE.
2.
Press1 to program the light ON.
2.
Press 0 to program the light OFF.
3.
Press the desired memory key.
3.
Press the desired memory key.
4.
Press 7 2 # or your telephone company 4.
feature code for turning Call Forwarding ON.
Press 7 3 # or your telephone company
feature code for turning Call Forwarding OFF.
Read the display to confirm the number. If the number is wrong press
GOODBYE and begin again.
Read the display to confirm the number. If the number is wrong press
GOODBYE and begin again.
5.
Press SAVE again.
5.
6.
6.
Write Call Forwarding ON on the
receiver card (in pencil). The light is
now programmed but will not come ON
until you use the feature.
Press SAVE again.
Write Call Forwarding OFF on the
receiver card (in pencil).
To save ON and OFF keys for a telephone company feature without the light, omit step 2
from the above examples. Your Mæstro may be programmed with only one ON and one
OFF key.
Note: The feature in use light may be preprogrammed (see Quick Reference Card). Once
the feature ON and OFF codes have been assigned to two keys, other features will
not turn the light ON and OFF.
Maestro User Guide
P0834568 01 E UG 3500 US Page 12 Tuesday, April 25, 2000 3:48 PM
12
Answering your questions
Display is in the wrong language.
You can change the language by pressing the OPTIONS key and pressing 1 twice.
Callers are not identified on the display.
Until you subscribe to Caller ID or Call Waiting ID from your telephone company, your
telephone will not receive the name/number of a caller.
Persistent clicking or tones interrupt calls.
Turn off Option 9 using the OPTIONS key. When this option is turned OFF, your Mæstro
will act as a Caller ID telephone only.
You hear the Call Waiting ID tone but no caller information is on the display.
You need to subscribe to Call Waiting ID and/or confirm that the Call Wait ID option is
ON (see Option 9).
While pressing , Reviewo, the display shows List is empty.
You must subscribe to Caller ID or Call Waiting ID, for the telephone to record incoming
calls.
No dial tone. Check phone cord may appear on the display.
Read the display. If the line cord is not attached properly the display will prompt you.
Also, make sure the receiver cord is attached securely.
Telephone doesn’t ring. Ringer is OFF may appear on the display.
The ringer may be turned OFF. Without lifting the receiver, press the right side of the
volume bar — to turn the ringer ON. You can adjust ringer volume and tone in the
OPTIONS list.
No information on the display and ringer volume is low.
Make sure the power adaptor is plugged into a working electrical outlet.
Cannot hear a caller or be heard.
Make sure the receiver cord is inserted securely into the jack. If you are using Speaker/
Mute ensure that the Mute feature is not active. The red light beside the Speaker/Mute key
will flash if mute is in use.
Light stays ON and display shows Feature ON even when call forwarding
is not in use.
You must program a call forwarding OFF key “To save a Call Forwarding OFF key:” on
page 11.
When you have a power failure.
Mæstro will still operate as a regular telephone during a power failure, but the display, the
advanced features, and shifted memory keys will not operate until the power is restored.
Cannot switch to an incoming Call Waiting ID caller.
Make sure that all off-hook extensions are SuperFlash capable. Also, a pause of 3 seconds
is required before pressing FLASH again.
For customer service and technical assistance please call 1-800-574-1611.
Maestro User Guide
P0834568 01 E UG 3500 US Page 13 Tuesday, April 25, 2000 3:48 PM
INDEX
A
K
Area code 9
Key reference 9
C
L
Call Forwarding
Off 11
On 11
Call Wait ID 9
Call Waiting ID 3,
Caller ID 5, 8, 9
Callers List 3, 9
change 9
deleting 5
Review key 5
saving from 5
viewing 5
Contrast 8
Language
incorrect 12
select 8
Lens 2
Lights 10
Locking memory keys 7
Long distance calls 6, 7,
8, 9, 12
D
Date
set 8
Desk mount 2
Display
contrast 8
messages 10, 12
Display messages 10
E
Extension phones 3,
12
F
Faceplate 2
Flash 3, 4, 7,
12
H
Hold 4,
9
M
7
I
Installation 2
faceplate 2
Lens
memory card 2
receiver card 2
line cord 2
memory card 2
phone base 2
power adapter 2
receiver 2
receiver card 2
receiver cord 2
Memory card 2
Memory keys
erasing 7
flash 7, 10
letter chart 7
locking 7
long distance numbers 7
on/off keys 11
pause 7, 10
programming 6
saving 6
unlocking 7
using Shift 6
viewing contents 7
Message waiting 8
Messages 10
Mute 4
O
Options
Changing 8
P
Password 7
Pause 7
Privacy 7, 11
R
Receiver card 2
Receiver volume 4
Review key 5, 6, 12
Ring Tone
set 8
Ringer 12
Ringer volume 4
P0834568 01 E UG 3500 US Page 14 Tuesday, April 25, 2000 3:48 PM
INDEX
S
Saving
entering names 6
adding a space 6
erasing 6
letter case 6
next letter 6
entering numbers 6
shift key 6
Shift key 6
Speaker/Mute 4, 7, 8, 12
SuperFlash 3, 12
T
Test
phone cord connection 2
Time
set 8
Troubleshooting 2, 12
V
Volume control 4
W
Wall mount 2
P0834568 01 E UG 3500 US Page 15 Tuesday, April 25, 2000 3:48 PM
P0834568 01 E UG 3500 US Page 16 Tuesday, April 25, 2000 3:48 PM
P0834568 Issue 02 CC1918 Rev 01
© Aastra Telecom Inc., 2000