1
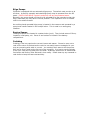
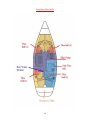
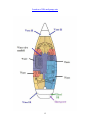
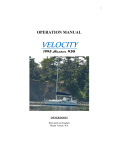
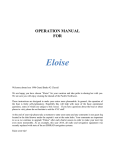
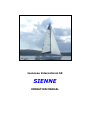
Jeanneau International 50
SIENNE
OPERATION MANUAL
Welcome Aboard!
We are happy that you have chosen Ship Harbor Yacht Charters and
the vessel, Sienne, for your vacation. We hope you enjoy your
cruising experience in the lovely islands of the Pacific Northwest.
This manual will help you become more familiar with your boat. If you
have any further questions, about the boat or your itinerary, please do
not hesitate to ask the SHYC staff.
Remember our vessels are non-smoking boats. .
Bon Voyage!
The Ship Harbor Yacht Charters Staff
1
TABLE OF CONTENTS
Boat Operation
Engine Inspection
Start-Up
Shutdown
Getting Underway
Cruising
Docking
Fueling
Boat Electrical
A.C. (Shore) Power
Inverter
D.C. (House) Systems
Batteries
Sanitation System
Marine Toilet
Holding Tank(s)
Y-Valve
Water Systems
Fresh Water Tanks
Fresh Water Pump
Hot Water
Shower
Galley
Propane
Refrigeration/ Freezer
Stove/ Oven
Heating Systems
Diesel Heater (DC)
Electric Heater
Electronics
VHF Radio
Auto Pilot
Tridata
Wind System
GPS/Plotter
DVD/CD Stereo AM/FM Radio
Anchoring
Sails and Rigging
BBQ
Dinghy/Outboard
Other Notes
Safety Precautions
Bilge Pumps
Engine Spares
Crabbing
Serial/Part Numbers
Thru-Hull Diagram
Fill and pump out diagram
Page
3
4
5-6
6
7
8
9
9
10
11
14
15
2
BOAT OPERATION
Engine Inspection
Remember your “WOBBS” every morning. (Water (Coolant), Oil, Bilges (Inspect and
Pump-out), Belts, and Sea Strainer. Check the level of COOLANT in the expansion
tank. Check the level of your engine oil with the dipstick. Your dipstick is located on
the port side of the engine block. Look at the etch mark on the dipstick that
indicates proper level. DO NOT OVERFILL! Fill only if oil level is below the ½ mark.
Check the general condition of the hoses and belts.
Ensure the RAW WATER THRU-HULL is OPEN! (Lever position in-line with valve).
Check the sea strainer for debris. If necessary, close the thru-hull, open the strainer
lid, clean out debris, and reassemble. REOPEN THE THRU-HULL!
Start Up
SIENNE has a 90 hp Perkins diesel engine with a 3 bladed prop. There is an ignition,
throttle and transmission control in the cockpit. The vessel cruises at 1800 rpm to a
speed of 7.5 knots depending on water conditions. Running your engine much above
2000 will burn a lot more diesel with very little gain in boat speed.
The boat has a definite prop walk to port in reverse with little effect in forward.
When in reverse, be careful to keep a firm grip on the wheel. Use only low rpms in
reverse.
To start engine: Place transmission in the neutral position by placing the shift arm in
the straight-up position with the red button depressed. Turn the ignition switch on
and leave on while engine is running. Your oil and temperature alarms will sound.
Push the ignition button (~ 1/2" diameter) in. The engine should start immediately.
Depress the red button on the throttle and increase the rpm to 1100 to clear the
warning lights and then back the throttle to 1000 rpm. Immediately check for water
exiting the exhaust at starboard side aft. This is an indicator that the thru-hull is
open and that water is keeping the engine cool.
Do not hold the ignition key in for more than 5 seconds at a time. If the engine does
not start the first time, wait about 15 seconds before trying again. NEVER TURN OFF
THE KEY WHILE ENGINE IS RUNNING!
After the engine starts, warm it up at about 1000 rpms for about 5 minutes.
Observe that no warning lights are illuminated and no alarms are sounding. If so,
shut down the engine and assess the situation for a potential problem. (Note: Was
there a lack of water exiting with exhaust? Are thru-hulls open and debris cleared
from sea-strainer? If a problem continues to occur, call SHYC Service.)
3
Shut Down
Before shutting the engine down, let it cool for 5 minutes at idle and transmission in
neutral. Turn off the engine by lifting the "Kill" "T" handle. Then switch the ignition
to the off position. DO NOT TURN OFF THE IGNITION SWITCH FIRST!
Getting Underway
Disconnect the shore power cord (see AC Power next page). Close portholes,
windows, and hatches. Turn on VHF, auto pilot and electronics. Assign crew
members to their tasks. Put one crew member (the “dinghiest” member of course!)
in charge of the dinghy if it is under tow. It needs to be kept on a tight leash when
in the marina. Once outside marina, have your crew members bring in fenders and
put lines away.
Cruising
Slowly bring the engine up to a speed of 2400 rpm where you will cruise at approx.
6-8 knots SOG (Speed-Over-Ground) using only about .75 gallons of diesel/hour.
Using excessive rpms will only give you a ½ knot gain in speed and will damage the
engine. Speed will vary depending on weight, load, weather, and water conditions.
Docking
During docking, give clear instructions to the crew on what you will expect of them
(i.e. lines and fenders, dinghy). Always come into the dock slowly allowing for any
wind or tide. If you have a choice, dock on the port side because as you put the
transmission in reverse, the boat will pull to port drawing you in closer to the dock.
Have the bow, stern, and spring lines ready. If you are short on crew, lead the lines
to the midsection of the boat (where it is widest) where your crew member can
easily step off with one of the lines, secure it, and quickly grab the next one.
As you are approaching the dock, have your crew call out distances to the captain
(i.e. 20 feet, 10 feet, 3 feet etc.). This will help with a successful landing.
If you find you are too far from the dock, DO NOT ALLOW YOUR CREW TO JUMP!
Back out and try it again. Disaster may follow if someone falls into the water.
Fueling Up
You will need to top-off the fuel tank upon completion of your charter. Your fuel
tanks hold 70 gallons each or a total of 140 gallons. You should have a rough idea of
the number of gallons you will need to add to your tank. (I.e. if you use .75 gal per
hour and have run 20 hours: .75gph x 20h = 15 gal)
Open the fuel filler cap (2) located on the transom, port side, with the key located in
the Nav Station or a winch handle. MAKE SURE YOU HAVE DIESEL! Make sure fuel
is going into the right deck fill! DOUBLE-CHECK! Before pumping, have your oil/fuel
sorb ready to soak up any spilled fuel. Do not add water at the same time.
Put the DIESEL nozzle into the deck fitting and pump slowly listening to the sound of
the flow. Pumping too fast may not allow excess air to escape, which will lead to
spillage out the vent. As the tank fills, the sound will rise in pitch or gurgle. Pay
4
attention to the vent that it does not spill fuel into the water. Top-off carefully,
catching any spillage with your sorb pad.
Check your gauges. Replace the deck fill caps and clean up any spatter and wash
hands thoroughly.
BOAT ELECTRICAL
The electrical system is divided into two distribution systems: 110 volts or AC and 12
volts or DC. The systems are controlled from the electrical panel located at the Nav
Station. The battery switches are located behind an access door under the center
settee bench.
When not connected to shore power your batteries provide most of your electrical
power. Therefore, the use of onboard electricity needs to be monitored very
carefully. TURN OFF ELECTRICAL DEVICES when they are not being used (lights,
instruments, etc.)
120 Volt or AC (Alternating Current)
Shore Power supports all AC equipment and receptacles on board as well as the
inverter/charger.
To connect to shore power, plug the power cord into the transom fitting and then
into the dock receptacle (rotate plug-end clockwise to lock). Check your power
rating/plug size of the dock receptacle (i.e. 30 amp, 20 amp etc.) If necessary, add
an adaptor located at the Nav Station. Secure the cord around the shore power
electrical receptacle and off the bow or stern. (i.e. wrap around dock line a few
times) turn the dock power breaker on.
On the boat, turn the shore circuit breaker on at the AC electrical panel. Turn on
appropriate breakers for inverter/charger, water heater, and receptacles. Watch
your voltmeter for load. If the load exceeds the voltage, it will trip the breaker. If
this occurs, wait to turn on one of your systems (i.e. water heater) until the power
requirement decreases.
Inverter
The inverter provides AC power to the 120 receptacle plugs (i.e. microwave) when
the boat is disconnected from shore power. The inverter will not supply power to the
water heater or battery charger when not connected to shore power. Your inverter
panel is located at the Nav Station with an on/off switch. Make certain it is on. The
actual inverter is located under the center settee bench (Make sure that no gear is
stowed on top of or near the inverter unit!) Your inverter also acts as a battery
charger when connected to shore power. The Inverter is powered by 3 house
batteries located under the center salon sole at the base of the stairs. The amount
of DC power is limited to the capacity of these batteries so use it very sparingly!!!
This means use of a blender, computer, microwave, television, etc. must be
monitored closely.
5
When connected to shore power, the inverter acts as a battery charger for the 12
volt house batteries. Should you detect the inverter failing to charge the house
batteries, check the circuit breaker on the AC panel (inverter) and the inverter panel
to make certain that it is on. There is a circuit breaker located on the front of
inverter itself that may be tripped during a power surge. A primary shore power
breaker is located behind the main electrical panel in the white junction box on the
right.
House 12-volt System
Two battery banks support your 12 volt system: #1 Engine Start and #2 House
Batteries and #3 Ship’s Ground are located under the salon sole. Normally you will
leave all three switches on or in the vertical position while running.
When anchored or moored, turn off the #1 engine start battery. (Turn switch to the
horizontal position) Note: Changing the position of the battery switches with the
engine running will cause damage! Only change positions with the engine off!
Your 12 volt panel shows all the systems supported by your batteries. Primarily, you
will be turning on these breakers for lights, water pressure, electronics, etc. Bilge
pump #2 will always be left on. Your breakers for the propane solenoid (located to
the right of the galley sink) and secondary bilge pump should be turned off after use.
When disconnected from shore power, the 12–volt systems will drain the battery
especially when at anchor. Monitor your batteries very carefully. The DC voltmeter
on the DC panel can be switched between your battery banks to measure battery
voltage. The inverter systems display will provide a more detailed analysis.
Typically the bank should read from about 13.0 to 14.5 volts when being charged.
While at rest, the battery voltages will decrease. Refer to the figures listed below.
All your batteries are charged while underway by the alternator. The engine and
house batteries are charged by the battery charger/inverter while connected to shore
power. Ensure that the engine battery charger is on.
Voltage
12.65 volts
12.47 volts
12.25 volts
11.95 volts
11.70 volts
Battery State of Charge
100%
75 %
50 %
25 %
0%
SANITATION SYSTEM
Marine Toilet (Jabsco)
It is imperative that every member of the crew be informed on the proper use of a
marine head. The valves, openings, and pumps are small and will clog easily. If the
head gets clogged, it is your responsibility! Always assist small children when
pumping the toilet so you can be certain of what is being flushed. Note: Never put in
6
paper towels, napkins, sanitary products, household T.P., or food into marine heads.
Use only marine T.P. provided by SHYC.
To use the toilet, move selector switch to the “wet bowl” or left position. Pump the
handle 3-5 times to wet the bowl. After using head, pump to remove waste from
bowl (approx. 20 times). Then return selector back to “dry bowl” or right position
and pump for a few times until bowl is dry.
Your toilet raw water intake thru-hull is located under each sink cabinet if you should
need to shut off the water to the toilet.
Should the toilet pump squeak or be sticky to operate, lubricate with a couple of
squirts of dish soap or salad oil. Put in bowl and pump 2-3 times to get it to the
pump and leave overnight. Again, leave in the “dry bowl” or right position.
Holding Tanks
Your four (4) sanitation holding tanks each hold 10 gallons. Be aware of the rate of
waste production (about 1 gallon/flush). If you overfill your tank, you will break a
hose, clog a vent, or burst the tank (which is an indescribable catastrophe!) and will
be a very expensive fix for you. Empty the holding tanks at least every other day to
avoid any problems.
The holding tank for each head is located behind the toilet compartment partition.
The holding tanks are emptied in one of two ways:
#1 At the pump-out station, remove the deck waste cap located on the starboard
deck (2) and port deck (2). Insert the pump-out nozzle into the waste opening.
Double-check that you have the right deck opening! Turn on the pump at the dock
and open the valve on the handle of the hose. When pumping is completed, close
the lever on handle and turn off the pump. Remove from deck fitting.
If there is a fresh water hose on the dock, rinse the tank by adding water for 1-2
minutes. Then re-pump to leave the tank rinsed and clean for the benefit of the next
charter. This also eliminates any head odors.
#2 The tank’s contents can also be discharged directly at sea by opening the
Overboard Thru-hull valve located under each sink cabinet. Note: Overboard
discharge is only allowed in Canadian waters. It is illegal to discharge overboard
within U.S. waters.
Y-Valve
The Y-valve directs the flow of waste into the holding tank or directly overboard.
The Y-Valve is located under each sink cabinet. To flush directly overboard, move
the handle in line with the overboard hose.
WATER SYSTEM
Fresh Water Tank/ Pump/ Hot Water Heater
The (4) fresh water tanks hold a total of 270 gallons. Waste water from the sinks
and showers drains overboard through various thru-hulls located under the sinks. To
fill the tanks, remove the deck water fill caps located on both starboard and port
7
decks. When filling the tank, avoid flushing debris into the fill opening. Do not fill
water and diesel at the same time! A manifold to switch tanks is located under the
settee in the salon seating.
The water pressure pump is located under the settee by the Nav Station. Activate
the pump by turning ON the breaker at the DC panel. If, when in use, the pump
continues to run, you are either out of water or have an air lock (which can be
corrected by opening a faucet). If you run out of water, shut the pressure pump OFF
(DC Panel) and then turn OFF hot water heater (AC Panel). You can cause serious
damage to the heating element if the hot water heater is left ON.
The hot water heater has a 12 gallon capacity. It is heated when the AC breaker is
ON while connected to shore power or when the engine is running. Do not use the
water heater if the water level is low. The water heater is located under the settee.
Shower
Before taking a shower, make sure the water pressure and shower sump pump
breakers are on. Take short “boat” showers by turning off the water between
soaping and rinsing. Press black toggle switches in head to evacuate water. Please
wipe down the shower stall and floor when finished to keep shower tidy. Pick up any
accumulation of hair in the drains as it clogs the hoses. Ensure that the faucets are
tightly turned off after each shower to save water. There is also a transom shower.
GALLEY
Propane Stove
The boat is equipped with a pressurized propane system for cooking. The propane
tanks (2) are located in the starboard lazarette. Begin by first opening the tank
valve. Then go to the propane solenoid switch panel (located right of the galley sink)
and turn to ON. A red light will illuminate. When lighting the stove top or oven for
the first time, allow a few seconds for the gas to travel from the tank to the stove.
Use a hand-held igniter or stick match to light burner. After lighting, you may need
to keep the stove top or the oven knob depressed in the “light position” for a few
more seconds while the thermo-coupler warms up.
To ensure safety, turn off the propane solenoid switch on the panel after each use
and the propane tank valve when the stove will not be used for a period of time.
Refrigerator
The refrigerator/freezer is a highly efficient 12v and110v shore power holding plate
system. The 12v engine driven system does require you to set the timer periodically
to maintain proper refrigerator/freezer temperatures. To operate the refrigerant
compressor:
1. Start engine and allow to warm-up to operating temperature.
2. Increase engine speed to 1500-1800 RPM.
3. Set timer switch (located in the cupboard, far right of galley) for 20-30
minutes. You should hear the compressor engage and a slight drop in
engine RPM. Engine speed may then be reduced to 1000 RPM.
4. CAUTION! Do not run compressor over 1800 RPM for more than a few
minutes or damage may occur.
8
The 110 v can be used when connected to the shore power. The thermostat is
located on the galley wall behind the refrigerators. The right side longer box is the
freezer and the left side smaller box is the refrigerator.
Typically, once the refrigerator/freezer is cold, the compressor only needs to be run
once or twice per day. Ice may also be used to extend refrigerator use without
running the compressor.
Note: A good time to run the compressor is when you are underway at low
RPM, like approaching or departing a harbor or anchorage or when charging
batteries.
Use a cooler when possible for all your drinks and keep the refrigerator door closed
as much as possible. The manual foot-activated refrigerator pump-out is located in
front of the galley sink, left pedal.
HEAT
The Webasto diesel forced-air heater is located in the transom lazarette. It provides
heat much like your household furnace. The thermostat is located at the Nav
Station. Switch to the ON position and set the thermostat to the desired
temperature using the arrow keys. Check the exhaust port located aft-starboard to
make certain that no obstruction such as a fender or line exists. Let the furnace run
at least 15 minutes before turning it off. Turn the furnace OFF at the thermostat.
Use caution while running the furnace in DC mode as it will deplete battery power
rapidly.
An electric space heater may also be used when connected to shore power ONLY.
Make sure the appropriate AC breaker is on. CAUTION: DO NOT USE WITH THE
INVERTER!
ELECTRONICS
VHF Radio
The VHF radio is located at the Nav Station. To activate, switch the breaker (VHF
Radio) at the DC Panel to ON. Always monitor Channel 16 while underway. The
weather channel is Channel 4.
TRIDATA
The Raymarine Tridata displays depth, water temperature, speed, trip and timer
information and is located on the instrument panel. To activate, switch the DC
breaker (Electronics) to ON. The sounder is reliable in waters less then 200 feet and
at slower speeds. If your reading is blinking, it might be a false reading due to
excessive depths or strong currents! Watch your depth carefully while cruising
unknown waters that might have rocks or obstacles. Note: Speed readings may
vary sometimes due to marine growth on the transducer impeller. SOG (speed-overground) GPS readings may be more accurate.
9
AUTO PILOT
The Autohelm Auto Pilot display is located on the instrument panel. To activate,
switch the DC breaker (Auto Pilot) to ON. Refer to the instruction manual for proper
use. Use caution when operating the auto pilot in unfamiliar waters or where
obstructions may be present. Make sure the helm is in the unlocked position.
GPS (Global Positioning System)
The Garmin 128 GPS is located at the Nav Station. To activate, switch the DC
breaker (Electronics) to ON.
Wind System
The Raymarine wind system displays true or apparent speed and direction as well as
close-hauled segments. To activate, switch the DC breaker (Electronics) to ON.
DVD/CD Stereo AM/FM Radio
The JVC DVD/CD Stereo AM/FM Radio is located at the NAV Station. To activate,
switch the DC breaker (Radio) to ON. Use the handheld remote arrow keys to adjust
volume, fade/balance, and tone.
DVD movies may be played by opening the drop-down door and inserting a DVD
disk. Then turn the television monitor to ON and select AV1 using the TV remote.
Sound will be heard via the stereo speakers and adjusted with the JVC remote
control. Note: The DVD/CD is 12 volts DC while the TV is 120 volts AC.
ANCHORING
The primary working anchor, a CQR or plough type, is attached to 150 feet of chain
which is passed through the deck into the bow Anchor Locker. An additional 150 feet
of nylon rode (stowed in the starboard lazarette) may be added if necessary. The
chain is marked off in 20 foot increments.
To activate the windlass, first start your engine due to excessive power draw and
ensure that the circuit breaker switch, located behind the settee access door, is
pressed up. Locate the remote control, located in the forward crew cabin. Press the
UP and DOWN buttons to raise and lower the anchor.
A spare Bruce anchor is located in the port cockpit locker with 150 feet of rode
attached.
SAILS AND RIGGING
The headsail is a 120% roller-furled Genoa. The furling halyard runs on the port side
of the cockpit. To unfurl the headsail: #1 Uncleat the furling halyard. #2 Wrap the
Genoa sheet clockwise around the appropriate winch. #3 Pull the sheet aft while
applying some tension to the furling halyard. #4 Cleat the furling halyard when the
Genoa is fully out or when you have achieved an appropriate reef point.
To furl the Genoa, apply slight tension on the Genoa sheets while pulling in the
furling halyard until there are 2-3 wraps of the sheet around sail. Genoa sheets are
10
led back to the two large cockpit winches. Adjust fairleads forward in heavy air, aft
in light wind.
The battened Mainsail is raised and lowered by pulling or easing the cockpit led
mainsail halyard. A Lazyjack system is used to simplify sail handling. To raise the
mainsail, head the boat into the wind, connect the main halyard shackle to the
mainsail, pull on the main halyard using the cockpit winch, secure the main halyard,
begin to sail trimming as necessary.
Two reefing lines are also run to the cockpit. To apply a reef, head into the wind,
lower the main halyard, pull in on the desired reefing line sufficiently, and then raise
the main again with reef in place.
Genoa sheets, reefing lines, halyards, and traveler all lead back to the cockpit. There
is an adjustable boom vang. There is no spinnaker or whisker pole on-board. Please
use the topping lift located at the mast to raise the boom to its usual position after
sailing.
Troubleshooting:
Main resists being raised: Check all lines. All reefing lines should be loose as well as
the boom vang. Make sure a batten is not stuck as in a lazyjack. If so, lower the
sail and try again.
Furling line gets stuck: Check the tension applied to the sheets. Try letting the sail
out and repeating the process. Be sure you are headed into the wind. You also
might have an override inside the furling drum.
Unable to point with reef: Maybe the reef line is not snugged in sufficiently. Be sure
lines are snug before raising main halyard.
Other Problems: That’s what being a sailor all is about! But isn’t it nice when you
kill that noisy engine and enjoy the sounds of the water.
BARBEQUE
The Barbeque and mounting bracket are stored in the port cockpit locker or on the
aft rail. Secure the Barbeque to the aft rail.
Attach the propane bottle and regulator, usually found in starboard cockpit locker.
Carefully light the unit with an igniter. This Barbeque cooks fairly hot and fast so
keep a good eye on your food. Please wipe the BBQ down with a rag or paper towel
before covering. Note: Propane bottles are not stocked by SHYC so you will need to
purchase a bottle if one is not found onboard during your check-out. Ensure that
outboard gas or any other flammables are not near the barbeque.
DINGHY AND OUTBOARD MOTOR
Your Avon dinghy is equipped with a 5 hp 2-stroke Mercury outboard motor. The
outboard motor is stored on the stern rail mount when cruising or when not in use.
The dinghy has a capacity of 1000 pounds or about 4 people and gear.
The dinghy will usually be kept in the water tethered to Christelle or pulled up onto
the dock. Make sure a responsible crew member is assigned to managing the
dinghy, particularly when slowing down or maneuvering in tight quarters to prevent
11
the tow line from becoming entangled around the prop. Secure the tow line to a
deck cleat only.
Use extreme caution when mounting the outboard on the dinghy due to very
awkward lifting conditions. Select at least two crew members capable of lifting 50+
pounds. Secure the dinghy tightly against the transom platform. With one person in
the dinghy and two people on the transom, carefully lift the outboard from its mount
and pass it to the person in the dinghy. Make sure a safety rope is attached to the
motor and a towel or pad is placed under the outboard to prevent damage to deck
surfaces if you need to set it down.
Your outboard motor is a 2-stroke design and requires oil to be mixed with the
gasoline. The fuel tank is stored in the port transom locker along with 2-stroke oil
and a Ratio Rite measuring cup. Use approved 2-stroke oil only. Place the fuel tank
in the dinghy, shake the fuel/oil mixture, connect the fuel line to the motor, open the
fuel tank vent, and squeeze the priming bulb to fill the carburetor.
Gasoline to Oil Ratio: 50:1
Note: Failure to use proper fuel mix will cause extensive damage to the motor.
To start the engine, slide the kill switch key into kill switch button, place the
transmission lever in neutral, pull out the choke, adjust the throttle, and carefully
pull the start cord. As soon as the engine starts, adjust the throttle. Let the motor
warm-up slightly if cold.
Please use extreme care when beaching your dinghy. Make sure to tilt the engine a
safe distance from shore so the prop does not hit the bottom or shear the pin. Use
your oars if necessary. Choose an area that is free of sharp rocks that may damage
the hull. DO NOT DRAG THE DINGHY ON THE BEACH. Please have your crew lift and
carry the dinghy if needed. Make sure the dinghy is well secured on the beach as
the tide in this area moves up very quickly.
When returning to the boat, leave your “shore” shoes in the cockpit and slip into
your deck shoes or slippers to avoid marking the deck surfaces.
OTHER NOTES
Safety Precautions
Safety should be paramount to your daily cruising. A man overboard drill should be
discussed and practiced with an unlucky PFD as the victim. (Please rinse and dry the
PFD before stowing). Remember that your lifejackets are stowed in both the
starboard cockpit locker and under the settee. A few PFD’s should always be readily
available. Flares and other safety equipment are located next to the Nav Station
Always post a sharp lookout to watch for logs, deadheads, or other flotsam and
jetsam. Floating debris tends to gather along current lines and shoal areas. Avoid
these potential “mine fields”. A log hitting your prop or hull could ruin your vacation.
12
Bilge Pumps
Christelle is equipped with an automatic bilge pump. The switch must remain on at
all times. A second, manually activated bilge pump may be operated from the DC
panel. CHECK YOUR BILGE regularly and pump out any accumulated water.
Normally, the pump should only have to be operated for a few seconds to clear the
bilge; otherwise you may have a serious problem! The inspection cover is located
next to the settee forward.
An auxiliary hand-operated bilge pump is located in the transom and operated by a
pump level handle located in the cockpit locker. This is used in an emergency
situation.
Engine Spares
The engine spares are located in a settee locker (port). They include extra oil filters,
impellers, head pump, etc. Extra oil and coolant is located in the battery
compartment.
Crabbing
Crabbing is fun but requires the correct license and season. Please be sure not to
crab off the stern of the boat as the crab line can easily become entangled in your
prop as you swing with wind or current. You certainly don’t want to be the person
who has to dive in and cut the line out of the propeller. It is best to use the dinghy
to set your crab pot/ring away from the boat. A partially opened can of seafood cat
food works well as any other bait and is less messy. Please clean up any seaweed or
crab shells to keep the boat neat and tidy.
13
Location of thru hulls
14
Location of fills and pump outs
15