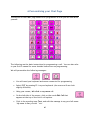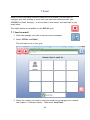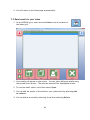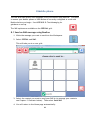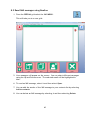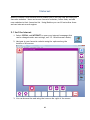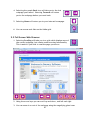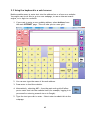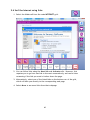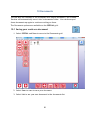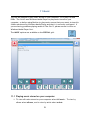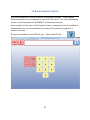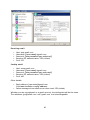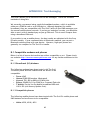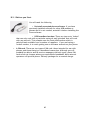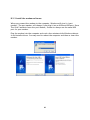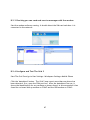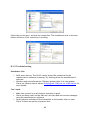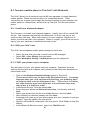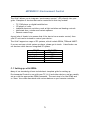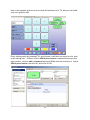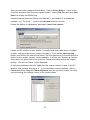
1
Beeline - Table of Contents Beeline - Table of Contents ..................................................................... 1 1 What is Beeline? ................................................................................ 5 Key features .................................................................................... 5 2 Installing Beeline ............................................................................... 7 3 User Settings .................................................................................... 8 3.1 Copying a user ............................................................................. 8 3.2 Input Method............................................................................... 9 3.3 Visibility .................................................................................... 9 3.4 Speech settings ...........................................................................10 3.5 Workspace Settings ......................................................................11 3.5.1 Web browser..................................................................... 11 3.5.2 Email .............................................................................. 11 3.5.3 Mobile phone .................................................................... 11 4 Getting to know the home page.............................................................12 5 Learning how to use the different types of cells .........................................13 5.1 The Yellow Cells – Pronouns ............................................................13 5.2 The Function cells .......................................................................14 5.2.1 Special Functions................................................................ 14 5.3 The Green Cells - Verbs .................................................................15 5.3.1 The Helping Verbs (Auxiliary Verbs) .......................................... 15 5.3.2 The Action Words (Verbs) ...................................................... 16 5.3.3 More Action Words .............................................................. 17 5.4 Combining Yellow and Green Cells (pronouns and verbs) ..........................19 5.5 Changing the Tenses of Verbs ..........................................................21 1 VOCABULARY REVISION 1 .......................................................................22 5.6 Adding grey cells - „little‟ or function words .........................................23 5.6.1 Using „some‟; „any‟;‟ every‟;‟ no‟ ............................................ 24 VOCABULARY REVISION 2 .......................................................................25 5.7 More Grey Cells (Conjunctions) ........................................................26 5.7.1 Yet More Grey Cells! ............................................................ 27 5.8 The Brown Cells (Prepositions) .........................................................29 5.9 The Pink Cells.............................................................................30 5.9.1 More Pink Cells .................................................................. 31 5.10 The Descriptions Page (Adjectives) ..................................................32 5.11 The Useful Words Page.................................................................34 5.12 The Topic Pages.........................................................................35 5.13 The Spelling Page .......................................................................38 VOCABULARY REVISION 3 .......................................................................39 6 Personalising your Chat Page ................................................................40 7 Email ............................................................................................42 7.1 Send an email.............................................................................42 7.2 Read emails in your inbox...............................................................43 8 Mobile phone ..................................................................................44 8.1 Send an SMS message using Beeline ...................................................44 8.2 Read SMS messages using Beeline ......................................................45 9 Internet.........................................................................................46 9.1 Surf the Internet .........................................................................46 9.2 Full Screen Web Browser................................................................47 9.3 Using the keyboard in a web browser .................................................48 9.4 Surf the Internet using links ............................................................49 10 Documents ....................................................................................50 2 10.1 Saving your work as a document......................................................50 10.2 Opening a saved document ............................................................51 11 Music ..........................................................................................52 11.1 Playing music stored on your computer .............................................52 11.2 Play music on CD........................................................................53 12 Environment Control ........................................................................54 13 Contacts.......................................................................................55 13.1 To add a contact ........................................................................55 14 My Settings ...................................................................................57 14.1 Speech options ..........................................................................57 14.2 Power information ......................................................................57 14.3 Calculator and Clock ...................................................................57 15 Other places to look for help ..............................................................58 15.1 The Grid 2 Manual ......................................................................58 15.2 The Grid 2 Training Cards .............................................................58 15.3 Sensory Answers ........................................................................59 15.4 Sensory Technical Support.............................................................59 15.5 Sensory Update .........................................................................59 APPENDIX A: Email Settings ....................................................................60 A.1 Your email account ......................................................................60 A.2 Entering your email account details in The Grid 2 ..................................60 A.3 Googlemail and Gmail settings .........................................................61 A.3.1 Configure googlemail for POP access......................................... 61 A.3.2 Configure the email settings in The Grid 2 .................................. 61 APPENDIX B: Text Messaging ...................................................................63 B.1 Compatible modems and phones.......................................................63 B.1.2 Broadband (3G) Modems ....................................................... 63 3 B.1.3 Compatible phones ............................................................. 63 B.1.4 Partially compatible phones ................................................... 64 B.1.5 Incompatible phones ........................................................... 64 B.2 Connecting a USB Modem to Grid 2....................................................64 B.2.1 Before you Start................................................................. 65 B.2.2 Install the modem software. .................................................. 66 B.2.3 Checking you can send and receive messages with the modem .......... 67 B.2.4 Configure and Test The Grid 2 ................................................ 67 B.2.5 Troubleshooting ................................................................. 68 B.3 Connect a mobile phone to The Grid 2 with Bluetooth .............................69 B.3.1 Install your bluetooth adaptor ................................................ 69 B.3.2 Edit your Grid 2 user ........................................................... 69 B.3.3 'PAIR' your phone to your computer .......................................... 69 B.3.4 Setting up The Grid 2 for SMS ................................................. 70 B.3.5 Security settings on the phone ................................................ 70 APPENDIX C: Environment Control ............................................................71 C.1 Setting up with GEWA ...................................................................71 C.1.2 Advanced options with GEWA ................................................. 74 C.2 Setting up TIRA and UUIRT .............................................................75 C.2.1 Hold Button for TIRA and UUIRT .............................................. 77 C.3 Other Environment Control systems ...................................................77 4 1 What is Beeline? It is a symbol-based, single word vocabulary designed for users with relatively good language skills. Beeline offers a large, single word or short common phrase vocabulary with a view to generating novel sentences. The majority of the high frequency core vocabulary is accessed by one or two selections with a maximum of three selections for the majority of words. Beeline follows a rigid structure that makes it relatively easy to locate and add new words. Key features • Designed for symbol users ready to make their own sentences word by word • Core words on top page with access to topic pages • Majority of the large vocabulary accessed from just 1-3 selections • Special features such as email, internet and media player • Easy for parents, teachers and SLT‟s to add content within existing structure • Lesson plans that fit within the curriculum 5 • Includes verb morphology, word completion and next word prediction Beeline has been created by Gillian Rumble of VOCAtion, and Sensory Software International Ltd. 6 2 Installing Beeline You will have received a free copy of Beeline when you purchased The Grid 2. Alternatively you can download it from our Grids Online site (http://grids.sensorysoftware.com). If you do need to install it on The Grid 2, you can use the instructions below. 1. Run The Grid 2 and go to Grid Explorer. 2. If you see a grid instead of Grid Explorer when The Grid 2 starts, select Grid Explorer from the File menu at the top of the screen (if you cannot see the file menu it may be hidden, press F12). . 3. Select „Import Grid Bundle‟ from the panel on the left. You will be required to locate the grid bundle you wish to import and click Open. If you are installing from a CD, locate the CD driver. Otherwise, navigate to where you have saved the grid bundle you want to install. 4. To locate the CD drive, go to My Computer then select the CD drive. A new user will be created for you, so just click Ok to start importing the grids. 7 3 User Settings Before Beeline is used, there are some important settings that need to be adjusted to suit the needs of the user. If Beeline was introduced to you by your Speech Therapist or Occupational Therapist, then these should have already been discussed. You may even have been supplied with a specially configured system. If not, you should look carefully at the following list to make sure that they are right for you. The following is just a guide; to find out more about the settings see Chapter 14 My Settings. 3.1 Copying a user It is a good idea to make a copy of your user profile. This allows you to make changes to the grids or the user settings whilst retaining a “master” copy of the grids to refer back to, or restore earlier settings. 1. Open Grid Explorer and right click on the user icon you want to duplicate. Select „Clone user‟ from the menu. 2. Enter a name for your new user and select „Ok‟. The new user icon should appear in the same folder as the cloned user in Grid Explorer. 3. You can view and edit the user settings for this user, by selecting User settings from the drop-down menu when you right click on the user icon. 8 3.2 Input Method Your “input method” is the way you access the computer: switches, mouse, touch screen, head pointer, eye gaze etc. There are some useful settings in the Pointer Settings menu that can help if you have difficulty with the touch screen or pointing device. You can find these in The Grid 2 by opening User Settings then selecting Input Settings > Pointer > Settings. Switch users will need to set up switches to work with their system. There are different options for connecting different switches, e.g. with a Joystick or switches built into a communication aid for example. There are many settings for more advanced switch control. These changes are made in User Settings in the section Input settings > Switch. 3.3 Visibility You can adapt the text size and colour scheme to ensure that the grids are visually accessible. The size of text that can be used depends on the resolution of the screen as well as its size. Font and symbol sizes can be set up for each preset cell styles (used for different types of cells). For example, the “Speak” cell uses the “Action Cell” preset style. Changes to the appearance of this cell‟s colour, font style or size or the relative picture size within the cell are made by editing a cell and selecting Edit Style. Note: A preset style is used by many cells across the Beeline user. Making changes to a preset style will alter ALL of the cells using that style on all grids within that User. To make changes to only one cell, the cell style must be “specified for this cell‟s style individually”. 9 The colour scheme of cells is an integral part of the Beeline system, and this is controlled using preset styles within The Grid 2. Some additional changes, for example to the workspace fonts that are used, can be made within User Settings and Appearance Settings. 3.4 Speech settings It is important to select a voice that is acceptable to the end user. Acapela speech, provided as part of The Grid 2, gives the user a selection of high quality male and female voices. When first using Beeline, a voice will need to be selected. A full range of speech settings is available in User Settings, under Speech settings. You can select voices for your public and private voice. Your public voice is the voice you use to talk to other people. Your private voice is the voice used to read information back to you – for instance, for auditory feedback or to read text messages you have received. You can also adjust your settings to speak each word you select/type into the workspace, or read a sentence out loud when you have completed it. Or you can set it to only read the workspace out loud when you select „Speak‟. 10 3.5 Workspace Settings Beeline offers interfaces for browsing the web, checking and sending emails and SMS messages. You need to ensure your user settings are correctly configured for these to work. This section offers an overview, but see the appendices for instructions or Chapter 15 Other places to look for help for further help and advice. 3.5.1 Web browser In user settings you can change your homepage, and add or remove filters for particular websites. 3.5.2 Email In user settings you can set up Beeline to receive emails from your preferred email account. This differs for different kinds of email accounts, and up to date detailed advice for your particular email account can be found in APPENDIX A: Email Settings or on the Sensory Answers website. 3.5.3 Mobile phone In user settings you can connect your mobile phone or USB modem to Beeline to send and receive text messages, as well as make phone calls. Specific up-to-date advice on how to do this is available from the Sensory Answers website, or from APPENDIX B: Text Messaging. 11 4 Getting to know the home page This is the main page of the vocabulary and it is the one to which you will always return. It provides you with the core vocabulary that offers the words that make up most of your sentences. You will need to get very familiar with this page to the point where you do not really need to think about where the words are. This will speed up your communication and help you to become more fluent with your talking. Use this Vocabulary Guide to help you get to know these important words. The shape of the cells gives you a clue as to what they do: A rounded edge cell is a VOCABULARY cell or it is a FUNCTION cell An index shaped cell is a PAGE TURN cell and will move you to another page. The square edged cells with the golden outline in the centre of the page are part of the MAGIC STRIP and will give you predicted words. 12 5 Learning how to use the different types of cells All cells are colour-coded to help you learn what each type of cell does. See below for an explanation of each type of cell. 5.1 The Yellow Cells – Pronouns Yellow cells give you „people‟ words. The seven yellow cells on the Home Page show all the pronouns. Press each of the cells and the word on the cell will appear in the Workspace and you will hear the word spoken: I you he she it we they If you want one of the other pronoun words, you need to look at the MAGIC STRIP (in the middle of the page) to find more: 13 I Press „I‟ Now look in the MAGIC STRIP and you will find all your other „I‟ words: “me”, “my”, “mine”, “myself”. Press “my” in the MAGIC STRIP and you will see that „I‟ has been replaced with “my” in the Workspace. Now find: „us‟, „our‟, „ours‟, „ourselves‟ by pressing “we” we 5.2 The Function cells There are three FUNCTION cells on the Home Page: Press SPEAK to listen to the words you have said. Press DELETE to take away your last word in the Workspace. 5.2.1 Special Functions Press SPECIAL to open a page of special functions you will need when talking: 14 This is the page that lets you turn your voice off or make it louder or quieter. Press Mute to turn the voice off and press it again to turn the speech back on. Talk, Shout and Whisper change the volume settings for different situations. There are extra speech options - to speak the last word (WORD) or to stop speaking. Press CLEAR to wipe all the text from your workspace. There are also lots of other functions on this page such as email, SMS and internet. For more information, please see the appropriate chapters. 5.3 The Green Cells - Verbs These are your Action words (verbs). On the Home Page there are two types of green cells, the helping verbs (auxiliary verbs) and the action words (verbs). 5.3.1 The Helping Verbs (Auxiliary Verbs) These words are used with the People Words (Yellow Cells) and other Action Words. Press: The word „is‟ has been spoken and is in the Workspace. 15 Look in the MAGIC STRIP and you will find lots of other words that are part of this helping verb: „be‟, „am‟, „are‟, „was‟, „were‟, „being‟, „been‟. Press „was‟ and you will see that the „is‟ has changed to „was‟ in the Workspace. Now clear the display (go to SPECIAL functions) Press do/does: look in the MAGIC STRIP to find more „do‟ words. Now find: „have‟, „has‟, „having‟, „had‟. Now clear the display: 5.3.2 The Action Words (Verbs) On the Home Page you have some of the action words you will use the most. Remember to look in the MAGIC STRIP to find more parts of the same action word. 16 Press “come” Look in the MAGIC STRIP to find „come‟, „comes‟, „coming‟, „came‟. Press “came”. You will see that „come‟ has been replaced with „came‟ in the Workspace. Now press “go” and find all the parts of this word: „go‟, „goes‟, „going‟, „went‟, „gone‟. Now see if you can find all the parts of these verbs: 5.3.3 More Action Words If you can‟t find the action that you want, it may be offered in ACTIONS. 17 Press ACTIONS and you will see a change to your page. More actions are offered. Take some time to look at the action words offered on this page. You will notice that everything else about this page looks the same as the HOME page. Press „think‟: You will see that your word has been spoken and you have automatically gone back to the HOME page. Now see if you can find some more ACTIONS words: „put‟, „sleep‟, „give‟, „help‟. Top Tip: If you ever get confused about where you are, press HOME: This will always take you back to the Home page. 18 5.4 Combining Yellow and Green Cells (pronouns and verbs) Beeline will work out how the action words should sound depending on the person word you have chosen. This will save you key presses when you are talking. Press „I‟ and „do/does‟: “„I do” Press „he‟ and „do/does‟: “he does” Press „they‟ and „do‟: Press „it‟ and „do‟: “„they do” “it does” 19 Now try the same with the following: Clear the display: Now see what will happens if you try pressing these cells the other way round: You will notice that the words are reversed and now help you to ask questions: “am I”; “has he”; “are you”; “have they”;”is he” Now see if you can find the following question starters: “should we” “will you” “can I” “could he” “may I” Clear the display: 20 5.5 Changing the Tenses of Verbs To save you key presses, Beeline will automatically change the tense of your verb by looking at the Helping Verb you have chosen. Try these combinations to see how this works: “I am eating” “He has seen” “they are wanting” “I have drunk” “he has slept” “I am thinking” 21 VOCABULARY REVISION 1 Thinking about all you have learnt so far, see if you can say these sentences. Try to say them with the least number of key presses possible. Use SPEAK and CLEAR after each sentence. “I am making it” “He has eaten it” “Are they coming?” “Will you drink it?” “Did they see us there?” “Have you got it?” “Shall I use it?” “I know she likes me” “I think he is working” “I remember seeing her take it” 22 5.6 Adding grey cells - ‘little’ or function words These are some of LITTLE words that we need in every sentence. You will use at least one of these words in every sentence. Press: „a‟, „an‟, „the‟, „this‟, „that‟, „these‟, „more‟, „now‟. These words are important because they are the start of other useful words. The MAGIC STRIP will show you the other choices. You will see that the MAGIC STRIP will suggest words that are often used after these words. The MAGIC STRIP will remember things that you have said and will start to offer these to you to speed up your talking. When you press these LITTLE word cells you never know what the MAGIC STRIP will suggest, it will depend on what you have said before. 23 5.6.1 Using ‘some’; ‘any’;’ every’;’ no’ By combining these cells plus the MAGIC STRIP you will be able to say more useful words: Press some Look in the MAGIC STRIP and you will find „thing‟, „are‟, „where‟, „time‟, „times‟, „body‟, „how‟. Say „somewhere‟, „sometime‟, „somehow‟ Now look at every, any and no: Can you say: „anytime‟, „anyplace‟ „anywhere‟, „nobody‟, „no one‟ and „nothing‟ Press all The MAGIC STRIP offers words that start with „al‟ – „almost‟, „already‟, „also‟, „always‟ and „alright‟. 24 VOCABULARY REVISION 2 Thinking about all you have learnt so far, see if you can say these sentences. Try to say them with the least number of key presses possible. Use SPEAK and CLEAR after each sentence. “I see him here, there, everywhere” “Would you like a drink?” “He might use it now” “I just said that” “Somebody must be going there” “Should you really be doing that?” “Can you make something for me?” “Did you like anybody there?” “Can you stop doing that now?” “She will always help us anytime we need her.” “Every time I see her she is always doing something” 25 5.7 More Grey Cells (Conjunctions) These Grey Cells are your linking words that join one sentence to another so that you can make longer sentences. Try saying them: Try these sentences using the linking words: “You and me” “Go and see it” “You can go but only with me” “I like her because she likes me” “You can come if you want to” “You should take something for yourself” 26 “I do not know if I am coming or going” “If you said I must do it so I will” 5.7.1 Yet More Grey Cells! By pressing LIT WORD you will find another page of LITTLE words: Take some time to get to know this page as it has many of the LITTLE words that you will need in your sentences. You will find that once you have selected one of these words, Beeline will take you automatically back to the HOME page. If you do not find the word that you want on this page, you can go back HOME by pressing: 27 See if you can find the following words on this page. Remember you will have to press LIT WORD every time you want to find the next word: since such again once most soon well never away next quite before only either 28 5.8 The Brown Cells (Prepositions) The brown cells are position words (prepositions). You will use these in many of your sentences. Try them: „to‟, „of‟, „with‟, „from‟, „at‟, „on‟ and „in‟ You will find more Brown cells by going to LIT WORD: 29 5.9 The Pink Cells All pink cells are social cells; on the HOME page the social cells will start questions: Try saying these words: The next word you normally use will come up in the MAGIC STRIP when you press a question word e.g. „who did‟, „when are‟, „where were‟, „why was, „how does‟, „which has‟. Ask these questions: “Who did you go with?” “Why was he coming?” “When did you get there?” “How are you now?” 30 “Where is everybody then?” “Which drink would you like?” 5.9.1 More Pink Cells You will find more useful social words by selecting LIT WORD: You will notice that the pink words are now giving you other useful social words: “hello”, “goodbye”, “please”, “thank you”, “sorry”, “ok”, “yes”, “actually” On the HOME page you will also seeing a page link to CHAT, this will give you a page of social words and questions to help you get started with a conversation: 31 5.10 The Descriptions Page (Adjectives) You can move to a page of DESCRIPTIONS by selecting the page link at the top of the screen. This page link is offered on all pages as you are likely to require these words in many of your sentences. 32 Many of the descriptions words are grouped together in pairs or opposites for ease of location. Once a description word has been chosen, Beeline will take you straight back to the HOME page as these words are always used in sentences. On your return to the HOME page, you will notice that the MAGIC STRIP gives you other forms of your chosen word. Try the following to see how this works: Select „happy‟ on the DESCRIPTIONS page Beeline has taken you back to the HOME page and the word “happy” has been spoken and is displayed in the Workspace. Look at the MAGIC STRIP and you will see that other „happy‟ words are offered. Choose “happier” and your new word will be spoken and replaced in the Workspace. Now select „slow‟ from the DECRIPTIONS page. Change it to “slowly” by choosing the word in the MAGIC STRIP Now try these words: 33 5.11 The Useful Words Page On the HOME page, below the MAGIC STRIP, there is a link to a page of USEFUL words (nouns) that are often used in sentences: Once you have selected one of these words, Beeline will take you back to the HOME page. Try these sentences using the USEFUL words page: “This is the life” “Just a minute” “I can come to see you in a moment” “I think that was a mistake” “That is the way to go” “I have made a decision now” “Are you on my side?” “What is the price please?” 34 5.12 The Topic Pages On every page you have a link to the TOPICS pages. This is where you will find word pages grouped by topic: 35 Select the FOOD page and you will be taken to a page of food words: The FOOD page offers a wide range of words organised into columns related to different meals. Find the following words: When these words are selected, Beeline will take you back to the HOME page as you will usually want to use the FOOD word as part of a full sentence. Eg. “I had a burger for lunch today”. The quickest way back to the FOOD page is to select the LAST PAGE link on the HOME page. This link will take you straight back to the page you have just left. The pink cells on the far right column of the FOOD page are sentence openers and will keep you on the page so you can choose the food to complete the sentence. 36 Try these combinations to see how this works: “I want toast” “would you like cheese? “I like chocolate” Ending these sentence openers with the NOT cell will give you a negative sentence: “I don‟t like chocolate” “I don‟t want toast” At the bottom of each column there is a page link to more words related to each meal: 37 5.13 The Spelling Page If you are unable to find a word stored in the vocabulary you can go to the SPELLING page: Take some time to look at this page. You will see that there is a number pad as well as the alphabet. Two phrases are stored. One to help you explain to your listener why you are going slower and one to say if you make a mistake with your spelling. You may like to add some more phrases such as “I will try to spell it”; “Please programme that word into my vocabulary” etc. As you start to spell a word, look in the MAGIC STRIP to see if Beeline is offering your word. When you have completed spelling your word, you will need to take yourself back to the home page by selecting: 38 VOCABULARY REVISION 3 Thinking about all you have learnt so far, see if you can say these sentences. Try to say them with the least number of key presses possible. Use SPEAK and CLEAR after each sentence. “Would you like fish and chips for dinner?” “I think it is time for a snack” “How long have you been here?” “He is happy because he is going home” “Hello how are you?” “We are almost there now” “I would like a large pizza with cheese and tomato please” “When are you coming to see me again?” “He would love to play outside if it gets warmer today” “We will go there tomorrow after breakfast” “This is the end of our work, time for a nice cup of tea” 39 6 Personalising your Chat Page This section of the CHAT page needs to be programmed so that you can talk about yourself: The following are the basic instructions for programming a cell. You can also refer to your Grid 2 manual for more detailed instructions on programming. We will personalise the following messages: You will need your keyboard and mouse connected for programming. Select EDIT by pressing F11 on your keyboard. (the screen will now look slightly different) Using your mouse, left click on my name cell. On the left side of the screen, click on the words Edit Cell that appears at the top of the list of cell options. Click in the area that says Text, and edit the message to say your full name: “My name is Harry Potter ” etc. 40 Click OK to accept the changes to the cell Now left click on „I live in‟ cell. Click on the words Edit Cell that appears at the top of the list of cell options. Click in the area that says Text, and edit the message to say the name of your home town or village: “I live in Little Whinging” etc. Click on OK. Now left click on „my address‟ and Edit Cell. Edit the text to say your full address: “My address is 4 Privet Drive, Little Whinging.” Press F11 on your keyboard to save your changes when you have finished editing. 41 7 Email Beeline works with many different email service providers; you will need to configure your user settings to work with your particular email provider (see APPENDIX A: Email Settings). It can be used to send email, and read mail in your email inbox. The email options are available on the SPECIAL grid. 7.1 Send an email 1. Write the message you want to send into the workspace. 2. Select SPECIAL and EMAIL. This will take you to a new grid: 3. Select the contact you want to send your email to (to manage your contacts see Chapter 13 Contacts below). Then select Send Email. 42 4. You will return to the Home page automatically. 7.2 Read emails in your inbox 1. On the SPECIAL grid, select the email Inbox icon to be taken to the inbox grid. 1. Your emails will appear on the screen. You can select different emails using the Up and Down arrows. The selected email will be highlighted in blue. 2. To read an email, select it and then select Open. 3. You can add the sender of the email to your contacts list by selecting Add to contacts. 4. You can delete an email by selecting it and then selecting Delete. 43 8 Mobile phone You can send and receive text messages from your mobile using Beeline. You need to ensure your Mobile phone or USB modem is correctly configured to work with Beeline before you begin. See APPENDIX B: Text Messaging for guidance on set-up. The SMS options are available on the SPECIAL grid. 8.1 Send an SMS message using Beeline 1. Write the message you want to send into the Workspace. 2. Select SPECIAL and SMS. This will take you to a new grid: 3. Select the contact you want to send your SMS to (to manage your contacts see Chapter 13 Contacts below). Then select Send SMS. 4. You will return to the Home page automatically. 44 8.2 Read SMS messages using Beeline 1. From the SPECIAL grid select the SMS INBOX. This will take you to a new grid: 5. Your messages will appear on the screen. You can select different messages using the Up and Down arrows. The selected email will be highlighted in blue. 6. To read an SMS message, select it and then select Open. 7. You can add the sender of the SMS message to your contacts list by selecting Add to contacts. 8. You can delete an SMS message by selecting it and then selecting Delete. 45 9 Internet Beeline contains a web browser which enables you to surf the web and read your favourite websites. Users can browse favourite websites, follow links, and add new websites to their favourites list. Using Beeline you can fill out online forms and use internet search engines. 9.1 Surf the Internet 1. Select SPECIAL and INTERNET to open your internet homepage (this can be changed under user settings, see 3.5.1 Web browser above). 2. Navigate to your favourite website using the options along the bottom of the screen. 3. You can browse the web using the icons on the right of the screen. 46 4. Selecting the purple Back icon will take you to the last webpage you viewed. Selecting Forward will return you to the webpage before you went back. 5. Selecting Home will return you to your internet homepage. 6. You can access web links on the Links grid. 9.2 Full Screen Web Browser 1. Selecting Scrolling will take you to a grid which displays more of the current webpage, but retains some browsing functionality. This is useful if you wish to read the page you are on. 2. Using the arrow keys you can scroll up and down, and left and right. 3. You can zoom in or out of the webpage using the magnifying glass icons. 47 9.3 Using the keyboard in a web browser Beeline enables users to enter text into the address bar or a form on a website. You might want to do this to go to a new webpage, to use an internet search engine, or to login to a website. 1. If you want to enter a new website address, select Address from the main INTERNET page. This will take you to a new grid. 2. You can now type the name of the web address. 3. Press enter to load the website. 4. Alternatively, selecting ABC… from the main web grid will allow you to enter text into the website itself (for example, logging in to your email or entering a search term in Google). 5. Type the text you wish to enter. Select enter to submit this to the webpage. 48 9.4 Surf the Internet using links 1. Select the Links cell from the main INTERNET grid. 2. You can follow links using the Next link and Activate cells. However, this requires you to go from one link to the next consecutively, and can be time consuming if the link you want is further down the page. 3. Alternatively, select one of the listed links on the bottom row of the grid, which will take you directly to the corresponding web page. 4. Select More to see more links from that webpage. 49 10 Documents You can save the contents of the workspace as a simple document (.doc format). Beeline will automatically save it into a documents folder. You can then open these documents up again to continue working on them. The Documents options are available on the SPECIAL grid. 10.1 Saving your work as a document 1. Select SPECIAL and Save to move to the Documents grid. 2. Select Save to want to save your document. 3. Select List to see your new document in the documents list. 50 10.2 Opening a saved document 1. Select Save and List to see the list of saved documents. 2. Use the up and down arrows to select the document you want. Select Open when the document you want is highlighted. You can now edit or read this document. 3. You can also Print your document. Please remember to set up your Printer settings in User Settings. 51 11 Music You can use Beeline to play music stored on your computer, or to play CDs and DVDs. The Grid 2 uses Windows Media Player to play music stored on your computer, so before using Beeline to play music ensure that your music is stored in folders monitored by Windows Media Player and that it is correctly configured. If you are having problems playing media in The Grid 2, please ensure it works on Windows Media Player first. The MUSIC options are available on the SPECIAL grid. 11.1 Playing music stored on your computer 1. To view all tracks stored on your computer select All music. To view by album select albums, and to view by artist select artists. 52 2. To select a different track use the up and down arrows; the selected track will be highlighted in blue. 3. Select play to play the highlighted track, and select it again to pause it. 4. You can stop play and skip backwards and forwards, as on a hi-fi. 5. If you select albums Beeline will display all the albums stored in your music library. If you select „Play’ for a particular album, Beeline will play music from that album, starting with the first song. 6. If you select artists, Beeline will display all the artists stored in your music library. If you select „Play’ for a particular artist, Beeline will play all stored music from that artist, starting with the first song. 7. If you select playlists, Beeline will display all the playlists stored in your music library. If you select „ Play’ for a particular playlist, Beeline will play all stored music from that playlist, starting with the first song. 8. You can adjust the volume of playback. 11.2 Play music on CD Before playing music from a CD, ensure that this works with Windows Media Player, and that it is not set to automatically play on CD insertion. 1. Insert CD into computer. 2. Select play CD. 53 12 Environment Control You can use Beeline to control different environment settings. These require different systems to be configured to work with The Grid 2. For more information on how to do this please see APPENDIX C: Environment Control. As an example of the uses of Environment Control, a sample grid set is available to demonstrate how you can use Beeline to control your television instead of a remote controller. This grid is available on the SPECIAL grid. Select the ECU cell. 54 13 Contacts Beeline contains a dedicated grid for editing your email and mobile phone contacts. This is accessible from the SPECIAL grid. Select Contacts. 13.1 To add a contact 1. Select New from the Contacts grid. 2. Select Name to enter their name in the display box. 3. Select Email to enter their email address in the display box. 4. Select Phone to enter their phone number in the display box. 5. Select Save when you have entered the details. 55 Note: You can also manage contacts from the AutoContent menu, by selecting ‟Contacts‟. Here you can add a picture or photograph to each contact. 56 14 My Settings 14.1 Speech options There are options to vary the volume of your speaking voice. On the SPECIAL grid, select the VOLUME cell. 14.2 Power information You can also check to see how much battery power you have remaining. Select the BATTERY cell on the SPECIAL grid. 14.3 Calculator and Clock On the SPECIAL grid, there are two icons which take you to a basic calculator which can be operated within Beeline and a clock. You can change the settings of the clock in User Settings. The clock can also read out the current date and time. 57 15 Other places to look for help Various sources of help with set up, operation and editing of The Grid 2 and Beeline are available. In the first instance the Help menu at the top of the screen contains several sources of advice, including an electronic copy of the Reference Manual and Training Cards, as well as links to Internet support resources. 15.1 The Grid 2 Manual When you purchased a copy of The Grid 2, you will have received a hard copy of The Grid 2 manual, and this information is also available by selecting the Reference Manual option from the Help menu. This contains advice about using The Grid 2 in general, but not specific grid sets. You could look in here for advice on: Installation and user setup of The Grid 2 Setting up different workspaces Editing grids Finding new grids online and adding them 15.2 The Grid 2 Training Cards When you purchased a copy of The Grid 2 you will have received a set of Training Cards. You can also view an electronic copy of the Training Cards from the Help menu. The Training Cards contain more detailed advice on: Voice and input settings Editing and creating your own grids 58 Information about different Users 15.3 Sensory Answers Sensory Software, the creators of Beeline and The Grid 2, run a website with answers to common problems at: http://answers.sensorysoftware.com Take a look and search the site to see if other people have been asking the same question. You can find up-to-date specific advice on: Setting up more complex workspaces, such as Email and Music Troubleshooting common problems Editing more complex functions such as predictive spelling and grammar 15.4 Sensory Technical Support If you are still having trouble, please feel free to phone us on 01684 578868, and we can talk you through it. If you are online, we can also use our Sensory Support tool, which allows us to see your screen over the internet, and control your keyboard and mouse. We use this to allow you to show us what your problem is. You can find Sensory Support on the start menu, or on our website at http://www.sensorysoftware.com/support.html. 15.5 Sensory Update Some issues with Beeline or The Grid 2 may be fixed by updating your software using Sensory Update. Sensory Update is a program that was installed on your computer with The Grid 2. 1. Close down any Sensory Software programs that are running. 2. Go to Start > Programs > Sensory Software > Sensory Update. 3. Follow the instructions on the screen. This will download the latest version of the software from the internet. Very often, we will already have been notified of the problem and will have issued an update to fix it. As an added bonus, Sensory Update also gets you the latest new features. 59 APPENDIX A: Email Settings The Grid 2 has built-in email to allow you to send and receive emails easily, using your existing email account. A.1 Your email account To send emails with The Grid 2, you need a POP3 email account. You will probably have one of these from your Internet Service Provider (ISP), the company that provides your internet access. You need to locate the details of the POP3 account to enter in to The Grid 2. If you do not have a POP3 email account, you can set up a free one online. It is easy to set up a Googlemail account with The Grid 2. A.2 Entering your email account details in The Grid 2 The Grid 2 stores separate email information for each user. If you have Grid Explorer open, start the user that you wish to configure. If you cannot see the menu bar above your grid, press F12. Now select Edit > User Settings from the menu. From the categories on the left, select Workspaces. From the sub-categories, select Email. You will now see the Email Workspace setup screen. Here you can enter the details of your email account. Here are a few tips: Your username and password will usually be case-sensitive. 60 Most email accounts do not require secure encrypted connections (SLL). The port for incoming email is normally 995. The port for sending mail is normally 465. When you have finished entering the details you can test the settings before returning to your grids, by clicking on Test Email Settings. These settings vary depending on your email account, but see below for standard Gmail and Googlemail settings. A.3 Googlemail and Gmail settings If you do not have a googlemail account, go to http://www.googlemail.com (this will open in a new browser window). A.3.1 Configure googlemail for POP access You need to log in to googlemail and configure it for POP3 access. POP3 is the protocol that most email programs (including The Grid 2) use for email. Log in to your googlemail account on the googlemail website. Click on the Settings link in the top right corner. Click on the Forwarding and POP option at the top of the main window. Mark the box Enable POP for all mail. Click on Save Changes. A.3.2 Configure the email settings in The Grid 2 You can now enter the settings into The Grid 2. Go to User Settings -> Workspace Settings -> Email, and enter the following: 61 Receiving email: Host: pop.gmail.com Username: [username]@gmail.com Password: [the password you selected] Requires SSL authentication: YES (ticked) Port: 995 Sending email: Host: smtp.gmail.com Username: [username]@gmail.com Password: [the password you selected] Requires SSL authentication: YES (ticked) Port: 465 Other details: Reply address: [username]@gmail.com You must include a reply address. Delete messages from email server when read: YES (ticked) Whether you use a googlemail or a gmail account, the settings should be the same. The addresses „googlemail.com‟ and „gmail.com‟ are interchangeable. 62 APPENDIX B: Text Messaging The Grid 2 allows you to send and receive SMS messages. There are different methods of doing this. We currently recommend using a mobile broadband modem, which is available either as a PCMCIA card or as a USB device. Although designed for mobile broadband, they are compatible with The Grid 2 and will send SMS messages over the normal mobile phone network. If you buy an 'unlocked' version, you should be able to use it with a standard pay-as-you-go SIM card. This is much cheaper than using a broadband SIM card. If you prefer to use a mobile phone, the best results are obtained with the Sony Ericsson models. If your communication is Bluetooth enabled, you can pair a Bluetooth mobile phone with your device. However, high spec phones are generally too complex for The Grid 2 to handle. B.1 Compatible modems and phones Below is a list of known devices that are either compatible or not. Please check our website http://answers.sensorysoftware.com for any further additions to this list. B.1.2 Broadband (3G) Modems The following modems have been tested with The Grid 2's mobile phone and SMS features and are known to be compatible. Zoom: 4945 Huawei E180 USB modem (illustrated) Aircard: 750, 850 or 880 for PCMCIA slot Enfora: GSM0110-01 for PCMCIA or Compact Flash slot T-Mobile: Pay As You Go Mobile broadband USB stick 110 & 120 (run Sensory Update first). B.1.3 Compatible phones The following mobile phones have been tested with The Grid 2's mobile phone and SMS features and are known to be compatible. Nokia: 6230, 6310i, 6021 63 Sony Ericsson: W890, C903, C510, K530i, K750i, K810i, K850i, T610, W810i, W850i, S500i, W715 Motorola: V360 B.1.4 Partially compatible phones The following phones can be used with The Grid 2, but do not offer complete functionality. Nokia: E63, 6233 6234, 6300, 7500 (sends ok but cannot read inbox) LG: Shine (can send messages and read new messages, but cannot access old message in inbox) Samsung: U700 (sends but cannot read inbox) Samsung: U600 (not useable with Bluetooth connection, cannot read inbox) Samsung: J700i (reads inbox, but cannot send messages) B.1.5 Incompatible phones The following phones are not compatible with The Grid 2. Sony Ericsson: Any model with first digit less than 3, eg C205, Motorola: RAZR (does not support serial connections over bluetooth) Nokia: E70 (not supported), 6110 Navigator Samsung: SGH – A411 HTC: S710 Merlin/Novatel: U530 PCMCIA wireless modem You will generally need to install the software supplied with the phone or modem, but the software should not be running when you try to use it with Grid 2. B.2 Connecting a USB Modem to Grid 2 This note shows how to use a USB modem to send and receive SMS messages with The Grid 2. Since Grid 2 has been written to support the widest number of phones and modems, the actual procedures for your system may differ. If you need assistance setting up your system please phone, but not when you are rushed. Setting up the system requires the followings steps: Obtain the correct equipment Activate a SIM card and put some credit on it. Install the modem on the computer and install the software that came with it. Check you can send messages with the modem Configure The Grid 2 and test. 64 B.2.1 Before you Start You will need the following Uninstall unwanted phone software. If you have previously installed software for other USB modems or phones and it is not needed, uninstall it before installing the Zoom software. USB broadband modem. There are two sorts: 'locked' that can only work with a particular network; and 'unlocked' that will work with any network. This example uses the Zoom 4945 modem which is unlocked and available from a number of suppliers. If you are buying a 'locked' modem, it is worth getting one on the same network as your phone. A SIM card. There are two types of SIM card: those intended for use with phones; and those that give a broadband connection. Although you will probably be able to send & receive messages with both types, phone SIM cards work out cheaper unless you need mobile broadband. Most network operators will provide phone „SIM only' packages for a nominal charge. 65 B.2.2 Install the modem software. When you connect the modem to the computer, Windows will give it a 'port number'. The port number will change if you plug it into a different USB port. Since The Grid 2 needs to know the port number, its best to always use the same USB port for your modem. Plug the modem into the computer and wait a few minutes while Windows detects it and installs drivers. You may need to reboot the computer and then re-insert the modem. 66 B.2.3 Checking you can send and receive messages with the modem Start the modem software running. It should detect the SIM card and show it is connected to the network: B.2.4 Configure and Test The Grid 2 Start The Grid 2 and go to User Settings->Workspace Settings->Mobile Phone Click the 'Autodetect' button. The Grid 2 may report more than one phone has been detected. If so, open the COM port box. After the Autodetect has run, it shows the identification for any modems or phones found. In this screenshot it has found the on board dial up modem on COM 3 and the USB modem on COM 9. 67 Select the correct port, and test the connection. The checkboxes next to the test button will show if the connection is working. B.2.5 Troubleshooting Autodetect fails: With some devices, The Grid 2 cannot access the modem while the manufacturer's software is running. Try shutting down the manufacturer's software. Windows may have allocated a COM port greater than 16 to the modem. Check our Sensory Answer online Changing the COM port for a USB device for more details. Can’t send: Make sure you are in an area where reception is good. Check you have credit on the SIM card, and can send and receive messages using the manufacturer's software. Some software switches off the transmitter in the modem when it exits. Check if there are options to prevent this. 68 B.3 Connect a mobile phone to The Grid 2 with Bluetooth The Grid 2 allows you to send and receive SMS text messages via some bluetooth mobile phones. Please see the list above for compatible phones. These instructions are to guide you through the process of setting up your computer and mobile phone to communicate, and then set up The Grid 2 to find your mobile phone. B.3.1 Install your bluetooth adaptor The first step is to install your bluetooth adaptor. Usually this will be a small USB device. Your computer may already have Bluetooth, in which case you do not need to follow this step. When you connect it to your computer, Windows w ill detect it (which may take a few minutes). When it is ready, you will have a notice saying "your new hardware is installed and ready to use." B.3.2 Edit your Grid 2 user The Grid 2 stores separate mobile phone settings for each user. Select the user that you want to send/receive SMS messages. Select Edit > User Settings from the menu. Select Workspace Settings > Mobile phone from the categories. B.3.3 'PAIR' your phone to your computer The next step is to 'pair' your phone with your computer. Bluetooth works by 'pairing' devices (such as a computer and a phone) so that they have permission to control each other. Click on the Windows Bluetooth Settings button in The Grid 2. These instructions are for Microsoft Bluetooth Drivers. If nothing happens when you click on Bluetooth Settings, you probably have an adaptor that uses the Widcomm driver. The process is similar, but some buttons may have different text and some steps may take place in a different order. In Bluetooth Devices, click the button Add... Ensure that your phone has Bluetooth turned on, tick the box and click Next. Select your phone from the list of available devices, and click Next. Allow Windows to choose a passkey and click Next. A message will come up on your phone saying that your computer is trying to connect. Type the passkey into your phone. Windows will establish connection with your phone. Click Finish to close the Wizard. In the Bluetooth Devices window, select the COM Ports tab. 69 Check which number has been assigned to the Outgoing port for your phone. You might have more than one outgoing COM port for your phone. Use the first one in the list in this case. If there are no outgoing COM ports listed then your phone is not compatible with SMS in The Grid 2. Click Ok to close Bluetooth Devices. B.3.4 Setting up The Grid 2 for SMS You can now configure your Grid 2 user to connect to the mobile phone. Select the outgoing COM port for your phone (from the previous stage). If you do not know which one it is, you can click AutoDetect and The Grid 2 will try to determine which port it is. Select the country code for phone calls in your country. Click on Test to test the connection to the phone. The Grid 2 will connect to the phone and test that it can download the inbox. It will then try to send an SMS - enter a phone number when prompted to test SMS sending, or click cancel to skip this test. B.3.5 Security settings on the phone Some phones have a security setting that controls how your computer can connect to the phone. This may cause the phone to ask you to click a button each time Grid 2 tries to connect to the phone. As an example, the followings settings are for a Sony Ericsson w850i walkman phone: Select: Connectivity->Bluetooth->My Devices Scroll through the list of paired devices to select the computer Select: More->Allow Connection->Always allow That's it! You're now set up to use your phone with The Grid 2 for SMS messages. Try using our pre-made SMS grids to get you started. 70 APPENDIX C: Environment Control The Grid 2 allows you to integrate “environment control” (EC) directly into your grids. Examples of devices that can be controlled in this way include: TV, DVD player or digital/satellite box. CD player or radio. Adapted electronic switches, such as light switches and heating controls. Motorised door, window and curtain openers. Remote control toys. A good rule of thumb is to assume that if the device has a remote control, then your EC unit can be trained to control your device. The Grid 2 supports a range of EC systems, which include GEWA, TIRA and UUIRT. If you are not sure which system you have, please get in touch. Listed below are our devices which have an integrated EC system. DEVICE Powerbox 5 Powerbox 6 MyTobii P10 Tobii C-Series BackBox EC SYSTEM UUIRT & Z-Wave GEWA GEWA TIRA GEWA C.1 Setting up with GEWA Many of our standard grid sets include basic template grids for setting up Environmental Control to use with your TV, Hi-fi and other devices, and are usually set up with the appropriate GEWA command. The next step is for the GEWA unit to „learn‟ the codes associated with various buttons on your remote controller. 71 Here is an example grid set up to include all functions for a TV, but you can build your own grids as well. Enter editing mode by pressing F11, and choose a cell that you want to edit, such as the vol up cell. If there is not a GEWA press button command showing in the edit window, click on add a command and type GEWA into the search box. Select GEWA press button from the list, and click on OK. 72 Once you have the command shown above, click on Select Button. If this is the first time you have used the environment control, select COM Port and then Auto Detect to locate the GEWA Prog. Choose a button (you have 256 at your disposal!), and rename it to something relevant, e.g “TV vol up”. Click on the Rename button to do this. Ensure the button is highlighted, and select Learn from remote. Locate the EC window on your device, it usually looks like a dark piece of plastic or glass, and point the remote control towards it. Click on the Start learning button, and follow the instructions listed. The first instruction is to hold down the button on the remote control. In this example, it will be the „Volume up‟ button. Once there is a green tick in the first box, release the button and press it again quickly. You will now have 3 ticks displayed. If you have problems with this, make sure the remote control is close to the EC window, and pointing directly at it. If you continue to have problems, click on Cancel and select Prog and Check alignment from the previous window to check you are holding the remote control in the correct place. 73 Once you have trained this button, you can test it works by clicking on Test button. When you are finished, press OK to return to the editing grid. This process can now be repeated for all the other buttons on your remote control. C.1.2 Advanced options with GEWA There are a number of other commands available for use with the GEWA unit, which are listed here: GEWA continuous button This option is useful when wanting to avoid repeated pressing of one button. For example, if used with the volume button, the volume would increase until you make your next selection. This is useful when using scanning, so that you don‟t have to repeatedly navigate to the volume button when significantly varying the volume. GEWA hold button Some devices can be fussy about the amount of time a button needs to be held down for. For example, if you press the number one on your TV remote too long, it will take you to channel 11 rather than channel 1. This command can be used to minimize or maximize the time required to hold down the button. GewaLink commands Some EC devices, such as dedicated lights or curtain openers, may specify which GEWA codes need to be used. You can enter the code, rather than using the remote control to learn particular functions. GEWA special commands These commands are occasionally used by those with technical knowledge of GEWA, allowing them to take direct control of the GEWA. 74 C.2 Setting up TIRA and UUIRT Many of our standard grid sets include basic template grids for setting up Environmental Control to use with your TV, Hi-fi and other devices, and are usually set up with the appropriate GEWA command. However, it is easy to replace this with a TIRA or UUIRT command. Although TIRA and UUIRT systems are different, the set up procedure within The Grid 2 is very similar. If you have a TIRA system, go to User Settings -> Environmental Control -> TIRA, and select the Auto detect button. This will find the TIRA hardware, ready for you to use. Then return to the grid you wish to edit. This is not required if using UUIRT. 75 Here is an example grid to include all functions for a CD player, but you can edit the grid to look however you want. Enter editing mode by pressing F11, and choose a cell that you want to edit, such as the Play cell. If there is a GEWA press button command showing in the edit window, delete it. Click on add a command and type TIRA or UUIRT into the search box top left. Select the relevant UUIRT press button or TIRA press button command from the list, and click on OK. 76 Select Learn button, and another window will appear. Hold your remote control close to the EC sensor, as instructed, and click on Start learning. You can now repeat this process for other buttons on your remote control. C.2.1 Hold Button for TIRA and UUIRT There is also a hold button command for each system. Some devices can be fussy about the amount of time a button needs to be held down for. For example, if you press the number one on your TV remote too long, it will take you to channel 11 rather than channel 1. This command can be used to minimize or maximize the time required to hold down the button. C.3 Other Environment Control systems There are also commands available for the B&J Perseo and Z-wave EC systems, and these work in a very similar fashion to those of the TIRA and UUIRT systems. Please get in touch if you need any help setting these up. 77