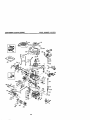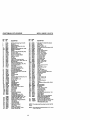
1
Owner's Manual
JCRRFTSMRWI
6.75 HORSEPOWER
21" REAR DISCHARGE
POWER PROPELLED
ROTARY LAWN MOWER
Model No.
917.378431
Safety
•
•
•
•
Assembly
Operation
Maintenance
•
•
Espa_ol
Repalr Parts
CAUTION:
Read and follow all
Safety Rules and Instructions
before operating this equipment
Sears, Roebuck and Co., Hoffman Estates, IL 60179
Visit our Craftsman website: www.sears.corrVcraffsman
Warranty .................................................
2
Safety Rules ........................................ 2-4
Assembly ............................................. 4-5
Operation ............................................. 6-9
Maintenance Schedule ........................ 10
Maintenance .................................... 10-13
Product Specifications .......................... 11
Service and Adjustments................. 13-14
Storage ............................................ 15-16
Troubleshooting .............................. 16-17
Repair Parts ..................................... 35-43
Parts Ordering ........................ Back Cover
LIMITED'I3NO YEAR WARRANTY ON CRAFTSMAN POWER MOWER
For two years from date of purchase, when this Craftsman Lawn Mower is maintained,
lubricated, and tuned up according to the operating and maintenance instructions in
the owner's manual, Sears will repair free of charge any defect in material or workmanship.
If this Craftsman Lawn Mower is used for commemial or rental purposes, this warranty
applies for only 90 days from the date of purchase.
This Warranty does not cover:
• Expendable items which become worn during normal use, such as rotary mower
blades, blade adapters, belts, air cleaners and spark plug.
• Repairs necessary because of operator abuse or negligence, including bent
crankshafts and the failure to maintain the equipment according to the instructions
contained in the owner's manual.
Warranty service is available by returning the Craftsman power mower to the nearest
Sears Service Centar/Departmant in the United States. This warranty applies only
while this product is in use in the United States.
This Warranty gives you specific legal rights, and you may also have other rightswhich
vary from state to state.
Sears, Roebuck and Co., D/817 WA, Hoftman Estates, Illinois60179
IMPORTANT= This cutting machine is cepabte of amputating hands and feet and
throwing objects. Failure to observe the following safety instructions could result in
serious injury or death.
• Be sure the area is clear of other
I. GENERAL OPERATION
people before mowing. Stop machine if
• Read, understand, and follow all
anyone enters the area.
instructionson the machine and in the
• Do not operate the mower when
manual(s) before starting. Be thorbarefoot or weadng open sandals.
oughly familiar with the controls and
Always wear substantial foot wear.
the proper use of the machine before
• Do not pull mower backwards unless
starting.
absolutely necessary, Always look
• Do not put hands or feet near or under
down and behind before and while
rotating parts. Keep clear of the
moving backwards.
discharge opening at atl times.
• Do not operate the mower without
• Only allow responsibte individuals,
proper guards, plates, grass catcher or
who are familiar with the instructions, to
other safety protective devices in place.
operate the machine.
• See manufacturer's instructions for
• Clear the area of objects such as
proper operation and installation of
rocks, toys, wire, bones, sticks, etc.,
accessories. Only use accessories
which could be picked up and thrown
approved by the manufacturer.
by the blade.
•
•
•
•
•
•
Stop the blade(s) when crossing gravel
drives, walks, or roads.
Stop the engine (motor) whenever you
leave the equipment, before cleaning
the mower or unclogging the chute.
Shut the engine (motor) off and wait
until the blade comes to complete stop
before removing grass catcher.
Mow only in daylight or good artificial
light.
Do not operate the machine while
under the influence of alcohol or drugs.
Never operate machine in wet grass.
Always be sure of your footing: keep a
firm hold on the handle and walk; never
run.
• Disengage the self-propeUed mechanism or drive clutch on mowers so
equipped before starting the engine
(motor).
• If the equipment should start to vibrate
abnormally, stop the engine (motor)
and check immediately for the cause.
Vibration is generally a warning of
trouble.
• Always wear safety goggles or safety
glasses with side shields when
operating mower.
IL SLOPE OPERATION
Slopes are a major factor related to slip
and fail accidents which can result in
severe injury.All slopes require extra
caution. If you feel uneasy on a slope, do
not mow it.
DO:
• Mow across the face of slopes: never
up and down. Exercise extreme caution
when changing direction on slopes.
• Remove obstacles such as rocks, tree
limbs, etc.
• Watch for holes, ruts, or bumps. Tall
grass can hide obstacles.
DO NOT=
• Do not trim near drop-offs, ditches or
embankments. The operator could lose
footing or balance.
• Do not tdm excessively steep slopes.
• Do not mow on wet grass. Reduced
footing could cause slipping.
Ill.CHILDREN
Tragic accidents can occur if the operator
is not alert to the presence of children.
Children are often attracted to the
machine and the mowing activity. Never
assume that children will remain where
you last saw them.
• Keep children out of the trimming area
and under the watchful care of another
responsible adult.
• Be alert and turn machine off if children
enter the area.
• Before and while walking backwards,
look behind and down for small
children.
• Never allow children to operate the
machine.
• Use extra care when approaching blind
corners, shrubs, trees, or other objects
that may obscure vision.
IV. SERVICE
• Use extra care in handling gasoline
and other fuels. They are flammable
and vapors are explosive.
- Use only an approved container.
- Never remove gas cap or add fuel
with the engine running. Allow
engine to cool before refueling. Do
not smoke.
- Never refuel the machine indoors.
- Never store the machine or fuel
container inside where there is an
open flame, such as a water heater.
• Never run a machine inside a closed
area.
• Never make adjustments or repairs with
the engine (motor) running. Disconnect
the spark plug wire, and keep the wire
away from the plug to prevent accidental starting.
• Keep nuts and belts, especially blade
attachment belts, tight and keep
equipment in good condition.
• Never tamper with safety devices.
Check their proper operation regularly.
• Keep machine free of grass, leaves, or
other debris build-up. Clean oil or fuel
spillage. Allow machine to cool before
storing.
• Stop and inspect the equipment if you
strike an object. Repair, if necessary,
before restarting.
• Never attempt to make wheel height
adjustments while the engine (motor) is
running.
• Grass catcher components are subject
to wear, damage, and deterioration,
which could expose moving parts or
allow objects to be thrown. Frequently
check components and replace with
manufacturer's recommended parts,
when necessary.
• Mower blades are sharp and can cut.
Wrap the blade(s) or wear gloves, and
use extra caution when servicing them.
• Do not change the engine governor
setting or overspeed the engine.
_,WARNING: Battery posts, terminals and
related accessories contain lead and lead
compounds, chemicals known to the State
of California to cause cancer and birth
defects or other reproductive harm. Wash
hands after handling.
_, CAUTION: Muffler and other engine
parts become extremely hot during
operation and remain hot after engine has
stopped. To avoid severe burns on
contact, stay away from these areas.
ALook for this symbol to point out
important safety precautions. It means
CAUTION!!t BECOMEALERT!t! YOUR
SAFETY IS INVOLVED.
A CAUTION: In order to prevent
accidental starting when setting up,
transporting, adjusting or making repairs,
always disconnect spark plug wire and
place wire where it cannot contact spark
plug.
&WARNING: Engine exhaust, some of its
constituents, and certain vehicle
components contain or emit chemicals
known to the State of California to cause
cancer and birth defects or other
reproductive harm.
These accessories were available when this lawn mower was produced. They are not
shipped with your mower. They are also available at most Sears retail outlets and
service centers. Most Sears stores can also order repair parts for you, when you
provide the model number of your lawn mower. Some of these accessories may not
apply to your lawn mower.
LAWN MOWER PERFORMANCE
CUPPING DEFLECTOR
FOR REAR DISCHARGE LAWN MOWERS
MULCHER
GRASS CATCHERS
FOR
REAR DISCHARGE
LAWN MOWERS
KITS
STABILIZER
GRASS CATCHERS
FOR
SIDE DISCHARGE
LAWN MOWERS
GAS CANS
LAWN MOWER MAINTENANCE
MUFFLERS
BELTS
AIR FILTERS
BLADES
BLADE ADAPTERS
Read these instructions and this manual
in its entirety before you attempt to
assemble or operate your new lawn
mower.
SPARK PLUGS
WHEELS
ENGINE OIL
IMPORTANT: This lawn mower is
shipped WITHOUT OIL OR GASOLINE in
the engine.
4
TO INSTALL A'I'I'ACHM ENTS
Your lawn mower was shipped ready to
be used as a mulcher. To convert mower
to bagging, see "TO CONVERT MOWER"
in the Operation section of this manual.
TO PREPARE BA'I'rERY
NOTE: Your battery must be charged
before you can start your lawn mower.
1. Disconnect engine battery connector
(male) from battery connector (female)
2. Connect battery charger connector
(male) to battery connector (female).
3. Plug battery charger into 110 volt A.C.
outlet.
4. Leave battery charger connected for
24 hours before starling your engine
for the first time.
5. After charging, connect engine
connector (male) to battery connector
(female).
Your engine has an integral alternator for
partial charging. Connect your battery
charger to charge battery as required.
IMPORTANT: The engine alternator will
not charge a discharged battery.
At the end of the mowing season the
battery should be charged for 48 hours to
protect the battery during winter storage.
ACAUTION:
Always disconnect the
engine connector (male) from the battery
connector (female) to prevent accidental
starting when transperting or storing your
lawn mower after the season.
Your new lawn mower has been assembled at the factory with the exception
of those parts left unassembled for
shipping purposes. All parts such as nuts,
washers, bolts, etc., necessary to complete the assembly have been placed in
the parts bag. To ensure safe and proper
operation of your lawn mower, all parts
and hardware you assemble must be
tightened securely. Use the correct tools
as necessary to ensure proper tightness.
TO REMOVE LAWN MOWER FROM
CARTON
1. Remove loose parts included with
mower.
2. Cut down two end corners of carton
and lay end panel down flat.
3. Remove all packing materials except
padding between upper and lower
handle and padding holding operator
presence control bar to upper handle.
4. Roll lawn mower out of carton and
check carton thorougly for additional
loose pads.
HOW TO SET UP YOUR LAWN
MOWER
TO UNFOLD HANDLE
IMPORTANT: Unfold handle carefully so
as not to pinch or damage control cables.
1. Raise handles until lower handle
section locks into prace in mowing
position.
2. Remove protective padding, raise
upper handle section into place on
lower handle and tighten both handle
knobs.
3. Remove handle padding holding
operator presence control bar to
upper handle.
Your lawn mower handle can be adjusted
for your mowing comfort. Refer to "ADJUST HANDLE" in the Service and
Adjustments section of this manual.
Charger connector
Battery connector
Operator
con_'olbar
Engine connector (male)
Lift u
Mowing
position
Lowerhandle
5
Battery charger
KNOWYOUR
LAWNMOWER
READ THIS OWNER'S MANUALAND SAFETY RULES BEFORE OPERATING YOUR
LAWN MOWER. Compare the illustrationswith your lawn mower to familiarize yourself
with the location of various controls and adjustments. Save this manual for future
reference.
These symbols may appear on your lawn mower or In literature supplied with the
product, Learn and understand their meaning.
CAUTION
OR WARNING
ENGINE
ON
ENGINE
OFF
FAST
SLOW
CHOKE
FUEL
OIL
DANGER, KEEP HANDS
AND FEET AWAY
presence control her
Engine zone
control
start switch
Auxlfiary
starter handle
Gasoline cap
Air filter
Engine oil cap
with
Primer
Muffler
Ddve cover
Housin
IMPORTANT: This lawn mower is shipped
WITHOUT OIL OR GASOLINE in the engine
_Wheel adjuster
(on eachwheel)
MEETS CPSC SAFETY REQUIREMENTS
Sears rotary walk-behind power lawn mowers conform to the safety standards of the
American National Standards Institute and the U.S. Consumer Product Safety Commission. The blade turns when the engine is running.
Operator presence control bar - must
be held down to the handle to start the
engine. Release to stop the engine,
Key start switch- used for starting the
engine,
Auxiliary starter handle - used for
starting the engine.
Primer - pumps additional fuel from the
carburetor to the cylinder for use when
starting a cold engine.
Drive control lever - used to engage
power-propelled forward motion of lawn
mower,
6
Theoperation
ofany
lawn
mower can result in foreign
objects thrown into the
eyes, which can result in
severe eye damage.
Always wear safety glasses or eye
shields while operating your lawn mower
or performing any adjustments or repairs.
We recommend a wide vision safety
mask over spectacles or standard safety
glasses.
HOW TO USEYOUR LAWN MOWER
ENGINE SPEED
The engine speed was set at the factory
for optimum performance. Speed is not
adjustable.
ENGINE ZONE CONTROL
ACAUTION:
Federal regulations require
an engine control to be installed on this
lawn mower in order to minimize the risk
of blade contact injury. Do not under any
circumstances attempt to defeat the
function of the operator control. The blade
turns when the engine is running.
• Your lawn mower is equipped with an
operator presence control bar which
requires the operator to be positioned
behind the lawn mower handle to start
and operate the lawn mower.
DRIVE CONTROL
• Self-propelling is controlled by holding
the operator presence control bar down
to the handle and pushing the drive
control Teverforward until it clicks; then
releasing the lever.
• Forward motion will stop when the
operator presence control bar is
released. To stop forward motion
without stopping engine, release the
operator presence control bar slightly
until the drive control disengages. Hold
operator presence control bar down
against handle to continue mowing
without self-propelling.
• To keep drive control engaged when
turning comers, push down on handle
and lift front wheels off ground while
turning lawn mower.
Drive
control
TO ADJUST CU'I-rlNG HEIGHT
Raise wheels for low cut and lower
wheels for high cut, adjust cutting height
to suit your requirements. Medium
position is best for most lawns.
• TO change cutting height, squeeze
adjuster lever toward wheel. Move
wheel up or down to suit your requirements. Be sure all wheels are in the
same setting.
NOTE: Adjuster is properly positioned
when plate tab inserts into hole in lever.
Also. 9-pesition adjusters (if so equipped)
allow lever to be positioned between the
plate tabs.
LowerWheels for High Cut
Raise Wheels for LowCut
Ddve control
disengaged 7
Lever
TO CONVERT MOWER
Yourlawn mower was shippedreadyto be
used as a mulcher.To convertto begging :
REAR BAGGING
• Uft mar door of the lawn mower and place
the grass catcherframe hooks onto the
doar pivct p_ns.
• To convert to mulching ope_,
remove
grasscatcher and dose rear door.
ACAUTION:
Do not run your lawn mower
without clipping deflector or approved
grass catcher in place, Never attempt to
operate the lawn mower with the rear
door removed or propped open.
Pivot
"
Catcher frame hook
To engage
drive control
Plat_Ta_l,
Rear
Grass
catcher
handle
TO EMPTY GRASS CATCHER
1. Open door and lift up on grass catcher
using the frame handle.
2. Remove grass catcher with clippings
from under tawn mower handle.
3. Empty clippings from bag using both
frame handle and bag handle.
NOTE: Do not drag the bag when
emptying; it will cause unnecessary wear.
Grass
catcher
handle
Bag
handle
AWARNING: Experience indicates that
alcohol blended fuels (called gasohol or
using ethanol or methanol) can attract
moisture which leads to separation and
formation of acids during storage. Acidic
gas can damage the fuel system of an
engine while in storage. To avoid engine
problems, the fuel system should be
emptied before storage of 30 days or
longer. Drain the gas tank, start the
engine and let it run until the fuel lines
and carburetor are empty. Use fresh fuel
next season. See Storage Instructionsfor
additional information. Never use engine
or carburetor cleaner products in the fuel
tank or permanent damage may occur.
A CAUTION: Fill to bottom of gas tank
filler neck. Do not ovedill. Wipe off any
spilled oil or fuel. Do not store, spill or
use gasoline near an open flame.
filler cap
BEFORE STARTING ENGINE
ADD OIL
Your lawnmower is shipped without oil in
the engine. Engine holds 20 oz. of oil.
For type and grade of oil to use, see
"ENGINE" in Maintenance section of this
manual.
1. Be sure lawnmower is level and area
around oil fill is clean.
2. Remove engine oft cap and fill to the
full line on the dipstick. Pour oil slowly.
Do not over fill.
NOTE: Allow oil to settle down into engine
for accurate reading. To read proper level,
tighten engine oil cap, then remove it to
read the dipstick.
3. Reinstall engine oil cap and tighten.
• Check oil level before each use. Add
oil if needed. Fill to full line on dipstick.
• Change the oil after every 25 hours of
operation or each season. You may
need to change the oil more often
under dusty, dirty conditions.
ADD GASOLINE
• Fill fuel tank. Use fresh, clean, regular
unleaded gasoline with a minimum of
87 octane. Do not mix oil with gasoline. Purchase fuel in quantities that
can be used within 30 days to assure
fuel freshness.
Engine
oil cap
TO START ENGINE
NOTE: Due to protective coatings on the
engine, a small amount of smoke may be
present during the initial use of the
product and should be considered
normal.
I. TO start a cold engine, push primer
three (3) times before tryingto stad.
Use a firm push, This step is not
usually necessary when starting an
engine which has already run for a
few minutes.
2. Hold operator presence control bar
down to the handle.
3. Turn electric start key clockwise to
crank engine.
IMPORTANT:
Do not crank engine
MULCHING MOWING TIPS
IMPORTANT: Forbestperformance,
keep mower housing free of built-up
grass and trash. See "CLEANING" in the
Maintenance section of this manual.
• The special mulching blade will recut
the grass clippings many times and
reduce them in size so that as they fall
onto the lawn they will disperse into the
grass and not be noticed. Also, the
mulched grass will biodegrade quickly
to provide nutdents for the lawn.
Always mulch with your highest engine
(blade) speed as this will provide the
best recutting action of the blades.
• Avoid cutting your lawn when it is wet.
Wet grass tends to form clumps and
interferes with the mulching action.
The best time to mow your lawn is the
early afternoon. At this time the grass
has dried and the newly cut area will
not be exposed to the direct sun.
• For best results, adjust the lawn mower
cutting height so that the lawn mower
cuts off only the top one-third of the
grass blades. If the lawn is overgrown
it will be necessary to raise the height
of cut to reduce pushing effort and to
keep from overloading the engine and
leaving clumps of mulched grass. For
extremely heavy mulching, reduce your
width of cut by overlapping previously
cut path and mow slowly.
• Certain types of grass and grass
conditions may require that an area be
mulched a second time to completely
hide the clippings. When doing a
second cut, mow across or perpendicular to the first cut path.
• Change your cutting pattern from week
to week. Mow north to south one week
then change to east to west the next
week. This will help prevent matting
and graining of the lawn.
more
than five continous seconds between
each time you try to start. Wait 5 to 10
seconds between each attempt.
1. To start engine using the auxiliary
starter handle, follow the steps above.
Exchange the use of the start key for
starter handle. Pull starter handle
quickly. Do not allow starter rope to
snap back.
TO STOP ENGINE
To stop engine, release operator
presence control bar.
NOTE: In cooler weather it may be
necessary to repeat priming steps. In
warmer weather over priming may cause
flooding and engine will not start. If you
do flood engine wait a few minutes before
attempting to start and do not repeat
priming steps.
MOWING TIPS
• Under certain conditions, such as very
tall grass, it may be necessary to raise
the height of cut to reduce pushing
effort and to keep from overloading the
engine and leaving clumps of grass
clippings. It may also be necessary to
reduce ground speed and/or run the
lawn mower over the area a second
time.
• For extremely heavy cuffing, reduce the
width of cut by overlapping previously
cut path and mow slowly.
• For better grass bagging and most
cutting conditions, the engine speed
should be set in the fast position.
• When using a rear discharge lawn
mower in moist, heavy grass, clumps of
cut gross may not enter the grass
catcher. Reduce ground speed
(pushing speed) and/or run the lawn
mower over the area a second time.
• If a trail of clippings is left on the right
side of a rear discharge mower, mow in
a clockwise direction with a small
overlap to collect the clippings on the
next pass.
• Pores in cloth grass catchers can
become filled with dirt and dust with
use and catchers will collect less grass.
To prevent this, regularly hose catcher
off with water and let dry before using.
• Keep top of engine around starter clear
and clean of grass clippings and chaff.
This will help engine air flow and
extend engine life.
Max 1/3
9
.A,NTENANCE
BC.EDU'E
Check for Loose Fasteners
Clean/Inspect Grass Catcher
(if Equipped)
_
MClean
Clean Under
Lawn Mower
Drive Cover
W
I_
I_
I/
I_
I/
Check drive bel ulleys
IPower-PrOpelled
Mowers)
(Powe r-Propell_lPMowers)
t_S
R c heck/S
harp•
n/Replace
Blade
V
r_'_
LubriCationChart
Clean BatteP//ReChar_
Elect ric Start Mowers
¥/
i/
li/
1/4
E
Check Engine Oil Level
N
Change
Clean AirEngine
Filter Oil
t/l_t 2
I_
Inspect
Clean
orMuffler
Replace Spark Plug
f_
t/
E Replace Air Filtar Paper Cadridge
t
2
3
4
ItS=
- Change mona often when opgralklgunde_• heavy load or in high ambkml I_111_alum$.
- Sarvk:e morl o_len_
operetlng In dirty or dusty conditions.
- Re_,uce blades mo,e often whim mowing in sandy =o_,
- Cha_e 48 hour_ at end of =e_
GENERAL RECOMMENDATIONS
The warranty on this lawn mower does
not cover items that have been subjected
to operator abuse or negligence. To
receive full value from the warranty,
operator must maintain mower as
instructed in this manual.
Some adjustments will need to be made
periodically to properly maintain your
unit.
All adjustments in the Service and
Adjustments section of this manual
should be checked at least once each
season.
• Once a year, replace the spark plug,
clean or replace air filter element and
check blade for wear. A new spark
plug and clean/new air filter element
assures proper air-fuel mixture and
helps your engine run better and last
longer.
• Follow the maintenance schedule in
this manual.
LUBRICATION
(_) Brake
spring
bracket
Rear
(_) Handle bracket mounting pins
door hinge
(_) Spray lubricant
(_) See "ENGINE" In Maintenance section.
BEFORE EACH USE
1. Check engine oil level.
2. Check for loose fasteners.
LUBRICATION
Keep unit well lubricated (See "LUBRICATION CHART').
CHART
(_) Wheel adjuster
eachwheel)
10
IMPORTANT: Do not oil or grease
plastic wheel bearings. Viscous
tubricants will attract dust and did that
will shorten the life of the self-lubricating bearings. If you feel they must be
lubricated, use only a dry, powdered
graphite type lubricant sparingly.
PRODUCT
SPECIFICATIONS
ERIAL NUMBER:
DATE OF PURCHASE:
GASOLINECAPACITY/TYPE:
1.5 QUARTS (UNLEADED REGULAR)
OIL'tYPE (API-SF-SJ):
OIL CAPACITY:
SAE 30 (ABOVE 32°F); SAE 5W-30 (BELOW 32°F
20 OUNCES
SPARK PLUG (GAP: .045")
BLADE BOLTTORQUE:
CHAMPION RESISTOR TYPE RJ19LM4
35-40 FT. LBS.
The model and serial numbers will be found on a decal on the rear of the mower
housing. Record both serial number and date of purchase in space provided above
LAWN MOWER
Alwaysobservesafety ruleswhen performing any maintenance.
TIRES
• Keep tiresfree of gasoline,oil,or insect
contrelchernicalswhichcan harm rubber.
• Awid stumps,stones,deed ruts,shaq3
objectsand other hazardsthat may cause
_m damage.
(opposite sharp edge) is up toward
the engine.
4. Install the blade bolt with the lock
washer and hardened washer into
blade adapter and crankshaft.
5. Use block of wood between blade and
lawn mower housing and tighten the
blade bolt, turning clockwise.
• The recommended tightening torque is
35-40 ft. Ibe.
IMPORTANT: Blade bolt is grade 8 heat
treated.
TO SHARPEN BLADE
NOTE: We do not recommend sharpening blade - but if you do, be sure the
blade is balanced.
Care should be taken to keep the blade
balanced. An unbalanced blade will
cause eventual damage to lawn mower
or engine.
• The blade can be sharpened with a file
or on a grinding wheel. Do not attempt
to sharpen while on the mower.
• To check blade balance, drive a nail
into a beam or wall. Leave about one
inch of the straight nail exposed. Place
center hole of blade over the head of
the nail. If blade is balanced, it should
remain in a horizontal position. If either
end of the blade moves downward,
sharpen the heavy end until the blade
is balanced.
BLADE CARE
For best results, mower blade must be
kept sharp. Replace bent or damaged
blades.
TO REMOVE BLADE
1. Disconnect spark plug wire from spark
plug and place wire where it cannot
come in contact with spark plug.
2. Turn lawn mower on its side. Make
sure air filter end carburetor are up.
3. Use a wood block between blade and
mower housing to prevent blade from
turning when removing blade bolt.
NOTE; Protect your hands with gloves
and/or wrap blade with heavy cloth.
4. Remove blade bolt by turning counterclockwise.
5. Remove blade and attaching hardware (bolt, lock washer and hardened
washer).
NOTE: Remove the blade adapter and
check the key inside hub of blade
adapter. The key must be in good condition to work properly.Replace adapter if
damaged.
TO REPLACE BLADE
1. Position the blade adapter on the
engine crankshaft. Be sure key in
adapter and crankshaft keyway are
aligned.
2. Position blade on the blade adapter
aligning the two (2) holes in the blade
with the raised lugs on the adapter.
3. Be sure the trailing edge of blade
Crankshaft
Key_.
_ keyway
Blade
Blade
b_t
11
shaft
washer
Trailing edge
Blade adapter
GRASS CATCHER
• The grass catcher may be hosed with
water, but must be dry when used.
• Check your grass catcher often for
damage or deterioration. Through
normal use it will wear. If catcher
needs replacing, replace only with a
manufacturer approved replacement
catcher. Give the lawn mower model
number when ordering.
DRIVE WHEELS
Check front drive wheels each time
before you mow to be sure they move
freely.
The wheels not turning freely means
trash, grass cuttings, etc. are in the drive
wheel area and must be cleaned to free
drive wheels.
If necessary to clean the ddve wheels,
check both front wheels.
1. Remove hubcaps, hairpin cotters and
washers.
2. Remove wheels from wheel adjusters.
3. Remove any trash or grass cuttings
from inside the dust cover, pinion and/
or drive wheel gear teeth.
4. Put wheels back in place.
NOTE: If after cleaning, the drive wheels
do not turn freely, contact a Sears or other
qualified service center.
GEAR CASE
• To keep your drive system working
properly, the gear case and area
around the drive should be kept clean
and free of trash build-up. Clean under
the drive cover twice a season.
• The gear case is filled with lubricant to
the proper level at the factory. The only
time the lubricant needs attention is if
service has been performed on the
gear case.
• If lubricant is required, use only Texaco
Starplex Premium 1 Grease, Part No.
750369. Do not substitute.
ENGINE
LUBRICATION
Use only high quality detergent oil rated
with API service classification SF-SJ.
Select the oil's SAE viscosity grade
according to your expected operating
temperature.
NOTE: Although multi-viscosityoils
(5W30, 10W30 etc.) improve starting in
cold weather, these multi-viscosity oils
wilt result in increased oil consumption
when used above 32°F. Check your
engine oi( level more frequently to avoid
possible engine damage from running
low on oil.
Change the oil after every 25 hours of
operation or st least once a year if the
lawn mower is not used for 25 hours in
one year.
Check the crankcase oil level before
starting the engine and after each five (5)
hours of continuous use. -tighten oil plug
securely each time you check the oil
level.
TO CHANGE ENGINE OIL
NOTE: Before tipping lawn mower to
drain oil, drain fuel tank by running
engine until fuel tank is empty.
1. Disconnect spark plug wire from spark
plug and place wire where it cannot
come in contact with spark plug.
2. Remove engine oil cap; lay aside on a
clean surface.
3. Tip lawn mower on its side as shown
and drain oil into a suitable container.
Rock fawn mower back and forthto
remove any oil trapped inside of
engine.
4. Wipe off any spilled oil on lawn mower
and on side of engine.
5. Fill engine with oil. (See "ADD OIL" in
the Operation section of this manual.)
6. Reconnect spark plug wire to spark
plug.
AIR FILTER
Your engine will not run propedy and may
be damaged by using a dirty air filter.
Replace the air filter every year or after
every 100 hoursof operation, more often
if you mow in very dusty, dirty conditions.
Do not wash air filter.
12
TO CHANGE AIR FILTER
1. Remove the air filter by turning
clockwise to the stop and pull away
from collar.
2. Remove filter from inside of cover.
3. Clean the inside of the cover and the
collar to remove any dirt aocumuletien.
4. Insert new filter into cover.
5. Put air filter cover and filter into collar
aligning the tab with the slot.
6. Push in on cover and turn counterclockwise to tighten.
SPARK PLUG
Replace spark plugs at the beginning of
each mowing season or after every 100
hours of operation, whichever occurs first.
Spark plug type and gap setting are
shown in "PRODUCT SPECIFICATIONS"
in Maintenance section of this manual.
CLEANING
IMPORTANT: For best performance,
keep mower housing free of built-up
grass and trash. Clean the underside of
your mower after each use.
_;kCAUTION: Disconnect spark plug wire
from spark plug and place wire where it
Turn
Collar
cannot come in contact with the spark
clockwise
plug.
to
Clip
• Clean the underside of your lawn
mower by scraping to remove build-up
of grass and trash,
• Clean engine often to keep trash from
accumulating. A clogged engine runs
hotter and shortens engine life.
• Keep finished surfaces and wheels free
of all gasoline, oil, etc.
• We do not recommend using a garden
Slot
hose to clean lawn mower unless the
Airfilter
electrical system, muffler, air filter and
Turn
carburetor are covered to keep water
counterout. Water in engine can result in
Airfilter
cover
dock-wiseto tighten
shortened engine life.
CLEAN UNDER DRIVE COVER
Clean under drive cover at least twice a
MUFFLER
season. Scrape underside of cover with
putty knife or similar tool to remove any
Inspect and replace corroded muffler as it
could create a fire hazard and/or dambuild-up of trash or grass on underside of
drive cover.
age.
LAWN MOWER
TO ADJUST CUTTING HEIGHT
See "TO ADJUST CUTTING HEIGHT" in
the Operation section of this manual.
REAR DEFLECTOR
The rear deflector, attached between the
rear wheels of your mower, is provided to
minimize the possibilitythat objects will
be thrown out of the rear of the mower
into the operator mowing position. If the
deftsctor becomes damaged, it should be
replaced.
_CAUTION:
Before performing any
service or adjustments:
1. Release control bar and stop engine.
2. Make sure the blade and all moving
parts have completely stopped.
3. Disconnect spark plug wire from spark
plug end place where it cannot come
in contact with plug.
13
TOREMOVE/REPLACE
DRIVE
BELT
1. Remove
drivecover.Remove
belt
2.
3.
4.
5.
6.
7.
from geamese pulley by pushing
down on pulley and rolling belt off it.
Turn lawn mower on its side with air
filter and carburetor up.
Remove blade.
Remove debris shield.
Remove belt from engine pulley on
crankshaft.
Install new belt by reveming above
steps.
Always use factory approved belt to
assure fit and long life.
TO ASSEMBLE GRASS CATCHER
1. Put grass catcher frame into grass bag
with rigid part of bag on the bottom.
Make sure the frame handle is outside
of the bag top.
2. Slip vinyl bindings over frame.
NOTE: If vinyl bindingsare too stiff, hold
them in warm water for a few minutes. If
bag gets wet, let it dry before using.
ACAUTION:
Do not run your lawn
mower without clipping dallector or
approved grass catcher in place. Never
attempt to operate the lawn mower with
the rear door removed or propped open.
Ca_
frame
handle
Drive
cover
Belt
TO ADJUST HANDLE
The upper handle may be adjusted to
four (4) different height positions.
1. Loosen both handle knobs only
enough to allow the upper handle to
pivot to the desired adjustment
position.
2. Tighten both handle knobs securely.
opening
ENGINE
ENGINE SPEED
Your engine speed has been factory set.
Do not attempt to increase engine speed
or it may result in personal injury. If you
believe that the engine is running too fast
or too slow, take your lawn mower to a
Sears or other qualified service center for
repair and adjustment.
CARBURETOR
Your carburetor has a non-adjustable
fixed main jet for mixture control. If your
engine does not operate propedy due to
suspected carburetor problems, take
your lawn mower to a Sears or other
qualified service center for repair and/or
adjustment.
IMPORTANT: Never tamper with the
engine governor, which is factory set for
proper engine speed. Overspeeding the
engine above the factory high speed
setting can be dangerous. If you think the
engine-governed high speed needs
adjusting, contact a Sears or other
qualified service center, which has
proper equipment and experience to
make any necessary adjustments.
Handle knob
14
Operator
control bar
Immediately pmpara your lawn mower for
storage at the end of the season or if the
unit will not be used for 30 days or more.
LAWN MOWER
When lawn mower is to be stored for a
period of time, clean it thoroughly, remove
all did, grease, leaves, etc. Store in a
clean, dry area.
1. Clean entire lawn mower (See
"CLEANING" in the Maintenance
section of this manual).
2. Lubricate as shown in the Maintenance section of this manual.
3. Be sure that all nuts, bolts, screws,
and pins are securely fastened.
Inspect moving parts for damage,
breakage and wear. Replace if
necessary.
4. Touch up all rusted or chipped paint
surfaces; sand lightly before painting.
HANDLE
You can fold your lawn mower handle for
storage.
1. Squeeze the bottom ends of the lower
handle toward each other until the
lower handle clears the handle
bracket, then move handle fonvard.
2. Loosen upper handle mounting bolts
enough to allow upper handle to be
folded back.
IMPORTANT: When folding the handle
for storage or transportation, be sure to
fold the handle as shown or you may
damage the control cables.
• When setting up your handle from the
storage position, the lower handle will
automatically lock into the mowing
position.
Squeeze to fold
Fold
Lower
Fold
backward
Mowing
position
ENGINE
FUEL SYSTEM
IMPORTANT: It is important to prevent
gum deposits from forming in essential
fuel system parts such as carburetor, fuel
filter, fuel hose, or tank during storage.
Also, experience indicates that alcohol
blended fuels (called gasohol or using
ethanol or methanol) can attract moisture
which leads to separation and formation
of acids during storage. Acidic gas can
damage the fuel system of an engine
while in storage.
1. Drain the fuel tank.
2. Start the engine and let it run until the
fuel lines and carburetor are empty.
• Never use engine or carburetor cleaner
products in the fuel tank or permanent
damage may occur.
• Use fresh fuel next season.
NOTE: Fuel stabilizer is an acceptable
alternative in minimizing the formation of
fuel gum deposits during storage. Add
stabilizer to gasoline in fuel tank or
storage container. Always follow the mix
ratio found on stabilizer container. Run
engine at least 10 minutes after adding
stabilizer to allow the stabilizer to reach
the carburetor. Do not drain the gas tank
and carburetor if using fuel stabilizer.
ENGINEOIL
Drain oil (with engine warm) and replace
with clean engine oil. (See "ENGINE = in
the Maintenance section of this manual).
CYLINDER
Handle
Mounting pin
Hairpin cotter
15
1. Remove spark plug.
2. Pour one ounce (29 ml) of oil through
spark plug hole into cylinder.
3. Pull starter handle slowly a few times
to distribute oil.
4. Replace with new spark plug.
BA'I'rERY
Disconnect
thebattery
fromtheengine
connector
andcharge
battery
48hours.
OTHER
• Do not store gasoline from one season
to another.
• Replace your gasoline can if your can
starts to rust. Rust and/or dirt in your
gasoline will cause problems.
• If possible, store your unit indoors and
cover it to protect it from dust and dirt.
TROUBLESHOOTING
PROBLEM
goes not start
• Cover your unit with a suitable protective cover that does not retain moisture.
Do not use plastic. Plastic cannot
breathe, which allows condensation to
form and will cause your unit to rust.
IMPORTANT: Never cover mower while
engone and exhaust areas are still warm.
A CAUTION:Never store the lawn mower
with gasoline in the tank inside a building
where fumes may reach an open flame or
spark. Allow the engine to cool before
storing in any enctosure.
CHART
CAUSE
CORRECTION
1. Dirty air filter.
2. Out of fuel.
3. Stale fuel.
4. Water in fuel.
5. Spark plug wire is
disconnected.
6. Bad spark plug.
7. Loose blade or broken
blade adapter.
8. Control bar in released
position.
9. Control bar defective.
10.Weak Battery
11 .Disconnected battery
connector.
16
1. Clean/replace air filter.
2. Fill fuel tank.
3. Drain tank and refill with
fresh, clean fuel.
4. Drain fuel tank and
carburetor and refill tank
with fresh gasoline.
5. Connect wire to plug.
6. Replace spark plug.
7. Tighten blade bolt or
replace blade adapter.
8. Depress control bar to
handle.
9. Replace control bar.
1O.Charge battery.
11.Connect battery to engine.
TROUBLESHOOTINGCHART
CAUSE
PROBLEM
Loasofpower
CORRECTION
1. Rear _ lawn mower
housing or cutting blade
dragging in heavy grass.
2. Cutting too much grass.
3. Dirty air filter.
4. Buildup of grass, leaves,
and trash under mower.
5. Too much oil in engine.
6. Walking speed too fast.
PoorcutJneven
1. Worn, bent or loose blade.
2. Wheel heights uneven.
3. Buildup of grass, leaves
and trash under mower.
Excessive
vibration
1. Worn, bent or loose blade,
2. Bent engine crankshaft.
Starter rope
hard to pull
1. Engine flywheel brake is on
when control bar is release¢
2, Bent engine crankshaft.
3. Blade adapter broken.
4. Blade dragging in grass.
1. Set to "Higher Cut"
position.
2. Set to "Higher Cut"
position.
3. Cleardreptace air filter.
4. Clean underside of mower
housing.
5. Check oil level.
6. Cut at slower walking
speed.
1. Replace blade. Tighten
blade bolt.
2. Set all wheels at same
height.
3. Clean underside of
mower housing.
1. Replace blade. Tighten
blade bolt.
2. Contact a Sears or other
qualified service center.
1. Depress control bar to
upper handle before
pulling starter rope.
2. Contact a Sears or other
qualified service center.
3. Replace blade adapter.
4. Move lawn mower to cut
grass or to hard surface.
Loss of drive
1. Drive wheels not turning
with drive control engaged,
2. Belt not driving
1. Adjust or replace drive
control cable.
2. Put belt on pulleys or
replace belts if broken.
Grass catcher
notfllllng (if so
equipped)
1, Cutting height too low.
2. Lift on blade worn off.
3. Catcher not venting air.
1. Raise cutting height,
2. Replace blade.
3. Clean grass catcher.
Hard to push
1. Grass is too high or wheel
height is too low.
2, Rear of lawn mower
housing or cutting blade
dragging in grass.
3. Grass catcher too full.
4. Handle height position not
right for you.
1, Raise cutting height.
17
2. Raise rear of lawn mower
housing one (1) setting
higher.
3. Empty grass catcher.
4. Adjust handle height to
suit.
Garant[a ................................................
18
Reglas de Seguridad ...................... 18-20
Montaje ............................................ 20-21
Operaci_n ........................................ 22-25
Mantenimiento ................................. 26-29
Programa de Mantenimiento ................ 26
GARANTfA L|MITADA DE DOS _OS
Especificaclones del Producto ............. 27
Servicio y Adjustes .......................... 30-31
Almacenamiento ............................. 31-32
Identificaci6n de problemas ............ 33-34
Panes de repuesto ............ Vea el manual
ingl4Jsde_due_o
PAPA LA SEGADORA A MOTOR CRAFTSMAN
Pot dos (2) at3os a pertir de la fanha de cornpra cuando esta Segadora Craftsman se
mantanga, lubdque y afine segt3ntas instruccionsa para la operacibn y el mantenimiento an el
manual del due_o Sears reparard gratis todo defecto an el matadal y la mano de obra
Si la Sagadota Craftsman se usa pare fines comemiales o de erriando, esta garantia s61o se
aplica per noventa (90) dlas a partir de la fecha de compra
Esta Garant[a no cubra:
• Artloulos qua sa desgastan durante el use normal tares como las cuchiflsa segadoras
rotatoti=s, los adaptadores de la cuchtila, 1ascorreas los ftitros de airs y las bujlaa
• Reperaciones necesadas debido al abuso o ala negligencia del operadot incluy6ndosa a los
cig',e_ales doblados y ala falta de mantenimiento del equipo segOn las instrucciones qua sa
incluyan en el manual del due5o
EL SERVIClO DE GARANTfA ESTA DISPONIBLE al devolver la sagadora a motor Craftsman al
CentroiDapartmento de Servicio Sears mas cercano an los Estados Unidos Esta garanda sa
aplica solamenta mlantras el producto esta an usa en los Estados Unidos
Esta Garande _e otorga derechos tegalsa especffloos y puede qua tambf_n tenga otros
derechos que vadan de estado a estade
Sears, Roebuck and Co,, D/817 WA, Hoffman Estates, Illinois 60179
USA
IMPORTANTE: Esta maquina cortadaora es capaz de amputar las manos y los manos y los
pies y de lanzar objetos Si no sa observan las instrucciones de sagundad siguiantes se pueden
producir laslones graves o la muerLe
• NO tire de la segadora hacia atrds a manos
I OPERACION
qua sea absolutarnenta necosado. Mire
• Antes de empezar, debe familiarizarse
siemprs hania abajo y hacia detrds antes y
completamante con los controtes y el usa
miantrsa que se mueve hacia atrds
correcto de la maquina Pars esto, debe leer
• No opere la sagadora sin los rsspectivos
y comprender todas tas instrucciones qua
resguardos, las places el recogndor de
aparecen en la maquina y an los manuales
c6sped u otres aditamentos dise ados para
de operaci6n
su pmteocibn y seguddad
• Nopongalasmanosotospiescereao
• Refi6rasa alas instrucclones del fabricante
debajo de las partes rotatorias Mant6ngasa
pare el funcionamiento e instalaci6n de
siempre lejos de la abertura de la descarga
accsaodos Use ,,nicamente acuesorios
• Permita que solarnente lea personas
aprobados per el fabncante
responsables qua est6n familiarizadas con
• Detanga la cuchilla o las cuchiUas cuando
las instruccioues operan la mdquina
cruce pot calzadas, calles o caminos de
• Despeje el &rea de objetos tales coma
grave
piedras juguetas, alambres, huesos palos
• Parer el motor cada vez qua so abandona
etc que pueden eer recogidos y lanzados
el aparato, antes de 5mpiar la segadora o de
pot )as cuchJJ]as
remover residuos del tubo
• Asag0resa qua el drea no se hallen
• Apagar el motor y esperar haste que las
personas antes de sagar Pare la maquina
cuchillas est6n complatamente parades
si alguian entre en el drea
antes de remover el receptor de hierba
• NO opera la maquina sin zapatos o con
• Sager solamante con luz del die o con una
sandellas abiertas Pbngase siempre
buena luz artificial.
zapatos s_idos
NO opera la mdquina bajo la influencia del
alcohol o de las dregas,
18
• Nunca opera la maquina ouando la hierba
est6 mojada Aseg0rese siempre de taner
buena tracoibn en sus pies; mantenga el
mango firmaments y carnine; nunca corra
• Desconectar el mecanismo de propulsi6n
autbnoma o el embrague de transmisi6n en
las segadOras qua Io tienan antes de poner
en marcha el motor
• Si el equipo empezara a vibrar de una
manara anormal, pare el motor y revise de
inmediato pars averiguar la causa
Generelmenta la vibraci6n susie indicar que
exista atguna averfa
• Siampre use galas de seguddad o antecjos
con protecok_nlateral cuando opere la
segadora
IL OPERAClON
SOBRE I.AS CUESTAS
Los acoidentes ocurren con mds frecuencia
an les cuestas Es_s aesidentes ocurren
debido a resbeladas o cafdas, las cuales
pueden resultar en graves lesiones Operar la
recortadora en cuestas requiem mayor
concentraelbn Si se siente inseguro an ona
cuesta, no la recorte
HACER:
• Posde recortar a trav6s de la superficie de
la cossta, nunca hacia arriba y hacia abajo
Proosda con extrema precaucibn cuando
nambie de direc_Y_ en lascuestas
• Renueva todos los objetos extraSos, tales
como guijarros, ramas, etc
•Debe
prestar atenci6n a hoyos, baches o
protuberanelas Recuerde que la hierba alta
puede esconder obstdculos
NO HACER:
• No recorte osrca de pendientes, zanjas o
terraplenes El operador puede perder la
tracci6n en los pies o el equilibrio
• No recorte cuestes demasiado inclinadas
• No recorte en hierba majada La reducoidn
en la traccic_nde la pisada puede causar
resbalones.
III. NINOS
Se pueden producir accidentes trdgicos si el
operador no presta atanci6n a la presencia de
los nihos A menudo, tos ni_os se sientan
atraidos por la mbquina y por la actividad de la
siega Nunos suponga qua los niSos van a
perrnaneosr en el mismo lugar donde los vio
por ,'.ltima vez
• Mantenga a los nii',os alejados del drea de la
siega y bajo el cuidado estdcto de otrs
persona adulta responsable
• Est6 alerts y apague la mdquina si hay ni_os
qua entran al drea
• Antes y cuando este retrocediendo, mire
hacia atrds y hacia abajo para verificar si
hay elt_os pequerlos
• Nonca permita que los nifios operen la
mdquina
•Tenga
un cuidado extra cuando se acerque
a esquinas donde no hay visibilidad, a los
arbustos, t=rboles u otros objetos que
pueden interfedr con su lines de visibn
IV. SERVIClO
•Tenga
cuidado extra al manejar la gasolina
y los dernds combustibles Son inflamables
y los gases son explosivos
Use solarnente un envase aprobado
Nunca remueva la tapa del dep6sito de
gasolina o agregue combustible con el
motor funcionando Permita qua el motor
se enfrfe antes de vo_ver a pone
combustible No fume
Nunna vuelva a poner combustible en la
mdquina en recintos cerrados
Nunca almaosne la mdquina o el envase
del combustible dentro de alg0n lugar en
doncle hays una llama expuesta, tel cot'no
la del celentador de agua
• Nunca haga funcionar una m6quina dentro
de un drea cerrada
• Nunca hags ajustes o reparaciones
rnientras el motor est6 en mamha
Desconecte el cable de la bujla, y
mantdngalo a cierta distancia de 6sta para
prevenir un arranque accidental.
• Mantenga las tuercas y los pemos,
especialmenta los pemos del accesorio de
la ouchilla, apretados y mantenga el equipo
en buenas condiciones
• Nunca manipule de forma indebida los
disposiUvos de seguridad Controls
regularmente su funcionamiento correcto
• Mantanga la mdquina libra de hierba, hojas
u otras acumuleciones de desperdicio
Limpie los derrames de acelte o combustible Permita que la mdquina se enfrfe antes
de almaosnarla
• Pare e inspeccione el equipo si le pega aun
objeto Repdrelo, si es nacesado, antes de
hacedo arranosr
• En ning0n caso hay qua regular la altura de
les tuedas mientras el motor est_ en
marcha
• Los componentes del receptor de la hierba
van sujetos a desgasta, dafios y deterioro
que pueden exponer las panes en
movimiento o permitir que objetos sean
disparados Controlar frecuentamenta y
cuando sea necesario sustituir con partes
aconsejadas por el fabdcanta
• Las cuchillas de la segadora ect_n afiladas
y pueden cortar Cubrir las hojas o Ilevar
guantes y utilizar precauciones especiales
cuando se efect0a mantanimiento sobre las
rnJsmas
• NO cambie el ajusta del regulador del motor
ni exosda su veloCidad
19
A_kBusqueeste sfmbok_que ser3elalas wecaudones de segpridadde ir,_
Quiem dedr liiATENCIbN!!! IIIESTE ALERTO!I! $U
SEGURIDAD ESTA COMPROMETIDA.
_at_mbreRECAUCleN:
S_elwpm_e
el .
de la bujiay pc_galodonde no pueoa
entraren contacto con la bujia, para evitarel
an'anquepot accidente, durante la preparack_, el
trensporte,el ajuste o cuando se hacen
reparaelones.
J_LDVERTENCIA: El tubo de escape del motor,
algunosde sus cons_uysates y el_
comlx_e_
detvehiculo conlJeneno
despmnden produc_osqufmicos conoeldesen el
Estadode Californiacon_ocausa de cdncer y
defectos al nadmiento u ob'osda_os
reproducUvos.
_DVERTENCIA:
Los bornes, terminates y
accesonos mlatJvos de la bateda con'denenplomo
o cornpuestosde piomo, productosqulmicos
conoddos en el Estado de Californiacomo causa
de cdncer y defectos al nacimientou eros da_os
repmducO_s. Laver la= rnanoe despu_ de
manlpularlos.
_PRECAUCI(_N:
El silenciador y otras piezes
del motor llegan a set extremadamente
calientes durante la operacien y siguen siendo
calientes despu_s de que el motor haya
parade. Para evitar quemaduras severas,
permanezca lejos de estas _reas.
Estos accesorios estaban disponibles cuando se produjo la segadora. No son
facllltados Junto al cortacesped. Tambi_n estdn disponibles en la mayorfa de las
tiendas de Sears y en los centros de servicio. La mayorfa de las tiendas Sears
tambidn pueden mandar a pedir partes de repuesto para usted, si les proporciona el
nL_merodel modelo de su segadora. Algunos de estos accesorios tal vez no se
apliquen a su segadora.
RENDIMIENTO DE LA SEGADORA
DF.SVIADOR DE RECORTES
PARA SEGADORAS CON DESCARGA TRASERA
P_A
eE_
COND_AR°_
RE_REDOR
TR._E_
_
MANTENIMIENTO
JUEGOS PARA LA ACOLCHADORA
PA_
SEG_OP#_
CON
RECOR_R
D_
LATERAL
_
_
EI_AS_
DE LA SEGADORA
SILENCIADORES
CORREAS
ESTABILIZADORES
CUCHILLAS
Lea estas instrucciones y el manual
completamente antes de tratar de montar u
operar su segadora nueva.
RLTROS
DE CUCHILLA
DE AIRE
BUJ[AS
RUEOAS
DEL MOTOR
IMPORTANTE: ESTE CORTACESPED VIENE
SIN ACEITE O GASOLINA EN EL MOTOR.
2O
Su segadora nueva ha sido montada en la
fdbrica con la excepcibn de aquellas partes
qua se dejaron sin montar par razones de
env[o. Todas las partos come las tuercas, las
arandelas, los pernos, etc., que son
necosadas pare completar el montaje hen sido
colcoadas an la bo_sa de partes. Pare
asegurarse que su secladora funcione en
forma segura y adecuada, todas las partes y
los artlculos de ferreterfa clue se monten
tianen que ser apretados seguramente. Use
las herramiantas correctas, como sea
necesario, pare asegurar que se apdetan
adecuadamente.
PARA REMOVER
LA SEGADORA
DE
LA CAJA DE CART6N
1. Remueva las partes sueltas que se
incluyan con la segadora.
2. Corte los dos esquinas de los extremos de
ta osja de cartbn y tianda el panel del
extremo piano.
3. Remueva todo el material de empaque,
exospto la cui_a entre el mango superior y
61inferior, y la cuRa que sujeta la barra de
los control que exige la presencia pal
oparador junto con el mango superior.
4. Haga rodar la segadora hacia afuera de la
caja de cartbn y revfsela cuidadosamente
para verificar si todav(a quedan partes
sueltas adicionales.
COMO PREPARAR
SU SEGADORA
PARA DESDOBLAR EL MANGO
IMPORTANTE: Despliegue el mango con
mucho coidado para no pellizcar o dai_ar los
cables de control.
1. Levante los mangos haste que la secci6n
del mango inferior se asegure en su lugar,
en la posicibn para segar.
2. Remueva la cuba protectora, levante la
seccibn del mango supedor haste su lugar
an el mango inferior, y apdete ambas
manillas del mango.
3. Remueva la cure pal mango que sujeta la
barra de los control que exige la presencia
del oparador )unto con el mango superior,
El mango de la segadora puede ajustarse
osg_n le acornode pare segar. Refi_rase a
=AJUSTE DEL MANGO" en la Secoibn de
Servicio y Ajustes de este manual.
PARA INSTALAR LOS ACCESORIOS
Su segadora fue enviada lista para usarse
como una acolchadora de ospa vegetal. Para
convertida de modo que pu6da ensacar,
rer=6msea "PARA CONVERIR LA
SEGADORA" en la Secoibn de Operacibn de
este manual.
PARA PREPARAR LA BATERJA
AVISO: Su bateria tiene que estar canada
antes de que pueda haosr arrancar su
segadora.
1. Desconecte el conector del motor (macho)
al conector de la paterfa (hembra).
2. Conecte el conector del cargador de la
paterla (macho) al conector de la bateria
(hembre).
3, Enchufe el caPgador de la baterfa dentro
del enchufe de 110 volt C.A.
4. Deje el cargador de la baterla conectado
por 24 horas antes de hacer arrancar su
motor por la primera vez.
5. Despu6s de cargar, conecte el conector
del motor al conector de la bateria.
Su motor cuenta con un altemador integrado
pare carga parciat. Conecte eL=osrclador de
baterfa pare cargada segOn sea
necesado.
IMPORTANTE: El eltemador clel motor no
cargara una baterla descargada.
AI final de la temparapa de siecla, [a bateria se
debe cargar por 48 bores para protegerla
durante el perfodo de almacenamianto en el
inviemo.
_PRECAUCI6N:
Siempre desconecte el
conector del motor pal conector de la baterla
para evitar el arranque par accidente al
transportar o guarder su segadom despu_s
de la temporada.
Conector del cargador
Conector della
| (hembra)
Barmde contro_
quesx" la pcesenciadelope_ador
MangoInferior
Le
__
Lev=_rJt
_
Conector del
//
Posicibnparesegar21
Conector del cargodor de ta bateria
FAMILIARICESE
CON SU SEGADORA
LEA ESTE MANUAL DEL DUEllO Y LAS REGLAS DE SEGURIDAD ANTES DE OPERAR SU
SEGADORA. Compare las ilustracionas con su segadora para familiarizarse con la ubicaci6n de
los diversos controles y ajustes. Guarde este manual para referencia en el futuro.
Estos simbolos pueden apareser sobre su segadora o en la literature proporclonada con
el producto. Apreoda y oomprenda sue signlflcados.
ATFENCI_N 0
ADVERTENCIA
MOTOR
ENCENDIDO
MOTOR
APAGADO
RApIco
LENTO
ESTRANGU
LACI_N
COMBU6TIBLE
ACEFTE
PELIGRO, GUARDE LAS
MANOaYLCOPIESLEJOS
Bane de control que exige la
presencia del odemdor
Cable de contrOl
Mango del
anancador auxiliar
Tapa del deposito de la gasolLna
Fittro de airs
Tape del deposfto de
aceite de_ motor con
varil]a indicadora d
Cabad_
Silenciador
Cubierta de
la impuLsibn
IMPORTANT: Este cortacesped viens
SIN ACEITE 0 GASOLtNA en el motor.
(encadarueda)
CUMPLE CON LOS REQUISlTOS DE SEGURIDAD DE LA CPSC
Las segadoras a motor, que se condunan desde la parts de atrds, rotatodas, Seam, cumplen
con tos estdndams de saguridad del Amedcan National Standards Institute y de la U.S. Consumer Product Safety Commission. La cuchilla gira cuando el motor esterfunelonando.
Barra de control que exlge la prencla del
operador - tiena que sujetar-se abajo, junto
con el mango, para hacor arrancar el motor.
Su_ltela pare parar el motor.
Cebador - bombea combustible adicionel
desde el carburador al cilindro para uso
cuando se necesita hacer arrancar un motor
fr(o.
Mango del arrancador auxlllar - ss usa para
hacer arrancar el motor.
Pelenca de control de hi Impulel6n - ss
usa para enganchar la ssgadora para
movimiento hacia adelante impulsada a motor.
gnterruptor de errenque de nave - ss usa
22Para
hacer arrancar el motor.
I_a operacibn de cualquier
segadora puede hacer que
salten objetos extraSos dentro
de sos ojos, lo que puede
producir daSos graves en _stos.
Siempre use anteojos de seguddad o
protecc_n para los ojos mientras opere su
segadora o cuando haga ajustos o
reparacionos. Recomendamos una mascara
de seguddad de visibn amplia, para uso
espejuelos o anteojos de segur_dad
estandarte.
COMO USAR SU SEGADORA
VELOClDAD
DEL MOTOR
La velooldad dell motor se estableci6 en la
fdbdca para un rendimiento 6ptimo. La
velocidad no se puede ajustar.
CONTROL DE ZONA DEL MOTOR
_PRECAUCl0N:
Los regulaciones federales
exigon que se instale un control para el motor
en esta segadora para reduolr a un mfnimo el
desgo de lesionarse debido al contacto con la
cuchilla. Por ning,',nmotivo trate de eliminar ta
funci6n del control del operador. La cuchilla
gira cuando el motor estd funcionando.
• Su segadora viene equipada con una barra
de controles que exigen la presencia del
operador, Io que requiem que el operador
est6 detrds del mango de la segadora para
hacerla arrancar y operarla.
CONTROL
DE LA IMPULSION
• La autolmpulsibn se controla al sujetar la
barra de osntrol que exJge la presencia del
operador hacia abajo en el mango y al
empujar la palanca de control de ta
impulsi6n hacia adelante hasta que suene
=ctic," luego se suelta la paler,ca.
• El movimiento hacia adelante parard cuando
la barra de control que exige la presencia
del operador se suelta. Para parar el
movimiento hacia adelante sin parar el
motor, suelte la barra de control que exige la
presencia del operador un poco hasta qoe
se desenganche el control de la impulsibn.
Sujete la barra de control que exige la
presencia del
operador abajo en contra del mango para
continuar segando sin autolmpulsi6n.
• Para mantener el control de la imputsi6n
enganchado coando se de vuelta en tas
esquinas, empuje el mango hacia abajo y
levante las ruedas delanteras fuera del
sueto al girar la segadora.
Barrade controlqueexigela presenciadel operador
Controlde ta
impulsibn
__
PARA AJUSTAR
LA ALTURA DE
CORTE
Levante las ruedas para el corte bajo y baje
las ruedas para el corte alto., ajuste la altura
de corte para que se acomode a sus
requisitos. La posicibn del medio es la mejor
para la mayoria de los c6spedes.
• Para cambiar la altura de code, empuje la
patanca del ajustador hacia la rueda. Mueva
La rueda hacia ardba o hacia abajo de modo
que se acomode a sus requisitos.
Aseg_rese que todas las ruedas queden
igualmente ajustadas.
AVISO: El ajustador esta correolamente
colcoado cuando las orejas de la placa estdn
insertadas en el agujero del mango, Tambi6n,
los ajustes de 9 posiciones (si equipado)
permiten que el mango pueda ssr movido
entre las orejas de la placa.
Para uncodealto,
baje las ruedas
Para un cortebajo,_evante las ruedas
POUR CONVERTIR
LA TONDEUSE
Su segadora rue enviada lista para usarse
como acolchadora de ospa. vegetal. Para
convertida a una operacibn de ensacado:
SEGADORAS CON DESCARGA TRASERA
• Levantar la puerta trasera de cortac6sped y
colocar los ganchos del arrnaz6n de la
mcolectora de hierba en los pasadores de1
quicio de la puerta.
• Para pasar a la opercai6n de
acolchamiento, remover la recolectora de
hierba y osrrar la puerta trasera.
4_I,PRECAUCI(SN: No hago funcionar su
segadora sin el desviador de recortes o sin el
recogedor de c_sped, aprobados, en su lugar.
Nunca irate de operar la segadora cuando se
ha removido la puerta trasera o cuando est_
un poco abierta.
trasera
Gancholateraldel
Mangodel
bastidordel
_ogedor
de c_sped
PARA
VACIAR
ELRECOGEDOR
DE
CESPED
1. Abra
lapuarta
trasera
ylavanto
el
recogedor
dec_sped
usando
elmango
del
bastidor.
2. Remuava
elrecogador
dec6sped,
conlos
recortes,
dedebajo
delmango
dela
segadora.
3. Vaele
losrecortes
delabolsa
usando
tanto
el mango dal bastidor como 61de la
gasolina con plomo aumentard los
dsp6s_tos de 6xido de plomo y carbono y se
reducirztla duracibn de la vdlvula). No
mszcta el acaita con la gasolina. Para
asegurar qua la gasolina utilizada sea
fresca compre astanquas los coeles
puedan ser utilizados duranta los primaros
30 dlas.
_=ADVERTENClA:La
axpshancia ha indioado
qua los combustibles mezclados con alcohol
(cocooldos como gasohol, o el uso de etanol o
bolsa.
matanol) pueden atraer la humedad, la qua
AVISO: No arrastre la bolsa cuando la vacle;
conduce a la saparaoi6n y formaci6n de
se producird un desgaste innecesado.
dcidos duranta el almacenamiento. La gasolina
acfdica puede dai_ar el slstema del combustible de un motor duranta el almaconamiento.
Para evitar los problemas con el motor, se
dsbe vaciar el sistama del combustible antes
de guardado por un perlodo de 30 dias o mds.
Vacla el ostanqus del combustible, haga
arrancar el motor y h_galo funcicoar hasta
Mangode4 qua las lineas del combustible y el osrburador
reco_edofqueden vaolos. La prbxima tamporada use
de c6sped combustible nuevo. Vea las instrucoiones para
El Almacenamianto para rnds informaci6n.
Nunca usa productos de limpieza para el
motor o para el carburador en el estanque del
Mango de
la bolsa
combustible puas se puedan producir da_os
p_r_anentes.
ECAUCI(3N: Llane basra la parta inferior
del cuello de reHeno dol astanque de gasolina.
No Io liana damasiado. Limpia el aosite o el
ANTES DE HACER ARRANCAR EL
combustible darramado. No almaosna,
MOTOR
darrame o usa gasolina osrca de una llama
AGREGUE ACEITE
axpuesta.
Su segadora fue enviada sLnacaita sn el
motor. El motor pueda contanar 20 oz. de
deposito de la
acelte. Para el tipo y la calidad vea =MOTOR"
gasolina
en la secoibn de las Mantenimiento enasta
manual.
1. Asegt_resa qua la sagadora astd nivalada
y qua el drea elrededor dal dap6sito de
aceite est6 limpia.
2. Remueva la tapa del dep6sito de aosita del
motor y rellane hasta la Ifnea de llano an
_
Tapa de1
dsta, Vacfe el acoita lentamiente. No Io liens
damasiado.
Tapa del
AVISO: Permita que el aceite sa aciante bian
degos_t
aceite del motor
_. I1_ I_ll_
en el motor para una lectura exacta. Para leer
el nival apropiado, apnata la tapa del retiano
del aceite de motor, ramuevala para leer la
varilla rnedidora del aceite.
PARA HACER ARRANCAR
EL MOTOR
3. Vualva a instatar la tapa del depbsito del
NOTA: Dabido a los capas protectoras del
aosita y apd6teIa.
motor, una cantidad pequaha de humo puede
• Revise el nivel del aceite antes de cada uso.
estar presanta duranta el uso iniciel dol
Agregue aceite si es necesado. Uena hasta
producto y se debe considorar normal.
?aIfnsa de llano en la varilla indicadora de
1, Para haosr arranoar un motor frfo, smpujs
nivel.
el cebador tres (3) veces antes de tratado.
• Cambia el aceite despu6s de 25 horas de
Usa un ampuje firmamente. Este paso
oparack_'_o una vez por tamporada. Puede
normalmante no as necesado coando sa
necssitar cambiar el aosite rnds a menudo
haca armncar un motor qua ya ha astado
cuando las condicionas son golvorosas o
funcionando pot onos cuantos minutos.
sucias.
2, Sujata la barra de control qua axiga la
AGREGUE GASOLINA
prosancia del operador abajo an el mango.
3. Gira la Ilava para el arranqua al_ctdco an
• Llene el estanqua de combustible. Usa
el santido de las manillas dal relcj para
gasolina regular, sin plomo, nueva y limpLa
haosr arrancar el motor.
con el minimo de 87 octanos. (El uso de
24
CONSEJOS PARA SEGAR Y ACOLCHAR
IMPORTANTE: Para obtener el mejor
rendimeinto mantenga la caja de la segador a
sin acumlacion de cesped y bosura. Vea
"LIMPIEZA" en seccion de Mantenirnento de
eete manual.
• La cuehilla acelchadora especial va a vo]ver
a cotter los recortes de c_sded touches
veces, y los reduce en tamel_o, de modo
que si se caen en el c6sped se van s
dispesar entre 6ste y no se van a notar.
Tambi6n, el c6sped acolchado se va a
deshacer r&pidamente entregando
substancias nutdtivas pars el c6specl.
Siempre acolche con la velcoidad del motor
(cuchiUa) rods elta, puss asl ee obtendrd la
mejor acoi6n de recorte de/as cuchiltas.
• Evite cortar el c6sped coande est6 rnojado.
El c_sped mojado tiende a formar montonos
e interfiere con la acoibn de acelchado. La
mejor hora pars segar el c_sped es
temprano en Is tarde. A sea hora _ste se ha
secado y el Area reci6n cortada no quedard
expuosta al sol directo.
• Pars obtener los mejores resultados, ajuste
la eltura del corte de la segadora de modo
que 6eta corte sc4amente el tercio superior
de las hojas de c_sped. En el case de que
el c6sped haya erecido demesiado, puede
ser neossario el elevar fa altura del torte
para reducir el esfuerzo necesado para
empujar la segadora y para evitar
sobrecargar el motor, dejando montones de
recortes de c6sped. Pars un acolchamiento
muy pesado, reduzca el ancho det torte
pasando per encJma del lugar antedormente
eortado y siegue lentamente.
• Ciertos tipos de c_sped y sue condiciones
pueden exigir que un &rea tenga qua ser
acolchsda por seguncla vez para esconder
completamente los recortes. Cuando se
hags el segundo code, siegue atravesado o
en forma perpendicular a la pasada del
primer corte.
• Cambie su patrbn de corte de semana a
sernane. Siegue de node a sur una eemana
y luego cambie de este a oeste la prbxima
semana. Esto evitarb que el c6sped se
enrede y cambie de direco_bn.
IMPORTANTE:
No hags arrancar el motor
rods de 5 segundos eontinuados. Espere 5 s
10 segundos entre cada vez que irate de
hacedo arracoar.
1. Para hacer arrancar et motor osando la
manilla del arrancador auxiliar, siga los
pasos anterlores. Intercambie el oso de la
Ilave del arranque el_ctrico por el cord6n
arrancedor. Tire la manilla arranosdora
rbpidamente. No permits que el corden
arrancador se devuelva abruptamente.
PARA PARAR EL MOTOR
• Pars parar el motor, suelte la barra de
control que exige la presencia del operedor.
AV|SO: En climes rods fr|os puede que sea
necesarlo repetir los pasos del cebado. En
climes m_ts oslurosos el ceber demasiado
puede producir el ahogo y el motor no va a
arrancar. Si se ahoga el motor espere unos
cuantos minutes antes de tretar de hacedo
arrancar y no repita los pasos del cebado.
CONSEJOS PAPA SEGAR
• Bajo clertos condMones, tel como c6spe_
muy alto, puede ser necesar_o el elevar ta
altura del corte pars reduclr el esfuerzo
necesado para empujar la segadora y pars
evitar sobmcargar el motor, dejando
montones de recortes de c6sped. Puede
que sea neossade reducir la velocidad del
recorrido y/o haga funcioner la segedora
sobre el drea por segunda vez.
• Pars un corte muy pesado, reduzca el
ancho del corte pasando parcialmente por
encirna del lugar antedormente cortado y
siegue ]entamente.
• Pars un rnejor ensacade del e_sped y para
la mayoda de las osndiciones de code, la
velcoidad del motor debe ajustarse a la
po_c)bn de r_pido.
• Cuando use una segadora con descarga
trasera en e6sped h0medo y pesado, tos
montones del c6sped cortado puede qua no
entrenen el recogedor de c6spsd. Reduzca
la velocided del recorrido (velocided de
empuje) y/o haga funcionar la segsdora
sobre el drea pot segunda vez.
• Si queda una huella de cortes en el lado
derecho de una segadora con doscarga
trasem, elegue en IS direcci6n en que giran
tas manillas del reloj, solapsndo un poco
pars recaudar los recortes en la prbxima
pasada.
• Los poros en los recogedores de c6sped
de tela pueden Ilenarse con mugre y delvo
con el uco y los recogedores recaudar_n
menos e6sded. Pars evitar 6sto, rocie el
recogedor con la manguere de agua
regularmente y dejelo secarse antes de
usarlo.
• Mantenga Is parts superior del motor
elrecledor de arranosdor, despejada y sin
_'ecortos de e_sped y paja. Esto ayudard e
flujo del elre del motor y extender,_ su
duraci6n.
Max, 1/3
25
QUE COMPLETE
S
SU SERVlClO
REGULAR
I UmpiarAnspec_onar
Revtsat si ha)* su_etadom$
sueltos de
el recoGedor
c_sped (si viene equipado)
/_
_ _'_
i_
I1_
Ll_ar
D
sadas Ise_jadoras con F_oderpropu_r)
Ro_,sarlascormasyl
Lspeleasim
_Revisar c4afilar/camblar la cuchilla
nA
Tael,
_"
I_
flt/
(segador_
d_bajo de la
conpo_er
cubl_rta de
propul_)
la tra_-
G
_'_'_0_
1/
i/
_
:}
v'
d_ lubricac_l
Urn_ la baterfe/recargar
(segador_conarranque
_ctr_o)
I_
M
Re'_'_ar el nivel del aceit e
O
Cambiarelaceieldelmotor
Umpiarel f_trodeaim
If1.2
Ik_2
Inspecc_onar
Limpero/camblar
elsilenciador
]a bujls
ik/
t/
Cambiar el ca,lucho de papel del fl_o
de a]re
1_'2
v"
; _4
_4
1 - C,Bml_r n_ 8 n_
cu_
e*eo_
bajo car_ p_
o en _MttN
¢O_1altas t_e_.
2 - Dar servi_o m_s a menu,d_cuardo _e opera _ CondK:_nes SUdM o po/voro_.
3 - Camble I_ cud_ffu m_ a _
cua_xlosh_JUeen terr_
_.
4 - Cargar po_48 hoa_ _dr,_nde I_ temp_a_a.
TABLA DE LUBRICACK_N
RECOMENDACIONES
GENERALES
La garantia de esta segadora no cubre los
artfculos que han estado sujetos al abuso o a
la nogligencia del operador, Para recibirtodo el
valor de la garanfla, el operador tiene que
mantener la segadora segt_n las instrucoiones
descritas an este manual.
Hay algunos ajustes que se tianan que hacer
en forma peribdica para poder mantaner su
unidad edecuadamante.
Todos los ajustes an la secoibn de Servicio y
Ajustes de este manual tienen que ser
revisados por Io menos un vez por cada
temporada,
• Una vez al afio, c_mbie la bujfa, limpie o
cambie et elemanto del filtro de aire y revise
si la cuchilla estd desgastada. Una buj|a
nueva y un elemento del fi)tro de aim limpio/
nuevo aseguran la mezcla de airecombustible edecuada y ayudan a que su
motor funcione mejor y que dure mds.
• Siga el programa de mantenimiento an este
manuel,
ANTES DE CADA USO
1. Revise el nivel det aceite del motor.
2. Revise si hay sujetadores sueltos.
LUBR]CACI(_N
Mantanga la unidad bien lubricada (vea la
_/ABLA DE LUBRICACI(_N").
(_) Puntal de
resorte del
freno
del motor
Bisagre de
la puede
traser
(_) Clavija de montaje del puntal del mango
(D Rocle el lubricante
(_ Vea"MOTOR" en la section de Manterllmkmto
26
IMPORTANTE: No aceite o engrase los
rodamientos de ta rueda de plaslJco. Los
lubdcantes viscosos atearan polvo y
mugre, Io acortare la duracion de los
rodamiantos autolubricantes. Si cree que
tienen que lubricarse, use Iosamante un
lubdcante tipo creflto, de polvo seco, en
forme moderada.
ESPEClFICACIONES
NUMERO
FECHA
DEL PRODUCTO
DE SERIE:
DE COMPRA:
CAPACIDAD
Y TIPO DE GASOLINA:
TIPO DE ACEITE (API-SF-SJ):
CAPAClDAD
DE ACEITE:
1.5 CUARTOS
IREGULAR
SAE 30 Isobre
20 ONZAS
32°F);SAE
BUJIA IABERTURA:
.045")
CHAMPION
TORSION DEL PERNO DE LA CUCHILLA:
SIN PLOMO)
5W-30
(debajo 32°F_
RJ19LM4
35-40 FT. LBS.
• El num6ro del nodelo y el de serie se encuentran en la calcomania adjunta a la parte trasera
de la caja de ta segedora. Debe registrar tanto el num6re de serie come la fecha de compra y
rr_ntengalos en un lugar seguro pare refencia en el futuro.
SEGADORA
Siempre observe las reglas de seguridad
cuando haga el mantanimiento.
LLANTAS
• Mantenga las llantas sin gasoline, acoite o
substanoias qufmicas pare control de
insectos que pueden dariar la goma,
• EV_telos tocones, las piedras, las gdetas
profundes, los objetos arilados y otros
peligros que pueden dariar alas Ilantas.
CUIDADO DE LA CUCHILLA
Para obtener los mejores resultados, la
cuchilla de la segedora tienon que mantanerse
afilada. Cambie la cuchilla doblada o dariada.
PAPA REMOVER LA CUCHILLA
1.
3.
Aseg,',rese de que el borde de salida de
cuchilla (opuesto al borde afilado) est6
hacia ardba hacia et motor.
4, Instale el pemo de la cuchilla con la
arandela de seguddad y la arandela
endurecida en el adaptador de la cuchilla y
el ciguerial.
5. Use un bloque de madera entre la cuchilla
y la osja de la segadora y apriete el pemo
de la cuchilla girdndolo en el sentEdoen
que giran las manillas del reloj.
• La torsi6n para apretar recomendada es de
35 - 40 pies libras,
IMPORTANTE: El pemo de la cuchilla es
clase 8 tratado a calo.
PARA AF]LAR LA CUCHILLA
AVISO: No recomendamos el afilar la cuchilla
- pero si Io hace, aseg,',rese de que quede
balanceada,
Se tiene que tener cuidado de manteneda
balanceada, Una cuchilla que no ectd
balanceada va a producir eventualmente daSo
en la segadora o en el motor.
• La cuchilla puede afilarse con una lima o en
una rueda rectifiosdora. No trate de arilarla
mientr_s se encuentra en la segadora.
• Pare revisar el balance de la cuchilla, clave
un clavo en una viga o en la pared. Deje
alrededor de una pulgada de gn clavo recto
expuesto. Ponga el agujero central de la
cuchilla sobre la osbeza del clavo. Si la
cuchilla estd balanceada debe permaneosr
en ]a posici6n horizontal. Si cualquiera de
los extremos de la cuchilla se mueve hacia
abajo, afile el extremo pesado hasta que
6sta quede balanceada.
Deeconecte el alambre de la bujfa y
pbngalo en donde no pueda entrar en
contacto con dsta.
2. Haga descansar la segadora en su lado.
Aseg_rese que el filtro de aire y que el
carburador queden mirando hacia arriba.
3. Use un bloque de madera entre la cuchilla
y la caja de la segadora para evitar que la
cuchilla gire coando se le quite el perno.
AVlSO: Preteja sos manos con guantes y/o
envuelva la cuchilla con una tela gruesa.
4, Remueva el pemo de la cuchilla girdndolo
en el sentido contrario en que giran las
manillas del reloj.
5. Remueva la cuchilla y los articulos de
ferreterfa edjuntadores (el perno, la
arandela de seguridad y la arandela
endurecida).
AVISO: Remueva el aclaptador de la cochilla y
revise el cobo interior de la ranura del
adaptador de la cuchilla. La ranura tiene qos
ester en buenas condielones para que
ciguenal
funcione en forma adecuada. Cambie el
adaptador si estd da_ado,
PARA CAMBIAR LA CUCHILLA
Cuchilla
1. Ponga el adaptador de la cochilla en el
cigos_al del motor. Asegdrese que la
ranura del adaptador y que el chavetero
de4 cigueSal est6n alineados.
2. Ponga la cuchilla en el adaptador de 6sta
alineando los dos (2) agujeres en la
Pemo
Arandela
cuchilla con las salientas elevadas en el
de la endurecida
adaptador.
27 cuchilla
Borde de sa_k:la Adaptador de la cuchilla
RECOGEDOR DE ClaSPED
• El recogedor de c6sped puede ser rociado
con el agua de la manguera pero Uene que
estar seco cuando se vaya a usar.
• Revise su recogedor de c6sped a menudo
pare verificar si estd daSado o deteriorado.
Se va a desgastar con el uso normal. Si se
necesita cambiar el recogedor, cdmbielo
solamente por uno que sea aprobado por el
fabdcante. D_ el ndmero del modelo de la
segadora cuando Io ordene.
RUEDAS DE IMPULSION
Revise las ruedas de impulsion delanteras
cada vez antes de esgar, pare asegurarse de
que se muevsn libremente.
Si les ruedas no giran libmmente quiere deck
qus hay basum, recortes de c6sped, etc. en el
&rea de las medas de impulsi6n y tienen que
limpiarse para liberadas.
Es necesario limpiar las medas de impulsi6n;
revise ambes rusdas delanteras.
1. Rsmueva los tapacubes, ias clavijas de
horquilla y las arandeles.
2. Remueva las ruedas de los ajustadoms de
las ruedas.
3. Remueva la basura y los recortes de
c6sped de dsntro de la cubierta contra el
polvo, piS(_ny/o de los disntes de los
engranajes de las medes de impulsi6n.
4. Ponga las medas de vuslta on su lugar.
AVISO: Si despu6s de limpiar las ruedas de
impulsi6n no giran librernente, p_gase en
contacto con su centre de servicio Sears o
con un otro centro de servicio cualificado.
CAJA DE ENGRANAJES
• Para mantener el sistema de impulsibn
funcionando en forma adecuada, la caja de
engranajes y el drea alredeclor de la
impulsi6n tienen que mantensrse limpias y
sin acumulacl6n de basura. Umpie debajo
de la cublerta de la impulsi6n dos veces por
temporada.
• La caja de engranajes ss Ilena con
lubricante haste el nivel adecuado en la
fdbrica. La dnica vez qua el lubricants
necesita atencibn es cuando se le ha
prestado servicio ala caja de engranajes.
• Si se necesita lubricante, use solaments
Grasa Texaco Starplex Premium 1, Parts
No. 750369. No use substitutos.
MOTOR
LUBRICACI_N
Use solamente acsite de detergents de alta
calidad clasificado con la clasificac;bn SF-SJ
de servicio API. Seleccione la calidad de
viscosidad SAE segdn su temperatura de
operaci6n espemda.
CALIDADES
DE VI_COSIDAD
AVISO: A peesr de que los aceites de
multiviscosidad (5W30, 10W30, etc.) mejoran
el arranque en clima frlo, estos aceites de
multiviscosidad van ha aumentar el consumo
de eceits cuando se usan en temperatures
sobre 32* F. Revise el nivel del eceite del
motor mds a menudo, pare evitar on pesib_e
daSo sn el motor, dobido a que no tiene
suficiente acoite.
Cambie el eceite despu6s de 25 bores de
opemci6n o p_r Io menos una vez al argosi la
esgadora es utilize menos 25 horas el a_o.
Revise el nivel del aceite del cdrter antes de
arranoar el motor y despu6s de esda cinco (5)
bores de uso continuado. Apdete el tape'1 del
eceite en forrna segura cada vez que revise el
nivel del aceite.
PARA CAMBIAR EL ACEITE DEL MOTOR
AVISO: Antes de incliner la segadora pare
drenar el eceite, drone el tanque de combustible haciondo onrrer el motor haste que el
tanque est6 vacio.
1. Desonnecte el alambre de la bujla y
pbngalo de modo que no puecla sntrar en
contecto con 6sta.
2. Rsmueva la tape del dep6s_todel ecelte;
d_jela a un lado en una superficie Iimpia.
3. Incline la cortadora de c6sped por este
costado tel como se moestra y purgue el
aceite en un recipients id<_eo. Mueva la
ssgadora de atrds para adelante pare
remover todo el eceite que se haya
quedado atrapado dentro dsl motor.
4. Limpie todo el eceite dsrrsmado en la
segadora yen el ledo del motor.
5. Rellene el motor con eceits. (Vsa _PARA
AGREGAR EL ACEITE" en la secck_nde
Operactbn de este manual.)
6. Vuslva a conecter el alambre de la bujla a
6sta.
DE
28
FILTRO DE AIRE
Su motor puede sufrir averlas y funcionar de
manera incorrecta con un filtro del airs sucio.
Sustituir el papel del cartucho una vez al a_o o
tras 100 horas de funcionamiento, m;_sa
menudo si se utiliza en condiciones de
suciedad y polvo particutares. No lave el fi]tro
de aJre.
PAPA CAMBIAR EL FILTRO DE AIRE
SILENCIADOR
Inspeccione y cambie el silenciador si estd
corro[do puede producir un peligro de
incendio y/o daho.
BUJiA
1. Remueva el filtro de airs girdndolo en el
sentido en que girela de las manillas del
re=ojpara apretada, hasta el tope, y retfrelo
del collar.
2. Remueva el filtro de la parts interior de la
cubierta.
3. Umpie la parte intedor de la cubierta y el
collar para remover toda acumulaci_n de
mugre.
4. Inserte el filtro nuevo en la cubierta.
5. Ponga la cubierta del filtrode airs dentro
del collar alineando la oreja con la ranura.
6. Empuje la cubierta hacia adentro y glrela
en e_sentido contrario de las mani,as del
reloj para apretarla.
C_lar
Abraza_
Gim en el sentido alas rnanillas del
mlo]par8
remover
F_x8
Fi_trode aim
Cubierta del flltro de aire
Gire en
)1 sentido
contrario las manillas
del reloj para apre_ar
29
Cambie las bujfas al comienzo de cada
temporada de siega o despuds de cada 100
horas de operaci_n, Io que suceda pdmero. El
tipo de bujla y el ajuste de la abertura
aparecen en =ESPECIFICACIONES DEL
PRODUCTO" secck_._de este manual.
LIMPIEZA
IMPORTANTE: Pare obtener el mejor
rendimiento, mantenga la caja de la segadora
sm acumulacion de cesped y basura. Limpin la
parts de abajo de su segadora despues de
cada uso.
_PRECAUCl6N:
Desconecte et alambre de
la bujla y p6ngalo en donde no pueda entrar
en contacto con 6sta.
• Limpie la parte inferior de su segadora
raspdndola para remover la acumulacibn de
c_sped y basura.
• Limpie el motor a menudo para evitar que
se acumule la basura. Un motor tapado
func[ona mds caliente y as acorta su
duraci6n.
• Mantenga las superficies pulidas y [as
ruedas sin gasolina, aceite, etc.
• No recomendamos el uso de una manguera
de jardin para I[mpiar la segadora a menos
que el sistema eldctdco, el silenciador, e]
filtro de aire y et carburador est6n tapados
para evitar qua les entre el ague. El agua en
el motor puede acortar la durack_n de 6ste.
LIMPIE DEBAJO DE LA CUBIERTA DE LA
IMPULSI()N
Limpie debajo de la cubierta de la impulsi6n
por Io menos dos races cads temporada.
Rasps debajo de la cubierta con un cuchil]o
para masilla o con una herramienta parecida,
pare remover toda acumulaci6n de c_sped o
basura en la parte inferior de la cubierta de la
impulsi6n.
=_.PRECAUCI(_N: Antes de dar calquier
se_'ico o de hacer ajustes:
1. Suelte la barra de control y pare el motor.
2. Asegbmse que la cuchilla y que todas las
partes movibles se hayan detanido
completamente.
3. Desconecte el atambre de la bujfa y
p_ngslo en donde no pueda entrar en
contacto con dsta.
SEGADORA
PARA AJUSTAR LA ALTURA DE CORTE
Vea "PAPA AJUSTAR LA ALTUPA DE
CORTE" en la secoi6n de Operaci6n de este
manual.
DESV|ADOR TRASERO
Se pmbomicoa un desviador trasero, adjunto
entre las ruedas traseres de su segadora,
pars redcoir a un rnlnimo la posibilidad que
objetos sean lanzados hacla afuera de la parte
trasera de la segadom, en la bosicibn en
donde se encuentra el opersdor. Si se da_a el
desviador debe c.ambiarse.
PARA REMOVER/CAMBIAR
LA CORRPA
DE IMPULSI(_N
1. Remueva ta cubierta de la impulsibn.
Rernueva la correa empujando hacia abajo
en la bOles de la caja de engranajes.
2 Haga descansar la segadora en su lado
con el filtro de sire y el carburador mirando
hacia arriba.
3. Remueva la cuchilla.
4. Remueva la defensa en contra del
desperdicio.
5. Rernueva la correa de la bOlea del motor
en el ciguei_aL
6. Instale la correa nueva siguiendo los
pasos anteriores en el ordan inverso.
7. Siempre use ta correa aprobada bOr la
f_bdca para esegurarse que calce y dure.
Manillade
mango
Manals
dernango
PARA MONTAR Y ADJUNTAR EL
RECOGEDOR DE ClaSPED
1. Ponga el bastJdordel recogedor de c6sped
en la bolss del c6sped con la parts dgida
de la bolsa en la parts inferior. Aseg,3rese
que el mango del bastidor est6 en el
exterior de la parts superior de la bolsa.
2. Deslice los sujetadores de vinilo sobre el
bastidor.
AVISO: Si los sujetadores de vinilo estdn muy
duros, m6talos an agua caliante por algunos
minutos. Si se moja la bolsa, d6jela qus se
seque antes de usada.
_1_PRECAUCl0N:
No haga funcionar su
segadora sin el desviador _e recortes o sin el
recogedor de c6sped, apmbados, en su
lugar. Nunca trste de operar la segadom
cuando se ha removido la puerta trssera o
cuando estd un poco abierta.
Cubieda de
la impulsion
Correa
I_tstidordel
r
PARA AJUSTAR EL MANGO
El mango superior quede ser ajustado a
cuatro (4) distintes po_icinoes de altura.
1. Afloje ambas perillas del mango solamente
bastante para perrni_r que el mango
superior gire a la posiclbn deseada.
2. Apriets arnbas perillas del mango con
seguridad.
Sujetadores
i;
• ,!,! de vinilo
3O
_De_
MOTOR
VELOCIDAD DEL MOTOR
La velOCidaddet motor ha aids ajus_eda en le
fdbdca. No trate de aumentar la velociclad del
motor pues se pueden producir lesiones
pemona_es. Si croe qua el motor estd
funcionando demasiado r_pido o demaslado
lento, Ileve su segadora a mes con SU cantro
de se_vicio Sears o con un sirs cantro de
sewicio cuaSflcado.
CARBURADOR
Su cai'burador tiene un chorro principal fijo no
ajustable pare controlar la mezda. Si su motor
no estd funcionando en fotma adecuade
debido a pmblemas que se $ospecba vienen
del carburador, Ileve su segadora a contacts
con su centro de servicio Sears o con un sirs
cantro de serviclo cualificado para reparada y/
o ajustarla.
IMPORTANTE: Nunca manipule el regulador
del motor, el qua ha side ajustado en la fdbrica
para la velocidad del motor adecuada. Puede
ser peligroso haosr funcionar el motor e una
velocidad por sobre el ajuste de alta velocidad
de ta _brloa. Si ores qua le ve_cidad alta
regulada del motor necesita ajuste,contacto
con su centre de serviclo Sears o con un otto
centro de sewicLo cuaSfica_o, el qua cuenta
con el equips adecuade y la expedencla pare
hacar los ajustas necasarios.
[nmediatamente prepare su segadera para el
almacenamiento at fir,at de c_da temporeda o
si la unidad no se va a user por 30 dies o
m_s.
SEGADORA
Cuando se va a guarder la segadera por
ciarto periods de tiempo, Ifmpiela
cuidadesarnente, mmueva rode la mugro, la
grasa, las hojas, etc. Gudrdela en un drea
limpia y seca.
1. Limpie toda la segadora (Vea =LIMPIEZA"
en ta secci6n de Mantenimiento de este
manual).
2. Lubrfquela seg0n se muestra en la
secci6n de Mantanimiento de este manual.
3. Aseg_mse de qua tode$ las tueross y
clavijas y todes los pemos y tomillos est6n
apretados en forma segura. Inspeccione
las partes que se mueven pare vedficar si
estdn dafiadas, quebradas o desgastadas.
C_Lmbietesst es nesesafio.
4. Retoque todas las superficies qua est6n
oxidadae o con la pintura picade; use una
Ilia antes de pintar.
MANGO
Puede doblar el mango de su segedora para el
almacanamiento.
1. Apnete los extremos inferiores del mango
infedor entre s| haste qua el mango inferior
quads separado del puntal del mango,
loego mu6valo hacia adelante,
2. Suelte los pemos de montaje del mango
superior Io sufioiente como pare permltir
clue el mango superior se pueda doblar
hacta atrds.
IMPORTANTE: Cuando doble et mango para
el almacenamiento o el transports, aaegt_rese
qua lo doble segdn se muestra o purde deodar
los cables de control.
• Cuande prepare sus mangos a parer de ta
posici0n de almacanamiento, el mango
infedor automdticaments se asegurard sn la
pos_ci6n para segar.
\
Apdeteparadoblar
mango
Clavija de horquilla
BarTade controlqua
Doblar
operado_
Mang
Mango
Dob_ar
hacia
atrds
31
MOTOR
SISTEMA DE COMBUSTIBLE
IMPORTANTE: Es importante evitar clue se
formsn depbsitos de goma en partes
fundamentales del sistama de combustible
tales como el carburador, el filtro del combustible, la manguera del €ombustible o an el
estanque derante el almacenamiento. La
expedencia tambi6n indica qus los combustibles mezclados con alcohol (conocido como
gasohol o q_e _ene_ e_arra_o metanot) pueden
atrasr Ilumedad, Io qua conduce ala
separation y ala formacion de acidos duranta
el alm,_cenamlento, La, gasoline acidica puede
da_ar el sistema de combustible de un motor
durante el periodo de almacenamiento.
1. Drane el estanque de combustible.
2. Haga arrancar el moor y d6jelo funcionar
haste qua las Ifneas del combustible y el
carburador estdn vacfos.
• Nunco use los productos pare limpieza del
carburador o del motor en el estanqus de
combustible puss ss pueden pmducir
daSos permanentes.
• Use combustible nuevo la prbxima
temporada.
AVISO: El estab_izador de combustible es una
altemativa aceptable pare reducir a un minimo
la formac_bn de dep6sitos de gorna en el
combustible duranta el perlodo de
almacenamiento. Agregue estabilizador a ]a
gasolina en el estanque de combustible o en el
envase para el aimacenamiento. Siempre siga
la pmpomk_n de mezcla qua se encuentra en
el envase del estabilizador. Haga funcionar el
motor por Io menos 10 minutos despu6s de
agregar el estabitizador, para permitir qua este
Ilegue al carburador. No drene la gasoline det
estanqus de gasolina y el carburador sise
est_ t.mando estabi_ize,dor de combustibte.
ACErFE DEL MOTOR
Drene el aceite (con el motor cattente) y
cdmbielo con aceita de motor limpio. (Vee
=MOTOR" en ta secoibn de Mantenimiento de
es_e mant:_l.)
ClLINDRO
1. Remuava la bujla.
2. Vac|e 29 ml (una _nza) de aceite a tra.v_s
del agujero de la buj(a en el cilindro.
3. Tire lamanina de ananque lantamanta
unas coantas vsces pare clistdbuirel
aceite.
4. Cambis por una bujfa nueva.
BATER|A
Separe la bater|a del conector del motor y
ca_gue la baterla durante 48 horas.
OTROS
• No guarde la gasoline de una temporada a
la otra.
• Cambie el envase de la gasolina s_se
empieza a oxidar. La oxidacibn y/o la mugre
en su gasolina producirdn problemas.
• Si es posibte, guards su _Jnidaden un
recinto cerrado y cdbrala pare pmtegeda
contra el polvo y la mugre.
• Cubra su uW_dad con un forte protector
adecuado qua no retenga la tlumedad. No
use pl_stico. El pldstico no puede reepirar. Io
qus permits la fon'naci6n de condensacibn,
Io que producird la oxldacibn de su unidad.
IMPORTANTE: Nunca cubra la segadora
mientras el motor y las areas de escape to
davia estan calientss.
_PRECAUCI(_N:
Nunca almacens ia
segadora con gasoline an el estanque dentra
de un edificio en donde los gases pueden
a_zar
una llama expuesta o una chiepa.
Permita clue se enfrfe el motor antes de almacanada en algQn recinto cerrado.
32
IDENTIFICACI(_N
PROBLEMA
No arranca
DE PROBLEMAS
CAUSA
CORRECClON
1.
2.
Filtro de aire sucio.
Sin combustible.
1.
2.
3.
Combustible rancio.
3.
4.
Agua en ei combustible.
4.
5.
PJambre de la bujfa
desconectado.
Bujia mala.
Cuchilla suelta o adaptador
de la cuchilla quebrado.
5.
6,
7.
8.
Barra de control on la
posici6n suelta.
9. Barra de control defectuosa.
10. Bater_a ddbi
11. Desconecte el conector
de la baterfa.
Falta de fuerza
1. Cuchllla desgastada, doblada
o suelta.
2.
AItura de las ruedas dispareja.
3.
4.
Velocidad del motor lenta.
Acumulacibn de c_sped,
hojas o basura debajo
de la segadora.
Demasiado aceite en
el motor.
Velocidad de reconido
demasiado r_pida.
5.
6.
Mal corte-
6.
7.
Cambie la bujfa.
Apriete el perno de la cochilla
cambie el adaptador de la
cuchilla.
8. Presione la barra de control
hacia el mango.
9. Cambie la barra de control.
10. Cague la baterfa
11. Conecte la baterfa al motor.
1. Ajuste a la posici6n de =Code
mds alto."
2. Ajuste a la posici6n de =Code
mds alto."
3. Limpie/cambie el firm de aire.
4. Limpie la parte infedor de la
caja de la segadora.
5.
Revise el nivel del aceite.
6.
Corte a una velocidad de
recorddo rnds lenta.
Cambie la cuchilla. Apdete el
pemo de la cochilla.
Ajuste todas las ruedas a la
misma altura.
Limpie la parte infedor de la
caja de la segadora.
1.
Cuchilla desgastada, doblada
o suelta.
1.
2.
Altura de las ruedas dispareja.
2.
3.
Acomulaci6n de c6sped,
hojas o basura debajo
de ta segadora.
3.
dispareJo
33
Limpie/cambie el filtro de aire.
Llene el estanque de combustible.
Drene el estanque y vuelva a
Ilenado con combustible fimpio
y nuevo.
Drene el estanque de combustible y el carburador y vuelva a
Ilenar el estanque con gasolina
nueva.
Conecte el alambre a la bujfa.
IDENTIFICACION
DEPROBLEMAS
PROBLEMA
Vibraci6n
exceslva
CAUSA
1.
Cuchilla desgastada, doblada
o suelta,
Ciguehal del motor doblado,
1. Cambie la cuchilla. Apriete el
pemo de la cuchilla.
2. P6ngase an contacto con su
contro de serviolo Sears o con
un otro cantro de servicio
cualJricado.
El freno del volante del
motor estd aplicado
cuando se suolta la barra de
control,
Ciguerial dol motor doblado.
1. Presione la barra de control
hacia el mango
superior antes de tirar el
cord6n arrancador.
2. POngase an contacto con su
centro de servicio Sears o con
un otto contro de servicio
cualiricado.
Adaptador de la cuchilla
quebrado,
La cuchilla se arrastra en
el c6sped.
3.
Carnbie el adaptador de la
cuchilla.
4.
Mueva la segadora a un lugar
en donde el cdsped ha sido
cortado o a una superflcie firme
para hacor arrancar el motor.
1. Ruedas impulsoras no
dgirancuancloel control
e impulsibn estd
enganchado.
2. La correa no estd
impulcando.
1.
Ajuste o cambie el cable de
control deimpulsi6n, si est_
roto.
2.
Ponga las correas en las
poleas o cdmbiolas
si estdn rotas.
1.
AItura de corte demasiado
haja.
Levantamiento de la cuchilia
desgastado.
Recogodor sin venfilaci6n
de aim.
1.
Eleve la altura de code.
2.
Cambie las cuchiHas.
3.
Limpie el recogedor de cdsped.
El c6sped estd demasiado
alto o la altura de la rueda
demesiado baja.
Parte trasera de la
1.
Eleve la altura de code.
2.
Eleve la parte trasera de la caja
de la segadora (1) un lugar
rods alto.
3.
Vac|e el recogedor de c6sped
4.
Ajuste la altura del mango de
modo que le acomode.
2.
Cord6n
arrancador
dificil de Urar
1.
2,
3.
4,
Pdrdlda de
impulsl6n
Recogedor de
c6sped no se
Ilena (sl vlene
equipado)
2.
3.
Dificil de empujar
CORRECClON
1.
2.
3,
4.
caja/cuchilta de la segadora
arrastrdndose an el c6sped.
Resogedor de c_sped
demasiado Ifeno.
Posicibn de la altura del
mango no adecuada para
usted.
34
CRAFTSMAN
ROTARY
LAWN
MOWER-- MODEL NUMB ER 917.378431
GEAR CASE ASSEMBLY -- PART NUMBER 175258
KEY PART
NO. NO.
1
2
3
4
6
17490416
175248X004
137_o3
57O72
48373
7
8
9
10
11
12
13
14
15
16
17
18
19
77881
137061
175257
57079
131484
700343
86447
137050
7504,36X
75(_69
120(]0(X_
81585XG04
DESCRIPTION
Tapping Screw 1/4-20 x 1-1/4
Engagement Bracket
Shifter
SCeJ
Gear Case Halves Kit
(Includes Key Numbers 4 and 7)
Bearing
Worm Shaft
Ddve Shaft
Hardened Washar
Clutch Yoke
Bushing
Rug
Helical Gear
Clutch Jaw
Grease
E-Ring
Hi*Pro Key
spring Bracket
NOTE: A_ component dimensions given in U.S. inches,
1 inch = 25,4 mm
35
CRAFTSMAN
ROTARY
LAWNMOWER-MODEL
NUMBER
917.378431
- 24
31
35
44
13
28
46
25
CRAFTSMAN ROTARY LAWN MOWER- - MODEL NUMBER 917.378431
KEY
NO.
1
2
3
4
5
6
7
8
9
10
11
12
13
14
15
16
17
18
19
2O
21
22
23
24
25
26
27
28
29
3O
31
3_
34
35
PART
NO.
175391X479
175245)(479
169780
156577
171407
136376
517o_
66426
175794
128415
175G69X479
175070X479
17060410
175576X479
175577X479
175243
175244
132004
153638
178398
88652
85543
87677
- -150406
83_3
17732O
160_28
57143
175574XCO4
161961
175C53X004
63124
175575X2O4
177321
DESCRIPTION
Upper Handle
Lower I-kuldle
ControlBar
Engine Zone Control Cable
Handle Bolt
Handle Knab
Hairpin Cotter
WireTie
Rear Door Kit (Ind. Key #16 & 17)
Pop Rivet
Support Bmcket LH
Support Bracket RH
Screw 14-20 x 5/8
Handle Bracket Assembly (Left)
Handle Bracket Assembly (Right)
Spring LH
Spdng RH
Kabs Locknut 1/4-20
RopeGuide
Rear Skirt
Hinge Screw 1/4-20 x 1-1/4
Engine Pulley
Hi-Pro Key #505
Engine-Cnidts,'nan-Model No. 143.016734
Hex Read Thread Rolling Srew 3/8-16 x 1-1/8
Hex Flange Nut
Whe_
Shoulder Relt 5/16-18 x .33
WaveWasher
Axle Arm Assembly RR
Selector Knob
Selector Spdng
Nut 5/16-18
Axle Ann Assembly LR
Hubcap
KEY
NO.
PART
NO.
DESCRIPTION
36
37
38
43
44
45
46
47
48
49
50
78
79
80
81
82
85
86
87
88
89
90
91
92
9_
---
165912
150078
19112222
175083
176289
85463
851514
175064
851074
_
851084
170954
170953
178574
170955
170956
175551
17411312
175273
750909
175271
141841
175.552
111549X
86353
161058
179_378
Bolt
Threab Cutltng Screw wiSems 5/16-18 x 3/4
Washer
Bottom Bolt Cover
Lawn Mower Housing (Incl. Key #10, 11, 12& 45)
Bonger Deal
SladeAdepter
BIsde21"
Hardened Washer
HelP-..alWasher 3/8-24 x 1-3/8 Gr. 8
Hex Head Machine Screw 3/8-24 x 1-3/8 Gr. 8
Handle Adjuster, Outside, LH
Handle Adjuster, Inside, LH
Handle Adjuster Spring
Handle Adjuster, Inside. RH
Handle Adjuster, Outside. RH
Bolt, Shoulder
Screw, Hex Head
Box, Bottety
Battery
Tdm Plate
Screw
Control Cable (Includes Key)
Charger, BatteP/
Connector, Mounting C_ip
Waming Decal(Not Shewn)
Owner's Manual (English/Spanish)
Available accessories not _lcluded with lawn mower:
-917.33314
Clipping Deflector (Available in Service Dept. only)
-71 33623
Gas Can
*71 33500
Fuel Stabilzer
- 71 33000
SAE 30W Oil (20 oz.)
NOTE: All component dimensions given in U.S. inches.
1 inch ==25.4 mm
CRAFTSMAN ROTARY LAWN MOWER-- MODEL NUMBER 917.378431
11
/
'_,
,';, -..
13
15
14
11
12 13
_--37
CRAFTSMAN ROTARY LAWN MOWER-- MODEL NUMBER 917.378431
KEY PART
NO. NO.
DI_SCRIP'RON
1
3
4
5
6
8
9
11
12
13
14
15
16
18
26
Control Cable Assembly
Locknut #10-24
Hex Washer Head Screw 1/4-20 x 2.12
V-Belt
Spang Retainer
Hubcap
Locknut
Wheel & Tire Assembly
E-Ring
Plaion
Oust COver
FeltWasher
W_sher 1/2 x 1-1/2 x .134
Selector Knob
Pan Head Tapping Screw #10-24 x 2-3/4
145755
751152
158755
175436
150495
175012
145212
150340
12000058
137054
88060
88118
67725
701037
175262
KEY PART
NO. NO.
28
31
32
35
36
37
38
40
41
54
56
57
175065
132010
137(To2
151521
175258
137090
63601
75192
151520
175084
175739
175058
DESCRIPTION
Drive Cover
Hex Flange Nut
Drive Pulley
Wheel Adjuster Assembly (Left)
Gear Case Assembly
Spring
L0cknut 1/4-20
Spheg
Wheel Adjuster Assembly (Right)
Grassbag Assembly
Driveshaft Cover
Frame
NOTE: All component dimensions given in U.S. inches.
1 inch = 25,4 mm
MODEL NUMBER 143.016734
CRAFTSMAN 4-CYCLE ENGINE
/355
-390
4OO
130
120
119
182216
195
19
174
182
185
370c
_
238
81-"
/"z/
250
40
MODEL NUMBER 143.016734
CRAFTSMAN 4-CYCLE ENGINE
KEY
NO.
PART
NO,
1
2
6
7
12
12A
12B
14
15
16
17
18
19
2O
30
40
41
42
43
45
46
48
50
37465
26727
33734
36557
36775
365.58
36694
28277
30689
34839A
31335
651018
36281
3260O
37464
40_7
40042
4O0O6
20_81
36777
32610A
27241
37460
52
69
70
72
75
80
81
82
86
86
89
90
86
9_
134
101
186
104
110
110A
110B
119
120
125
29914
37609
37608
37614
27897
2O574A
3_0A
33591
3To88A
65O488
611004
611150
65_15
65_16
443C
610118
651007
37480
37047
38663
36_o4
36787
36825
36780
126
130
135
150
151
151A
169
172
174
178
1_2
37288
37289
6_1A
37598
31672
31673
40017
36783
36784
302O0
29752
6201
DESCRIPTION
Cylinder (Includes Key #2 & 20)
DoweIPin
Breather Elernent
Breather Ass'y. (Incl. 6 & 12A)
EreatherTube
Breather Cover & Tube (Inol. 12B)
BreatherTube Elbow
Washer
Governor Rod (Includes Key #14)
Governor Lever
GovernorLeverClamp
Screw, T-15,8-32x19/64"
Extension Spring
Oil Seal
Crankshaft
Piston, Pin & Ring Set (Std.)
Piston & Pin Ass'y. (Std.) (Incl. 43)
Ring Set (Std.)
Piston Pin Retaining Ring
Connecting Rod Assly. (Incl. 46)
Connecting Rod Bolt
Valve Lifter
Camshaft Exhaust(MCR)
(Ino_udes Key Number 104)
Oil Purnp Assembly
• MounltngFlangeGasket
Mounting Flenge (Incl. 72 thnJ 83)
Oil Drain Plug
Oil SCal
GovernorShaft
Washer
Governor Gear Assembly (Inc_.81)
Governor Spool
Screw, 1/4-20 x 1-1/4"
Flywhael Key
Rywheel
BollevilleWasher
Flywhaal Nut
Solid State IgniUon
Spark Plug Cover
Screw, T-15, 10-24 x 15/16"
Cam Bushing
Ground W_re
Wire Ass'y
Wire Ass'y
• Cy_iederHeadGasket
Cylinde: Heod
Exhaust Valve (1/32" OS)
(toc_udes KeyNumber 151)
Exhaust Valve (Std.) (Incl. 151 )
Intake Valve (Std.) (Incl. 151 )
Screw, 5/16-18 x 1-1/2"
Resistor Sperk Plug (RJ 19LM4)
Valve Spring
Valve Spring Cap
Intake Valve Seal
• Valve Cover Gasket
Valve Cover
Screw, 10-24 x 9/18"
Nut & Lock Washer, I/4-28
Screw, 1/4-28 x 7/B"
I_-Y
NO.
PART
NO.
DESCRIPTION
184 26756
186 37466
186 32653
189 650831
191 36559
186 610973
207
34336
216
33066
223 650451
224 36786
238 650_2
239
34338
241
36919
245
36905
250
37122
260
36980
261
30200
286
650831
263A 37184
275
37462
277
650868
285
_
287
6509_6
290
29774
292
26460
298 28763
300 36916
301 37656
305 35647
306 37610
307 35499
309 650562
3GOA 650786
310 35648
311A 37611
313 34(_0
314 650767
315 36862
322 35013
322A 610885
325 35249
347 65_38
370A 36261
370C 37318
37G_1 37317
380
640271
390
590739
395
35709
400
37613
416
36065
417
900
900
.....
* Carburetor To Intake Pipe Gasket
]ntake Pipe
Governor Link
Screw. 1/4-20 x 1/2"
S.E. Brake Bracket (Includes #195)
Tsmltnal
Throttle Link
R.P.M. Adjusting Lever
Screw, 1/4-20 x 1"
Intake Pipe Gasket
Screw, 10-32 x 49/64"
* AlrCleanerGasket
AJrCleanerCollar
Air Cleaner Filter
AirCleaner Cover
BlowerHousing
Screw, 1 0-24 x 9/16"
Screw, 1/4-20 x 1/2"
Starter Grill
Muffler
Screw, 1/4-20 x 2-5/16"
Starter Cup
Screw, 8-32 x 21/64"
FuelLine
FuelLine Clamp
Screw, 10-32 x 35/64"
Fuel Tank (Includes #292 & 301 )
Fuel Cap Assembly
Oil FiltTube
" =O-Ring
=O*P,ing
Screw, 10-32 x 1/2"
Screw, 10-24 x 3/4"
Dipstisk
Hold Down Bracket
Spacer
Lockwasher & Screw 6-32 x 27/64"
Ccil
BodyConnector
Body Connector
Spring Clip
Screw, 10-32 x 51/64"
Lub r_.ation Decal
Primer Decal (3 X)
Warning Decal
Carburetor(Inc]odesKeyNo.
184)
RewindStarter
Electric Motor
Gasket Set (Incl. items Marked*)
Spark Arrestor Kit (Opitonal)
(includes Key Number 417)
650760
Screw, 8-32 x 5/8" (Optional)
750865
Replacement S/B order from 71-999
750867A
Rep. Engine order from 71-999
RPM High 2900 to 3200
NOTE: This engine could have been built with 590702
starter.
NOTE: All component dimensions given in U.S. inches
1 inch = 25.4 mm
41
MODEL NUMBER 143,016734
CRAFTSMAN 4-CYCLE ENGINE
K_'Y
NO.
PART
NO.
--
640271
1
2
4
5
6
7
16
17
18
20
20A
25
27
28
29
30
31
35
36
36A
37
40
44
47
48
60
(pm_
Carburetor (Includes Key Number
184 of Engine Parts List)
31615
Throttle Shaft & Lever Assembly
31767
Throtlte Return Spr_ng
631184 "Dust Seet Washer
631183 * Dust Seal (Throttle)
640070
Throttle Shutter
650506 * Shutter Screw
631807
Fuet Fitting
651_25
Thro_e Crac!dldle Speed Screw
630766
Tension Spdng
640_o7
Idle Restrtctor Screw
6402(_
Idle Restrietor Scrwe Cap (Black)
631867
Roet Bowl
631024 * F]oet Shaft
6,32019
Fk_t
631028 ° Float Bowl "O" Ring
631021 ° Inlet Needle, Seat, & Clip (IncL 31)
631(_2
SpdngClip
64_.59
P dmer Bulb/Releiner Ring
640_60
Main NozzlaTube
632766
Cart_JretorTube
632547 * 'O" Ring, Mala Nozzle Tube
640030
High Speed Bowl Nut
27110A °BowINut Washer
630748 • Welch Plug, Idle Mixture Welt
631027 * Welch P_ng,Atmospheric Vent
632760B Repair kit (led. Items Marked ° )
KL:Y PART
NO. NO.
8
6\¢
$
11C
-1
2
3
4A
5B
6
7
8
10A
11C
35709
34955
34_o0
34954
34949A
34953
33450
34944
34945
590500
35714
12
13
14
15
16
17
18
34947
34946
34e51
34_?,
34948
34963
590608
42
DESCRIPTION
DESCRIPTION
Electrk: Slerter (12 Volt)
Retainer Ring
Spring Retainer
Spdng
Gear
Drive End Cap Assembly
Lock Nut
Amletu_
Housing ASS_,
Thrust Washar
Commutetor End Cap Assembly
(Indedes br_hes)
Bolt, 10-32 x 3-3/16"
Pink_ Ddver
CapWasher
Retainer Ring
Washer
Drive Nut
Washer
CRAFTSMAN 4-CYCLE ENGINE
MODEL NUMBER 143.016734
KEY PART
NO. NO.
1÷
DESCRIPTION
2
3
4
5
6
7
8
11
59071_
59(ToggA
590600
590696
590601
590697
590698
_
590700
590703
12
13
59_535
590701
ReCOUStarter
Spring Pin (includes Key #4)
Washer
Retainer
Washer
Brake Spdng
Stmler Dog
Dog Spnng
Pulley & Rewind Spring Assembly
Starter Housing Assembly
(40degreegrommet)
Stader Rope ( 98" x 9/64" diameter)
Stader Handle
KEY
NO,
pART
NO,
DESCRIPllON
-3
6
7
8
11
590739
5,90740
590616
5.,°0617
590618A
590638
12
13
14
59(To35
590701
590760
0--2
V--14
_'11
Rewind Statler
Retainer
Stader Dog
Dog Spdng
Pufley & Rewind Spdng Assembly
Stader Housing Assembly
(40 degree grommet)
Stader Rope (98" x 9/64" diameter)
Stader Handle
Swir_j Clip
FOrrepairofmajorbrandappliancesIn your own home...
no matterwhomade it,no matterwho sold
1-800-4-MY-HOME _ AnyUme,
_ayorr_tt
0-_0-4e9-,_)
(U.SAandC,_ada)
Www.see, rs.c_fn
wlMN.seeJr$.c_
Forrepairofcarry-inproductslikevacuums,lawnequipment,and
electronics,callfor the nearestSears Parts and Repair Center.
1-800-488-1222
ArVane,
dayorn_ (U.SAody)
wwwm
Forthe replacementparts,accessoriesand owner'smanuals
thatyou need to do-it-yourself,
callSears PartsDirectS"!
1-800-366-PART
O-a_o-3_q27e)
6am.-11
p.m., 7daysa_k
(U_Ao_y)
To purchaseor inquireabouta SearsServiceAgreement
or Sears MaintenanceAgmemer_
1-600-827-6655 (u.sA)
7 a.m.- 5 p.rn.,CST, Mo_ - Sat.
Parapeal,"
sewicio
demparac_a
d_niciio,y paraordenarpiezas:
1.888.SU.I-IOGAR
s_
(1-888-784-6427)
1-800-361-6665 (Canada)
9 a.m.- 8 p.m.EST, M - F, 4 p.n,,.Sat.
AuCanada
pour
se_beenfr'_:
1.e004JE-FOYI_RMc
'4W_N.Se_S.Ca
© Seazs,
Roeduck
andCO.
® Registered Trademark / na Trademark I su Service Mark of Seam, Roebuck and Co.
® Marca Registreda / TMMama de F_bdca I su Mama de Serviclo de Sears, Roebuck and CO.
uc Marque de commerce / uo Marque d6pos6e de Sears, Roebuck and Co.
179378 05.03.01 BY
Printed in U.S.A.