1
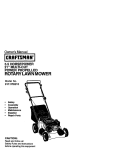
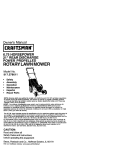
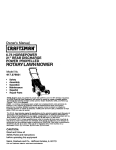
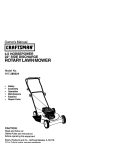
-Owner's Manual
ICRAFTSMBN'I
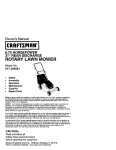
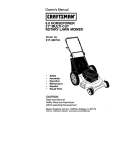
6.0 HORSEPOWER
21" MULTI-CUT
ROTARY LAWN MOWER
Model No.
917.389621
•
•
•
•
•
•
Safety
Assembly
Operation
Maintenance
Espa_ol
Repair Parts
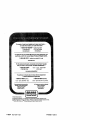
NOTE: Engines which are certified to comp/y with California and U.S. EPA emission regulations
for SORE (Small Off Road Equipment), are certified to operate on regular unleaded gasoline, and
include the following emission control systems: Engine Modification (EM), and Three-way
Catalyst (TWC) (if so equipped).
AVISO: Los motores homologados para cumplir con la rnglamentaci6n sobre emisiones de
California y de la Agenda de proteccibn Ambtental estadounidense (EPA) para equipos
pequei_os no circulantes (SORE) funciooan con gasolina normal sin plomo, e incluyen los
siguientes sistemas de control de emislones: medificacibn del motor (EM) y catalizador de triple
accibn (TWC) (en caso de tenet!o).
The D.O,M. decal includes engine life specifications for the emissions-related useful life period of
your engine. This peded relates to the emission compliance life as certified by EPNCARI_ To
find the/ife period specification for your engine, please match one of the following letters with the
letter pdnted on your D.O.M. decal: (C) 125 hours, (B) 250 hours, (A) 500 hours.
La calcoman|a D.O.M. induye espectiicaciones sobre la duraci6n del motor pars el perfedo de
vida ,',tilde su motor relaeJ'.,lonedo
con emisiones. Este perledo se relaciona con la dursck_n en
confownided con las emisiones segOn Io cert_cado por EPA/CARB. Pars hallar la especiflcacibn
del pedodo de vida de su motor, mire oudl de las siguientes letres viene impresa en su
calcomanla D.O.M,: (C) 125 horas, (B) 250 hares, (A) 500 horas.
CAUTION:
Read and follow all
Safety Rules and Instructions
before operating this equipment
Sears, Roebuck and Co, Hoffman Estates, IL 60179
Visit our Craftsman website: www sears.condcraftsman
Warranty ............................................... 2
Safety Rules ......................................... 2
Assembly .............................................. 5
Operation .............................................. 6
Maintenance Schedule ...................... 10
Maintenance ....................................... 10
Product Specifications........................ 11
Service and Adjustments .................... 13
Storage ............................................... 14
Troubleshooting ................................. 16
Repair Parts ........................................ 34
Parts Ordedng ..................... Back Cover
LIMITED TWO YEAR WARRANTY ON CRAFTSMAN POWER MOWER
For two years from date of purchase, when this Craftsman Lawn Mower is maintained,
lubricated, and tuned up according to the operating and maintenance instructionsin
the owner's manual, Sears will repair flee of charge any defect in matsdal or workmanship.
If this Craftsman Lawn Mower is used for commercial or rental purposes, this warranty
applies for only 90 days from the date of purchase.
This Warranty does not cover:
• Expendable items which become worn during normal use, such as rotary mower
blades, blade adapters, belts, air cleaners and spark plug.
• Repairs necessary because of operator abuse or negligence, including bent
crankshafts and the failure to maintain the equipment according to the instructions
contained in the owner's manual.
Warranty service is available by returning the Craftsman power mower to the nearest
Sears Service CenterlDepartment in the United States. This warranty applies only
while this product is in use in the United States.
This Warranty gives you specific legal dghts, and you may also have other dghts which
vary from state to state.
Seers, Roebuck and Co., D/817 WA, Hoffman Estates, Illinois 60179
IMPORTANT: This cutting machine is capable of amputating hands and feet and
throwing objects. Failure to observe the following safety instructions could result in
sedous injury or death.
• Be sure the area is clear of other
I.GENERAL OPERATION
people before mowing. Stop machine if
• Read, understand, and follow all
anyone enters the area.
instructionson the machine and in the
• Do not operate the mower when
manual(s) before starting. Be thorbarefoot or weedng open sandals.
oughly familiar with the controls and the
Always wear substantial foot wear.
proper use of the machine before
• Do not pull mower backwards unless
starting.
absolutely necessary. Always look
• Do not put hands or feet near or under
down and behind before and while
rotating parts. Keep clear of the
moving backwards.
discharge opening at all times.
• Do not operate the mower without
• Only allow responsible individuals, who
proper guards, plates, grass catcher or
are familiar with the instructions, to
other safety protective devices in
operate the machine.
place.
• See manufacturer's instructionsfor
• Clear the area of objects such as rocks,
proper operation and installation of
toys, wire, bones, sticks, etc., which
eccessodes. Only use accessories
could be picked up and thrown by the
blade.
2 approved by the manufacturer.
• Stop the blade(s) when crossing gravel
ddves, walks, or roads.
• Stop the engine (motor) whenever you
leave the equipment, before cleaning
the mower or unclogging the chute.
• Shut the engine (motor) off and wait
until the blade comes to complete stop
before removing grass catcher.
• Mow only in daylight or good artificial
light.
• Do not operate the machine while
under the influence of alcohol or drugs.
• Never operate machine in wet grass.
Always be sure of your footing: keep e
firm hold on the handle and walk; never
• Keep children out of the trimming area
and under the watchful care of another
responsible adult.
• Be alert and turn machine off if children
enter the area.
• Before and while walking backwards,
look behind and down for small
children.
• Never allow children to operate the
machine.
• Use extra care when approaching blind
comers, shrubs, trees, or other objects
that may obscure vision.
IV. SERVICE
• Use extra care in handling gasoline
run.
and other fuels. They are flammable
• Disengage the self-propelled mechaand vapors are explosive.
nism or drive clutch on mowers so
-Use only an approved container.
equipped before starting the engine
-Never remove gas cap or add fuel
(motor).
with the engine running. Allow
• If the equipment should start to vibrate
engine to cool before refueling. Do
abnormally, stop the engine (motor)
not smoke.
and check immediately for the cause.
-Never refuel the machine indoors.
Vibration is generally a warning of
-Never store the machine or fuel
trouble.
container inside where there is an
• Always wear safety goggles or safety
open flame, such as a water heater.
glasses with side shields when
• Never run a machine inside a closed
operating mower.
area.
I1. SLOPE OPERATION
• Never make adjustments or repairs with
the engine (motor) running. Disconnect
Slopes are a major factor related to slip
the spark plug wire, and keep the wire
and fall accidents which can result in
away from the plug to prevent accidensevere injury. All slopes require extra
tal starting.
caution. If you feel uneasy on a slope, do
• Keep nuts and bolts, especially blade
not mow it.
attachment bolts, tight and keep
DO:
equipment in good condition.
• Mow across the face of slopes: never
• Never tamper with safety devices.
up and down. Exercise extreme caution
Check their proper operation regularly.
when changing direction on slopes.
• Keep machine free of grass, leaves, or
• Remove obstacles such as rocks, tree
other debris build-up. Clean oil or fuel
limbs, etc.
spillage. Allow machine to cool before
• Watch for holes, ruts, or bumps. Tall
storing.
grass can hide obstacles.
• Stop and inspect the equipment if you
DO NOT:
stdke an object. Repair, if necessary,
• Do not trim near drop-offs, ditches or
before restarting.
embankments. The operator could lose
• Never attempt to make wheel height
footing or balance.
adjustments while the engine (motor) is
• Do not trim excessively steep slopes.
running.
• Do not mow on wet grass. Reduced
• Grass catcher components are subject
footing could cause slipping.
to wear, damage, and deterioration,
which could expose moving parts or
III. CHILDREN
allow objects to be thrown. Frequently
Tragic accidents can occur if the operator
check components and replace with
is not alert to the presence of children.
manufacturer's recommended parts,
Children are often attracted to the
when necassan/.
machine and the mowing activity. Never
• Mower blades are sharp and can cuL
assume that children will remain where
Wrap the blade(s) or wear gloves, and
you last saw them.
use extra caution when servicing them.
• Do not change the engine governor
3
setting or overspeed the engine.
• A_J_ookfor this symbol to point out
important safety precautions. It means
CAUTION!!] BECOMEALERT!!! YOUR
SAFETY IS INVOLVED.
A CAUTION: In order to prevent
accidental starting when setting up,
transporting, adjusting or making repairs,
always disconnect spark plug wire and
place wire where it cannot contact spark
plug.
_WARNING: Engine exhaust, some of its
constituents, and certain vehicle
components contain or emit chemicals
known to the State of Califemia to cause
cancer and birth defects or other
reproductive harm.
AWARNING: Battery posts, terminals and
related accessories contain lead and lead
compounds, chemicals known to the State
of Califomia to cause cancer and birth
defects or other reproductive harm. Wash
hands after handling.
CAUTION: Muffler and other engine
parts become extremely hot dudng
operation and remain hot after engine
has stopped. To avoid severe burns on
contact, stay away from these areas.
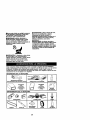
These accessories were available when this lawn mower was produced. They are not
shipped with your mower. They are also available at most Sears retail outletsand
service centers. Most Sears stores can also order repair parts for you, when you
provide the model number of your lawn mower. Some of these accessories may not
apply to your lawn mower.
LAWN MOWER PERFORMANCE
CLIPPING DEFLECTOR
FOR REAR DISCHARGE LAWN MOWERS
MULCHERK_S
FOR
REAR DISCHARGE
GRASS
LAWN CATCHERS
MOWERS
STABILIZER
FOR
SiDE DISCHARGE
GRASS
LAWN CATCHERS
MOWERS
GAS CANS
LAWN MOWER MAINTENANCE
MUFFLERS
BELTS
SPARK PLUGS
AIR FILTERS
BLADES
BLADE ADAPTERS
4
WHEEL
ENGINE OIL
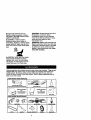
Read these instructions and this manual in
its entirety before you attempt to assemble
or operate your now lawn mower.
IMPORTANT: This lawn mower is shipped
WITHOUT OIL OR GASOLINE in the
engine.
Your now lawn mower has been assembled at the factory with the exception
of those parts left unassembled for
shipping purposes. All parts such as nuts,
washers, bolts, etc., necessary to complete
the assembly have been placed in the
parts bag. To ensure safe and proper
operation of your lawn mower, all parts
and hardware you assemble must be
tightened securely. Use the correct tools as
necessary to ensure proper tightness.
TO REMOVE
3. Remove any packing material from
around control bar.
Your handles may be adjusted for your
mowing comfort. Refer to Service and
Adjustments section of this manual.
Operator presence
control bar
Upper handle
Lift up
Mowing
Lower handle
LAWN MOWER FROM
CARTON
1. Remove loose parts included with
Handle pin
mower.
2. Cut down two end comers of carton
and lay end panel down flat.
3. Remove all packing materials except
padding between upper and lower
handle and padding holding operator
presence control bar to upper handle.
4. Roll lawn mower out of carton and
check carton thorougly for additional
loose parts.
3-Position
handle adjustment
bracket
HOWTO SET UPYOUR LAWN
MOWER
TO UNFOLD HANDLE
IMPORTANT: Unfold handle cerefufly so
as not to pinch or damage conh*olcab|es.
1. Raise lower handle section to operating position and squeeze the bottom
ends of lower handle towards each
other until the pin in handle can be
inserted into one of the three height
adjustment holes.
2. Remove protective padding, raise
upper handle section into place on
lower handle and tighten both handle
knobs.
J
TO INSTALL ATTACHMENTS
Your lawn mower was shipped ready to
be used as a mulcher. To convert to
bagging or discharging, see "To convert
mower = in the OPERATION section of this
manual.
5
KNOW YOUR LAWN MOWER
READ THIS OWNER'S MANUAL AND SAFETY RULES BEFORE OPERATING YOUR
LAWN MOWER. Compare the illustrationswith your lawn mower to familiarize yourself
with the location of vadous controls and adjustments. Save this manual for future
reference.
These symbols may appear on your lawn mower or In literature supplied with the
product. Learn and understand their meaning.
CAUTION
ENGINI_
OR WARN)NG
ON
ENGINE
OFF
FA_T
_.OW
CHOKE
FUEL
OIL
DANGER, KEEP HANDS
AND REET AWAY
• Operator presence control
bar
Handle knob
Gasoline filler cap
Grass catcher _
Engine oil cap
Mulcher door
IMPORTANT: This lawn mower is shipped
WITHOUT OIL OR GASOLINE in the
engine.
Lawn mower housing
MEETS CPSC SAFETY REQUIREMENTS
Sears rotary walk-behind power lawn mowers conform to the safety standards of the
Amedcan National Standards thstJtute and the U.S. Consumer Product Safety Commission. The blade turns when the engine is running.
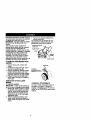
Operator Presence Control Bar- must
be held down to the handle to start the
engine, Release to stop the engine,
Primer - pumps addiUonal fuel from the
carburetor to the cylinder for use when
starting a cold engine.
Starter Handle - used for starting the
engine.
Theoperation
of any lawn
mower can result in
foreign objects thrown into
the eyes, which can result
in severe aye damage.
Always wear safety glasses or eye
shields while operating your lawn mower
or performingany adjustments or repairs.
We recommend a wide vision safety
mask over spectacles or standard safety
glasses.
HOWTO USEYOUR LAWN MOWER
TO CONVERT MOWER
Your lawn mower was shipped ready to
be used as a mulcher. To convert to
bagging or discharging:
REAR BAGGING
• Lift rear door of the lawn mower and
place the grass catcher frame hooks
onto the door pivot pins.
• To convert to mulching or discharging
operation, remove grass catcher and
close rear door.
ENGINE SPEED
The engine speed was set at the factory
for optimum performance. Speed is not
adjustable.
ENGINE ZONE CONTROL
_CAUTION:
Federal regulations require
an engine control to be installed on this
lawn mower in order to minimize the risk
of blade contact injury. Do not under any
cimumstances attempt to defeat the
function of the operator control.The blade
turns when the engine is running.
• Your lawn mower is equipped with an
operator presence control bar which
requires the operator to be positioned
behind the lawn mower handle to start
and operate the lawn mower.
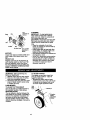
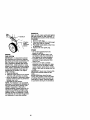
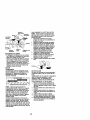
TO ADJUST CUTTING HEIGHT
Raise wheels for low cut and lower
wheels for high cut, adjust cutting height
to suit your requirements. Medium
position is best for most lawns.
To change cutting height, squeeze
adjuster lever toward wheel. Move
wheel up or down to suit your requirements. Be sure all wheels are in the
same setting.
NOTE: Adjuster is propedy pes'dioned
when plate tab inserts into hole in lever.
Also, 9-position adjusters (if so equipped)
allow lever to be positioned between the
plate tabs.
LowerWheels forHigh Cut
Pla_
Pivotpins
SIDE DISCHARGING
• Rear door must be closed.
• Open mulcher door and install discharge deflector under guard as
shown.
• Mower is now ready for discharging
operation.
• To convert to mulching or bagging
operation, discharge deflector must be
removed and mulcher door must be
closed.
SIMPLE STEPS TO REMEMBER WHEN
CONVERTING YOUR LAWN MOWER
FORMULCHING1. Rear door closed.
2. Mulcher door closed.
FOR REAR BAGGING 1. Grass catcher installed.
2. Mulcher door closed.
FOR SIDE DISCHARGING 1. Rear door closed.
2. Side discharge deflector installed.
•,CAUTION:
Do not run your lawn
mower without rear door dosed or
approved grass catcher in place.
Never attempt to operate the lawn mower
with the rear door removed or propped
open.
RaiseWheels for LowCut
Mulcher
door
• Open
MulcherDoor
BEFORE STARTING ENGINE
ADD OIL
Your lawnmower is shipped without oil in
the engine. Engine holds 20 oz. of oil.
For type and grade of oil to use, see
_ENGINE" in Maintenance section of this
manual.
1. Be sure lawnmower is level and area
around oil fill is clean.
2. Remove engine oil cop and fill to the
full line on the dipstick. Pour oil slowly•
Do not over fill.
NOTE: Allow oil to settle down into engine
for accurate reading. To read proper level,
tighten engine oil cop, then remove it to
read the dipstick.
3. Reinstall engine oil cop and tighten.
• Check oil level before each use. Add
oil if needed. Fill to full line on dipstick•
• Change the oil after every 25 hours of
operation or each season. You may
need to change the oil more often
under dusty, dirty conditions.
ADD GASOLINE
• Fill fuel tank. Use fresh, clean, regular
unleaded gasoline with a minimum of
87 octane. Do not mix oil with gasoline. Purchase fuel in quantities that
con be used within 30 days to assure
fuel freshness.
AWARNING: Experience indicotesthat
alcohol blended fuels (called gasohol or
using ethanol or methanol) con attract
moisture which leads to separation and
formation of acids during storage• Acidic
gas con damage the fuel system of an
engine while in storage. To avoid engine
problems, the fuel system should be
emptied before storage of 30 days or
longer. Drain the gas tank, start the
engine and let it run until the fuel lines
and carburetor are empty. Use fresh fuel
next season. See Storage Instructionsfor
additional information. Never use engine
or carburetor cleaner products in the fuel
tank or permanent damage may occur.
_, CAUTION: Fill to bottom of gas tank
filler neck. Do not overfill. Wipe off any
spilled oil or fuel. Do not store, spill or
use gasoline near an open flame.
Engine _Y=I_
Gasoline fiUer
cap____
cap
TO START ENGINE
NOTE: Due to prote_ve coatings on the
engine, a small amount of smoke may be
present during the initial usa of the
product and should be considered
normal.
1. To start a cold engine, push primer
three (3) times before trying to start.
Use a firm push. This step is not
usually necessary when starting an
engine which has already run for a
few minutes.
2. Hold operator presence control bar
down to the handle and pull starter
handle quickly. Do not allow starter
rope to snap back.
TO STOP ENGINE
• To stop engine, release operator
presence control bar.
NOTE: In cooler weather it may be
necessary to repeat priming steps. In
warmer weather over priming may cause
flooding and engine will not start. If you
do flood engine, wait a few minutes
before attempting to start and do not
repeat priming steps.
.MOWING
TIPS
• Under
certain
conditions,
suchasvery
tallgrass,itmaybenecessary
toraise
theheight
ofcuttoreduce
pushing
effortandtokeepfrom ovedoading the
•
•
•
•
MULCHING MOWING TIPS
IMPORTANT: For best performance,
keep mower housing free of built-up
grass and trash. Clean UNDERSIDE OF
MOWER HOUSING after each use. See
•Cleaning" in MAINTENANCE section of
this manual.
• The special mulching blade will recut
the grass clippings many times and
reduce them in size so that as they fall
onto the lawn they will disperse into the
grass and not be noticed. Also, the
mulched grass will biedegrade quickly
to provide nutrients for the lawn.
Always mulch with your highest engine
(blade) speed as this will provide the
best recutting action of the blades.
• Avoid cutting your lawn when it is wet.
Wet grass tends to form clumps and
interferes with the mulching action. The
best time to mow your lawn is the eady
afternoon. At this time the grass has
dded and the newly cut area will not be
exposed to the direct sun.
• For best results, adjust the lawn mower
cutting height so that the lawn mower
cuts off only the top one-third of the
grass blades. If the lawn is overgrown it
will be necessary to raise the height of
cut to reduce pushing effort and to keep
from ovedoading the engine and
leaving clumps of mulched grass. For
extremely heavy mulching, reduce your
width of cut,
mow slowly and raise
the rear of the lawn mower one wheel
adjuster setting higher than the front.
• Certain types of grass and grass
conditions may require that an area be
mulched a second time to completely
hide the clippings.When doing a
second cut, mow across or perpendicular to the first cut path.
• Change your cutting pattern from week
to week. Mow north to south one week
then change to east to west the next
week. This will help prevent matting
and graining of the lawn.
engine and leaving clumps of grass
clippings. It may also be necessary to
reduce ground speed and/or run the
lawn mower over the area a second
time.
For extremely heavy cutting, reduce the
width of cut by overlapping previously
cut path and mow slowly.
For better grass bagging and most
cutting conditions, the engine speed
should be set in the fast position.
Pores in cloth grass catchers can
become filled with dirt and dust with use
and catchers will collect less grass. To
prevent this, regularly hose catcher off
with water and let dry before using.
Keep top of engine around starter clear
and clean of grass clippings and chaff.
This will help engine air flow and
extend engine life.
1/3
9
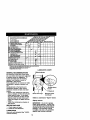
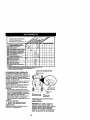
MAINTENANCE SCHEDULE
FILL _N DATES
AS YOU COMPLETE
_ERVICE
REGULAR SERVICE
q
Check for Loose Fasteners
;lean/Insp_t Grass Catcher
_Equipped)
m
"l,/
1/
Cleen Lawn Mower
DATES
1/
m
1/
t/
I/
I_ /
Clean Under Drive Cover
(Powec-Propei_ed
Mowecs)
Check drive he
ys
(Power.pmpell_eM
I/
_ow_)
C_harpen/Replace
Blade
I/3
Lubrication
Chart
CJeanBatteP//Rechaq
EleCMCStart Mowers
CheckEngine On Level
Change Engine Oil
Clean Air Filter
1/
I_
t_/
1/4
I/
1/1.2
I_ 2
1/
Inspect Muffler
Clean or Replace Spark plug
b/
Replace Air Filter Paper Cartridge
1/z
1 - ChllrOD r_orl) o_n _d1_1 _
Ulld_ i h_lVy IGqd _- tl_ h_h _
2 - Set_t_ more offlm v.tlen 0_enl_
_n didy or dusly oondt_m_.
3 - R_a¢8
_adel
mo_ _,*_ when _
in sandy aOll.
b'_eqiluI#.
4 - Charge 48 Ix_Jmat endof m.
LUBRICATION CHART
GENERAL RECOMMENDATIONS
The warranty on this lawn mower does
not cover items that have been subjected
to operator abuse or negligence. To
receive full value from the warranty,
operator must maintain mower as
instructed in this manual.
Some adjustments will need to be made
periodically to propedy maintain your
unit.
All adjustments in the Service and
Adjustments section of this manual
should be checked at least once each
season.
• Once a year, replace the spark plug,
clean or replace air filter element and
check blade for wear. A new spark
plug and cleaNnew air filter element
assures proper air-fuel mixture and
helps your engine run better and last
longer.
• Fonow the maintenance schedule in
this manual.
BEFORE EACH USE
I. Check engine oil level.
2. Check for loose fasteners.
LUBRICATION
Keep unit well lubricated (See "LUBRICATION CHART").
_Nheel
adjusters
• ) Brake Spring
Bracket
(_) Engine oil
• ) Rear doorhinge
(_Handle bracket
mountingpin
_)Refer to maintenance
"Engine" section,
{_Spray lubricant
IMPORTANT: Do not oil or grease
plastic wheel bearings, viscous lubricants will attract dust and dirt that will
shorten the life of the self-lubricating
beadngs, if you feel they must be
lubricated, usa only a dry, powdered
graphite type lubricant sparingly.
10
•PRODUCT SPECIFICATIONS
SERIALNUMBER
DATEOF PURCHASE
GASOLINECAPACITY/TYPE:
OiLTYPE (API-SF-SJ):
1.5 QUARTS
UNLEADED REGULAR
OIL CAPACITY:
SAE 30 (ABOVE 32°F)
SAE 5W-30 (BELOW 32°F)
20 OZS.
SPARK PLUG(GAP: .045")
BLADE BOLT TORQUE:
CHAMPION RESISTOR TYPE RJ19LM4
35-40 FT. LBS.
• The model and serial numbers will be found on a decal attached to the roar of the
lawn mower housing.Record both sedal number and date of purchase in space
provided above.
LAWN MOWER
Always observe safety rules when
performing any maintenance.
TIRES
• Keep tiros free of gasoline, oil, or insect
control chemicals which can harm
rubber.
• Avoid stumps, stones, deep ruts, sharp
objects and other hazards that may
cause tire damage.
BLADE CARE
For best results, mower blade must be
kept sharp. Replace bent or damaged
bledes.
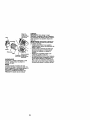
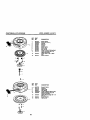
TO REMOVE BLADE
1. Disconnect spark plug wire from spark
plug and place wire where it cannot
come in contact with spark plug.
2. Turn lawn mower on its side. Make
sure air filter and carburetor are up.
3. Use a wood block between blade and
mower housing to prevent blade from
turning when removing blade bolt.
NOTE: Protect your hands with gloves
and/or wrap blade with heavy cloth.
4. Remove blade bolt by turning counterclockwise.
5. Remove blade and attaching hardware (bolt, lock washer and hardened
washer).
NOTE: Remove the blade adapter and
check the key inside hub of blade
adapter. The key must be in good condition to work properly. Replace adapter if
damaged.
TO REPLACE BLADE
1. Position the blade adapter on the
engine crankshaft. Be sure key in
adapter and crankshaft keyway are
aligned.
2. Position blade on the blade adapter
aligning the two (2) holes in the blade
with the raised lugs on the adapter.
3. Be sure the trailing edge of blade
(opposite sharp edge) is up toward
the engine.
4. Install the blade bolt with the lock
washer and hardened washer into
blade adapter and crankshaft.
5. Use block of wood between blade and
lawn mower housing and tighten the
blade bolt, tuming clockwise.
• The recommended tightening torque is
35-40 ft. Ibs,
IMPORTANT: Blade bolt is grade 8 heat
treated.
TO SHARPEN BLADE
NOTE: We do not recommend sharpening blade - but if you do, be sure the
blade is balanced,
Care should be taken to keep the blade
balanced. An unbalanced blade will
cause eveotual damage to lawn mower
or engine.
• The blade can be sharpened with a file
or on a gdnding wheel. Do not attempt
to sharpen while on the mower.
11
Check the crankcase oil level before
starting the engine and alter each five (5)
hours of continuous use. Tighten oil plug
securely each time you check the oil
level.
TO CHANGE ENGINE OIL
NOTE: Before tipping lawn mower to
drain oil, drain fuel tank by running
engine until fuel tank is empty.
1, Disconnect spark plug wire from spark
plug and place wire where it cannot
Key.._.
X kCr
ynkyhaft
come in contact with spark plug.
2. Remove engine oil cap; lay aside on a
clean surface.
3, Tip lawn mower on its side as shown
and drain oil into a suitable container.
Rock lawn mower back and forth to
_,,_
[ / _
V'1_o_\
Crank
remove any oil trapped inside of
engine.
4. Wipe off any spilled oil on lawn mower
and on side of engine.
bolt Har_d
e ned
Tdera_adeing
Bl_ade
adapter 5. Fill engine with oil. (See =Add Oil" in
the Operacion section of this manual•)
washer
e ga
6. Reconnect spark plug wire to spark
GRASS CATCHER
plug.
• The grass catcher may be hosed with
water, but must be dry when used.
• Check your grass catcher often for
damage or deterioration. Through
normal use it will wear. If catcher needs
Container_
replacing, replace only with a manufacturar approved replacement catcher.
Give the lawn mower model number
AIR FILTER
when ordering.
Your engine will not run properly and may
ENGINE
be damaged by using a dirty air filter.
LUBRICATION
Replace the air filter every year or after
Use only high quality detergent oil rated
every 100 hours of operation, more often
with API service classification SF-SJ.
if you mow in very dusty, dirty conditions.
Do not wash air filter.
Select the oil's SAE viscosity grade
according to your expected operating
TO CHANGE AIR FILTER
temperature,
I. Remove the air filter by turning
clockwise to the stop and pull away
from collar.
2. Remove filter from inside of cover.
3. Clean the inside of the cover and the
collar to remove any dirt accumulation,
NOTE: Although multi-viscosity oils
4. Insert new filter into cover.
(5W30, lOW30 etc.) improve starting in
5. Put air filter cover and filter into collar
cold weather, these multi-viscosityoils
aligning the tab with the sloL
will result in increased oil consumption
6. Push in on cover and tum counterwhen used above 32°F. Check your
clockwise to tighten.
engine oil level more frequently to avoid
possible engine damage from running
low on oil.
Change the oil alter every 25 hours of
operation or at least once a year if the
lawn mower is not used for 25 hours in
one year.
• • To check blade balance, drive a nail
into a beam or wall. Leave about one
inch of the straight nail exposed, Place
center hole of blade over the head of
the nail• If blade is balanced, it should
remain in a horizontal position. If either
end of the blade moves downward,
sharpen the heavy end until the blade
is balanced,
Blade
adapter
12
Turn
__,ollar
Clip
clockwise
remove
to
J
Airfilter
Tab
Air filter cover Turn counterclockwise to
tighten
MUFFLER
Inspect and replace corroded muffler as it
could create a fire hazard and/or damage.
SPARK PLUG
Replace spark plug at the beginning of
each mowing season or after every 100
hours of operation, which ever occurs
flrsL Spark plug type and gap setting are
shown in "PRODUCT SPECIFICATIONS"
section of this manual,
ACAUTION:
Before performing any
service or adjustments:
1. Release control bar and stop engine.
2. Make sure the blade and all moving
parts have completely stopped,
3. Disconnect spark plug wire from spark
plug and place where it cannot come
in contact with plug.
LAWN MOWER
TO ADJUST CUTTING HEIGHT
See "TO ADJUST CUTTING HEIGHT* in
the Operation section of this manual.
REAR DEFLECTOR
The rear deflector, attached between the
rear wheels of your mower, is provided to
minimize the possibilitythat objects will
be thrown out of the rear of the mower
into the operator mowing position. If the
deflector becomes damaged, it should be
replaced.
CLEANING
IMPORTANT: For best performance,
keep mower housing free of built-up
grass and trash. Clean the underside of
your mower after each use.
ACAUTION:
Disconnect spark plug wire
from spark plug and place wire where it
cannot come in contact with the spark
plug.
• Clean the underside of your lawn
mower by scraping to remove build-up
of grass and trash.
• Clean engine often to keep trash from
accumulating. A clogged engine runs
hotter and shortens engine life.
• Keep finished surfaces and wheels free
of all gasoline, oil,etc.
• We do not recommend using a garden
hose to clean lawn mower unless the
electrical system, muffler, air filter and
carburetor are covered to keep water
out. Water in engine can result in
shortened engine life.
TO ADJUST HANDLE
The handle on your lawn mower has
three (3) height positions - adjust to
height that suits you.
• Squeeze the bottom ends of lower
handle towards each other until the pin
in handle can be inserted into one of
the three height adjustment holes.
High
Med
Low.
pin
handle
adjustment
bracket
13
TO ASSEMBLE GRASS CATCHER
• 1. Put grass catcher frame into grass bag
with dgid part of bag on the bottom.
Make sure the frame handle is outside
of the bag top.
2. Slip vinyl bindings over frame.
NOTE: If vinyl bindingsare too stiff, hold
them in warm water for a few minutes. If
bag gets wet, let it dry before using.
_,CAUTION: Do not run your lawn mower
without clipping deflector or approved
grass catcher in place. Never attempt to
operate the lawn mower with the rear
door removed or propped open.
Catcher
frame
handle
Frame
opening
Immediately prepare your lawn mower for
storage at the end of the season or if the
unit will not be used for 30 days or more.
LAWN MOWER
When lawn mower is to be stored for a
period of time, clean it thoroughly, remove
all dirt, grease, leaves, etc. Store in a
clean, dry area.
1. Clean entire lawn mower (See
"CLEANING" in the Maintenance
section of this manual).
2. Lubdcata as shown in the Maintenanca section of this manual.
3. Be sure that all nuts, bolts, screws,
and pins are securely fastened.
Inspect moving parts for damage,
breakage and wear. Replace if
necessary.
4. Touch up all rusted or chipped paint
surfaces; sand lightly before painting.
HANDLE
You can fold your lawn mower handle for
storage.
1. Loosen the two (2) handle knobs on
sides of the upper handle and allow
handle to fold down to the rear.
ENGINE
ENGINE SPEED
Your engine speed has been factory set.
Do not attempt to increase engine speed
or it may result in personal injury. If you
believe that the engine is running too fast
or too slow, take your lawn mower to a
Sears or other qualified service center for
repair and adjustment.
CARBURETOR
Your carburetor has a non-adjustable
fixed main jet for mixture control. If your
engine does not operate propedy due to
suspected carburetor problems, take your
lawn mower to a Sears or other qualified
service canter for repair and/or adjustment.
IMPORTANT: Never tamper with the
engine governor, which is factory set for
proper engine speed. Overspeeding the
engine above the factory high speed
setting can be dangerous. If you think the
engine-governed high speed needs
adjusting, contact a Sears or other
qualified service center, which has
proper equipment and expedenca to
make any necessary adjustments.
2. Squeeze the bottom ends of lower
handle toward each other until pins in
handle clear the brackets and pivot
entire handle assembly forward and
allow it to rest on mower.
• When setting up your handle from the
storage position, the lower handle will
require manuafly locking into the
mowing position.
IMPORTANT: When folding the handle
for storage or transportation, be sure to
fold the handle as shown or you may
damage the control cables.
Operator presence
controlbar
Upper handle
Fold forward for ,
stmage
Fold
-_ckward
Mowing
position
14
Lower handle
Med,
Low,
pin
/
3-Position
handle
adjustment
bracket
ENGINEOIL
Drain oil (with engine warm) and replace
with clean engine oil. (See "ENGINE" in
the Maintenance section of this manual).
CYLINDER
1. Remove spark plug.
2. Pour one ounce (29 ml) of oil through
spark plug hole into cylinder.
3. Pull starter handle slowly a few times
to distribute oil
4. Replace with new spark plug.
OTHER
ENGINE
FUEL SYSTEM
IMPORTANT: It is important to prevent
gum deposits from forming in essential
fuel system parts such as carburetor,fuel
filter, fuel hose, or tank during storage.
Also, experience indicates that alcohol
blended fuels (called gasohol or using
ethanol or methanol) can attract moisture
which leads to separation and formation
of acids dudng storage. Acidic gas can
damage the fuel system of an engine
while in storage.
I. Drain the fuel tank.
2. Start the engine and let it run until the
fuel lines and carburetor are empty.
• Never use engine or carburetor cleaner
products in the fuel tank or permanent
damage may occur.
• Use fresh fuel next season.
NOTE: Fuel stabilizer is an acceptable
altemative in minimizing the formation of
fuel gum deposits during storage. Add
stabilizer to gasoline in fuel tank or
storage container, Always follow the mix
ratio found on stabilizer container. Run
engine at least 10 minutes after adding
stabilizer to allow the stabilizer to reach
the carburetor. Do not drain the gas tank
and carburetor if using fuel stabilizer.
• Do not store gasoline from one
season to another.
• Replace your gasoline can if your
can starts to rust. Rust and/or dirt in
your gasoline will cause problems.
• If possible, store your unit indoors
and cover it to give protection from
dust and dirt.
• Cover your unit with a suitable
protective cover that does not retain
moisture. Do not use plastic. Plastic
cannot breathe which allows condensation to form and will cause your unit
to rust.
IMPORTANT: Never cover mower while
engone and exhaust areas are still
warm.
A, CAUTION:Never store the lawn
mower with gasoline in the tank inside
a building where fumes may reach an
open flame or spark. Allow the engine
to cool before storing in any enclosure.
15
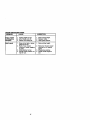
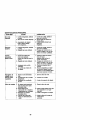
TROUBLESHOOTING
CHART
PROBLEM
CAUSE
)oes not start
CORRECTION
I. Dirty air filter.
2. Out of fuel.
3. Stale fuel.
4. Water in fuel.
5, Spark plug wire is
disconnected.
6. Bad spark plug.
7. Loose blade or broken
blade adapter.
8. Control bar in released
position.
9. Control bar defective.
.oss of power
1. Rear of lawn mower
housingor cutting blade
dragging in heavy grass.
2. Cutting too much grass.
3. Dirty air filter.
4. Buildup of grass, leaves,
and trash under mower.
5. Too much oil in engine.
6. Walking speed too fast.
Door cut Jneven
1. Worn, bent or loose blade.
2. Wheel heights uneven.
3. Buildup of grass, leaves
and trash under mower.
-'xcessive
_ibratlon
1. Wom, bent or loose blade.
2. Bent engine crankshaft.
:';tarterrope hard
:opull
1. Cleanlreplaca air filter.
2. Fill fuel tank.
3. Drain tank and refill with
fresh clean fuel.
4. Drain fuel tank and
carburetor and refill tank
with fresh gasoline.
5. Connect wire to plug.
6. Replace spark plug.
7. Tighten blade bolt or
replace blade adapter.
8. Depress control bar to
handle.
9. Replace control bar.
1. Set to "Higher Cut"
position,
2. Set to "Higher Cut"
position.
3. Clean/replace air filter.
4. Clean underside of mower
housing.
5. Check oil level.
6. Cut at slower walking
speed.
1. Replace blade, Tighten
blade bolt,
2. Set all wheels at same
height
3. Clean underside of
mower housing.
1 Replace blade Tighten
blade bolt
2 Contact a Bears or other
qualified service center
1. Engine flywheel brake is on 1 Depress control bar to
when control bar is released.
upper handle before
pulling starter rope.
2. Bent engine crankshaft.
2.
Contact a Bears or other
qualified service canter.
3. Blade adapter broken.
3 Replace blade adapter.
4 Move lawn mower to cut
4. Blade dragging in grass.
grass or to hard surface.
16
ROUBLESHOOTING
PROBLEM
CHART
CAUSE
CORRECTION
3rass catcher
_otfllling (if so
)quipped)
1. Cutting height too low.
2. Lift on blade wom off.
3. Catcher not venting air.
1. Raise cutting height.
2. Replace blade.
3. Clean grass catcher.
-lard to push
1. Grass is too high or wheel
height is too low.
2, Rear of lawn mower
housing or blade dragging
in grass.
3. Grass catcher too full.
4. Handle height position not
right for you.
1. Raise cutting height.
17
2. Raise rear of lawn mower
housing one (1) setting
higher.
3. Empty grass catcher.
4. Adjust handle height to
suit.
Garant{a ..............................................
Reglas de Seguridad .........................
Montaje ...............................................
Operacibn ...........................................
Mantenimiento ....................................
18
18
21
22
26
Programa de Mantenimiento .............. 26
Especificaciones del Producto ........... 27
Servicio y Adjustes ............................. 30
Almacenamiento ................................ 31
Identificacibn de probZemas............... 32
Orden de Partes ................... Contratapa
GARANTIA LIMITADA DE DOS AltOS PARA LA SEGADORA
A MOTOR CRAFTSMAN
Pot dos (2) arlos, a partir de la facha de compra, cuando esta Segadors Craftsman se
mantenga, lubdque y aflne seg,',n las instrucciones para la operacibn y el mantenimiento en el
manual del duello, Sears reparar_, gratis todo defecto en el matedal y la mano de obra.
Si la Segadora Craftsman se usa para fines comerelales o de arriendo, esta geranfla sblo se
aplica pot noventa (90) dias a partir de la fecha de compra.
Esta Garant{a no cubre:
• Arficulos que se desgastan duranta el uso normal tales como las cuchillas segadorss
rotatodas, los adaptadores de la cuchilla, las correas, los filtros de airs y las bujias.
• Reparaciones necesarias debido al abuso o a la negligencia del operador, incluy6ndose a los
cig_efiales doblados y a la falta de mantanimiento del equipo seg0n les instmcciones que se
incluyen en el manual del duefio.
El servicio de garantia esta disponible al devolver la recortadora para mala hierba Craftsman al
Centro/Departmento de Serviclo Sears mas cercano en los Estados Unidos. Esta garsntfa se
aplica solamenta mientras el producto este en uso en los Estados Unidos.
Esta Garantla le otorga derechos legales especificos, y puede qua tambi6n tenga otros
derechos que var|an de estado a estado.
SEARS, ROEBUCK AND CO., D/817 WA HOFFMAN ESTATES, ILLINOIS 60179
IMPORTANTE: Esta maquina cortadaom as capaz de amputar las manes y los manos y los
pies y de lanzar objetos. Si no se observan las instmcciones de seguridad siguientes se pueden
producir lesiones graves o la muerte.
I,OPERAClON
• No fire de la segadora hacia atrds a menos
que sea absolutamente necesarlo. Mire
• Antes de empezer, debe familiadzarse
siempre hacia abajo y hacia dotrds antes y
completamenta con los controles y el uso
mientras que se mueve hacia atrds.
correcto de la maquina. Para esto, debe leer
• No opere la segadora sin los respecfivos
y osmprender todas las instrucciones que
resguardos, las plaoss, el recogedor de
aparecen en la maquina y en los manuales
c6spad u otros aditamentos dise ados pera
de operaci6n.
su protecel6n y seguddad.
• No ponga las manos o los pies cerca o
• Refi_rase alas instrucciones del fabric.ante
debajo de los partas rotat_as. Mant_ngase
para el funclonamiento e instalacibn de
siempre lejos de la abertura de la descarga.
accesodos. Use 0nicamente acossodos
• Permita que solamenta las personas
apmbados por el fabdcante.
responsables que est6n familiarizadas con
• Detenga la cuchilla o las cuchillas cuando
las instrucciones operen la m_quina.
cruce per calzades, callos o caminos de
• Despeje el brsa de objetos tales como
grava.
piedras, juguetos, atambres, huesos, palos,
• Parar el motor cada vez qua se abandona
etc. que pueden ser recogidos y lanzados
por las cuchilles.
el aparato, antes de limpier la segadom o de
remover residuos del tubo.
• Aseg0mse que el i,rea no se hagen
• Apagar el motor y esparer hasta que las
personas, antes de segar. Pare la mdquina
cuchiflas est_m completamenta parades
si alguien entra en el drea.
antes de remover el receptor de hierba.
• No opere la maquina sin zapatos o con
• Segar selamenta con luz del dla o con una
sandalias abiertas. Pbngase siempre
buena luz artificial.
zapatos s_lidos.
18
• Nunca permtta que los nii_os operen la
:, No opere la mJ,quina bajo la influencia del
alcohol o de las drogas.
mdquina.
• Tonga un coidado extra cuando se acarque
• Nunca opere la maqulna cuando la hierba
a esquinas donde no hay visibilidad, a los
est6 mojada. Asegt_rese siempre do taner
arbustos, drbolos u otros objatos que
buena traccibn en sus pies; mantanga el
mango firmementa y camine; nunca corra.
pueden interfedr con su linea de visi6n.
• Desconectar el mecanismo de propulsibn
IV. SERVIClO
aut6noma o el embrague de transmisibn en
• Tonga cuidado extra al manejar la gasolina
las segadoras que Io tienan antes de porter
y los dembs combustibles. Son Inflamablos
en marcha el motor.
y los gases son explosivos.
• Si el equipo empezara a vibrar de una
- Use solamente un envase aprobado.
manera anormal, pare el motor y revise de
- Nunca remueva la tapa del dsp6sito de
inmediato para avedguar la causa.
gasolina o agregue combustible con el
Generalmante la vibraci6n scale indicar que
motor funcionando. Permita qus el motor
exists alguna averia.
se enffle antes de volver a pone
• Siempre use gafas de seguddad o anteojos
combustible. No fume.
con protecck_mlateral coando opere la
- Nunca vueh,a a poner combustible en la
ssgadora.
mdquina en recintos cerrados.
II. OPERAClON
SOBRE I.A8 CUESTAS
- Nunca almacano la mdqutna o el envass
Los accidentas ocurren con m&s frecuencia
del combustible dentro de algt_nlugar en
an las cuastas. Estos acoidontas ocurren
donde haya una llama axpuesta, tal como
debido a resbeladas o caidas, las cualos
la dot calentador de agua.
pueden resultar en graves lesiones. Operar la
• Nunca haga funcionar una m,_quinadsntro
de un ,_rea carrada.
recortadora en cuestas requiem mayor
concentraci6n. Si se siente inseguro sn una
• Nunca haga ajustes o reparaciones
mientms el motor est_ en marcha.
ccasta, no la recorte.
Desconecta el cable de la bujfa, y
HACER:
mant6ngalo a cierta distancia de 6sta para
• Puede recortar a travds de la superflcie de
prevenir un arranque accidental.
la cuesta, nunca hacia ardba y haela abajo.
• Mantenga las tuercas y los pemos,
Procada con extrema precaucibn coando
especialmente los pemos del accesorio de
cambie de direcci6n en las cuestas.
la cochilla, apretados y mantsnga el equipo
• Renueva todos los objetos extrahos, tales
en buenas condiciones.
como guijarros, ramas, etc.
• Nunca manipule do forma indebida los
• Debs prestar atenc_6n a hoyos, baches o
dispositivos de seguddad. Controle
protuberancias. Recuerde que la hierba alta
rsgularmente su funelonamiento correcto.
puede esconder obst_culos.
• Mantanga la n_quina libre de hierba, hojas
NO HACER:
u otras acumuladonos de desperdicio.
• No recorte cerca de pendientas, zanjas o
Limpie los derramos de acaita o combusterraplenos, El operador puede perder la
tible. Permita que la mdquina se enfrie antes
de almacenada.
tracci6n en los pies o el equilibdo.
• No mcorte cuostas demasiado inclinadas.
• Pare o inspeccione el equipo sile pega a un
• No recorte en hlerba mojada. La reducci6n
objeto. Repdrelo, si es necasado, antes de
en la tracci6n de la pisada puede causar
hacado arrancar.
resbalones.
• En ningdn caso hay que regular la altura de
las ruedas mientras el motor est_ en
III.NINOS
mamha.
Se pueden producir accidontss tr_gicos si el
• Los componentes del receptor de la hierba
operador no presta atenct6n a la presencia de
van sujetos a dasgasta, da_os y detedoro,
los ni_5os.A menudo, los nhSosse sienten
que pueden exponer las partas en
atraidos por la mdquina y por la actividad de la
movimiento o permitir qua objetos sosn
siega. Nunca suponga que los nifios van a
disparados. Controlar frecuentemente y
permanecer en el mismo lugar donde los vio
cuando sea necasado sustituir con partes
por dtiima vez.
acoosejadas por el fabdcante.
• Mantenga a los nii_os alejados del drea de la
• Las cuchinas de la segadora esldn afiladas
siega y bajo el cuidado estdcto de otra
y pueden cortar. Cubrir las hojas o Ilevar
persona adulta rosponsable.
guantos, y utilizar precauciones especiales
• Est_ alerta y apague la m._quinasi hay nii_os
cuando se efectda mantenimiento sobre los
que entran al drea.
mismas.
• Antes y cuando esta ratrocediendo, mire
• No cambie el ajuste del rsgulador del motor
hacia arras y hacia abajo para voriflcar si
ni excada su velocidad.
hay nitios pequs_os.
19
este simbdo que _
.las.preca.udo• oss ae segurldadde tmpodanda. Qumm deor iiiATENCI(_NIH iiiESTE ALERTO!t! SU
SEGURIDAD ESTA COMPROMETIDA.
_PRECAUClON: Siempm desconecte el .
alambm de la bujlay p_
donde no pueea
entrar en contactocon la buj|a, para evitar el
arranque por accider_, durante la preparack_, el
trar_,
el ajuste o cuando se hacen
reparaciones.
d_DVERTENCIA: Eltubodeescapedelmotor,
ak3unc6
de suso0os_ituyentes
y elgunos
comp_entesdelvehiculoo0nqienen
o
desprende_pcoductos
quimicos
conoddosen el
Estadode Cellfornla
comocausadec_ncory
_
el nadmientou ol_osdarx_
r_uc_vos.
_M)VERTENClA: Loshomes,t_
y
accesodos
relaUvos
dela bate_aconlJenen
plorno
o compuestos
de plomo,productos
quirelcos
co_oddosenel EstadodeCalEomiacomocausa
de c_nosry defects al nadmientou obosdarlos
reproducSvos.Lav_ las manos desp_s de
manipulados.
_PRECALICION: El silenciador y otras piezas
del motor Ilegan a ser extremadamente
calientes durante la operaci6n y siguen siendo
calientes despu_s de que el motor haya
parado. Para eVdar quemaduras severas,
permanezca lejos de estas _reas.
Estos accesorios estaban dispenibles cuando se produjo la segadora. No son faoilitados
junto al cortaceaped. Est_n disponibles en la mayorla de las tiendas de Sears yen los centros
de sewicio. La mayorla de las tiendas Sears tambi6n pueden mandar a pedir partes de
repuesto pare usted, si les proporciona el n,3mero del modelo de su segadora. Algunos de estos
accesorios tal vez no so apliquen a su segadora.
RENDIMIENTO
DE LA SEGADORA
DESVlADOR DE RECORTES
pAPA SEGADORAS CON DESCARGA TRASERA
JUEGO$
pARA LA ACOLCHAOORA
PARA
SEGADORAS
CONDESCARGA
REGOREDOR
TRASERA
MANTENIMIENTO
PAPA
SEGADORAS
CONDESCARGA
RECOREDOR
LATERAL
_
ENVIES
DE LA SEGADORA
SlLENCIADORES
CORREA$
ESTABtLIZADORES
CUCHILLAS
FILTRO$
D_ CUCHILLA
20
DE AIRE
BUJIAS
RUEDAS
OSL MOTOR
Lea estas instrucciones y el manual
complstamente antes de tratar de montar u
operar su segadopa nueva.
IMPORTANTE: ESTE CORTACESPED VIENE
SIN ACEITE O GASOLINA EN EL MOTOR.
Su sngadora nueva ha sido montada en la
f_bdca con la excepcibn de aquellas partes
que sa dejaron sin montar por Pazones de
envio. Todas las partes corno las tuercas, las
apandelas, los pemos, etc., que son
necesadas para completar el montaje han sido
colocadas en la bolsa de pades. Papa
asegurarse qua su segadora fundone sn
forma segura y adecuada, todas las partes y
los adloulos de ferreter|a que se monten
tienen que ser appatados sngupamente. Use
las herramientas correctas, como sea
necasado, para asegupar que se aprJetan
adecoadamente.
PARA REMOVER LA SEGADORA
DE
LA CAJA DE CARTON
1. Remueva las [Jades sueltas que se
incluyen con la segadora.
2. Corte las dos esquinas de !os extremos de
la caja de caddn y tienda el panel del
extremo piano.
3. Remueva todo el material de empaque.
excepto la curia entre el mango superior y
61inferior, y la curia que sujeta la barra de
los control que exige la presencia del
operador junto con el mango superior.
4. Haga rodar la segadora hacia afuepa de la
caja de cartbn y revisela cuidadosamente
para veriflcar si todavia quedan partes
sueltas adicionales.
COMO PREPARAR
SU SEGADORA
PARA DESDOBLAR EL MANGO
IMPORTANTE: Despliegua el mango con
mucho cuidado papa no pellizcar o dai_ar los
cables de control.
1. Levanta la secc_n del mango inferior ala
posick_ de oparad_ y presione las
extremidades inferioros del mando inferior
una en contra una de la otra hasta que la
pinza del mando pueda ser insedada en
uno de los tpasngujaros del conl_-olde la
altupa.
2. Levante la secci6n del mango supedor
haste la posick_nde oporaci6n, remueva la
cui_a protectora y aprieta las manillas del
mango en forma segora.
3.
Remueva el matedal de empaque de
alrodedor de la bana de control.
Sus mangos pueden ajustarse papa que Is
acomoda al segar. Refi6pase ala seccibn de
Servicio y Ajustes en este manual,
Barrade controlquesxlgela presendadel operador
go
pe"
LeMv__
nta_
_/7
_rc_Po_ick_n
para
MangoInferior
Pinza
del mango
Soporte de
ajusts
Mango de
3 poslciones
J
pARA INSTALAR LOS ACCESORIOS
Su sngadora rue enviada Usta papa usarse
como una acolchadma de caps vegetal. Papa
convedida de modo que pueda ensacar o
descargor, Refi6pasa a "Para Convertir la
Segadora" in la secclon de este manual.
21
FAMILIARICESE CON SU SEGADORA
LEAESTE MANUALDEL DUEROY LASREGLASDE SEGUP-JDAD
ANTESDE OPERARSU
SEGADORA. Co_pa_e las tlustraciones co_ su segadora para fa_ilfadzax_e con I_ ubicad_n de
lOSd_versosco_trcCesy,,ajustes. Gua_e es_ m_aJ para refe_m
en el futuro.
Estos s|mbolos pu_den =Ipa_ser sob_ su segadont o an la li_rai'ura proporclonada con
el _,
/_enda
y comprenda sus slgniflcados.
IMPORTANTE: Este c_rtac_spad viene $_N
ACEiTE O GASOL!NA en el _tor, ...................
CUMPLE CON LOS REQUISITO$ DE $EGURIDAD DE LA CPSC
Las segadoms a motor, que se conduce_ desde la parte de at_,s, rotatorJas,Seam, cumplen
con los estdnd_es de seguddad del Amed_m Na_r_I Standards Institute y de I_ U._;. Co_
s_
P_duct Safety Commission. La cuchtfiagim o_ando e_ moiot est_ funcionando,
Elarm de control que exlge _a pre_nc.ia de_
operado_-- tlene que sujetarse abajo, j',,_o
con el mango, I_m hac_ arrancar s_m_:,to_'.
Su_ela pare parer e_ motor,
Cebador-- bombea combustible ad_
desde el ca;,bu,'adotal _lindro pare uso
_
s_ nacesita hater armncar un mot_
fr_o.
Cord6n arr_c_r--c,e
usa para h_:_e_
22arran_r
e_ motor,
SEGADORAS CON DESCARGA TRASERA
• Lavantar la puarta trasera de cortac6sped y
colocar los ganchos dal armaz6n de la
recolactora de hierba en los pasadores dsl
quicio de la puerta.
• Para pasar a la oparcaibn de
acolchamiento, remover la recoleotora de
hiarba y carrar la puerta trasem.
segadora puede hacar que
saltan objatos extra/los dentro
de sus ojos, lo que puede
producir darios graves an _stos.
Siampre usa anteojos de seguddad o
proteccibn para los ojos mientras opers su
segadora o cuando haga ajustes o
reparacionas. Racomendamos una mascara
de seguridad de visibn amplia, para uso
espejuslos a antaojos de seguddad
estandarte.
Laopereci6n
decualquier
COMO
USAR
SU SEGADORA
VELOCIDAD
DEL MOTOR
La velocidad dal motor se estableci6 en la
fdbrica para un rendimiento 6ptimo. La
velocidad no se pueda ajustar.
CONTROL DE ZONA DEL MOTOR
_i, PRECAUGI(SN: Las regulaciones fedarales
extgen que se instala un control para el motor
an asta segadora para reducir a un minimo el
riesgo de lesionarse debido al contacto con la
cuchilla. Por niegdn moUvo trata de elim]nar la
funci6n del control del operador. La cuchilla
gira cuando el motor estd funsionando.
• Su segadora vians equipada con una barra
de controlas qua axigen la presencia del
oparedor, lo qua requiem qua el operador
est6 datrds del mango de la segadora para
hacada arrancar y oparada.
PARA AJUSTAR LA ALTURA DE
CORTE
Lavanta las ruedas para el corte bajo y baja
las ruedas para el code alto., ajusta la altura
de corte para que se acomoda a sus
requisitos. La posici6n del medio es la major
para la mayoda de los c6spedes.
• Para cambiar ta alture de coda, empuja la
palanca dal ajustador hacia la rueda. Muava
la ruada hacla arriba o hacia abajo de modo
qua se acomode a sus requisitca.
Asegdresa que todas las medas quedan
igualmente ajustadas.
AVISO: El ajustador ssta COiTeotamanta
colocado cuando las orejas de la placa astdn
insertadas en el agujsro del mango. Tambidn,
los ajustes de 9 posiciones (si equipado)
parmiten qua el mango pueda ser movido
entre las orejas de la placa.
Pasador
del quiclo
SEGADORAS CON DESCARGA LATERAL
• La puerta trasare tiena que estar carrada.
• Abra la protecc_6ncontra la descarga y
instale el dssviador de contra la descarga
debajo de la protecci_n como sa muestra.
• La segadora esta lista para la operecibn de
la descarga.
• Para convertir a la operaci6n de ansacado
o de dascarga, el dasviador de la dascarga
deba ser removido y la protecci6n contra la
dascarga deba estar carrada.
PA$OS SIMPLES DE RECORDAR
CUANDO CONVIERTA SU SEGADORA
PAPA ACOLCHAMIENTO.
1. Puerta trasera canada.
2. La preteccibn contra la descarga lateral
canada.
PAPA ENSACAMIENTO TRASERO 1.
2.
La tap6n acolchadora trasara removlda.
La pmtecci6n contra la descarga lateral
carrada.
PAPA DESCARGA LATERAL1. Puarta b'asam carreda.
2. La pmteccibn contra la descarga lateral
instalada.
_PRECAUCI(_N:
No hega funclonar su
segadora sin la placa de la acalchadora
apmbada en su lugar, o sin el desviador de
recortes o sin el recogedor clasped aprebados
sn su lugar. Nunca trate de operar la
segadora cuando se halla removido la p_Jerta
trasara o cuando se ha removido a puarta
trasera o cuando est_ un poco abierta.
Para un cortealto,baje OreJasde la plac_
lasluedas _
_Mango
Para uncodebajoi_)vantelas ruedas
PARA CONVERTIR LA SEGADORA
Su segadora rue anviada lista para usarse
corno acolchadora de capa vegetal. Para
convertirla a una operaci6n de snsacado o de
dascarga;
_1_
Puertade la
acolchadora
23
Abra la pue_a
Desviadorde la
descarga
ANTES DE HACER ARRANCAR
EL
MOTOR
AGREGUE ACEITE
Su segadora fue enviada sin acsite en el
motor. El motor puede contener 20 oz. de
acsita. Para el tpo y la calidad vea "MOTOR"
en la secci6n de las Mantenimento snasta
manual.
1. Aeegt_rese que la segadora est_ nivelada
y que el &rea alrededor del dep6sito de
aceite est_ limpia.
2. Ramuava la tapa dal dapbsito de aceite del
motor y rellena hasta la tnea de llano an
6sta. Vacla el acoite lantamente. No Io liens
dsmasiado.
AVISO: Permita qua el aceite se aciente bian
en el motor para una lactura exacta. Para leer
el nivel apropiado, apdata la tapa del relteno
del aeeita de motor, mmuevala para leer la
varilla medidora del aeeite.
3. Vuelva a instalor la tapa dal dep_sito del
aeeits y apridtela.
• Revise el nivel del acoite antes de cada uso.
Agregus aceite si es necesario. Liens hasta
la Iloea de neno sn la vadlla indicadora de
nivel.
• Cambia el aceits despu_s de 25 horas de
oparaci6n o una vez por temporada. Puede
necesitar cambiar el aceita n_s a menudo
cuando los condicionas son polvorosas o
suoias.
AGREGUE GASOLINA
• Ltena el estanque de combustible. Use
gasolina regular, sin plomo, nueva y limpla
con el minimo de 87 octanos. (El uso de
gasolina con pk_no aumentar_ los
dep6eltos de 6xido de plomo y carbono y sa
reducird la duraci6n de la v&lvula). No
mezcte el acelta con la gasolina. Para
aeegurar qua la gasolina utlizada sea
ffesca compre estanques los cuates
puedan ser utiSizadosdurante los pdmaree
30 dlas.
_e_DVERTENCIA:La
expedencia ha indloado
que los combustblee mezcladee con alcohol
(coneeidos como gasohol, o el uso de etanol o
metanol) pueden atraer la humedad, te qua
conduce a la separaci6n y formacibn de
&cidos duranta el almacenamianto. La gasolina
acidica pueda dafiar el sistama del combustible de un motor duranta el almacenamianto.
Para avitar los problamas con el motor, ee
debe vaciar el sistema del combustible antes
de guardado pot un parlodo de 30 dias o m_s.
Vacia el estanque del combustible, haga
arrancar el motor y h_galo funclonar hasta
que las lineas del combustible y el corburador
queden vacios. La prbxima temporada usa
combustible nuevo, Vaa las instrucelones para
El Almacenamianto para mds infonnaci6n.
Nunca use productos de limpiaza para e4
motor o para el carburador en el estanque del
combustible puee se puedan producir dafios
permanentes.
_,PRECAUGION: Liens hasta Saparte interior
del cuallo de relleno del astanque de gasolina.
No lo Ilene demasiado. Limpia el aceite o el
combustible derramado. No almacone,
derrams o use gasolina eerca de una llama
expuasta,
delrellenador
de gasoUna
PAPA HACER ARRANCAR
EL MOTOR
AVISO: Debido a lee capas protectoras del
motor, una cantdad pequefia de humo pueda
estar presents duranta el uso inicial del
producto y se debe considsrar normal.
1. Para hacer arrancar un motor _o, empuje
el cobador tree (3) veces antes de tratarlo.
Empuje firmaments. Este paso
normalmante no es necesario cuando ee
haco arrancar un motor qua ya ha astado
funclonando pot unos cuantos minutos.
2. Sujete la barra de controle_squa exigan te
presencia del operador abajo en el mango
y tire el mango del arrancador
r&pidamente. No permita que el cordbn
arrancador se devuelva abruptamenta.
PAPA PAPAR EL MOTOR
• Para parar el motor, suelto la barra de
controlas qua exigen la pmeencia del
operador.
AVISO: En dimas m_s frlos puede que sea
necesado repetir los passe dal cobado. En
climas rnds calurosos el cebar demasiado
pueda producir el ahogo y el motor no va a
armncar. SI ee ahoga el motor espem unos
cuantos minutee antes de tratar de hacodo
arrancar y no mpita los paees dal eebado.
24
,CONSEJOS PARA SEGAR
• Bajo ciedas condiciones, tal como c_sped
muy alto, puede ser necesario el elevor Io
attura del code para reducir el esfuerzo
necesario para empujar la segadora y para
evitar sobrecargar el motor, dejando
montones do recortes do cdsped. Puede
que sea necosado reducir la velocidad del
recorrido y/o haga funcionar la segadora
sobre el _rea por segunda vez.
• Para un corte muy pesado, reduzca el
ancho dol code pasando parcialmente per
encima del lugar anterior'monte cortado y
sieguo Isntamente,
• Para un major ensacado del c6sped y para
la mayoda de las condictones de coda, la
veloddad del motor debe ajostarse a la
posic_bnde rdpido.
• Los poros en los recogedores do c6sped de
tela puedon flenarse con mugre y polvo con
el uso y los recogedores recaudar_n manos
c6sped. Para ovitar 6sto, rccie el recogedor
con la manguera de agua regutarmento y
ddjelo secarse antes do usarlo.
• Mantonga la parts superior del motor,
alredodor dsl arrancador, despejada y sin
recortes de c_sped y paja. Esto ayudard el
flujo del aim del motor y extsnderb su
duraci6n.
CONSEJOS PAPA SEGAR Y ACOLCHAR
IMPORTANTE: Para obtener el mejor
rendimiento mantenga la osja do la segadom
sin acumulacion do cesped y basura. Vea
"Umpleza" en la seccion do
"MANTENIMENTO " de osto manual.
• La cuchifla acolchadora especial va a volver
s cortar los recopies de c6sped muchas
veces, y los reduce en tama_o, do modo
que si so casn en el c_sped sa van a
disposar entre 6sto y no se van a notar.
Tambi6n, el c6sped acolchado so va a
deshacer rdpidamente ontrogando
substancias nutritivas para el c6sped.
Siompre acolche con la volocidad del motor
(cuchilla) m_s aria, puss asi se obtendr_ la
mejor accibn do recorte do las cuchillas.
• Evito cortar el c6sped cuando est6 mojado.
El c_sped mojado tiondo a for'mar montones
s intsrfiere con la acci6n do acolchado. La
mejor hora para segar el c_sped es
temprano en la tards. A esa hora 6sts se ha
secado y el _rea reci6n cortada no quedard
expuesta al sol directo.
• Para obtenor los mejoros rosultados, ajusto
la altura del code do la segadora de modo
que 6sta code solamente el tercio superior
de las hojas do c_sped. En el caso de quo
el c6sped haya crecido domasiado, puede
ser necosado el elevar la altora del corte
parareducir el osfuorzo necesano para
empujar la segadora y para evitar
sobrecargar el motor, dejando montonos de
recortes de c6sped. Para un acolchamiento
muy pesado, reduzca el ancho dal corta
posando per encima del lugar antedormenta
cortado y sieguo lentamonte.
• Ciodos tipos de c6sped y sos condiciones
pueden exigir quo un drsa tonga que ser
acolchada por segunda vez para esconder
completamento los recortes. Cuando se
haga el segundo code, siegue atravesado o
en forma perpendicular a la pasada del
primer code.
• Cambio su petrbn do code de semsna a
semana. Siegue de norte a sur una somana
y luego cambio de este a oeste la pr6xima
semana. Esto evitard qua el c_sped ss
enrede y cambie de direcci6n.
3
25
PROGRAMA
DE MANTENIMIENTO
LLENE LAS FECHA$
QUE COMPLETE _
A MEDIDA
SERVIC_O REGULAR
FECHAS
c6sped
(_ _e.e equ_do)
um_ la_dom
Revisor
t"
V'
f/
DE SERVICIO
I,/
l/
18s corro Js y Iss pokp&s I
Reviser o/afiladcarn_ar
la cuch_lkJ
(1_ 3
Tab4a de _
Linear la batorla/recargar
(,e;.a_oras
o_narranq_,el_co)
_
_1
_
t/
a/4
Reds,st el ni_sl del acute
CatalPa," el _
del motor
_1,_
L,m;_are_51vodea_re
Ir_
edsi_m,c_ador
t,in'c_or
_c_l_
ta t:,uifa
Carollerelcartud_o
depap_ds_filVo
dea_m
12 3 4 -
1_2
t/
It/2
C,IlmlPkIr r_
a fle4h_do _Jalldo
so 4_
bajo (_a._a pe_l_a o _'_ arnbd_ttea co,q aires tofrv_lit_s.
Dm_sefv]clo md_ a moP.do ¢_amdo N opera _ condJcJone_ auc_
o p_vo.oal.
Camb_ la| cucrdHas m_s a rma_JdO _ar, d_ lie;tin en b_t mlo a_
Cergar pot 48 horaa al fin de la _empomda,
TABLA DE LUBRICACI(_N
RECOMENDACIONES
GENERALES
La gamntfa de esta segadora no cubre los
erticulos que ban ostado sujetos al abuso o a
la negligencia del opemdor. Pare recibir todo el
valor de la garant|a, el operador tiene que
mantener la segadora segOn los instrucciones
doscdtas en oste manual.
Hay algunos ajustes que se tienen que hacer
en forma ped{xlica para poder mantener su
unidad adecuadsmonte.
Todos Jossjustes en la secci6n de Servicio y
Ajustos de este manual tienen que set
revisados pot Io menos un vez por cada
temporada.
• Una vez al aRo. camb_e la bujia, limpio o
cambie el elomento del filtro de aim y revise
si la cuchilla estd desgastada. Una bujia
nueva y un elemento del filtro de aire limpio/
nuevo aseguran la mezcla de airecombustible adecuada y ayudan a que su
motor funcione mejor y que dure mds.
• Siga el p¢ograma de mantenimiento en este
manual.
ANTES DE CADA USO
1. Revise el nivel del aceito del motor.
2. Revise si hay sujotadores sueltos.
LUBRICAClON
Mantonga la unidad bien lubncada (yea la
"TABLA DE LUBRICACION').
_) Su
ressortdu 5-ein
moto_
(_Clavija de montaje
del puntal del mango
_)BIsagra de la
p_erta trasera
(_RoflerHe a Jasecr.Jon de Mant_nimlento
"Motor" "MOTOR"
_Rocie el lubrJcante
en
IMPORTANTE: No aceite o engrase los
rodamientos de la rueda de plastico. Los
lubricantes viscosos atearan polvo y mugre. Io
acortara la duracion de los rodamientos
autolubdcantes. Si cree que tienen que
lubricarse, use Iosamente un lubricanto tipo
crafito, de polvo seco. en forms moderada.
26
•ESPECIFICACIONES
:ECHADE COMPRA
DEL PRODUCTO
3APACIDADYTIPO
3EGASOLINA:
1.5 CUARTOS
REGULAR SENPLOMO
FIPODE ACEITE:
API-SFiSI._SG)
3APAClOAD
DEACEITE:
SAlE 30 (SOBRE 32"F)
SAE 5W-30 (DEBAJO 32°F!
20 OZ. DE CAPACIDAD
3UJIAIABERTURA: .045")
tORSION[:)ELPERNO
3ELACUCHILLA:
CHAMPION RJ19LM4
35-40 FT LBS,
' El num6m del nodelo y el de sede se encuentran en la selcomania ad unta a la parte trasera
de la seja de la segadora. Debe reg strar tanto el num6m de sede come la fecha de compra y
mantengalos en un lugar seguro para refencia en el futuro.
SEGADORA
Siempre obsen,elas reglas de seguridad
cuando haga el mantenimtento.
LLANTAS
• Mantenga las Ilantas sin gasolina, acelte o
substancias quimicas para control de
insectos qua pueden da_ar la goma.
• Evite los tocones, las piedras, las grietas
profundas, los objetos afllados y otros
peligros qua pueden dai_ar alas Ilantas.
CUIDADO DE LA CUCHILLA
Para obtener los mejores resultados, la
cuchilla de la segadora Uenen qua manteneme
afilada. Cambie la cuchilla doblada o da_ada.
PARA REMOVER LA CUCHILLA
1. Desconecte el elambre de la buj|a y
p6ngalo an donde no pueda entrar an
contacto con 6sta.
2. Haga dessenser la segadora an su lado.
Asegz]rese que el filtm de aire y qua el
carburador queden mirando hacia arriba.
3. Use un bloque de madera entre la cuchilla
y la caja de la segadora para evitar qua la
cuchilla gire cuando sele quite el pemo.
AVISO: Proteja sus manos con guantes y/o
envuelva la cuchllla con una tela gruesa.
4. Remueva el pamo de la cuchilla girdndolo
en el sentido contrario en qua giran las
manillas del reloj.
5. Remueva la cuchilla y los articolos de
ferreterla adjuntadores (el pemo, la
arandela de seguddad y la arandela
endurecida).
AVISO: Remueva el adaptador de la cuchilla y
revise el cubo interior de la ranura del
adaptador de la cuchilla. La ranura tiene qua
estar en buenas condiciones para qua
funclone en fonna adecuada. Cambte el
adaptador si est_ dai_ado.
PARA CAMBIAR LA CUCHILLA
1. Ponga el adaptador de la cuchilla en el
clguer_al del motor. Aseg'3rese qua la
ranura del adaptador y qua el chavetero
del clguer_al est6n alinsedos.
2. Ponga la cuchilla en el adaptador de 6sta
alineando los dos (2) agujeros an la
cuchilla con las salientes elevadas en el
adaptador.
3. Aseg_rese de qua el borde de salida de la
cuchilla (opuesto al borde afilado) estd
hacla arriba hacia el motor.
4. Instale el pemo de la cuchilla con la
arandela de seguddad y la arandela
endurecida en el adaptador de la cuchilla y
el ciguer_al.
5. Use un bloque de madera entre la cuchilla
y la caja de la segadora y apdete el perno
de la cuchilla gir&ndolo en el senUdo en
qua giran las maniilas del reloj.
• La torsi6n para apretar recomendada es de
35 - 40 pies libras.
IMPORTANTE: El perno de la cuchilla es
clase 8 tratado a calo.
PAPA AFILAR LA CUCHILLA
AVlSO: No recomendamoe el afilar la cuchiLla
- pero si Io hace, aseg0rese de que quede
balanseada.
Se tiene qua tener cuidado de mantenerla
balanceada. Una cuchilla que no est_
balanseada va a produclr eventualmente dai_o
an la segadora o en el motor.
• La cuchilla puede afllarse con una lima o an
una rueda rectificodora. No trate de afilada
mientras se encuentra en la segadora.
• Para reviser el balance de la cuchilla, clave
un clavo en una viga o an la pared. Deje
alrededor de una pulgada de un clavo recto
expuesto. Ponga el agujero central de la
cuchilla sobre la cabeza del davo. Si la
cuchilla est_ balanceada debe permanecer
en la posici6n horizontal. Si cualqulera de
los extremos de la cuchilla se mueve hacia
abajo, aria el extremo pesedo hasta qua
6sta quede balanseada.
27
Ranura
Arandelade
/uandela
enduredda
Adaptador
de la cuchilla
Chavetero
del dguei_al
f
salida
Adaptadorde la
cuchilta
RECOGEDOR DE ClaSPED
• El recogedor de c6sped puede ser rociado
can el agua de la manguera pero tiene que
estar seco cuando se vaya a usar.
• Revise su recogedor de crisped a menudo
para verificar si est_ da_ado o detedorado.
Se va a desgastar con el uso normal. Si se
necasita cambiar el recogedor, cdmbielo
solamente por uno que sea aprobado por el
fabricante. D6 el n_mere del modelo de la
segadora cuando Io ordene.
MOTOR
LUBRICAClON
Usa solamente acede de detergente de alta
calidad clasificado con la clasificacibn SF-SJ
de servicio API. Seleccione la calidad de
viscosidad SAE seg,',n su temperatura de
operaci6n esperada.
AVISO: A pesar de que los acedes de
multiviscosidad (5W30, 10W30, etc.) mejoran
el arranque en clima frio, estos aceites de
multiviscosidad van ha aumentar el cansumo
de ace'de cuando se usan en ternperaturas
sobre 32" R Revise el nivel del aceite del
motor m&s a menudo, para evitar un posible
da_o en el motor, debido a que no tiene
suficiente aceite.
Cambie el aceite despu6s de 25 horas de
operacibn o por to menos una vez al ai_o si la
segadora se utiliza menos 25 horas el a_o.
Revise el nivel del aceite del critter antes de
arrancar el motor y despu_s de cada clnco (5)
horas de uso conUnuado. Apdete el tap6n del
aceite en forma segura cada vez que revise el
nivel del aceite.
PAPA CAMBIAR EL ACEITE DEL MOTOR
AVI$O: Antes de inclinar la segadora pare
drenar el aceite, drene el tanque de combustible haelendo carrer el motor hasta que el
tanque est6 vacio.
1. Descanecte el alambre de la bujla y
pdngalo de modo que no pueda entrar en
cantacto can _sta.
2. Remueva la tapa del depbsito del aceite;
d_jela a un lado en una supenlcie lirnpia•
3. Incline la cortadora de c&spad pot este
costado tat como se muestra y purgue el
aceite en un recipiente idbneo. Mueva la
segadora de atr_Lspara adelante para
remover todo el aceite que se haya
quedado atrapado dentre del motor•
4. Limpie todo el aceite derramado en la
segadora yen el lado del motor.
5. Reflene el motor con aceite. (Vea "Para
agregar el aceite" en la seccibn de
Oparaclbn de este manual.)
6. _h_elva a canectar el alambre de la bujia a
6sta.
Envase_
F|LTRO DE AIRE
Su motor no funcionar.'_en forma adecuada y
puede su_r da_os si se usa un filtro de aire
sucio.
Cambie el flltro de aire cada a_o o despu6s de
cada 100 horas de operaci6n, y m_Lsa
menudo si siega en condiclones muy
polvoresas o suelas. No lave el filtro de aire.
PARA CAMBIAR EL RLTRO DE AIRE
1. Remueva el filtro de aire gir_ndolo en el
sentido en que g{rela de las maninas del
reloj para apretada, hasta el tope, y retirelo
del callar.
2. Remueva el filtro de la parte interior de la
cubieda.
3. Limpie la parte interior de la cubierta y el
collar para remover toda acumulaci6n de
mugre.
4. Inserte el filtro nuovo eo la cubierta.
5. Ponga la cubierta del filtro de aire dentro
del collar alineando la oreja con la ranura.
6. Empuje la cubierta hacia adentro y girela
en el sen6do cantrado de las manillas del
reloj para apretaria.
28
Gire en e_
sentidoalas
rnan[llas
del reloj
pararemover
Collar
Oreja
UMPIEZA
IMPORTANTE: Para obtanar el mejor
randimiento, mantenga la caja de la segadora
sin acumulacion de cesped y basura. Limpin la
parte de abajo de su segadora daspues de
cada uso.
Gire en el sentido
Cubiertadelcontradolas
fiitrode aire maniUasdel reloj
paraapreiar
SILENCIADOR
Inspecelone y cambie el silenciador si ast_
corroido pueda producir un peligro de
incendio y/o dafio.
BUJ|A
Cambie las bujias al comienzo de cada
tamporada de siega o daspuds de cada 100
horas de operacJan, Io qua sueeda primaro, El
tipo de buj|a y el ajusta de la abartura
aparecen an "ESPECIFICACIONES DEL
PRODUCTO" seccian de esta manual.
_PRECAUCION:
Desconecte el elambre de
bujla y p_ngalo an donde no puada entrar
an contacto con 6sta.
• Limpie la parle infedor de su segadora
raspdndola para remover la acumulacibn de
casped y basura.
• Limpie el motor a menudo para avitar qua
sa acumule la basum. Un motor tapado
funciona rnds ca,ante y sa acorta su
duracian.
• Mantanga las superficies pulidas y las
ruedas sin gasolina, aceita, etc.
• No racomendamos el usa de una manguem
de jardfn para limpiar la segadora a menos
qua el sistama elactdco, el silenciador, el
filtro de aira y el carburador estdn tapados
para avitar que les entre el agua. El agua en
el motor pueda acortar la duracian de 6ste.
29
APRECAUClON:
Antes de dar calquter
servico o de hacer ajustes:
1. Suelte la ban'a de control y pare el motor,
2. Asegdrese que la cuchilla y qua todas las
pades movibtes se hayan detenido
completamente.
3. Desconecte el alambre de la bujia y
pbngelo an donde no pueda entrar en
contecto con 6eta.
SEGADORA
PARA AJUSTAR LA ALTURA DE CORTE
Vea "PARA AJUSTAR LA ALTURA DE
CORTE" en la seccibn de Operadbn de este
manual.
DESVIADOR TRASERO
Se proporciona un desviador trasero, adjunto
entre las ruedas traseras de su segadore,
pare raducir a un minimo la posibilidad que
objetos sean lanzados hacia afuera de la parte
trasere de la segadora, en la posicibn en
donde se encuentre el operador. Si se dafia el
desviador debe cambiarse.
TPARA AJUSTAR EL MANGO
El mango de su segadora cuenta con tres (3)
posiciones de altura - aj_stalo a la altura qua
le acomode.
• Presione las extremidades interiores del
mando infedor una en contra una de la otra
hasta que la pinza del mango pueda ser
insertada an uno de los tres agujeros del
control de la altura.
Alta
mango
aJuste
Mango de 3
poslciones
PARA MONTAR Y ADJUNTAR EL
RECOGEDOR DE ClaSPED
1. Ponga el bastidor del recogedor de c_spad
en la bolsa del cdspad con la parte rigida
de la bolsa en la parte inferior. Asegt_rese
qua el mango del bastidor est_ en el
exterior de la parta supedor de ta bolsa.
2, Desfice los sujetedores de vinilo sobre el
hastidor.
AVISO: Si los sujetadores de vinilo estdn muy
dures, matelos en agua caliente par algunos
minutos. Si se moja la bolsa, d_jela que se
seque antes de usada.
PRECAUClaN:
No ha_la functonar su
segadora sin el desviador _e recortes o sin el
recogedor de c_sped, aprobados, en su
lugar. Nunca irate de operar la segadora
cuando se ha removido la puerta tresare o
cuando est_ un poco abierta.
Mango del bastldor
del recogodor
Abertura
de_
bastldor
MOTOR
VELOClDAD DEL MOTOR
La velooldad del motor ha eldo ajusteda an la
f_bdca. No trete de aumentar la velocidad del
motor pues se pueden producir lesiones
personalas. Si c_ee que el motor estd
funolonando demasiado r_pido o damaelado
lento. Ileve su segadora a un Sears o con
unotro contro de servido cualificado reparada
o ajusteda.
CARBURADOR
Su carburador tiene un chorro principal fljo no
ajusteble para controlar la mezcla. Si su motor
no est_ funcionando en forma adecuada
debido a preblemas qua se sospacha vienen
del carburador, Ileve su segadore a un Sears
o con unotro centre de servicio coalificado
reparada ylo ajusteda.
IMPORTANTE: Nunca manipule ol regulador
del motor, el qua ha sido ajustedo en la fabdca
pare la velocidad dal motor adecuada. Puede
ser paligroso hacer functonar el motor a una
velocidad por sobre el ajuste de aria velooldad
de la fabrica. SI cree qua la velocidad aria
reguteda del motor necosite ajuste, Ix_ngase
en contecto con su Sears o con unotro centro
de servicto cualificado, el qua cuente con el
equipo adecuado y la expadencia para hacor
lOS ajustes
30
nacesarios.
Inmediatamenta prepare su segadora pore el
almacenamlento al final de cada tamporada o
si la unidad no se va a usar por 30 dlas o
m_s.
SEGADORA
Cuando se va a guardar la segadora por
cierto pododo de tiempo, fimpiela
cuidadosamante, remueva toda la mugre, la
greaa, los hojaa, etc. Gudrdela en un drea
limpia y seca.
1. Llmpie toda la segadore (_sa "LIMPIEZA"
an la secoi6n de Mantenimento de oste
manual).
2. Lubriquela aegdn se muestra on la
secci6n de Mantanimento de este manual.
3. AsegGrese de qua todas las tuercas y
clavijas y tados los pornos y tomillos est_.n
apretados en forma segura. Inspeccic_e
las partas que se mueven para verificar si
ostdn dafiadaa, quebradas o desgastadas.
Cdmbielas si os necesario.
4. Retoque todaa las superficies que estan
oxldadas o con ta pintura piosda; use una
lija antes de pintar.
MANGO
Posde doblar el mango de au segadora para el
almacenamionto.
1. Suelte las dos (2) manillas del mango an
cada lado del mango superior y permita
qua el mango se doble hacia datras.
2. Apriota los extremos inferiores del mango
infedor entre ai hasta qua el mango inferior
quede separado del puntal del mango,
luego mu6valo hacia adelante.
• Cuando prepare su mango a partJrde la
posicibn de almacenamionto, el mango
inferior nesacitara osrredo manualmente
para la posicibn do saga.
IMPORTANTE: Cuando doble el mango para
el almacenamiento o el transporte, aseg0rese
qua Io doble aeg0n se muestra o purde datiar
los cables de control
Barra de control qua
op_ador
Mango
suped_
Dob_arhada
adelante para
aknacenar
Doblar hada
atnls
Pos_c_n_ra
segar
Mango Inferio_
ARa
Baja
mango
J
Soportede
aJuste
Mangode 3
MOTOR
SISTEMA DE COMBUSTIBLE
IMPORTANTE: Es importante evitar qua se
formen dapositos de coma en partea
fundamerltalas del sistoma do combustible
tales osmo el carburador, el filtro del combustible, la manguora del combustible o en el
estanque duranta el almaosnamiento. La
expodencia tambien indica quo los combustibles tambion indica qua los combustibles
mezclados con alcohol (conocido como
gasohel o qua tienen etanol o metanel) pueden
atraer humedad, Io quo conduce a la
separecion y a la formacion de acidoa duranta
el almacenamienta. La gasolina acidica puode
danar el sistama de combustible de un motor
durente el periodo de almacenamianta.
1. Drene el estanque do combustible.
2. Haga arrancar el motor y d6jolo funcionar
hasta qua las lineas del combustible y el
carburador est6n vacfos.
• Nunca use los productos para limpieza del
osrburador o del motor en el estanque de
combustible puoa se pueden prcducir
doi_os permanentes.
• Use combustible nuavo la prbxima
tamporeda.
AVISO: El estabilizador de combustible os una
altamativa aceptable para reductr a un minimo
la formaci6n de dep6sitos de goma an el
combustible duranta el periodo de
almacenamiento. Agregue estabilizador a la
gasolina en el estanqua de combustible o en el
envase para el almaosna-miento. Slempre siga
la proporcibn de mezcla que se encuentra en
el envase del estabitizad_. Haga fundonar el
motor por Io menos 10 minutos despu_a de
agregar el estabilizador, para permitir que este
Ilegue al carburador. NO drene la gasolina del
estanque de gasolina y el carburedor ai se
esta usaodo estabiflzador de combustible.
31
• Cambie el envase de la gaselina si sa
empieza a oxidar, La oxidacibn y/o la mugm
en su gasolina produd_n problamas
• Si es posibla, guarda su untdad an un
recinto corrado y c0brala para protegada
contra el polvo y la mugre
• Cubra su unidad con un form protector
adecuado qua no retenga ta humedad No
use pldstico El pldsUco no puede respirar, Io
qua permite la formacibn de condansaci6n,
to qua produci_ la oxidadbn de su uddad
IMPORTANTE: Nunca cub_a la segadora
mientras el motor y ias areas de escape to
davia estan calientas
. ACEITE DEL MOTOR
Drene el aceite (con el motor caliente) y
¢dmbialo con aceite de motor limpio, (Vea
"MOTOR" en la secoi6n de "Mantonimiento"
de esto manual.)
ClLINDRO
1. Remueva la buj[a.
2. Vacle 29 ml (una onza) de aceita a travds
del agujero de la bujla en el cilindro.
3. Tire la manilla de arranqua lentamente
unas cuantas veces para distribuir el
acaite.
4. Camble por una bujia nuava.
OTROS
APRECAUCl0N:
Nunca almacane la
segadora con gasolina en el estanque dentro
de un edifido an donda los gases puedan
elcanzar una llama expuesta o una chispa
Permito qua se enfria el motor antes de almacanada en algdn racinto carrado
• No guarda la gasol[na de una temporada a
la otra
IDENTIFICACI(_N
DE PROBLEMAS
PROBLEMA
No arranca
CORRECCION
CAUSA
1. Filtro de airo sucio
2. Sin combustible
3, Combustible rancio.
4. Agua en el combustible
5. Alambre de la bujfa
desconectado.
6. Buj|a mala.
7. Cuchilla sualta o adaptador
de la cuchilla quebrado
8. Barra de control en la
posicibn sualta.
Barra de control defectoose.
Jg.
Falta de fuerLa
1. Cuchilla desgastada, doblada
o sualta,
2. Altora de las nJadas disparoja.
3 Veloddad del motor lenta.
4. Acumulaci6n de c_sped,
hojas o basura debajo
de la segadora
5 Damastado aceite en
el rnotot.
6. Veloddad de recorrido
damasiado rdpida
32
1 Limpie/cambie el filtro de aire
2 Llene el estanque de combus
tibia
3 Drone el estanque y vuelva a
IJenadocon combustible limpio
y nuevo
4 Drane el estanqua de combus
tibia y el carburador y vuelva a
Ilanar el estanque con gaselina
nuava.
5 Conecte el alambre a la bujfa
6 Cambie la buj|a
7, Apdete el pemo de la cuchilla
cambie el adaptador de la
cuchiila
8 Prseione la barra de control
hacia el mango
9 Cambie la barra de contrd
1 Ajuste a la posici6n de "Code
n_s alto"
2. Ajusta a la posidbn de "Corta
m_ts alto."
J 3 Limpie/cambia el filtro de aira
4 Limpie la park) infedor de la
caja de la segadora
5
Revise el nivel del aceita
6 Corte a una velocidad de
recorrido mds lanta
|DENTIFICACION
PROBLEMA
dal cortetlsparejo
DE PROBLEMAS
CAUSA
CORRECCION
1. Cuchilla desgastada, doblada
o suelta,
2. Altura de las ruedas dispareja.
3. Acumulaci6n de c6spod,
hojas o basum debajo
de la segadora,
1. Cambie ta cuchilla. Apriete el
pemo de la cuchille.
2. Ajuste todas las ruedas ala
misme eltura.
3. Limpie la pads infedor de la
caja de la
segadora.
/ibracl6n
Dxeeaiva
1. Cuchilla desgastada, doblada
o suelta,
2. Ciguefiel del motor doblado.
1. Cambie la cuchilla. Apdete el
pemo de la cochilla.
2. Pongaea en contacto con un
centro de Sears o con un otro
centro de servicio cualificado.
¢ordSn
arraneador
liflcil de Urar
1. El freno del volante del
motor est_ aplicado
cuando se suelta la barTa de
control.
2. Ciguefiel del motor doblado.
1. Presione la barra de control
hecia el mango
superior antes de tirar el
cord6n arrancador.
2. Pongase en contacto con un
centro de Sears o con un otto
centro de serv]cio cualiflcado.
3. Cambie el adaptador de la
cochilla.
4. Mueva le segadora a un lugar
ea donde el c_sped ha sido
cortado o a una superficie firms
para hacer arrancar el motor.
3. Adaptador de la cuchifla
quebrado.
4. La cuchilla se arrastra en
el c6sped.
lecogedor de
_sped no se
lena (si vlene
_quipado)
)iflcil
de empujar
1. Altura de code demasiado
baja.
2. Levantamiento de la cuchnla
desgastado.
3. Recogedor sin ventilaci6n
de airs.
1. El cdsped eat_ demasiado
alto o la altum de la rueda
demasiado baja.
2. Parte trasera de la
caja]cuchilla de la segadora
arrastrdndoea en el c_sped.
3. Recogedor de c6spod
demasiado Ileno.
4. Posici6n de la altura del
mango no adecuada pare
usted.
33
1. Eleve la altura de code.
2. Cambie las cuchillas.
3. Limpie el recogedor de c6sped.
1. Eleve la attura de corte.
2. Eleve la parts traaearade la caja
de la segadora (1) un lugar
m_s alto.
3. Vaele el recogedor de c_Lsped
4. Ajuste la altum del mango de
mode que le
ecomode.
CRAFTSMAN ROTARY LAWN MOWER-- MODEL NO. 917.389621
49
68
67
CRAFTSMAN ROTARY LAWN MOWER - - MODEL NO. 917.389621
KEY
NO.
1
2
3
4
5
6
7
8
g
10
11
12
13
14
15
16
17
18
19
20
21
22
23
24
25
26
2/
28
29
3O
31
33
PART
NO.
DESCRIPTION
131696
166860X479
161105X479
132001
63601
131959
66426
74780512
154132
165754
156577
750634
850733X004
136376
51793
147286
165946X479
17600406
167132X004
167133X004
165858
168360X004
166875
751153
166236X479
166243x479
851856
Con_m_Bar
Upper Handle
Low_ Handle
Rope Guide
Locknut 1/4-20
Handle BOlt
WireTie
Hex Bolt 5/16-t8 x 3/4
Hinge Bracket
MulcherDoor
EngineZone Control Ca ble
Hex Washer Head Sczew #I 0-24 x 1/2
Up-Stop Bracket
Handle Knob
Hairpin Cotter
Hinge Rod
Support Bracket
Screw
Axle Arm Assembty - LF
Axle Arm Assembly - RF
Rear Skltt
Selector Spdng
Rear Door Assembly Kit (Incl. Spdngs)
Locknut 5/16-18
Handle Bracket Assembly (Left)
Handle Bracket Assembly (Right)
Screw 1/4-20 x 3/8
1sz124
H_geSpr_ng
16_835X007
19112222
165760
87877
Wheel Adjusting Bracket - Front
Spacer
Clip on Discharge Guard
Selector Knob
KEY
NO.
34
35
36
37
38
39
40
41
42
43
44
45
46
47
48
49
50
51
52
53
54
55
56
57
58
67
68
70
71
---
PART
NO.
16713OX004
166785
16C828
151162
164362
83923
77400
88652
165766
165767
165912
150406
85463
63124
167131X004
151161
57143
73990500
166878
851084
850263
851074
175064
851514
161551
166113
165755
......
132004
161058
178974
DESCRIPTION
Axle Arm AssembJy - LR
Locknut 5/16-18
Shoulder Bolt 5/16-18
WheelAssembly
Shoulder Bolt
Flanged Locknut
Hubcap
HingeBomw
Spdng (LH)
Spdng(RH)
Door BcAt
Hex Head Thread Roiling Screw 3/8-16 x 1
Danger Decal
Nut
Axle Ann Assembly - RR
Wheel
WaveWasher
Nut
Housing Assembly (Incl. Ref, #17, 18 & 46)
Hex Head Screw 3/8-24 x 1-318 Grd. 8
Helical Lockwashe_
Hardened Washer
21" Blade
EiadeAdapter
Adjustment Bolt
Grass Bag
Catcher Frame
Engine - (See Breakdown) Craftsman 143.016712
Nut 1/4-20
Warning Decal (Not Shown)
Owner's Manual
MODEL NUMBER t43.016712
• CRAFTSMAN 4-CYCLE ENGINE
130
120
119
195
4I
417_,/_
125
18:
104 30
36
MODEL NUMBER 143.016712
CRAFTSMAN 4-CYCLE ENGINE
KEY
NO.
1
2
6
7
12
12A
PART
NO.
37465
26727
33734
36557
36775
36558
12B
14
15
16
17
18
36694
28277
30589
34839A
31335
651018
19
20
30
40
41
36281
32600
37464
40027
40042
42
43
45
40006
20381
36777
46
48
50
32610A
27241
37460
52
69
70
29914
37609
37608
72
73
75
80
81
82
37615
28833
27897
30574A
30590A
30591
83
86
89
90
92
93
100
101
103
30588A
650488
611004
611112
650815
650816
34443C
610118
651007
104
110
119
120
125
37480
37047
36787
36825
36780
125
37288
126
130
135
37289
6021A
37598
150
151
151A
169
172
31672
31673
40017
36783
36784
DESCRIPTION
Cylinder(Inc_.2 & 20)
Dowel Pin
Breather Element
BreatherAss'y. (Incl. 6 & 12A)
Breather Tube
Breather Cover & Tube (Ind.
12B)
Breather Tube Elbow
Washer
Governor Rod (Incl. 14)
Governor Lever
Governor Lever Clamp
Screw, Tcrx T-15, 8-32 x 191
64"
Extension Spring
Oil Seal
Crankshaft
Piston, Pin & Ring Set (Std)
Piston& Pin Ass'y.(Std.)
(Incl.43)
Ring Set (Std.)
Piston Pin Retaining Ring
ConnectingRod Ass'y. (Incl.
46)
Connecting Rod Bolt
Valve Lifter
Camshaft Exhaust(MCR)(Inc.
ref 104)
Oil PumpAss'y.
Mounting Flange Gasket P
Mounting Flange (Ind. 72
thru 83)
Oil Drain Plug (Incl. 73)
Drain Plug Gasket
Oil Seal
Govemor Shaft
Washer
GovemorGearAss'y. (Ind.
81)
Govemor Spool
Screw, 1/4-20 x 1-1/4"
Flywheel Key
Flywheel
BelievilleWasher
Flywheel Nut
Solid State Ignition
Spark Plug Cover
Screw, Torx T-15, 10-24 x 15/
16"
Cam Bushing
Ground Wire
* Cylinder Head Gasket
Cylinder Head
Exhaust Valve (1132" OB)
(Ind. 151)
Exhaust Valve (Std) (Incl
151_e Valve (Std.) (Incl. 151)
Inta
Screw, 5/16-18 x 1-1/2"
Resistor Spark Plug
(RJI9LM4)
Valve Spdng
Valve Spdng Cap
Intake Valve Seal
* Valve Cover Gasket
Valve Cover
KEY
NO.
174
178
182
184
PART
NO,
30200
29752
6201
26756
DESCRIPTION
Screw, 10-24 x 9/16"
Nut & Lock Washer, 114-28
Screw, 1/4-28 x 7/8"
* Carburetor To Intake Pipe
Gasket
185 37466
Intake Pipe
Governor Unk
186 32653
189 650839
Screw, 114-20x 3/8"
191 36559A
S.E. Brake Bracket (IncL 195)
Terminal
195 610973
Throttle Link
207 34336
216 33086
R.RM. Ad
ustiugdj_Lever
Screw, 1/4-20 x 1=
223 650451
224 36786
• Intake Pipe Gasket
238 650932
Screw, 10-32 x 49/64"
• Air Cleaner Gasket
239 34338
Air Cleaner Collar
241 36919
Air Cleaner Filter
245 36905
Air Cleaner Cover
250 37122
260 35980
Blower Housing
Screw, 10-24 x 9/16"
261 30200
Screw, 1/4-20 x 1/2"
262 650831
StarterGnll
263A 37184
Muffler
275 37462
277 650988
Screw, 114-20 x 2-5/16"
285 35000A
Starter Cup
Screw, 0-32 x 21/64"
287 650926
Fuel Line
290 29774
292 26460
Fuel Line Clamp
Screw, 10-32 x 35/64"
298 28763
300 36916
FueITank Inc_. 292 & 301)
Fuel Cap (_lack)
301 36246
Oil FillTube
305 35647
306 37610
* "O'-Ring
307 35499
"O"-Ring
309 650562
Screw, 10-32 x IrZ'
309A 650783
Screw. 10-24 x 3/4"
310 35648
Dipstick
Hold Down Bracket
311A 37611
Spacer
313 34080
347 651038
Screw, 10-32 x 51/64"
Starter Handle
355 590701
Lubrication Decal
370A 36261
370C 37318
Primer Decal (3 X)
370R 37317
Warning Decal
380 640271
Carburetor (Incl 184)
Rewind Starter
390 590739
400 36792B
Gasket Set (Ind Items
Marked *
416 36085
Spark ArrestorK t ( ncL
417)(OpUonal)
Screw, 0-32 x 3/8" (Optional)
417 650760
900
Replacement En ine NONE
Replacement $1_ 750865
900
Order from 71 -999
RPM High 2900 to 3200
NOTE: This engine could have been builtwith
590702 starter)
NOTE: All com_pone=ent
dimensionsgiven in U.S.
inches linch = 25.4 mm
37
MODEL NUMBER 143.0167t2
CRAFTSMAN 4-CYCLE ENGINE
mu
qp_
KEY
NO.
PART
NO,
----
640271
1
31615
2
4
5
6
7
16
17
31767
631184
631183
640070
650506
631807
651025
18
20
20A
630766
640027
640200
Carburetor (Incl, 184 of
Engine Parts List)
Throttle 8haft & Lever
Assem
Throttle l_etum Spdng
* Oust Seal Washer
* Dust Seal (Throttle)
Throttle Shutter
* Shutter Screw
Fuel Fitting
Throttle Crack Screwlldle
Speed Screw
Tendon Spring
Idte Resl_ctor Screw
Idle Restdctor Scrwe Cap
27
28
29
30
631024
632019
631028
631021
* Float Shaft
Float
* Float Bowl "O" Ring
Inlet Needle. Seat. & Clip
31
35
36
36A
37
40
44
47
48
631022
640259
640080
632766
632547
640030
27110A
630748
631027
60
632760B
DESCRIPTION
26 831687
,g0d.3
*
.
*
*
pdng lip
primer Bulb/Retainer Ring
Main Nozzle Tube
Carburetor Tuba
"O" Ring, Main Nozzle Tube
High SSpeedBo_ Nut
Bowl Nut Washer
Welch Rug, Idle MixtureWell
Welch Plug, Atmospheric
Vent
Repair kit (Incl. Items Marked
• in Notes)
38
MODEL NUMBER 143.016712
•CRAFTSMAN 4-CYCLE ENGINE
NO.
NO.
590702
590599A
590600
_'11
3/_1_
1
DESCRIPTION
Recoil Starter
12
590535
818
590700
590701
_%P_asnhgePin
(Ind. 4)
Retainer
Washer
Brake Spring
Starter Dog
Spring
PD_uley
& Rewind Spring Ass'y
Starter Housing Ass'y,(40
degree grommet)
Starter Rope ( 98" X 9/64"
dia,)
Starter Handle
KEY
NO.
PART
NO.
DESCRIPTION
---3
6
7
8
11
590739
590740
590616
590617
590618A
590638
12
590535
13
14
590701
590760
_
K_Y
590696
PART
599601
_
7
590697
590698
590699
11
690703
--8
_--5
V--14
39
Rev_nd Starter
Retainer
Starter Dog
Spring
pD_uley
& Rewind Spring Ass'y
Starter Housing Ass'y (40
degree grommet)
Starter Rope(Length 98" x 91
64" dia.)
Starter Handle
Spring Clip
Forrepairof rnajorbrandal_
in your own home...
no matterwhomade it, nomatterwho soldit!
1.800.4-MY-HOME @ ArV_,_dayornigls
(1.em-46e._)
(usa andCanada)
wwwm
w_wiw
For repairofcarry-inproductslikevacuums,lavwlequipment,and
etec'm0r,_,callforthe nearestSears Parts and RepairCenter.
1-800-488-1222
/V_'_,dayorrk_JSAor_
vaw/Jleer_conl
Forthe repbcementparts,accessoriesand_vne_s rnanuals
thatyouneedtodo-it-yourself,
callSeam PmtsDIrect_l
1-800-366-PART
0-8oo_727s)
6a.m.- 11p.m.,7 daysa v,eek
(u_A cry)
w_
Topurchase
orinquire
abouta SearsSewlceAgreement
or SearsMaintenanceAgreement:
1-800-827-6655 (u.sJ_)
7 a.m. - 5 p.m.. CST, Moo. - SaL
Parapedir
seni,
ciodere_
a
donid_yparao_der,ar
pezas
1-aaS-,..%.u,-iOGN_
_
(1-_e-7S4-S42_
©Sear_RcebJ_ andC_
1-800-361-6665 (Canada)
9 a.m. - 8 p.m. EST, M-
F, 4 p.n'LSaL
AuCanampco'see,
tceen_
1-e00-LE_OYER
_
(1-e00.633-e_/)
WE
H =Ce ® J
® Registered Trademark I w= Trademark I TM Service Mark of Seam, Roebuck and Co.
® Marca Regislrada I a_ Marca de F;_d)rica/ su MarCa de Servicio de Sears, Roeb*JCk and Co.
Mc Marque de commerce I ao Marque d6poc_e de Sears, Roebuck and CO.
178974 03.15.01 rad
Printedin U.S.A.