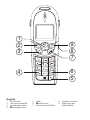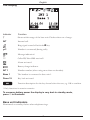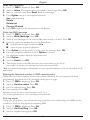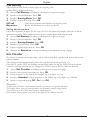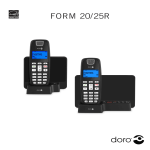
1
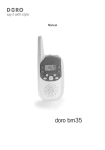
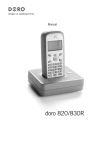
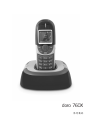
doro 760X
1
2
3
9
8
7
6
5
4
English
1
2
3
4
Scroll button
Left menu button/OK
Line/Speaker button
* and ringer off/on
5
6
7
Flash
# and key lock
Disconnect and Off/On
8
9
Headset connector
Right menu key/
Delete/Redial
English
Connection..............................1
The display..............................2
Base unit indicators................2
Area of use..............................3
Battery......................................3
Coverage.................................3
Making a call............................3
Receiving a call.......................3
Volume control........................4
Turning the handset Off/On...4
Redialling.................................4
Temporary silent mode..........4
Key lock....................................4
Speaker/Group listening........4
Paging......................................4
Phonebook..............................5
Incoming numbers (caller ID)6
SMS messages......................7
Network services....................9
Date/Time/Alarm....................9
Other settings..........................10
Cordless Baby Monitor..........10
Country Code..........................11
Register....................................11
Connection
Signals and display.................11
System settings.......................12
Call barring..............................13
Net. Provider............................13
Expanded system (+1)...........14
Specific absorption rate
(SAR)........................................14
Declaration of conformity.......14
Troubleshooting......................15
Guarantee................................15
1. Connect mains adapter and phone cable to respective wall sockets.
2. To charge and power up your handset please pull the label from
the bottom of the handset to connect the batteries.
3. Charge the handset with the keypad facing outwards (for 24 hours the first time).
4. Select language/date by following the instructions below.
Language
5. Press ☼ to illuminate the display.
6. Press Menu.
7. Scroll to Setting with the scroll button (☼/b ). Press OK.
8. Scroll to Handset Set. Press OK.
9. Scroll to Language. Press OK.
10.Scroll to required setting. Press OK.
11. Hold down L to return to standby.
Date/Time
12.Press Menu. Scroll to Date/Time. Press OK.
13.Scroll to Date/Time. Press OK.
14.Set date (DD.MM.YY). Press OK.
15.Enter time of day (HH MM). Press OK.
16.Hold down L to return to standby.
English
The display
Indicator
6
Function
Shown within range of the base unit. Flashes when out of range.
INT
Internal call.
Ring signal turned off with the * key.
Handset is connected (during calls).
q
Message indication*.
Caller ID/New SMS received*.
*
Alarm activated.
Battery charge indicator.
INT 1
Handset number (when using more than one handset).
Base 1
The handset is connected to base unit 1.
Press 19
Key lock activated.
Function description for the key shown below the text, e.g. OK to confirm.
* Only functions in certain countries.
To conserve battery power the display is very dark in standby mode,
press ☼ to illuminate.
Base unit indicators
Illuminated on standby, flashes when telephone rings.
English
Area of use
The handset is intended for indoor and outdoor use. It is shock resistant and is protected
against water and dust (IP53), but it must not be immersed in fluid, treated violently or
carelessly.
The base unit and extra charger (+1 only) are intended for indoor use only.
If the handset is damp it should be wiped dry before it is charged!
If the batteries need to be changed, ensure the battery door is properly closed with screws
tightened to ensure water and dust resistance.
Battery
Because batteries only have a certain lifespan it is quite normal that call time and standby time
will decrease somewhat compared to the specifications when the telephone is used regularly.
Fully-charged batteries (10 hours charging) will last for approx. 120 hours standby time or
approx. 10 hours call time. These operation times apply at normal room temperature.
Full battery capacity will not be reached until the batteries have been charged 4-5 times.
The base unit has an automatic charging mechanism that prevents the batteries from being
overcharged or damaged due to prolonged charging.
The display is unlit during charging, to check battery level press ☼ or lift the handset.
Please note!
The base unit should not be located close to other electrical equipment, in direct sunlight or near any other strong
heat source! This is to minimize the risk of interference.
It is normal for the device to become warm during charging and is not dangerous.
Use only DORO original batteries. The guarantee does not cover any damage caused by incorrect batteries.
Coverage
The telephone’s coverage will vary normally between 40 and 300 metres, depending on
whether the radio waves carrying the conversation are blocked by obstacles in their path.
Coverage can be improved by turning ones’ head so that the handset is aligned with the base unit.
Sound quality declines as the limit is reached until the call is finally interrupted.
Making a call
1. Enter the required number.
2. Press O , and the number will be dialled. Press L to terminate the call.
Receiving a call
1. Wait for the handset to ring.
2. Answer the call by pressing O . Terminate the call with L .
Please note!
You can press Menu during a call to access certain functions. See Operator Services for more information.
When the battery is low or when there is too great a distance to the base unit the telephone will be unable to
connect to a line.
English
Volume control
Adjust the volume during a call with the scroll button.
Turning the handset Off/On
Press and hold the L button for a few seconds to turn the handset off or on.
Redialling
Press Redial and scroll through the 10 last dialled numbers. Press O .
In order to protect codes, e.g. for Internet banking, only numbers shorter than 18 digits are saved.
Temporary silent mode
When someone calls, you can press Silent to turn off the handset ring signal.
Key lock
Lock the keypad by pressing # until Press 19 is displayed.
Unlock keypad by pressing 19.
The keypad will be unlocked if the handset is placed in the base unit.
Speaker/Group listening
The handset can be placed on the table, leaving your hands free. Group listening means that
you hold the handset to your head in the usual way, but the call will be heard through the
speaker if you want other people in the room to listen.
1. Once the call has been connected, press O several times to switch
between group listening, speaker mode and handset mode.
2. Press L to terminate call.
Please note!
Please remember that in handsfree speaker mode, it is only possible for one person at a time to talk.
Paging
The handset will ring when J on the base unit is pressed. The signal will stop automatically
after a while or if the L button on the handset or the J button on the base unit is pressed.
English
Phonebook
The phonebook can store 100 names and telephone numbers.
If you subscribe to a caller ID service the name in the phonebook will be shown
for incoming calls.
It is possible to choose between various ring signals (VIP) for the numbers
saved in the phonebook (only functions if you subscribe to a caller ID service).
You can select the desired VIP melody, see the Signals chapter.
However, the first signal can sound normal before the number is compared with the phonebook.
Letters
Each number key has been allocated certain letters. The phone book is arranged according to
the order of the buttons, which is not the same for all languages.
0.......................................................[Space]
#.......................................................Change
between upper/lower case
Store name/number in handset
1. Press b . Press Option.
2. Scroll to Add Entry. Press OK.
3. Press equivalent digit key one or more times for desired name.
4. Scroll to <Number>. Enter the telephone number, including the area code. Press OK.
You can insert a space in the telephone number by pressing and holding R.
Dialling from the phonebook
1. Press b .
2. Scroll among the entries. It is also possible to make a quick search in the phonebook
by pressing the equivalent numeral button for the first letter one or more times.
3. Press O , and the number will be dialled.
Changing telephone numbers/names
1. Press b . Scroll to desired entry. Press Option.
2. Scroll to Edit Entry. Press OK.
3. Edit the name/number. Press OK.
Deleting entries
1. Press b . Scroll to desired entry. Press Option.
2. Scroll to Delete Entry or Delete List. Press OK.
3. Confirm by pressing OK.
English
Copying to/from SIM card
Development of SIM cards is very rapid, and therefore we cannot guarantee that all available
cards on the market will function.
1. Insert the SIM card into the base unit.
2. Press b . Press Option.
3. Scroll to Copy from/to SIM. Press OK. Some SIM cards are protected by a PIN code.
4. After a short time you can scroll to required entry. Press Option.
5. Scroll to Copy Entry or Copy All. Press OK.
6. Downloading may take a few minutes. You can then remove the SIM card.
From SIM card
Check that the phonebook has been properly stored on the SIM card. Refer to the mobile phone user manual.
Check that the correct country code has been saved, see Other Settings. A maximum of 14 letters and 20 digits
can be copied per entry. The phonebook has a maximum size which cannot be exceeded. Entries are copied
according to position, which may not be in alphabetical order.
To SIM card
You can also add an area code when copying entries to the SIM card.
Incoming numbers (caller ID)
The display shows you who is calling and the 50 most recent incoming numbers.
New SMS message/Caller ID is indicated by * in standby mode.
If the same number calls in more than once it will be saved as only one entry.
Please note!
This function requires a subscription from your service provider.
Retrieving and dialling incoming numbers
1. Press *. Scroll to Caller list. The number of new calls is displayed. Press OK.
2. Select New Calls or All Calls. The number of received calls is displayed. Press OK.
3. Scroll to selected entry. Press O to dial number or press Back.
Caller identification messages
Date/time not set.
Unavailable
No information received, e.g. an international call.
Withheld
Number cannot be shown. Possibly a call from a telephone exchange.
Deleting a number
1. Scroll to required entry according to description above.
2. Press Option and scroll to Delete or Delete List. Press OK.
3. Confirm by pressing OK.
Storing a number in the phone book
1. Scroll to required entry according to description above.
2. Press Option and scroll to Copy to Phone. Press OK.
3. Enter names in the same way as for the phonebook.
English
SMS messages
This feature requires a current Caller Id subscription to be in place and only applies
to text message users (SMS). Please remember individual SMS features are country
dependent and will vary or be unavailable. Further details regarding the SMS text
message service are available from you local network provider.
Maximum 160 signs per message. The memory can store up to 30 messages.
New SMS message/Caller ID is indicated by * in standby mode.
Australia only
Short Message Service (SMS) facilities have been automatically activated for most Telstra®
telephone services across Australia. SMS services may not be available to, or between, other
service providers networks. A description of the SMS service provided by Telstra® can be
found at: http://www.telstra.com.au/talkingtext
There is no need to register your telephone with the Telstra® fixed line SMS service as your
DORO telephone is supplied pre-configured. When you send your first text message the
Telstra® network will automatically accept and deliver it (providing the destination offers a
compatible service).
Settings for your Telstra® fixed line SMS service can be changed by calling 0198 339 999 and
following the prompts.
UK only
- Program the correct SMS Center numbers as described on next page under the section
Entering the telephone numbers in SMS centre/operator.
E.g. for BT:
Send: 14701709400
Receive: 080058752
Terminal No.: 9
- To register for the SMS text messaging service you can either send a text message to
another telephone number, or text REGISTER to 00000.
- Should you wish to reset your SMS settings text RESET to 00000.
- You can also request a delivery report by entering * 0 # prior to any SMS message.
- An SMS message can also be sent to a telephone number that does not support this
feature, and will be received as a voice message.
- Not all networks (ie mobile, cable) are compatible.
Please note!
The available functions/services vary depending on service provider. It may not be possible for all service providers
to offer sending/receiving SMS messages on all types of units.
Some operators offer a service where you can send an SMS message to someone who does not have SMS
equipment. The message will then be read by a computer voice.
Failed SMS messages are stored in the outbox.
English
Read new SMS/inbox
1. Press *. SMS is displayed. Press OK.
2. Scroll to Inbox. The display shows the number of messages. Press OK.
3. Scroll to selected entry. Press Read. Read your message.
4. Press Option. Scroll to the required selection:
- Use (reply/forward)
- Delete
- Delete list
- Copy to Phoneb
5. Press OK and follow the instructions in the display.
Write new SMS message
1. Press *. SMS is displayed. Press OK.
2. Scroll to Write Message. Press OK.
3. Select if your message is to be sent as SMS (most usual) or e mail*. Press OK.
4. Press the equivalent number key for the desired text.
# switch between upper/lower case A/a
0 insert a space or special character
5. Press Option. Scroll forward to send or store the message. Press OK.
6. Enter the telephone number, or press Option to retrieve
the telephone number from the telephone book.
7. Press Option.
8. Scroll to Send. Press OK.
9. The display shows if the SMS has been sent successfully or not. If no
error report is shown, the message has been sent successfully.
*Requires special subscription. Remember to store special numbers in the service centre for E
mail below.
Entering the telephone number in SMS centre/operator
Check that the correct number (without the terminal number) for your operator has been
programmed. See details for UK/Australia on the previous page.
1. Press *. SMS is displayed. Press OK.
2. Scroll to Service centre. Press OK.
3. Scroll to selected entry. Press OK.
4. Enter number. Press OK.
Remember to enter the correct terminal number as well, e.g. 0.
The available functions/services vary depending on service provider.
First ring signal
It may be a good idea to turn off the first ring signal if you are subscribing to an SMS service,
in order to avoid any ring signal for incoming SMS.
1. Press *. SMS is displayed. Press OK.
2. Scroll to Set First Ring. Press OK.
3. Scroll to required setting. Press OK.
English
Network services
Most usual operator/extra services can be accessed via the menu or with the menu
buttons during a call. Some functions are pre-programmed but is not certain that all
functions will work on delivery as this will depend on the country of installation/
operator. You can change the codes that are sent, see Other Settings.
Please note!
You may have to pay extra for some services, contact your service provider for more information. Some services
will not work unless you have contacted your service provider to activate them.
Via the menu
1. Press Menu. Scroll to Net Services. Press OK.
2. Scroll to required service.
- Withhold No Withhold your number from recipient. The code for
this service must be programmed manually, see Other Settings.
- Call Divert Incoming calls are always diverted to another number.
- Call Waiting Function off/on. This is a practical function for
avoiding problems with temporary modem connections.
- Wake up Enter the time when you wish to receive your wake up alarm call. HH:MM.
3. Press OK. Follow the instructions on the handset/display.
4. Press L to terminate call.
During a call/On-line Menu
1. Connect an external call. Press Menu. Scroll to desired service (e.g.):
- Insert Pause May be required when dialling via PBX exchange.
- Mute to enable/disable the microphone.
- Make 2nd Call Dial a second number, e.g. to use in a conference or three-way call (=R).
- Ringback When the number is free you will hear a quick ring signal (=5).
- Phonebook To search the phonebook.
- INT Call Call another handset (+1...).
- Tone Temporary change to tone dialling.
- Notebook Store a number temporarily in the redial memory.
- Reject Call Reject an incoming call (=R 0).
- End Current Toggle between calls/End current call (=R 1).
- Toggle Toggle between calls/Answer incoming waiting call (=R 2).
- Conference Conference/Three-way call (=R 3).
2. Press OK.
Date/Time/Alarm
1. Press Menu. Scroll to Date/Time. Press OK.
2. Scroll to required setting. Press OK.
Alarm Clock
Date/Time
An activated alarm is indicated in standby mode by
. When the alarm goes off, an audio signal is heard for 60 seconds.
Press any key on the handset to turn off. The volume is determined
by the set ring signal level. If the symbol is not illuminated in standby
mode, the reason may be that the clock is not set.
Setting of date/time is described in Connection.
English
Other settings
1.
2.
3.
4.
5.
Press Menu.
Scroll to Setting. Press OK.
Scroll to Handset. Press OK.
Scroll to required function e.g. Language. Press OK.
Scroll to required setting. Press OK.
Auto Answer
The handset answers incoming calls when it is lifted from the base unit.
Vibrator
The vibrator that is activated when the phone rings can be turned off/on.
Select Base
Only used in systems with more than one base unit.
Language
Language setting is explained in Connection.
Country code
See separate description for programming country codes.
Baby Monitor
Cordless baby monitor, see separate description.
Abbr number
Programming of speed dial numbers. To call one of these, press down
the corresponding button 1 - 3.
Network
It is possible to change the codes for operator services (CF=Call Forwarding).
Register
To register a new handset, see separate description.
Handset PIN
You can change the pin code (0000 on delivery).
Default Set
Resetting the handset.
Cordless Baby Monitor
If you place the handset near the child (but out of reach), then you will receive a call if the
sound from the child’s room exceeds a set sensitivity level. You will then be able to hear the
child for one minute.
1. Access Baby Monitor according to instructions on previous page.
2. Scroll to desired setting as below with scroll button.
Activ.
Activate function off/on.
Call to
Select internal call (applies to +1...) or external call.
Level
Setting of sensitivity level.
3. Press OK. The display shows Baby Monitor On.
4. Test the setup before use by shouting into the handset which is to be
placed near the child, and have someone listen to the other unit.
5. To avoid disturbing the child with incoming calls, you can turn
off the ring signal by pressing and holding the * key.
6. Turn off the function by selecting OFF.
Important!
The Baby Monitor is a useful help, but it is obviously not a replacement for
regular baby care.
Ensure the equipment is always out of the child’s reach. Never place the
handset in the cot.
We recommend activating the Call Waiting function on the receiving unit, e.g.
a mobile phone, to avoid missing a call.
10
English
Country Code
To copy entries from the SIM card using “+”, it is often necessary to enter certain
information.
Telephone numbers on the SIM card that have been stored with the international dialling
code 00 followed by the country code will also be changed. Example of settings for UK:
Country code (domestic): 44
International prefix: 00
National prefix: 0
Register
Every new handset must be registered in order to use a base unit. Every base unit can manage
up to 6 different handsets.
See Expanded Systems for more information.
1. Access Register according to instructions on previous page.
2. Scroll to required base unit (√=previous reg.). Press OK.
3. Enter the base unit PIN code (0000 on delivery). Press OK.
4. Press down the J search button on the base unit until the indicator flashes.
5. After a few seconds (max 60) any unused handset number will be displayed.
Select one of these by pressing the corresponding key.
Signals and display
1.
2.
3.
4.
Press Menu.
Scroll to Ringer Set or Display. Press OK.
Scroll to desired function, e.g. Contrast. Press OK.
Scroll to required setting. Press OK.
Signals
Ringer Volume/
Ringer Melody
The handset’s ring signal can be adjusted.
VIP Melody
Select melody for VIP numbers in phonebook.
Key Beep
Heard when buttons are pressed.
SMS Alert
Heard when a new SMS message is received.
Display
Contrast
The contrast in the display can be adjusted to several
levels.
Wallpaper
The background image in the display can be changed.
Colour Scheme
The colour of the menus can be changed.
Handset Name
The text shown on standby can be altered.
11
English
System settings
System PIN is 0000 on delivery.
1. Press Menu. Scroll to Setting. Press OK.
2. Scroll to Base Set. Press OK.
3. Scroll to desired function e.g. Access Code. Press OK.
4. Scroll to required setting. Press OK.
Ring Priority
You can decide whether all handsets should ring at once when there
is an incoming call, or if one handset should start ringing before the
others. You can set the number of ring signals for this function as well.
Care dial
The CARE memory is used to store e.g. a security number. The call
will be connected via the speaker function by pressing the line key for
about a second.
Call barring
Different types of outgoing calls are blocked, see separate description.
Net. Provider
Settings to use different service providers, see separate description.
Dial Set
Settings for advanced installations, see separate description.
Deregister
To deregister a handset from a base unit.
Base PIN
You can change the pin code (0000 on delivery).
Default Set
Reset base unit.
Dial settings
These settings are usually not changed. System PIN is 0000 on delivery.
1. Press Menu. Scroll to Setting. Press OK.
2. Scroll to Base Set. Press OK.
3. Scroll to Dial Set. Press OK.
4. Scroll to desired function e.g. Access Code. Press OK.
5. Scroll to required setting. Press OK.
Access Code
Enter the digit that obtains an external line and the telephone will
insert a pause automatically when a number starts with that digit.
Recall Time
Only for adaptation to international company switchboards.
The UK setting is 98 ms. (600 ms in New Zealand).
Emergency No
Emergency numbers are excluded from call blocking functions.
Dialling Mode
The dial mode setting for UK must be Tone (Europe only).
12
English
Call barring
The telephone can block certain types of outgoing calls.
System PIN is 0000 on delivery.
1. Access Call Barring according to description on previous page.
2. Scroll to selected handset. Press OK.
3. Scroll to Barring Mode. Press OK.
4. Scroll to required setting. Press OK.
INT call
Only allows internal calls. Blocks all outgoing calls.
Barred no.
Blocks the numbers you select, see below.
Setting barred numbers
Enter the sequence of digits for the type of call to be barred. Example: select 00 to block
international calls. Three different bars of up to eight digits each may be used.
1. Access Call Barring according to description on previous page.
2. Scroll to selected handset. Press OK.
3. Scroll to Barring Number. Press OK.
4. Scroll to selected entry. Press OK.
5. Enter required digits (max 8). Press OK.
6. Activate the Barred no. setting according to description on top of page.
Net. Provider
To choose a certain service provider, one would usually dial a prefix code before the actual
phone number.
This function will automatically select the telephone network provider, e.g.:
Provider X (prefix 9301) for dialling international calls. Set up the LCR so that all phone
numbers starting with 00 will be changed to 930100. System PIN is 0000 on delivery.
1. Access Net. Provider according to description on previous page.
2. Scroll to the required preselection. Press OK.
3. Enter sequence to be sensed/exchanged (up to 5 digits, e.g. 00).
4. Scroll to <Number>. Enter sequence to be added (up to 10 digits, e.g. 930100).
5. Scroll to required setting Off/ On. Press OK.
Please note!
To place your call with a certain network provider, you must be a registered subscriber.
The display always shows the entered number (not the number actually being dialled).
You can have up to four Net Provider options simultaneously.
If the number sensing option is not selected, the digits will be added to every call.
13
English
Expanded system (+1)
All handsets included in the package are registered to the base unit already. The handset
number used for internal calls is shown in the display on standby.
The base unit should be positioned centrally so that the coverage area is roughly equal for all
handsets.
You can register up to 6 handsets to one base unit.
This model is GAP (Generic Access Profile) compatible, which means that the handset and the base unit can
both be used with most other GAP compatible units irrespective of manufacturer. However the GAP protocol
cannot guarantee that all functions may be accessed.
INT calls
1. Press Menu.
2. Scroll to INT Call. Press OK.
3. Press All or enter the handset number 1 - 6 for the handset you wish to call.
A tone will be heard if an external call comes in while an internal call is in progress. Answer
the external call by pressing Accept.
Conference/Transferring calls between handsets
1. While an external call is connected on line.
2. Initiate an internal call as described above.
3. Press L to transfer the call or press Conf for conference.
Specific absorption rate (SAR)
This device meets approved international safety requirements for exposure to radio waves.
This telephone measures 0.1 W/kg (measured over 10g tissue).
The max. limit according to WHO is 2W/kg (measured over 10g tissue).
Declaration of conformity
Doro hereby declares that the Doro 760X conforms to the essential requirements and other
relevant regulations contained in the Directives 1999/5/EC and 2002/95/EC.
A copy of the manufacturers’ declaration is available at www.doro.com/dofc
14
English
Troubleshooting
Check that the telephone cord is undamaged and properly plugged in. Disconnect any
additional equipment that may be connected, e.g. extension cords and other phones. If the
problem is resolved, the fault is with the other equipment.
Test the equipment on a known working line (e.g. at a neighbour’s). If the product works then
the fault is with your telephone line. Please inform your local telephone company.
No number shown when ringing
- This function requires a subscription from your service provider.
- A switchboard cannot usually pass on incoming numbers.
Warning signal while talking/Cannot connect
- The batteries may be running low (recharge the hand unit).
- The hand unit may be (nearly) out of range. Move closer to a base unit.
Telephone does not work
- Check that the adapter and telephone cord are connected to
the base unit and to their respective wall sockets.
- Check that you have selected Tone Dial, see System Settings/Dial.
- Check the charge status of the handset batteries.
The telephone continues to ring
- The telephone’s ring signals do not follow the line signal, which means that
the signal may continue for up to 10 seconds after answering a call.
SMS does not work
- In order for this feature to function, you must subscribe to
the SMS service from your network provider.
- Check that the correct telephone number is stored for each service.
If the telephone still does not work, contact the place of purchase. Don’t forget the receipt or
copy of the invoice.
UK
If you cannot resolve the fault using the faultfinder section, technical support is available by email
on: [email protected] Further contact details are available on our website: www.doro-uk.com
Guarantee
This product is guaranteed for a period of 12 months from the date of purchase. In the
unlikely event of a fault occurring during this period, please return the item with a copy of the
purchase receipt to your place of purchase. Proof of purchase is required for any service or
support required during the guarantee period.
This guarantee shall not apply to a fault caused by an accident or a similar incident or damage,
liquid ingress, negligence, abnormal usage, non-maintenance or any other circumstances on
the user’s part. Furthermore, this guarantee shall not apply to a fault caused by a thunderstorm
or any other voltage fluctuations. (As a matter of precaution, we recommend disconnecting the
telephone during a thunderstorm.)
This guarantee does not in any way affect your statutory rights. Batteries are consumables and
are not included in any guarantee. This guarantee does not apply if other batteries than DORO
original batteries have been used.
15
English
Australia and New Zealand
Products permitted for connection to the telephone network are marked with
in Australia
and
in New Zealand. These marks indicate the products comply with the
regulations and can be used without concern in the country of purchase.
If you believe this product is malfunctioning, please refer to the relevant section and/or
consult the troubleshooting guide in this manual to ensure that you have followed the
instructions carefully. As an alternative you can visit our web site for FAQ’s or send an e-mail
for a prompt reply.
Electro Magnetic Radiation (EMR)
This telephone complies with applicable safety requirements for exposure to radio waves.
The mean power of this telephone is not greater than 14 mW.
This is below the 20mW limit at which testing is required.
Guarantee
This product is guaranteed for a period of 12 months from the date of purchase.
Should you experience difficulties with the product, please contact us for assistance. If the
product is then found to be faulty you will be asked to return it directly to us with a copy of
the purchase receipt. This guarantee shall not apply to a fault caused by an accident or a similar
incident or damage, liquid ingress negligence, abnormal usage, not reasonably maintained or
any other circumstances on the purchaser’s part. Furthermore, this guarantee shall not apply
to a fault caused by a thunderstorm or lightning, excessive or any other voltage fluctuations
or faults on the telephone line. (As a matter of precaution, we recommend disconnecting the
telephone during a thunderstorm).
This guarantee does not affect your statutory rights.
AUSTRALIA
DORO Australia Pty Ltd
PO Box 6760
Baulkham Hills BC NSW 2153 Australia
Consumer Support
Ph:
Ph: 1300 885 023 Fax: (02) 8853-8489
Email: [email protected]
Web site: www.doro.com.au
NEW ZEALAND
Atlas Gentech (NZ) Limited
Private Bag 14927
Panmure
Auckland
New Zealand
Consumer Support
Ph: 0900-500-25 (Toll Call)
Fax: (09) 574-2722
Email: [email protected]
16
English
REN (RN for New Zealand)
The REN (Ringer Equivalence Number) or (RN) is of significance only if you wish to connect
more than 1 telephone to your telephone line. A standard telephone line has a maximum REN
capacity of 3 (RN of 5). It is possible to connect 3 devices with a REN of 1 (RN of 1) with no
degradation to the product’s performance. Exceeding this limit may cause the volume of the
ringer in any phone to decrease or not ring at all.
ALL PRODUCTS
The grant of a Telepermit for any item of terminal equipment indicates only that Telecom has
accepted that the item complies with the minimum conditions for connection to its network. It
indicates no endorsement of the product by Telecom, nor does it provide any sort of warranty.
Above all, it provides no assurance that any item will work correctly in all respects with
another item of Telepermitted equipment of a different make or model, nor does it imply that
any product is compatible with all of Telecom’s network services.
This equipment shall not be set to make automatic calls to the Telecom “111“ Emergency Service.
This equipment may not provide for the effective hand-over of a call to another device
connected to the same line.
This equipment should not be used under any circumstances that may constitute a nuisance to
other Telecom Customers.
CND PRODUCTS
If a charge for local calls is unacceptable, the “DIAL’’ button should NOT be used for local
calls. Only the 7 digits of the local number should be dialled from your telephone. DO NOT
dial the area code digit or the “0’’ prefix.
17
English
Version 1.0