1
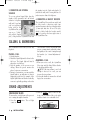
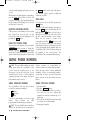
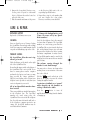
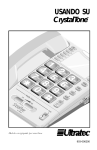
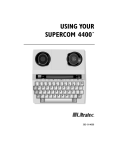
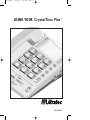
305-009402
11/23/05
2:22 PM
Page 1
USING YOUR CrystalTone Plus™
305-009402
305-009402
11/23/05
2:22 PM
Page 2
Ultratec, Inc.
450 Science Drive
Madison, WI 53711
(608) 238-5400 (Voice/TTY)
(608) 238-3008 (Fax)
[email protected] (Email)
www.ultratec.com
Third edition
November 2003
First Printing
© 1999, 2000, 2003 Ultratec, Inc.
is a registered trademark of Ultratec, Inc.
CrystalTone Plus is a trademark of Ultratec, Inc.
305-009402
11/23/05
2:22 PM
Page 1
CONTENTS
Contents . . . . . . . . . . . . . . . . . . . . . . . . .1
Overview . . . . . . . . . . . . . . . . . . . . . . .2-3
Installation . . . . . . . . . . . . . . . . . . . . .4-6
Calling & Answering . . . . . . . . . . . . . . .6
Sound Adjustments . . . . . . . . . . . . . . .6-7
Using Call Features . . . . . . . . . . . . . . .7-8
Saving Phone Numbers . . . . . . . . . . .8-9
Care & Repair . . . . . . . . . . . . . . . . . .9-10
Specifications . . . . . . . . . . . . . . . . .10-12
Index . . . . . . . . . . . . . . . . . . . . . . . . . . .13
Safety Instructions . . . . . . . . .Back Cover
CONGRATULATIONS!
Thank you for purchasing the Ultratec
CrystalTone Plus™ amplified telephone with built-in speaker phone.
With this phone you will be able to
adjust not only the volume but also the
clarity and quality of the sound that is
transmitted through the handset. Your
CrystalTone Plus offers one of the
highest levels of amplification available
(up to 50 dB), and it is hearing-aid
compatible.
4
1
2
7 8 5 6
9
0
#
3
CONTENTS
■
1
305-009402
11/23/05
2:22 PM
Page 2
OVERVIEW
2
TOP VIEW
1.
2.
3.
4.
Handset hook
Audio jack
Ring Flasher
Speed-Dial
Emergency buttons
5. Program button
6. Speed-Dial
Directory buttons
7. Directory label
8. Signal light
9. Number buttons
10. Redial button
11. Flash button
12. Hold button and
light
13. Outgoing Volume
button and light
14. Speaker Phone
button and light
15. Conversation Tone
control
16. Ringer on/off switch
17. Volume button and
light
18. Handset and Speaker
Phone Volume slide
control
4
3
5
PROGRAM
Area:
1
6
Signal
2
8
3
4
1
7
5
9
■
OVERVIEW
8
9
16
10
14
18
VOLUME
LOW
20
21
22
DIAL
23
RING VOLUME
24
RING PITCH
25
REDIAL
FLASH
HOLD
SPKR
PHONE
17
ON/OFF
HIGH
19
(shown without desktop/wall adapter)
2
7
10
11
12
13
6
BOTTOM VIEW
19. Power jack
20. Battery
compartment
21. Telephone line jack
22. Handset cord jack
23. Dial switch
24. Ring Volume switch
25. Ring Pitch switch
Telephone:
15
305-009402
11/23/05
2:22 PM
Page 3
The CrystalTone Plus works just like a FLASH BUTTON
standard telephone. It also has some very Some telephone service features like Call
helpful features. Please take a few minutes to Waiting require a “hook flash” which is a very
familiarize yourself with its full capabilities.
brief interruption of the connection like
hanging up the phone for one second. The
SPEAKER PHONE
timing for a hook flash can be tricky but the
Have your hands free by pressing the FLASH button times it perfectly so you will not
SPKR PHONE
button instead of lifting the accidentally disconnect your call.
handset. The speaker phone offers traditional
volume levels only, adjustable up to 20 dB.
HOLD BUTTON
You can put a call on hold by pressing the
VOLUME (VOL)
HOLD button. Neither you nor the person on
Everyone in your house can use the the other end of the line will hear sounds from
CrystalTone Plus. When you need ampli- the line.
fication, just press the VOL button. The
CrystalTone Plus remembers any volume and LOUD RING WITH RING FLASHER
tone adjustments made previously. When you The ringer has a separate volume control so
press VOL , the volume increases gradually so you can select the ring volume and pitch that
you will not be surprised by a sudden change. work best for you. Plus, the Ring Flasher lights
The amplification turns off when the handset up whenever the phone rings to provide a
is hung up or when VOL is pressed again.
visual alert.
TONE SLIDE CONTROL
Adjust the quality of sound that comes
through the handset to the range that works
best for you. With the TONE slide control, you
can increase low- or high-frequency sounds.
SPEED-DIAL BUTTONS
Save up to 10 frequently called numbers for
easy dialing. Once the number is saved, simply
lift the receiver and press the desired SpeedDial button to place a call. Plus, there are
three special buttons that can be programmed
with emergency numbers. You choose what
number is stored for each button—the
emergency buttons are NOT preprogrammed.
REDIAL BUTTON
OUTGOING VOLUME
You can amplify the sound of your voice being
heard by the person on the other end of the
line with the
button (Outgoing
Volume).
SIGNAL LIGHT
The red Signal light visually indicates things
such as a dial tone or a busy signal. It reacts
to sound coming over the telephone line to let
you know what is happening. To indicate a
dial tone, it lights steadily. A busy signal is
indicated by quick flashing. When the other
phone is ringing, the Signal light blinks
slowly along with each ring.
AUDIO JACK
When you get a busy signal, you can call back You can connect some assistive listening
later with the press of a button. The REDIAL devices and headsets directly into the
button automatically calls the last number CrystalTone Plus 3.5 mm audio jack.
that was dialed (up to 32 digits long).
OVERVIEW
■
3
305-009402
11/23/05
2:22 PM
Page 4
INSTALLATION
To set up the CrystalTone Plus, all you do is
insert a backup battery, connect the telephone
line, then plug it in! You can also choose to
mount the phone on the wall.
CrystalTone Plus includes the following parts:
✔ CrystalTone Plus amplified phone
✔ Handset with coiled cord
✔ AC adapter
✔ 7-foot telephone line cord
✔ 6-inch telephone line cord (for use when
mounting on wall)
✔ Desktop/wall adapter
CAUTION! Do not plug the CrystalTone
Plus into any telephone line other than a
standard, analog telephone line. Connection
to a digital system may damage the
CrystalTone Plus or the telephone system and
will void your warranty.
1. SELECTING A LOCATION
The CrystalTone Plus requires a standard
(analog) telephone line with either pulse or
tone (also called touchtone) dialing. To use
the CrystalTone Plus with a digital system,
some modifications to the telephone line are
required.
Set up the CrystalTone Plus in a place where:
✔ There is an electrical outlet nearby.
✔ There is a phone jack nearby.
✔ The Ring Flasher is easily visible.
✔ The surface it is set on, or mounted to, is
stable and secure.
✔ The area is protected from excessive heat or
humidity.
2. INSTALLING THE BACKUP BATTERY
Installing a battery allows you to use the
CrystalTone Plus continuously for one hour
during a power failure. The battery does not
4
■
INSTALLATION
save Speed-Dial numbers. Speed-Dial memory
is powered by the telephone line.
CAUTION! Disconnect the telephone line
and the power adapter before opening the
battery compartment.
Use a 9V alkaline battery. The battery
compartment is on the bottom of the
CrystalTone Plus.
1. Unplug both the telephone line and the
power adapter, if attached.
2. If it is connected,
remove the desktop/wall adapter.
(This will be replaced after setup
is complete.)
3. Use something
small like the tip of
a pencil to push in
the release on the
Slide
battery cover. The
release is marked
by the
symbol.
4. Hold down the
release and slide
Hold down
the cover toward
the outer edge of
the phone. Then,
pull up the cover.
5. Snap the battery
connector onto the
battery.
6. Place the battery
into the compartment making sure
that the connector
and wire are completely inside the
compartment and will not be pinched
when the cover is replaced.
7. Replace the battery cover, making sure it
snaps securely into place.
305-009402
11/23/05
2:22 PM
Page 5
3. SETTING PULSE OR TONE DIALING
Mounting on a Wall
The CrystalTone Plus is preset to use tone 1. Flip the handset
dialing because this is used by most telephone
hook over so that
lines. If your line uses pulse dialing, move the
1
1
the hook points up
4
4
switch located on the bottom of the
and will hold the
7
7
CrystalTone Plus to the “Pulse” setting.
handset when you
hang it up.
4. SETTING UP THE CrystalTone Plus 2. Plug the AC adapter cord into the round
power jack on the bottom of the
For Desktop Use
CrystalTone Plus.
3. Plug the 6-inch telephone line cord into
1. Plug the AC
the CrystalTone Plus.
adapter cord into
4. Replace the desktop/wall adapter so the
the round power
larger side is down. This aligns the
jack on the bottom
CrystalTone Plus so that it is flat when
of the CrystalTone
mounted on the wall.
Plus. If the
5. Plug the telephone
desktop/wall
cord into the wall
adapter is not removed, remove it now
jack. Then, line up
(see illustration on page 4).
the holes in the
2. Plug the telephone line cord into the
wall-mount
telephone line jack on the bottom of the
bracket with the
CrystalTone Plus and the other end into
mounting studs on
the wall phone jack.
the wall plate. Hook the bracket on the
3. Plug the AC adapter into an AC wall outlet.
studs then pull down.
4. Replace the desktop/wall adapter so that
6.
Plug the AC adapter into an AC wall outlet.
the larger side is along the top edge of the
The power cord should not lie across any
CrystalTone Plus.
walkway.
5. Set the CrystalTone Plus on a sturdy
surface such as a desk, table or counter.
1
2
3
INSTALLATION
■
5
305-009402
11/23/05
2:22 PM
Page 6
5. CONNECTING AN EXTERNAL
SIGNALER
To use an optional signal light, plug the
signaler (sold separately) into an unused
extension telephone
wall jack. If you have
only one jack that is
being used by the
CrystalTone Plus, you
can use a “Y-Jack”
(also called a “duplex
jack”). Plug both the CrystalTone Plus and
the signaler into the Y-jack and plug the Yjack into the wall jack. You can purchase a Yjack at any store that sells telephones.
6. CONNECTING A HEADSET RECEIVER
The CrystalTone Plus provides an audio jack
for direct audio connections with some
assistive listening technology. A headset with a
3.5 mm jack may also be used. The jack,
which is labeled with the headset symbol
( ), is located on the lower right corner of
the CrystalTone Plus.
CALLING & ANSWERING
The CrystalTone Plus works just like any
telephone.
PLACING A CALL
end of the line. If you do not hear the other
person, you may want to adjust the volume
and quality of the sound coming through
the handset (see “Sound Adjustments”
below).
1. Lift the Handset.
2. Watch the Signal light and/or listen for the
dial tone. The Signal light will stay lit ANSWERING A CALL
1. When you receive a call, the CrystalTone
when there is a dial tone.
Plus rings and the Ring Flasher flashes
3. Dial the number of the person you are
slowly along with the rings.
calling. When the person answers the
NOTE: If the ring volume is not loud
phone, begin your conversation.
enough to alert you to a call, you can
4. During a conversation, you can watch the
increase the ring volume.
Signal light for an indication of what is
happening on the line. For example, if the 2. Pick up the handset to answer the call and
begin your conversation.
Signal light blinks and flashes erratically,
someone is probably speaking on the other
SOUND ADJUSTMENTS
CONVERSATION VOLUME
2. Slide the VOLUME control, located on the
front of the CrystalTone Plus, to the right
To increase the overall volume of the person’s
until the volume is a comfortable level.
voice coming through the handset:
1. Press the VOL button. The red light
VOLUME
LOW
HIGH
comes on.
6
■
INSTALLATION
305-009402
11/23/05
2:22 PM
Page 7
VOLUME
To return the volume to your preferred setting,
press the VOL button at any time during a
conversation. The red light comes on, and the
CrystalTone Plus recalls the settings for:
✔ Conversation Volume
✔ Conversation Tone
Volume through the handset can be amplified
up to 50 dB. Although not amplified, the
speaker phone volume can also be adjusted up
to 20 dB using the VOL button. The
amplification turns off when you hang up the
call.
vious settings. You may wish to adjust the
TONE slide control from time to time depending on with whom you are speaking.
RING VOLUME
You can set the Ringer to Off,
Low, Medium or High with ON RINGER OFF
the switch on the side of the
CrystalTone Plus. Setting
Ringer to Off will also turn
off the Ring Indicator, so it will not light up
when you get a call.
RING PITCH
You can change the ringer
pitch with the switch on the
To adjust the tone of sounds coming through bottom of the CrystalTone
the handset or speaker phone:
Plus. Choose from low,
1. Press the VOL button. The red light comes medium or high pitch.
on.
2. Move the TONE slide
control to experience LOW TONE HIGH
the sound changes
while the other person is
talking. If you slide it up, toward the top of
the phone, more high-pitched sounds will
come through the handset.
3. Each time you press the VOL button, the
CrystalTone Plus will return to your pre-
CONVERSATION TONE
RING PITCH
USING CALL FEATURES
SPEED DIALING
REDIALING THE LAST NUMBER
Save up to 10 frequently called numbers for
easy, one-touch dialing. Plus, you can save up
to 3 emergency numbers. Once the number is
saved, simply lift the receiver and press the
desired Speed-Dial button to place a call.
NOTE: Speed-Dial buttons must be programmed with the desired number before they
will dial. To program the Speed-Dial buttons
see the next section, “Saving Phone
Numbers.”
When you get a busy signal, you can call back
later with the press of a button. The REDIAL
button automatically calls the last number
that was dialed. Just lift the handset and press
the REDIAL button.
USING FLASH
Some telephone service features like Call
Waiting or 3-Way Calling require a “hook
flash” which is a very brief interruption of the
SOUND ADJUSTMENTS
■
7
305-009402
11/23/05
2:22 PM
Page 8
connection like hanging up the phone for one
second.
When using hook flash during a conversation,
press the FLASH button. There is a brief click
or silence on the line. The Signal light flickers
briefly. If using Call Waiting, the second call
should now be connected.
ADJUSTING OUTGOING VOLUME
If the person you are talking to tells you that
they cannot hear you very well, you can
increase the volume of your outgoing voice by
pressing the
button.
USING THE SPEAKER PHONE
You can keep your hands free by pressing the
SPKR PHONE
button instead of lifting the
handset. Pressing SPKR PHONE again hangs
up the call. Pick up the handset to turn off the
speaker. Adjust the speaker phone volume with
the VOLUME control on the front of the phone.
The speaker phone provides traditional
volume up to 20 dB.
USING HOLD
You can put a call on hold by pressing the
HOLD button.
To use the Hold feature during a conversation,
press the HOLD button. Confirm that the red
light above the HOLD button is lit. As long as
this light is on, the person on the other end of
the line cannot hear what you are saying.
When you are ready to resume your
conversation, press the HOLD button a second
time. You can also resume your conversation
from another telephone on the same line. This
is done by hanging up the handset while the
CrystalTone Plus is on hold, then picking up
the handset of the second phone. The
CrystalTone Plus is automatically hung up.
SAVING PHONE NUMBERS
NOTE: The Speed-Dial numbers are saved
using power that the CrystalTone Plus
receives from the telephone line. If you
disconnect it from the wall jack for an
extended period of time, or if the telephone
company experiences an outage, the SpeedDial numbers may be erased.
Ultratec assumes no responsibility for
customer reliance upon this memory feature.
Follow the steps under “Saving Speed-Dial
Numbers” below to set emergency numbers,
except that in Step 4, press the Emergency
button instead of the Speed-Dial Directory
button.
SAVING EMERGENCY NUMBERS
SAVING SPEED-DIAL NUMBERS
The CrystalTone Plus has three buttons
reserved for emergency numbers:
Police
Hospital
Fire
You choose what number is stored for each
button. These buttons are NOT
preprogrammed with emergency numbers.
NOTE: The Speed-Dial buttons with these
symbols are provided only as a convenience.
1. Lift the handset.
2. Press the PROGRAM button.
3. Dial the phone number that you wish to
save just as if you were calling that
number. You can save a number up to 16
digits long.
4. Press the Speed-Dial Directory button that
you wish to use for this number.
5. Hang up the handset.
8
■
USING CALL FEATURES
305-009402
11/23/05
2:22 PM
Page 9
6. Remove the clear, plastic Directory cover:
on the Directory label next to the corUse the point of a pencil or other small
responding Speed-Dial button.
object to lift from the notches located on 8. Repeat these steps for each number that
each side of the cover.
you save. Replace the clear, plastic
7. Write the number and name of the person
Directory cover when you are finished.
CARE & REPAIR
REPLACING BATTERY
Replace the 9-Volt battery once a year.
CLEANING
Never use liquid or aerosol cleaners. Unplug
the CrystalTone Plus and wipe with a damp
cloth. If necessary, use a small amount of mild
soap such as dishwashing soap on the cloth.
PROBLEM SOLVING
My CrystalTone Plus does not ring
when I get a call.
Check the Ringer on/off switch on the right
side of the CrystalTone Plus.
Be sure that the ringer switch on the bottom of
the CrystalTone Plus is not set to Off. If you
have too many phones and/or computer
modems hooked up in your home, you may
have exceeded the “ringer equivalence”
(REN) of your telephone service. Contact your
telephone service provider to verify that your
service is adequate for your needs.
All of my Speed-Dial numbers have
been erased.
There was probably an extended interruption
in the telephone line. The Speed-Dial
numbers are saved using power the
CrystalTone Plus receives from the telephone
line. If you disconnect it from the wall jack or
if the telephone company experiences an
outage, the Speed-Dial numbers may be
erased after about 45 minutes.
If I change the backup battery, will
I have to resave all of my SpeedDial numbers?
Not if the the telephone line is disconnected
for fewer than 45 minutes. The Speed-Dial
numbers are saved using power that the
CrystalTone Plus receives from the telephone
line, not the battery. However, since you must
disconnect the telephone line before opening
the battery compartment for safety reasons,
the Speed-Dial numbers may be erased if the
telephone line is disconnected for an extended
period of time.
The volume coming through the
handset is not loud enough.
You may notice a decrease in volume when
another phone on an extension of the same
line is also off hook.
Slide the VOLUME control on the front of the
phone to the right to increase the volume
coming through the handset.
I experience feedback or a “squeal”
when hanging up the handset or
setting it down on a table.
Press the VOL button to turn off
amplification before setting down the handset
or hanging up.
SAVING PHONE NUMBERS
■
9
305-009402
11/23/05
2:22 PM
Page 10
REPAIR
If your CrystalTone Plus is not working, we
may be able to help you solve the problem over
the telephone. Call Ultratec at the number on
the inside front cover of this manual.
Follow these steps if you need to send the
CrystalTone Plus to our repair center:
1. Pack it in the original shipping carton or a
similar sturdy box.
2. Include a note that describes the problem.
The note will help our technicians find the
problem.
3. Insure the CrystalTone Plus for shipment.
Ultratec or an authorized Ultratec repair
center is not responsible for damage
during shipping to the center.
4. Send the CrystalTone Plus to:
Ultratec National Service Center
5901 Research Park Blvd.
Madison, WI 53719
Email: [email protected]
SPECIFICATIONS
Physical Dimensions
Controls
Dialing
Size: 8.1" x 9.5" x 2.75"
Weight: 2 lb. 4oz. (without
battery)
Memory:
Redial (up to 32 digits)
10 Speed-Dial buttons
(up to 16 digits each)
3 Emergency Speed-Dial
buttons (up to 16 digits
each)
Pulse or Tone
Large Keys:1.15" x 0.8"
Large Print: .65" (62 pt)
Conversation:
Handset Volume
(0-50 dB)
Speaker Phone Volume
(0-20 dB)
Tone
Ringer:
Ring Volume (0-95 dB)
Ring Pitch
Indicator Lights:
Hold
Outgoing Volume
Ring Flasher
Signal
Speaker Phone
Volume On/Off
Function Buttons
Handset
Power
AC Adapter: 12 VDC, 500 mA
(barrell is negative)
Adapter is UL/CSA listed.
Battery:
9V (not included)
Provides 1-hour emergency use
Keypad
Flash
Hold
Outgoing Volume
Redial
Speaker Phone
Volume
10
■
SPECIFICATIONS
Type: HAC (Hearing Aid
Compatible)
Style: K-style
Connections
Line: Plugs into a standard,
analog telephone line
Audio Jack:
3.5 mm
For use with some assistive
listening devices and
headsets.
Approvals
FCC approved
FCC registration number:
D8KUSA-27016-TF-E
REN: 1.1
305-009402
11/23/05
2:23 PM
Page 11
FCC information
This equipment generates and uses radio frequency
energy and if not installed and used properly, that is, in
strict accordance with the manufacturer’s instructions,
may cause interference with the radio and television
reception. The CrystalTone Plus has been tested and
found to comply with the specifications for a Class B
computing device in accordance with the specifications
in Subpart J of Part 15 of the FCC Rules. These rules are
designed to provide reasonable protection against radio
frequency interference in residential installations.
There is no guarantee that interference will not occur
during use. You can determine if this equipment causes
interference to radio or television reception by turning
the CrystalTone Plus on and off while the television or
radio is on.
If this equipment does cause interference the user is
encouraged to try to correct the interference by one or
more of the following measures:
– Reorient the radio or television receiving antenna.
– Move the CrystalTone Plus further away from the
radio or television.
– Plug the CrystalTone Plus into a different outlet so
it is on a different branch circuit than the television
or radio.
– If necessary, consult an experienced radio/television
technician or the manufacturer for additional suggestions.
The user may find the following booklet prepared by the
Federal Communications Commission helpful:
Interference Handbook. This booklet is available from
the Superintendent of Documents, U.S. Government
Bookstore, 310 W. Wisconsin Ave., Suite 150, Milwaukee,
WI 53203, (414) 297-1304 (voice).
This equipment complies with Part 68 of the Federal
Communications Commission (FCC) rules for the
United States.
The telephone jack used on the CrystalTone Plus
complies with FCC Part 68, Subpart F rules and
regulations and is an RJ11C.
A label is located on the underside of the CrystalTone
Plus containing the FCC registration number and the
Ringer Equivalence Number (REN). You must, upon
request, provide the following information to your local
telephone company: USOC Jack Type: RJ11;
REN: 1.1.
Should you experience trouble with this telephone
equipment, please contact:
Ultratec National Service Center
5901 Research Park Blvd.
Madison, WI 53719
email: [email protected]
The REN is used to determine the quantity of devices
which may be connected to the telephone line. Excessive
RENs on the telephone line may result in the devices not
ringing in response to an incoming call. In most, but
not all, areas the sum of RENs should not exceed five
(5.0). To be certain of the number of devices that may be
connected to a line, as determined by the total RENs,
contact the local telephone company.
If trouble is experienced with your CrystalTone Plus, for
repair or warranty information, please contact Ultratec
Inc. Customer Service at (608) 238-5400 (V/TTY). If the
equipment is causing harm to the telephone network,
the telephone company may request that you disconnect
the equipment until the problem is resolved.
This equipment cannot be used on public coin phone
service provided by the telephone company. Connection
to party line service is subject to state tariffs.
Your telephone company may discontinue your service if
your equipment causes harm to the telephone network.
They will notify you in advance of disconnection, if
possible. During notification, you will be informed of
your right to file a complaint to the FCC.
Occasionally, your telephone company may make
changes in its facilities, equipment, operation, or
procedures that could affect the operation of your
equipment. If so, you will be given advance notice of the
change to give you an opportunity to maintain
uninterrupted service.
Other than replacing the batteries, the CrystalTone Plus
does not have any user-serviceable parts.
SPECIFICATIONS
■
11
305-009402
11/23/05
2:23 PM
Page 12
INDUSTRY CANADA WARNINGS
AVIS D'INDUSTRIE CANADA
NOTICE: The Industry Canada Label identifies certified
equipment. This certification means that the equipment
meets telecommunications network protective,
operational and safety requirements as prescribed in the
appropriate Terminal Equipment Technical
Requirements document(s). The Department does not
guarantee the equipment will operate to the user's
satisfaction.
Before installing this equipment, users should ensure
that it is permissible to be connected to the facilities of
the local telecommunications company. The equipment
must also be installed using an acceptable method of
connection. The customer should be aware that
compliance with the above conditions may not prevent
degradation of service in some situations.
Repairs to certified equipment should be coordinated by
a representative designated by the supplier. Any repairs or
alterations made by the user to this equipment, or
equipment malfunctions, may give the
telecommunications company cause to request the user
to disconnect the equipment.
Users should ensure for their own protection that the
electrical ground connections of the power utility,
telephone lines and internal metallic water pipe system,
if present, are connected together. This precaution may
be particularly important in rural areas.
CAUTION: Users should not attempt to make such
connections themselves, but should contact the
appropriate electric inspection authority, or electrician,
as appropriate.
NOTICE: The Ringer Equivalence Number (REN)
assigned to each terminal device provides an indication
of the maximum number of terminals allowed to be
connected to a telephone interface. The termination on
an interface may consist of any combination of devices
subject only to the requirement that the sum of the
Ringer Equivalence Number of all the devices does not
exceed 5.
AVIS: L'étiquette d'Industrie Canada identifie le matériel
homologué. Cette étiquette certifie que le matériel est
conforme aux normes de protection, d'exploitation et de
sécurité des réseaux de télécommunications, comme le
prescrivent les documents concernant les exigences
techniques relatives au matériel terminal. Le Ministère
n'assure toutefois pas que le matériel fonctionnera à la
satisfaction de l'utilisateur.
Avant d'installer ce matériel, l'utilisateur doit s'assurer
qu'il est permis de le raccorder aux installations de
l'entreprise locale de télécommunication. Le matériel
doit également être installé en suivant une méthode
acceptée de raccordement. L'abonné ne doit pas oublier
qu'il est possible que la comformité aux conditions
énoncées ci-dessus n'empêche pas la dégradation du
service dans certaines situations.
Les réparations de matériel homologué doivent être
coordonnées par un représentant désigné par le
fournisseur. L'entreprise de télécommunications peut
demander á l'utitisateur de débrancher un appareil à la
suite de réparations ou de modifications effectuées par
l'utilisateur ou à cause de mauvais fonctionnement.
Pour sa propre protection, l'utilisateur doit s'assurer que
tous les fils de mise à la terre de la source d'énergie
électrique, des lignes téléphoniques et des canalisations
d'eau métalliques, s'il y en a, sont raccordés ensemble.
Cette précaution est particulièrement importante dans
les régions rurales.
AVERTISSEMENT: L'utilisateur ne doit pas tenter de faire
ces raccordements lui-même; il doit avoir recours à un
service d'inspection des installations électriques, ou à un
électricien, selon le cas.
AVIS: L'indice d'équivalence de la sonnerie (IES) assigné
à chaque dispositif terminal indique le nombre
maximal de terminaux qui peuvent être raccordés à une
interface. La terminaison d'une interface téléphonique
peut consister en une combinaison de quelques
dispositifs, à la seule condition que la somme d'indices
d'équivalence de la sonnerie de tous les dispositifs
n'excède pas 5.
12
■
SPECIFICATIONS
305-009402
11/23/05
2:23 PM
Page 13
INDEX
A
AC adapter ...4-6, 10, back cover
jack ...2, 5
Audio jack ...2-3, 6, 10
B
Battery ...4, 9, 10
compartment ...2, 4
installing ...4
replacing ...4, 9
safety ...back cover
type ...4, 9
Busy ...3, 7
C
Call Waiting ...3, 7-8
Cleaning ...9, back cover
D
Desktop/Wall adapter ...4-5
Dial tone ...3, 6
Dialing
emergency ...3, 7
redial ...3, 7
Speed-Dial ...3, 7
Directory
buttons ...2, 8, 10
cover ...9
label ...2, 9
Duplex jack ...6
F
Fire button ...8
Flash ...2-3, 7-8, 10
H
Handset ...2, 6, 7, 8, 9-10
hook ...2, 5
jack ...2, 5
Headset ...3, 6
Hearing aid ...1, 10
Hold ...2-3, 8, 10
Hook flash ...3, 7
Hospital button ...8
T
N
Telephone line ...4-6, 8-9, back
cover
jack ...2, 5
type ...4, 10
Tone ...3, 5, 7, 10
Number buttons ...2, 10
V
O
Outgoing Volume ...2-3, 8, 9-10
P
Police button ...8
Problem solving ...9-10
Pulse ...5, 10
R
Redial ...2-3, 7, 10
Repair ...10, 11, back cover
Ring
pitch ...2-3, 7, 10
volume ...2-3, 6, 7, 10
Ring Flasher ...2-3, 4, 6, 7, 10
Ringer equivalence (REN) ...9,
10, 11
S
Safety Instructions ...back cover
Signal light ...2-3, 6, 8, 10
Signaler ...6
Size ...10
Speaker Phone ...2-3, 8, 10
Speed-Dial ...2-3, 4, 7-8, 8-9, 10
emergency ...2-3, 8
Volume ...3, 7, 9-10
control ...2, 6
conversation ...2, 6-7, 10
outgoing ...2-3, 8
ring ...2-3, 6, 7
VOL button ...2-3, 6-7, 9, 10
W
Wall mount ...4-6
Y
Y-jack ...6
305-009402
11/23/05
2:23 PM
Page 14
SAFETY INSTRUCTIONS
General Safety
When using your CrystalTone Plus, basic safety
precautions should always be followed to reduce the risk
of fire, electric shock, and injury to persons.
1. Read and understand all instructions.
2. Follow all warnings and instructions on the
CrystalTone Plus.
3. Unplug the CrystalTone Plus from the wall outlet
before cleaning. Do not use liquid or aerosol cleaners. Use a damp cloth for cleaning.
4. Do not use the CrystalTone Plus near water, for
example, near a bath tub, wash bowl, kitchen sink,
laundry tub, in a wet basement or near a swimming pool.
5. Do not place the CrystalTone Plus on an unstable
cart, stand or table. The CrystalTone Plus may fall,
causing serious damage to the CrystalTone Plus.
6. The CrystalTone Plus should be operated only from
the type of power source indicated on the marking
label. If you are not sure of the type of power supply
to your home, consult your dealer or local power
company.
7. Do not allow anything to rest on the power cord. Do
not locate the CrystalTone Plus where people can
walk on the cord.
8. Do not overload wall outlets and extension cords.
This overloading can result in a fire or electric
shock.
9. To reduce the risk of electric shock, do not disassemble the CrystalTone Plus, but take it to a qualified service person when service or repair work is
required. Opening or removing covers may expose
you to dangerous voltages or other risks. Incorrect
re-assembly can cause electric shock when the
CrystalTone Plus is subsequently used.
10. Avoid using a telephone (other than a cordless type)
during an electrical storm. There is a remote risk of
electric shock from lightning.
11. Pressing the VOL button may subject the user to
dangerous volume levels.
Save these instructions!
12. Unplug the CrystalTone Plus from the wall outlet
and refer servicing to qualified service personnel
under the following conditions:
a. When the power supply cord or plug is damaged
or frayed.
b. If liquid has been spilled into the telephone.
c. If the telephone has been exposed to rain or
water.
d. If the telephone does not operate normally by
following the operating instructions. Adjust only
those controls that are covered by the operating
instructions. Improper adjustment of other controls may result in damage and will often
require extensive work by a qualified technician
to restore the telephone to normal operation.
e. If the CrystalTone Plus has been dropped and/or
damaged.
f. If the CrystalTone Plus exhibits a distinct
change in performance.
13. Do not use the telephone to report a gas leak in the
vicinity of the leak.
Battery safety
To reduce the risk of fire or injury to persons, read and
follow these instructions:
1. Disconnect the telephone line and the power cord
before opening the battery compartment.
2. Use only the type and size battery specified in the
battery instructions for your unit.
3. Do not dispose of the batteries in a fire. Cells may
explode. Check local codes for possible special disposal instructions.
4. Do not open or mutilate the batteries. Released
electrolyte is corrosive and may cause damage to
the eyes or skin. It may be toxic if swallowed.
5. Exercise care in handling batteries in order not to
short them with conducting materials such as
rings, bracelets, and keys. The battery or conductor
may overheat and cause burns.