1
Operator's Manuan
_;_,
: _Z_:_o_v
_
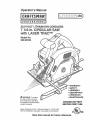
20.0.-VOLT LITHIUM=aON CORDLESS
7 l/4°ino CmRCULAR SAW
with LASER TRAC TM
Model No.
320.28102
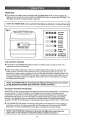
WARNING:
To reduce
the risk of injury, the user
must read and understand
the operator's manual before
using this product.
"WARRANTY
o SAFETY
° ASSEMBLY
o DESCRIPTION
° OPERATION
o MAINTENANCE
CHARGE
BEFORE
Sears, Roebuck and Co., Hoffman Estates, IL 60179 USA
Visit the Craftsman web page: www_sears.com/craftsman
Save this rnanuaa for future
BATTERY
FIRST USE
US
reference
M Warranty .....................................................................................................................................................................
2
Im Introduction
[]
......................................................................................................................................................
2
Safety Symbols ...................................................................................................................................................
3-4
_! General Safety Rules ..................................................................................................................................
5-8
[]
Specific Safety Rules ..................................................................................................................................
8-10
[]
Safety Rules for Charger .........................................................................................................................
10-12
[]
Description .....................................................................................................................................................
13-15
[]
Assembly .......................................................................................................................................................
15
[]
Operation ...................................................................................................................................................................
16-29
[]
Maintenance ........................................................................................................................................29-3'1
!_ Exploded View and Parts List ...............................................................................................................
32-34
[]
Sears Repair Parts Phone Numbers ....................................................................................Back Cover
TWO YEAR LIMITED WARRANTY
ON CRAFTSMAN
® PROFESSIONAL
TOOL
If this Craftsman Professional tool fails due to a defect in material or workmanship, RETURN
IT TO THE NEAREST SEARS STORE OR OTHER CRAFTSMAN OUTLET IN THE UNITED
STATES for free replacement during the first year from the date of purchase, and for free repair
during the second year from the date of purchase,
This warranty does not include expendable
parts such as lamps, batteries, bits or blades,
This warranty gives you specific legal rights, and you may also have other rights which vary from
state to state°
Sears, Roebuck and Co., Hoffman Estates, IL 60179
SAVE THESE INSTRUCTIONS!
READ ALL INSTRUCTIONS!
This Circular Saw has many features for making its use more pleasant and enjoyable° Safety,
performance and dependability have been given top priority in the design of this product making
it easy to maintain and operate,
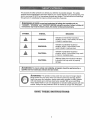
Thepurposeofsafetysymbolsis toattractyourattentiontopossibledangers.Thesafety
symbolsandthe explanations
withthemdeserveyourcarefulattentionandunderstanding..
The
symbolwarningsDONOTby themselves
eliminate any danger. The instructions and warnings
they give are no substitutes for proper accident prevention measures.
_WARNH_G:
BE SURE to read and understand all safety alert symbols such as
"DANGER", "WARNING" and "CAUTION" BEFORE using this product. Failure to follow all
instructions may result in electric shock, fire andtor serious personal injury.
SYMBOL
SlIGNAIL
MEANliHG
DANGER:
situation,
if not avoided,
will result
Indicates which,
an imminently
hazardous
in death or serious injury_
Indicates a potentially hazardous
situation, which, if not avoided, could
result in death or serious injury.
WARNIIIR@:
CAUTIIOH:
situation,
Indicates which,
a potentially
if not avoided,
hazardousmay result
in minor or moderate injury,
(Without Safety Alert Symbol) Indicates
a situation that may result in property
damage.
CAUTaO_:
I
WARNtING:
ensure safety
and reliability,
all repairs should be performed by a
qualified
serviceTotechnician
at Sears
Service Center.
_t_ARIRti_IG:
The operation of any power tool can result in foreign objects
being thrown into your eyes, which can result in severe eye damage. Before
beginning power tool operation, always wear safety goggles or safety glasses
with side shields and a full face shield when needed. We recommend Wide
Vision Safety Mask for use over eyeglasses or standard safety glasses with side
shields.. Always use eye protection which is marked to comply with ANSI Z871.
$AVE THESE
JN$TR@CTII@N$
3
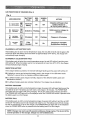
Some of these following symbols may be used on this tool. Please study them and learn their
meaning, Proper interpretation of these symbols wilt allow you to operate the tool better and safer,
SYMBOL
DESEGNATION/EXPLANA'FBOH
NAME
V
Volts
Voltage
A
Amperes
Current
Hz
Hertz
Frequency (cycles per second)
W
Watt
Power
rain
Minutes
Alternating
Time
Type of current
Current
Direct Current
Type or a characteristic
A
No Load Speed
no
N
,
,,,
@
Wet Conditions
speed, at no load
Double-insulated
Revolutions, strokes, surface speed,
orbits, etc., per minute
Do not expose to rain or use in damp
locations.
Alert
,,,,,
0
©
,,,,,,,,, __
To reduce the risk of injury, user must
read and understand operator's manual
before using this product.
Eye Protection
Always wear safety goggles or safety
glasses with side shields and a full face
shield when operating this product
Precautions
,
| ,, ,,
,,,,,,
that involve your safety,
, ,,,,, ,,,,,,,,,,,,,,,,,,,
,,,,,,,,,,
__
Failure to keep your hands away from the
blade will result in serious personal injury°
No Hands Symbol
@
@
,&
®
,,,........
Read The Operator's Manual
Safety Alert
........
construction
,,,,, ,, ,,,,,,.......
Per Minute
......
Imin
of current
.................................
Rotational
Class II Construction
............
............
...............
No Hands Symbol
Failure to keep your hands away from the
blade will result in serious personal injury°
No Hands Symbol
Failure to keep your hands away from the
blade will result in serious personal injury,
,, ,,,,,,,,
.........
Failure to keep your hands away from the
blade will result in serious personal injury°
No Hands Symbol
To reduce the risk of injury or damage,
avoid contact with any hot surface,
Hot Surface
4
,_WARNIING:
READ AND UNDERSTAND ALL INSTRUCTIONS.
Failure to follow all
instructions listed below may result in electric shock, fire andlor serious personal injury.
The term "power tool" in all of the warnings listed below refer to mains-operated (corded)
power tools or battery-operated (cordless) power tools.
SAFETY
PRECAUTIONS
FOR LASERS
The circular saw has a built-in laser iighL The laser is Class Ilia and emits out power of a
maximum 25roW and 650nm wavelengths. These lasers do not normally present an optical
hazard, however, do not stare at the beam as this can cause flash blindness,
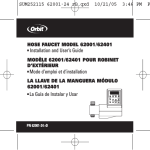
The following label is on your saw. It indicates where
the saw emits the laser light. Be aware of the laser
light location when using. AIways make sure that any
bystanders in the vicinity of use are made aware of
the dangers of looking directly into the laser.
,_WARNJING-" LASER LIGHT. LASER RADIATION.
Avoid direct eye exposure. Do not stare into beam.
Only turn laser beam on when the saw is on the
workpiece. Class Ilia Laser.
LASER RADIATION.
DO NOT STARE INTO BEAM
_
wavelength:650nm
Max output:_2.SmW
Ciasstlfa
L_serProduct
Complies
wtLh 21 CFR 1040,10 and 1040,11
AVOID EXPOSURE.Laser radiation is emitted
=z_,
through this aperture
J
_WAR_Ji_NG:
Use of controls, adjustments or performance of procedures other than
those specified in this manual may result in hazardous radiation exposure.
A_.WARND_]G: The use of optical instruments such as, but not limited to, telescopes or
transits to view the laser beam wilt increase eye hazard.
[] Do not remove or deface any product labels,
exposure to laser radiation
[] The laser on the circular saw is not a toy, Always keep out of the reach of children. The
laser light emitted from this device should never be directed towards any person for any reason,
[] Be sure the laser beam is aimed at a workpiece such as wood or rough coated surfaces
that do not have a reflective surface, Reflective surfaces can reflect the laser light into your
eyes causing flash blindness
[] Do not use on surfaces such as sheet steel that have a shiny, reflective surface. The
shiny surface could reflect the beam back at the operator° Be aware that laser light reflected off
of a mirror or any other reflective surfaces can be dangerous,
[] Always turn the laser beam off when not in use. Leaving the tool on increases the risk of
someone inadvertently staring into the laser beam
_CAUTIOiR:
Always follow the instructions
contained in this manual only when using
the laser. Use of this feature in any manner other than what appears in this manual may
result in a hazardous radiation exposure,
of this laser device. This may result in a
[] Use only accessories that are recommended
by Sears. Use of other accessories
been designed for use with other laser tools could result in serious injury.
[] For further information
use of lasers, available
/
Removing product labels increases the risk of
m The laser beam can be harmful to eyes. Always avoid direct eye exposure, Do not look
directly into the laser beam output aperture during operation° Do not project the laser beam
directly into the eyes of bystanders. Turn laser on only when making cuts.
[] Do not attempt to modify the performance
dangerous exposure to laser radiation.
]
regarding lasers, refer to ANSI-Z136,1 the standard
from the Laser Institute of America (407) 380-1553,
5
that have
for the safe
_WARNaNG:
READ AND UNDERSTAND ALL INSTRUCTIONS. Failure to follow all
instructions listed below may result in electric shock, fire and/or serious personal injury.
The term "power tool" in all of the warnings listed below refer to mains-operated (corded)
power tools or battery-operated (cordless) power tools.
SAVE THESE INSTRUCTIONS
WORK AREA SAFETY
I_ Keep work area clean and well lit. Cluttered or dark areas invite accidents,
[] Do not operate power tools in explosive atmospheres, such as in the presence of
flammable liquids, gases or dust. Power tools create sparks which may ignite the dust or
fumes.
[] Keep children and bystanders away while operating a power tool. Distractions cause you
to lose control
ELECTRICAL
SAFETY
[] Power tool plugs must match the outlet. Never modify the plug in any way. Do not use
any adapter plugs with earthed (grounded) power tools. Unmodified plugs and matching
outlets will reduce the risk of electric shock°
[] Avoid body contact with earthed (grounded) surfaces such as pipes, radiators, ranges
and refrigerators. There is an increased risk of electric shock if your body is earthed
(grounded).
[] Do not expose power tools to rain or wet conditions.
increase the risk of electric shock_
Water entering a power tool will
[] Do not abuse the cord. Never use the cord for carrying, pulling or unplugging the
power tool. Keep cord away from heat, oil, sharp edges or moving parts. Damaged or
entangled cords increase the risk of electric shock.
[] When operating a power tool outdoors, use an extension cord suitable for outdoor use.
Use of a cord suitable for outdoor use reduces the risk of electric shock.
[] Use battery only with charger listed,
BATTERY
PACK
CHARGER
320.25708
320.25709
PERSONAL
SAFETY
"1_Stay alert, watch what you are doing and use common sense when operating a power
tool. Do not use a power tool while you are tired or under the influence of drugs, alcohol
or medication. A moment of inattention while operating power tools may result in serious
personal injury,
[] Use safety equipment. Always wear eye protection.
Safety equipment such as dust masks,
non-skid safety shoes, hard hat or hearing protection used for appropriate conditions will
reduce personal injuries,
Avoid accidental starting. Ensure the switch is in the off position before plugging in.
Carrying power tools with your finger on the switch or plugging in power tools that have the
switch on invites accidents
[] Remove any adjusting key or wrench before turning the power tool on. A wrench or key
left attached to a rotating part of the power toot may result in personal injury,
[] Do not overreach, Keep proper footing and balance
control of the power tool in unexpected situations°
6
at all times, This enables better
[]
Dress properly. Do not wear loose clothing or jewelry. Keep your hair, clothing and
gloves away from moving parts. Loose clothes, jewelry or long hair can be caught in moving
parts
[] if devices are provided for the connection of dust extraction and collection facilities,
ensure these are connected and properly used. Use of these devices can reduce dustrelated hazard&
[] Do not wear loose clothing or jewelry. Contain
hair can be drawn into air vents.
long hair. Loose clothes, jewelry or long
[] Do not use on a ladder or unstable support. Stable footing on a solid surface enables
better control of the power tool in unexpected situations,
POWER TOOL USE AND CARE
[] Do not force the power toot. Use the correct power tool for your application,
power toot witl do the job better and safer at the rate for which it was designated_
The correct
[] Do not use the power tool if the switch does not turn it on or off. Any power tool that
cannot be controlled with the switch is dangerous and must be repaired.
[] Disconnect the plug from the power source and/or the batter pack from the power tool
before making any adjustments,
changing accessories
or storing power tools. Such
preventive safety measures reduce the risk of starting the power tool accidentally°
[] Store idle power tools out of the reach of children and do not allow persons unfamiliar
with the power tool or these instructions to operate the power tool. Power tools are
dangerous in the hands of untrained users,
[] Maintain power tools. Check for misalignment or binding of moving parts, breakage of
parts and any other condition that may affect the power tool's operation, If damaged,
have the power tool repaired before use. Many accidents are caused by poorly maintained
power tool&
[] Keep cutting tools sharp and clean. Properly maintained cutting tools with sharp cutting
edges are less likely to bind and are easier to control.
[] Use the power toot, accessories and tool bits etc., in accordance with these
instructions and in the manner intended for the particular type of power tool, taking in
account the working conditions
and the work to be performed.
Use of the power tool for
operations different from those intended could result in a hazardous situation
BATTERY
TOOL USE AND CARE
[] Ensure the switch is in the off position before inserting battery pack. Inserting the
battery pack into power tools that have the switch on invites accidents
[] Recharge only with the charger specified by the manufacturer.
A charger that is suitable
for one type of batter pack may create a risk of fire when used with another battery pack
Use power tools only with specifically
designated
packs may create a risk of injury and fire,
battery
packs.
Use of any other battery
[] When battery pack is not in use, keep it away from other metal objects like paper clips,
coins, keys, nails screws or other small metal objects that can make a connection from
one terminal to another, Shorting the battery terminals together may cause burns or a fire
[] Under abusive conditions, liquid may be ejected from the battery, avoid contact, if
contact accidentally occurs, flush with water. If liquid contacts eyes, additionally seek
medical help. Liquid ejected from the battery may cause irritation or burns
_WARHt]I_G:
To reduce the risk of injury, user must read instruction manual
j
SERVICE
[] Have your power tool serviced by a qualified repair person using only identical
replacement parts. This will ensure that the safety of the power tool is maintained_
[] When servicing a power tool, use only identical replacement
parts. Follow instructions
in the Maintenance section of this manual. Use of unauthorized parts or failure to follow
Maintenance instructions may create a risk of shock or injury.,
[] Hold power tools by insulated gripping surfaces when performing an operation where
the cutting toot may contact hidden wiring or its own cord. Contact with a "live" wire will
also make exposed metal parts of the tool "live" and shock the operator°
[] Use clamps or another practical way to secure and support the workpiece to a stable platform.
Holding the work by hand or against your body leaves it unstable and may lead to loss of control,
[] Know your power tool. Read operator's manual carefully. Learn its applications
and
limitations,
as well as the specific potential hazards related to this tool. Following this
rule will reduce the risk of electric shock, fire or serious injury.
[] Always wear safety glasses with side shields. Everyday glasses have only impact resistant
lenses. They are NOT safety glasses. Following this rule will reduce the risk of eye injury_
[] Protect your lungs. Wear a face or dust mask if the operation is dusty. Following this rule
will reduce the risk of serious personal injury
[] Protect your hearing. Wear hearing protection during extended
Following this rule will reduce the risk of serious person injury°
periods of operation.
[] Battery tools do not have to be plugged into an electrical outlet; therefore, they are
always in operating condition.
Be aware of possible hazards when not using your
battery toot or when changing accessories.
Following this rule will reduce the risk of electric
shock, fire or serious personal injury_
[] Do not place battery tools or their batteries
explosion and possibly injury_
near fire or heat. This will reduce the risk of
[] Do not crush, drop or damage battery pack. Do not use a battery pack or charger that
has been dropped or received a sharp blow. A damaged battery is subiect to explosion.
Properly dispose of a dropped or damaged battery immediately.
I_I Batteries vent hydrogen gas and can explode in the presence of a source of ignition
such as a pilot light. To reduce the risk of serious personal injury, never use any cordless
product in the presence of open flame. An exploded battery can propel debris and chemicals,
exposed, flush with water immediately
[] Do not charge battery
risk of electric shock.
tool in a damp or wet location.
If
Following this rule will reduce the
[] For best results, your battery tool should be charged in a location where the temperature
is more that 32°F (0°C) but less that 104°F (40°C). Do not store outside or in vehicles.
[] Under extreme usage or temperature conditions, battery leakage may occur. If liquid
comes in contact with your skin, wash immediately with soap and water, then neutralize
with lemon juice or vinegar. If liquid gets in your eyes, flush them with clean water for at
least 10 minutes, then seek immediate medical attention_ Following this rule wilt reduce the
risk of serious personal injury,
[] Save these instructions,
Refer to them frequently and use them to instruct others who may
use this tool.. If you loan someone this tool, also loan them these instructions_
[] If the power supply cord is damaged,
authorized service center to avoid risk.
it must be replaced only by the manufacturer
8
or by an
[]
DANGER! Keep hands away from cutting area and the blade. Keep your second hand
on auxiliary handle or motor housing. If both hands are holding the saw, they cannot be cut
by the blade°
I_ Do not reach underneath the workpiece. The guard cannot protect you from the blade below the
workpiece.
[] Adjust the cutting depth to the thickness of the workpiece.
blade teeth should be visible below the workpieceo
Less than a full tooth of the
[] Never hold piece being cut in your hands or across your leg. Secure the workpiece to a
stable platform. It is important to support the work properly to minimize body exposure, blade
binding or loss of control
[] Hold power tools by insulated gripping surfaces when performing an operation where
the cutting tool may contact hidden wiring or its own cord. Contact with a "live" wire will
also make exposed metal parts of the tool "live" and shock the operator.
[] When ripping, always use a rip fence or straight edge guide. This improves the accuracy
of cut and reduces the chance of blade binding
[] Always use blades with the correct size and shape (diamond versus round) of arbor
holes. Blades that do not match the mounting hardware of the saw will run erratically, causing
loss of control°
[] Never use damaged or incorrect blade washers or bolt. The blade washers and bolt were
specially designed for your saw for optimum performance and safety of operation.
[] If the power supply cord is damaged,
authorized service center to avoid risk
CAUSES AND OPERATOR PREVENTION
it must be replaced only by the manufacturer
or by an
OFKICKBACK:
Kickback is a sudden reaction to a pinched, bound or misaligned saw blade, causing an
uncontrolled saw to lift up and out of the workpiece toward the operator. When the blade is
pinched or bound tightly by the kerr closing down, the blade stalls and the motor reaction drives
the unit rapidly back toward the operator. If the blade becomes twisted or misaligned in the cut,
the teeth at the back edge of the blade can dig into the top surface of the wood causing the blade
to climb out of the kerf and jump back toward the operator, Kickback is the result of misuse and/
or incorrect operating procedures or conditions and can be avoided by taking proper precautions,
as given below:
[] Maintain
kickback
the blade.
controlled
a firm grip with
forces. Position
Kickback could
by the operator,
both hands on the saw and position your arms to resist
your body to either side of the blade, but not in line with
cause the saw to jump backwards, but kickback forces can be
if proper precautions are taken
[] When blade is binding or when interrupting a cut for any reason, release the trigger and
hold the saw motionless in the material until the blade comes to a complete stop. Never
attempt to remove the saw from the work or pull the saw backward while the blade is in
motion or kickback may occur. Investigate and take corrective actions to eliminate the cause
of blade binding
[] When restarting a saw in the workpiece,
center the saw blade in the kerf and check that
saw teeth are not engaged into the material. If saw is binding, it may walk up or kickback
from the workpiece as the saw is restarted
m Support large panels to minimize the risk of blade pinching and kickback. Large panels
tend to sag under their own weight. Supports must be placed under the panel on both sides,
near the line of cut and near the edge of the panel.
[] Do not use dull or damaged blades. Unsharpened or improperly set blades produce narrow
kerf causing excessive friction, blade binding and kickback_
[] Blade depth and bevel adjusting locking levers must be tight and secure before
cut. If blade adjustment shifts while cutting, it may cause binding and kickback.
9
making
[]
Use extra caution when making a "plunge cut" into existing walls or other blind areas.
The protruding blade may cut objects that can cause kickback_
[] Check lower guard for proper closing before each use. Do not operate saw if lower
guard does not move freely and close instantly. Never clamp or tie the lower guard into
the open position. If saw is accidentally dropped, lower guard may be bent° Raise the lower
blade guard with the retracting handle. Make sure it moves freely and does not touch the blade
or any other part, in alt angles and depths of cut
[] Check the operation of the lower guard spring. If the guard and the spring are not
operating properly, they must be serviced before use. Lower guard may operate sluggishly
due to damaged parts, gummy deposits or a buildup of debris.
[] Lower guard should be retracted manually only for special cuts such as "plunge cuts"
and "compound
cut." Raise lower blade guard by retracting handle. As soon as blade
enters the material, the lower guard must be released. For all other sawing, the lower
guard should operate automatically,
[] Always observe that the lower guard is covering the blade before placing the saw down
on bench or floor. An unprotected, coasting blade will cause the saw to walk backwards,
cutting whatever is in its path° Be aware of the time it takes for the blade to stop after switch is
released,,
[] Know your power tool. Read operator's manual carefully. Learn its applications and
limitations,
as well as the specific potential hazards related to this tool. Following this
rule will reduce the risk of electric shock, fire or serious injury.
[] Always wear safety glasses with side shields. Everyday glasses have only impact resistant
lenses. They are NOT safety glasses. Following this rule wellreduce the risk of eye injury_
[] Protect your lungs. Wear a face or dust mask If the operation
will reduce the risk of serious personal injury_
[] Protect your hearing. Wear hearing protection
during extended
Following this rule will reduce the risk of serious person injury_
is dusty. Following this rule
periods
of operation.
[] Battery tools do not have to be plugged into an electrical outlet; therefore, they are
always in operating condition.
Be aware of possible hazards when not using your
battery tool or when changing accessories.
Following this rule will reduce the risk of electric
shock, fire or serious personal injury_
]
_WARNgN@:
instructions listed
READ
below
AND
may
UNDERSTAND
result in electric
ALL shock,
INSTRUCTIONS.
fire andlor serious
Failure topersonal
follow all
Injury.
W Before using battery charger, read all instructions and cautionary markings in this manual,
on battery charger, battery and product using battery to prevent misuse of the products and
possible injury or damage
,_kCAUTtI@_=" To reduce the risk of electric shock or damage to the charger and battery,
charge only lithium-ion rechargeable batteries as specifically designated on your charger.
Other types of batteries may burst, causing personal injury or damage.
[] Do not use charger outdoors or expose to wet or damp conditions.
charger will increase the risk of electric shock.
Water entering
[] Use of an attachment
not recommended
or sold by the battery charger manufacturer
may result in a risk of fire, electric shock or injury to persons. Following this rule will
reduce the risk of electric shock, fire or serious personal injury.
10
I
[] Donot abusecord or charger.Neverusethecordto carrythecharger.Donotpullthe
chargercordratherthanthe plugwhendisconnecting
fromreceptacle,,
Damage'tothe
\
,
cord or charger could occur and create an electnc shock hazard
immediately,
Replace damaged cords
[] Make sure cord is located so that it will not be stepped on, tripped over, come in
contact with sharp edges or moving parts or otherwise subjected to damage or stress.
This will reduce the risk of accidental falls, which could cause injury and damage to the cord,
which could result in electric shock.
[] Keep cord and charger from heat to prevent damage to housing or internal parts.
[] Do not let gasoline, oils, petroleum-based
products, etc. come in contact with plastic
parts, They contain chemicals that can damage, weaken or destroy plastic+
[] An extension cord should not be used unless absolutely necessary. Use of improper
extension cord could result in a risk of fire and electric shock. If an extension cord must
be used, make sure:
1+That pins on plug of extension cord are the same number, size and shape as hose of plug on
charger,
2, That extension cord is properly wired and in good electrical condition;
and
3, That wire size is large enough for AC ampere rating of charger as specified below:
Cord Length (Feet)
25'
50'
100'
CordSize
16
16
16
(AWG)
NOTE: AWG = American Wire Gauge
[] Do not operate charger with a damaged cord or plug, which could cause shorting and
electric shock+ If damaged, have the charger repaired or replaced by an authorized service
technician at Sears Service Center,
[] Do not operate charger if it has received a sharp blow, been dropped or otherwise
damaged in any way. Take it to an authorized service technician at Sears Service Center for
an electrical check to determine if the charger is in good working order
[] Do not disassemble
charger. Take it to an authorized service technician at Sears Service
Center when service or repair is required Incorrect reassembly may result in a risk of electric
shock or fire,,
[] Unplug charger from outlet before attempting
the risk of electric shock.
any maintenance
or cleaning to reduce
[] Disconnect charger from the power supply when not in use. This will reduce the risk of
electric shock or damage to the charger if metal items should fall into the opening., it will also
help prevent damage to the charger during a power surge+
[] Risk of electric shock.
battery terminal+
Do not touch uninsulated portion of output connector or uninsulated
[] Save these instructions. Refer to them frequently and use them to instruct others who may
use this tool, If you loan someone this tool, loan them these instructions also to prevent misuse
of the product and possible injury,
11
[] SAVETHESEINSTRUCTIONS.
Thismanualcontainsimportantsafetyandoperating
instructionsforbatterycharger320..25709
andbatterypack32025708.
[] Beforeusing batterycharger,readallinstructionsandcautionarymarkingsonbattery
charger,batteryandproductusingbattery_
[] CAUTION_
Toreducetheriskofinjury,chargeonlylithium-ionrechargeable
batter[eso
Other
typesofbatteriesmayburst,causingpersonalinjuryor damage_
_WARN
! N G: Use of this product can generate dust containing chemicals known
to cause cancer,birth
defects or other reproductive
harm. Some examples of these
chemicals are:
[] Lead from lead-based paints
[] Crystalline silica from bricks and cement and other masonry products
Arsenic and chromium, from chemically treated lumber°
Your risk from these exposures varies, depending upon how often you do this type of
work. To reduce your exposure to these chemicals:
[] Work in a well-ventilated area,
[] Work with approved safety equipment, such as those dust masks that are specially
designed to filter out microscopic particles
Avoid prolonged contact with dust from power sanding, sawing, grinding, drilling and
other construction activities. Wear protective clothing and wash exposed areas with soap
and water. Allowing dust to get into your mouth, eyes or lay on the skin may promote absorption
of harmful chemicals
SAVE THESE
I HSTRUCT O $
12
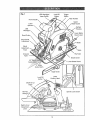
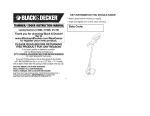
Fig. t
Lock-Off
Button
LED Worklight/
Laser Switch
Trigger
Switch
Rear Handle
Front Handle
Laser
Upper
Blade Guard
Battery
LEDAperture
Worklight
"\\.\\\
Lower Blade
Guard Lever
Bevel Scale _\\
Edge Guide
Lock Knob
x,
Blade
Bevel
Adjustment
Knob
Base
Crosscut
Ruler
Rip Ruler
Blade Screw
45 °
Guide
Lower Blade Guard
0 ° Blade
Guide Notch
Edge Guide
Lock-Off
Laser
Caution Label
DePshc'a_feCUt
Hex Key._
Spindle Lock Button
13
BladeDiameter
Motor
7 1/4-in..
20VoltDC
CuttingDepthat 90° (0°)
CuttingDepthat 45°
Bevel
2 3/8-in.
1 5!8-in.
Adjustable00-50
°
25OO
RPM
NoLoadSpeed
Laser
ClassIlia650nmMax_output:_<25mW
7.76Ib&
Lithiumqon
SawWeight(withoutbattery)
BatteryType
BatteryVoltage
Chargerinput
20,0VoltDC
120-Volts,
60HzAConly
32°F(0° C)-104°F(40°C)
OptimumChargingTemperature
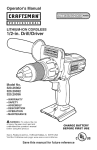
KNOW YOUR CIRCULAR
SAW (Fig. 1)
_WARNtlI_aGThe safe use of this product requires an understanding of the information on
the tool and in this operator's manual as well as a knowledge of the project you are attempting.
Before use of this product, familiarize yourself with all operating features and safety rules.
MAGNESIUM UPPER AND LOWER BLADE GUARD WITH ANTI-SNAG FEATURE
Heavy_duty, lightweight blade guards provide protection from the blade° The self-retracting
blade guard features an anti-snag design for more efficient cutting.
lower
ELECTRIC BRAKE
The saw has an electric brake to quickly stop the blade from rotating.
ALUMINUM BASE
The saw has an oversized, lightweight aluminum base to provide stability when cutting.
0 ° TO 50 ° BEVEL ADJUSTMENT
The bevel adjustment lever allows you to set the circular saw for bevel cuts from 0 ° to 50 °,
LASER TRAC TM LASER GUIDE
The laser guide projects a bright red beam onto the workpiece, aiding in alignment and accuracy.
LED WORKLIGHT
The fixed-position LED worklight, located on the front of the saw, allows better cut-line visibility.
INTEGRATED
RIP AND CROSSCUT
RUI.ER
The base has integrated rip and crosscut rulers for quick reference when making repetitive cuts°
EDGE GUIDE
The saw is equipped with an edge guide for accurate parallel cuts, The edge guide can be used
on either the left or right side of the saw blade..
HEX KEY STORAGE
The blade screw hex key is conveniently
stored on board, behind the motor housing of the saw.
ERGONOMIC DESIGN
The design of the saw allows proper two hand control when cutting_ It has been designed to be
comfortable and easy to grasp..
14
SPINDLELOCK BUTTON
The spindle lock button allows you to secure the blade when turning the blade screw,,
LOCK-OFF BUTTON
The lock-off button reduces the possibility of accidental starting
either the left or right of the trigger switch,
The button can be used on
DEPTH OF CUT ADJUSTMENT LEVER
The depth of cut adjustment lever adjusts the depth of cut a maximum of 0 to 2 3/8-ino at 90 °
and 0 to 1 5/8-in,, at 45 °,
_IJVARNt_'_IG." If any parts are broken or missing, DO NOT attempt to plug in the power
cord or operate saw until the broken or missing parts are replaced. Failure to do so
could result in possible serious injury.
A_kWARNtI_IG= Do not attempt to modify this saw or create accessories not
recommended for use with this saw. Any such alteration or modification is misuse and
could result in a hazardous condition leading to possible serious injury°
I
always
_kWARINIING."
remove the
To prevent
battery accidental
pack from the
starting
drill when
that could
assembling
cause serious
parts. personal injury,
UNPACKING
This product has been shipped completely assembled,
[] Carefully remove the tool and any accessories
the packing list are included,,
from the box, Make sure that al! items listed in
Et inspect the tool carefully to make sure no breakage or damage occurred during shipping,,
[] Do not discard the packing material until you have carefully inspected and satisfactorily
operated the saw,
[] If any parts are damaged or missing, please refer to the numbers listed on the back page of
operator's manual.
PACKING LIST
7 1/4-in. Circular Saw, Saw Blade, Edge Guide, Hex Key and Operator's
15
Manual
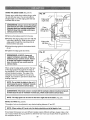
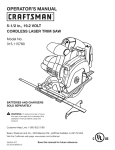
POWER BAR
[] This Lithium-Ion battery pack is equipped with a POWER BAR which is used to display the
battery pack's remaining run time_ Press the POWER BAR button to display the LED lights. The
LED lights will stay lit for approximately 4 seconds.
NOTE: The POWER BAR can be used when the battery is attached or removed from tool,J
Fig, 2
000@
80-100%
Charge
0000
60-79%
Charge
0000
40-59%
Charge
0000
20-39%
Charge
ooo÷
Under 10%
Charge
Completely
discharged
LOW CAPACITY
WARNING
[] If one LED on the POWER BAR begins to flash, the battery pack's charge is under 10%
capacity and should be recharged_
[] Unlike other battery pack types, Lithium-ion battery packs deliver fade-free power for their
entire run time° The tool will not experience a slow, gradual toss of power as you work. To
signal that the battery pack is at the end of its run time and needs to be charged, power to the
toot will drop quickly.. The POWER BAR will begin to display four flashing LED lights when it is
comptetely discharged_ When this happens, remove the tool from the workpiece and charge
the battery pack as needed°
1
NOTE:
POWER BAR
may (see
also display
fourTM flashing
lights due to an overload
or
high The
temperature
situation
SmartChip
Battery LED
protection).
SmartChip
TM
BATTERY
/
|
PROTECTION
SmartChip TM intuitive circuitry protects the battery pack from extreme temperature, over-discharge
and over-charge. To protect the battery from damage and prolong its life, the battery pack's
SmartChip TM circuitry wilt turn off the battery pack if it becomes overloaded or if the temperature
becomes too high during use_ This may happen in extremely high torque, binding and staliing
situations° This intelligent system will shutdown your battery pack if its operating temperature
exceeds 176°F (80°C) and wilt begin normal operation when it returns to 32°F (0°C) - 122°F (50°C).
[] The POWER BAR wilt display four flashing LED lights if the SmartChip TM circuitry detects a
momentary overload° You can conveniently reset the battery pack by pressing the POWER
BAR button. Press the POWER BAR button again to display the remaining charge.
I
NOTE:
the POWER
BAR continues
to flash
four LED
lights after
battery Ifpack
on the charger
to evaluate
the battery
condition
(see reset,
Fig. 4).place the
16
I
I
I.
that
the Abatteries
are near
the end
their
usable
and must
replaced.
OTE:
significantly
reduced
run of
time
after
fully life
charging
the be
battery
pack indicates
COLD WEATHER OPERATION
[] This Lithium-Ion battery pack will provide optimal performance in temperatures between 32°F
(0°C) and 104°F (40°C)., When the battery pack is very cold, it may "pulse" for the first minute
of use to warm itself up. Put the battery pack on a tool and use the tool in a light application°
After about a minute, the battery pack wilt have warmed itself up and will operate normally.
WHEN TO CHARGE THE BATTERY PACK
The Lithium-Ion battery can be charged at any time and will not develop a "memory" when
charged after only a partial discharge. It is not necessary to run down the battery pack charge
before recharging Remove the battery pack from the tool when convenient for you and your job,_
[] Use the POWER BAR to determine when you need to recharge the battery pack.
[] You can "top-off"
your battery pack's charge before starting a big job or long period of use,.
[] Due to Lithium-Ion's fade-free properties, the only time it is necessary to charge the LithiumIon battery pack is when the pack has reached the end of its charge. To signal the end of
charge, power to the tool will drop quickly. Charge the battery pack as needed.,
HOW TO CHARGE THE BATTERY PACK
!
first
NOTE:
time,
Thisfully
Lithium-Ion
charge thebattery
battery pack
pack.
is shipped
A fully discharged battery pack with a temperature
charge in about 50 minutes,
partially charged,
Before using it the
I[
between 32°F (0°C) and 104°F (40°C) will
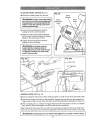
[] Charge the Lithium-lon battery pack only
with the correct charger
[] Connect the charger to a power supply.
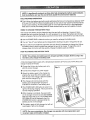
[] Attach the battery pack to the charger by
aligning the raised ribs of the battery pack
with the slot in the charger, Slide the battery
pack onto the charger (Fig. 3)
[] The charger wilt communicate with the
battery pack's SmartChip TM circuitry to
evaluate the condition of the battery pack.,
[] The POWER BAR LED lights will cycle from
right to left during charging, This is part of the
normal charging operation.
[] After charging is complete, the green LED
on the charger will come on and the POWER
BAR LED lights will go offr The POWER BAR
LED lights will not be displayed when the
POWER BAR button is pressed while the
battery pack is on the charger.
[] The battery pack wilt fully charge, but will not
overcharge, if left on the charger.
NOTE: For your convenience, the charger can operate with most generators
inverters rated at 300 watts or higher.
'I7
and
1
LED FUNCTIONS
OF CHARGER (Fig. 4)
F_g. 4
BATTERY
PACK
RED
LED
GREEN
LED
Hot/Cold
battery
On
Off
Charging will begin when
battery returns to
32°F (0°C).t0 ,
(40°0)
BATTERY
DEFECTIVE
Defective
Flashing
Off
Battery pack ol charger is
defective
CHARGING
BATTERY
Charging
Off
Flashing
FULL
BATTERY
Fully
charged
Off
LED INDICATOR
(n)
(SEE
HI/LO MANUAL)
TEMP.
CHARGING
On
ACTIC
Charges in 5! minutes
II
I
Charging is complete
Maintenance charging
A HOT BATTERY PACK
if the battery pack is above normal temperature range, the red LED will be lit and the green LED
will be off. When the battery pack cools down to approximately 104°F (40°C), the charger will
automatically begin charging.
CHARGING
A COLD BATTERY PACK
If the battery pack is below the normal temperature range, the red LED will be lit and the green
LED will be off. When the battery warms to a temperature of more than 32°F (0°C), the charger
will automatically begin charging_
DEFECTIVE
BATTERY
If the charger detects a problem, the red LED will begin flashing and the green LED will be off.
[] If defective, remove and reinsert the battery pack in the charger,. If the LED status reads
"defective" a second time, try charging a different battery pack.
[] if a different battery pack charges normally, dispose of the defective battery pack (see
Maintenance section).
[] If a different battery pack also indicates "defective,"
the charger may be defective.
BATTERY CHARGING
If the battery pack is within normal temperature range, the green LED will begin flashing and the
red LED will be off.. The battery pack will reach a full charge in 50 minutes,, The POWER BAR
LED lights will cycle right to left during charging, This is part of the normal charging operation_
The POWER BAR LED Iights will not be displayed when the POWER BAR button is pressed while
the battery pack is on the charger.
BATTERY FULL
if the battery pack is within normal temperature range, the green LED will be lit and the red LED
will be off The battery pack is fully charged and ready to use. The battery pack will fully charge,
but will not overcharge, if left on the charger. The POWER BAR LED lights will not be displayed
when the POWER BAR button is pressed while the battery pack is on the charger,,
1
NOTE:
up withCharge
several incontinuous
charge area.
cycles. This is part of the
normal Charger
operationmay
of warm
the charger.
a well ventilated
18
!
I
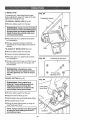
WALL-MOUNT
CAPABLE
(Fig,, 5)
Fig. 5
The charger has a key-hole hanging feature
for convenient storage. Screws should
be installed so that the center distance is
3-5/32-in. Use appropriate wail fasteners to
accommodate the combined weight of the
charger and battery pack. (approximately
3.5 lbs_ combined)
O
{_
c::=®r-•
3-5/32-in.
-_
O
0c::
CORD WRAP
O
The charger is equipped with a cord wrap
on the rear of the unit. Utilize this feature to
minimize workspace clutter and hazards.
O
_CAUTIION:
When placing the battery pack in the tool, be sure the raised rib on the
battery pack aligns with the housing on the rear of the saw and latches into place properly.
Improper installation of the battery pack can cause damage to internal components.
_WARNgNG:
Do not attempt to modify this saw or create accessories not
recommended for use with this saw. Any such alteration or modification is misuse
and could result in a hazardous condition leading to possible serious injury.
_WARNII_IG:
Always remove the battery pack from the tool when assembling parts,
changing blade and making adjustments. Failure to obey this warning could cause
serious personal injury.
TO ATTACH BATTERY
PACK (Fig 6)
Fig.
6
[] Align the raised portion on the battery
pack with the grooves on the bottom of the
housing on the rear of the saw, then attach
the battery pack to the saw as shown
[] Make sure the latch on the battery pack
snaps into place and the battery pack
is secured to the saw before beginning
operation.
TO DETACH BATTERY
PACK (Fig, 6)
[] Press the latch located on the front of the
battery pack to release battery pack,
[] Pull backward on the battery pack to
remove from the saw..
SAW BLADES
The best of saw blades wilt not cut efficiently if they are not kept clean, sharp and properly set°
Using a dull blade will place a heavy load on the saw and increase the danger of kickback. Keep
extra blades on hand, so that sharp blades are always available
Gum and wood pitch hardened on the blades will slow the saw down. Use gum and pitch
remover, hot water or kerosene to remove these accumulations, DO NOT USE GASOLINE.
19
BLADEGUARD
SYSTEM (Fig 7)
Fig. 7
The lower blade guard attached to your saw
is there for your protection and safety, it
should never be altered for any reason,, If it
becomes damaged or begins to return slow
or sluggish, do not operate the saw until
the damage has been repaired or replaced.
Always leave blade guard in operating
position when using the saw
_DAHGI_R:
When sawing through
workpiece, lower blade guard does
not cover blade on the underside of
workpiece. Since blade is exposed on
underside of workpiece, keep hands
and fingers away from cutting area. Any
part of your body coming in contact with
moving blade will result in serious injury.
Lower blade guard is in up
position when making a cut
Blade exposed on
underside of workpiece
,_CAUT_ON:
Never use saw when guard is not operating correctly. Check the guard
for correct operation before each use. The guard is operating correctly when it moves
freely and readily returns to the closed position. If you drop the saw, check the lower
blade guard and bumper for damage at all depth of cut settings before reuse.
_V#ARNItHG:
remove
the saw When
from the
using
workpiece
the saw, while
always
thestay
blade
alert
is and
moving.
exercise control. Do not
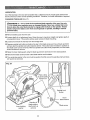
KICKBACK
(Fig_ 8-11 )
Kickback occurs when the blade stalls rapidly and the saw is driven back towards you. Blade
stalling is caused by any action which pinches the blade in the wood,,
Fig_ B
/
Blade is SetToo Deep
J
Correct Blade Depth
2O
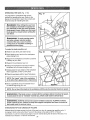
To guard against kickback, avoid
dangerous practices such as the
following:
Fig, 9
WRONG!
Setting blade depth incorrectly°
[] Sawing into knots or nails in the workpiece,,
[] Twisting the blade white making a cut.
[] Making a cut with a dull, gummed up or
improperly set blade,
[] Supporting the workpiece incorrectly,
[] Forcing a cut,
m Cutting warped or wet lumber,
INCORRECTSUPPORT
[] Operating the tool incorrectly or misusing
the tool,
[] Attempting to cut with blade at less than full
speed°
F_g. 10
_WAR
NI]NG: If the blade comes in
contact with the workpiece before it
reaches full speed, it could cause the
saw to "kickback" towards you, which
could result in serious injury.
Correct blade depth setting
is 1/4-in, maximum or less on
underside of workpiece
To lessen the chance of kickback,
avoid dangerous practices such as the
following:
[] Keep the blade at the correct depth setting.,
The depth setting should not exceed 1/4
inch below the materiat being cuL
m Inspect the workpiece for knots or nails
before cutting, Never saw into a knot or nail,,
[] Make straight cuts,, Always use a straight
edge guide when rip cutting, This helps
prevent twisting the blade,
[] Use clean, sharp and properly set blades,
Never make cuts with dull blades_
m Support the workpiece properly before
beginning a cut..
[] Use steady, even pressure when making a
cut, Never force a cut.
m Do not cut warped or wet lumber
[] Hold the saw firmly with both hands and
keep your body in a balanced position so as
to resist the forces if kickback should occur,
CORRECT
SUPPORT
]
_WARN_N(3:
To avoid kickback, release switch trigger immediately if blade binds or
I
saw stalls. Kickback could cause you to lose control of the saw. Loss of control can lead I
to serious injury.
•
1
2i
LOCK-OFF
BUTTON (Fig_ 12)
Fig. t2
The lock-off button reduces the possibility
of accidental starting The Iock-qff button
is located on the handle above the trigger
switch, The lock-off button must be depressed
before you pull the trigger switch.
I
Trigger
switch
Lock-off
button
from
left or
right
side.
OTE:either
The the
lock-off
can
be operated
STARTINGtSTOPPING
THE SAW (Fig, 12)
To start the saw:
m Depress the lock-off button.
[] Depress the trigger switch.
Always let the blade reach full speed, then
guide the saw into the workpiece_
To stop the saw:
[] Release the trigger switch_
After you release the trigger switch, allow the blade to come to a complete stop Do not remove
the saw from the workpiece while the blade is moving.
ELECTRIC
BRAKE
The saw has an electric brake to quickly stop the blade from rotating. The electric brake engages
when the trigger switch is released. When the brake is functioning properly, sparks may be visible
through the vent slots in the motor housing, This is norma! and is the action of the brake..
NOTE: If the electric brake repeatedly fails to quickly stop the blade rotation, the saw
should be repaired by a qualified service technician at Sears Service Center,
,_WARNUNG=
Always remove the battery
pack from the tool when assembling parts,
changing blade and making adjustments,
Failure to obey this warning could cause
serious personal injury,
DEPTH OF CUT ADJUSTMENT
F_g, t8
Depth-of-cut
indicator
(Fig, 13)
Always keep correct blade depth setting, The
correct blade depth setting should not exceed
!/4 inch below the material to be cut° Excess
blade depth will increase the chance of
kickback and cause the cut to be rough° One
blade tooth below the material to be cut works
best for efficient cutting action,
TO ADJUST BLADE
DEPTH
[] Remove battery pack from the saw,.
[] Loosen depth-of-cut
adjustment lever.
[] Hold the base flat against the workpiece
and raise or lower the saw until indicator
aligns with the desired depth on the scale,
[] Tighten the depth-of-cut
securely°
adjustment lever
22
Depth-of-cut
scale
_WAR_IIING: LASER
LIGHT. LASER RADIATION° Avoid Direct Eye Exposure,
DO NOT stare into beam. Only turn laser beam on when the saw is on the workpiece.
The laser is factory installed and aligned. Class Ilia laser.
I
NOTE: Make a trial cut on a piece of scrap material to ensure the laser is aligned properly.
USING THE LASER TRAC
(Fig,, I4-!5)
TM
LASER GUIDE
Fig, t4
Laser/LED
switch
To operate the laser guide:
[] Remove battery pack from saw
[] Mark the line to be cut on the workpieceo
Adjust the depth and angle of the cut as
neede&
[] Install the battery pack.,
[] Slide the Laser!LED switch back to turn
laser on,
[] Start the saw,
NOTE: Do not touch the blade to the
workpiece until the saw has reached
maximum speed.
[] Align laser beam with fine-of-cut and slowly
push the saw forward into the workpiece
[] Once the cut is complete, release the
trigger switch and allow the saw to come to
a complete stop
[] Always turn laser beam off when you have
finished cutting,
USING THE LED WORKLIGHT
(Fig. I4 & '16)
The saw is equipped with a fixed-position
worklight for better visibility when cutting,,
To operate the LED worklight:
[] Slide the Laser/LED
worklight on,
F_g. t¢
switch forward to turn
Field of illumination
3
NOTE: The laser guide or worklight will
automatically shut off approximately
four to seven minutes after the switch
trigger is released,
_WARNIING;
The worklight aids
in illuminating the cut-line. It is NOT
a substitute for adequate work area
lighting. Failure to obey this warning
could cause serious personal injury.
23
4
1
I
OPERATING
THE SAW (Fig. 17-18)
It is important to understand the correct
method for operating the saw. Refer to the
figures in this section to learn the correct and
incorrect ways for handling the saw.
A_.DANGER: When lifting the saw from
the workpiece, the blade is exposed on
the underside of the saw until the lower
blade guard closes. Make sure the lower
blade guard is closed before setting the
saw down.
_[_WARNBNG: To make sawing easier
and safer, always maintain proper
control of the saw. Loss of control
could cause an accident resulting in
possible serious injury.
To make the best possible cut:
[] Hold the saw firmly with both hands
Fig. t8
m Avoid placing your hand on the workpiece
while making a cut.
I_ Support the workpiece so that the cut (kerf)
is always to your side..
[] Support the workpiece
near cut.
[] Clamp the workpiece securely so that the
workpiece will not move during the cut.
[] Aiways place the saw weight on the workpiece
that is supported, not the "cut off" piece,
[] Place the workpiece with the "good" side down.
[
[] Draw a guideline along the desired fine of
cut before beginning your cut,
NOTE: Do not touch the blade to the workpiece
until the saw has reached maximum
speed.
I
,_kWARNgHG: If the blade comes in contact with the workpiece before it reaches full speed,
it could cause the saw to "kickback" towards you, which could result in serious injury.
]
,_I/tt'ARNIHG:
ALWAYS clamp and support workpiece securely. ALWAYS maintain
proper control of saw. Failure to clamp and support workpiece and loss of control of
saw could result in serious injury°
INTEGRATED
RIP AND CROSSCUT
RULERS
Marked along the base across the front of the saw is a ruler for measuring repetitive cuts It
is marked l-inch to the left of the 0° and 4 5/16-inches to the right of 45 ° in 1/16-inch
increments A ruler for measuring length of cuts is marked along the left side of the base It is
marked 0 to 8 inches in !/16-inch increments.
24
1
NOTE: The distance from the line of cut to the guideline is the amount you should
offset the guide.
MAKING CROSS CUTS AND RIP CUTS (Fig, 19-t9a)
When making a cross cut or rip cut, align your line of cut with the left side of the notch by the 0 °
indicator°
Since blade thicknesses vary, always make a trial cut in scrap material along a guideline to
determine how much, if any, the guideline must be offset to produce an accurate cut°
Fig. t 9a
Line of cut
0 ° indicator
,_W'ARN 0_._G:if the blade comes in contact with the workpiece before it reaches full speed,
it could cause the saw to "kickback" towards you, which could result in serious injury.
NOTE: Do not bind the blade in the cut. It could cause the saw to "kickback"
which could result in serious injury.
MAKING
towards you,
RIP CUTS
Always use a guide when making long or wide rip cuts with your saw, You can use either a
straight edge or use the edge guide that was included with the saw
[] Secure the workpiece,
[] Clamp a straight edge to the workpiece
using C-clamps
[] Carefully guide the saw along the straight edge to achieve a straight rip cut.
,_WARHIING:
ALWAYS clamp and support workpiece securely. ALWAYS maintain
proper control of saw. Failure to clamp and support workpiece and loss of control of
saw could result in serious injury.
EDGE GUIDE
The saw comes with an edge guide which fence is measured 7-inches long. It atiows you to make
accurate parallel cuts when trimming a workpiece. The edge guide attaches to the saw base and
is secured in place with a turn screw. The arm of the edge guide is stamped 0 to 7 inches in 1/8inch and 18 centimeters in 1 millimeter increments for easy adjustment of your cut.
25
It
I
USING THE EDGE GUIDE (Fig_ 20-21)
Always use a guide when making long or wide
rip cuts with your saw. You can use either a
straight edge or use the edge guide that was
included with the saw°
_kWARNDNG:
Always remove the battery
pack from the tool when assembling parts,
changing blade and making adjustments.
Failure to obey this warning could cause
serious personal injury.
F_g, 20
i_'":i
Edge guide
(right side)
edge guide <'/
!Edge guide
Ibck knob
..._[
J Z'_
_'
through slot ",4 __;/_:_
[] Remove the battery pack from the saw.
[] Position the edge guide so the arm with the
ruler side is facing up. Slide the arm of the
edge guide through the mounting slots at
the front of the saw base..
Adjust the edge guide to the desired width
of cut,.
[] Tighten the edge guide lock knob_
_.WARNIING:
ALWAYS clamp and
support workpiece securely. ALWAYS
maintain proper control of saw. Failure
to clamp and support workpiece and
loss of control of saw could result in
serious injury.
When using the edge guide, position the face
of the edge guide firmly against the edge of
the workpiece. This will help make a true cut
without binding the blade The edge of the
workpiece must be straight for the cut to be
straighL Use caution to prevent the blade from
binding in the cut,
NOTE: Do not bind the blade in the cut. It
could cause the saw to "ldckback" towards
you, which could result in serious injury.
_WARNII_IG:
if the blade comes in contact with the workpiece before it reaches full speed,
it could cause the saw to "kickback" towards you, which could result in serious injury.
NOTE: The edge guide can be used on the left or right side of the blade. (Fig. 20)
BEVEL CUTTING
(Fig_ 22-23)
The angle of cut can be adjusted to any desired setting between 0 ° and 50°_
NOTE: When making 50 ° bevel cuts, the blade should be set at full depth of cut.
Since blade thicknesses vary and different angles require different settings, always make a trial
cut in scrap material along a guideline to determine how much you should offset the guideline on
the workpiece to be cut.
26
TO ADJUST BEVEL SETTING (Fig° 22)
Bevel
indicator
[] Remove the battery pack from the saw.
_!N,O, RNII_G: Always remove the battery
pack from the tool when assembling parts,
changing blade and making adjustments.
Failure to obey this warning could cause
serious personal injury.
Bevel
adjustment
knob
[] Loosen the bevel adjustment knob by
rotating the knob counterclockwise
[] Raise the motor housing side of the saw
until the bevel indicator reaches the desired
setting on the bevel scale (0°-50°).
[] Tighten the bevel adjustment
rotating the knob clockwise,
_,bI_ARNIII_G:
knob by
If the blade comes in
contact with the workpiece before it
reaches full speed, it could cause the saw
to "kickback" towards you, which could
result in serious injury.
45 ° Indicator
0 45
11
2
3
4
MAKING A BEVEL CUT (Fig, 23)
[] Secure workpiece with clamps. When making a bevel cut, hold the saw firmly with both hands,
[] Rest the front edge of the base On the workpiece. Depress the lock-off button and squeeze the
trigger switch to start the saw° Allow the saw to reach full speed before attempting to make a cuL
[] After completing the cut, release the trigger switch and allow the blade to come to a complete
stop° After the blade has stopped, remove the saw from the workpiece,.
When making 45 ° bevel cuts, there is a notch in the saw base to help you line up the blade with
the line of cut_ Align your line of cut with the right side of the notch by the 45 ° indicator. (Fig, 23a)
_eARI_lt['_(_:
Attempting
bevel cut without
27
knob tightened can result in serious
injury, J
0 ° BEVEL STOP
Fig= 24
The saw has a 0 ° bevel stop that has been
factory adjusted to assure 0 ° angle of the saw
blade when making 90 ° cuts.,
Carpenter's square
TO CHECK 0 ° BEVEL STOP (Fig° 24)
[] Remove battery pack from the saw,
Blade
_WARN,NG=
Always remove the battery
pack from the tool when assembling parts,
changing blade and making adjustments.
Failure to obey this warning could cause
serious personal injury.
m Place the saw in an upside down position
on a workbench,,
[] Using a carpenter's square, check the
squareness of the saw blade to the base of
the saw°
TO ADJUST
Base
0 ° BEVEL STOP (Fig. 25)
[] Remove battery pack from the saw,,
[] Loosen the bevel adjustment knob.
[] Place the saw in an upside down position
on a workbench_
Underside of saw base
|
I
[] Using a 3/32-inch hex key, turn the 0 ° bevel
stop adjusting screw until it is square with
the saw blade,
_kWAR_ItlNG;
Attempting to make
cuts without the bevel adjustment knob
securely tightened can result in serious
injury.
POCKET CUTTING
(Fig 26)
,_WARMgNG:
Always adjust bevel
setting to 0° before making a pocket cut.
Attempting a pocket cut at any other
setting can result in loss of control of the
saw, possibly causing serious injury.
1_ Remove battery pack from the saw_
[] Adjust the bevel setting to zero.
[] Set the blade to the correct blade depth setting,
[] Place battery pack in saw,
[] Swing the lower blade guard up using the
lower blade guard lever.
i
NOTE: Always raise the lower blade guard
up using the lower blade guard lever to
avoid serious injury.
28
[] Hold the lower blade guard by the lever_
[] Rest the front of the base flat against the workpiece
blade does not touch the workpiece
with the rear of the handle raised so the
[] Start the saw and let the blade reach full speed
[] Guide the saw into the workpiece
and make the cut.
,_kWARNgNG:
Always cut in a forward direction when making a pocket cut. Cutting in
reverse direction could cause the saw to climb up on the workpiece and back toward you,
possibly causing serious injury.
[] Release the trigger switch and allow the blade to come to a complete stop.
[] Lift the saw from the workpiece.
[] Clear corners out with a hand saw or sabre saw.
,_WARNI]NG:
Never tie the lower blade guard in a raised position. Leaving the blade
exposed could lead to serious injury.
_WARNa_IG:
To ensure safety and reliability, all repairs should be performed
qualified service technician at Sears Service Center,
by a
_,WARN_I_IG:
To avoid serious personal injury, always remove the battery pack from
the tool and unplug the charger when cleaning or performing any maintenance.
1
]
it has been found that electric tools are subject to accelerated wear and possible premature
failure when they are used to work on fiber glass boats and sports cars, wallboard, spackling
compounds or plaster.. The chips and gdndings from these materials are highly abrasive to
electrical tool parts, such as bearings, brushes, commutators, etc. Consequently, it is not
recommended that this tool be used for extended work on any fiberglass material, wallboard,
spackling compound or plaster. During any use on these materials, it is extremely important that
the tool is cleaned frequently by blowing with an air jet.
GENERAL
MAINTENANCE
_WARNUNG:
Do not at any time let brake fluids, gasoline, petroleum-based products,
penetrating oils, etc., come in contact with plastic parts. Chemicals can damage,
weaken or destroy plastic which may result in serious personal injury.
Periodic maintenance allows for long iife and trouble-free operation. A cleaning, lubrication and
maintenance schedule shouid be maintained, As a common preventive maintenance practice,
follow these recommended steps:
[]
[]
[]
[]
When work has been completed, clean the too! to allow smooth functioning of the toot over time,,
Use clean damp cloths to wipe the toot,
Check the state of alt electrical cables,
Keep the motor air openings free from oil, grease and sawdust or woodchips and store toot in
a dry place,,
[] Be certain that all moving parts that are exposed are well lubricated, particularly after lengthy
exposure to damp and/or dirty conditions,,
29
LUBRICATION
All of the bearings in this tool are lubricated with a sufficient amount of high-grade lubricant for
the life of the tool under normal operating conditions+. Therefore, no further lubrication is required.
CHANGING
THE BLADE
(Fig,. 27)
_WARNgNGA 7 114-in. blade is the maximum blade capacity of the saw. Use only
7 l14-in, blade when replacing worn or damaged blades. Never use a blade that is too
thick to allow the outer blade washer to engage with the flats on the spindle. Thicker
blades will prevent blade screw from securing blade on spindle, resulting in serious
personal injury.
[] Remove battery pack from the saw
[] Loosen depth of cut adjustment lever. Raise the saw to maximum height and tighten depth of
cut adjustment lever. This practice allows easier access to blade mounting_
[] Locate and remove the hex key from the storage area+
[] Depress spindle lock button and place hex key in the blade screw and move it back and forth
unfit you feel the spindle lock button depress further,. This action locks the blade in position so
the blade screw can be removed+ With the spindle lock button firmly depressed, turn the blade
screw clockwise to remove,.
[] Raise the lower blade guard using the blade guard lever and hold it in the raised position+
[] Remove the blade screw and the outer blade washer and the blade.
[] The remaining washer is the inner bushing washer that fits around the spindle shaft and does
not need to be removed+.
Place a drop
of good-quality
machine oil
I_
\
Spindle Lock
Button
\
Outer
bEade washer
Direction of
blade rotation
inner bushing
washer
(teeth point up
at front)
3O
Blade screw
I_ Put a drop of good-quality machine oil onto the inner bushing washer and outer blade washer
where they will contact the blade (see Fig, 27),.
[] Place a new saw blade inside the lower blade guard, onto the spindle shaft and against the
inner bushing washer.,
NOTE: The teeth of the blade should point upward at the front of the saw
1
[] Replace outer blade washer,
[] Depress and hold spindle lock button as you replace the blade screw and hand tighten the
screw in a counterclockwise direction_ Use the hex key to tighten the blade screw securely.
[] Return hex key into the storage area.
i
i
the
OTE:
flat Never
side ofuse
the aspindle.
blade that is too thick to allow the outer blade washer to engage with
GENERAL
MAINTENANCE
Avoid using solvents when cleaning plastic part&. Most plastics are susceptible to damage from
various types of commercial solvents and may be damaged by their use. Use clean cloths to
remove dirt, dust, oil, grease, etc,
BATTERIES
The battery pack is equipped with Lithium-Ion rechargeable
each charge will depend on the type of work performed_
batteries. The duration of use from
The batteries in this tool have been designed to provide maximum trouble-free life. Like all
batteries, they will eventually wear out,. Do not disassemble the battery pack or attempt to replace
the batteries. Handling of the batteries, especially when wearing rings and jewelry, could result in
a serious burn°
To obtain the longest possible battery life, read and understand the operators manual
[] It is good practice to unplug the charger and remove the Lithium-ton battery pack when not in use,
For Lithium-Ion
battery pack storage longer than 30 days:
[] Store the Lithiumqon
moisture.
[] Store Lithium-Ion
battery pack where the temperature
battery packs in a 30%-50%
charged condition.
Every six months of storage, fully charge the Lithium-Ion
[] Exterior may be cleaned with a cloth or soft non-metallic
BATTERY
PACK REMOVAL AND PREPARATION
is below 80°F (26°C) and free of
battery pack_
brush,
FOR RECYCLING
To preserve natural resources, please recycle or dispose of batteries properly°
This product contains lithium-ion batteries,. Local, state or federal laws may
prohibit disposal of lithium-ion batteries in ordinary trash° Consult your local
waste authority for information regarding available recycling and/or disposal
options.
A_ARNnlRG=
Upon removal, cover the battery pack's terminals with heavy-duty
adhesive tape. Do not attempt to destroy or disassemble the battery pack or remove
any of its components. Lithium-ion batteries must be recycled or disposed of properly.
Also, never touch the terminals with metal objects and/or body parts as a short circuit
may result. Keep away from children. Failure to comply with these warnings could
result in fire and/or serious injury.
3I
]
20.0 VOLT LiTHIUM-ION CORDLESS
7 1/4-in. CIRCULAR SAW
MODEL NUMBER 320.28102
20.0 VOLT LtTHIUM.-ION CORDLESS 7 1/4-in. CmRCULAR SAW
MODEL NUMBER 320.28102
The Model Number wilt be found on the Nameplate attached to the motor housing on saw, Always
mention the Model Number in alt correspondence regarding your tool
.SSCR,PT,O.
1
5610040000
Tapping Screw
4
2
3320420000
Rear Cover ASSYo
1
3
5610042000
Tapping Screw
9
4
332O25800O
Right Handle ASSY
1
5
5610046000
Screw
4
6
3122812000
Fan Baffle
1
7
3121548000
Locker-off Trigger
1
8
3660244000
Spring
1
Switch Button
1
9
3121547000
,,
i
,
'10
,L
QTy.
L,
,,,
, ,, ,, ,
,
, ,,,
,
,, ,,, ,, ,,,............. ,, ,,,, ........
4930296000
,
|
,
,
I
,
,
Receptacle
, ,,,
1I
4890288000
12
4870304000
_,_....
,
,,,,
,
,,,,,.........
1
,,,,,,,,,,,,,,,w,,,,,,,_,_,_,,,,
..............................
PCB Assembly
1
Switch
1
o
,,
,,
13
L
I
, ,,
, ,,
....
1
,,,,,,,,,,,,,,,
14
L ,
,
2730120000
1
_
,
, ....
3550609000
,
....
,
1
,L
15
5650164000
1
I6
3520204000
1
17
3520205000
5
18
5440000000
1
2O
2822023000
Support ASSYo
1
2I
4890287000
PCB Assembly
1
22
3650077000
Metal Bar
I
23
3122814000
LED Holder
1
24
3122815000
LED Holder
t
,,,
3122811000
Transparent
Guard
1
26
3320257000
Left Handle ASSY,
1
27
3660244000
Spring
t
28
3400258000
Spindle Lock
I
29
2822022000
Gear Set
I
3O
5610094000
Thread Forming Screw
4
31
,
,,,,,,,, ,_,,,,,,,,
25
,,,
r.,'
,,,,,,,,,
........
L
32
5610057000
,
,,
,
,
......
,
,
,
,,, ,,,,,,,,,,,,,,,.,, ...........
5
Thread Forming Screw
,,,,
,
,
,
,,,,,,,,, ....................
3420401000
__
................
Cover
33
•
, , ,,,,
....
I
20.0 VOLT LITHIUM-ION CORDLESS 7 1/4-in. CIRCULAR
MODEL NUMBER 320.28102
SAW
The Model Number wil! be found on the Nameplate attached to the motor housing on saw Always
mention the Model Number in all correspondence regarding your tool
"T M"O"I
pARTs
No.
i
PART
DIESCRaPTnON
QTY.
33
3121051000
Stopper
1
34
3120561000
Lens
1
35
3420468000
Laser Holder
1
36
5640155000
Bolt
1
37
5610039000
38
3420362000
Fixed Guard
1
39
3660255000
Spring
1
40
3420363000
Lower Guard
1
Tapping
4
Screw
o,,,,,,,,,, ,,,,,,,,,,,,, ,,,,,
,, , ,,,,
4!
3121545000
Moving Guard Lever
1
42
5620040000
Screw
t
43
5660135000
Circtip for shaft
1
44
3520217000
Inner Flange
1
45
3703639000
185 Blade
1
3520218000
Outer Flange
1
Flange Bolt
1
,,
46
,,,,,,
,,, ,,,,, ,,,,,,,,
• ......
47
355O688OOO
48
5620051000
Screw
1
49
3122852000
Depth Adjusting Lever
1
5O
3550676000
Spindle Lock
1
51
5650017000
Plain Washer
52
5640027000
Bolt
53
564OO470OO
Wing Bolt
,, ,,,
I
2
1
1
,,,,,,,,,,,.,,,,,,,,,............................
54
5660071000
Spring
I
55
5630067000
Wing Nut
1
56
5670008000
Spring Pin
1
57
2822101000
Base Plate ASSY.
1
58
3700574000
Rip Fence
1
59
5680028000
Hexagon Wrench
1
34
35
Your Home
For repair-in your home-of all major brand appliances,
lawn and garden equipment, or heating and cooling systems,
no matter who made it, no matter who sold it!
For the replacement parts, accessories and
owner's manuals that you need to do-it-yourself.
ii__;?,i}i
_i
For Sears professional installation of home appliances
and items like garage door openers and water heaters.
1-800-4-MY-HOME
(1-800-469-4663)
®
Anytime, day or night
(USA and Canada)
www.sears.com
www.sears.ca
Our Home
:ii!%1_
For repair of carry-in items like vacuums, lawn equipment,
and electronic, call or go on-line for the location of your nearest
Sears
i i_i}_i,"
Parts
1-800-488-1222
& Repair
i=ii;%:ii;:!
Center.
Anytime, day or night (US,A,, only)
www,sears.com
i ?_i:.
?
_iii:i:i!!
i _::_i
- _::_
'i
To purchase a protection agreement (UoS.A.)
or maintenance agreement (Canada) on a product serviced by Sears:
!i_!•::?!?i•i
1-800-827-6655
(USA.)
1-800-361-6665
(Canada)
ii!iiii!!i i }
;_::.'::, .i__
Para pedir servicio de reparaci6n
a domicitio, y para ordenar piezas:
1-888-SU-HOGAR
(1-888-784-6427)
e
Au Canada pour se_ce en franc,,ais:
1-800-LE-FOYER
uc
(1-800-533-6937)
www.sears_ca
' i;% ,:", :i !"
© Sears Brands, LLC
® Registered Trademark / TMTrademark / SMService Mark of Sears Brands, LLC
® Marca Registrada / TM Marca de FAbrica / SMMarca de Sep_icio de Sears Brands, LLC
MCMarque de commerce / MDMarque d_pos_e de Sears Brands, LLC